
Yes, tickets can be automatically assigned to specific agents or teams based on rules such as category, priority, or department to streamline the resolution process.
Yes, Wavity provides a self-service portal where customers or employees can submit, view, and track the status of their tickets in real-time.
It is suitable for businesses of all sizes—startups, SMBs, and enterprises—and can be used by customer support teams, IT departments, HR teams, and service operations teams.
Wavity Help & Service Desk is a centralized platform that helps organizations manage customer support requests, internal IT tickets, and service operations efficiently from one place.
Wavity primarily follows a named-user licensing model. Licenses can be reallocated when an agent leaves the organization. For large-scale deployments (500+ agents), concurrent licensing models may be considered under alternative pricing structures, subject to commercial agreement.
All modules are developed on the Wavity SaaS platform and are deployed exclusively on Wavity’s AWS cloud infrastructure. Hybrid deployments with some modules running on-premises and others in the cloud are not supported currently.
Wavity supports REST and Open APIs, including webhooks, to enable seamless integrations. These APIs are not rate-limited, providing flexibility for high-volume and real-time use cases.
The CMDB can be populated and maintained through multiple methods, including Excel or CSV imports as part of the initial data migration from your existing system, as well as network-level discovery for automated identification and updates of configuration items.
Yes, Wavity includes a Knowledge Base Management module as part of its Help and Service Desk solution. The knowledge base supports access controls and allows user contributions, enabling organizations to build and maintain a collaborative, centralized repository of information.
Yes, the platform supports multi-tenant and multi-site deployments, enabling isolated and secure views for different business units while maintaining centralized administration.
At Wavity, data security is a top priority. Our platform meets or exceeds industry standards and is compliant with key regulations and certifications, including SOC 2, HIPAA, and GDPR.
Wavity offers a fully customizable self-service portal that can be branded with your company logo and configured with a customized URL, enabling a seamless and consistent on-brand user experience.
Yes, the portal is mobile-friendly and includes a dedicated mobile application. Currently, the system supports English language only.
Data is protected during transit using TLS/SSL encryption protocols. In addition, we leverage AWS Key Management Service (KMS) to securely manage encryption keys and ensure strong data security across all communications.
We follow a subscription-based licensing model, and AMC is included as part of the subscription. There is no additional annual maintenance cost separate from the license.
Yes, we offer managed services if needed. The pricing model is flexible and can be structured as per user, per hour, or fixed pricing, depending on the scope, duration, and level of services required.
Our support team operates 24/5, providing timely assistance for high-severity incidents. You can reach us via email or phone. Additionally, each customer is assigned a dedicated point of contact from the Wavity support team, who will assist with incident resolution, ongoing support, and any required customizations.
Yes, there will be migration costs depends on what we are going to migrate, we offer a fixed-price or hourly model SOW. Legacy data migration will be handled many different ways.
Wavity follows an annual subscription-based licensing model, determined by the number of technicians or agents. There are no caps or limitations on usage within the licensed terms.
The Help & Service Desk solution is available in four pricing tiers—Standard, Professional, Premium, and Enterprise—each offering tailored feature sets. An AI Suite add-on is also available. For full details, visit: AI-Driven Help & Service Desk Solution – Wavity
Wavity licenses renew annually. Multi-year pricing locks can be negotiated based on engagement terms.
License scaling is flexible—additional licenses can be added anytime, while reductions typically occur during annual renewal cycles.
Native integrations include Email, SMS, Active Directory (AD), SCIM, Jira, Microsoft Teams, SSO, WhatsApp, Slack, Instagram, Calendar, and Drive. Wavity also supports OpenAPI, REST APIs, and Webhooks with no usage limits.
Wavity supports integration with AD, Azure AD, Okta, HR systems, Jira, Asana and other third-party applications via REST and Open APIs.
Wavity offers a no-code, admin-friendly interface with drag-and-drop tools and wBots for workflow automation, configuration, and customization—no technical expertise required.
Yes, Wavity supports workflow builders, business rules, and triggers via its powerful workflow automation tools (wBots), enabling users to easily design and automate complex processes for enhanced efficiency and consistency.
Yes. Wavity is fully ITIL-compliant and natively supports core ITIL processes—Incident, Problem, and Change Management—alongside other ITIL-aligned components for comprehensive IT service management.
Wavity offers advanced AI native capabilities, including an autonomous ticket resolution, self evolving knowledge base, AI chatbot, auto ticket categorization and routing, AI-powered knowledge base, sentiment analysis, and AI-driven ticket resolution—streamlining support and enhancing efficiency.
Yes, Wavity supports Role-Based Access Control (RBAC) based on group assignments. Users and groups can be seamlessly synchronized through SCIM integrations, enabling streamlined and secure access management.
In alignment with ITIL standards, we offer a set of prebuilt dashboards and reports to support key ITSM functions. Additionally, we provide the flexibility to create and customize an unlimited number of dashboards/reports tailored to the specific needs of each organization.
Wavity tracks SLA breaches using workflow automation bots (wBots) and can send automated email alerts based on your specific requirements.
Yes. Encryption at rest and in transit using AWS KMS and TLS/SSL. Yes, admin action can be audited.
Yes, our system supports multi-level approval processes. In a SaaS product configuration, once implemented, it cannot be rolled back; however, adjustments or tweaks can still be made within the system.
Wavity offers comprehensive training for both administrators and users to ensure full understanding and effective use of the platform prior to Go-Live. Additionally, all training materials, including detailed documentation and runbooks, will be provided for ongoing reference.
Yes, our team will import all configuration data into the system after onboarding and before the go-live confirmation.
Wavity supports only a cloud-based deployment model. Pros: It offers easier maintenance, faster updates, lower upfront costs, and better scalability. Cons: It may have limitations for organizations with strict data residency or on-premise security requirements.
Yes. It is encrypted at rest using standards like AES-256.
Yes, our product is certified with ISO, HIPAA, AICPA/SOC, ISO 27001 and GDPR Compliance, this information is available at Wavity website.
Wavity is mentioned in multiple places Gartner websites like Capterra, GetApp and G2 with very high customer ratings, this information is publicly available at Wavity website.
For custom workflow development we do fixed charge, After Go-Live any major changes needed we charge either hourly or fixed charges
Yes, future upgrades and patches are included at no additional cost. Updates are applied monthly as part of our standard service.
Wavity’s admin console is highly admin-friendly due to its zero-code design. While it is intuitive and easy to navigate, initial training is recommended to become proficient with the drag-and-drop designers and configuration tools.
Wavity is a continuously evolving platform with new features added on a monthly basis. We also provide release notes and newsletters to keep you informed about major updates and upcoming enhancements.
Yes, Wavity enables you to set up custom notifications and automated follow-ups using wBots—robotic workflow designer. Admins can easily create workflows for auto-alerts, escalation rules, and scheduled follow-up emails based on specific conditions, all tailored to your organizational needs.
Wavity offers a self-service portal with full article management—create, categorize, archive, and restore documentation, FAQs, and KB articles.
Yes, Wavity is fully mobile-friendly. It offers a mobile app available on both the Google Play Store and Apple App Store. The app provides feature parity with the browser version, ensuring a consistent experience across devices—all built on a unified codebase.
Wavity’s Conversational UI is a modern, user-friendly, and interactive interface that allows users to communicate and collaborate in real time—eliminating the need for email back-and-forth. It streamlines conversations around tasks, requests, and workflows, making interactions more efficient and intuitive.
Wavity offers a zero-code designer that makes it easy to customize or configure forms and fields—no coding required. You can tailor layouts, field types, validation rules, and workflows to match your specific business needs with complete flexibility.
Yes, Wavity allows branding with your logo, theme colors, and custom domains.
Articles can be categorized, archived, restored, and edited directly from the admin interface.
Yes, Wavity’s AI chatbot can access the Knowledge Base to search for relevant articles and provide users with summarized, helpful responses based on their queries.
Yes, Wavity includes a built-in Knowledge Base management module that allows you to publish and organize how-to articles, FAQs, troubleshooting guides, and other helpful content. It’s designed to support self-service and improve issue resolution efficiency.
Yes, Analytics and reports update in real-time to provide immediate insights.
Wavity allows you to generate a wide variety of reports based on the data within the platform. For example, in IT Service Management (ITSM), you can create reports on ticket volumes, agent activity, SLA breaches, CSAT trends, and more. All reports are exportable and can be customized to meet your specific needs.
Yes, Wavity offers powerful support for custom analytics and reporting through its zero-code analytics designer. You can easily create tailored reports and visualizations—such as line charts, spline graphs, pie charts, and summary reports—based on data within the platform. No coding is required, making it accessible for both technical and non-technical users.
You can interact with the AI Chatbot to create, check, or close tickets using natural language. It can also retrieve answers from the knowledge base.
Wavity Bots (wBots) is a zero code automation bot enables admins to create fully customizable workflows that automate routine tasks and processes without writing any code. This intuitive tool allows you to design and configure workflows specific to your organization’s needs, ensuring that tasks like ticket routing, notifications, or escalations happen automatically.
Yes, Wavity supports integration with Slack and Microsoft Teams, enabling it to send real-time updates directly to Slack and Teams channels.
Yes, Wavity provides live chat option in its portal for real time support by agents.
Emails sent to a configured support address are automatically converted into tickets, preserving the email thread.
Yes, customers can use a customizable self-service portal to submit tickets, track progress, and access knowledge base articles.
Wavity offers advanced filtering, tagging, and search functionality to quickly locate tickets by status, category, or keywords.
Yes, users and agents can add images, documents, and screencasts directly to tickets. Also, Wavity provides options for users to attach files through storage providers such as Google Drive & OneDrive.
Yes. Wavity supports macros and templated responses to save time and maintain consistency in replies.
Agents can leave internal notes, use @mentions, apply time tracking, and use conversational UI while collaborating in real time inside ticket views.
Yes, you can define SLA policies and escalation rules based on your requirements. Wavity will automatically alert or escalate unresolved tickets based on timelines.
Using wBots (workflow bots), Wavity routes tickets based on category, priority, sentiment, or user-defined rules.
Tickets can be created through Waviy Platform with Role Based Interface, Web forms, Email-to-ticket, AI Chatbot, Live Chat, Wavity Mobile App, or via Slack, Teams and Whats App. This makes it easy for users to reach support through their preferred channel.
Wavity offers multiple channels for end users to create an incident ticket. You can submit a ticket directly through the platform by filling out a form, via email, through the mobile app, or by using third-party tools such as Slack and Microsoft Teams. Additionally, Wavity supports an AI chatbot that allows users to create tickets and ask queries seamlessly.
Log in to your account and click the user icon in the top right corner. From the dropdown menu, select "Account." Update your personal details as needed, but do not change your email ID. Click "Save" to apply the changes. A confirmation message—User updated—will appear at the bottom of the page.
When logging an incident, it's important to provide clear and detailed information to help IT resolve the issue quickly. While the exact steps may vary depending on your tenant's setup, the typical process includes:
- Log in to your account.
- Click "Report an Incident" from the quick links.
- Provide the following details:
- A brief description of the issue
- The time it occurred
- Any error messages
- Affected services or systems
- Steps you've already taken to troubleshoot
- Attach any relevant screenshots or log files to assist with diagnosis.
- Click "Submit" to send the request to an IT agent.
- You’ll receive an Incident ID to track the status of your request.
To manage incident tickets effectively, clearly describe the issue and include all necessary details when creating the ticket. Update the ticket promptly if new information becomes available. Regularly monitor the ticket status and respond quickly to any queries from the IT team. Use clear and descriptive subject lines to help with prioritization and faster resolution.
To log in, go to your company's Wavity tenant URL provided by your administrator. Use your work account credentials to sign in. Once authenticated, you’ll be successfully logged into the Wavity ITSM portal.
Incident management is a core ITSM practice focused on restoring normal service operations as quickly as possible after an unplanned interruption or reduction in service quality. Its goal is to minimize the impact of incidents on business operations and ensure service levels are maintained. This process typically involves identifying, logging, categorizing, prioritizing, and resolving incidents. Wavity’s ITSM solution includes robust incident management capabilities, enabling efficient tracking, resolution, and reporting aligned with ITIL best practices.
ITSM (IT Service Management) is a structured approach to designing, delivering, managing, and improving IT services to ensure they support business objectives. It emphasizes aligning IT services with organizational goals and includes core practices such as incident management, change management, and service desk operations. Wavity offers a comprehensive ITSM solution that covers all key practices and is fully aligned with ITIL frameworks for effective service management.
Wavity will keep you informed about the status of your ticket through email notifications. You will receive updates as the team works on the issue, and also when additional information is needed before the issue can be resolved.
Please provide as much information and detail as possible. This will help in speedy resolution. At a minimum, please provide the following:
- Company name
- Contact person's email and phone number
- Use case (Application) name
- Issue description along with screen shots or recorded video (if possible),
- When issue/problem occurred
- Severity of issue – (Minor, Major or Critical)
- Was the issue being reported previously working? If yes, what changes were made between the time the functionality was working and broken?
You have two options for submitting a ticket for support from Wavity:
- Send an email to support@wavity.com or
- Go to the Wavity Portal (https://www.wavity.com/contact-us/) and click on the "Contact" link under "Support"
Yes, we support email notification in all our solutions. Automatic Email notifications include the ability to customize the subject line and email body as per customer requirements and conditions.
Yes, we offer omnichannel support. Channels include Email, MS Teams, WhatsApp, Slack and SMS. Other channels can be supported relatively quickly based on customer requirements.
Wavity offers solutions based on a SaaS subscription model. Our help desk solution standard version is priced at $12/Agent/month. Please visit Wavity Help & Service pricing model by clicking the following link: Help and Service Desk Pricing | Wavity.
Our pricing is guaranteed to have no hidden costs and surprises. It is billed on an annual basis. For more information on pricing, please email us at sales@wavity.com.
In Wavity's ticketing solution, the default assignment of tickets to agents is done on a round robin basis. However, it is possible to assign a ticket to an agent or technician based on user's location or even type or category of the issue. For instance, a software issue can be assigned to one group and a hardware related ticket can be assigned to different group. Also, we support queue-based assignment process.
Yes, Wavity offers dynamic dashboards/layouts which are role specific. User and group-specific dashboards can be created in the platform thereby ensuring that users and groups see only what they are entitled to see.
Yes, it is possible, easy and quick to create interfaces/layouts based on roles of individuals in your company. Please see the link below where we explain in detail how to create dashboards/layouts.
Yes, we do offer support for Single Sign-On (SSO) integration using SAML compliant SSO tools such as Okta, Azure AD, Ping, etc. SSO Integration with other third-party tools that are not SAML compliant can also be done.
- Please click on Free Trial button (displayed in top right corner) on our website, https://www.wavity.com
- Select the solution name for the trial account. Enter your business email address. Click on Sign up.
- One of our support team member will reach out to you to set up your free trial account. You will also receive an email once your free trial is activated.
- Alternatively, you can reach out to us at freetrial@wavity.com.
Generating a ticket using email is part of our solution. This is done by integrating your in-house email (e.g. Outlook or Gmail) with our platform. Once a ticket is generated using email, all subsequent interactions till the ticket is closed can happen over email.
Yes, a free trial is available. Free trial is valid for 7 days from the date of first sign-in. For more information on free trail, please reach out to us at freetrial@wavity.com.
Integration with Email, SMS, Calendars, Cloud Storage services, MS Teams, SSO, Jira, Whats App & Slack are pre-built into our platform. In addition, we offer MS Excel including CSV files and spreadsheet integration out of the box. Integration with other third-party applications can be done depending on customer requirements and access to end point APIs.
Wavity provides App and Analytic Schedulers in our platform. Using App and Analytic Schedulers, it is possible to obtain periodic data reports. Users can generate reports without requesting IT or admins to generate reports for them.
Forms in any solution that is offered by Wavity can be very easily modified using our zero-code Application Designer. Categories and Sub-Categories which are essentially fields on a form, can be added, deleted, or modified in a matter of seconds or minutes at the very most. All modifications are done by drag-and-drop and point-and-click actions and do not require any coding.
Yes, not only does Wavity offer customization of our solutions to meet a customer's specific requirements, but we go further. We offer you the ability to make changes to our solutions using our zero-code Application Designer by yourself. What this means is that a customer does not need skilled technical resources to customize their solution. A solution can be customized by non-technical personnel like Business Analysts. We also offer Professional Services to customers who do not wish to customize the solution by themselves. And again, because we use our zero-code Applications Designer and wBots the customizations are done much faster (and at a lower cost) than other offerings on the market.
Wavity provides work calendars for all our solutions. Your work calendar can be configured to reflect your company policy and holiday schedules.
We take matters of data security very seriously at Wavity. We meet or exceed Data Security standards. We are a SOC-2, HIPAA, GDPR and ISO 27001 certified organization. There are two types of security that are relevant to protection of data:
Physical Security – We address physical security by hosting on highly secure and reliable AWS (Amazon Web Services) data centers that are protected by biometric locks and 24-hour surveillance.
Cyber Security – We address the issue of cyber security using several established best practices for handling data at rest, data in motion and data in use. Some of the technologies we use to ensure cyber security include https, SSL/TLS, Database encryption, multi-factor authentication and Role Based Access Controls (RBAC).
Also, our product is architected and built to be a multi-tenant service and every customer's data is logically segregated with a unique tenant ID so that one customer cannot access another customer's data.
Most Wavity customers use our cloud based SaaS solution that is hosted on AWS (Amazon Web Services). However, we do offer an on-premise solution after we have an understanding on our customer's in-house hosting needs, infrastructure and personnel skillsets.
Project Manager Guide: Managing the Assigned Task
- In Goal Management, the Project Manager works on tasks assigned by the Goal Owner or another Project Manager.
- Users with Project Manager access can log in with their credentials to land on the Project Manager. interface, or select the Goal Owner Interface from the Goal Management section under the Solution icon.

- Note: The steps provided are sample instructions and can be customized based on specific requirements, but the core workflow remains the same.
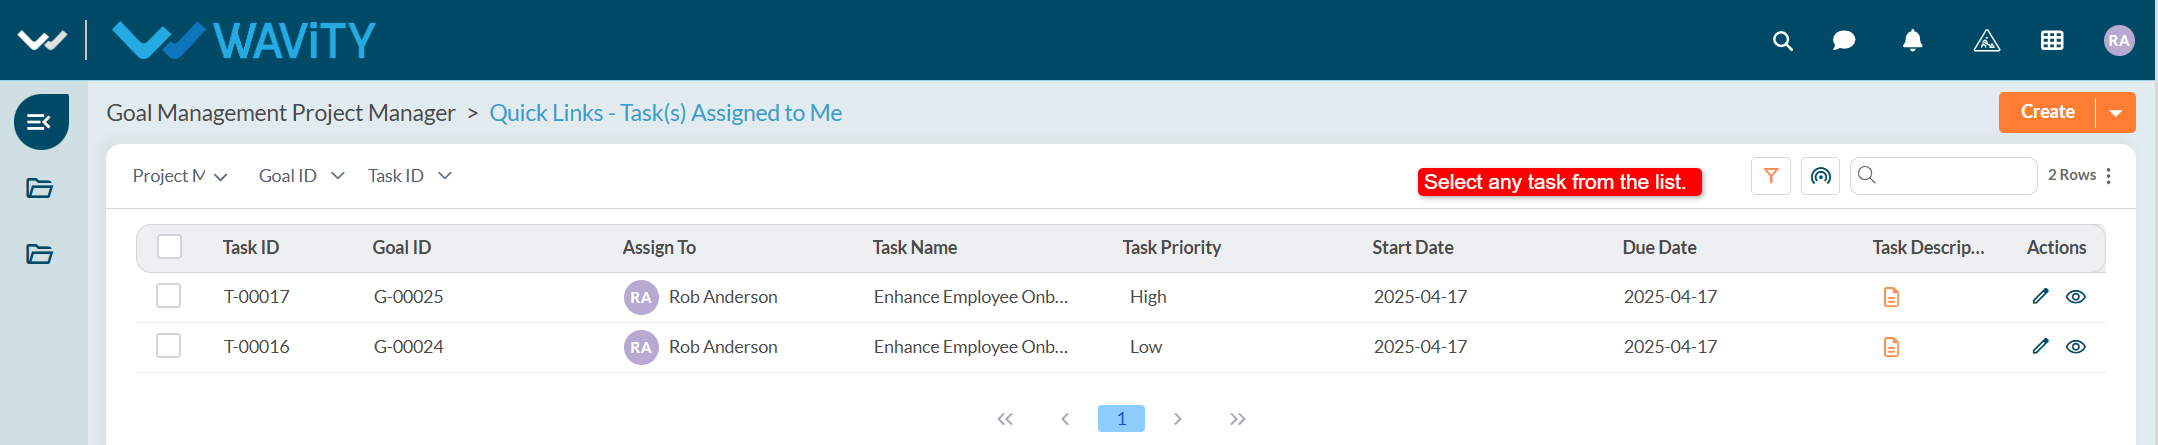
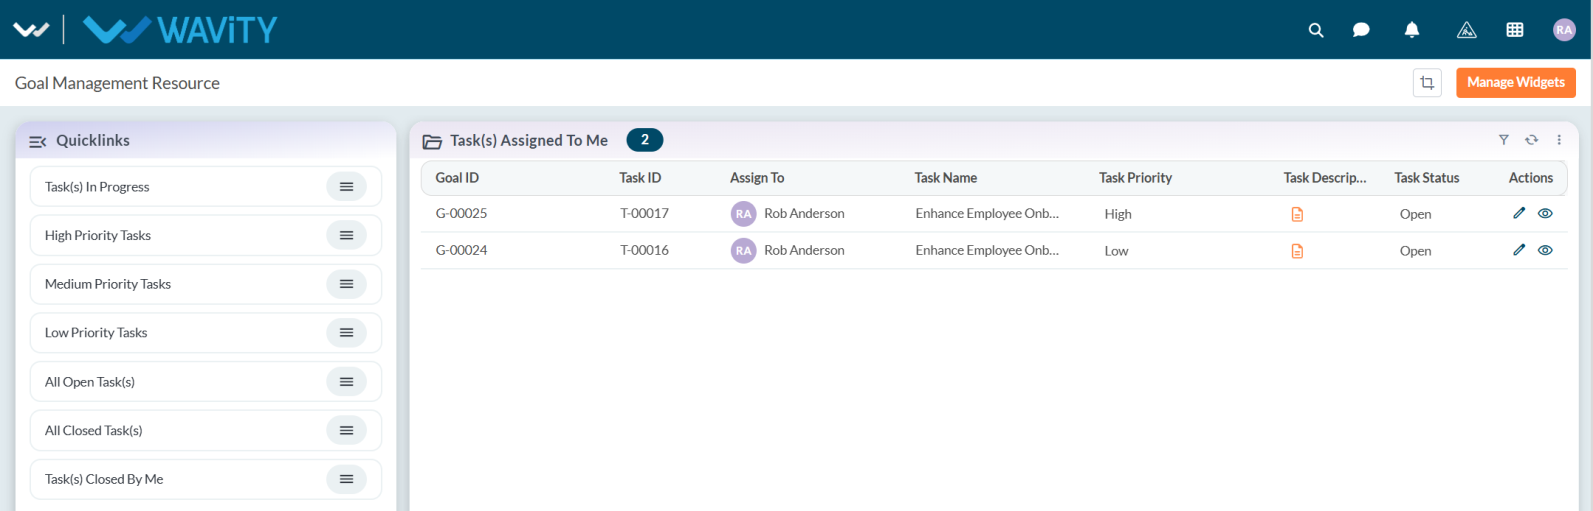
- From Quick Links, select Task(s) Assigned to Me.
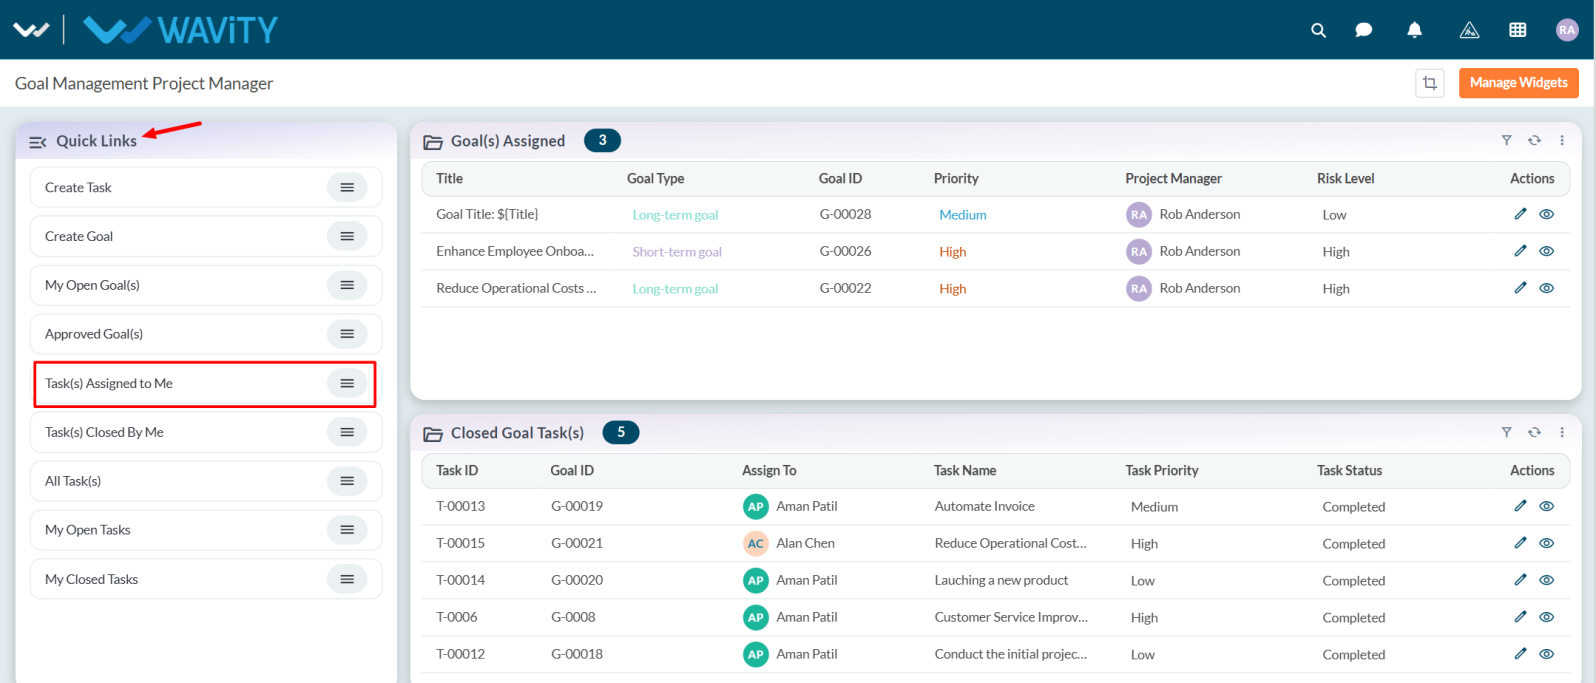
- View the list of tasks assigned to you and select any task as needed.
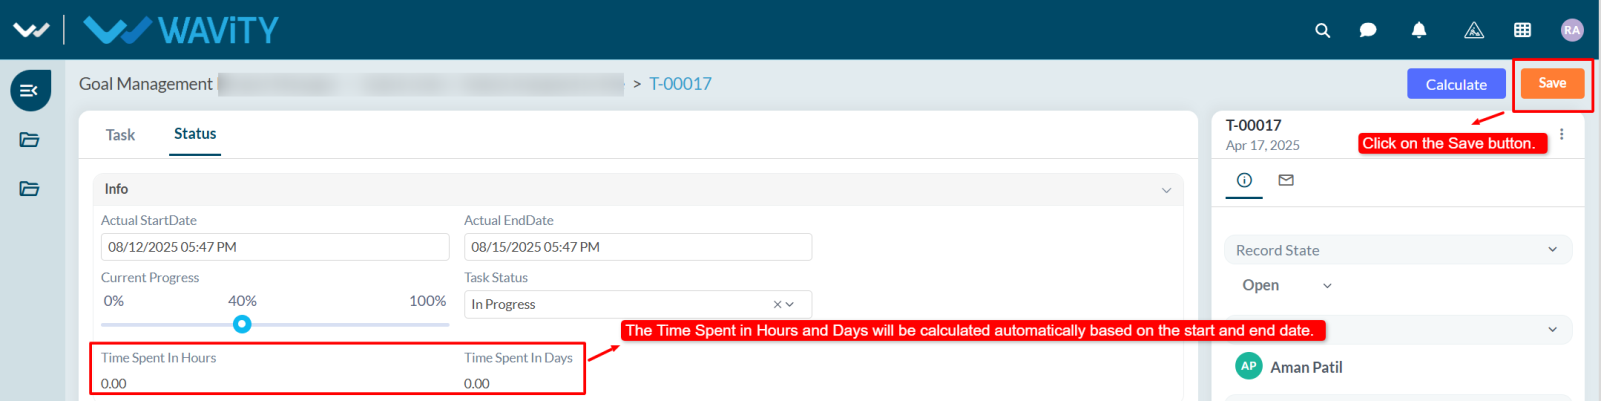
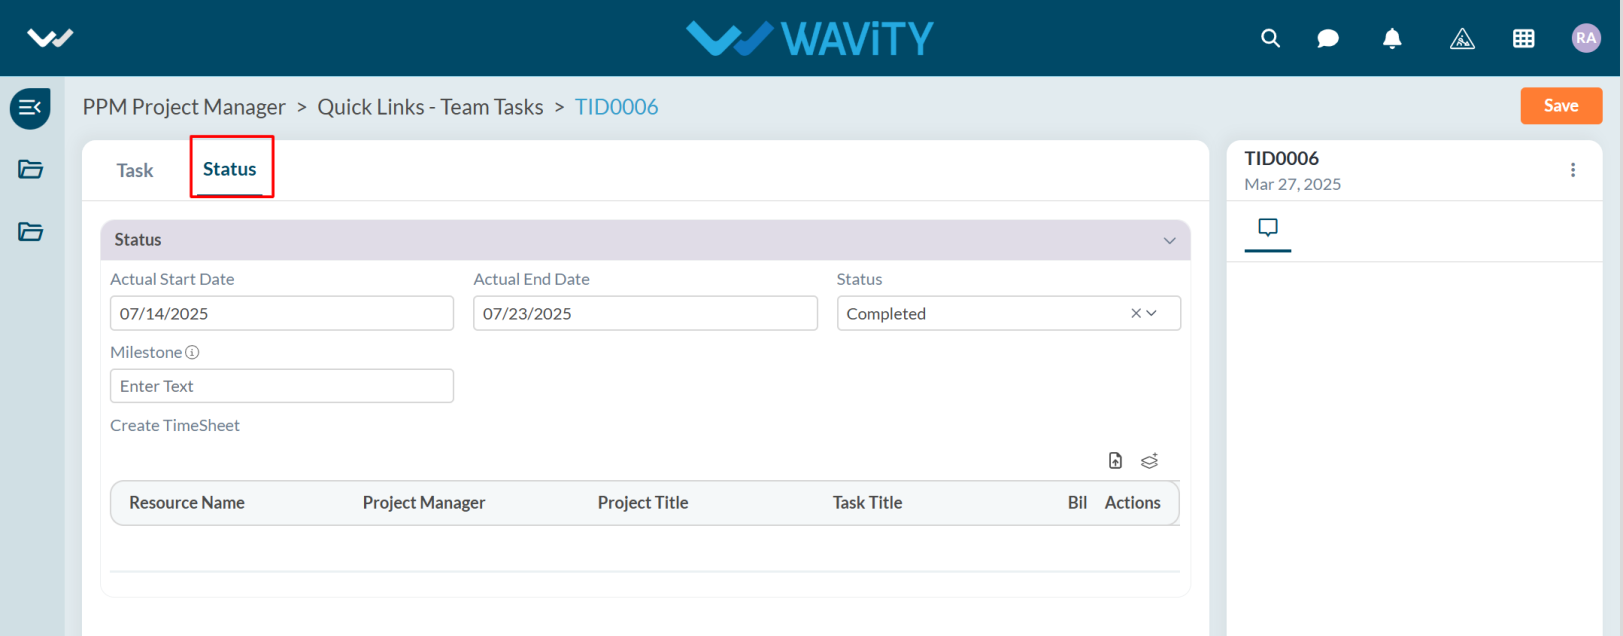
- Review the task details. Under the Status tab set the Actual Start Date and Actual End Date.
- Update the Current Progress and Status according to work progress.
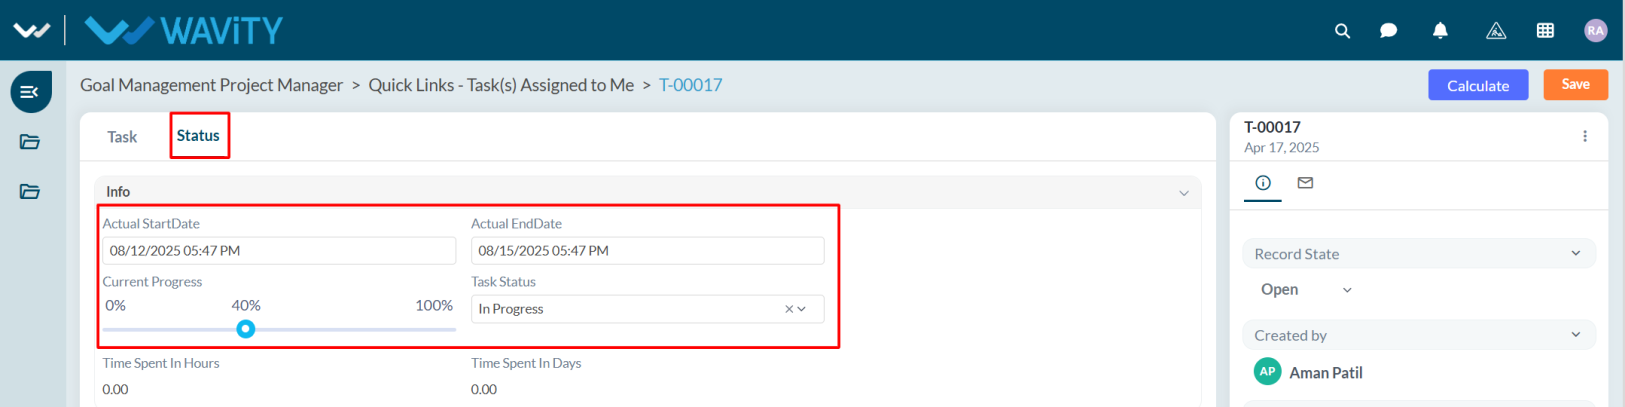
- After updating the status and other details, click Save.
- The Time Spent in Hours and Days will be calculated automatically based on the Actual Start Date and Actual End Date.

Project Manager Guide: Viewing All Tasks
- Project Managers can view all tasks, including those with statuses Open, In Progress, or Completed, along with their current progress.
- In the Wavity Goal Management module, users with Project Manager access can log in using their credentials to land on the Project Manager interface.
- Note: The following steps are sample instructions and can be customized based on specific requirements; however, the core workflow remains the same.
- From the Quick Links section, select All Task(s).
- A list of all tasks will be displayed, showing their status as Open, In Progress, or Completed.
- Select any task to view its details. The task’s status can be viewed in the Status tab.
Project Manager Guide: Managing Assigned Goal
- The Project Manager works on goals assigned by the Goal Owner.
- In Wavity Goal Management, the Project Manager can work on the assigned goals, assign tasks to any resource, and update the status based on work progress.
- Users with Project Manager access can log in with their credentials to land on the Project Manager interface, or select the Project Manager Interface from the Goal Management under the Solution icon.
- Note: The steps provided are sample instructions and can be customized as needed, but the core workflow remains the same.
- In the Goal(s) Assigned table widget, the user can select any goal they wish to work on.
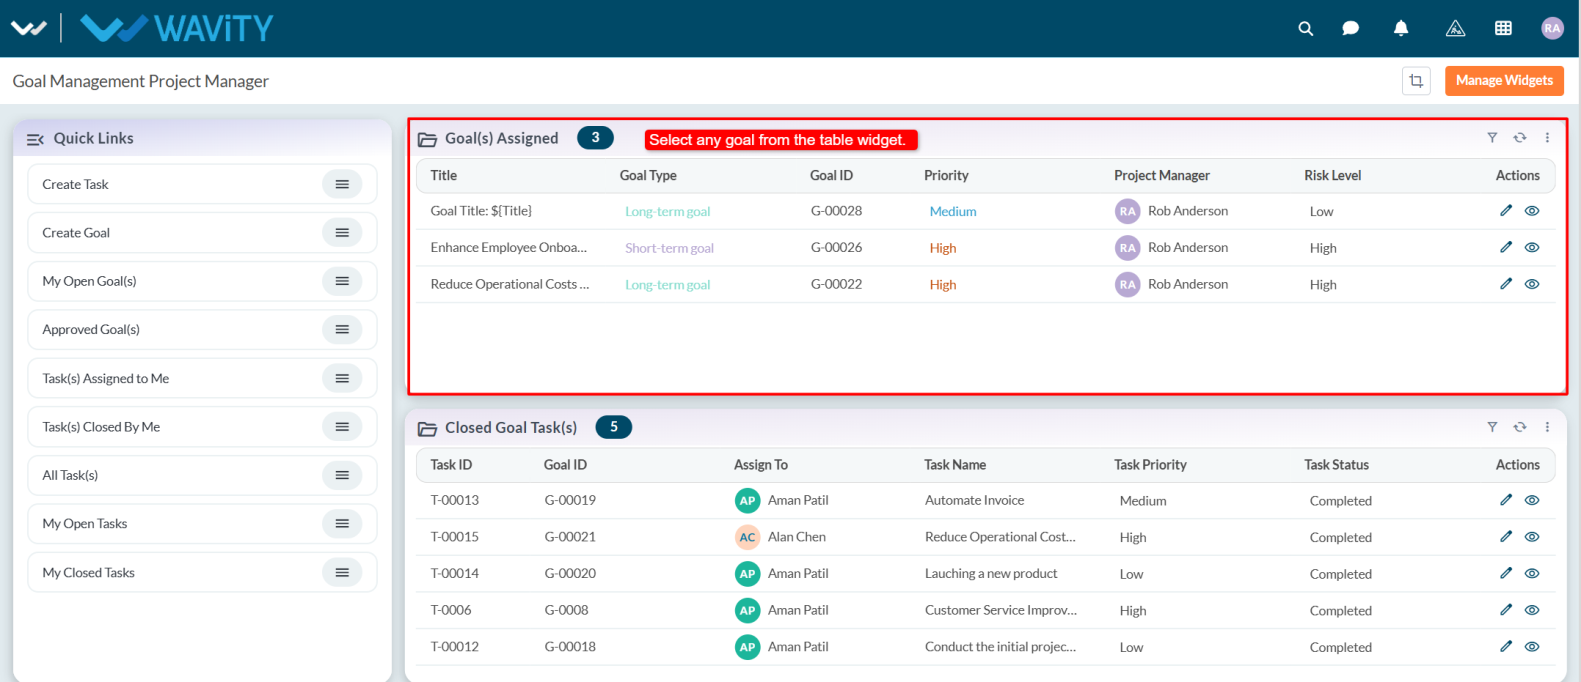
- Users can view the full goal details.
- In the PM tab, the user can create and assign a task to any resource by selecting the Create New Record icon.

- User need to fill the all required details in Task tab. Assigned person will work on the task and update the status as per their work progress.
- Users can update the status based on task progress. Once a task is marked as Completed, user will update the goal status to Closed.
- After making all updates, click Save to apply the changes.
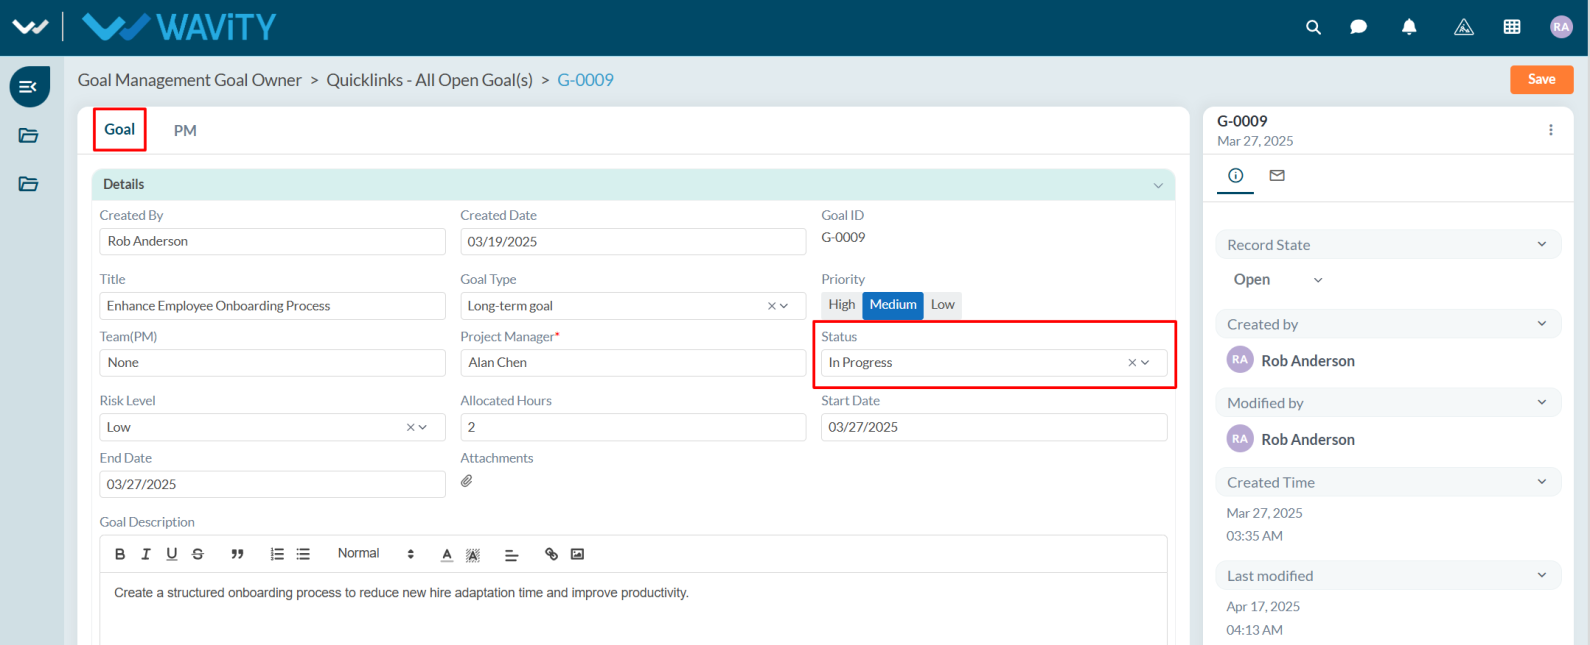
Goal Owner: Viewing all Open Goal(s)
- Goal Owners can view all goals with the status Open and monitor their progress.
- In the Wavity Goal Management module, users with Goal Owner access can log in using their credentials to land on the Goal Owner interface.
- Note: The following steps are sample instructions and can be customized based on specific requirements; however, the core workflow remains the same.
- From the Quick Links, select All Open Goal(s).
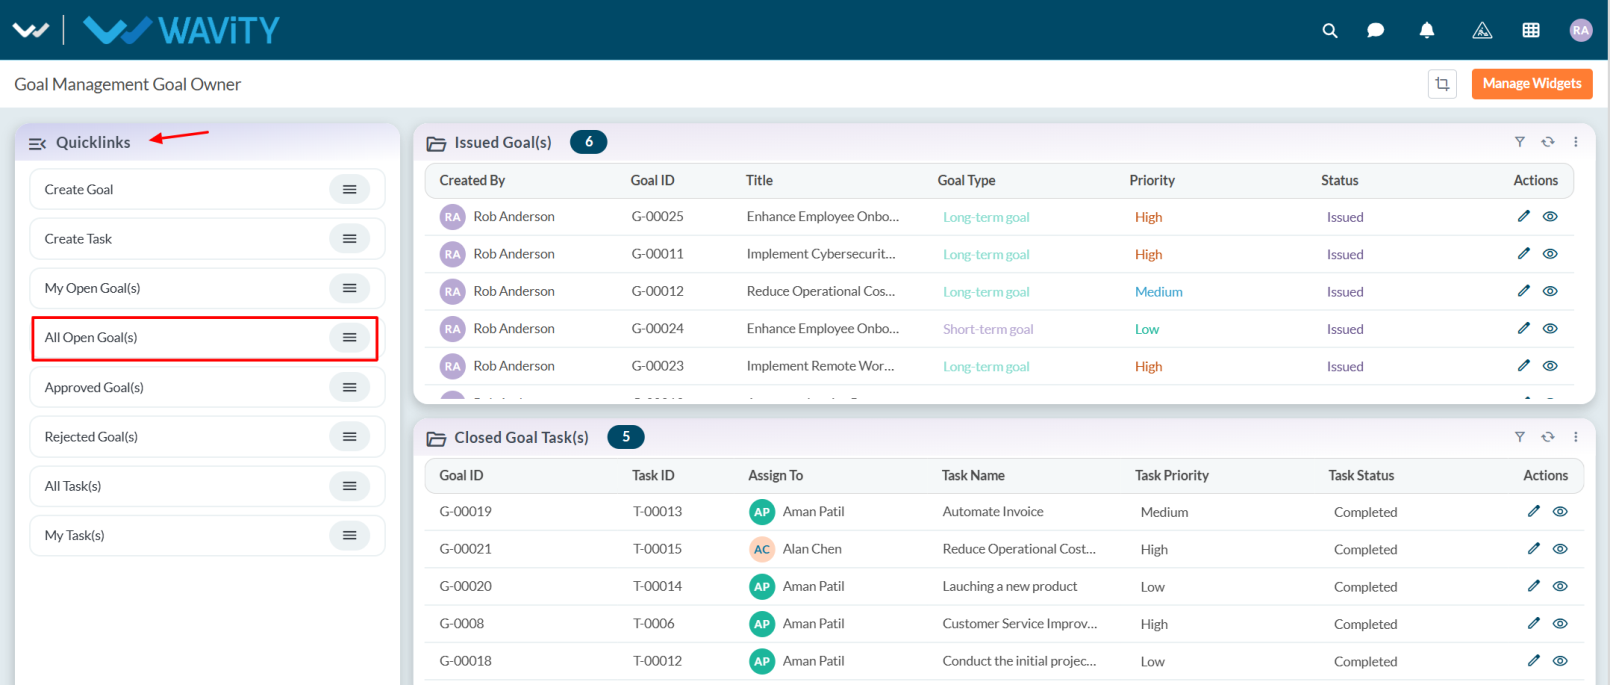
- A list of all open goals will be displayed.
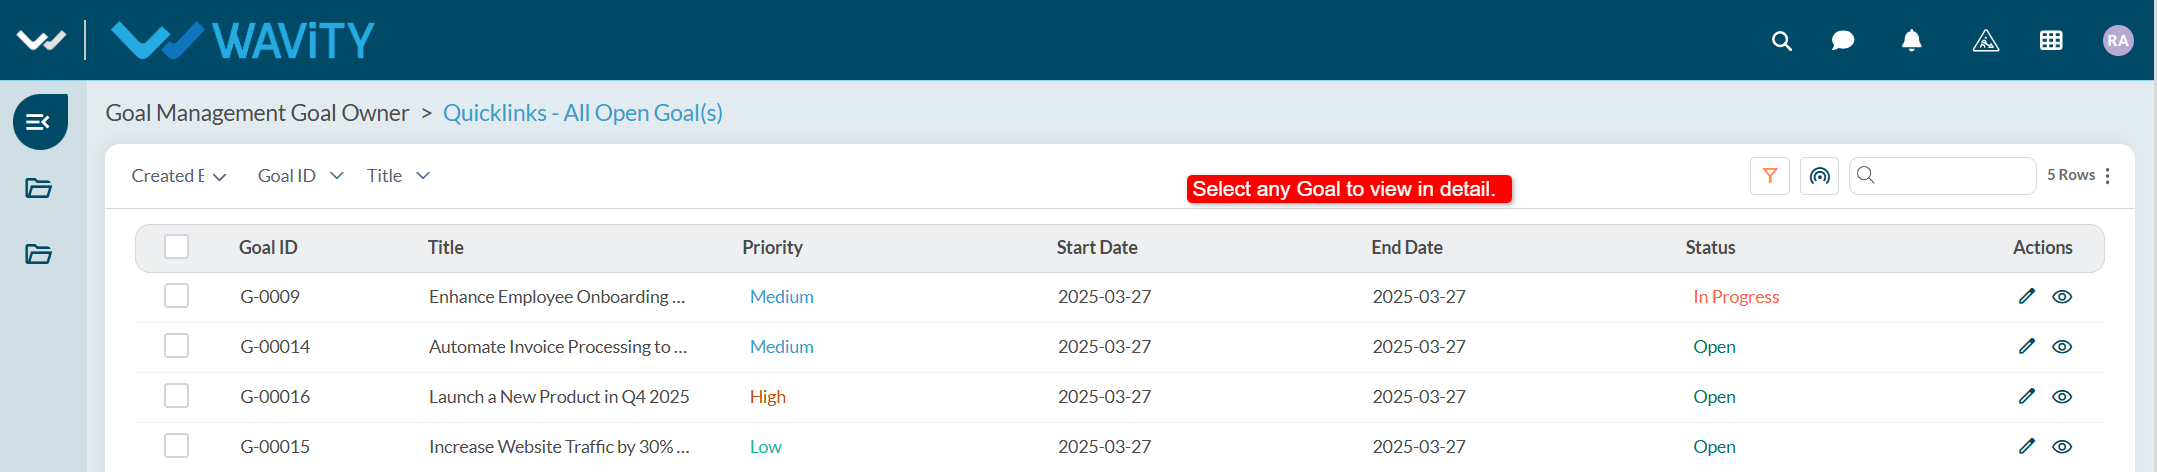
- Select any goal to view its details. The goal’s status and progress can be viewed in Status.
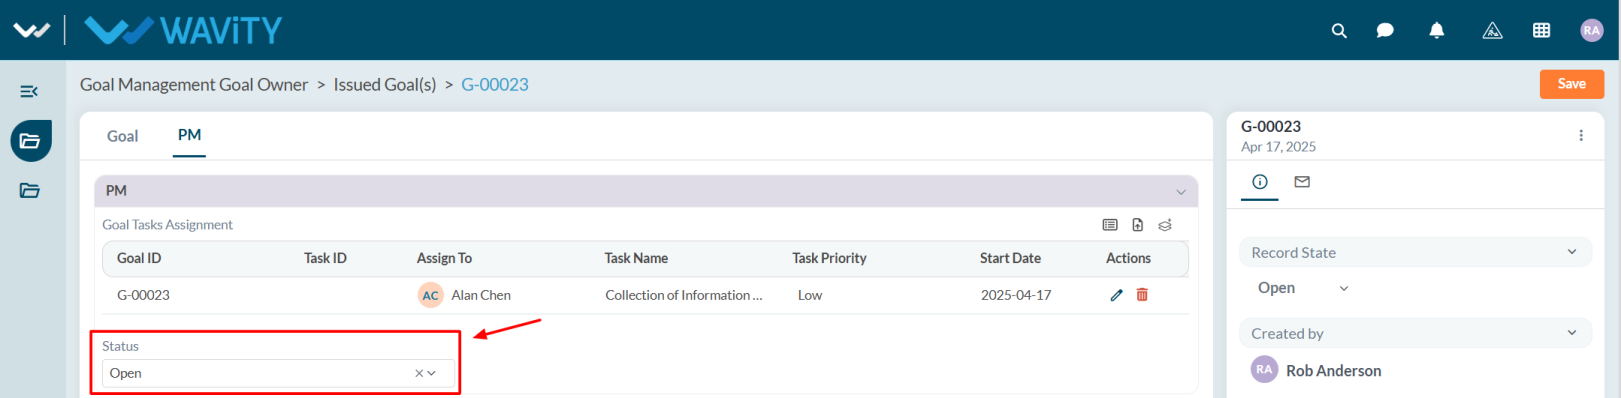
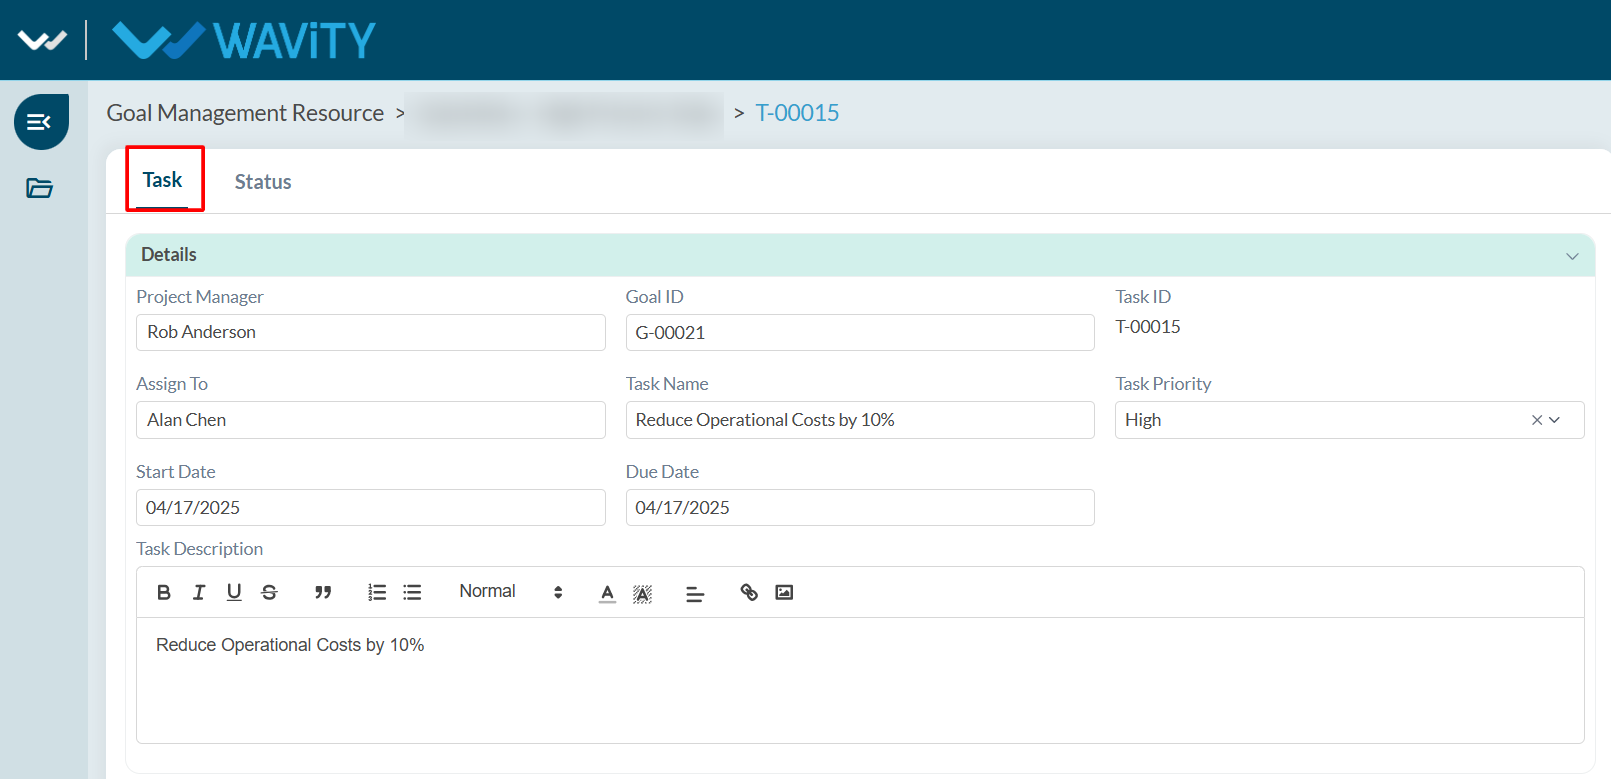
Goal Owner Guide: Creating Task
- In Goal Management, a Goal Owner can create and assign a task to any resource member.
- Creating a task in Goal Management is a simple and user-friendly process.
- Users with Goal Owner access can log in with their credentials to land on the Goal Owner interface, or select the Goal Owner Interface from the Goal Management section under the Solution icon.
- Note: The steps provided are sample instructions and can be customized based on specific requirements, but the core workflow remains the same.
- From the Issued Goal(s) table widget, select the goal for which you want to create a task. Users can also create a task through Quick Links.
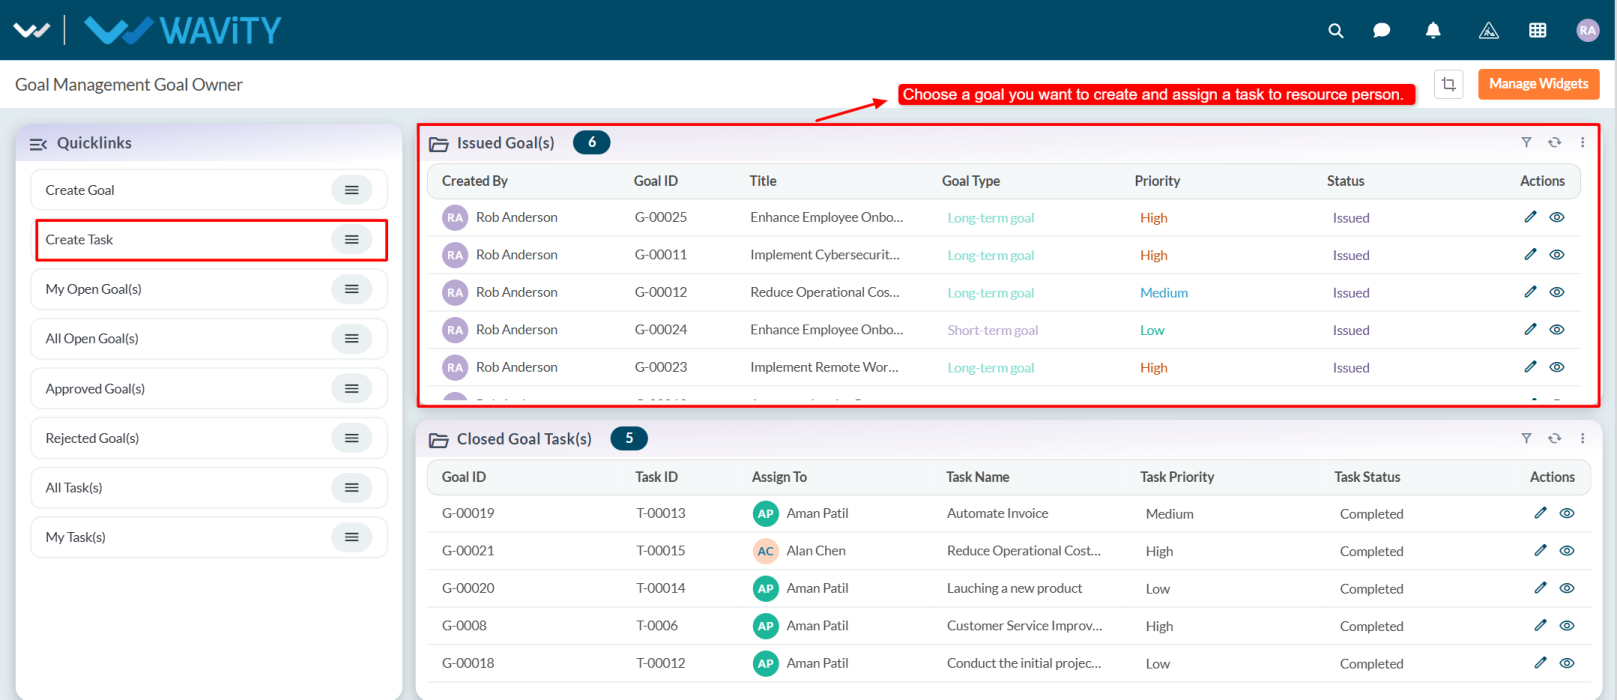
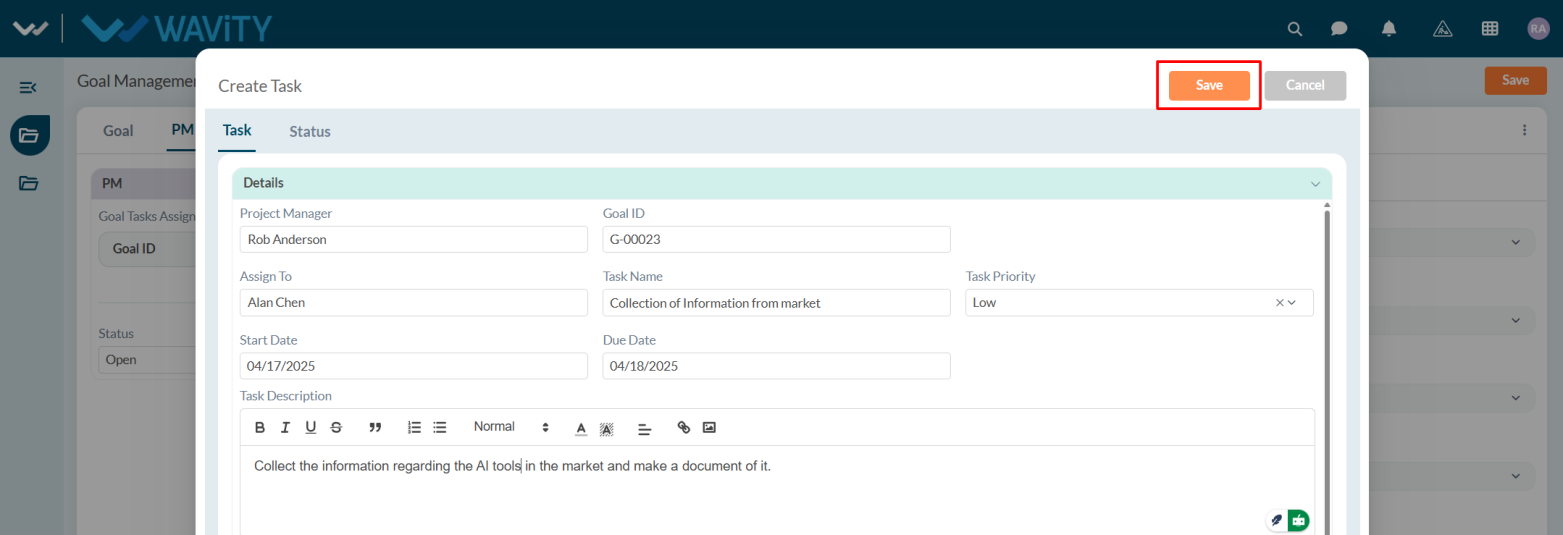
- Go to the PM tab under the PM section and click on the Create New Record icon.
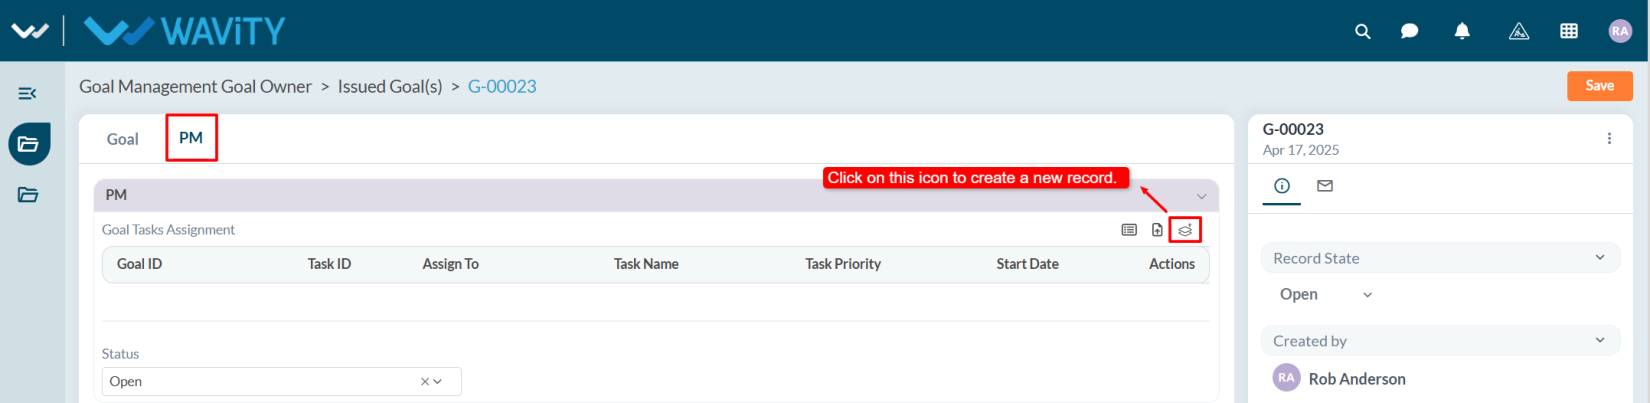
- The system automatically captures the Project Manager Name and Goal ID.
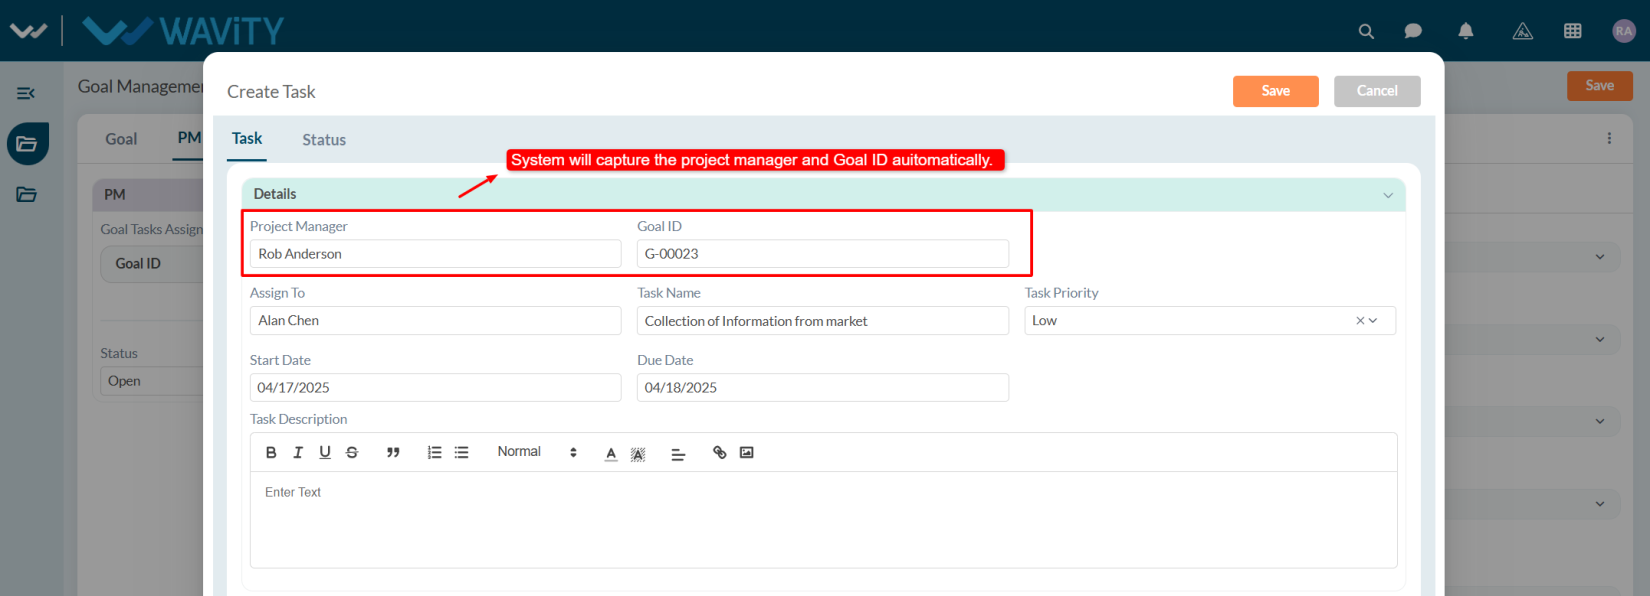
- Select a resource person in the Assign To field, enter the Task Name, and choose the Task Priority.
- Select the Start Date and Due Date.
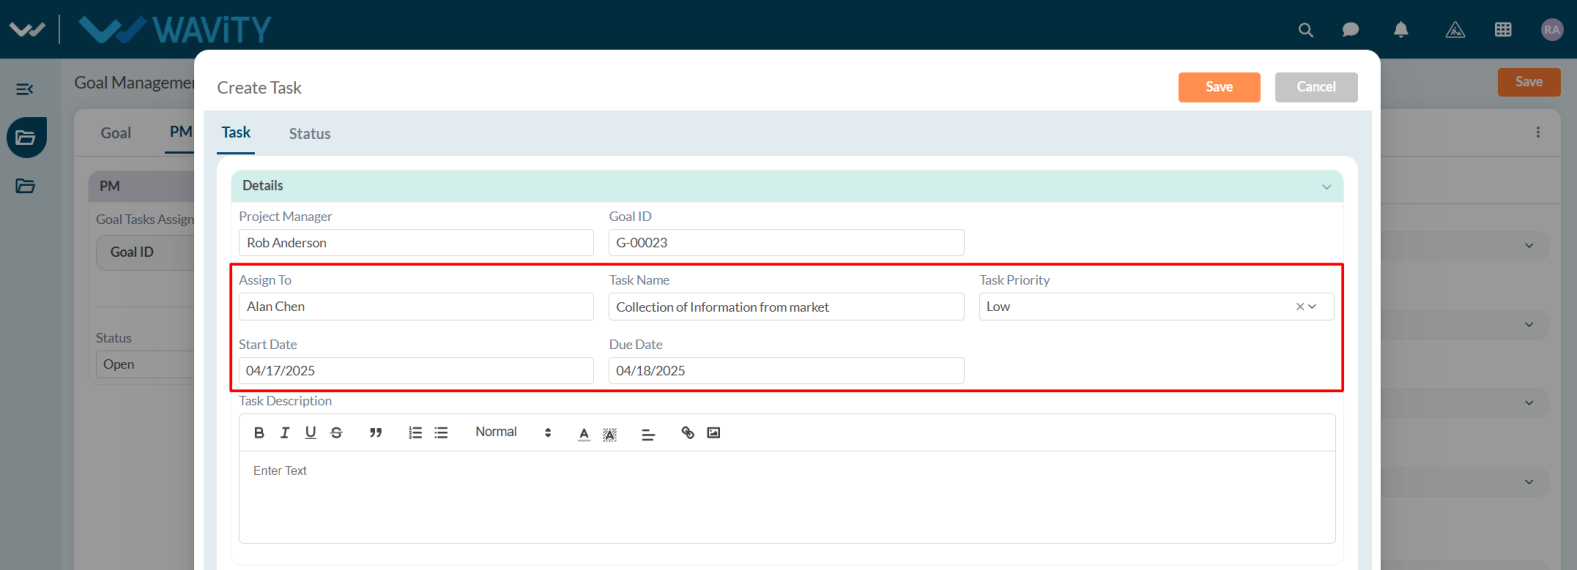
- Add a description if required and click on Save button.
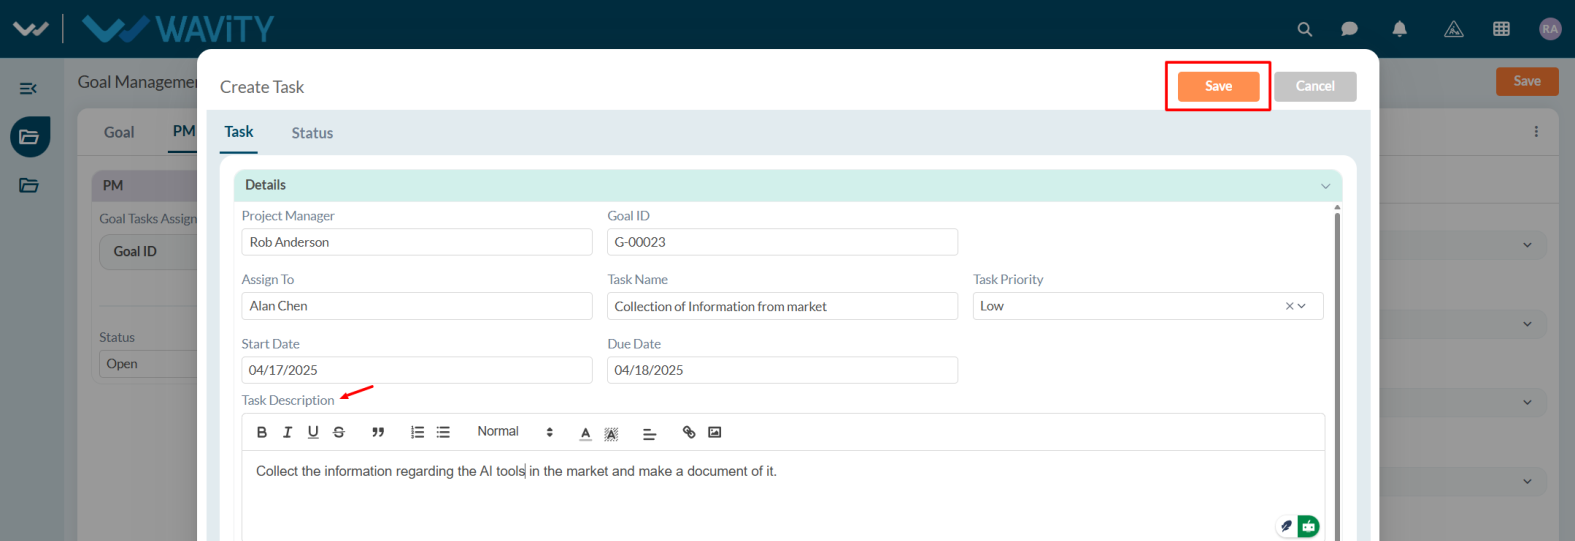
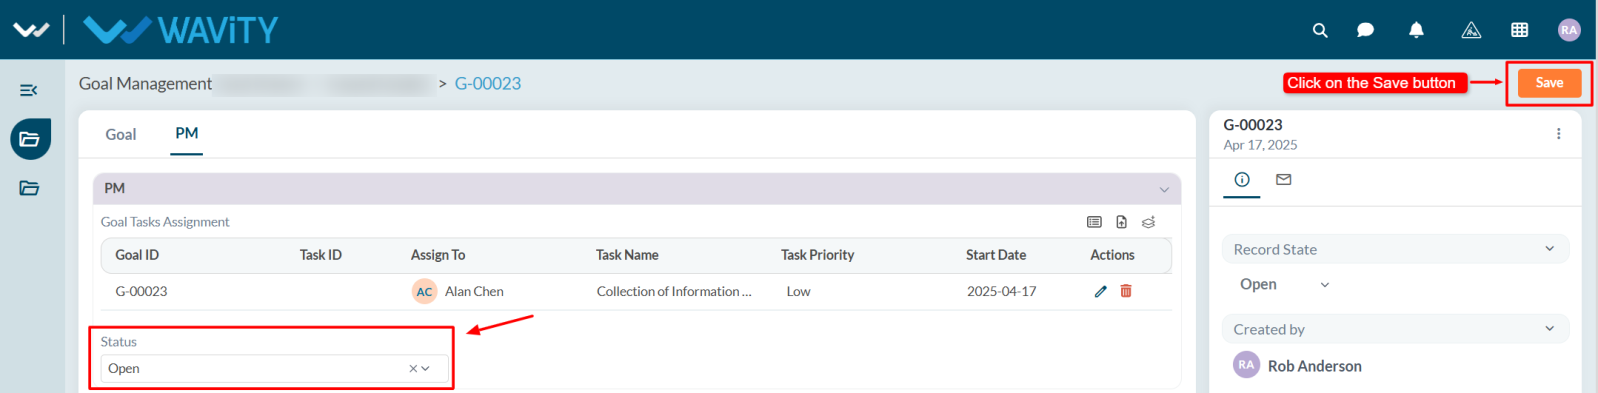
- Click Save to apply the changes. The assigned resource will receive a notification regarding the task and they will update the task status as per their work progress.
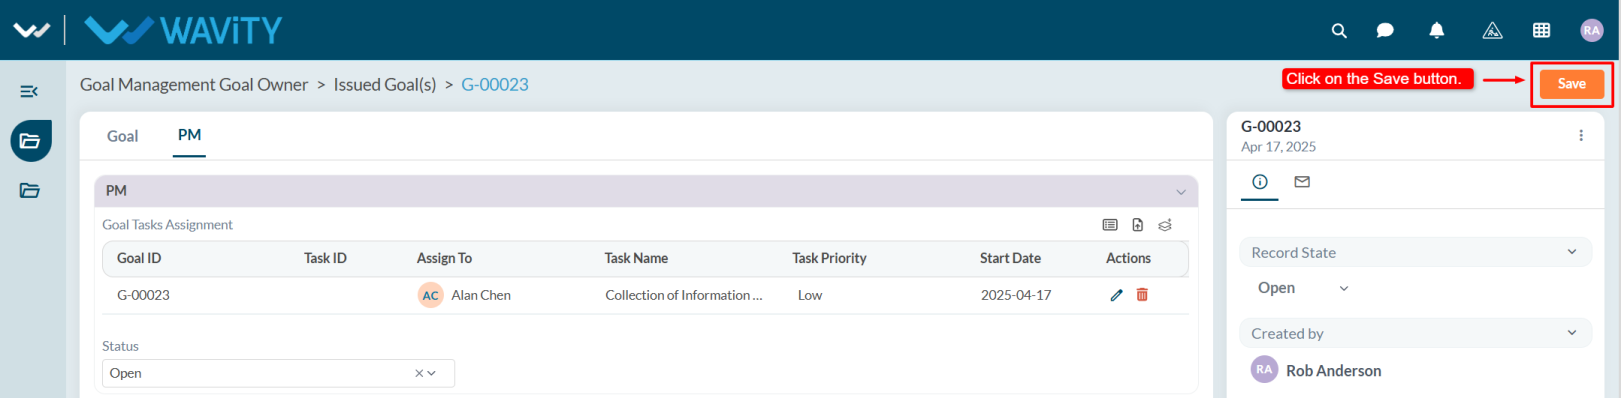
- Based on the task status, the project manager will update the status in the PM tab.
Resource Guide: Viewing All Open Task(s)
- Resource users can view all tasks with the status Open and prioritize their work accordingly.
- In the Wavity Goal Management module, users with Resource access can log in using their credentials to land on the Resource interface.
- Note: The following steps are sample instructions and can be customized based on specific requirements; however, the core workflow remains the same.
- From the Quick Links, select All Open Task(s).
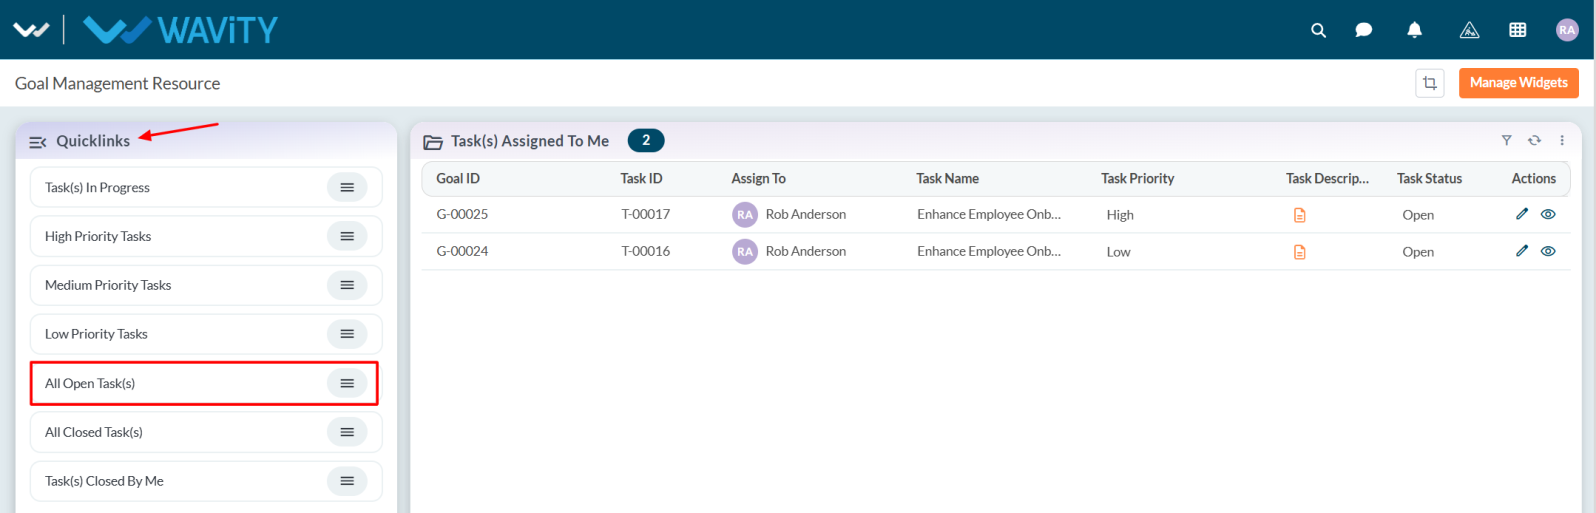
- A list of all open tasks will be displayed.
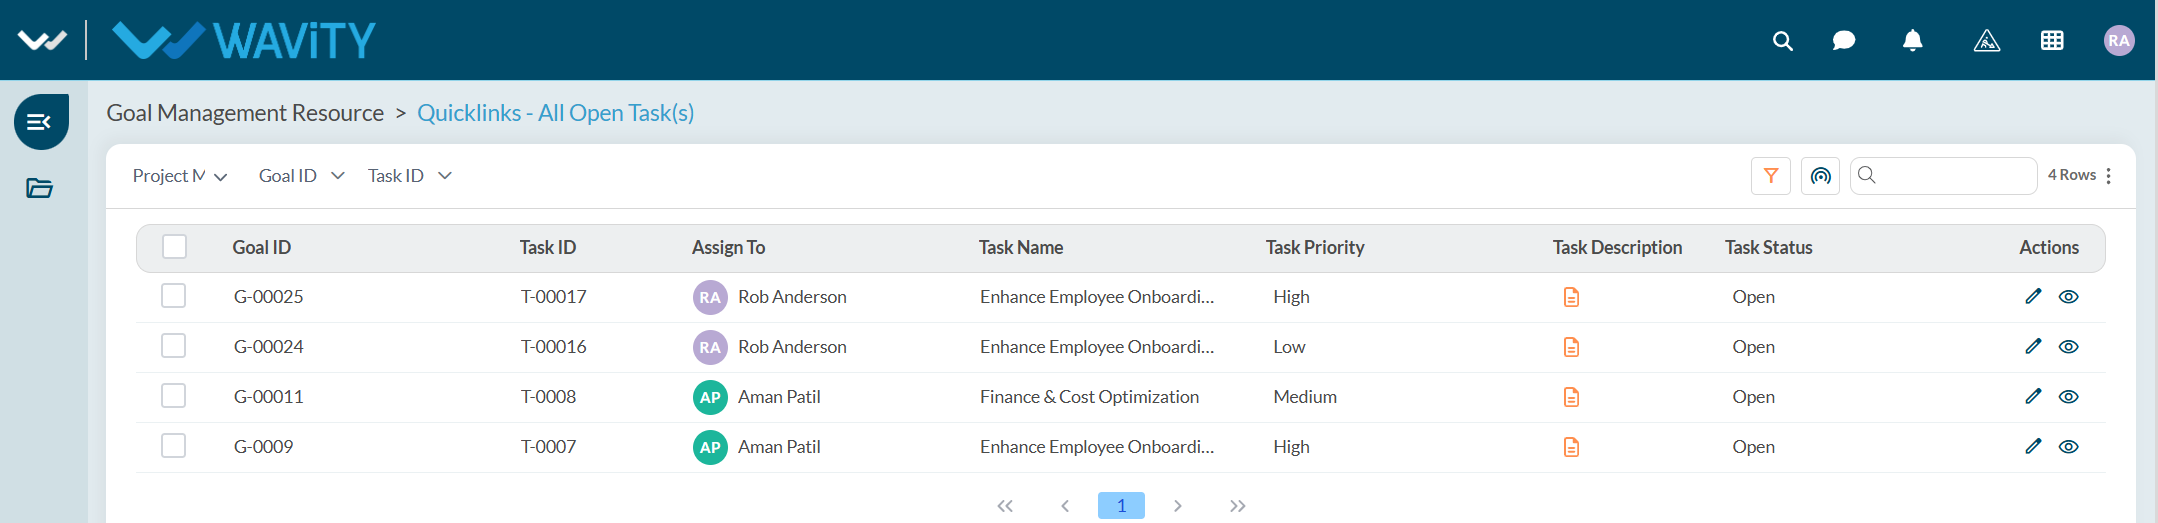
- Select any task to view its details. The task’s status and progress can be viewed in the Status tab.

Resource Guide: Managing the Assigned Task
- In Wavity Goal Management, a resource person can work on tasks assigned by the Project Manager or Goal Owner.
- Users with Resource access can log in with their credentials to land on the Resource interface, or select the Resource Interface from the Goal Management section under the Solution icon.
- Note: The steps provided are sample instructions and can be customized based on specific requirements, but the core workflow remains the same.

- In the Task(s) Assigned to Me table widget, users can view all tasks assigned to them and select any task as needed.
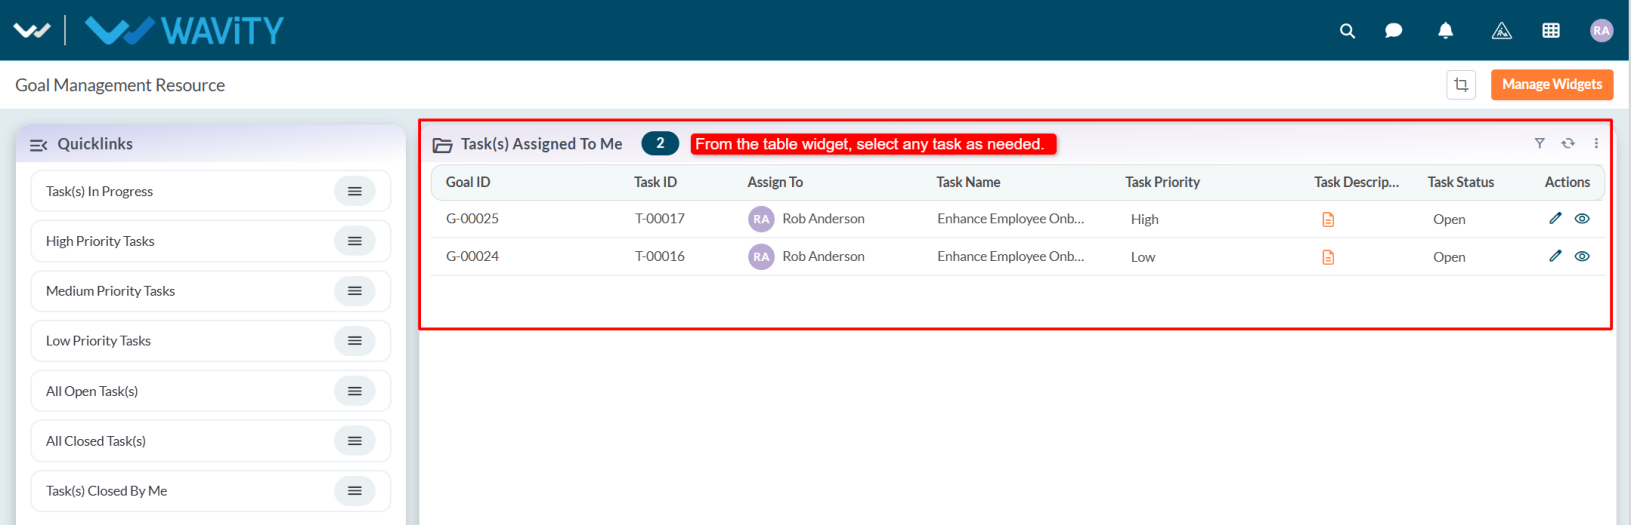
- User can view the task details in Task tab.
- In Status tab, resource person need to set the Actual Start Date and Actual End Date.
- Update the Current Progress and Status according to work progress.
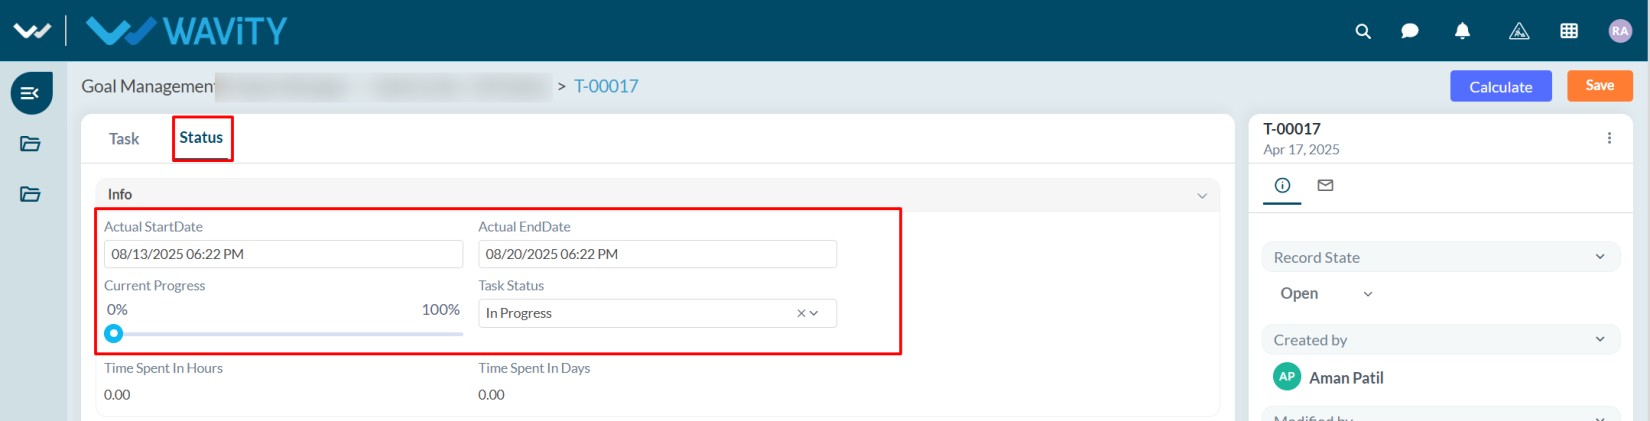
- The Time Spent in Hours and Days will be calculated automatically based on the Actual Start Date and Actual End Date.
- After updating the status and other details, click Save.
Resource Guide: Viewing High Priority Tasks
- Resource users can view High Priority Tasks, which should be addressed first.
- In the Wavity Goal Management module, users with Resource access can log in using their credentials to land on the Resource interface.
- Note: The following steps are sample instructions and can be customized based on specific requirements; however, the core workflow remains the same.

- From the Quick Links, click on High Priority Tasks.
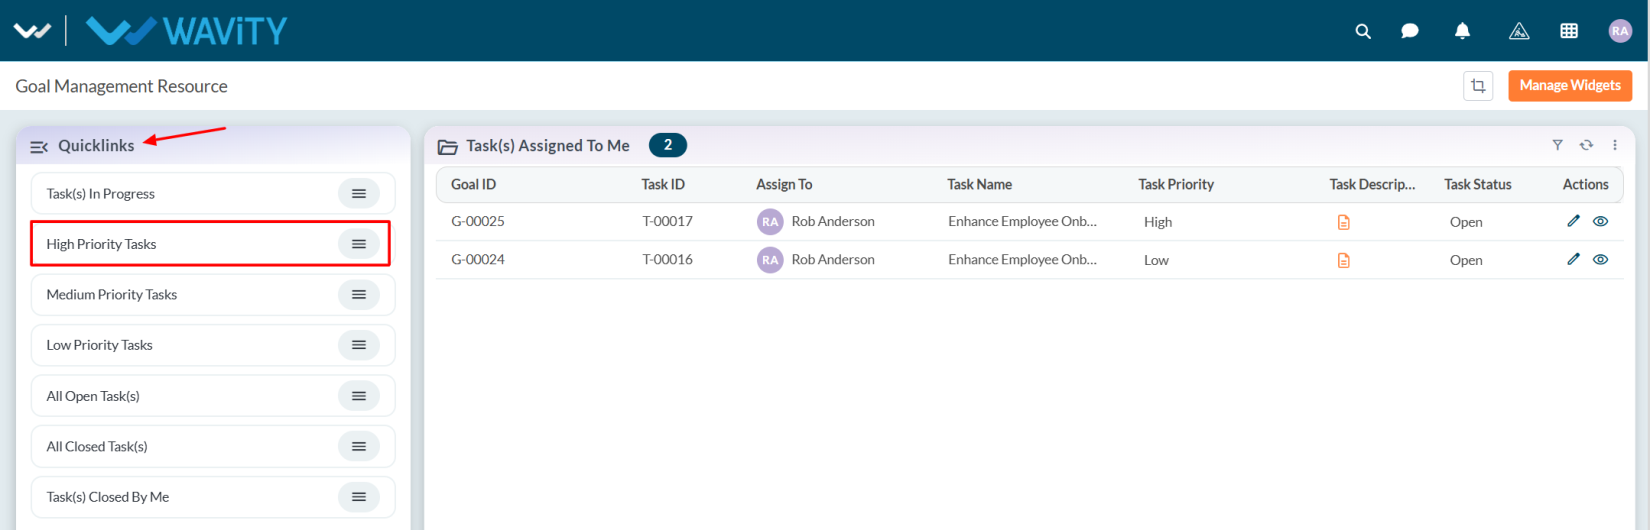
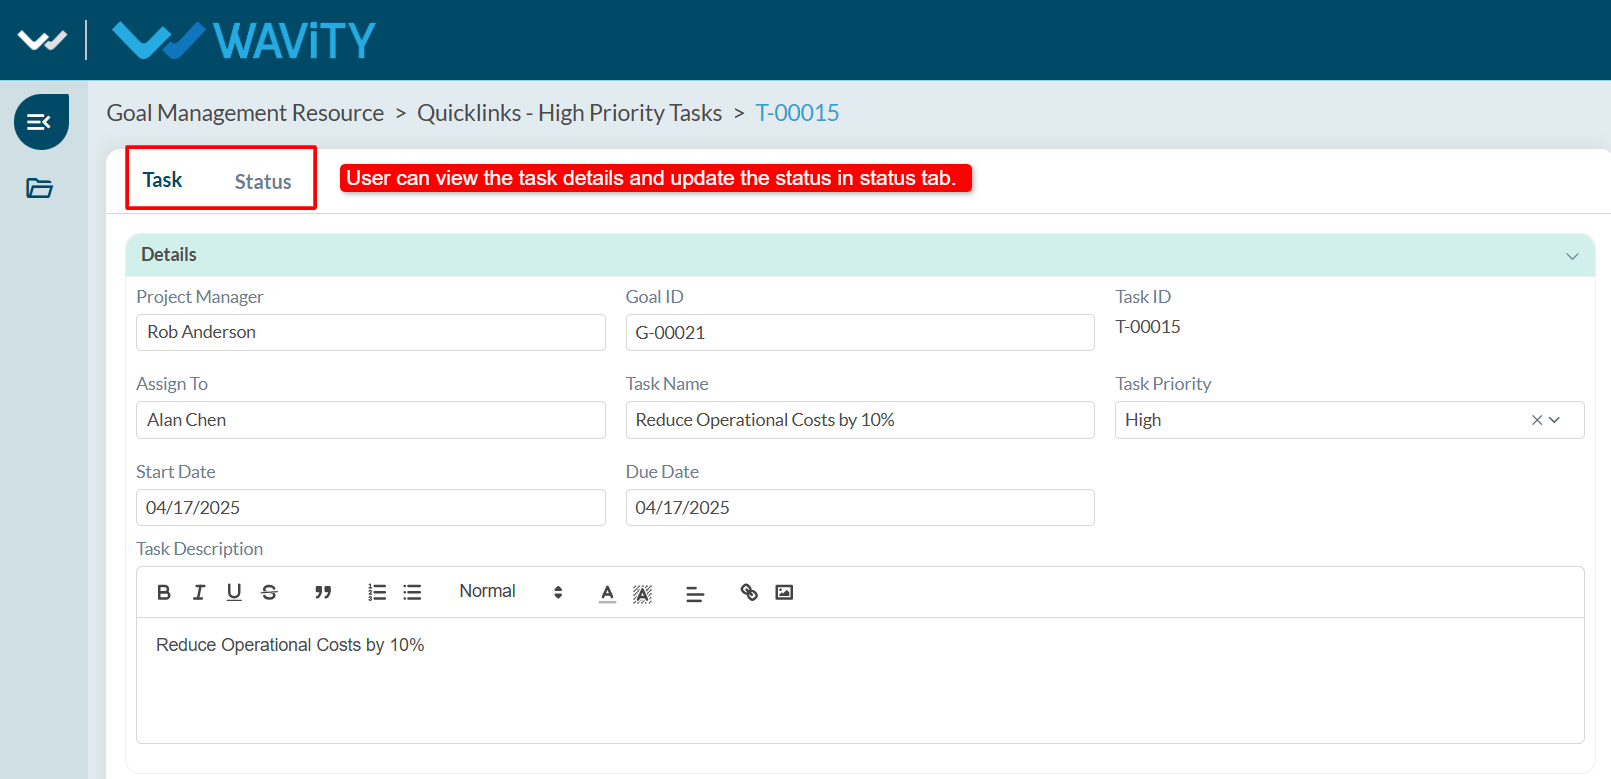
- All high priority tasks will be displayed. Select any task as desired.
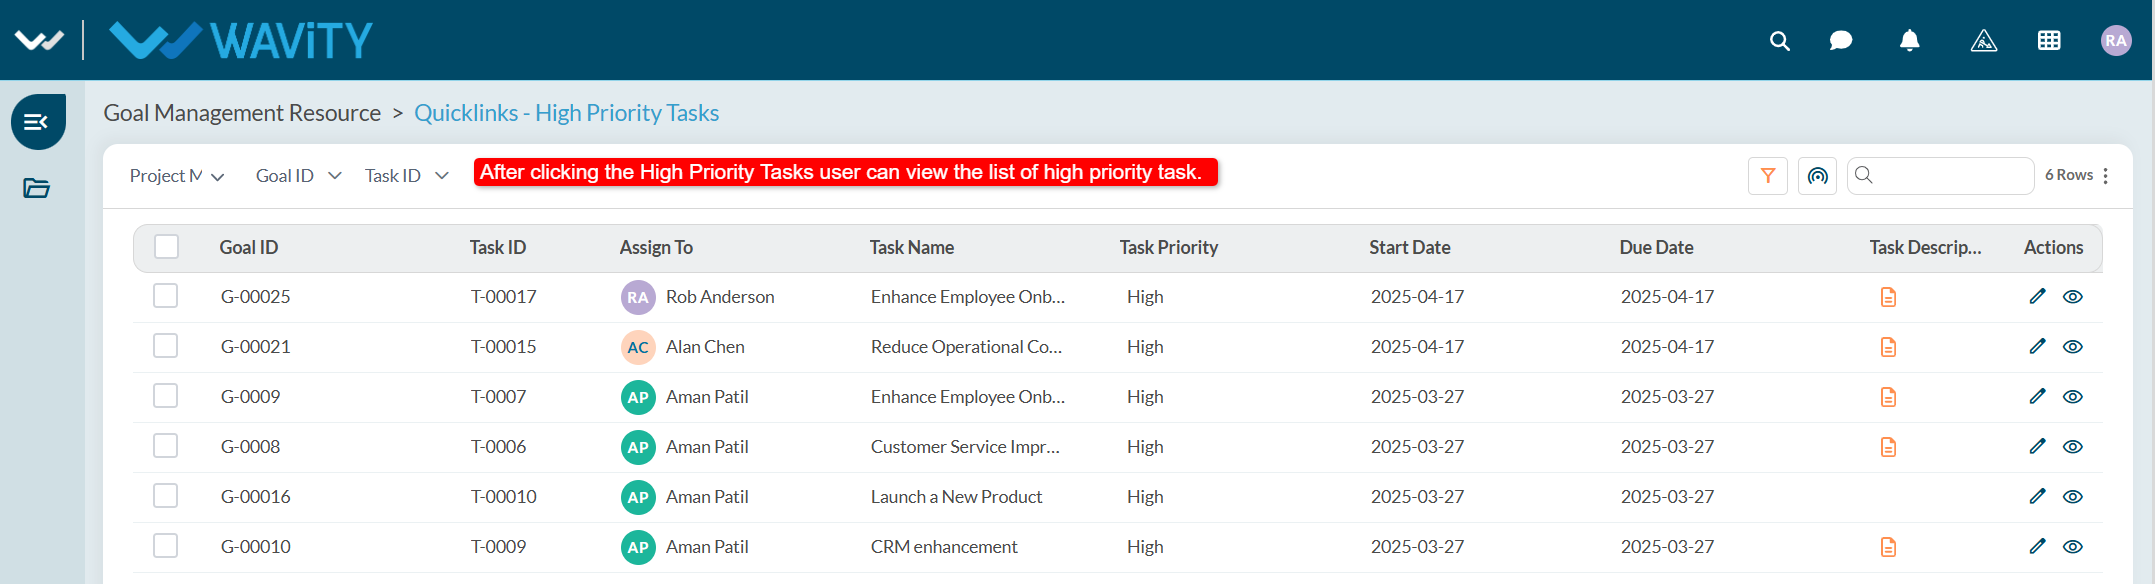
- View the task details and update the task status according to your work progress.
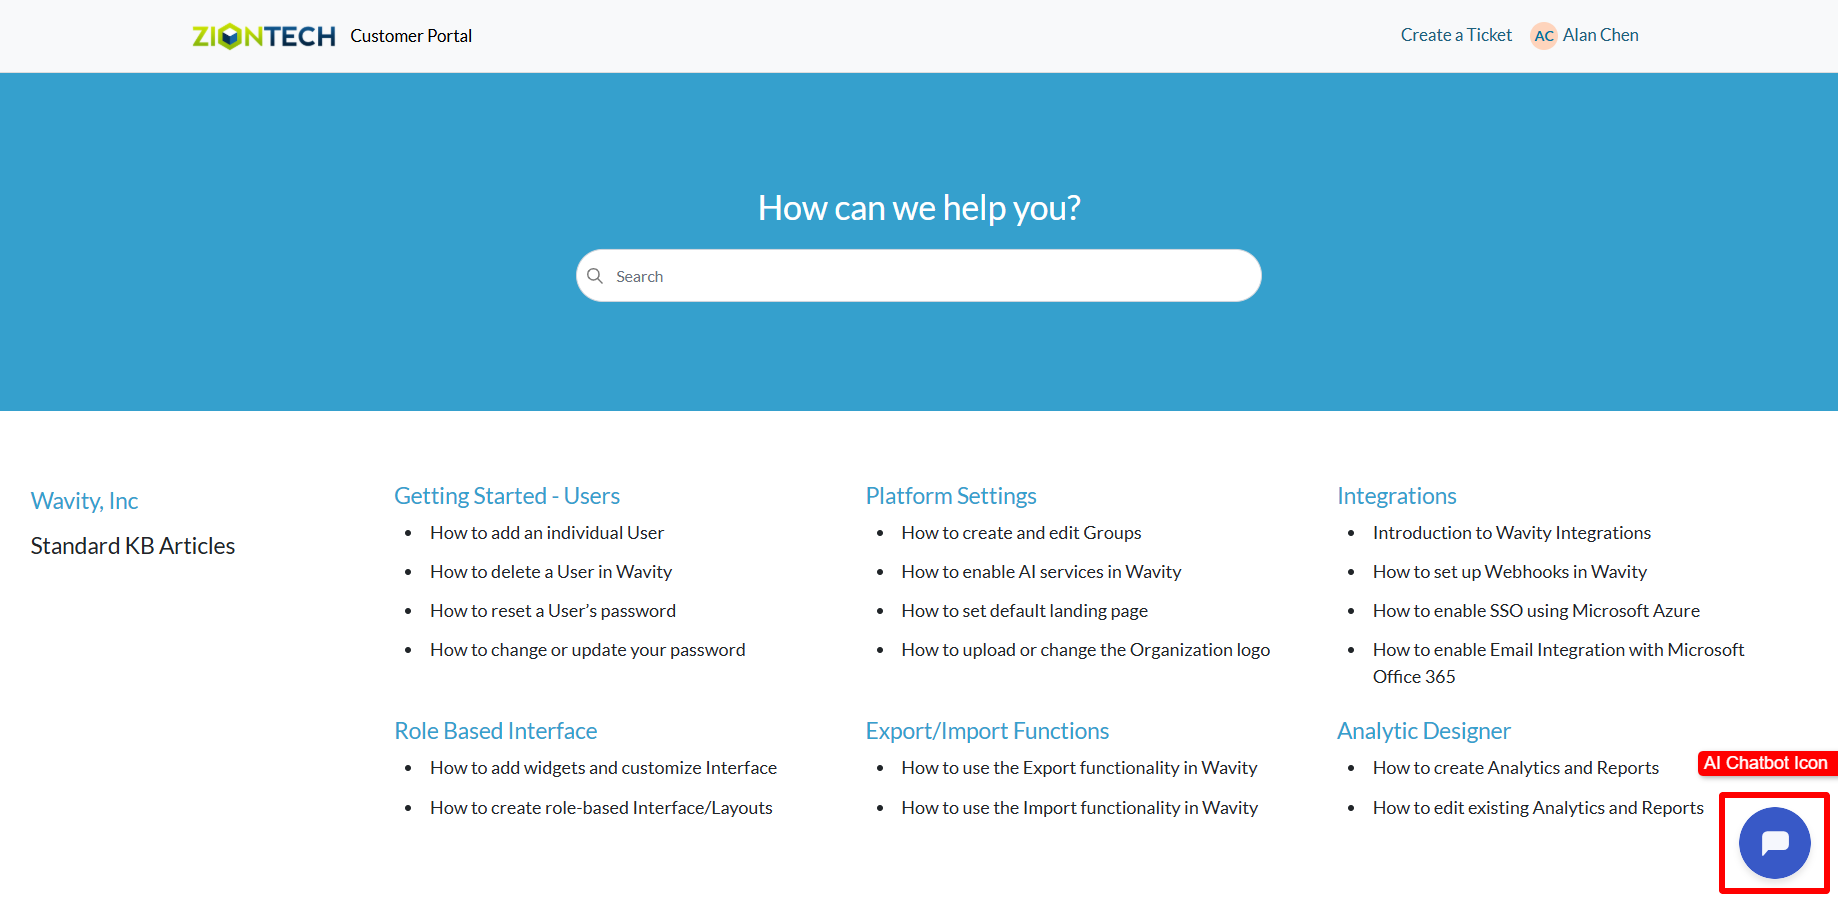
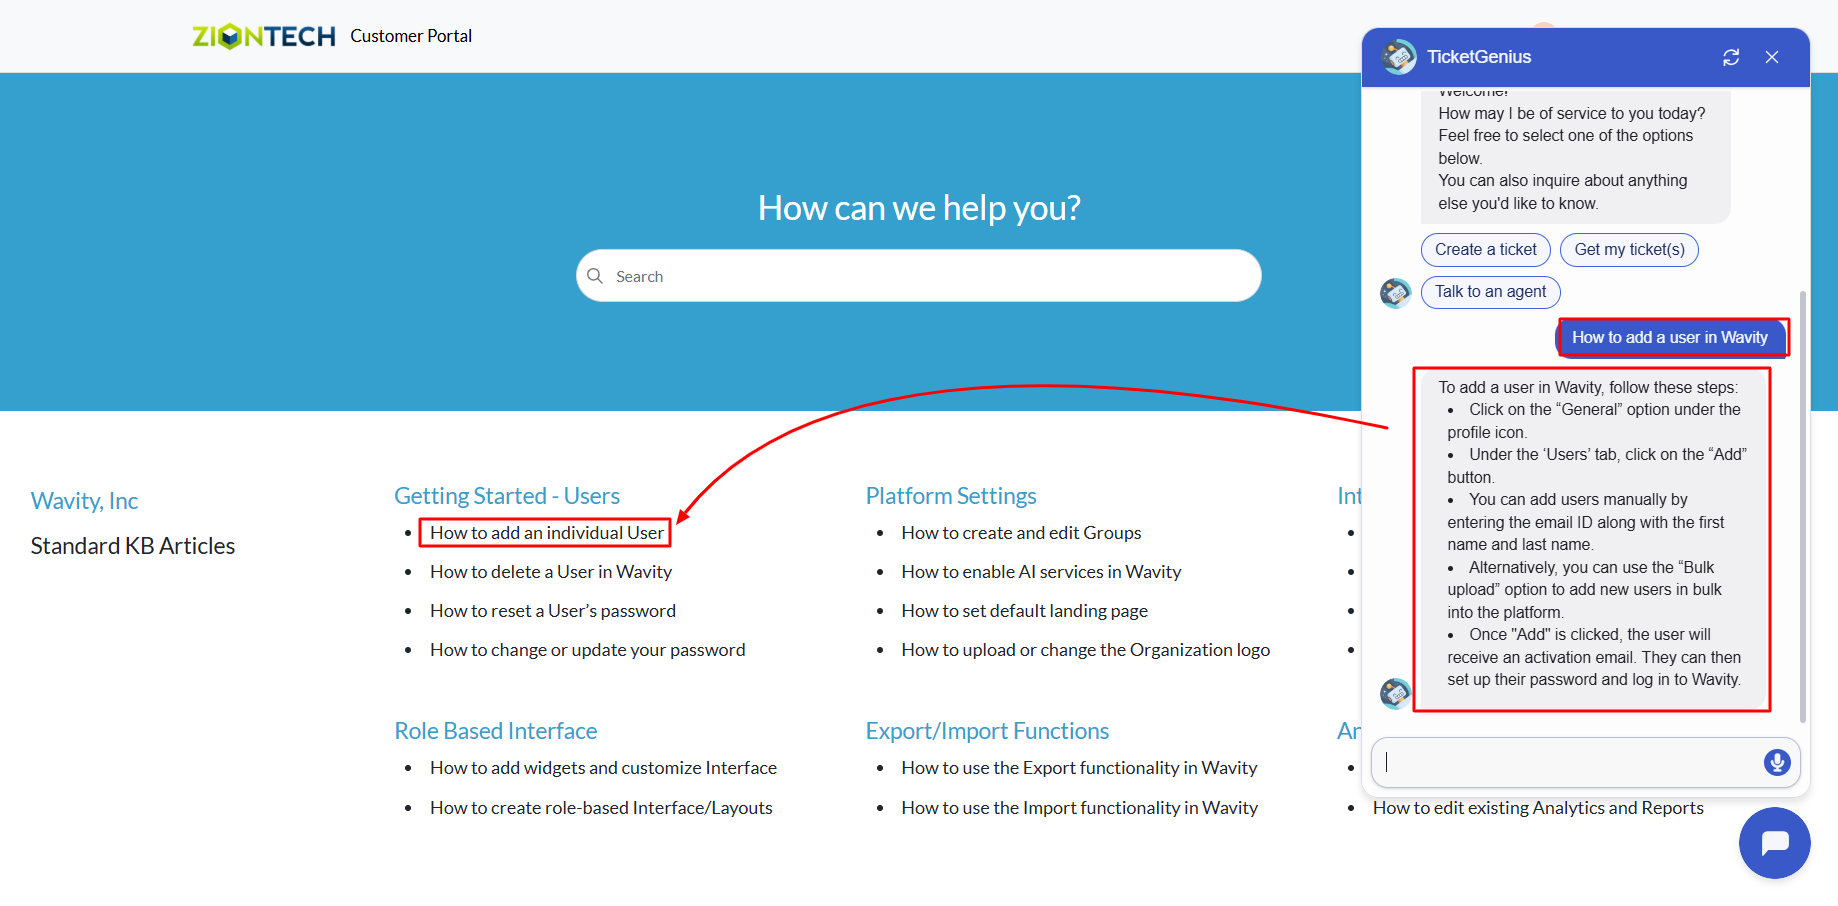
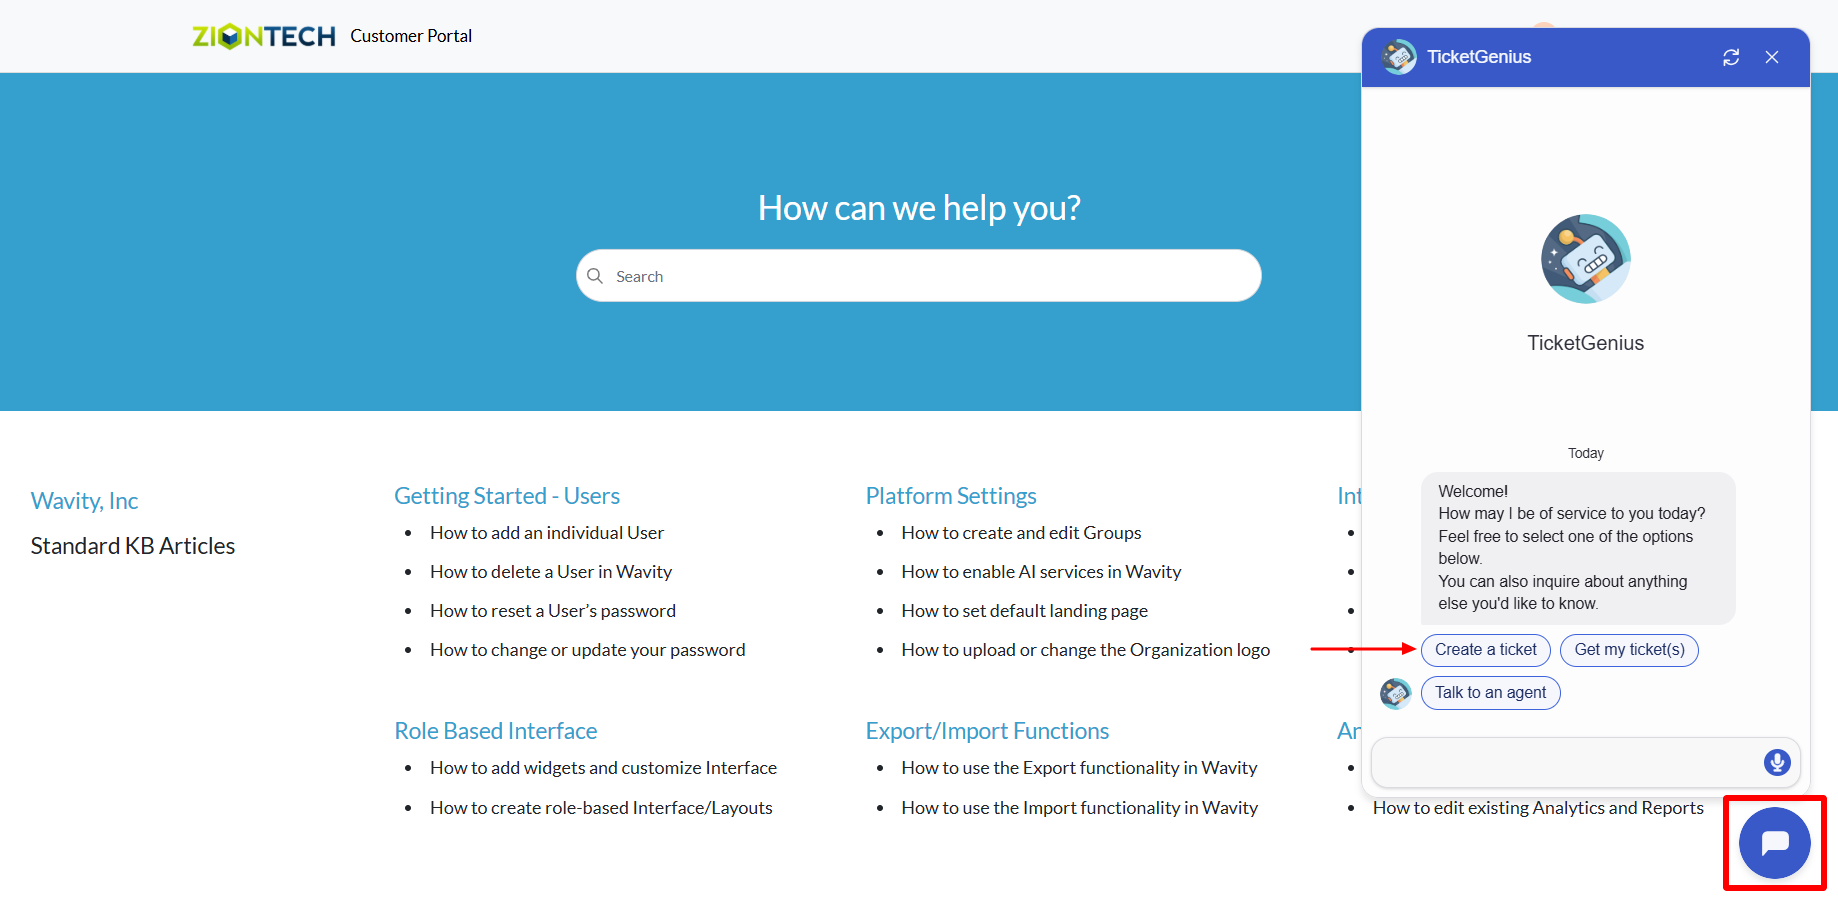
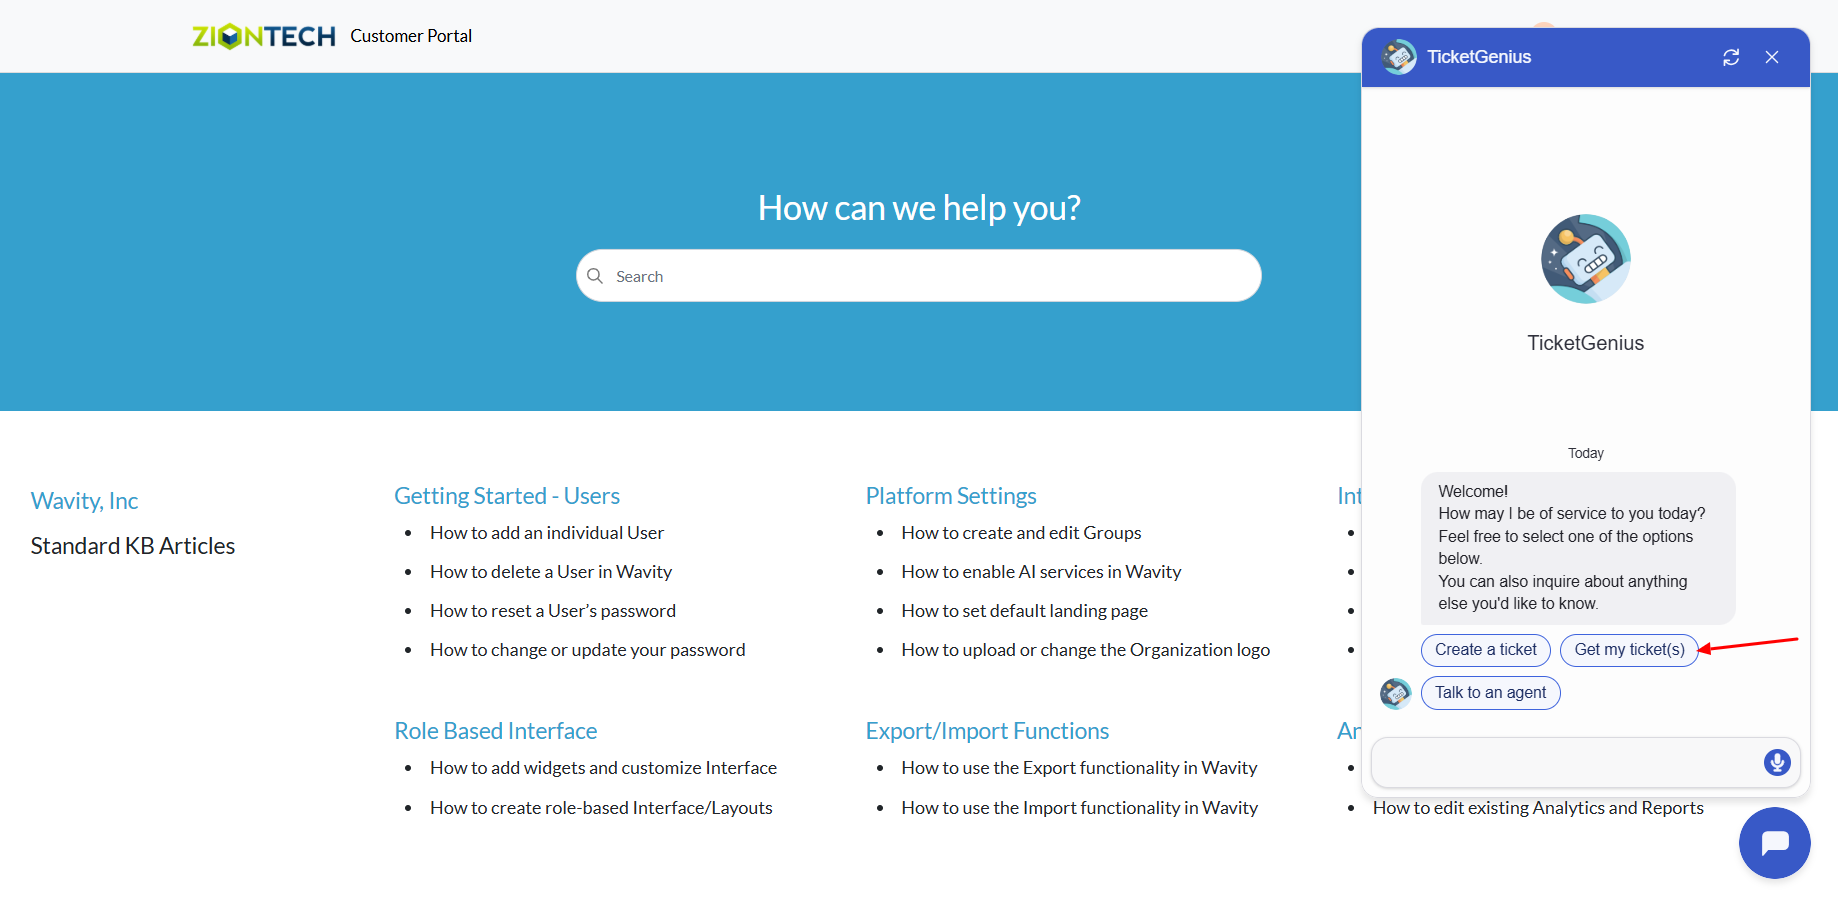
End User Guide: AI Chatbot Assistance - Ask and Receive Summarized Responses
- Wavity provides an AI-powered chatbot with guided conversations offers tailored, context-aware responses to both agents and customers. By leveraging natural language processing, the chatbot can engage in meaningful interactions, help customers resolve issues, and assist agents with troubleshooting and information retrieval.
- Users can access the chatbot via the Customer Portal URL or directly through the interface.
- From the interface, click on Customer portal icon.

- Click on the AI Chatbot Icon as shown in below image.
- Type and submit any query you have to the chatbot.
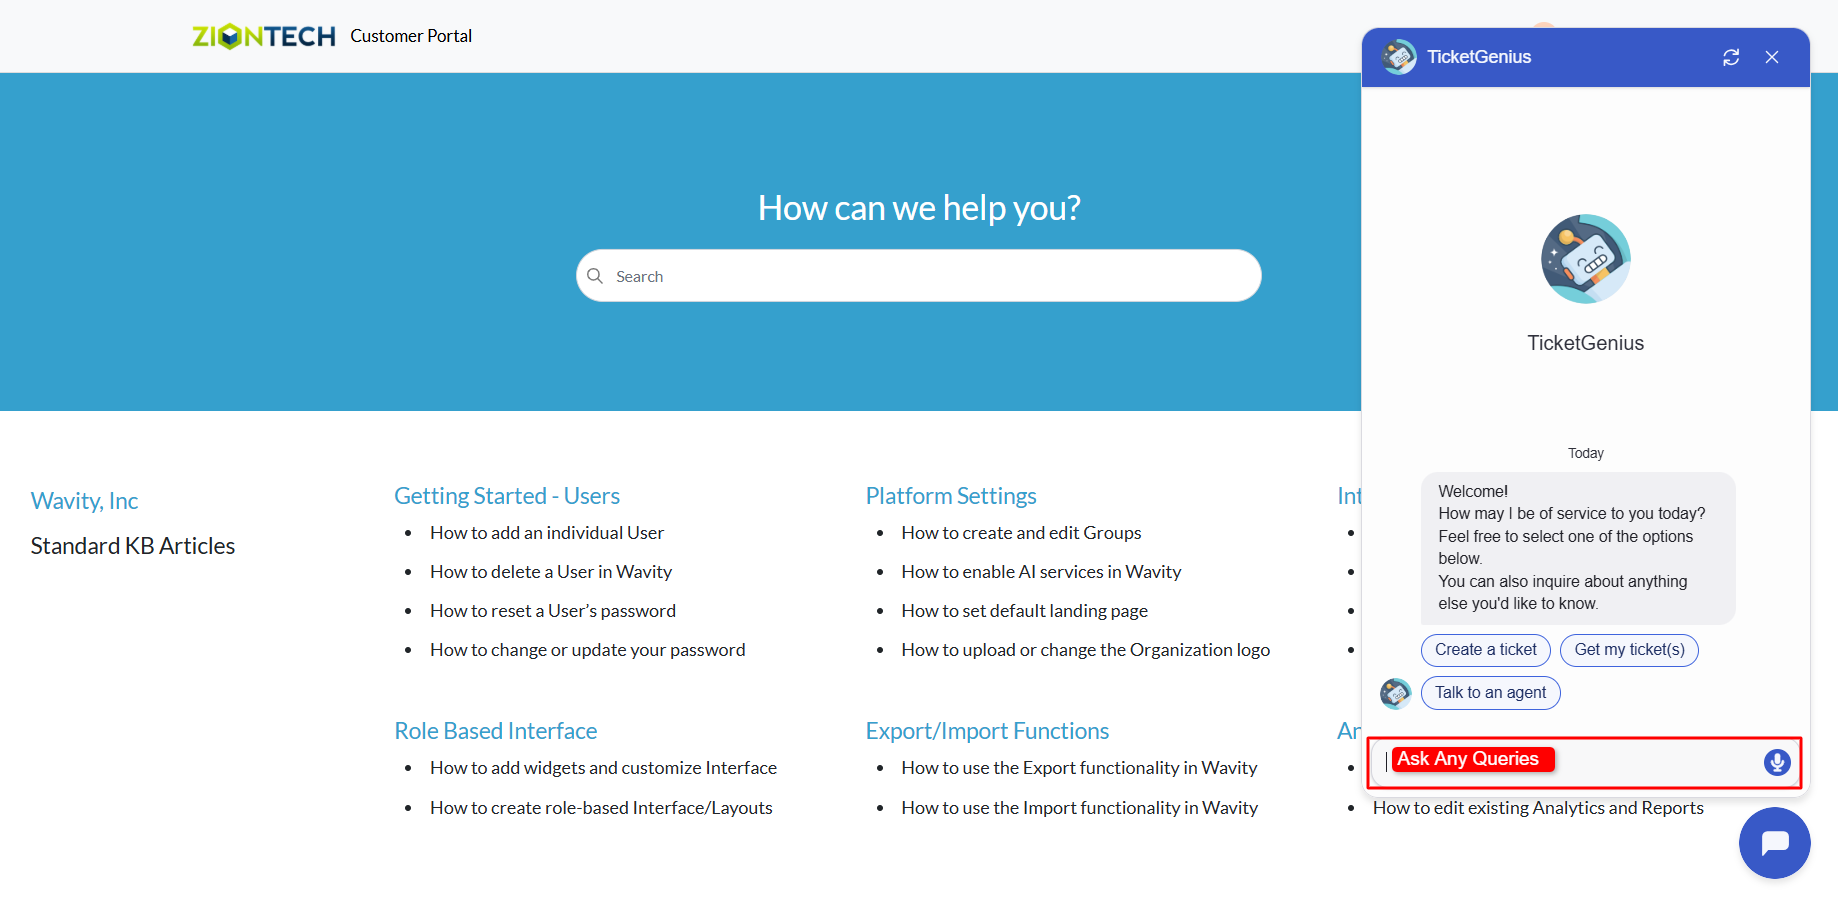
- The chatbot will respond to your query. If your admin has enabled knowledge base syncing, it will check for relevant articles and provide a summarized answer for quick reference.
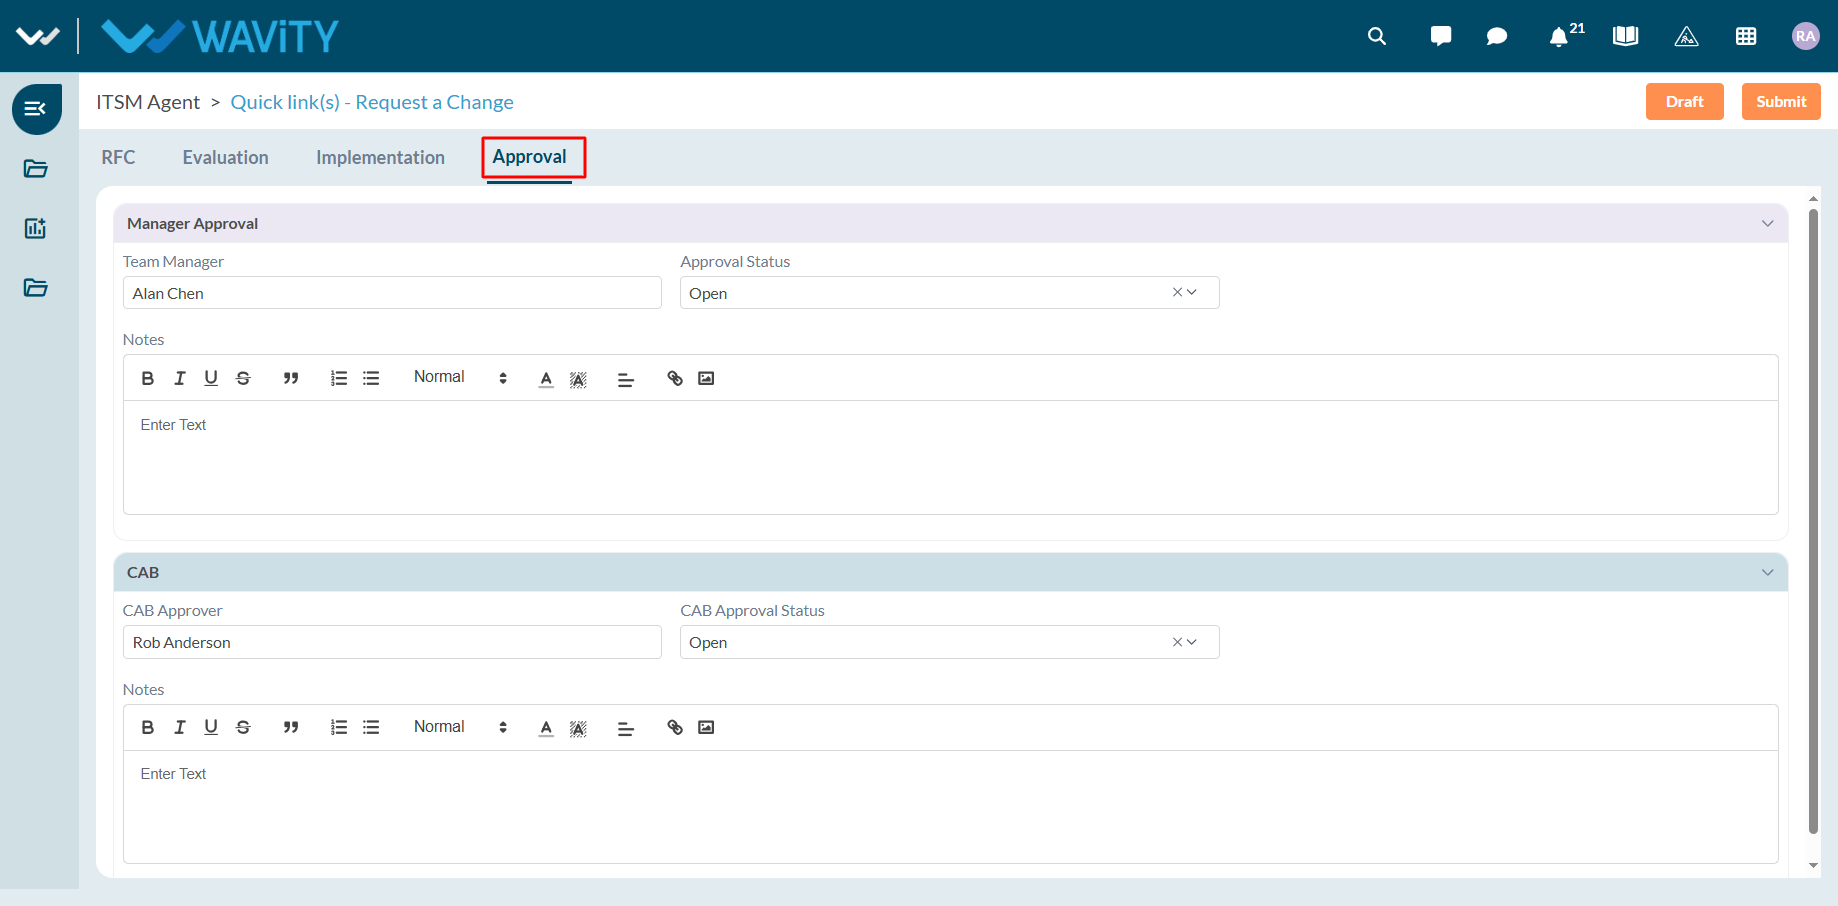
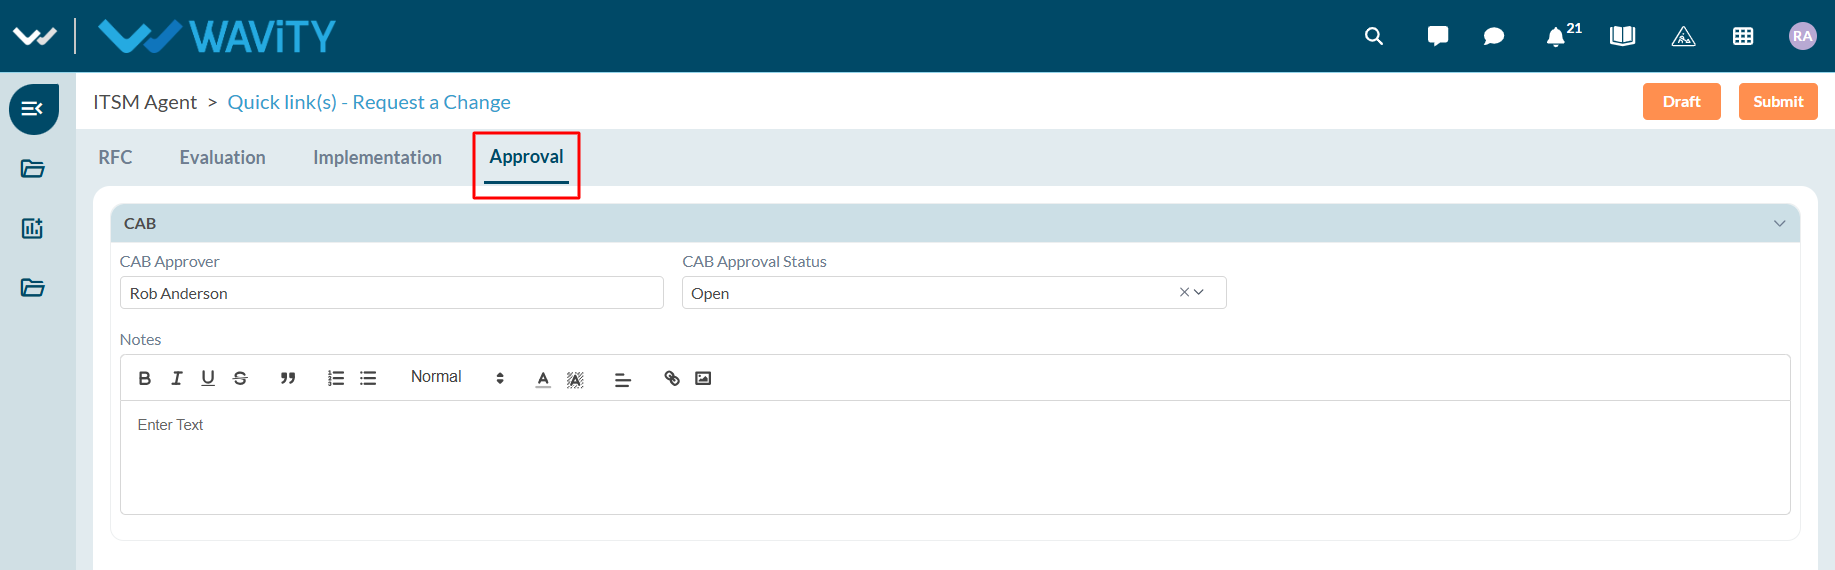
Agent Guide: Types of Change Classification
- Wavity ITSM solution includes a comprehensive Change Management module aligned with ITIL standards, featuring multiple change classifications and associated approval workflows.
- Note: The steps provided below are sample instructions and can be customized to suit specific organizational requirements; however, the core workflow remains consistent.
- Log in to the Wavity platform using your credentials. After logging in, you will be taken to the Agent Interface. Click on Request a Change.

- In the Change Classification field, select ‘Standard/Pre-Approved’.
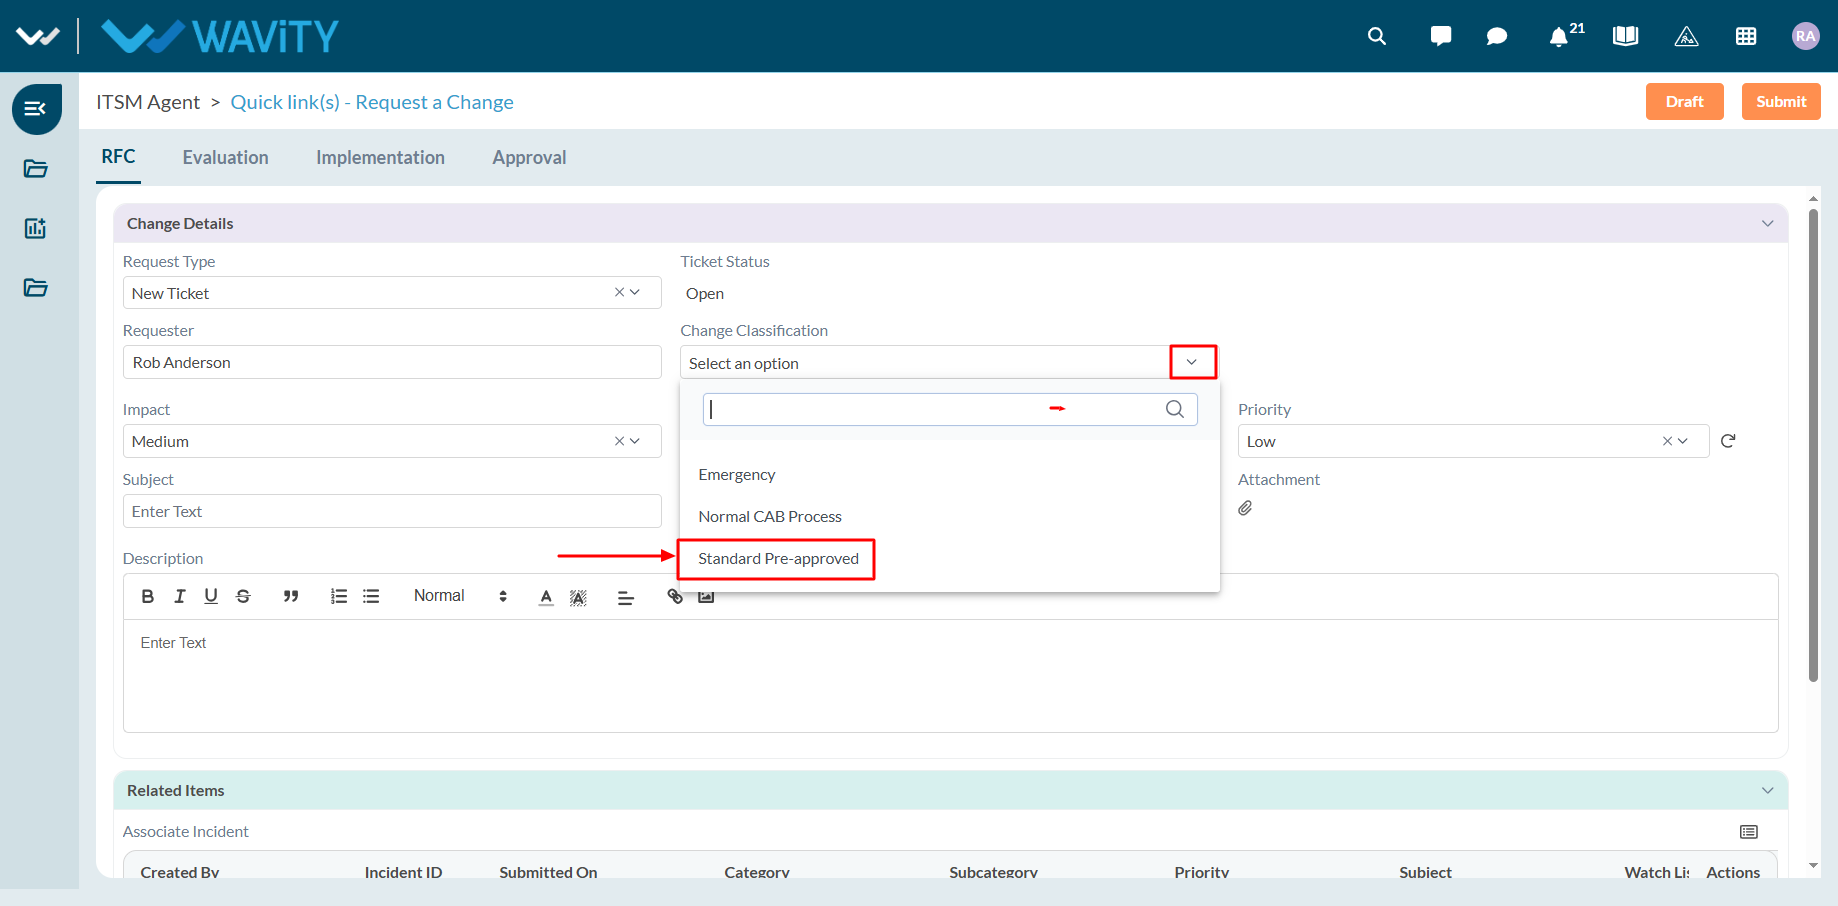
- When Standard/Pre-Approved is selected, a message will be displayed indicating that no approval is required, and the request can proceed automatically.

- As a second example, select ‘Normal CAB Process’ as the change classification type.
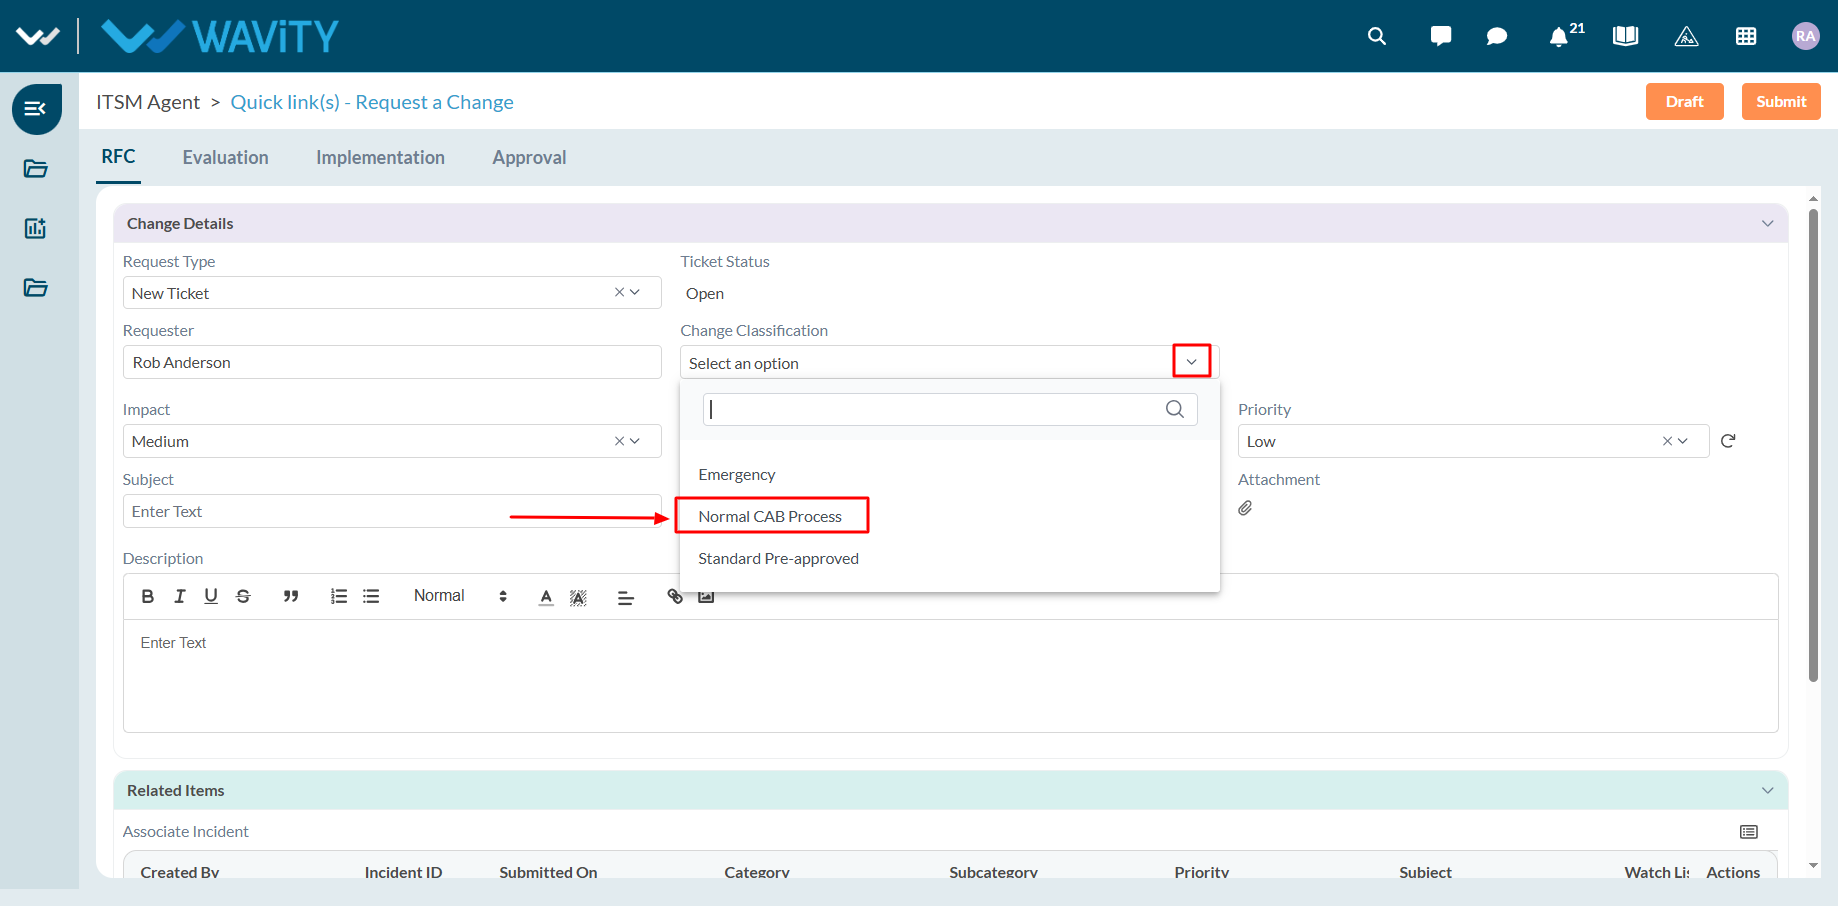
- When Normal CAB Process is selected, the system will require both Manager and CAB approvals before proceeding further.
- Similarly, select ‘Emergency’ as the change classification type.

- When Emergency is selected, the system will require CAB approval only before the change can proceed.
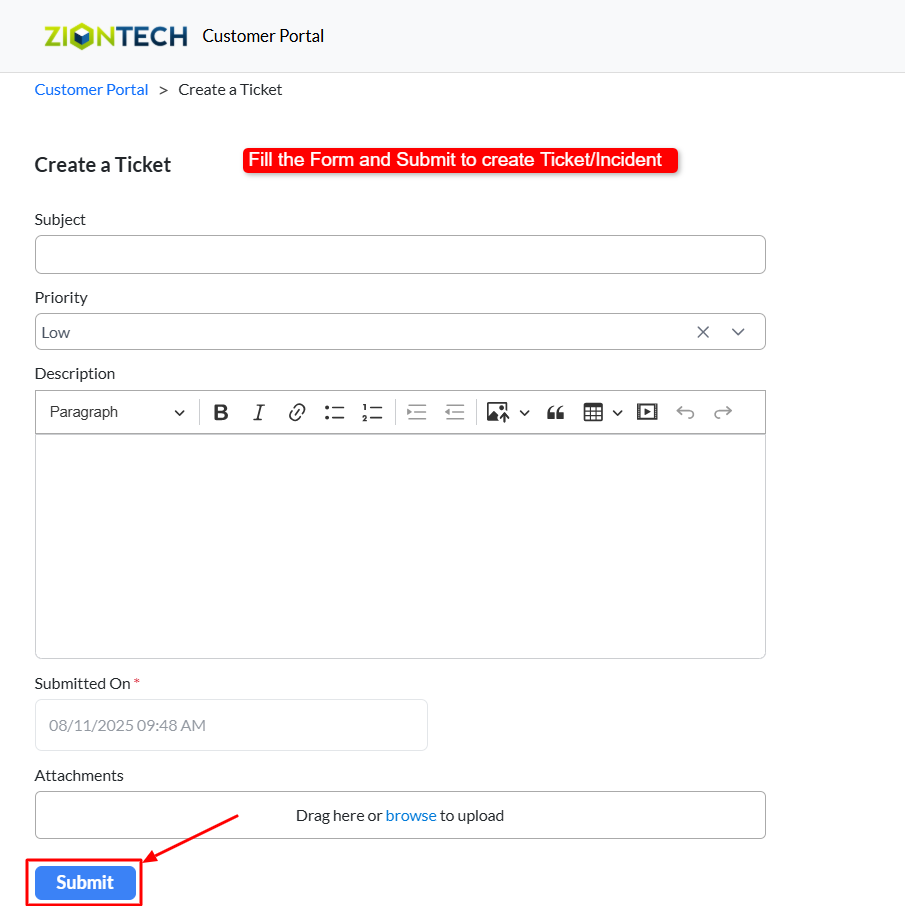
End User Guide: Create Tickets/Incidents via Customer Portal
- Creating incidents in the Wavity Customer Portal is a simple and user-friendly process.
- Note: The steps provided below are sample instructions and can be customized to suit specific organizational requirements; however, the core workflow remains consistent.
- Users can access the Customer Portal either directly through the Portal URL or via the interface.
- From the interface, click on Customer portal icon.
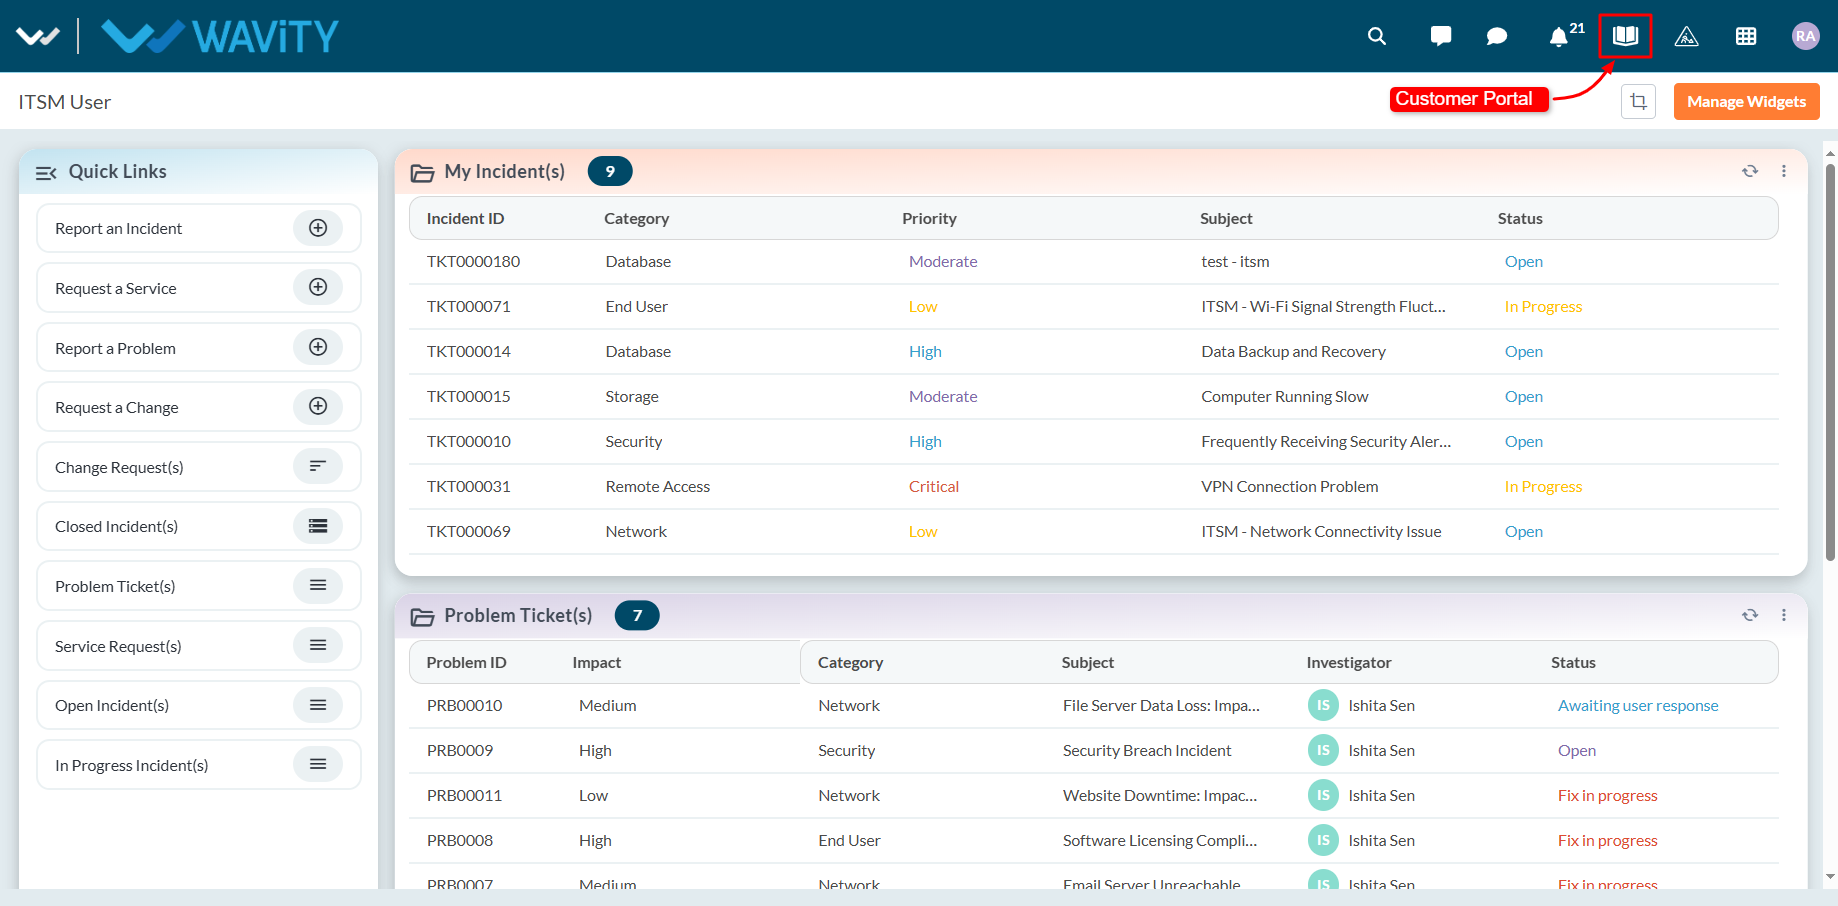
- In the Customer Portal, click on ‘Create a Ticket’ to open the incident/ticket creation form.
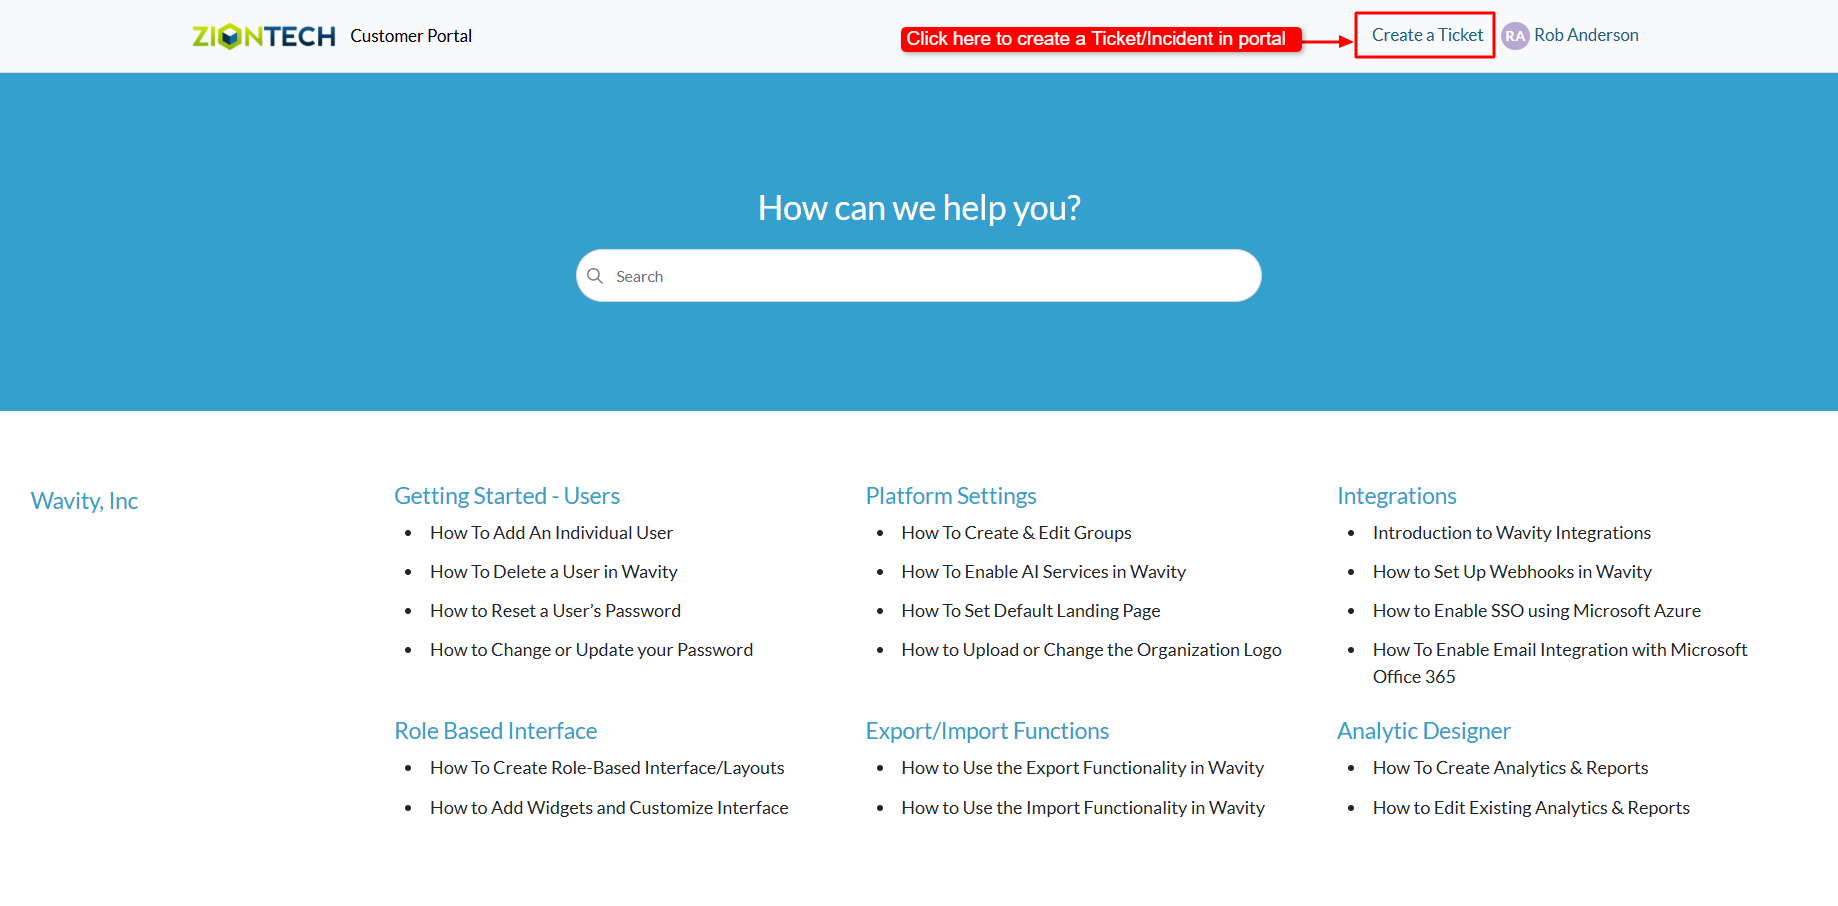
- Complete the form with the necessary details and click Submit to create a ticket or incident in the Wavity ITSM solution.
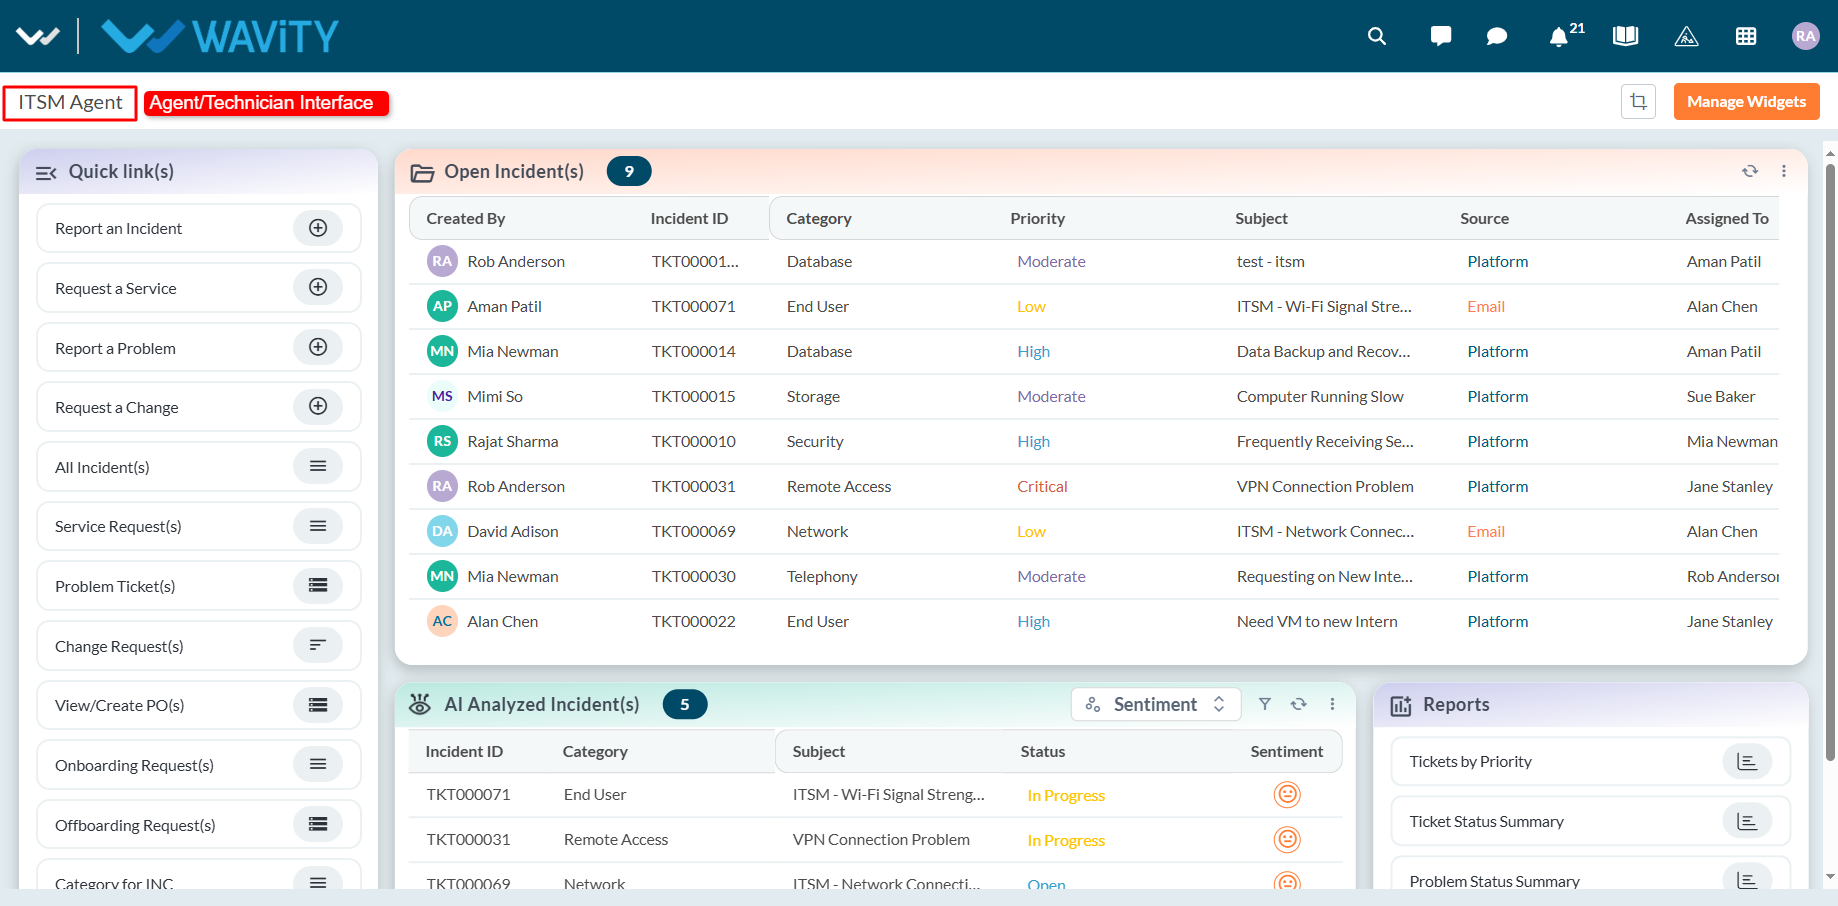
Agent Guide: Accessing Incidents
- Accessing and viewing incidents in Wavity ITSM is a straightforward and user-friendly process designed for ease of use.
- Note: The steps provided below are sample instructions and can be customized to suit specific organizational requirements; however, the core workflow remains consistent.
- Log in to the Wavity platform using your credentials. After logging in, you will be taken to the Agent Interface.
- Click on ‘Open Incidents’ to see a list of all incidents assigned to you that are still open.

- Select any incident from the list to view its full details.
- You can also search for a specific incident using the search bar located at the top.
- Use the filters on the left side of the screen to narrow down the incident list. For more advanced filtering, apply multi-condition filters using AND/OR logic to refine your search results.
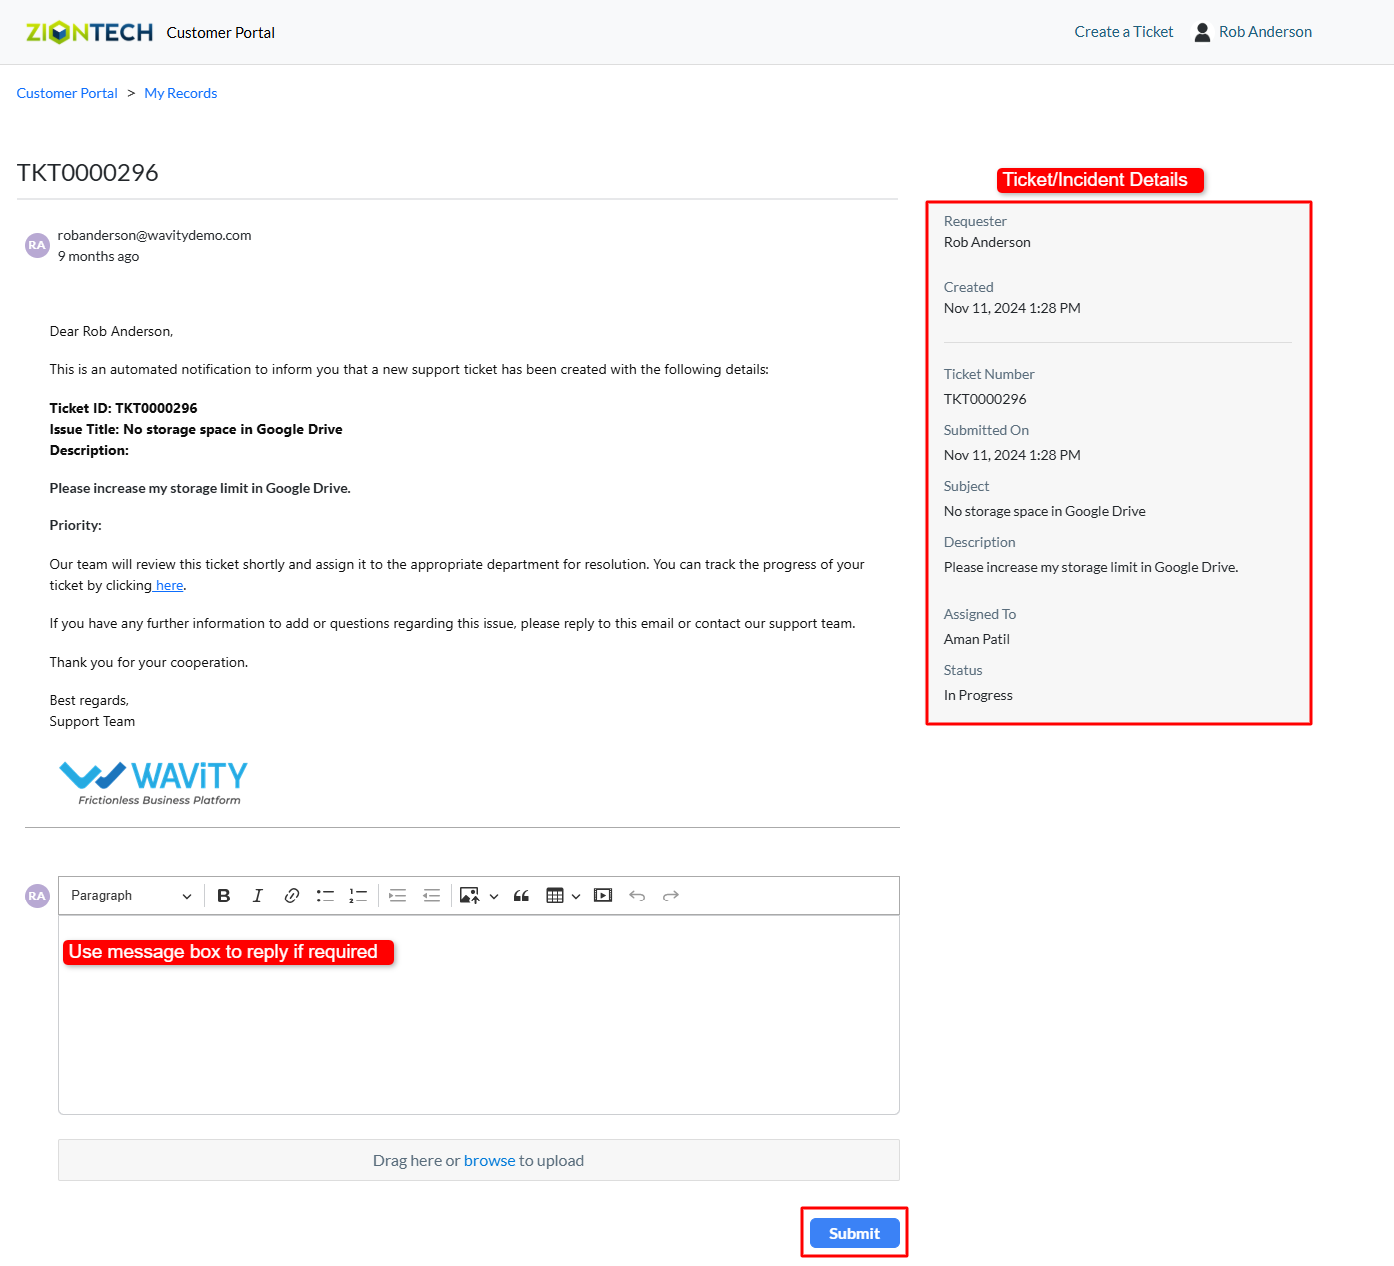
End User Guide: Accessing Incidents via Customer Portal
- Accessing and viewing incidents in the Wavity Customer Portal is a simple and user-friendly process.
- Note: The steps provided below are sample instructions and can be customized to suit specific organizational requirements; however, the core workflow remains consistent.
- Users can access the Customer Portal either directly through the Portal URL or via the interface.
- From the interface, click on Customer portal icon.
- In the Customer Portal, click on the Profile icon and then select Records to view a list of all requests you have created.
- Select any incident/tickets from the list to view its full details.
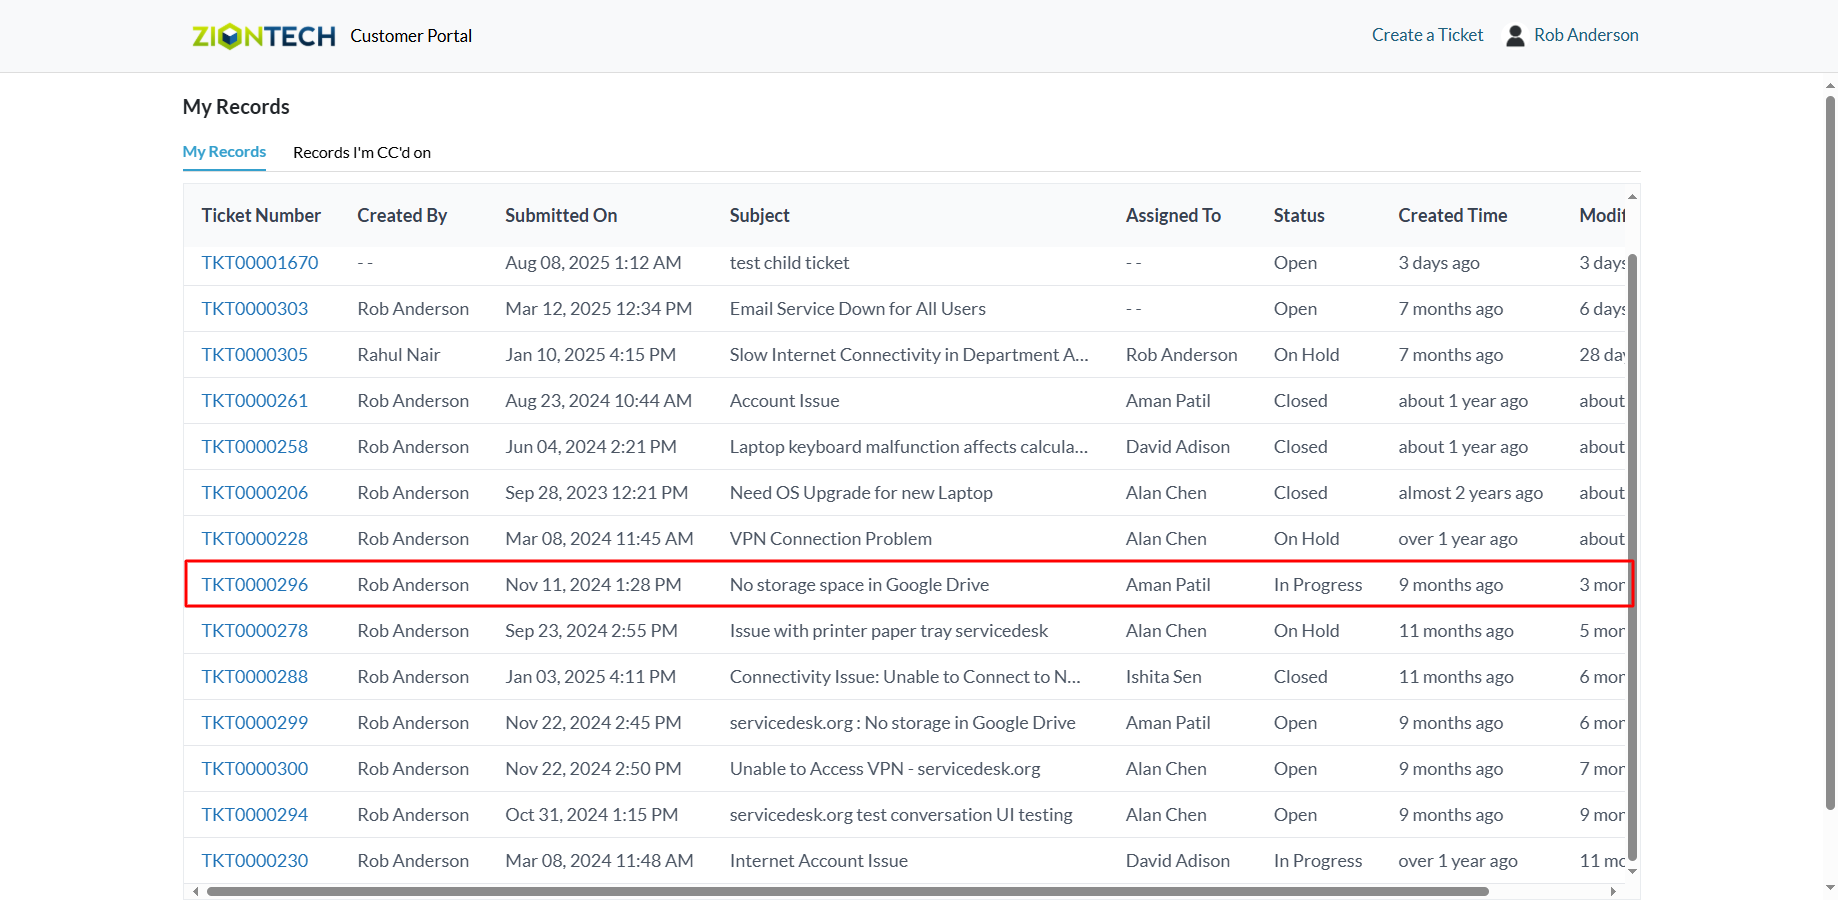
- The details of the selected ticket or incident will appear in the panel on the right, including its current status. If you wish to communicate with the support team, use the message box in the detail view to send a reply directly to the agent.
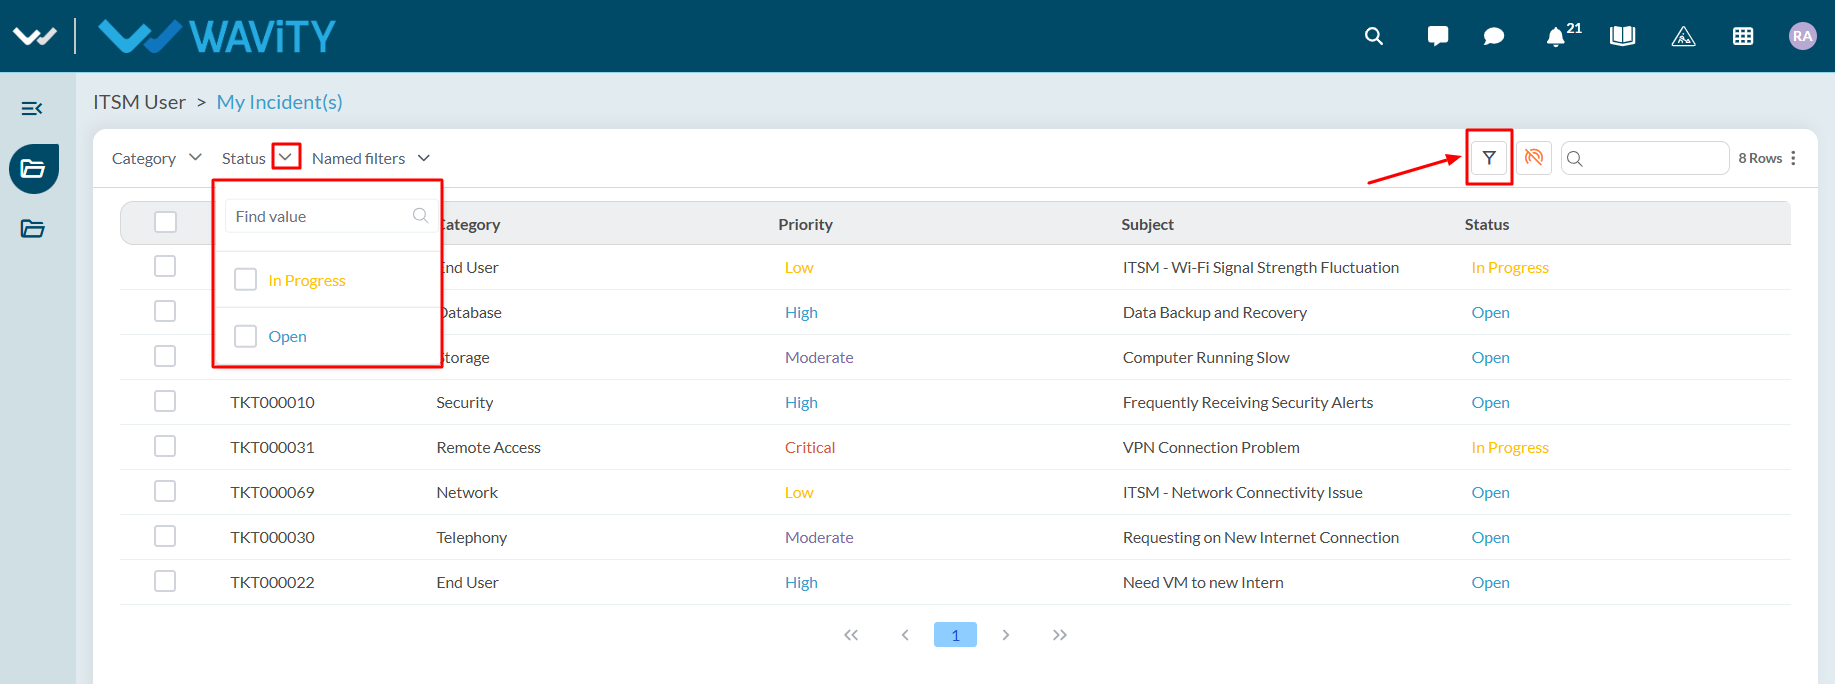
End User Guide: Accessing Incidents
- Accessing and viewing incidents in Wavity ITSM is a straightforward and user-friendly process designed for ease of use.
- Note: The steps provided below are sample instructions and can be customized to suit specific organizational requirements; however, the core workflow remains consistent.
- Log in to the Wavity platform using your credentials. After logging in, you will be taken to the End User Interface.
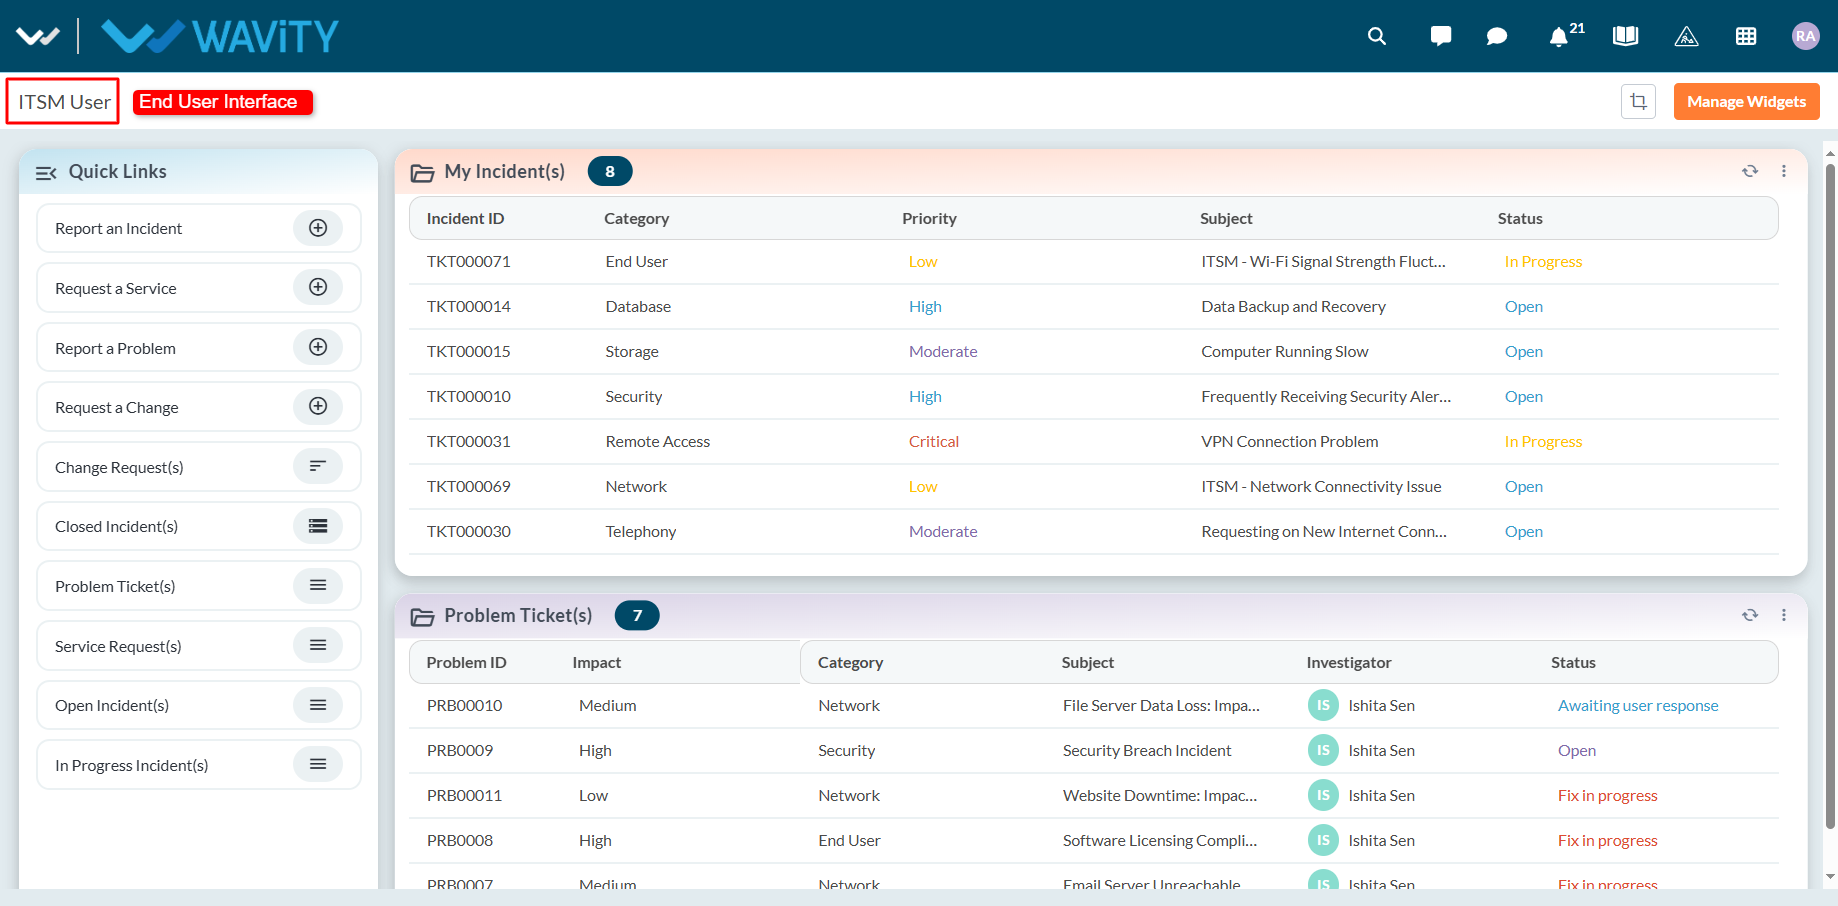
- Click on ‘My Incidents’ to see a list of all incidents you have created that are still open.
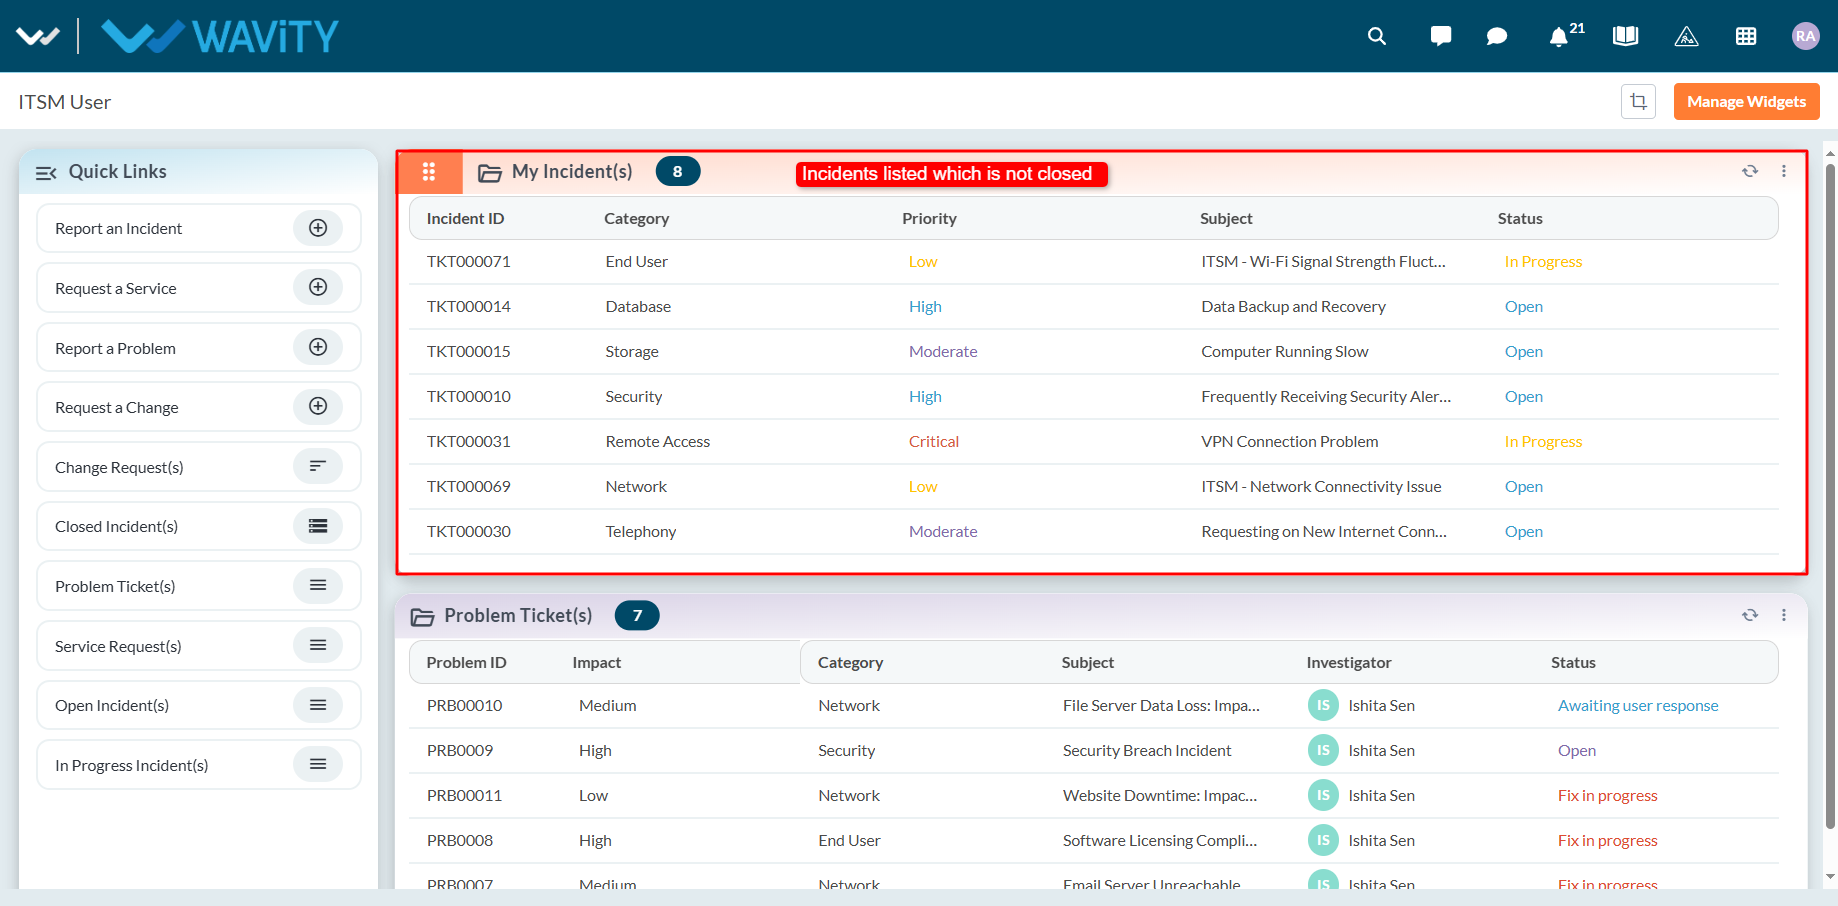
- Select any incident from the list to view its full details.
- You can also search for a specific incident using the search bar located at the top.
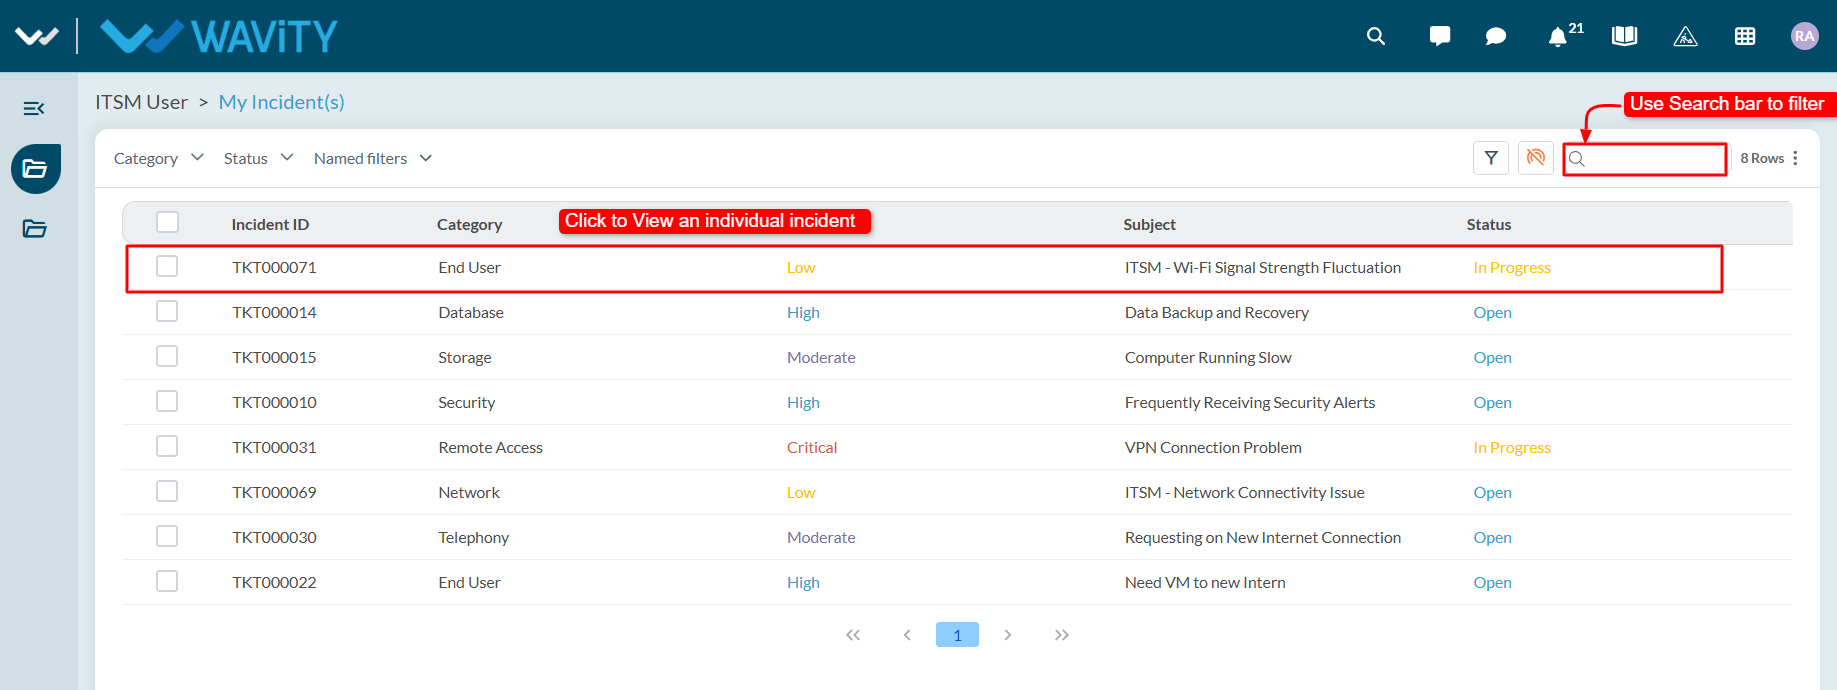
- Use the filters on the left side of the screen to narrow down the incident list. For more advanced filtering, apply multi-condition filters using AND/OR logic to refine your search results.
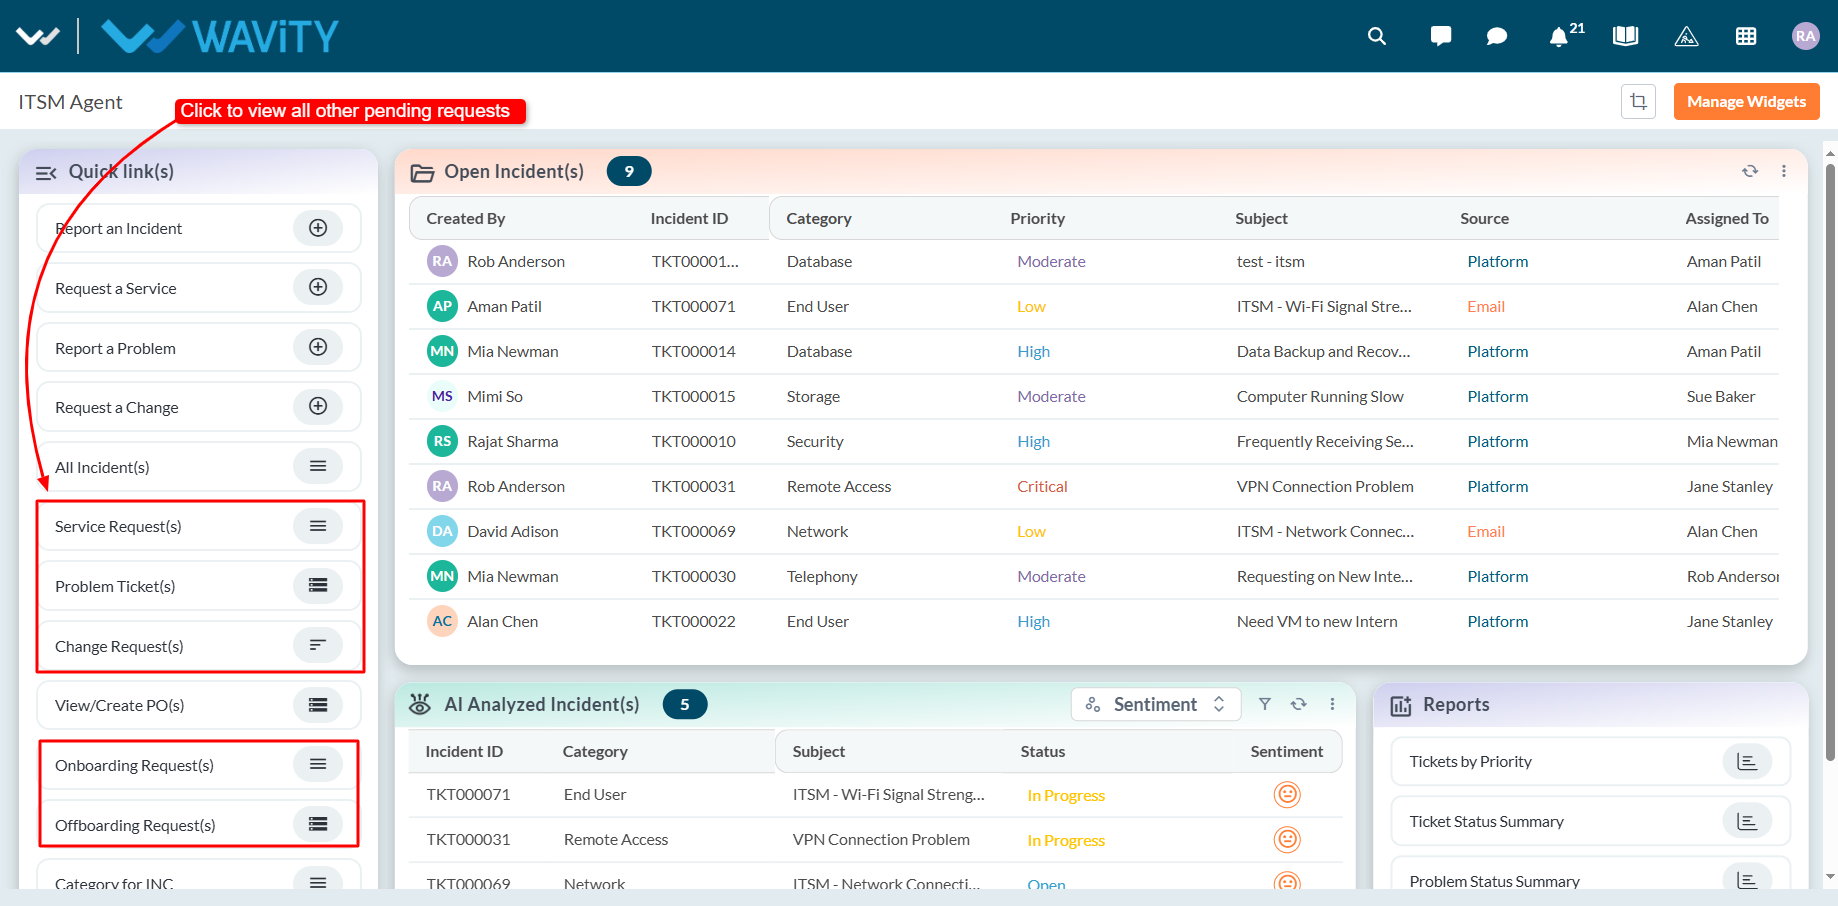
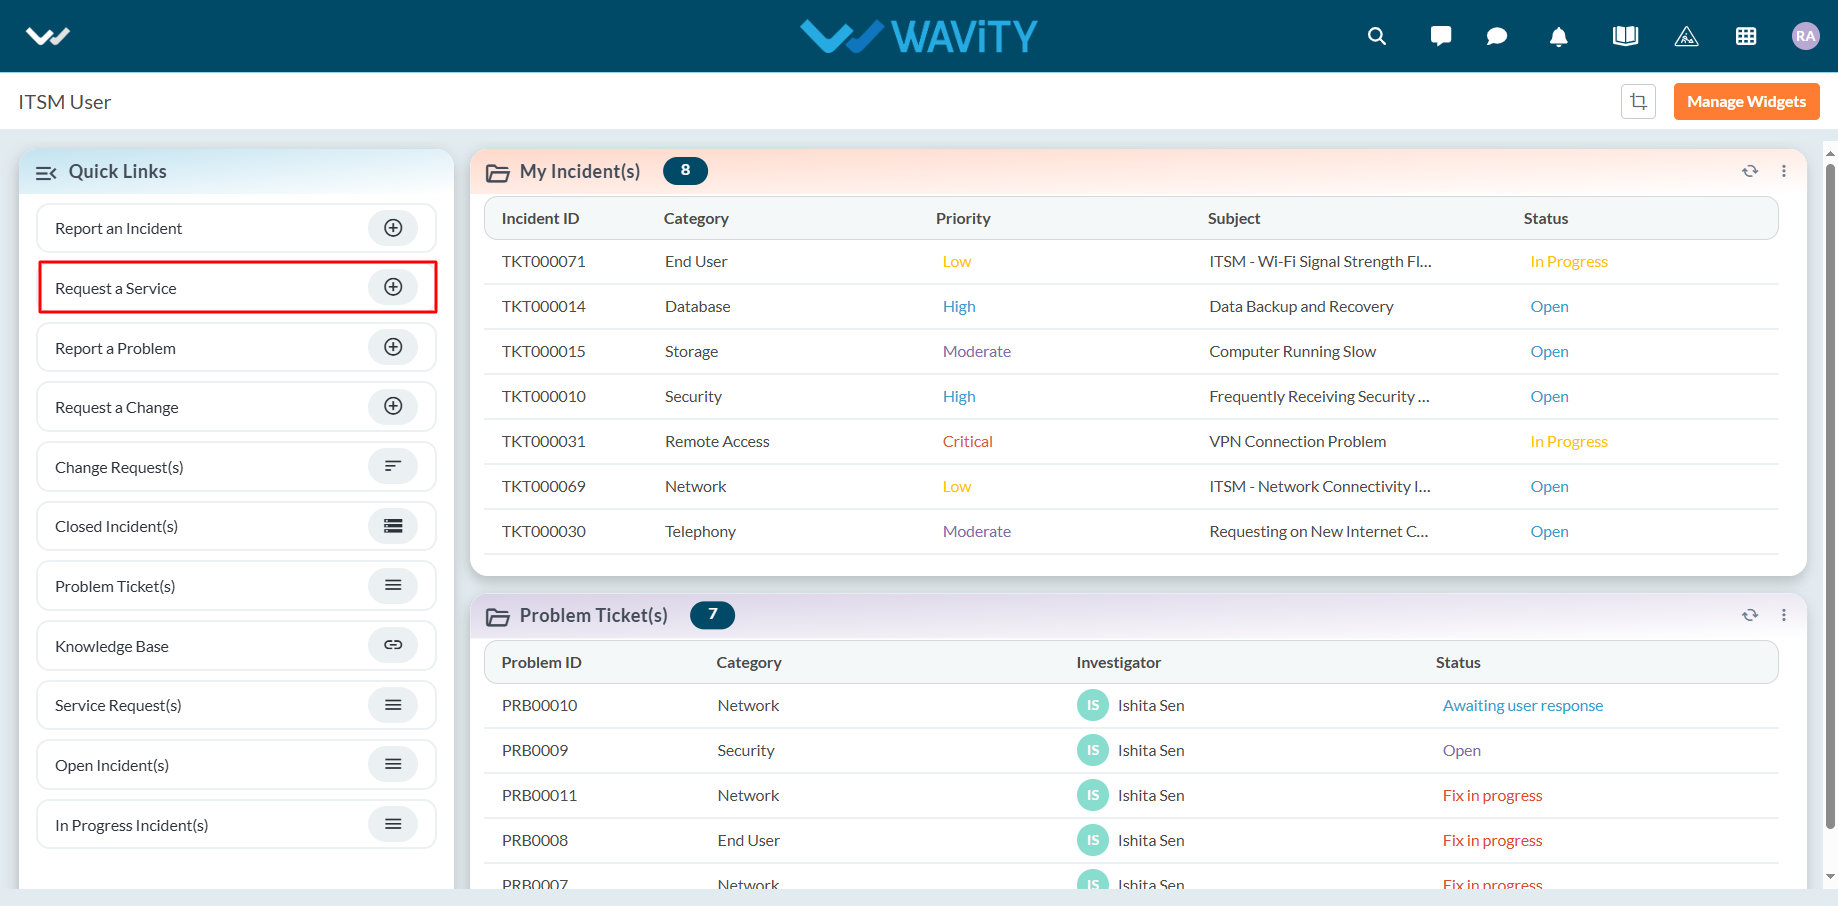
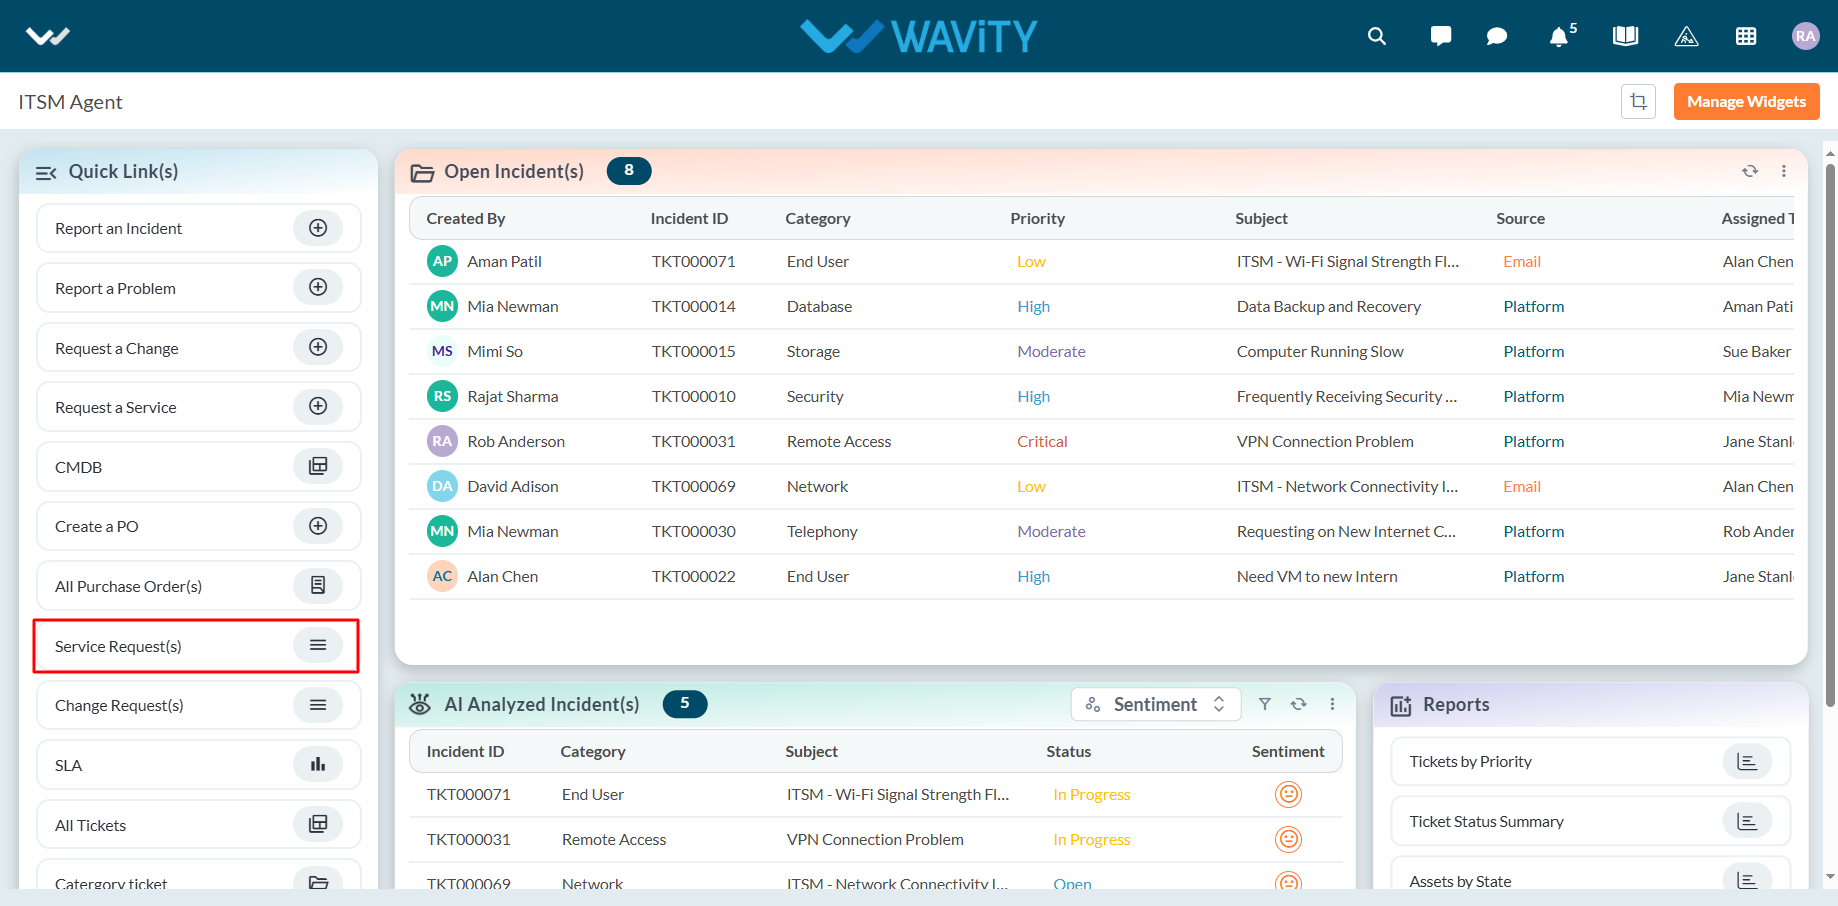
Agent Guide: Accessing Pending Requests
- Accessing and viewing pending requests in Wavity ITSM is a straightforward and user-friendly process designed for ease of use.
- Note: The steps provided below are sample instructions and can be customized to suit specific organizational requirements; however, the core workflow remains consistent.
- Log in to the Wavity platform using your credentials. After logging in, you will be taken to the Agent Interface.
- Click on ‘Open Incidents’ to see a list of all incidents assigned to you that are still open.
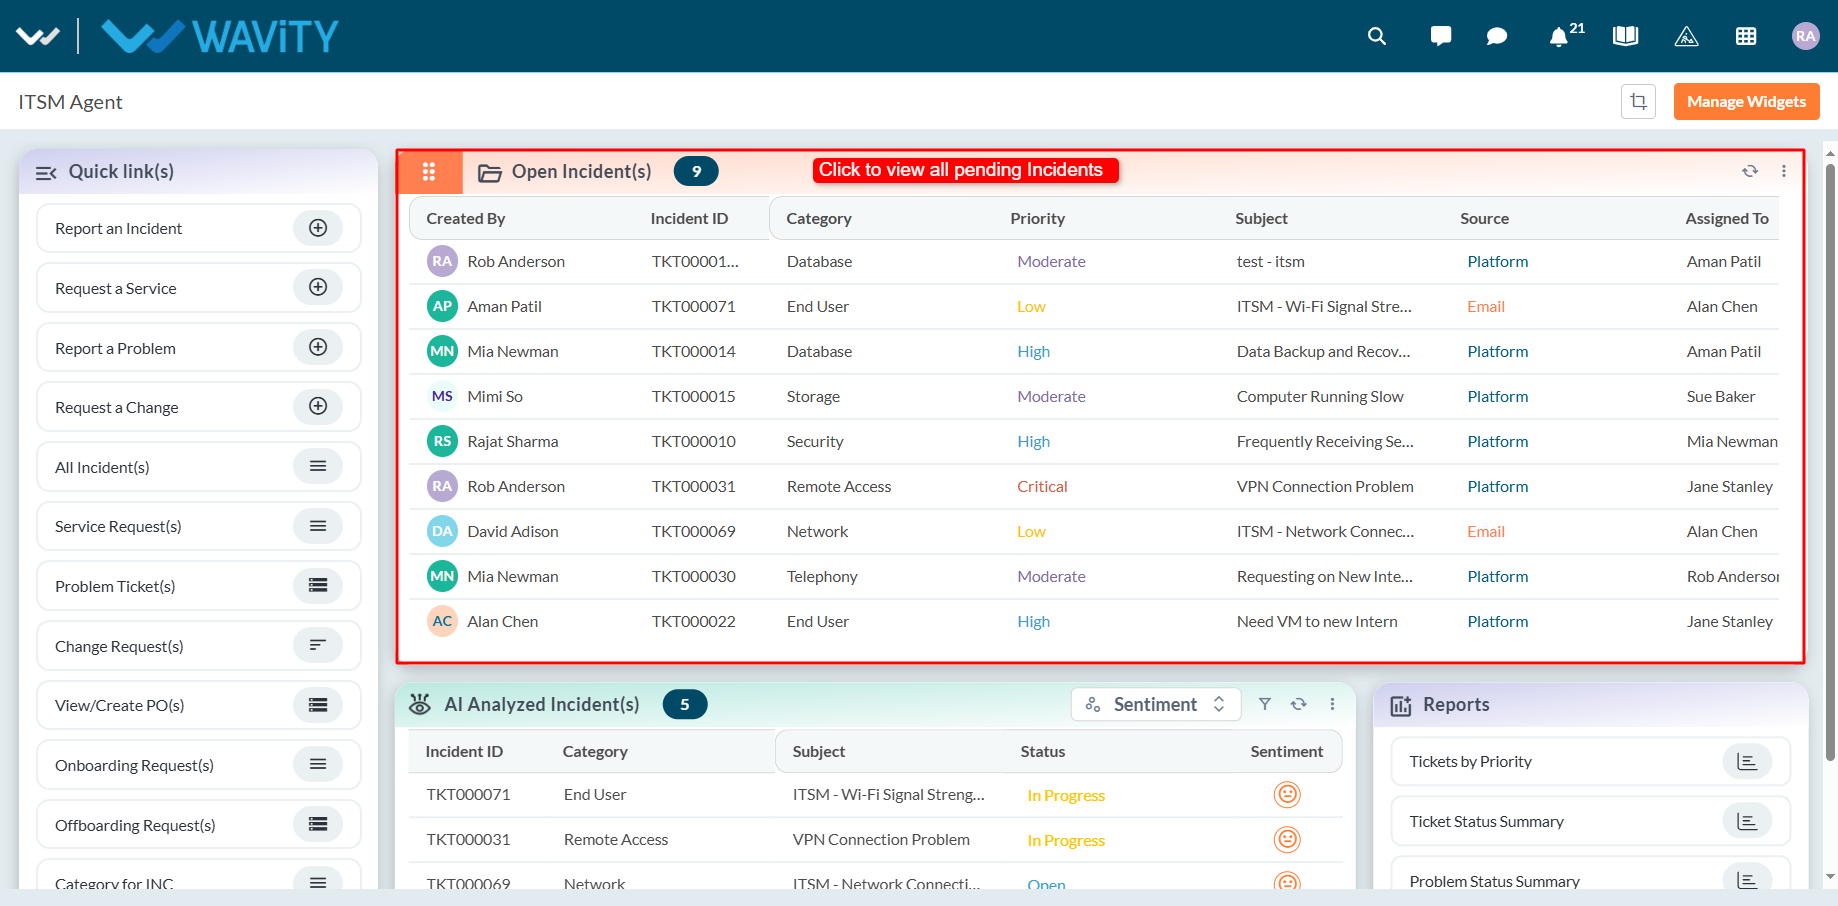
- Use the Quick Links section to access other pending requests, including: Service Requests, Problem Tickets, Change Requests, Onboarding Requests, Offboarding Requests.
Project Management Office: Viewing Rejected Projects
- In Wavity Project Portfolio Management, PMO (Project Management Office) Managers can view their rejected projects through the PMO Interface.
- Users with PMO Manager access can log in using their credentials to access this interface.
- Note: The steps provided below are sample instructions and can be customized as per specific requirements; however, the core workflow remains the same.
- From the Quick Links section, click on Rejected Projects.

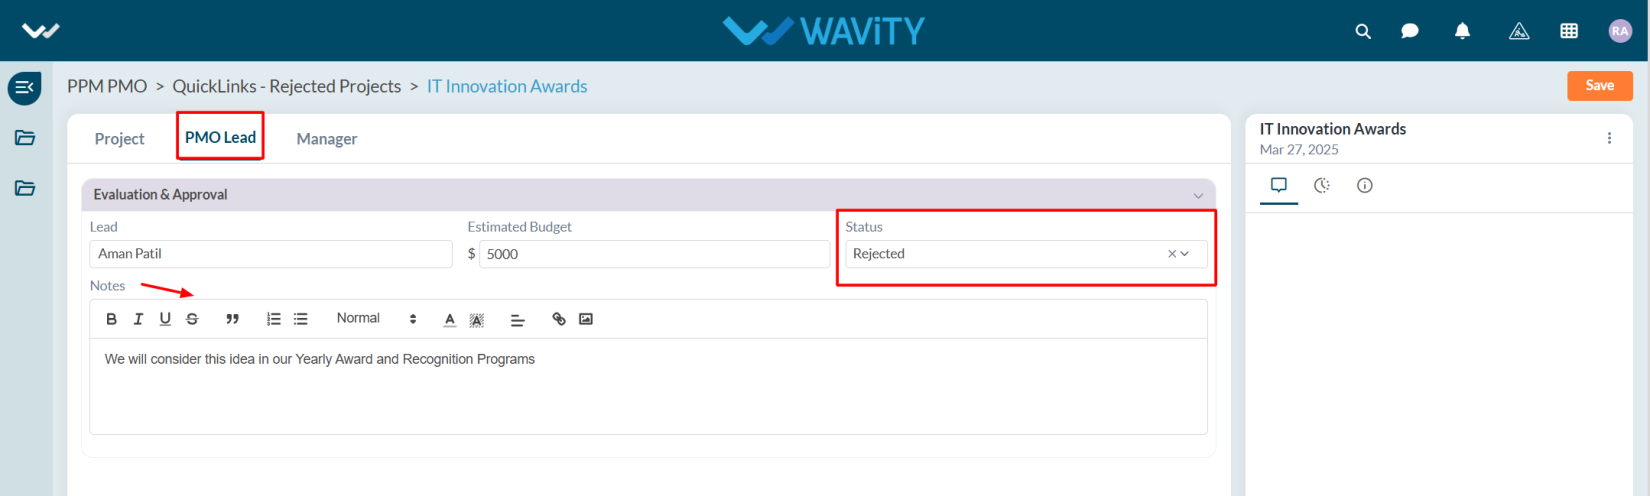
- A list of all rejected projects will be displayed. Click on the eye icon next to a project to view its details.
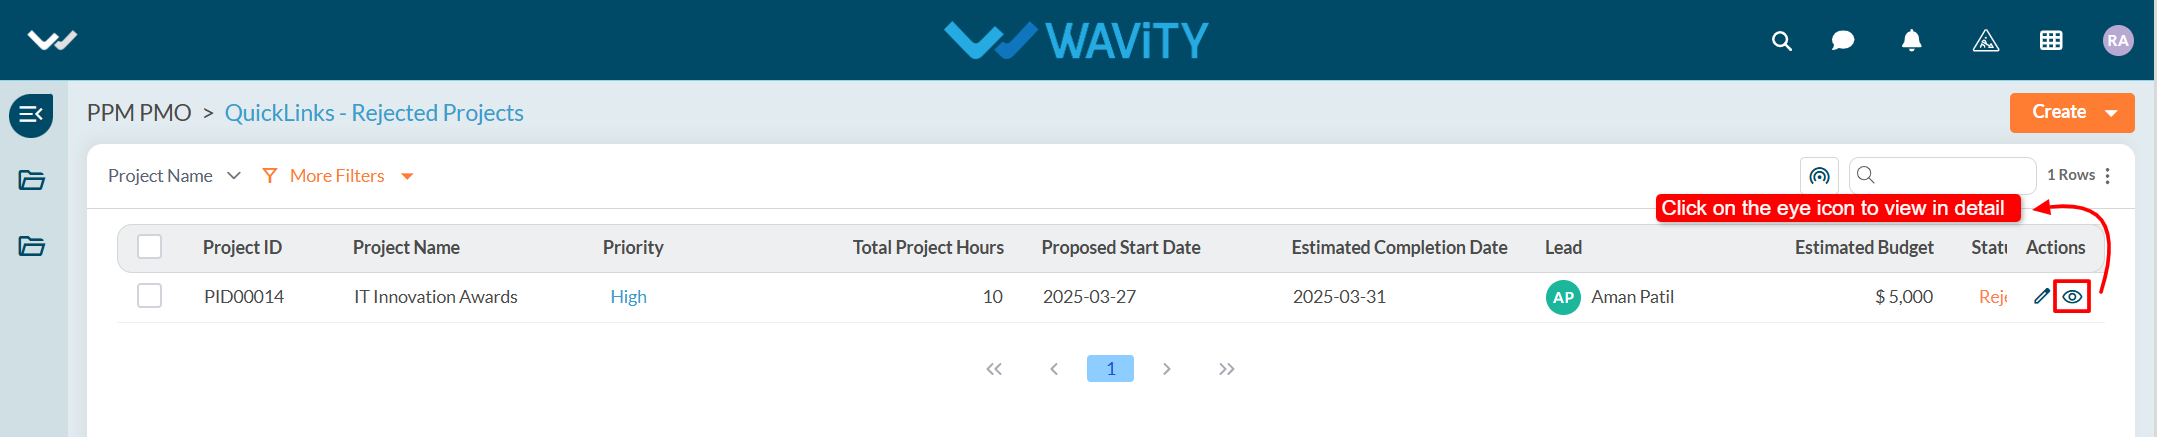
- Users can view the complete details of the rejected project for further review or action.
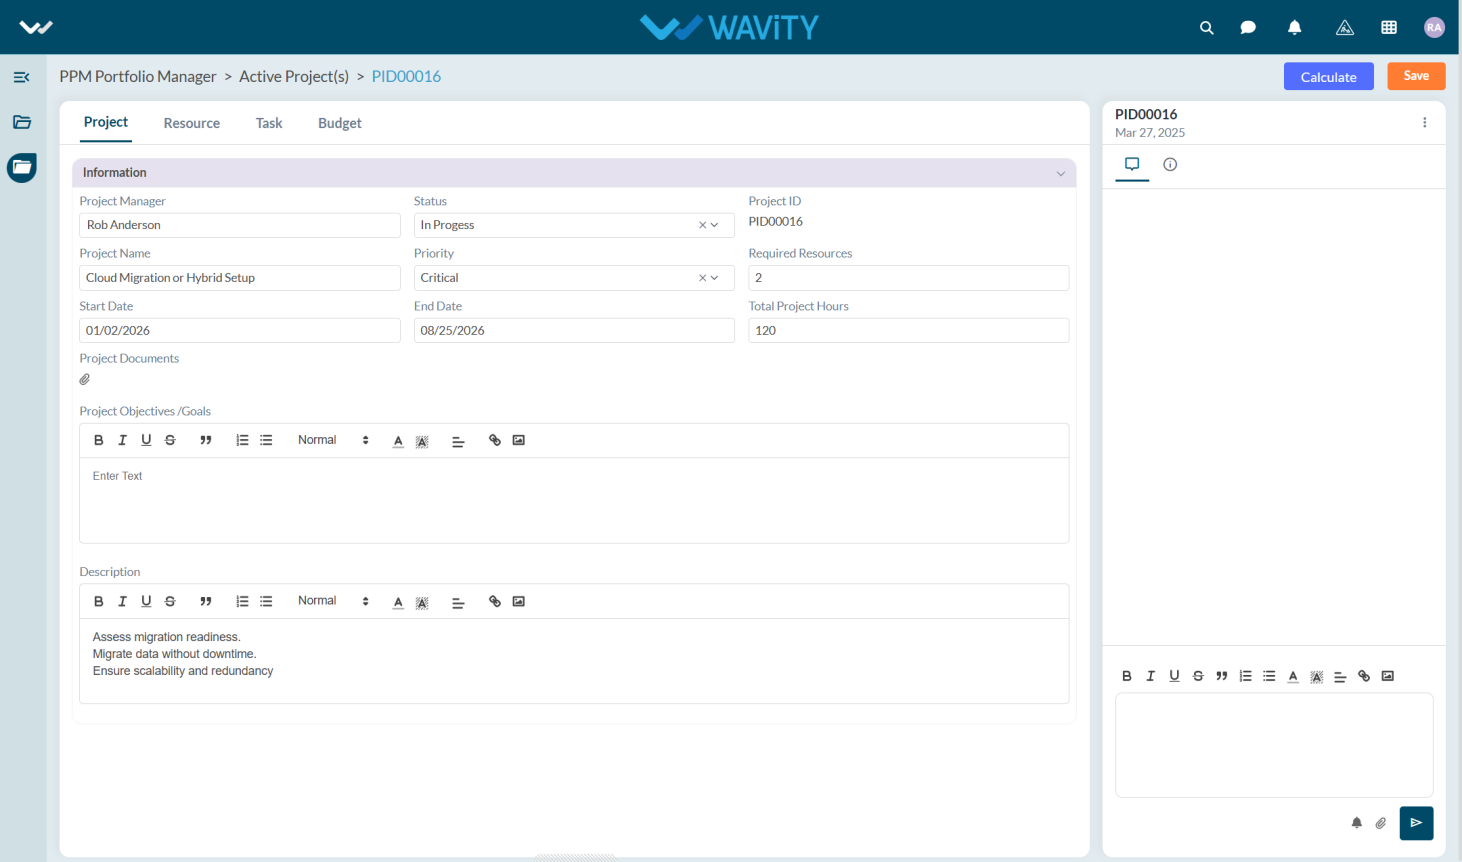
Portfolio Manager Guide: Viewing Active Projects
- In Wavity Project Portfolio Management, users can view all active projects that have been approved by the Portfolio Manager.
- Users with Portfolio Manager access can log in using their credentials to access the Portfolio Manager Interface.
- Note: The following steps are sample instructions and can be customized based on specific requirements, but the core workflow remains the same.
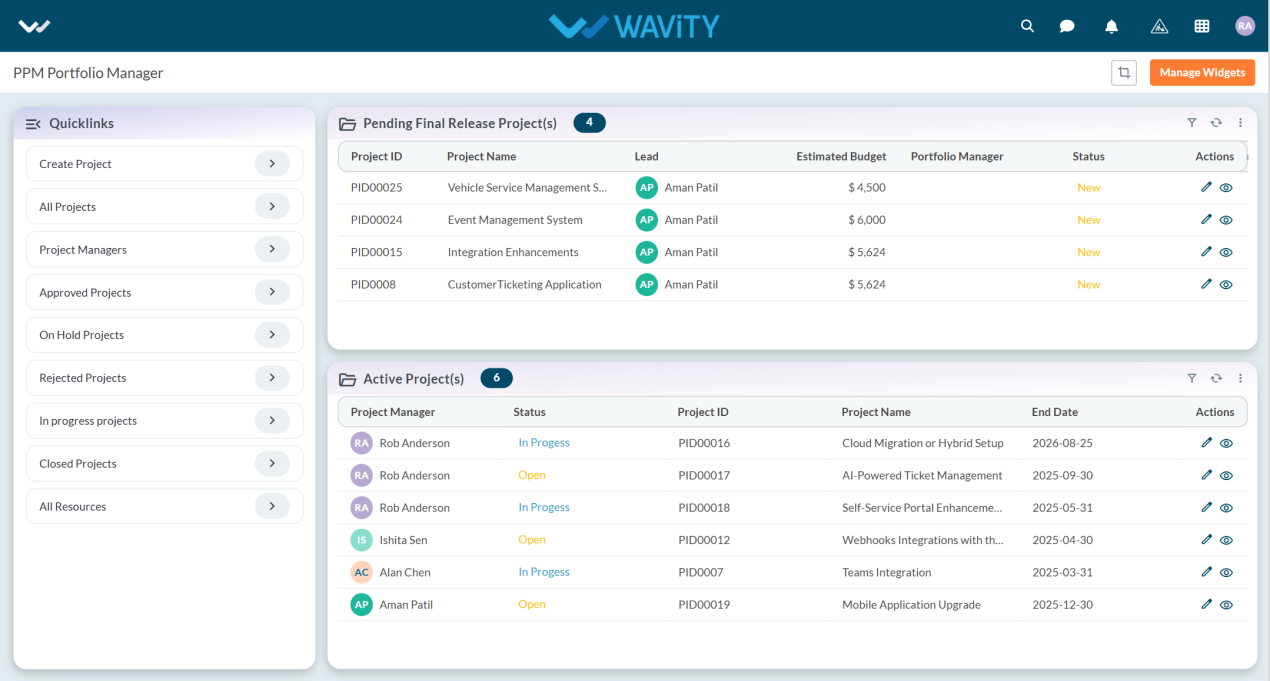
- Within the interface, users can see all Active Project(s) table widget created by the PMO and approved by the Portfolio Manager.
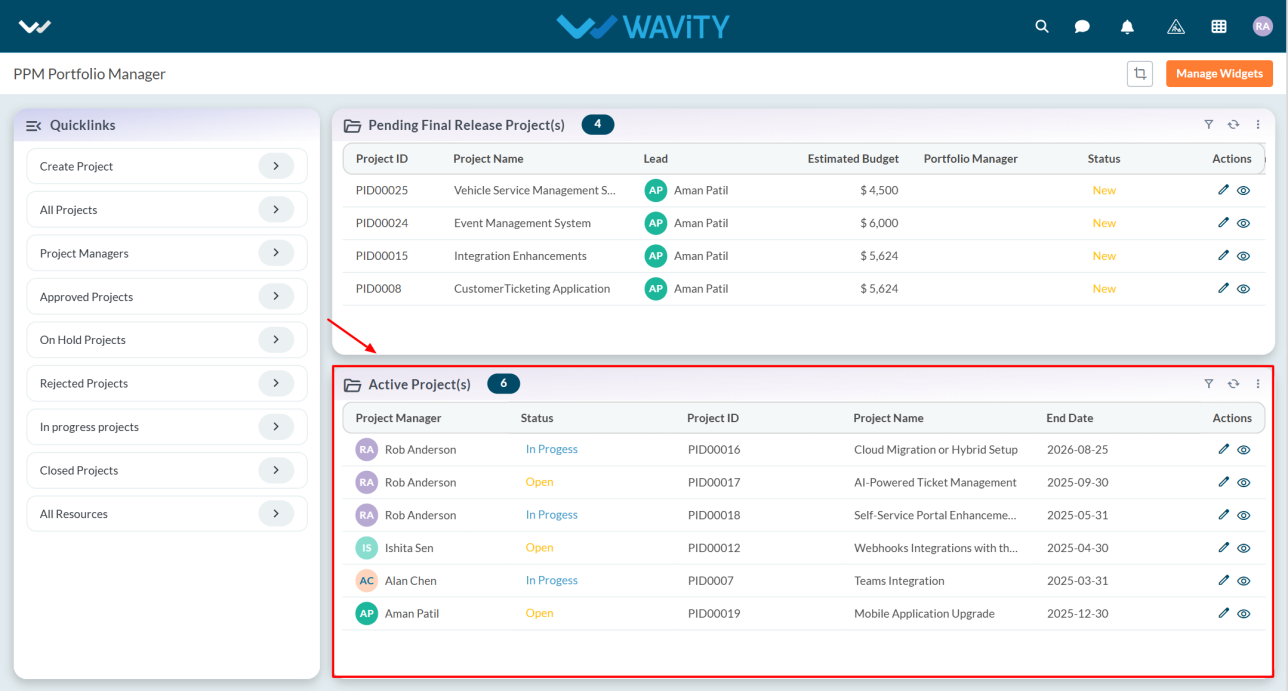
- Click on the eye icon to view project details.
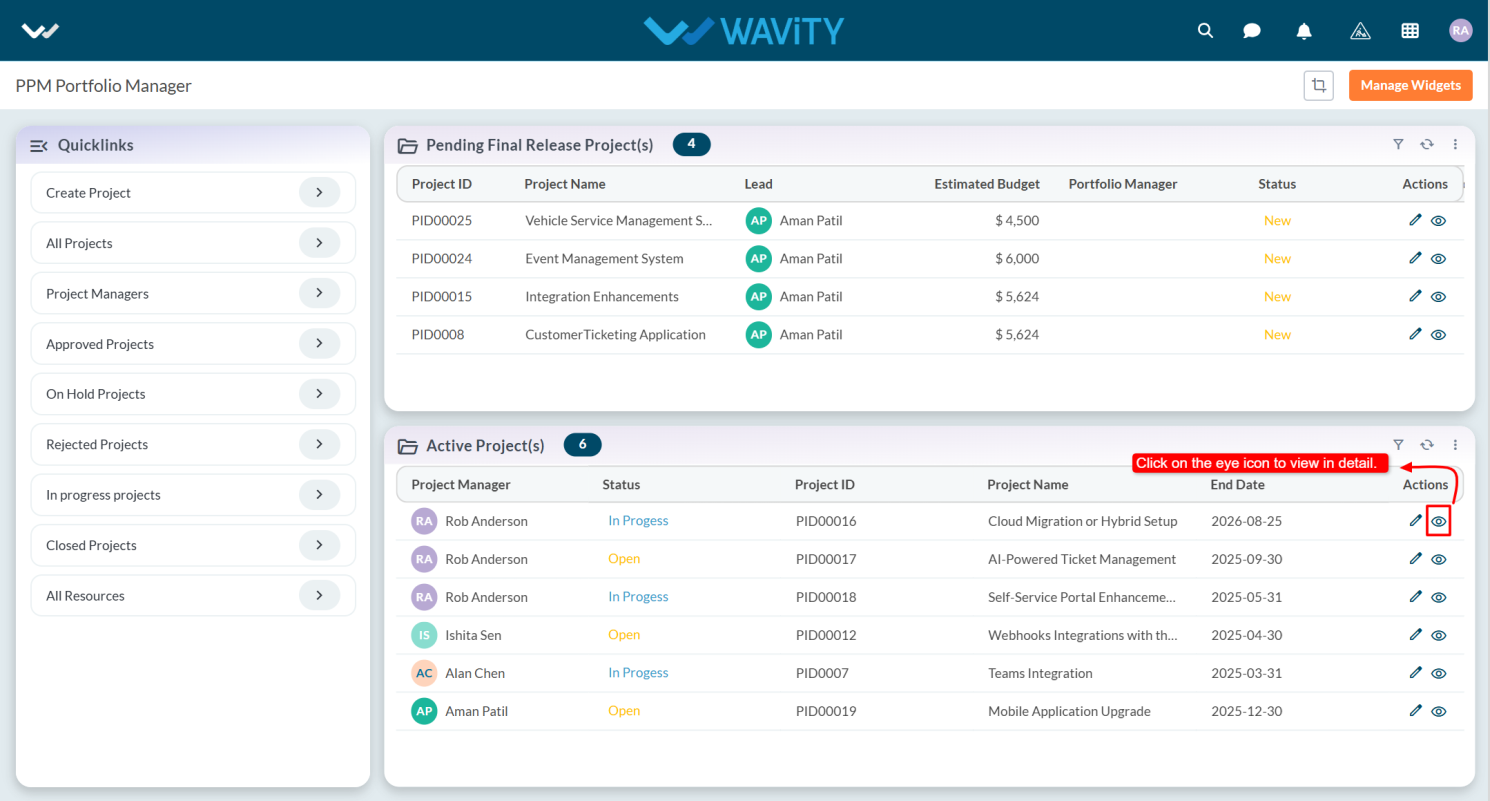
- User can view the project in detail.
Portfolio Manager Guide: Viewing All Projects
- In Wavity Project Portfolio Management, users can view all projects, whether they are in a pending, active, or completed state.
- Users with Portfolio Manager access can log in using their credentials to access the Portfolio Manager Interface.
- Note: The steps provided below are sample instructions and can be customized as needed; however, the core workflow remains consistent.

- In the Quick Links section, click on All Projects to view the complete list of projects.
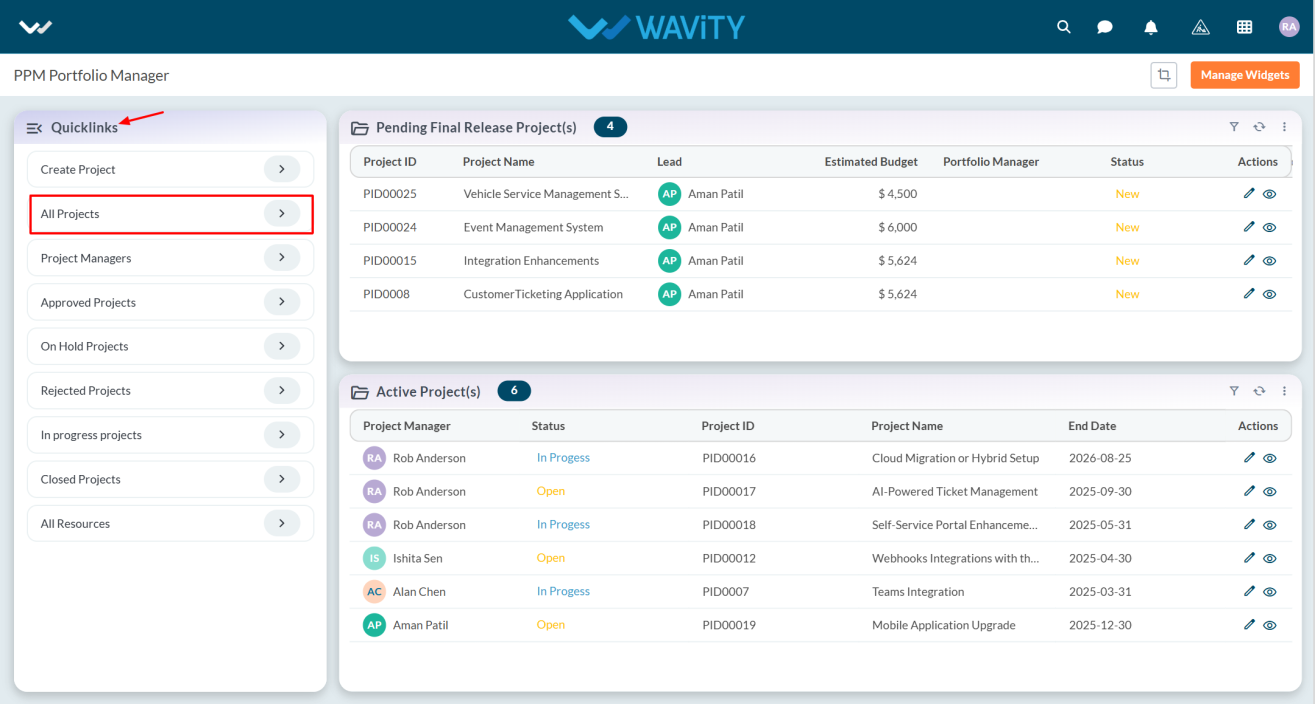
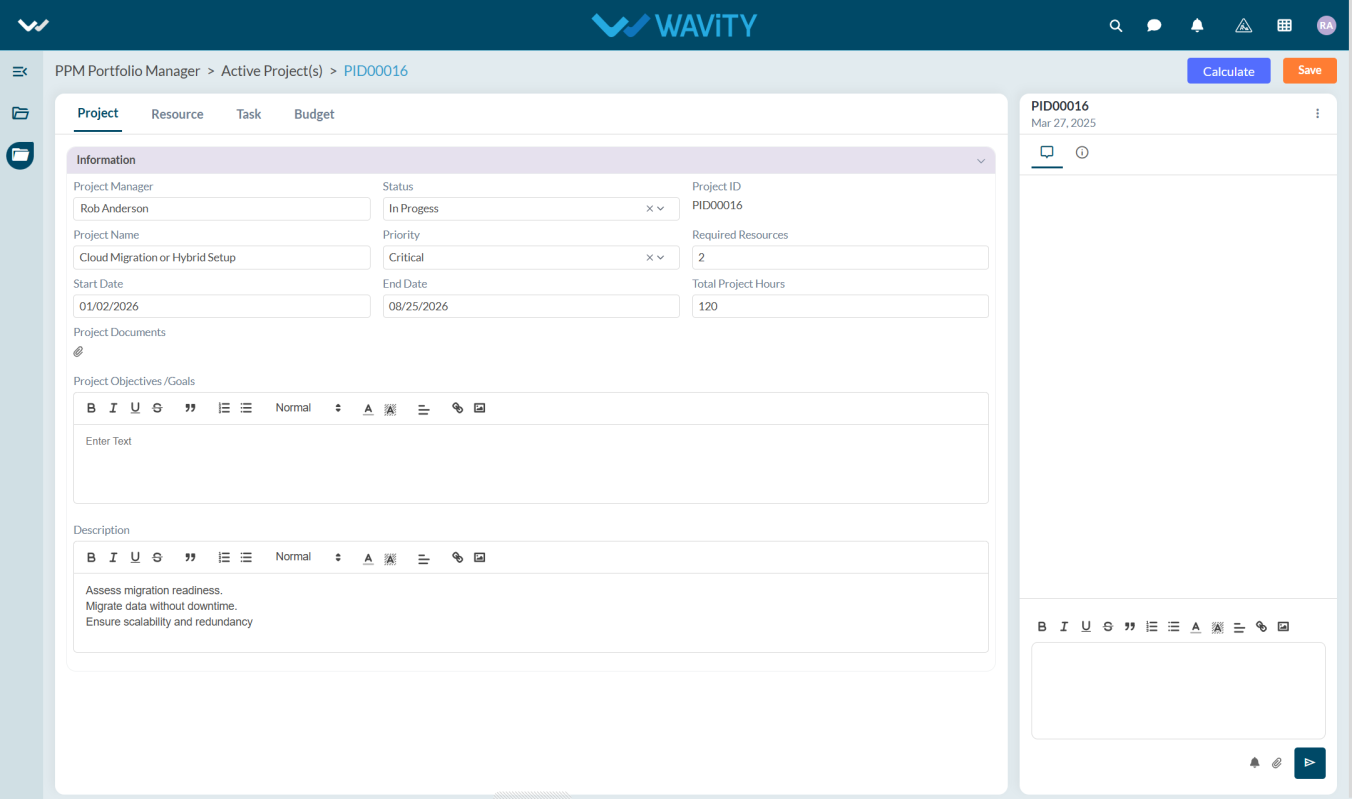
- All projects will be displayed. Click on the eye icon next to any project to view detailed information.
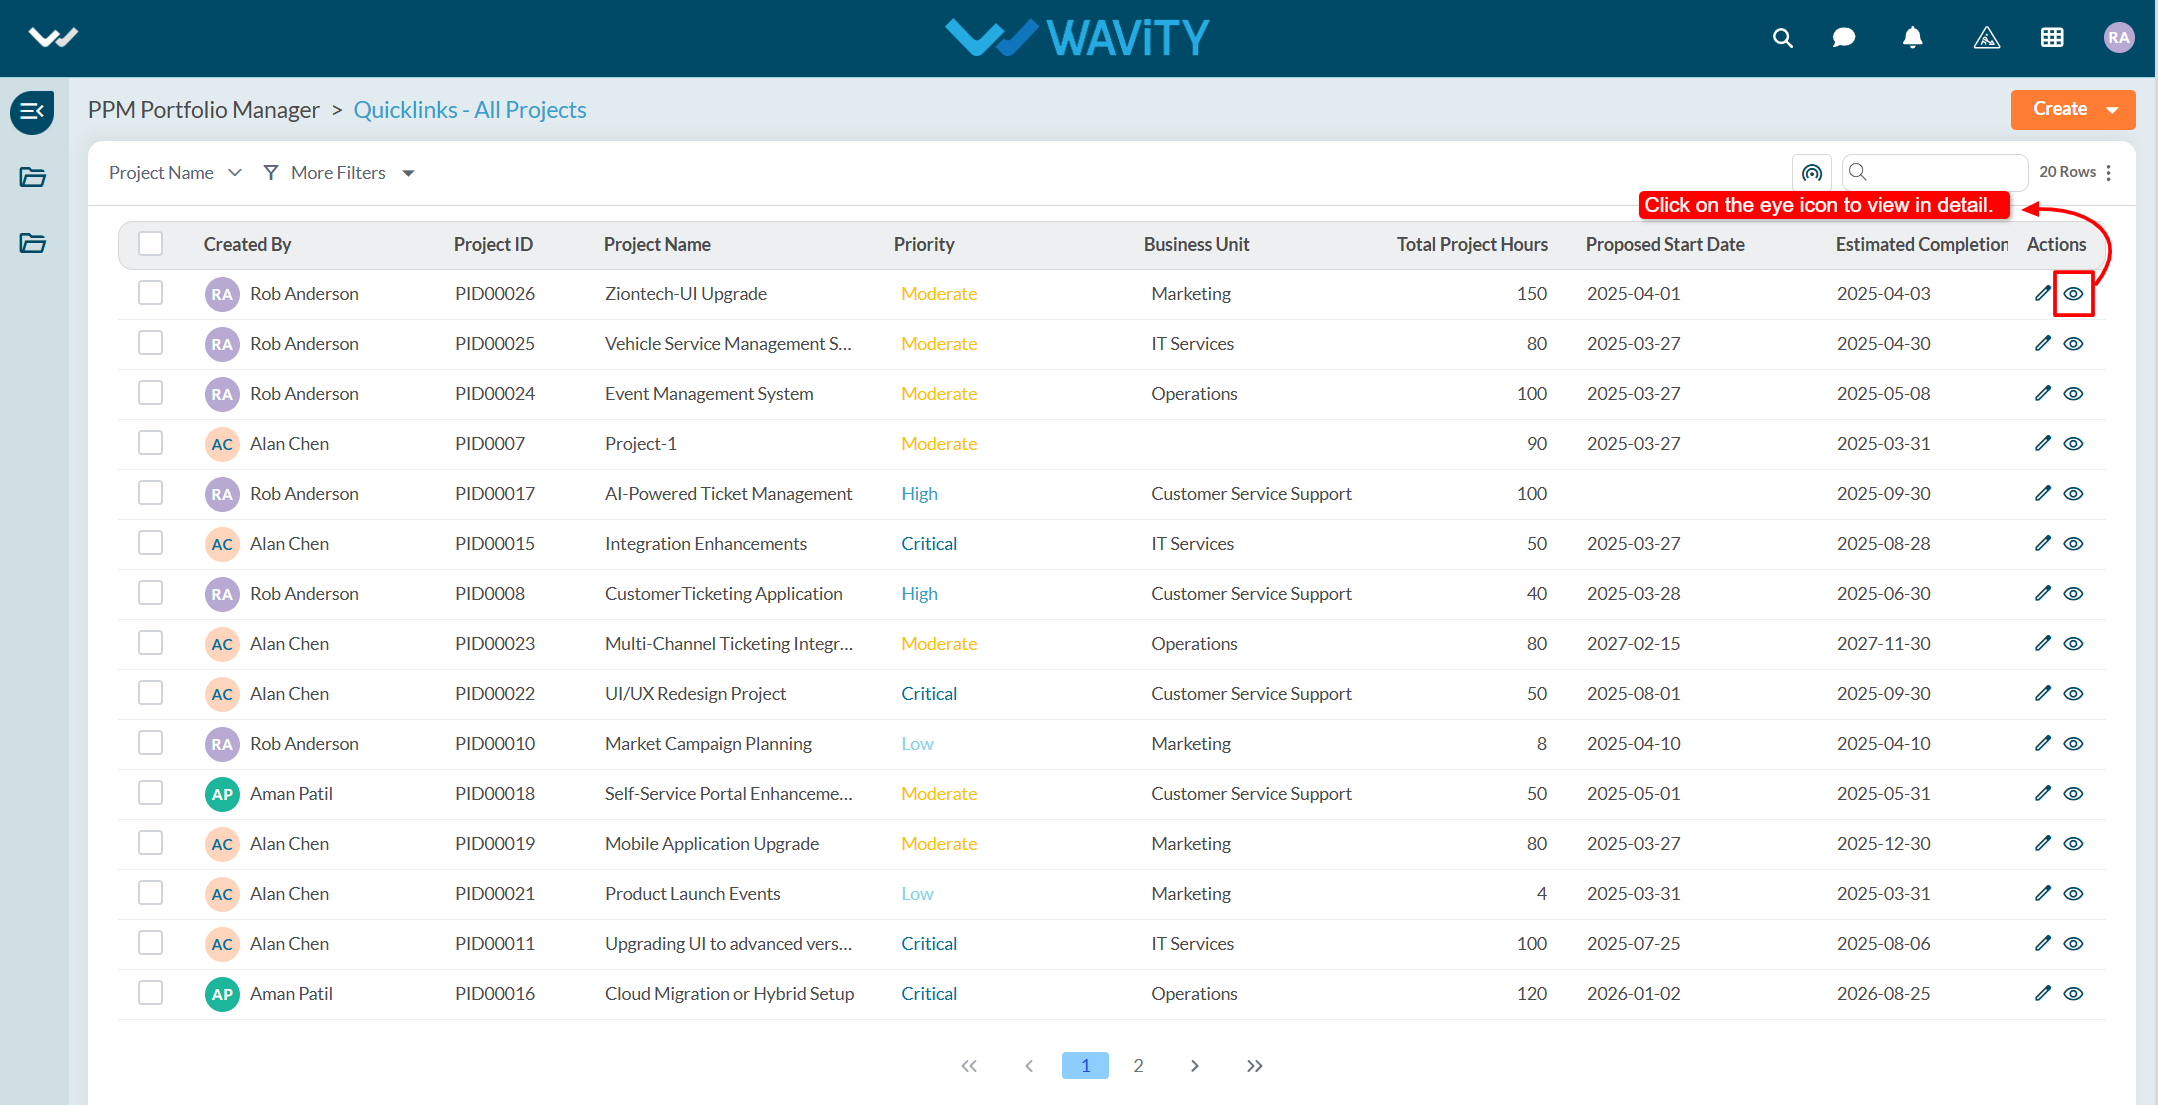
- The project details will be displayed.
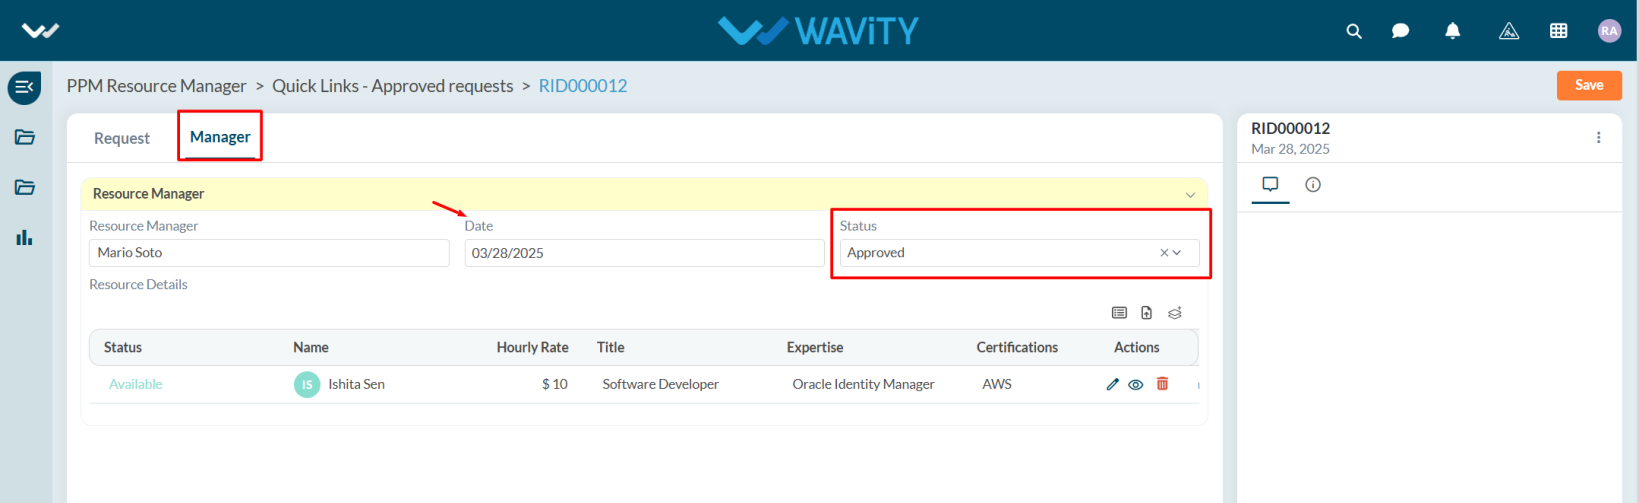
Resource Manager: Viewing the Approved Resource Requests
- In Wavity Project Portfolio Management, Resource Managers can view their approved resource requests through the Resource Manager Interface.
- Users with Resource Manager access can log in using their credentials to access this interface.
- Note: The following steps are sample instructions and can be customized based on specific requirements; however, the core workflow remains the same.
- From the Quick Links, click on Approved Requests to view the list of approved resource requests.
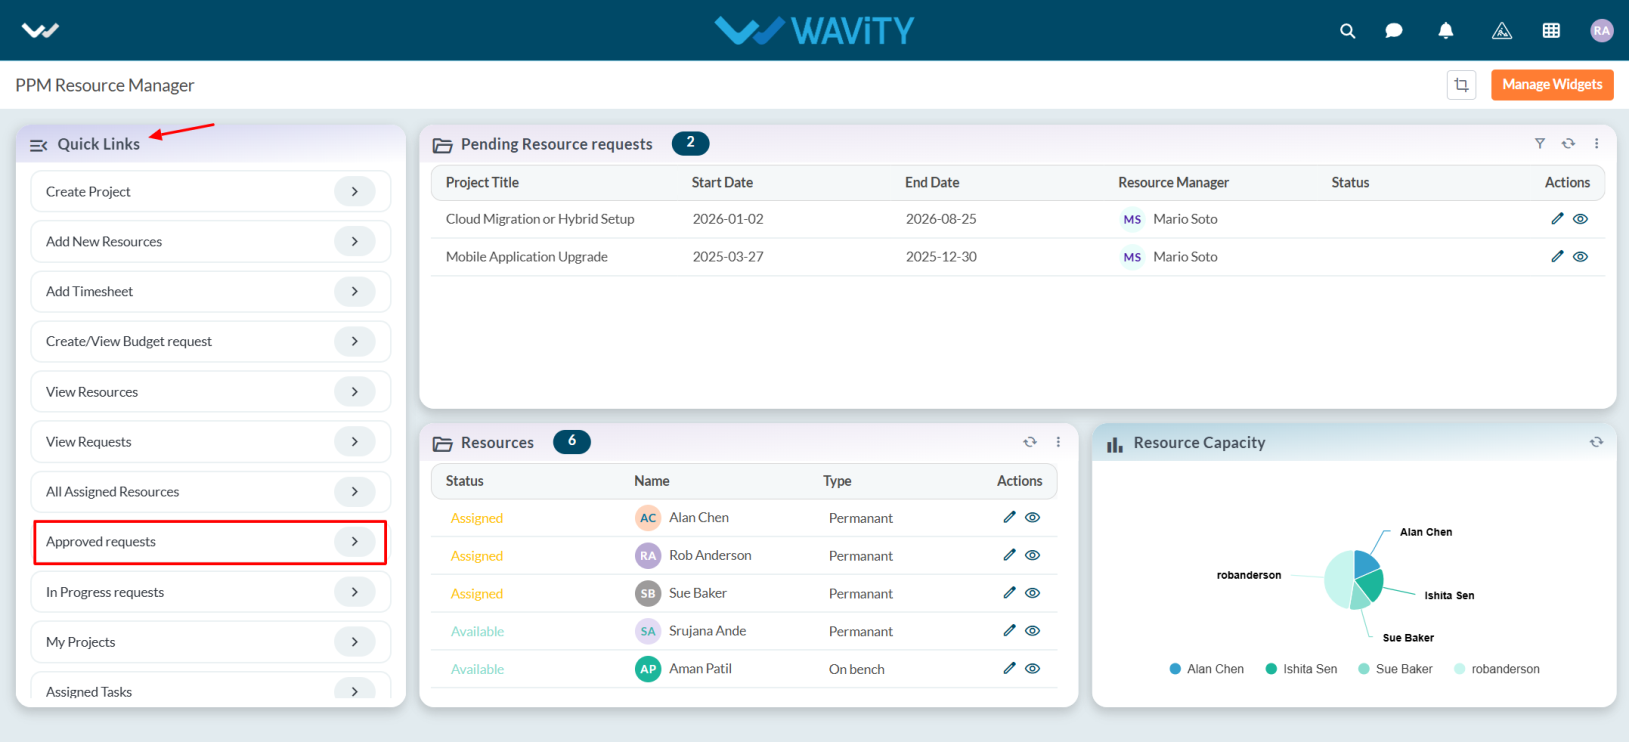
- The list of approved requests will be displayed. Click on the eye icon next to a request to view its details.
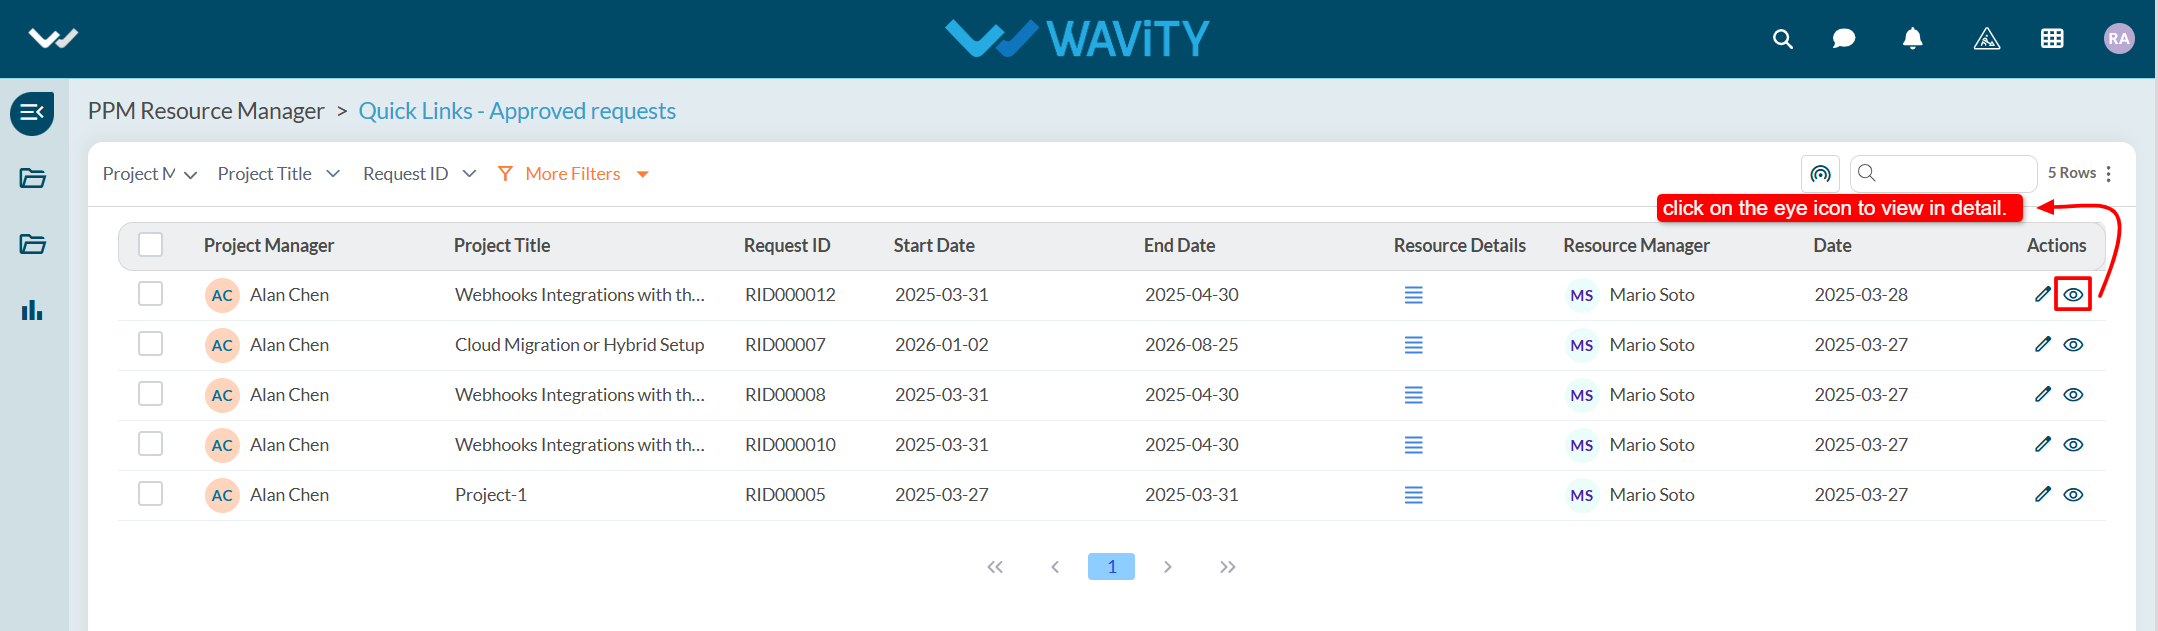
- Users can view all relevant approval details within the selected request.
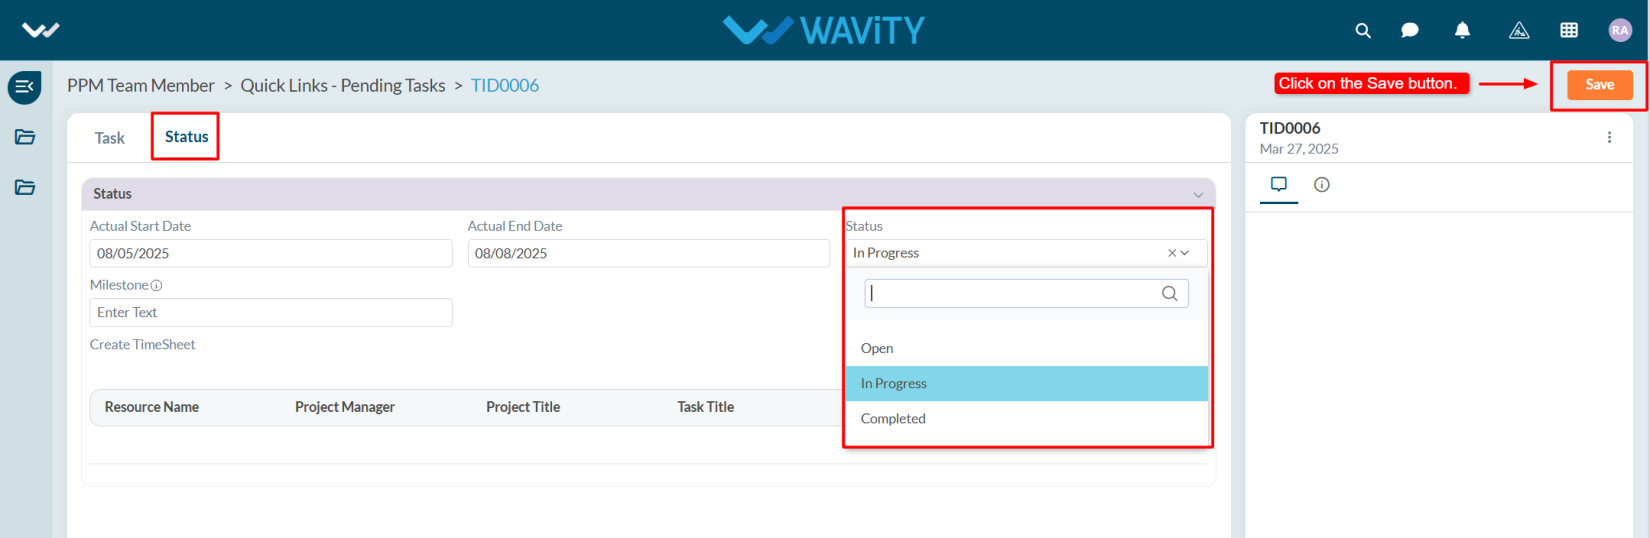
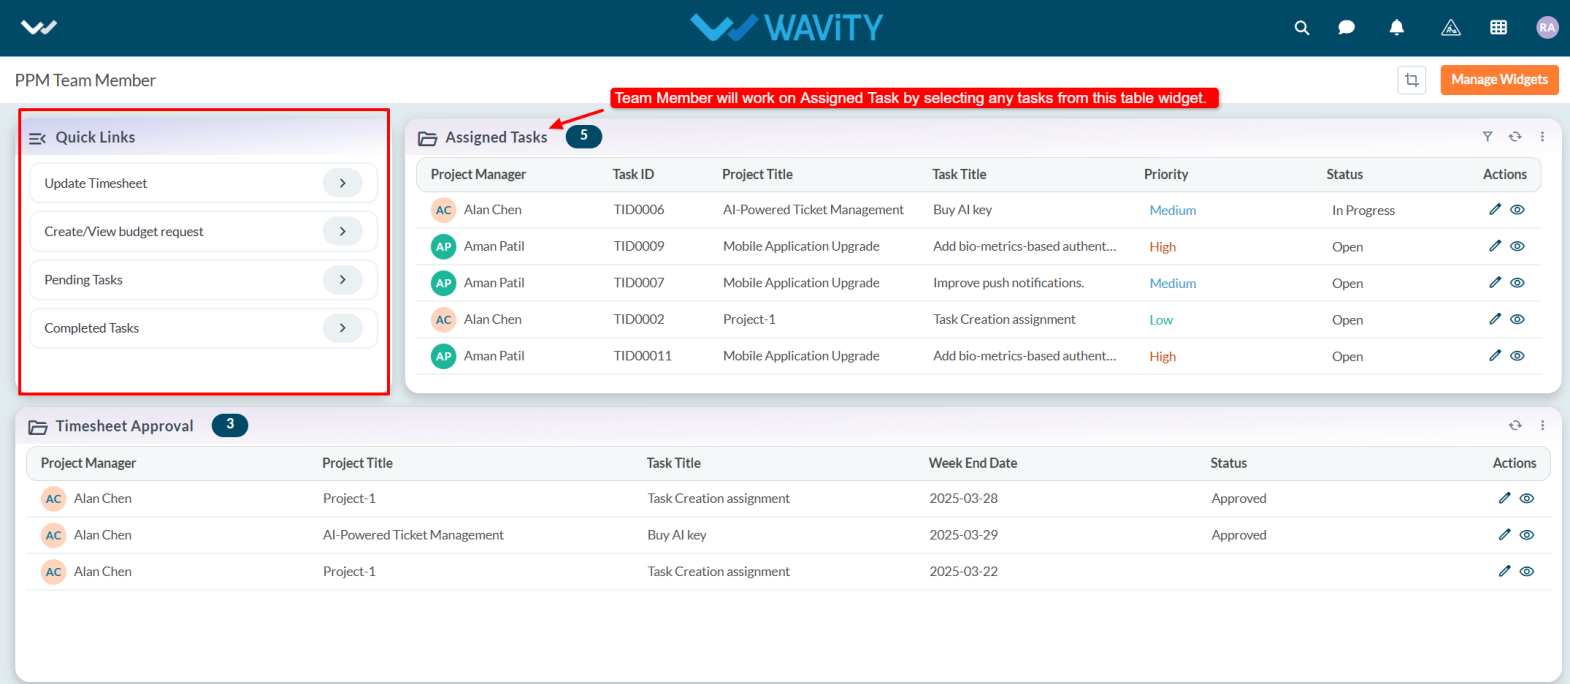
Team Member Guide: Viewing and Updating Pending Tasks
- In Wavity Project Portfolio Management, Team Members can view their pending tasks through the Team Member Interface.
- Users with Team Member access can log in using their credentials to access this interface.
- Note: The steps below serve as sample instructions and can be customized as per specific requirements, though the core workflow remains the same.
- In the Quick Links section, click on Pending Tasks to view the list of all assigned tasks that are pending.
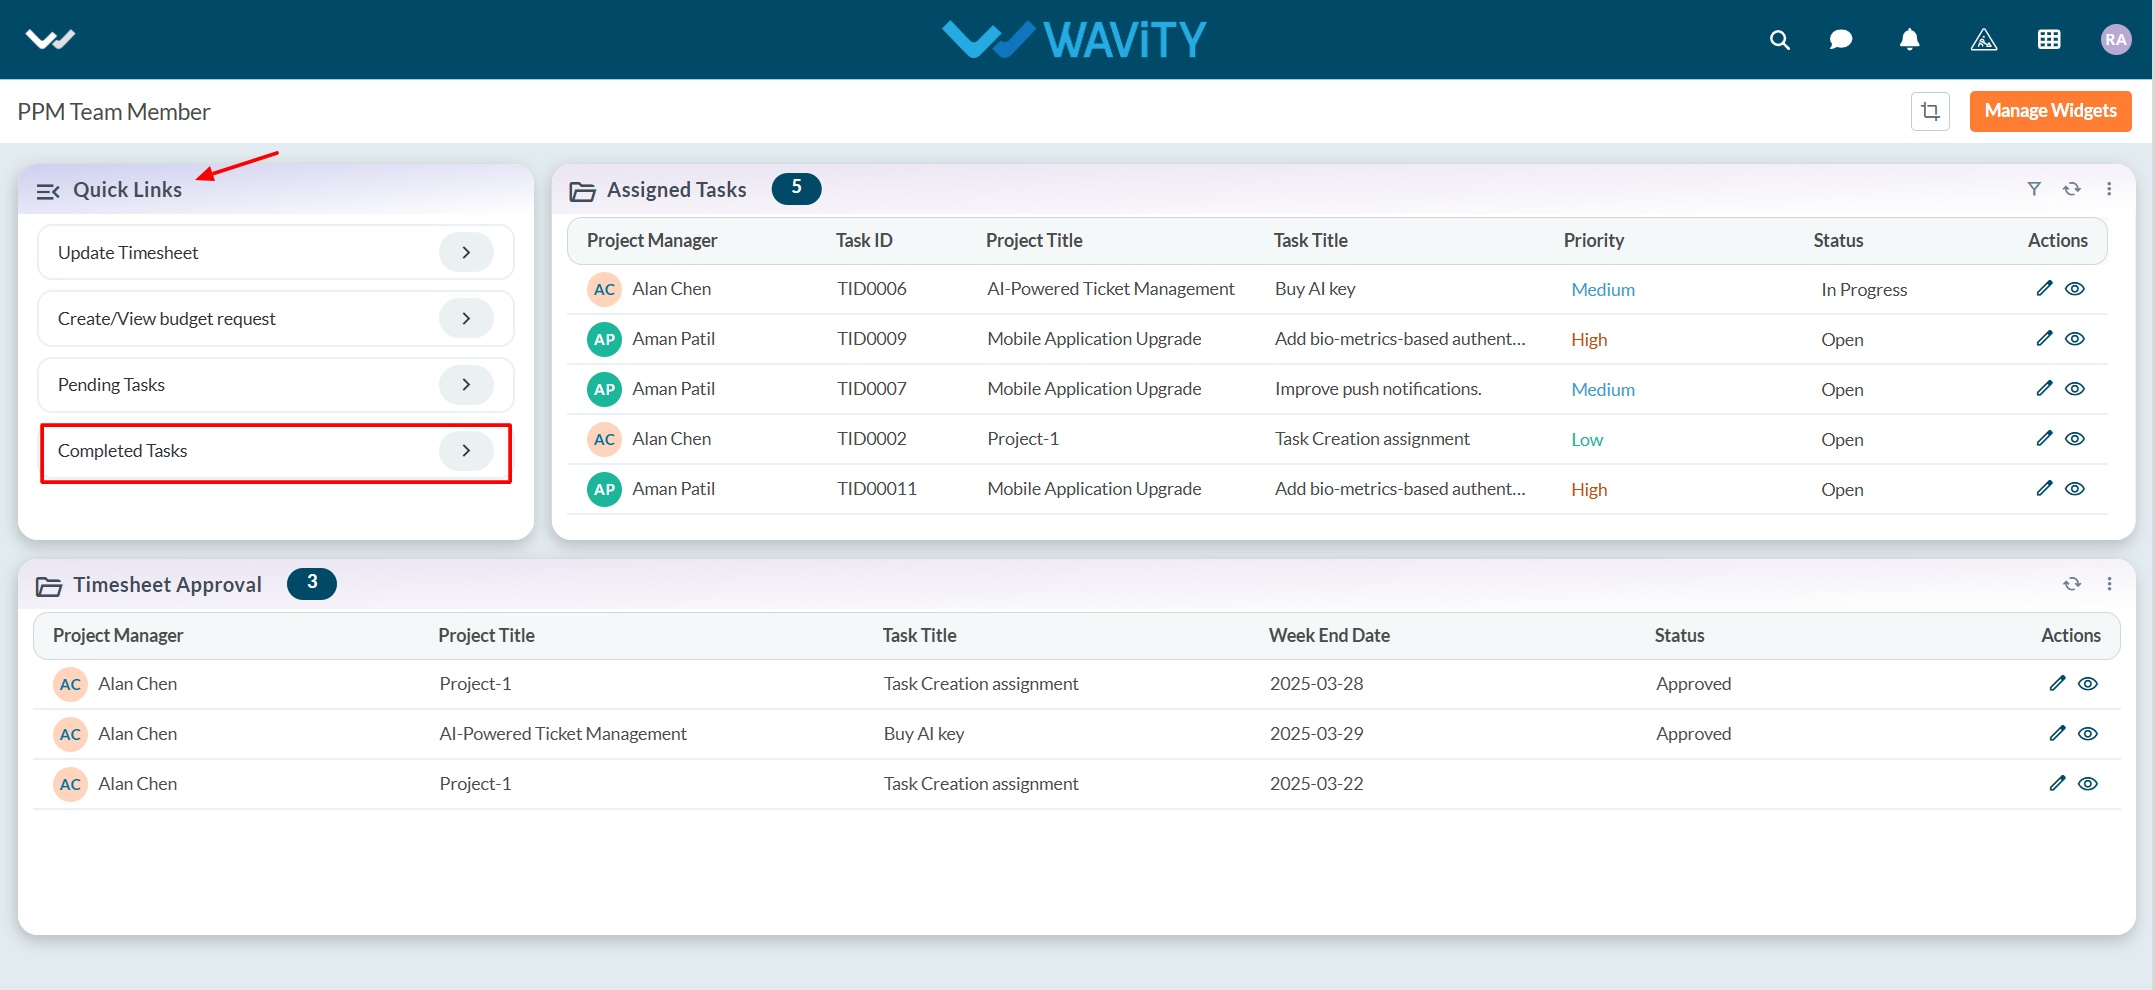
- All pending tasks will be displayed in a list format. Click on the eye icon next to a task to view its details.
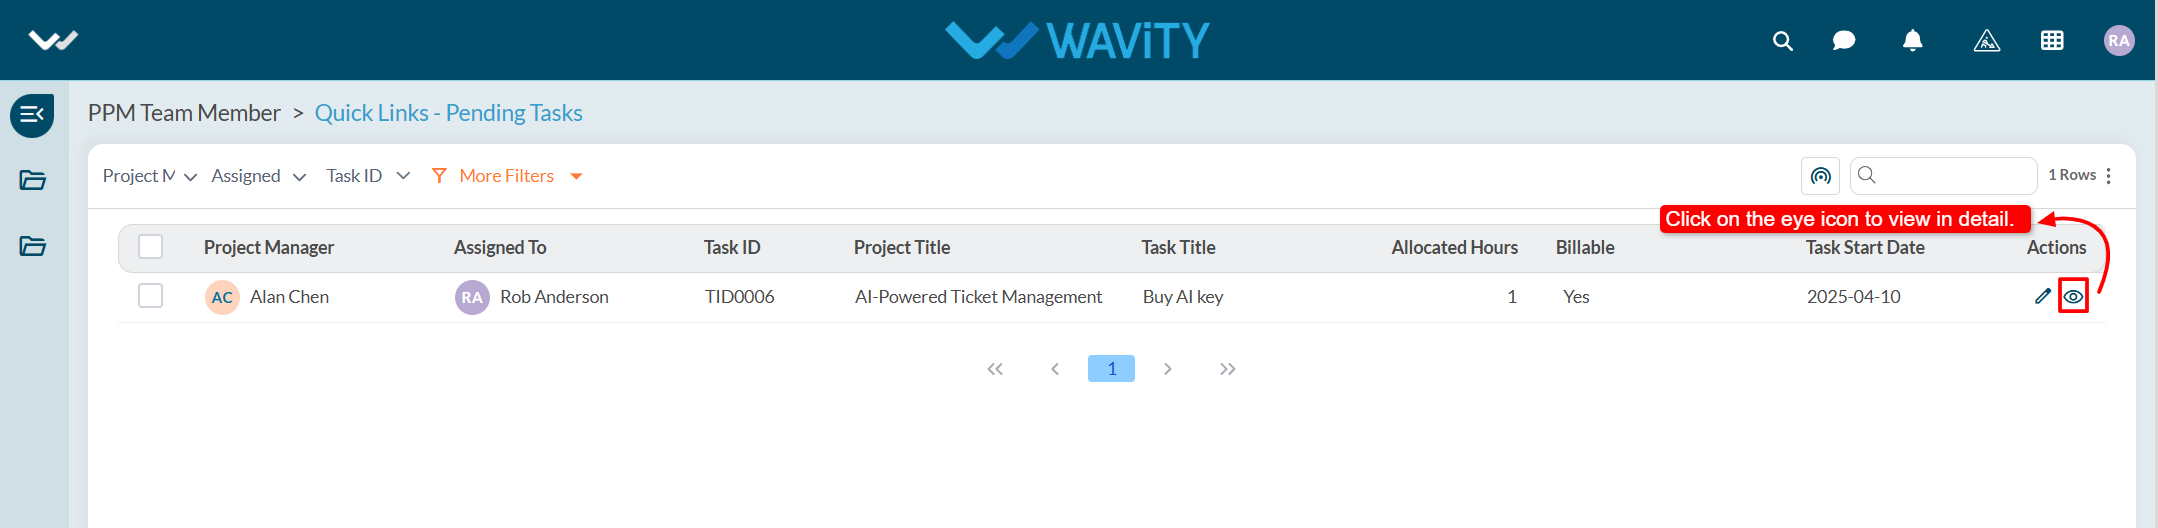
- Users can update the task status based on their current progress or working state and click on the save button to apply the changes.
End User Guide: Reporting an Incident via Chatbot
- Wavity provides an AI-powered chatbot with guided conversations offers tailored, context-aware responses to both agents and customers. By leveraging natural language processing, the chatbot can engage in meaningful interactions, help customers resolve issues, and assist agents with troubleshooting and information retrieval.
- Users can access the chatbot via the Customer Portal URL or directly through the interface.
- From the interface, click on Customer portal icon.
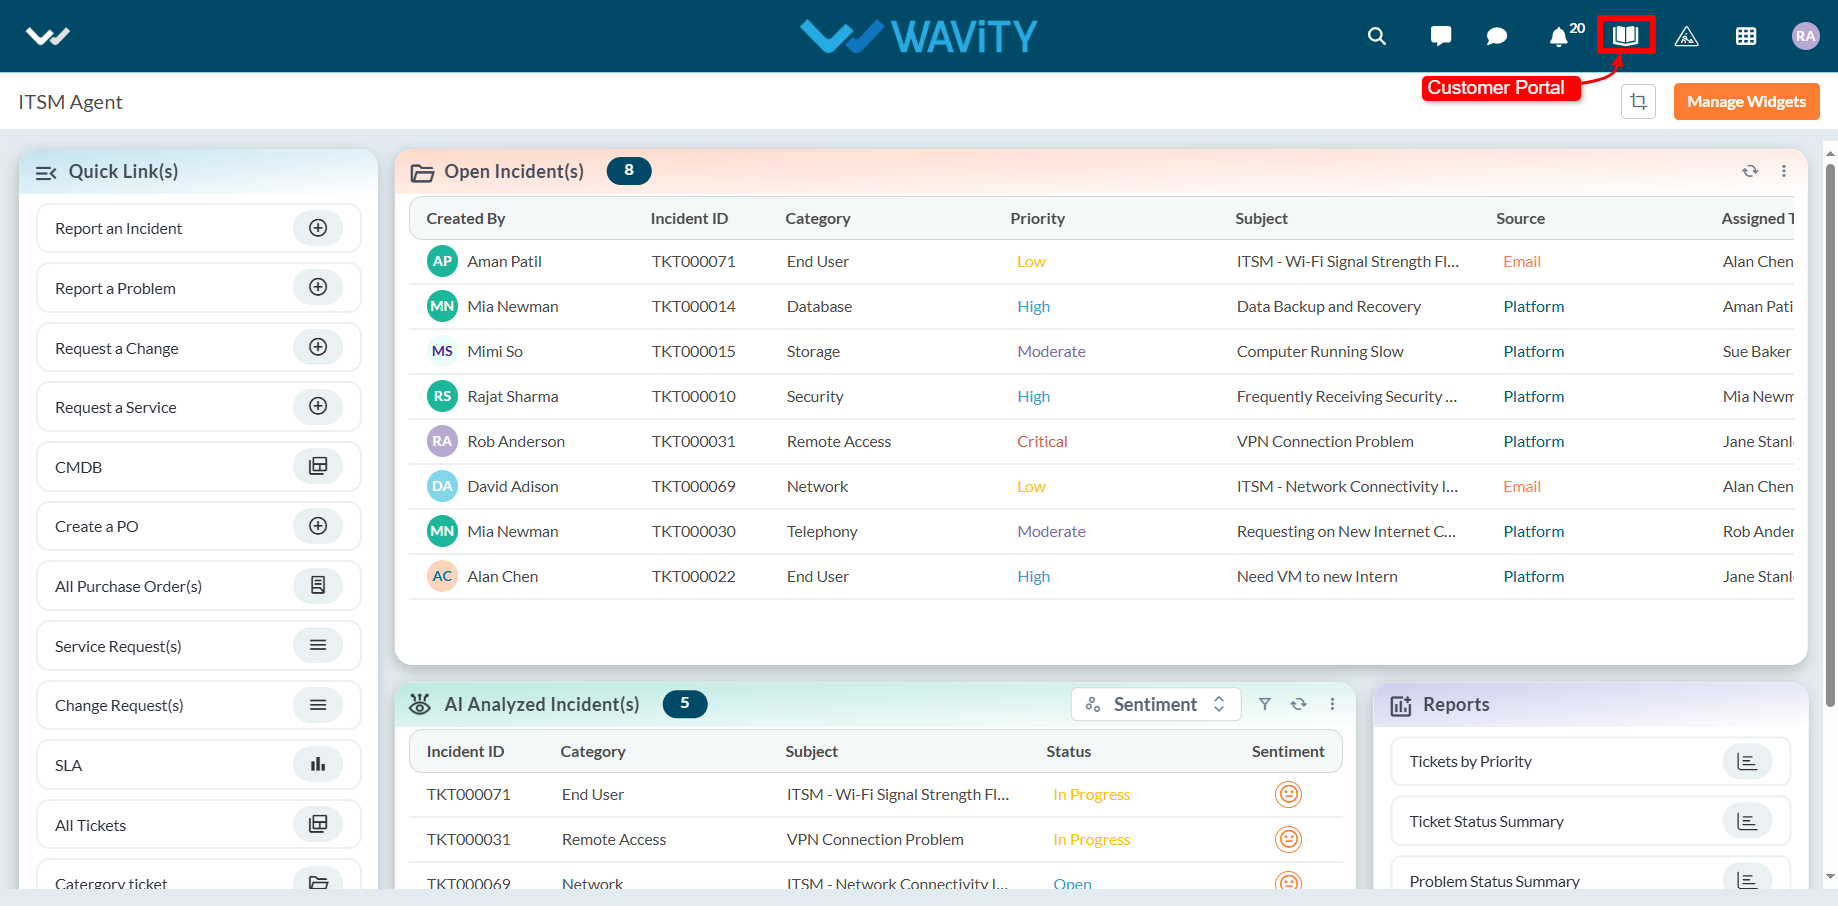
- Click on the AI Chatbot Icon as shown in below image.
- To create an Incident using the chatbot, click on ‘Create a Ticket/Incident’.
- Provide a brief description of the issue when prompted.
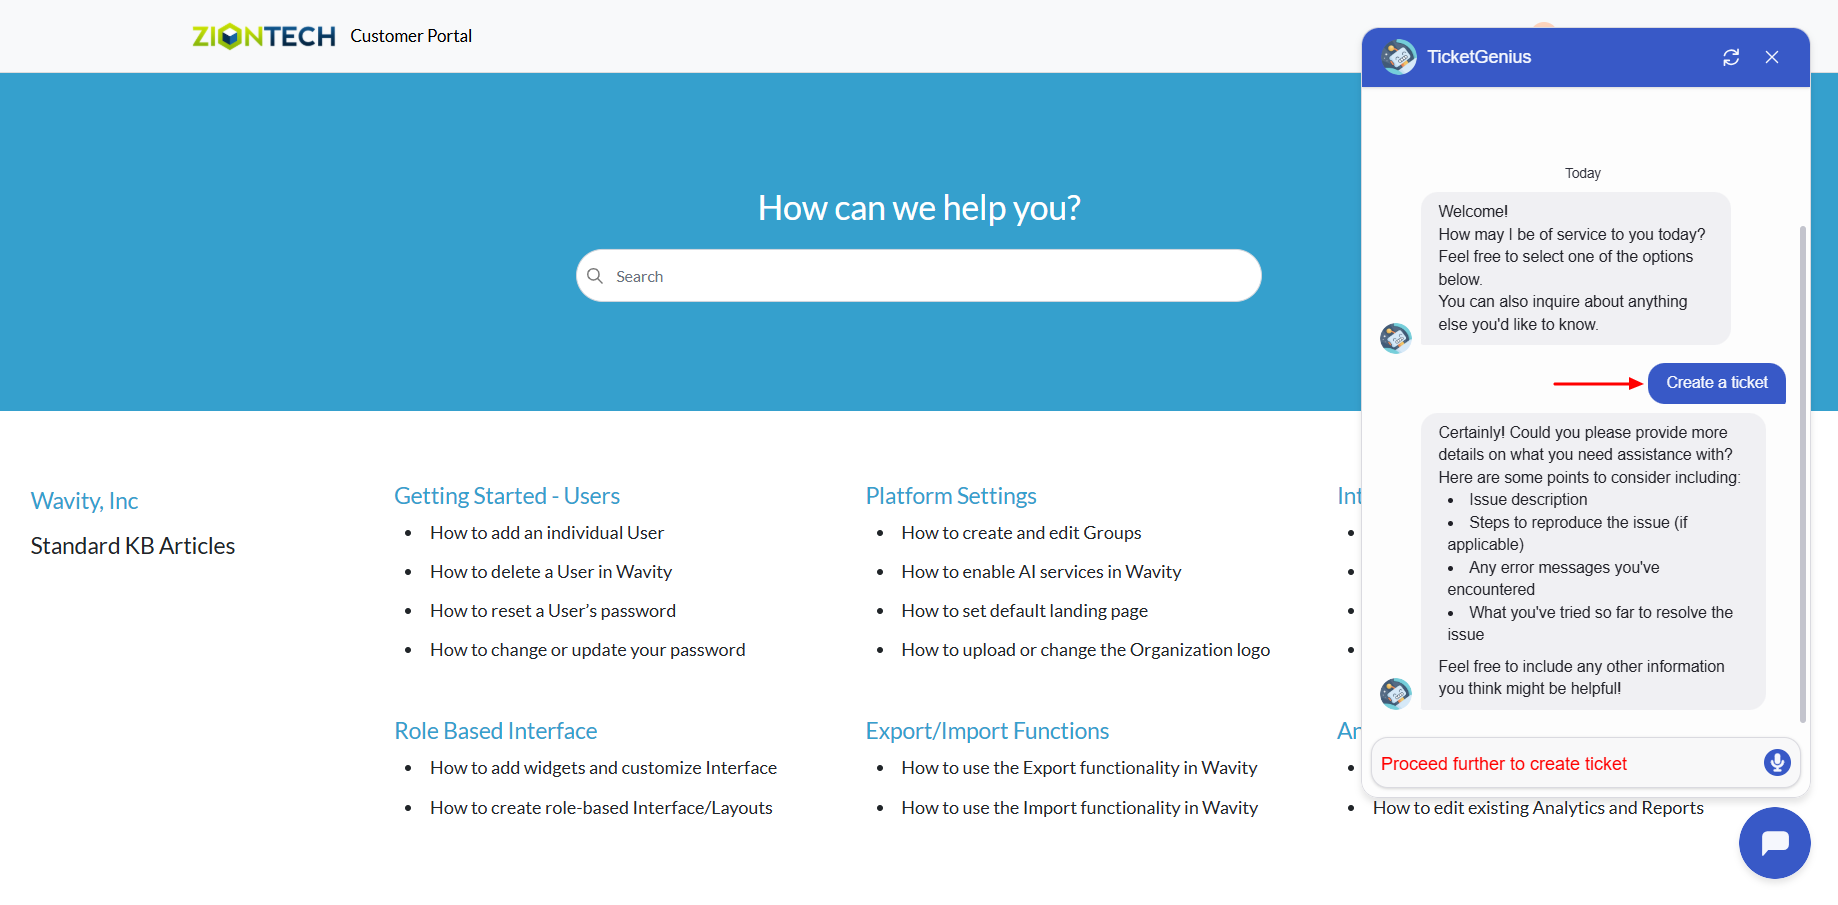
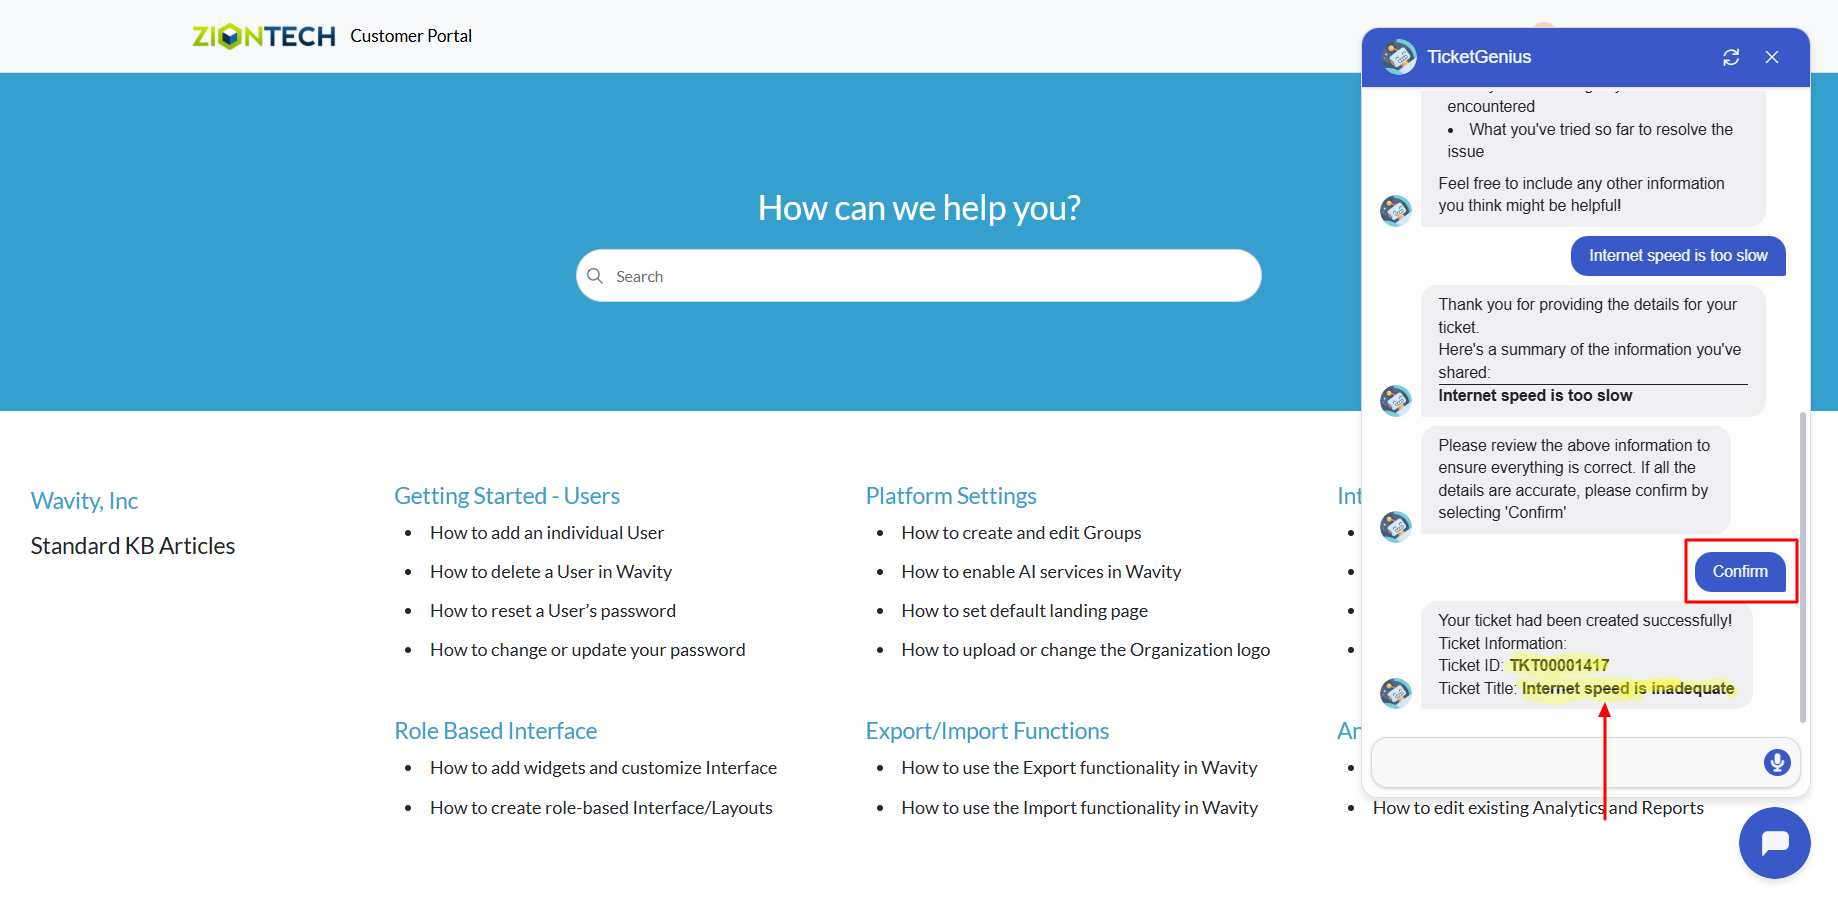
- Click on ‘Confirm’ to complete Incident creation in Wavity.
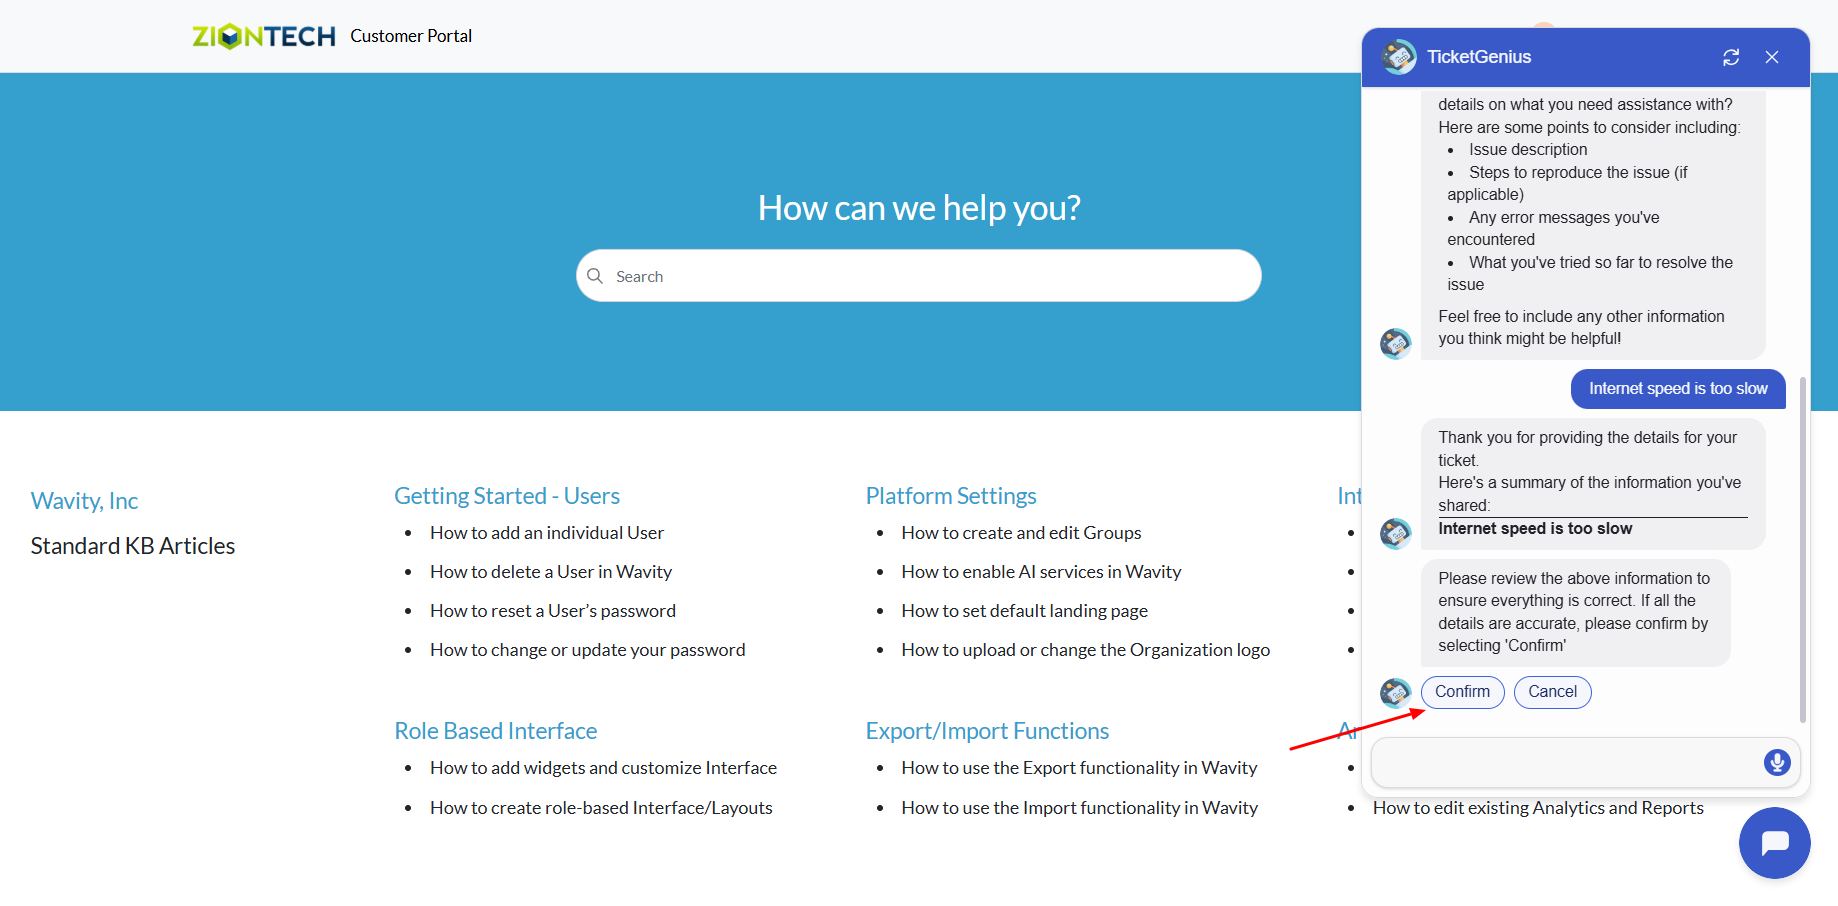
- A confirmation message will appear displaying the Ticket/Incident ID and Ticket/Incident title.
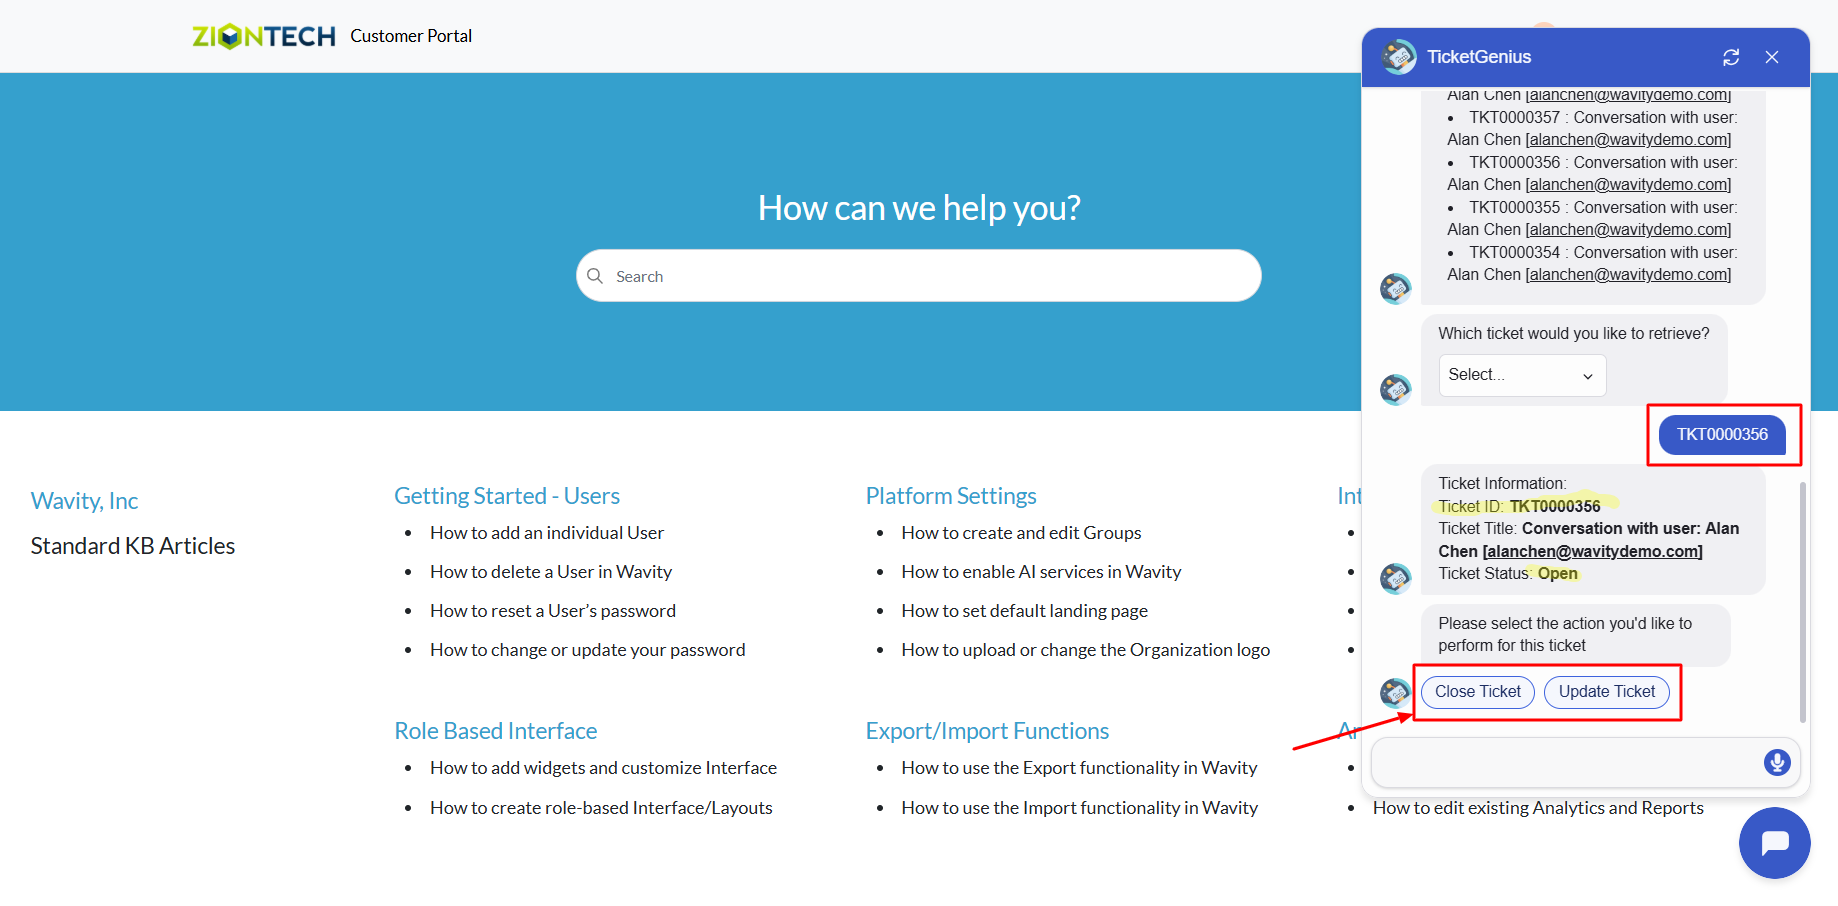
End User Guide: Retrieving and Managing Incidents via Chatbot
- Wavity provides an AI-powered chatbot with guided conversations offers tailored, context-aware responses to both agents and customers. By leveraging natural language processing, the chatbot can engage in meaningful interactions, help customers resolve issues, and assist agents with troubleshooting and information retrieval.
- Users can access the chatbot via the Customer Portal URL or directly through the interface.
- From the interface, click on Customer portal icon.

- Click on the AI Chatbot Icon as shown in below image.
- Click on ‘Get my Tickets’ to retrieve your Tickets/Incidents.
- A list of Incidents created by you will be displayed. Select the Ticket/Incident ID from the dropdown to view details.
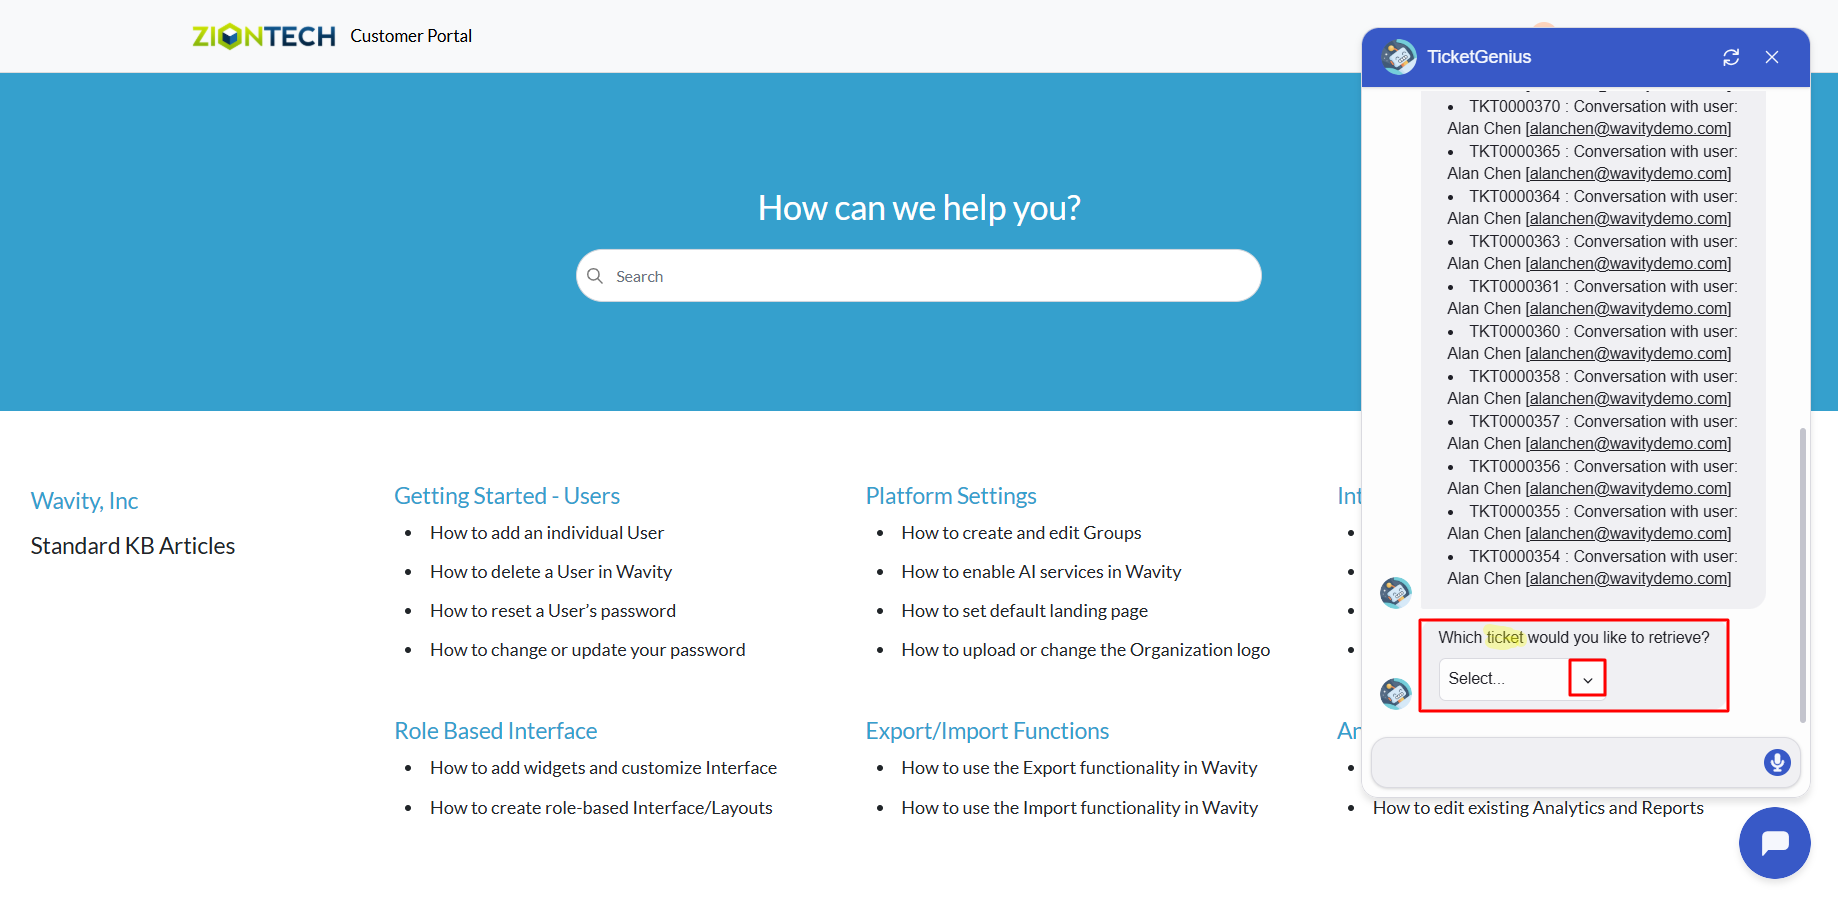
- You can now update or close the Ticket/Incident if needed.
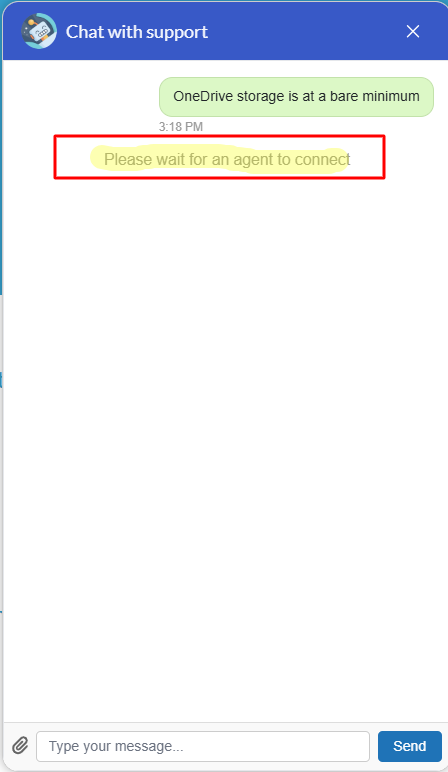
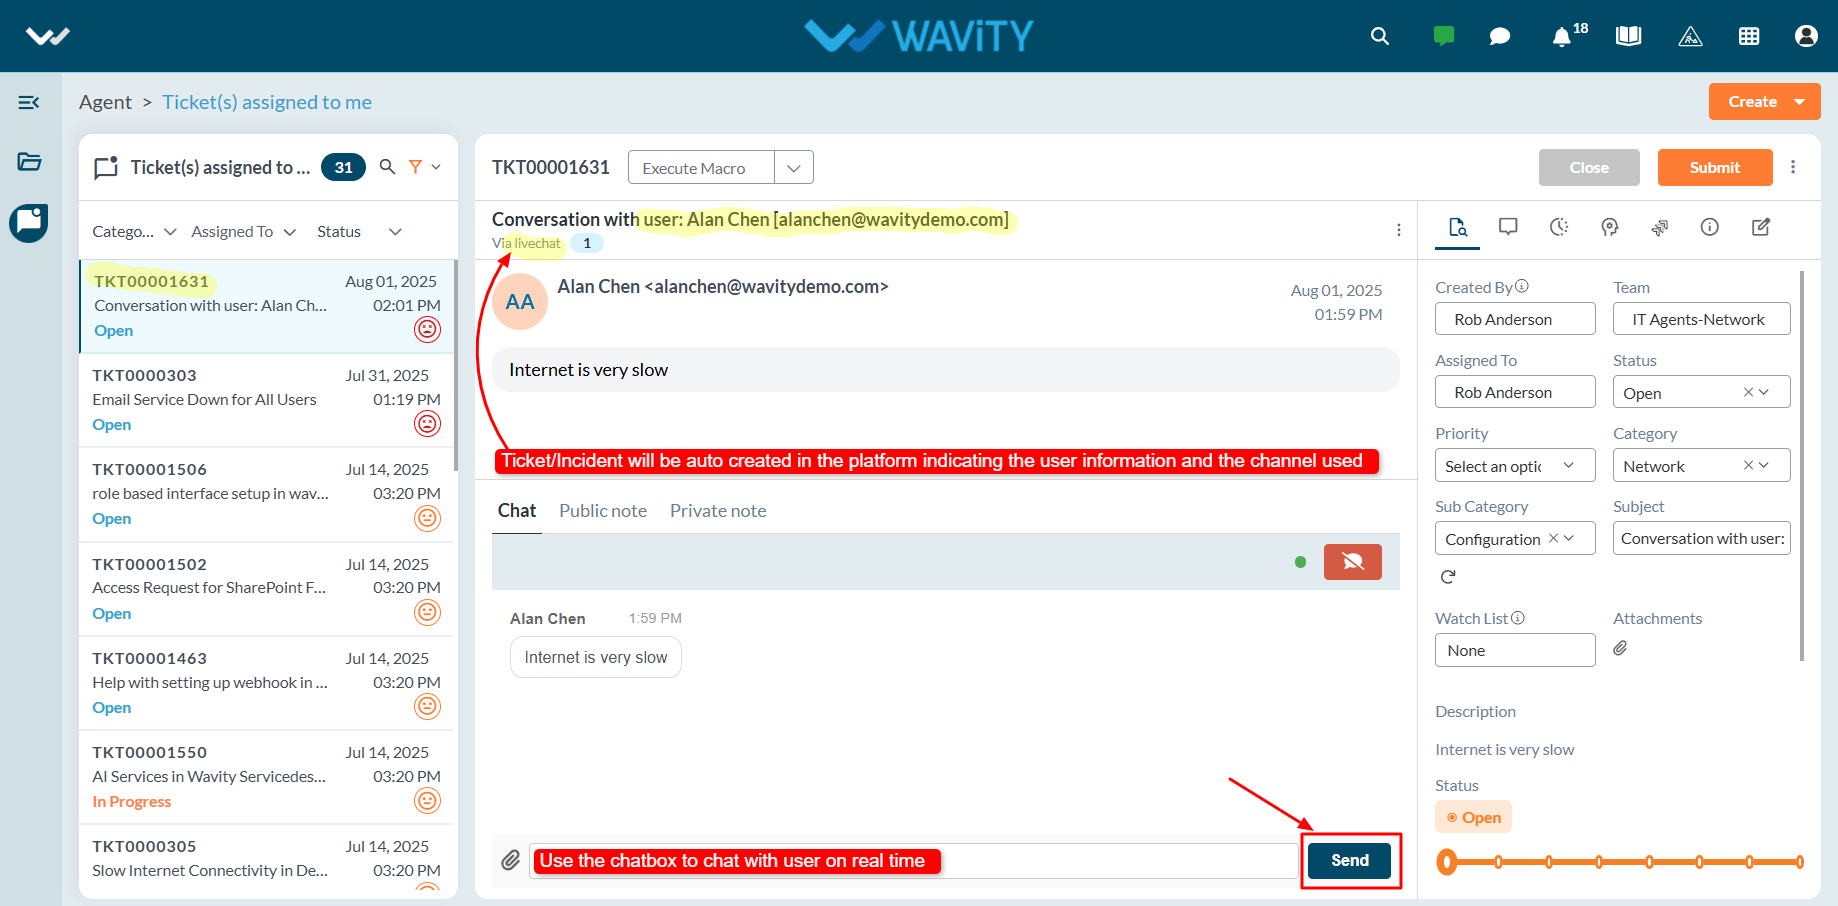
End User Guide: Live Chat- Talk to a Support Agent Instantly
- Wavity provides Live Chat which is a real-time communication tool that allows end users to interact with IT support staff or service agents instantly. This feature enables users (such as employees or customers) to ask questions, report issues, or request assistance through a chat interface, and receive quick responses.
- Users can access the Live chat via the Customer Portal URL or directly through the interface.
- From the interface, click on Customer portal icon.
- Click on AI Chatbot Icon.
- To use Live chat: Click on ‘Talk to an Agent’.

- Describe your issue in the message box.

- Click on Submit after entering your message.
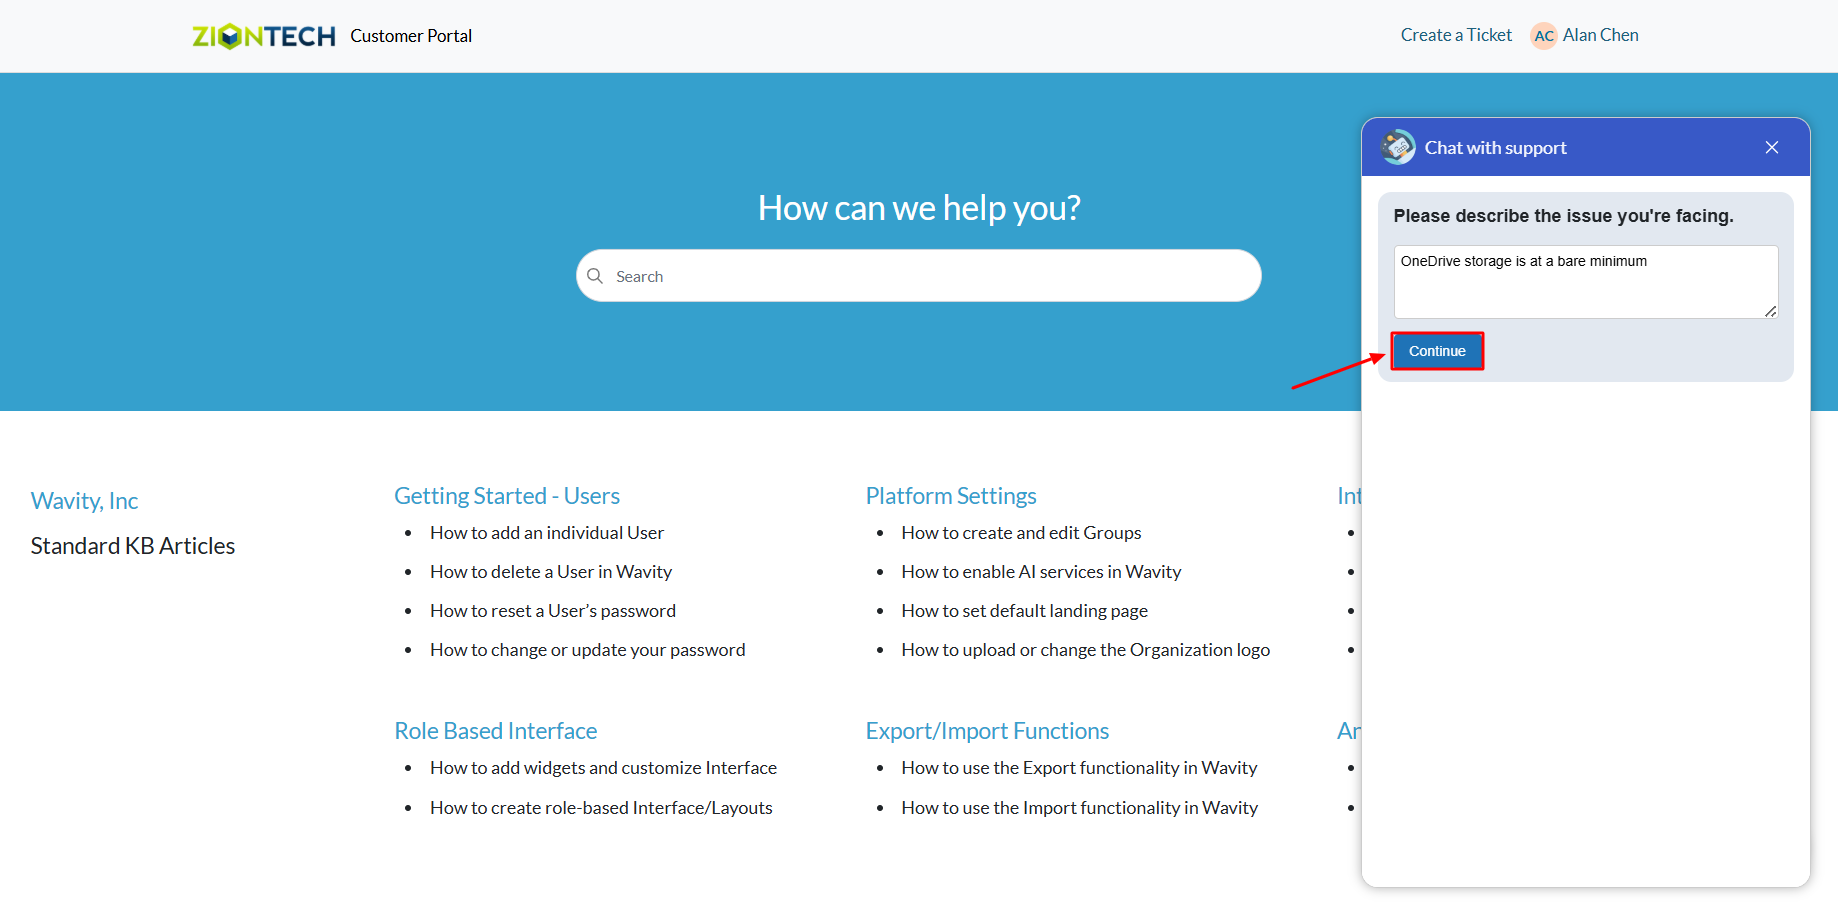
- If an agent is online in the Wavity platform, the chatbot will display a message: “Please wait for an agent to connect.”
- Once an agent connects, the chatbot will notify you that a support agent has joined the chat.
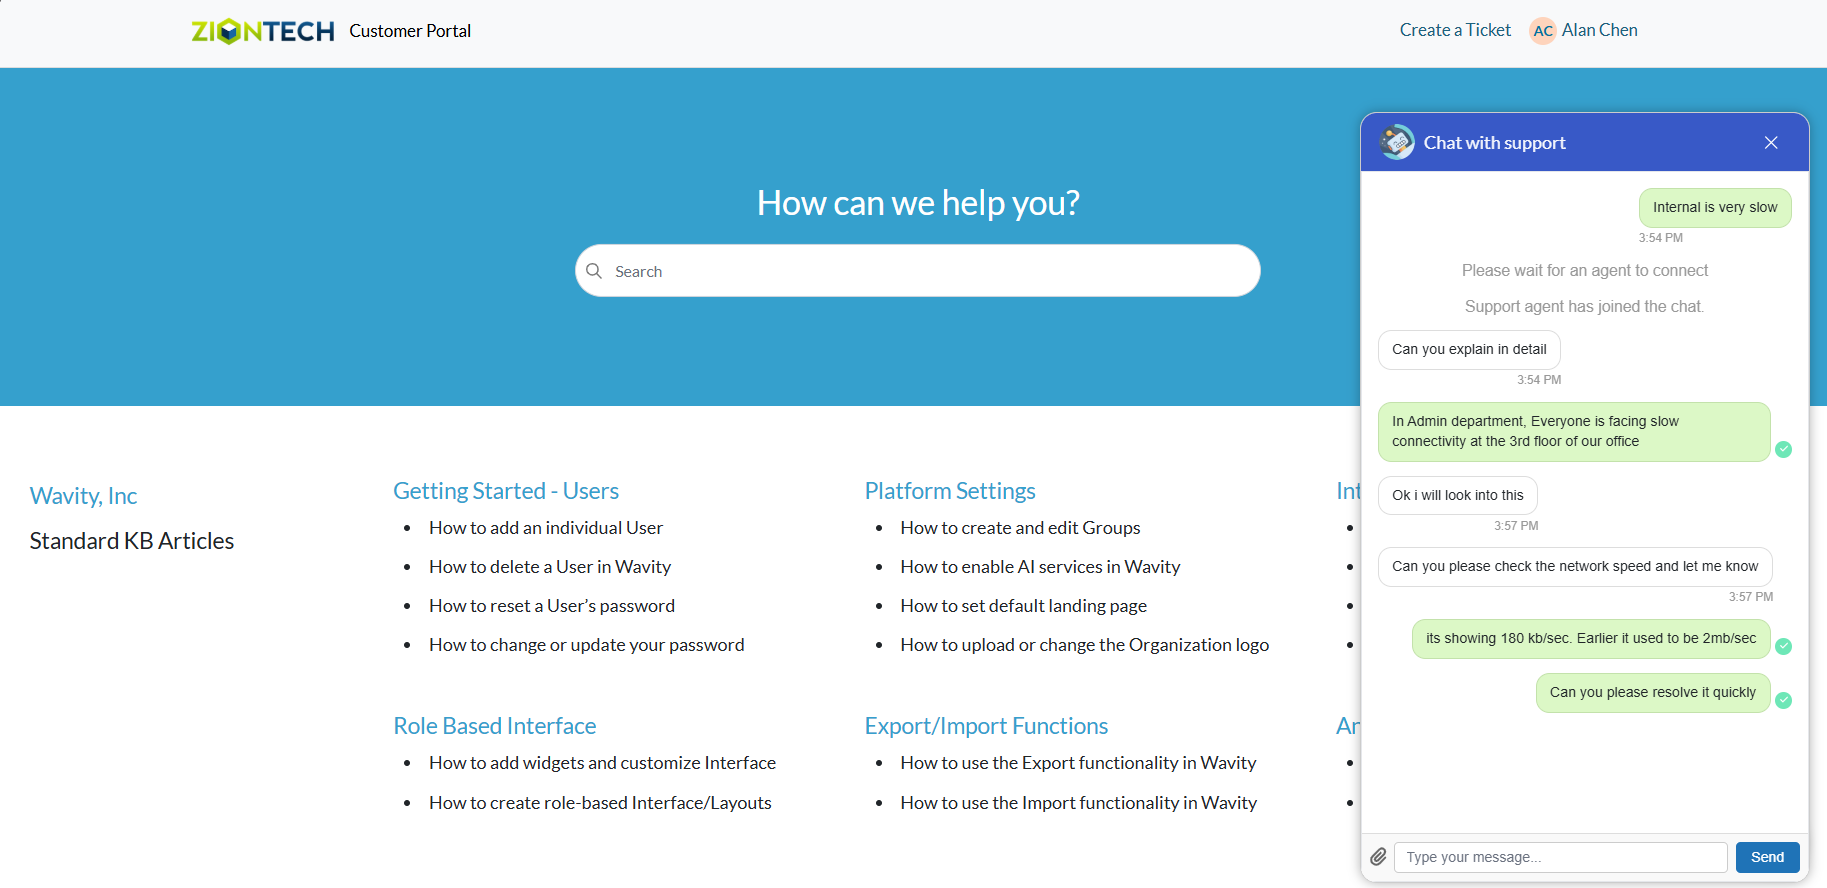
- You can now communicate in real time with the agent to explain your issue and receive assistance.
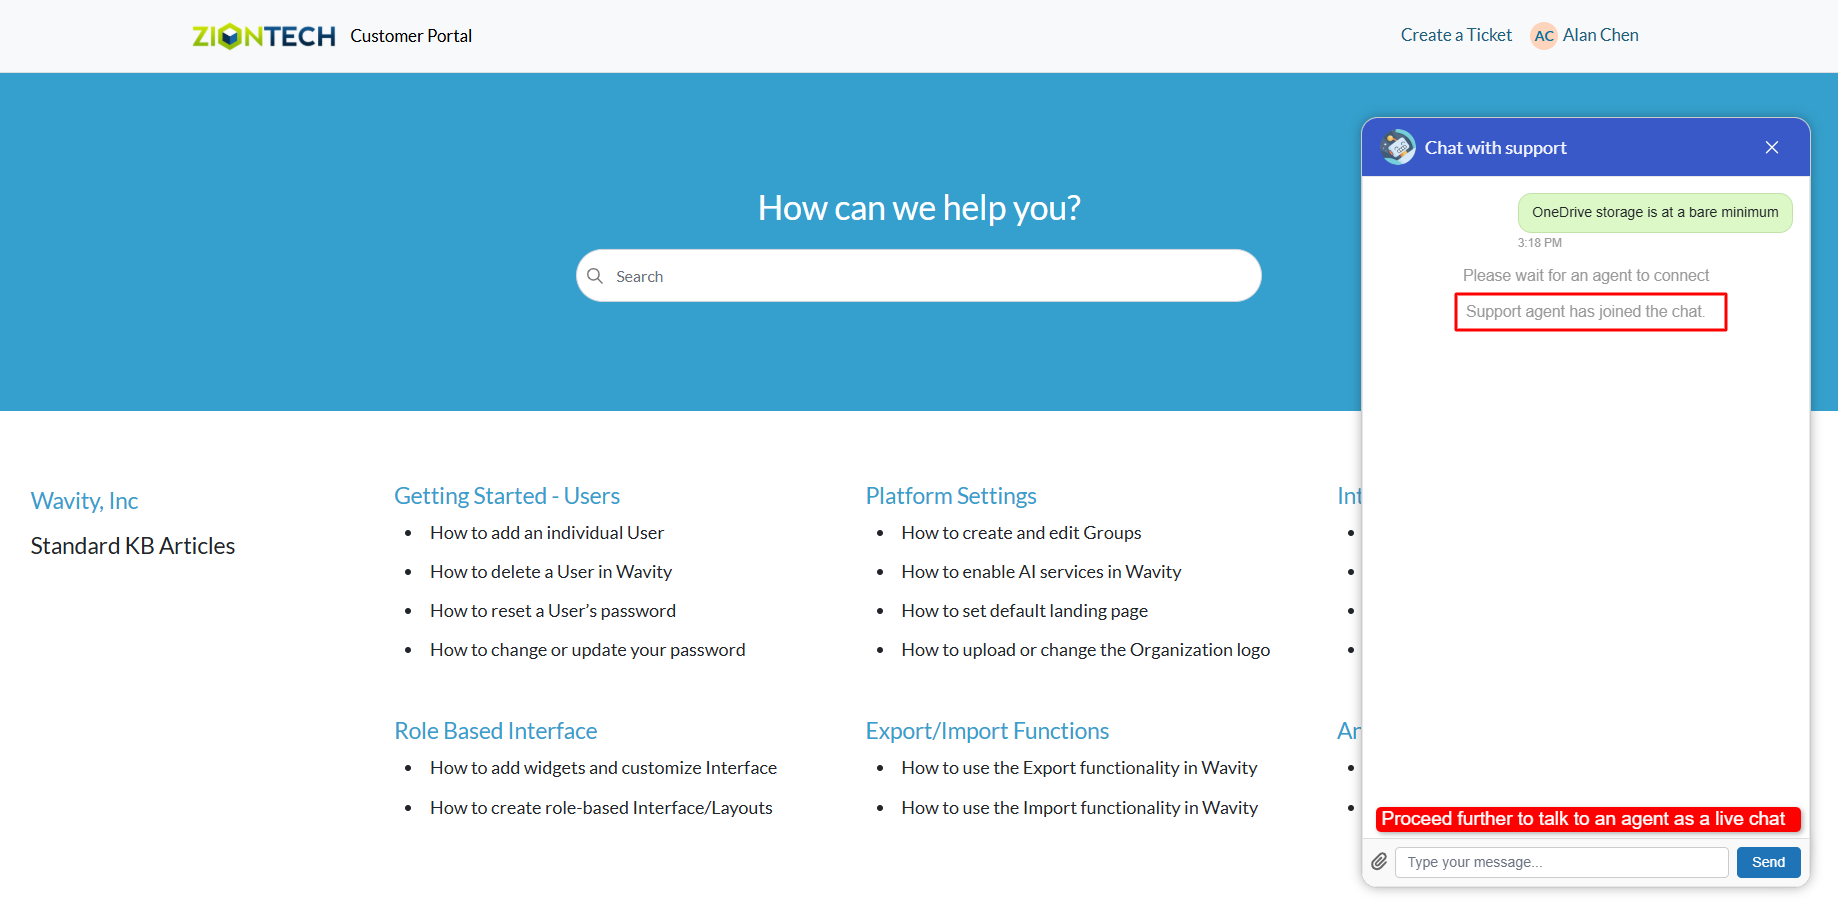
- An example of a live chat conversation is shown below for your reference.
Agent Guide: Live Chat Usage
- Wavity offers a Live Chat feature, enabling real-time communication between end users (employees or customers) and IT support staff or service agents. Users can ask questions, report issues, or request help through a chat interface and receive prompt responses.
- Agents can activate Online mode by clicking the Live Chat icon on the interface.
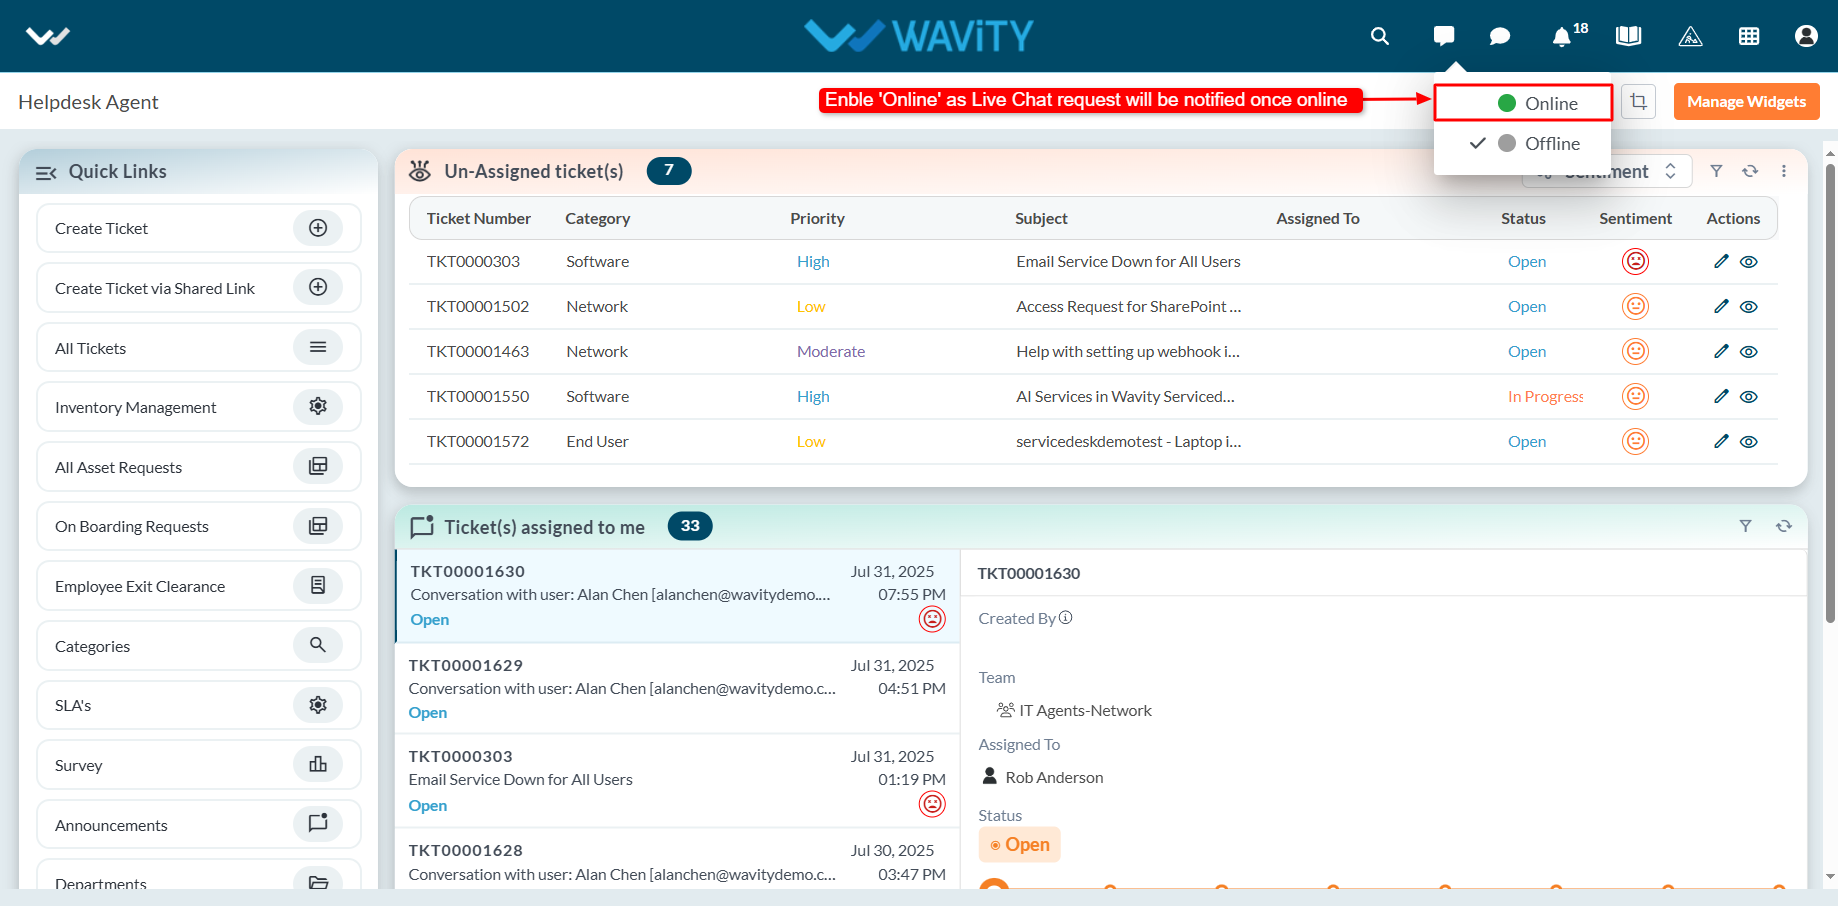
- When Online mode is enabled, the Live Chat icon turns green, indicating the agent is available to receive chat requests.
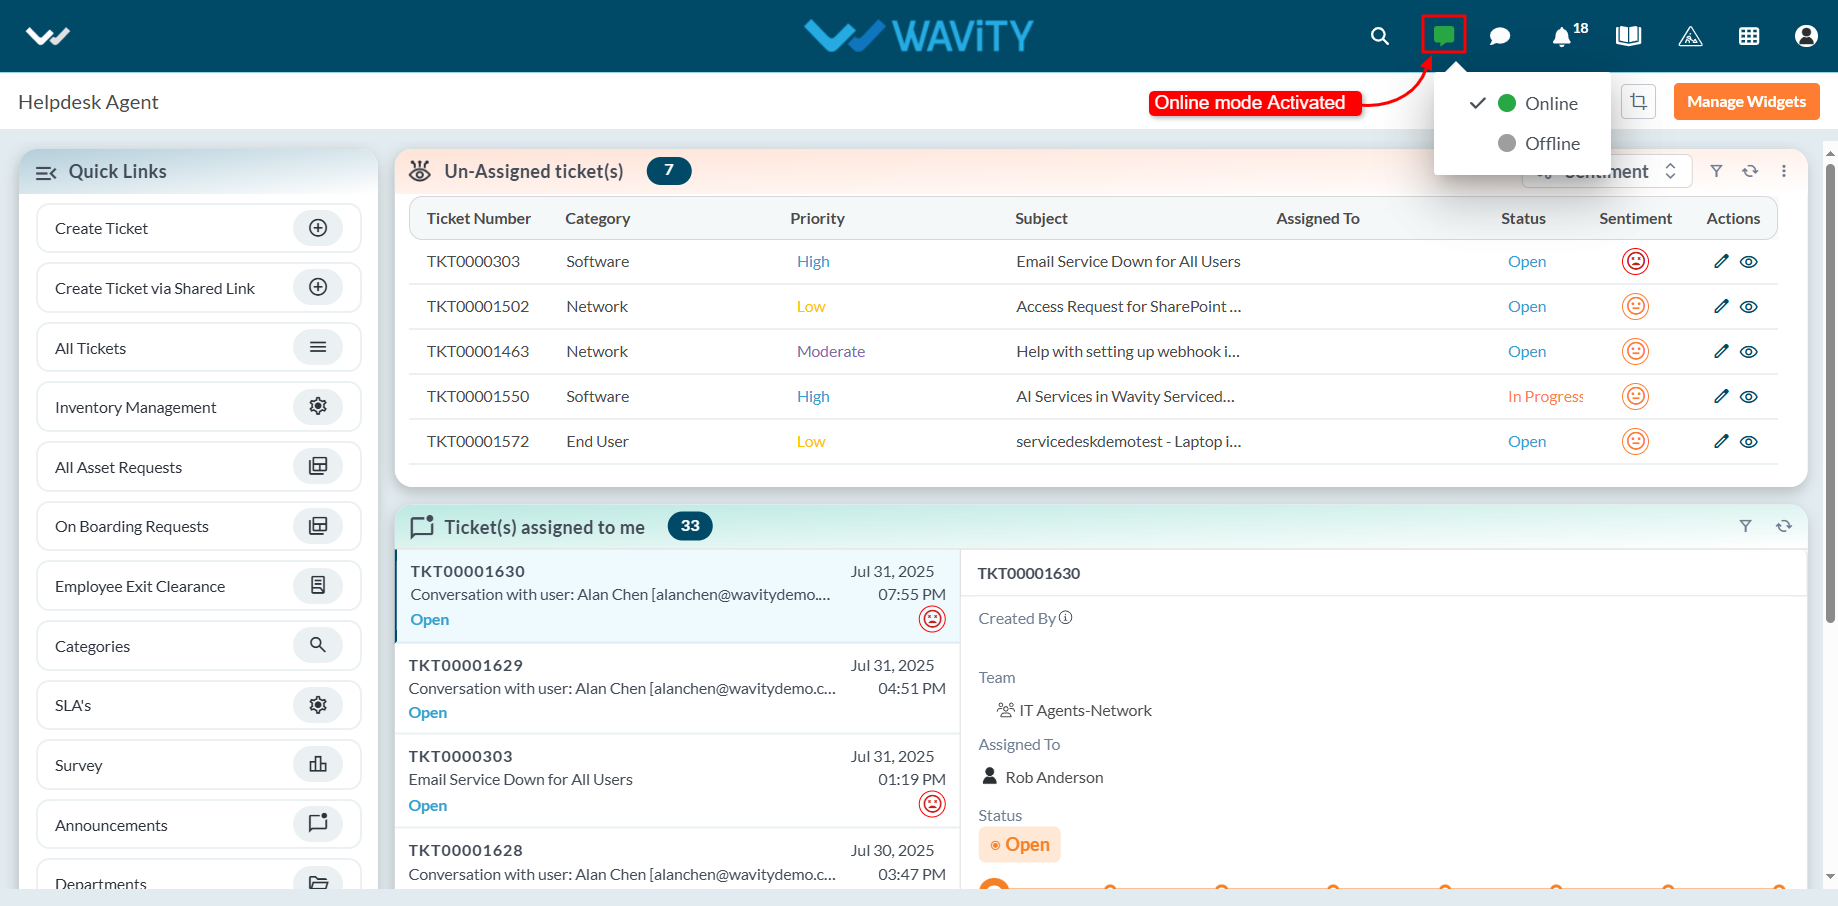
- When an end user initiates a Live Chat request, the agent receives a notification and can choose to accept it. Upon acceptance, the agent can begin a real-time chat session with the user.
- A new ticket or incident is automatically generated, capturing details such as the ticket ID, requester information, and communication channel.
- Agents can use the message box to interact with the user throughout the session.
- Once the issue is resolved, the agent can update the ticket status and click the Submit button to close the ticket or incident.

End User Guide: Documentation Requests in ServiceDesk (ITSM)
- Service requests in Wavity is simple, user-friendly, and accessible via Wavity Help & ServiceDesk.
- Note: The steps provided below are sample instructions and can be customized to suit specific organizational requirements; however, the core workflow remains consistent.
- Users can log in with their credentials on the Wavity platform, which will direct them to the End User Interface.
- From the Quick Links widget, click on ‘Request a Service’ to begin the process.
- Select Documentation Requests from the Category dropdown menu. Based on the selected Category, Sub-Category values will auto-populate.
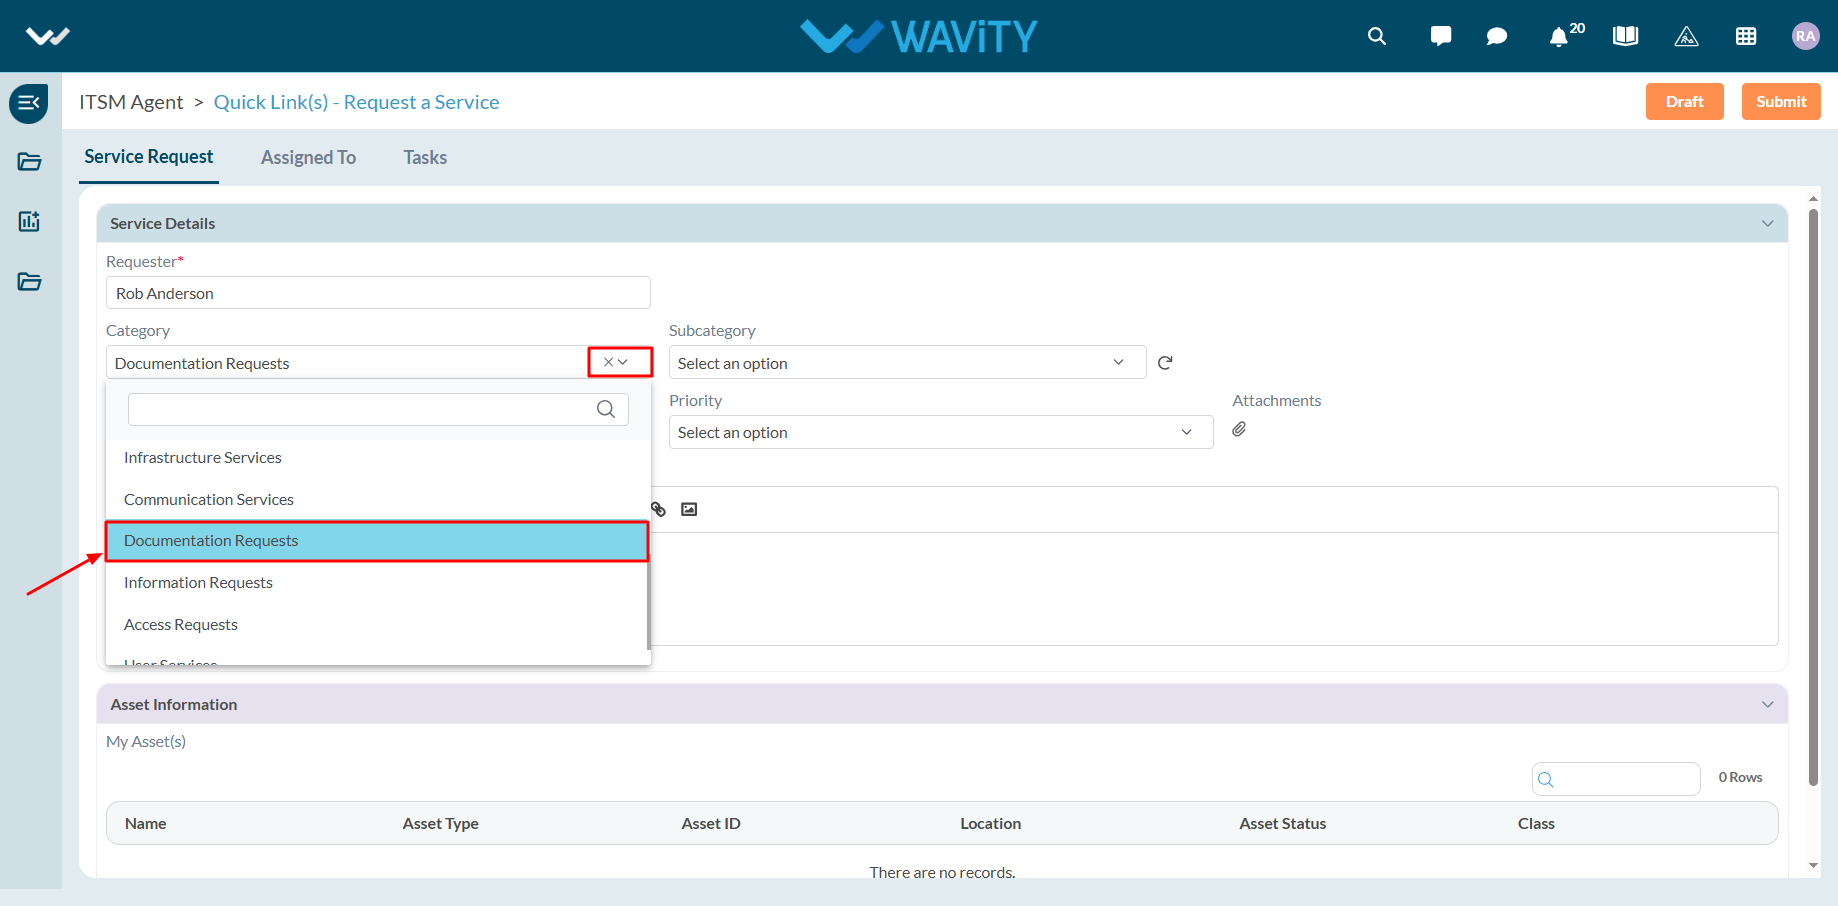
- Select the appropriate Sub-Category for your request.
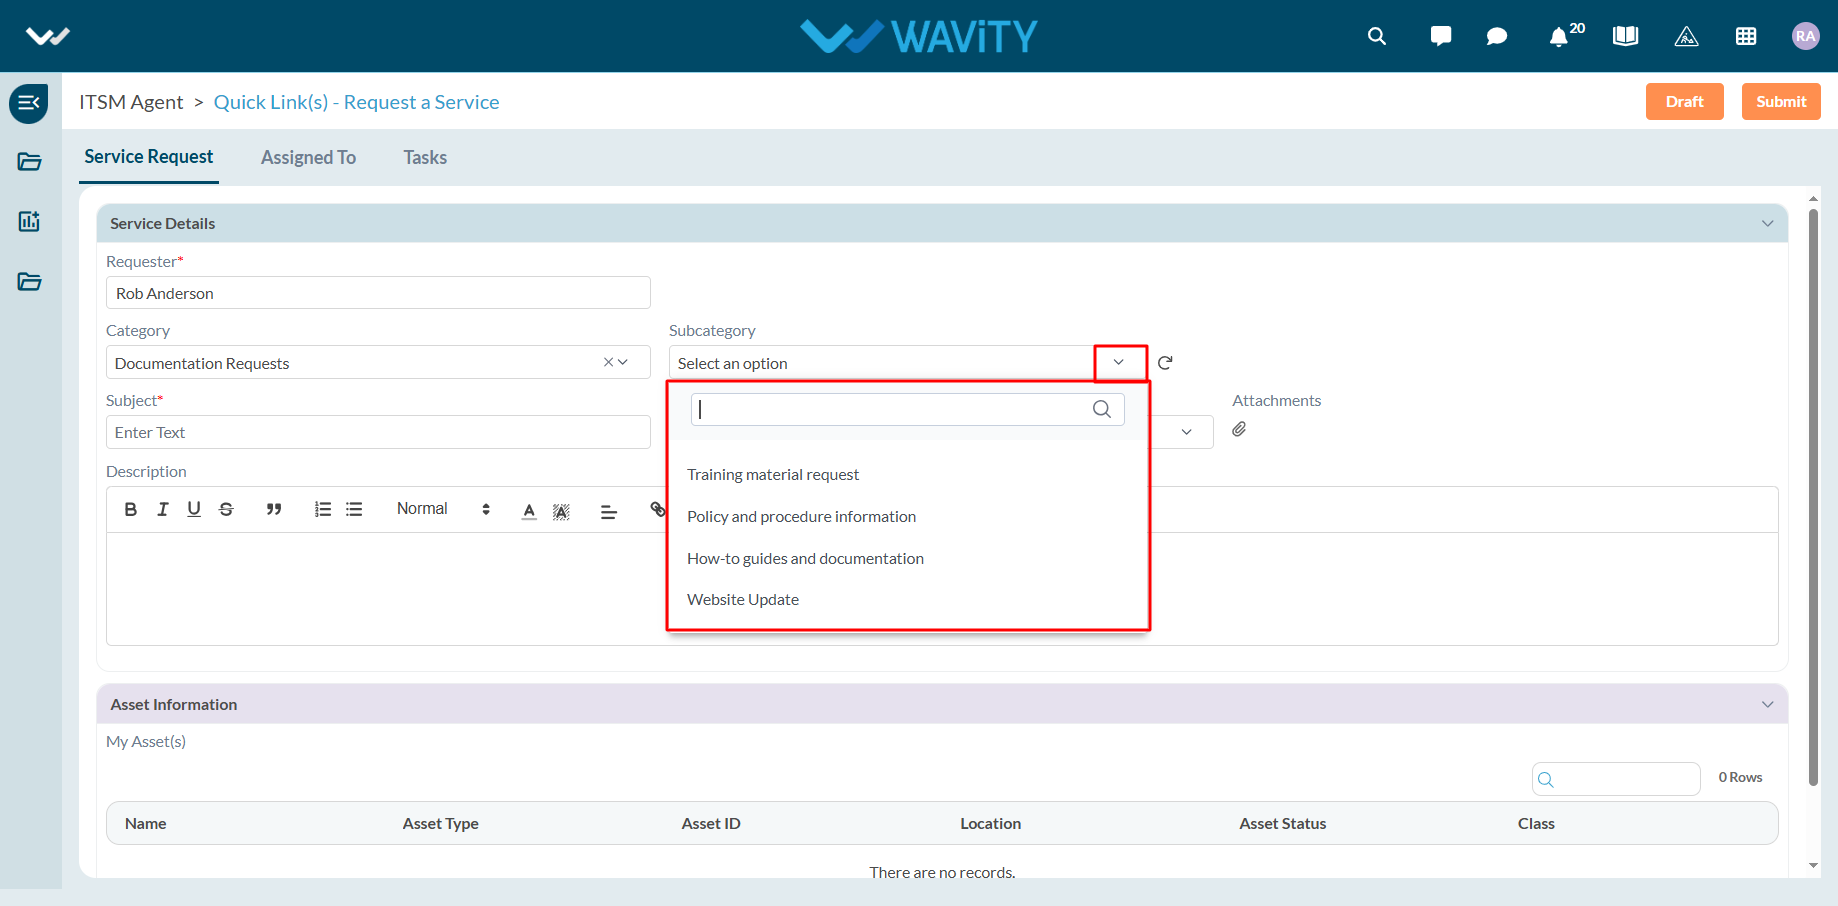
- Enter the Subject and a detailed description of your service request. Attach files if necessary.
- Choose the appropriate Priority level from the dropdown.
- Click Submit to complete the request process.

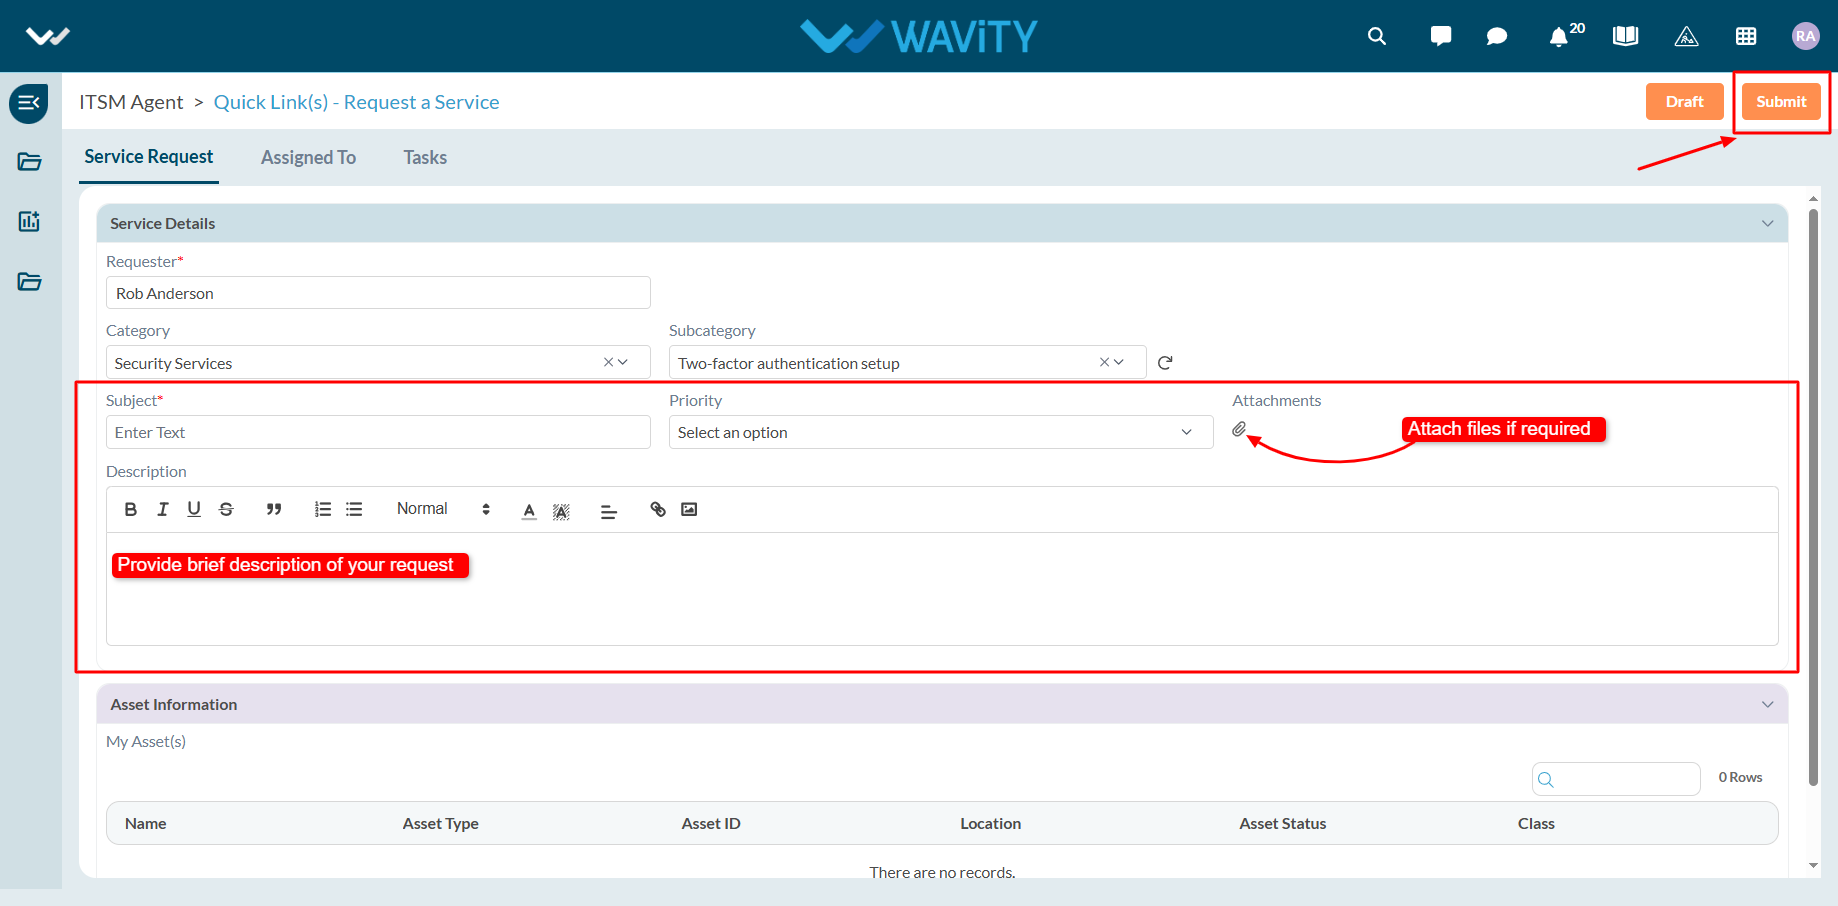
End User Guide: Security related Service Requests
- Service requests in Wavity is simple, user-friendly, and accessible via Wavity Help & ServiceDesk.
- Note: The steps provided below are sample instructions and can be customized to suit specific organizational requirements; however, the core workflow remains consistent.
- Users can log in with their credentials on the Wavity platform, which will direct them to the End User Interface.
- From the Quick Links widget, click on ‘Request a Service’ to begin the process.
- Select Security Services from the Category dropdown menu. Based on the selected Category, Sub-Category values will auto-populate.

- Select the appropriate Sub-Category for your request.
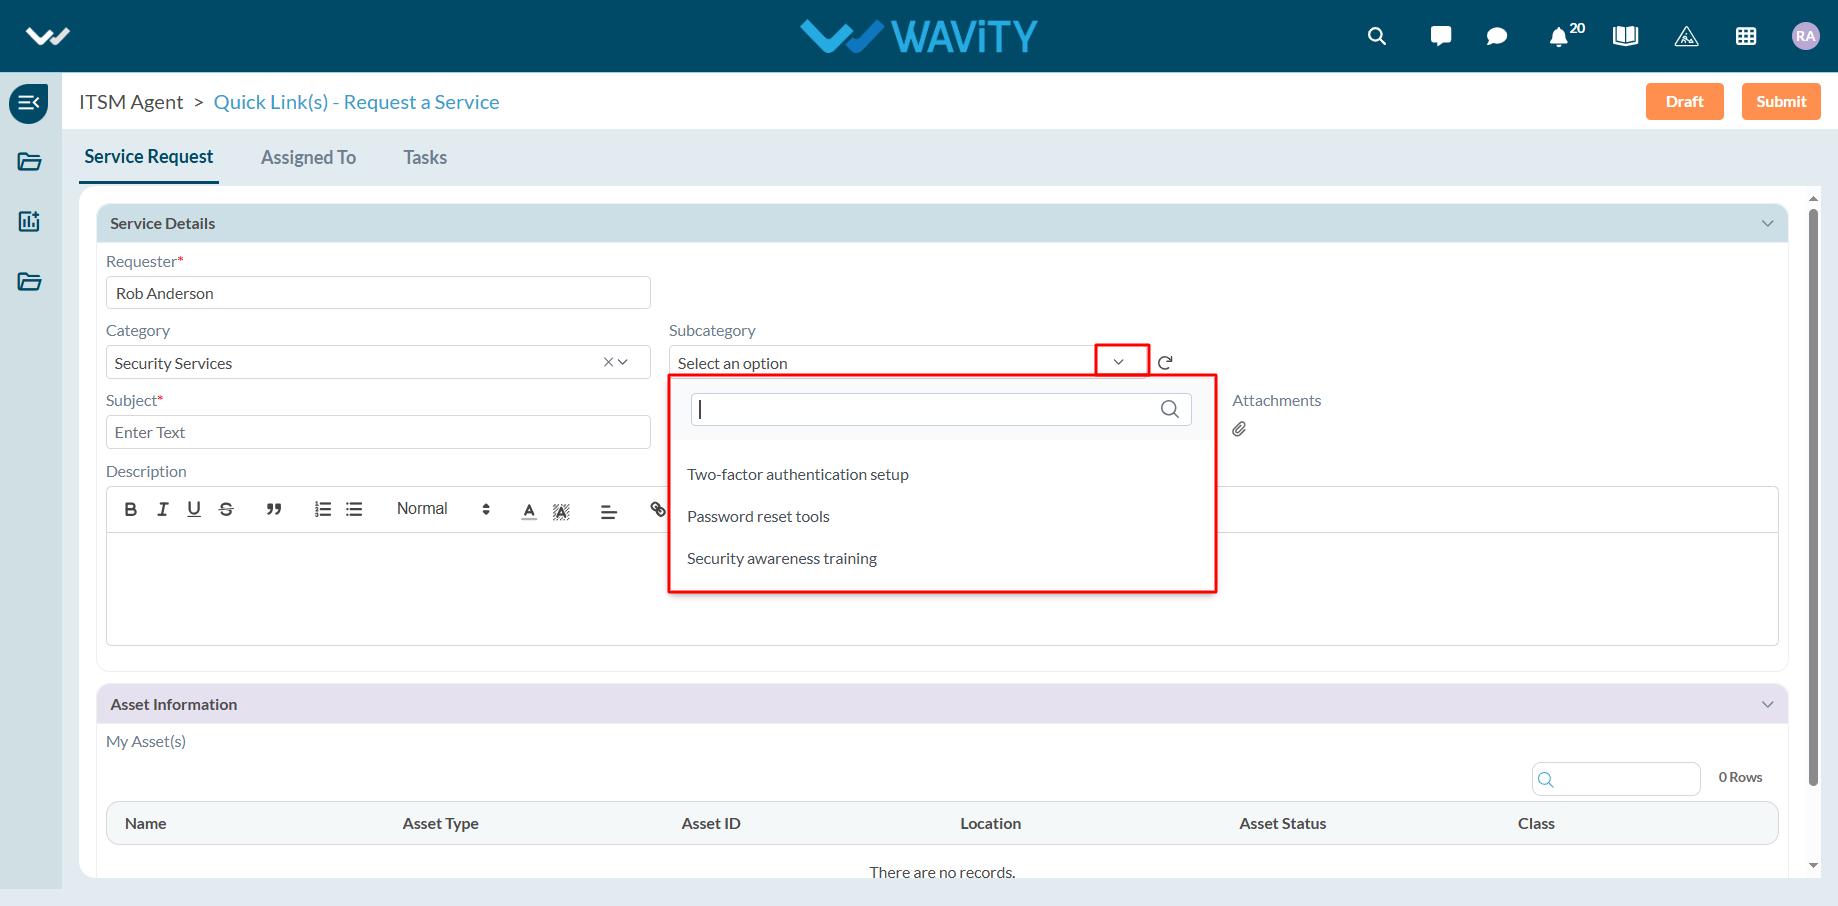
- Enter the Subject and a detailed description of your service request. Attach files if necessary.
- Choose the appropriate Priority level from the dropdown.
- Click Submit to complete the request process.
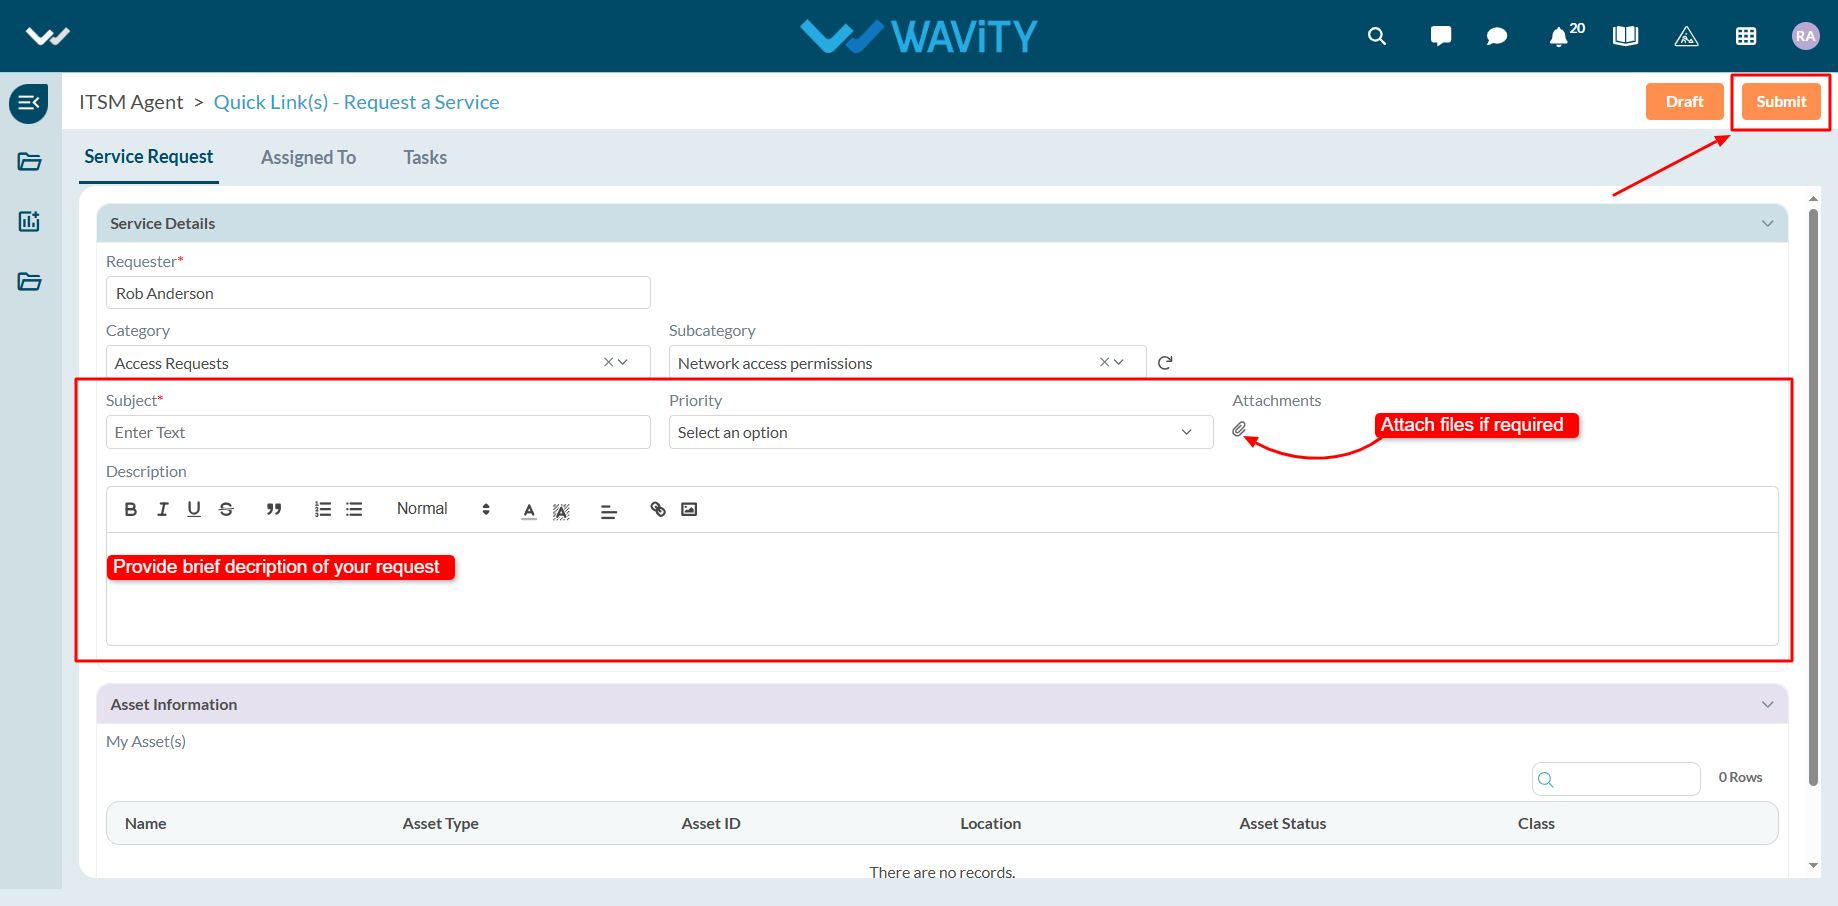
End User Guide: Access Requests in ServiceDesk (ITSM)
- Service requests in Wavity is simple, user-friendly, and accessible via Wavity Help & ServiceDesk.
- Note: The steps provided below are sample instructions and can be customized to suit specific organizational requirements; however, the core workflow remains consistent.
- Users can log in with their credentials on the Wavity platform, which will direct them to the End User Interface.
- From the Quick Links widget, click on ‘Request a Service’ to begin the process.
- Select Access Requests from the Category dropdown menu. Based on the selected Category, Sub-Category values will auto-populate.
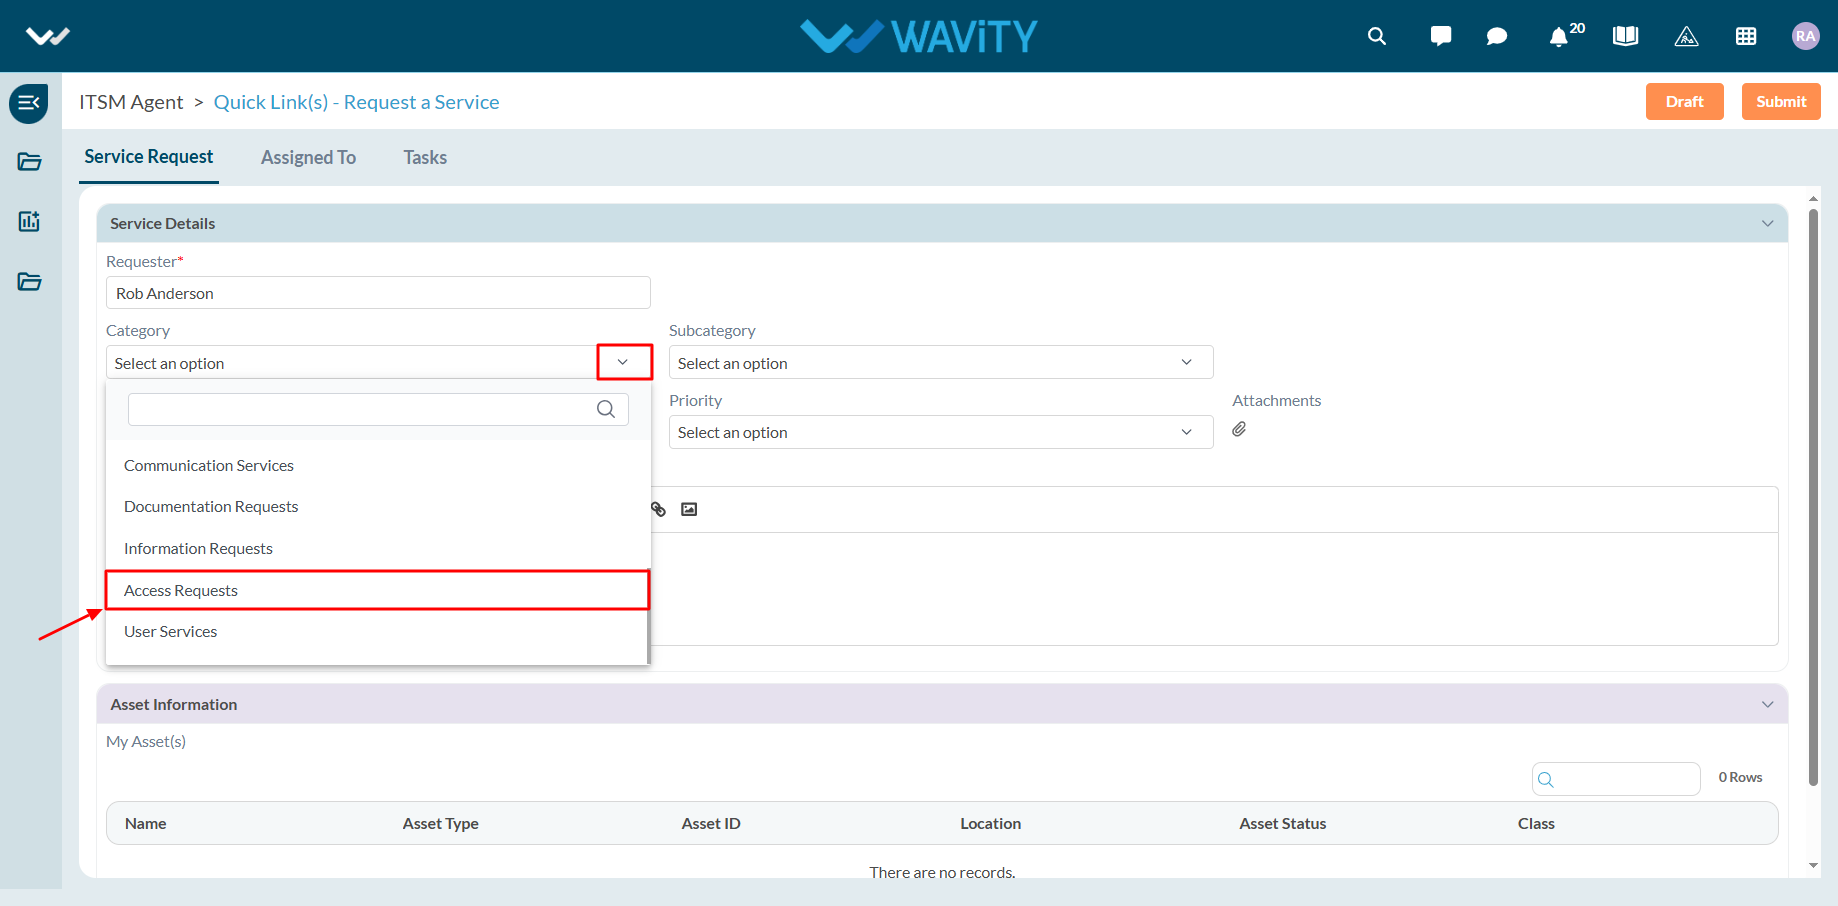
- Select the appropriate Sub-Category for your request.
- Enter the Subject and a detailed description of your service request. Attach files if necessary.
- Choose the appropriate Priority level from the dropdown.
- Click Submit to complete the request process.
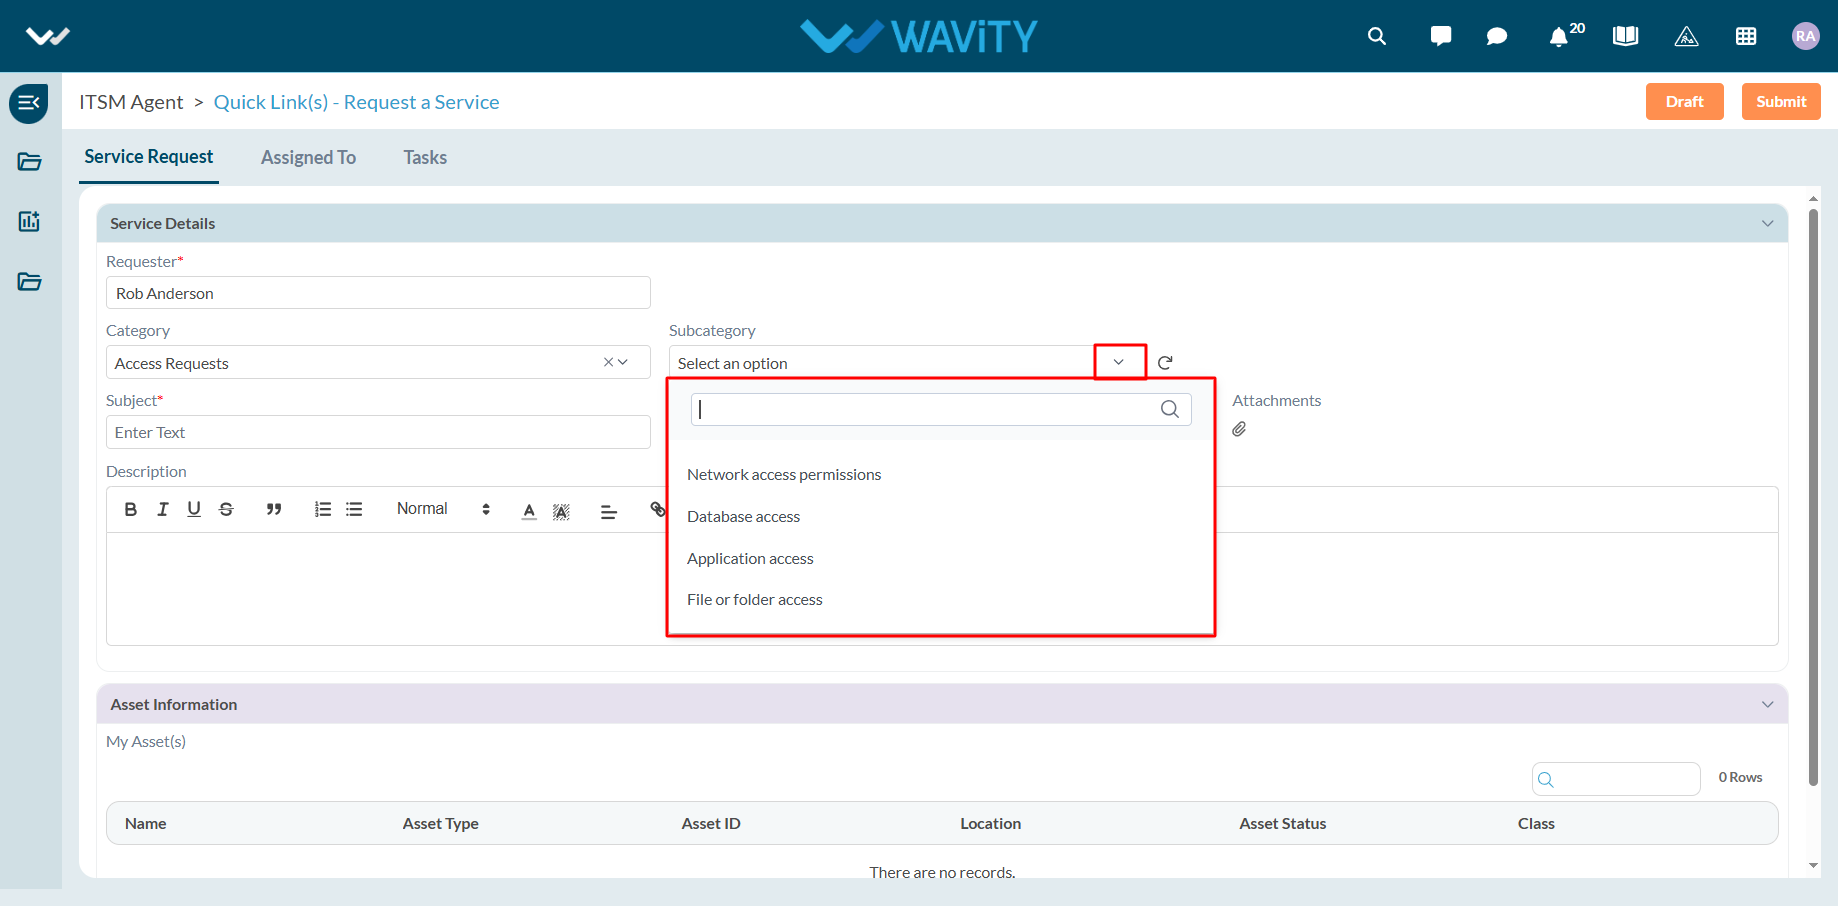
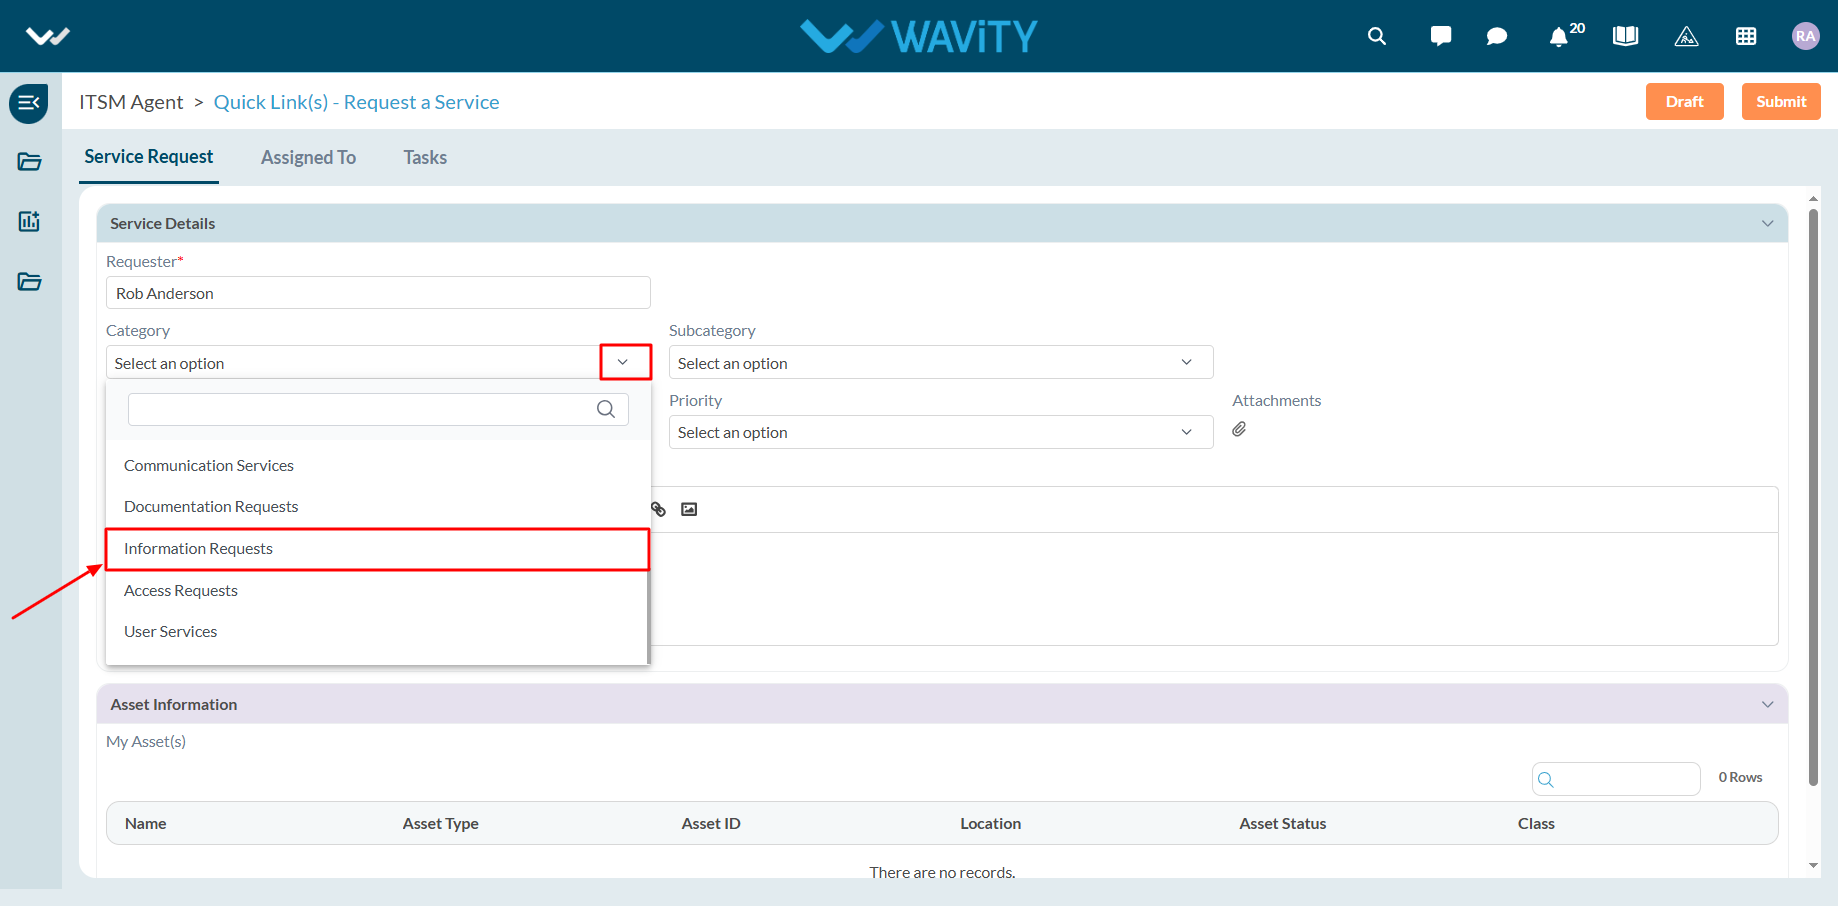
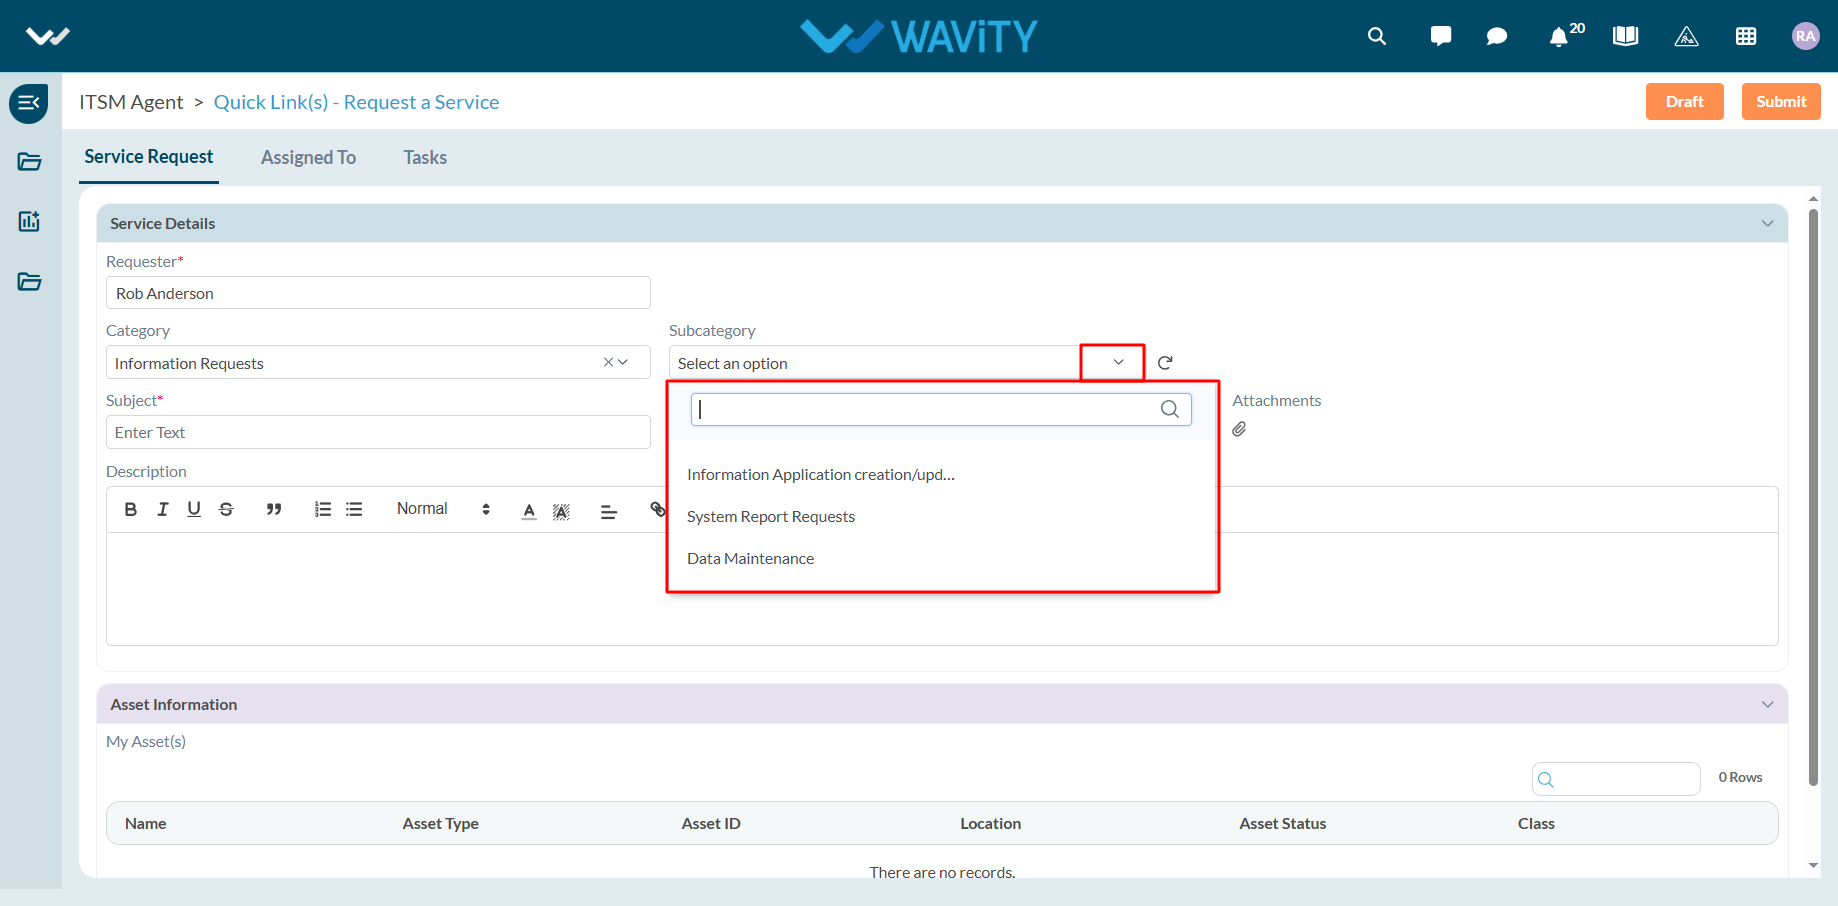
End User Guide: Information Requests in Servicedesk (ITSM)
- Service requests in Wavity is simple, user-friendly, and accessible via Wavity Help & ServiceDesk.
- Note: The steps provided below are sample instructions and can be customized to suit specific organizational requirements; however, the core workflow remains consistent.
- Users can log in with their credentials on the Wavity platform, which will direct them to the End User Interface.
- From the Quick Links widget, click on ‘Request a Service’ to begin the process.
- Select Information Requests from the Category dropdown menu. Based on the selected Category, Sub-Category values will auto-populate.
- Select the appropriate Sub-Category for your request.
- Enter the Subject and a detailed description of your service request. Attach files if necessary.
- Choose the appropriate Priority level from the dropdown.
- Click Submit to complete the request process.

End User Guide: Infrastructure related Service Requests
- Service requests in Wavity is simple, user-friendly, and accessible via Wavity Help & ServiceDesk.
- Note: The steps provided below are sample instructions and can be customized to suit specific organizational requirements; however, the core workflow remains consistent.
- Users can log in with their credentials on the Wavity platform, which will direct them to the End User Interface.
- From the Quick Links widget, click on ‘Request a Service’ to begin the process.
- Select Infrastructure Services from the Category dropdown menu. Based on the selected Category, Sub-Category values will auto-populate.

- Select the appropriate Sub-Category for your request.

- Enter the Subject and a detailed description of your service request. Attach files if necessary.
- Choose the appropriate Priority level from the dropdown.
- Click Submit to complete the request process.
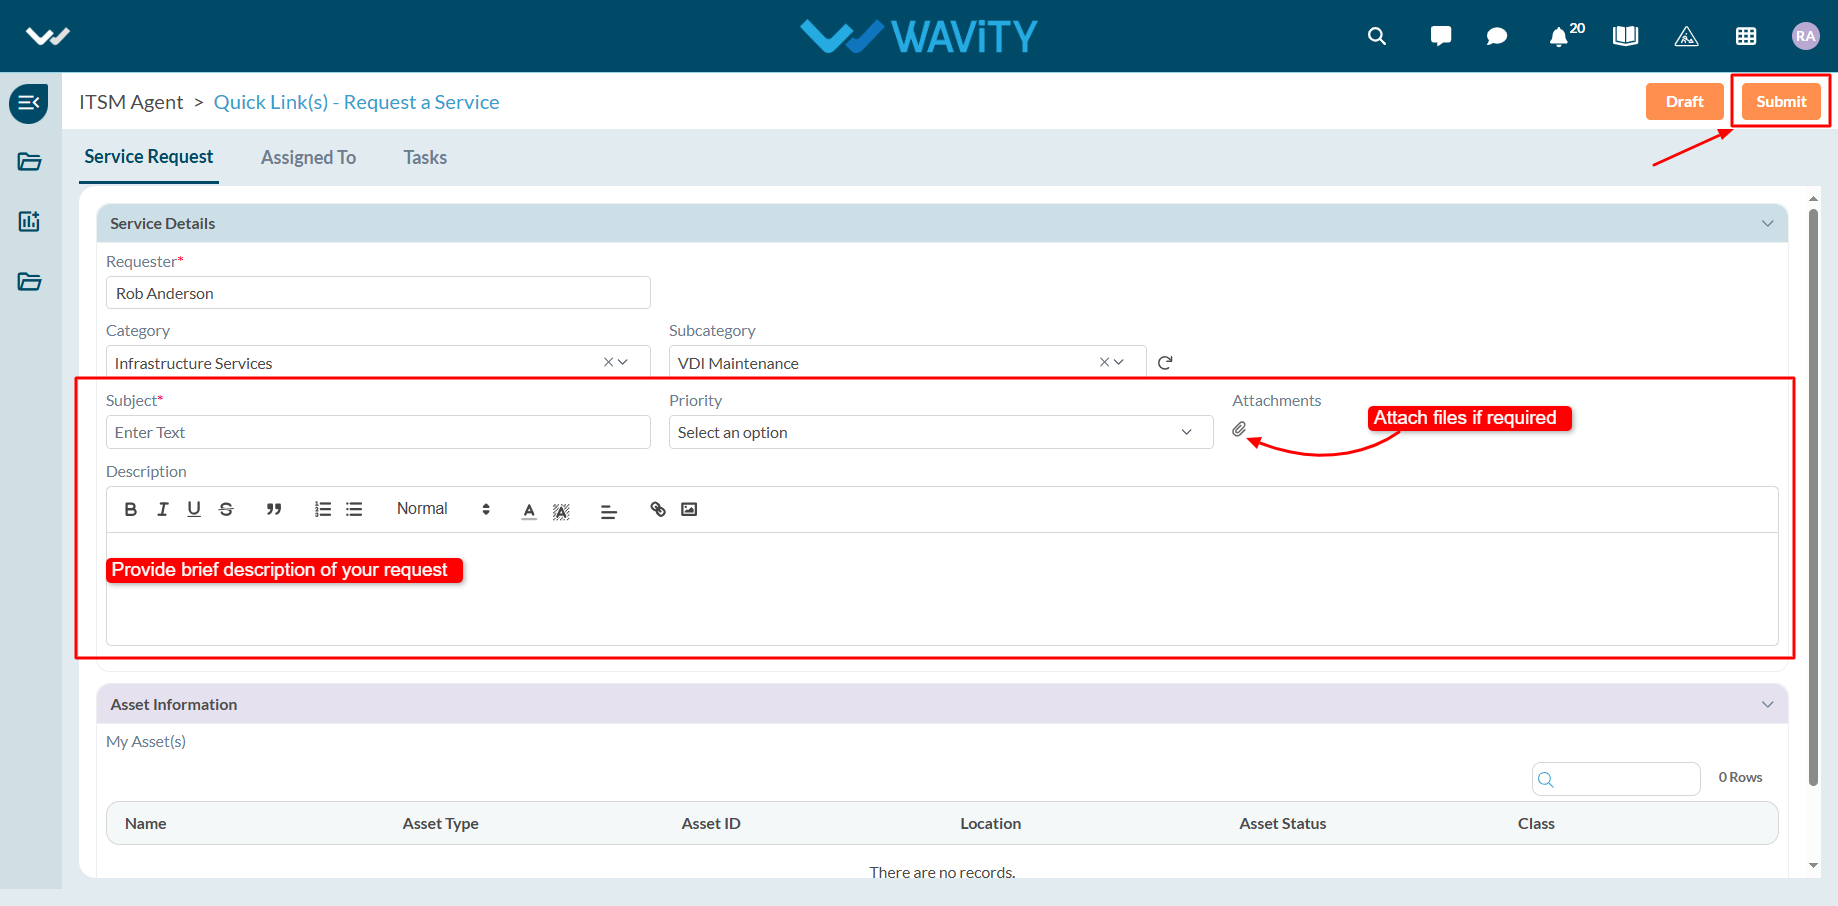
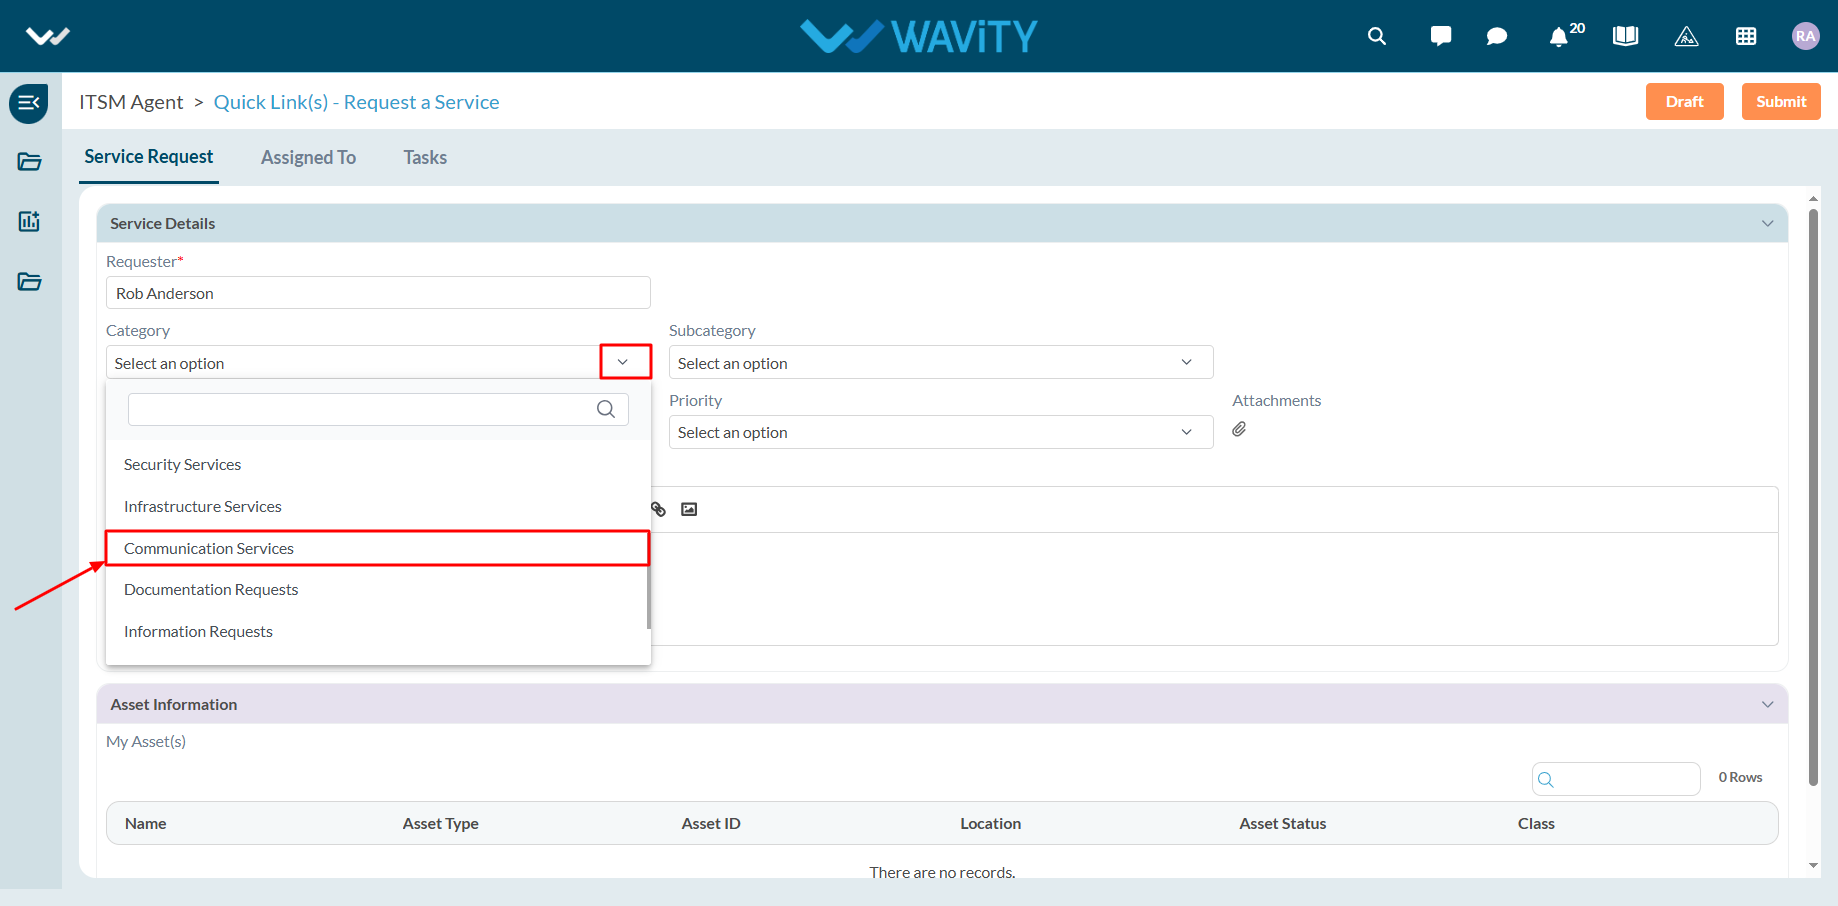
End User Guide: Communication related Service Requests
- Service requests in Wavity is simple, user-friendly, and accessible via Wavity Help & ServiceDesk.
- Note: The steps provided below are sample instructions and can be customized to suit specific organizational requirements; however, the core workflow remains consistent.
- Users can log in with their credentials on the Wavity platform, which will direct them to the End User Interface.
- From the Quick Links widget, click on ‘Request a Service’ to begin the process.
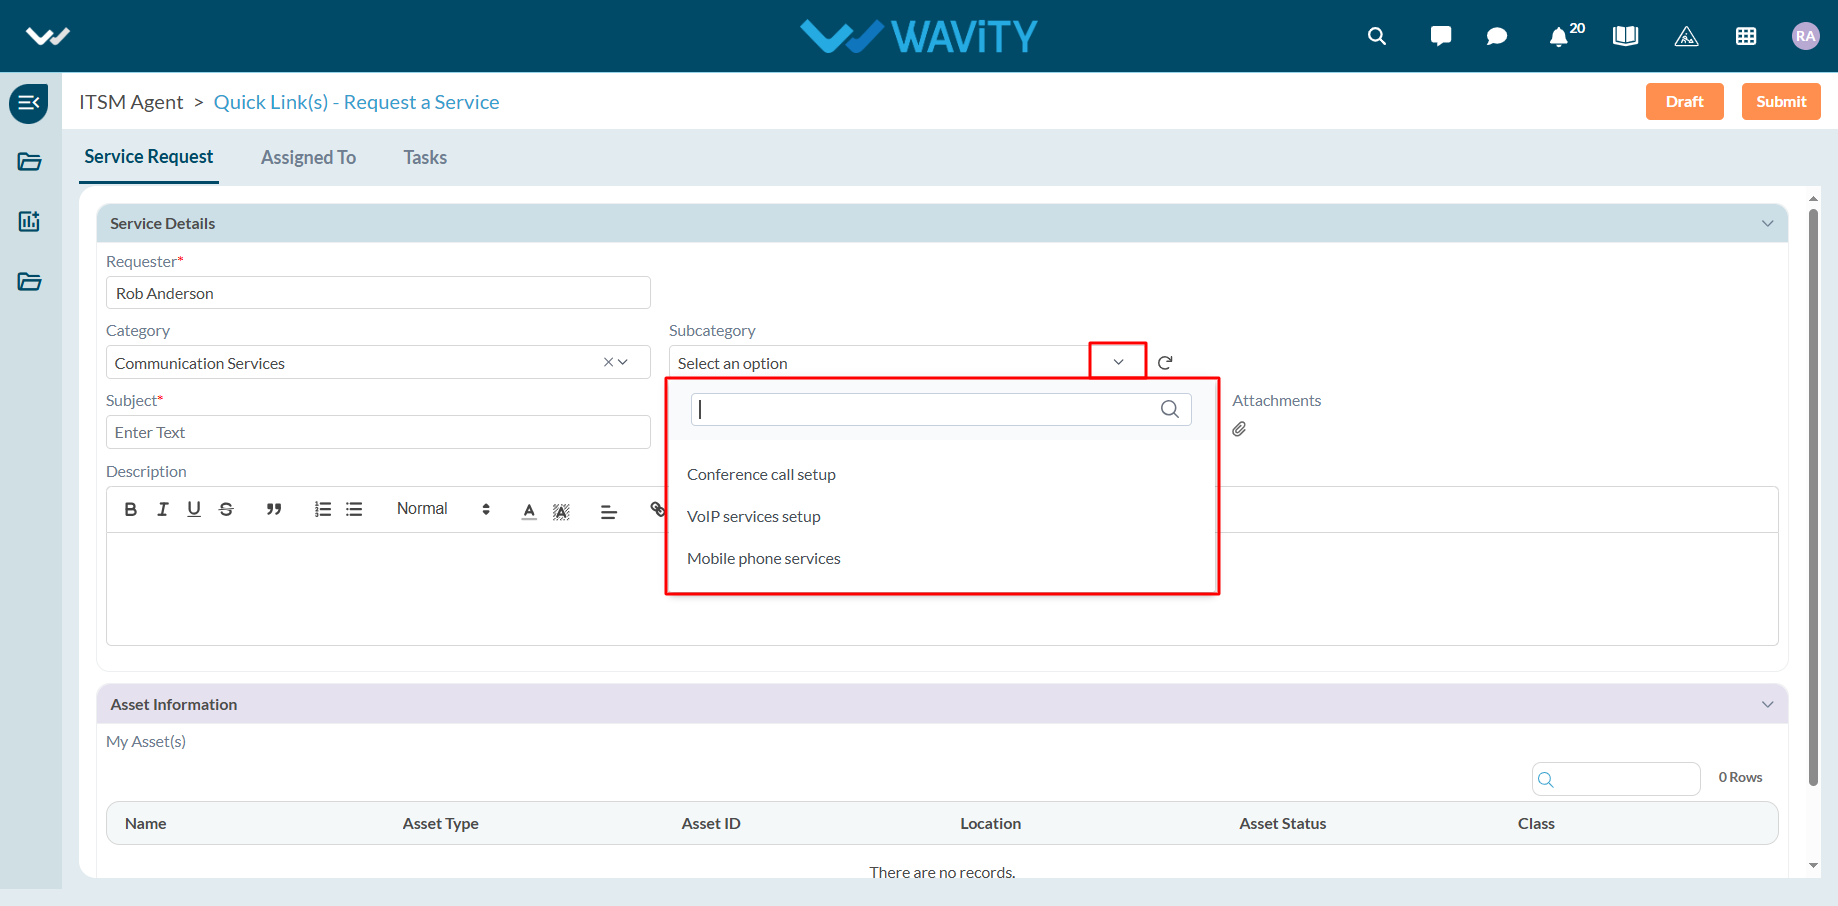
- Select Communication Services from the Category dropdown menu. Based on the selected Category, Sub-Category values will auto-populate.
- Select the appropriate Sub-Category for your request.
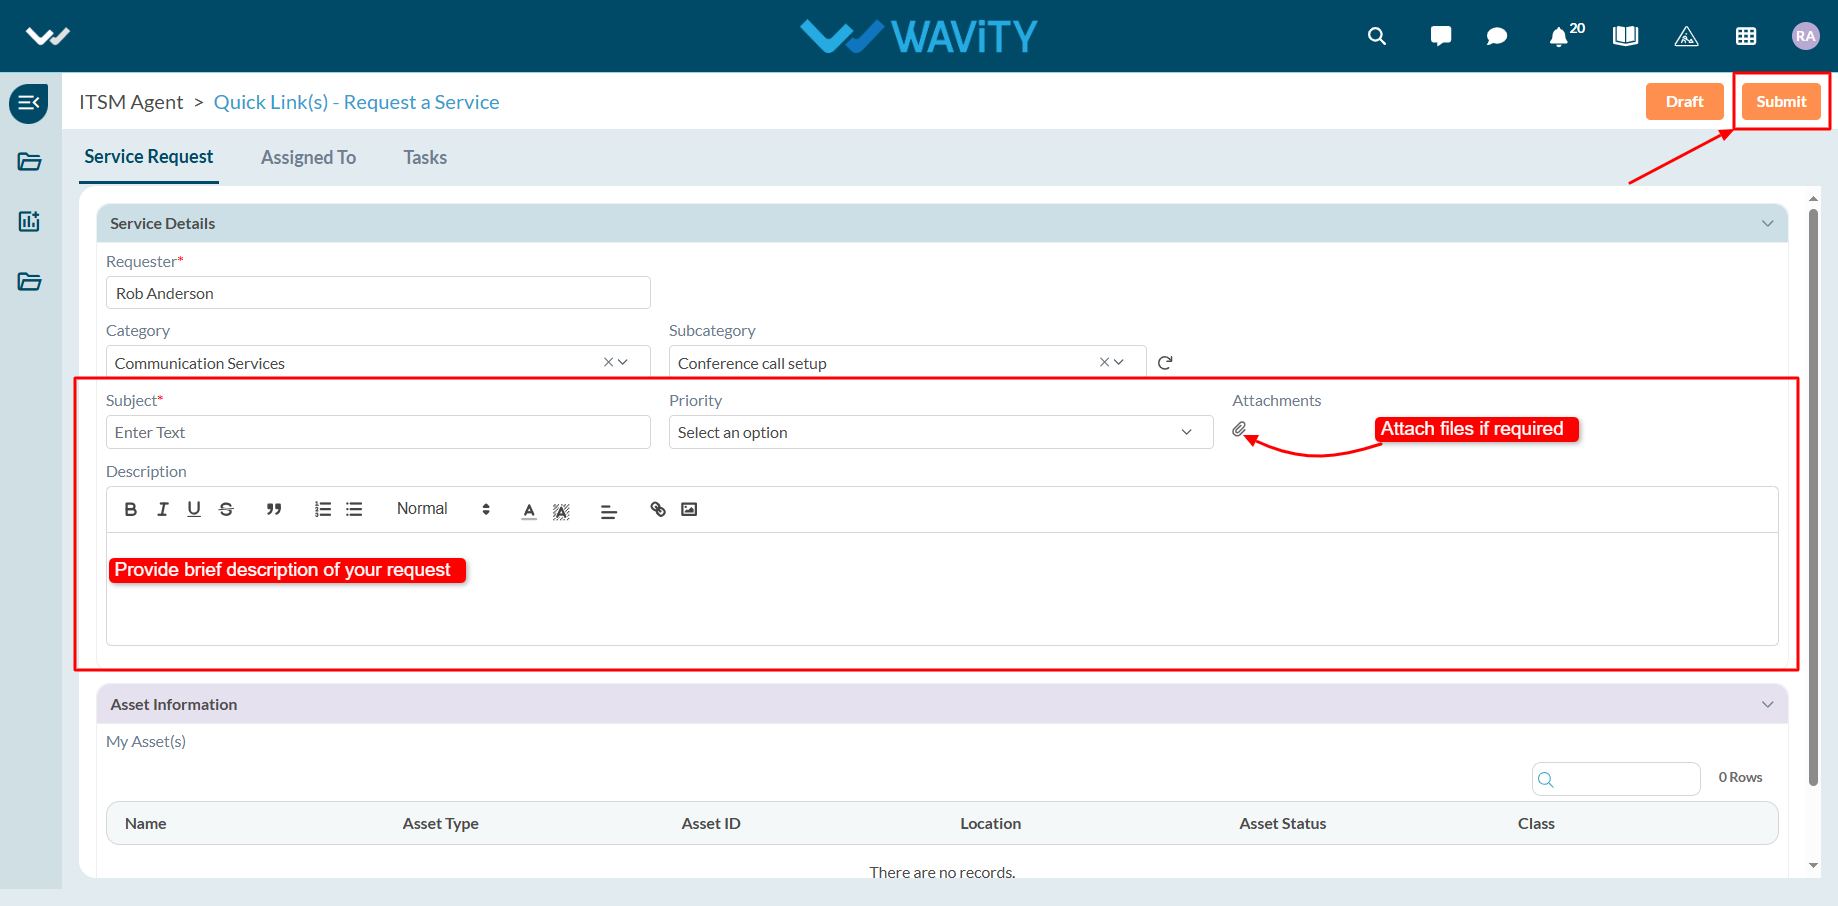
- Enter the Subject and a detailed description of your service request. Attach files if necessary.
- Choose the appropriate Priority level from the dropdown.
- Click Submit to complete the request process.
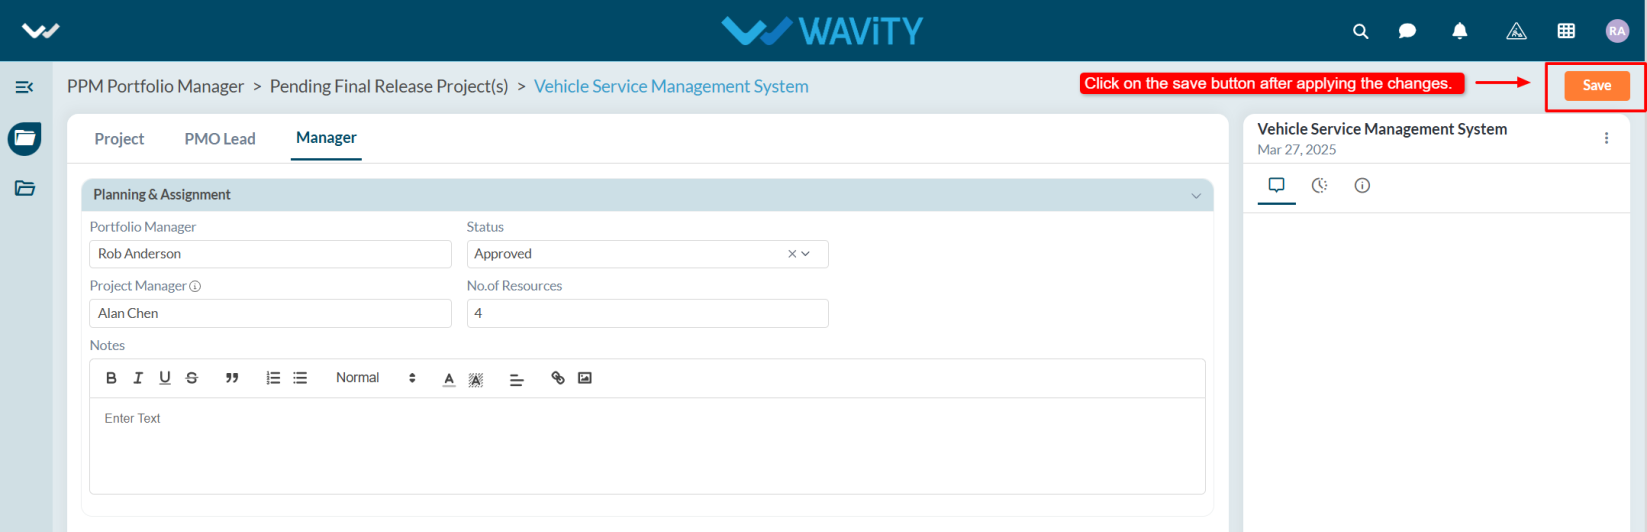
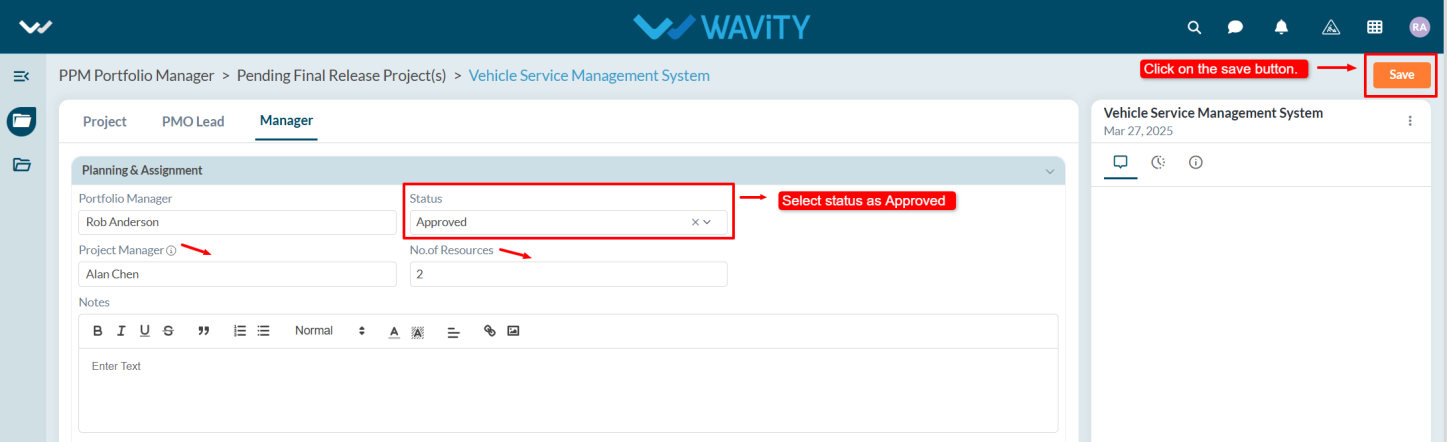
Portfolio Manager Guide - Assigning a Project Manager
- In the Wavity PPM Module, assigning a Project Manager to a project is a simple and user-friendly process.
- Only users with Portfolio Manager access can assign a Project Manager.
- Upon logging in with their credentials, users will be directed to the Portfolio Manager Interface.
- Portfolio Managers can track project statuses via Quick Links, view active projects in the Active Projects table widget, and monitor all pending projects in Final Release Project(s) table widget.
- Note: The steps outlined below are sample instructions and can be adapted based on specific requirements; however, the core workflow remains unchanged.

- To assign a Project Manager, select a project listed under Pending Final Release Project(s).
- Review the project details in the Project and PMO Lead tabs.
- Navigate to the Manager tab. Under the Portfolio Manager section, update the Status to Approved.
- Select the desired Project Manager from the dropdown, enter the required number of resources for the project, and include any notes if needed.
- Click Save to apply the changes. A notification will be sent to the assigned Project Manager, who can then begin working on the project.
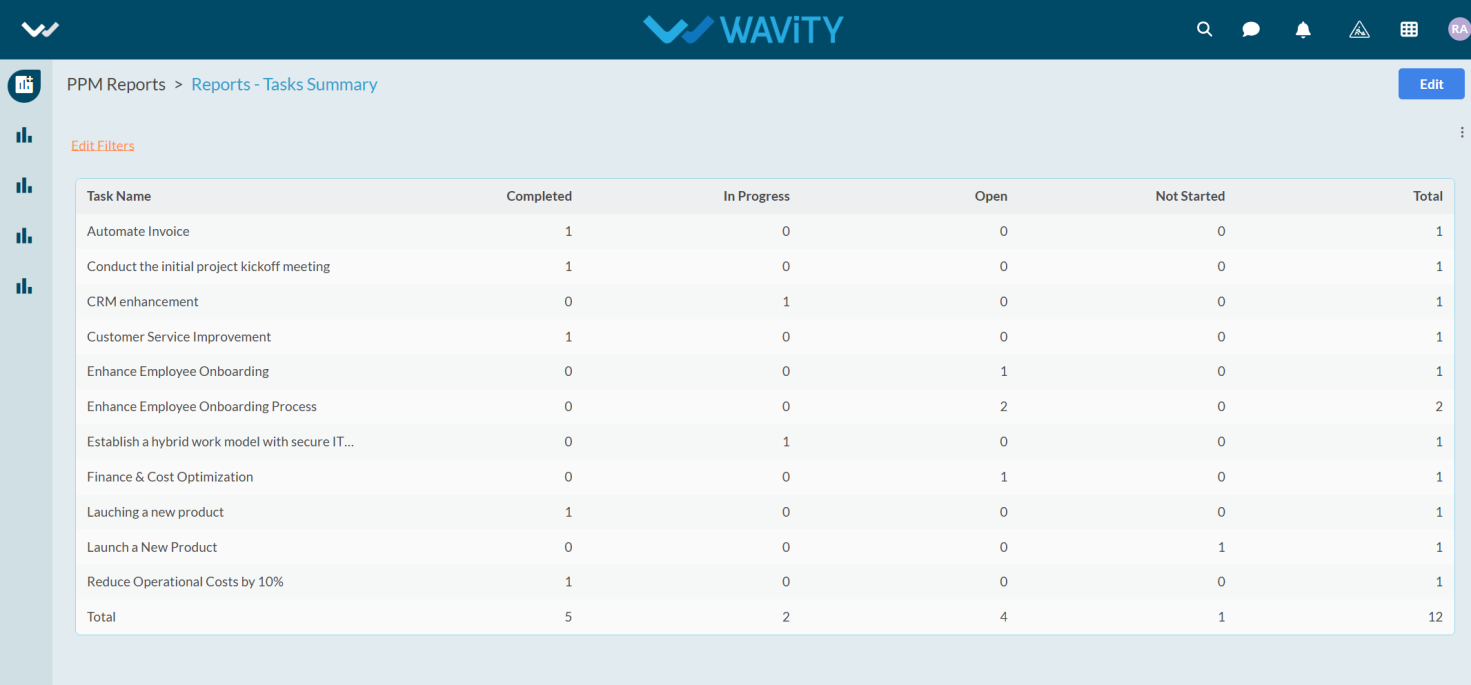
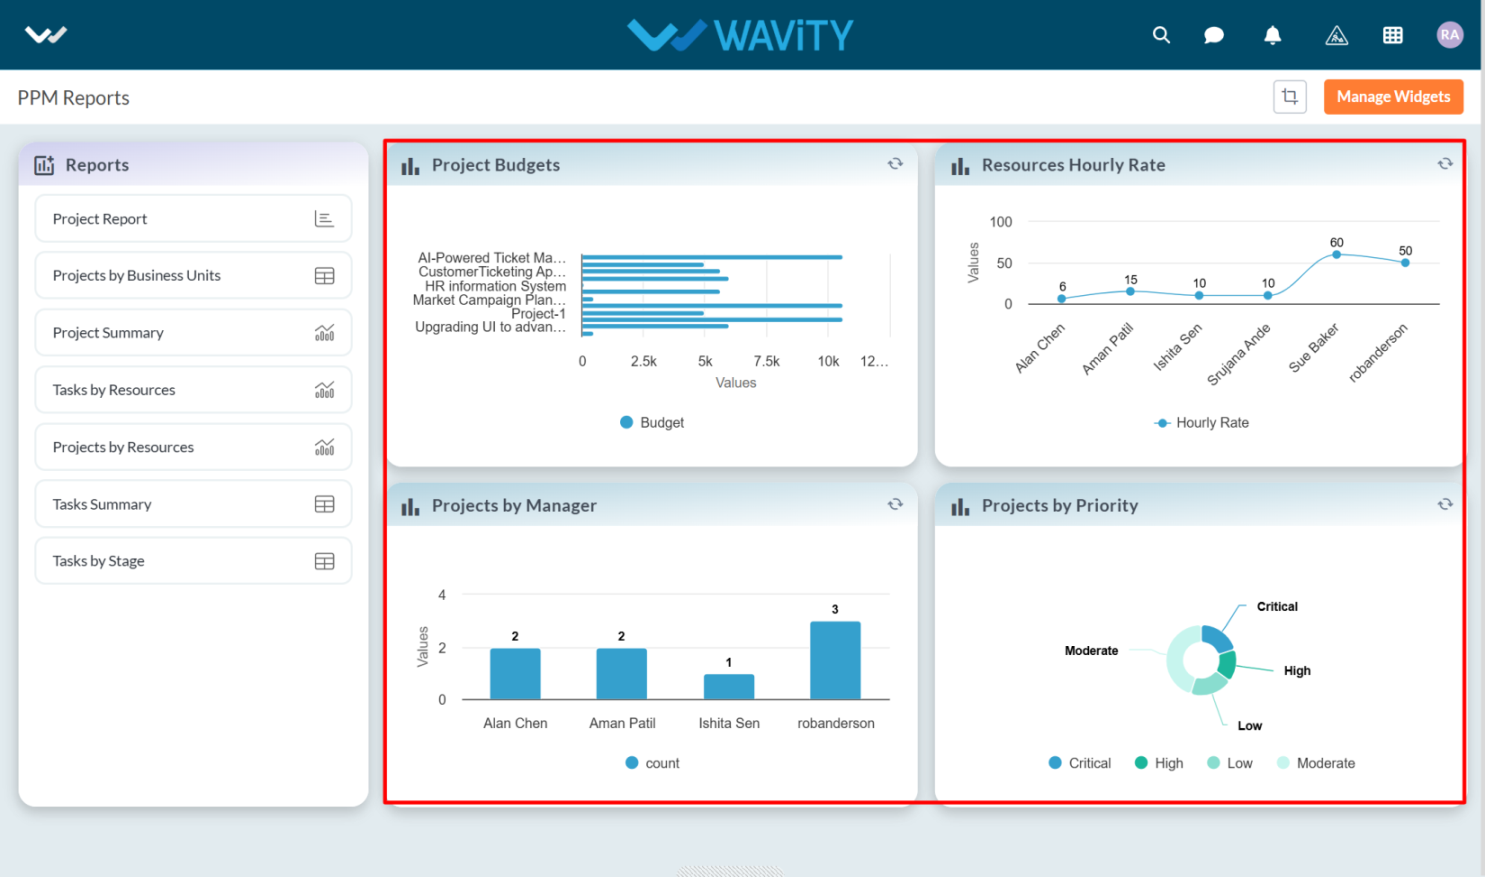
PPM Reports Interface: Overview
- The PPM Reports module in Wavity provides Project Managers, PMO leads, and other stakeholders with a centralized view of key project metrics, helping in efficient decision-making.
- Note: The steps provided serve as sample instructions and can be customized based on specific requirements; however, the core workflow will remain the same.
- Users can access various project reports from the left-hand side panel:

- Project Report – View detailed project information in column chart.
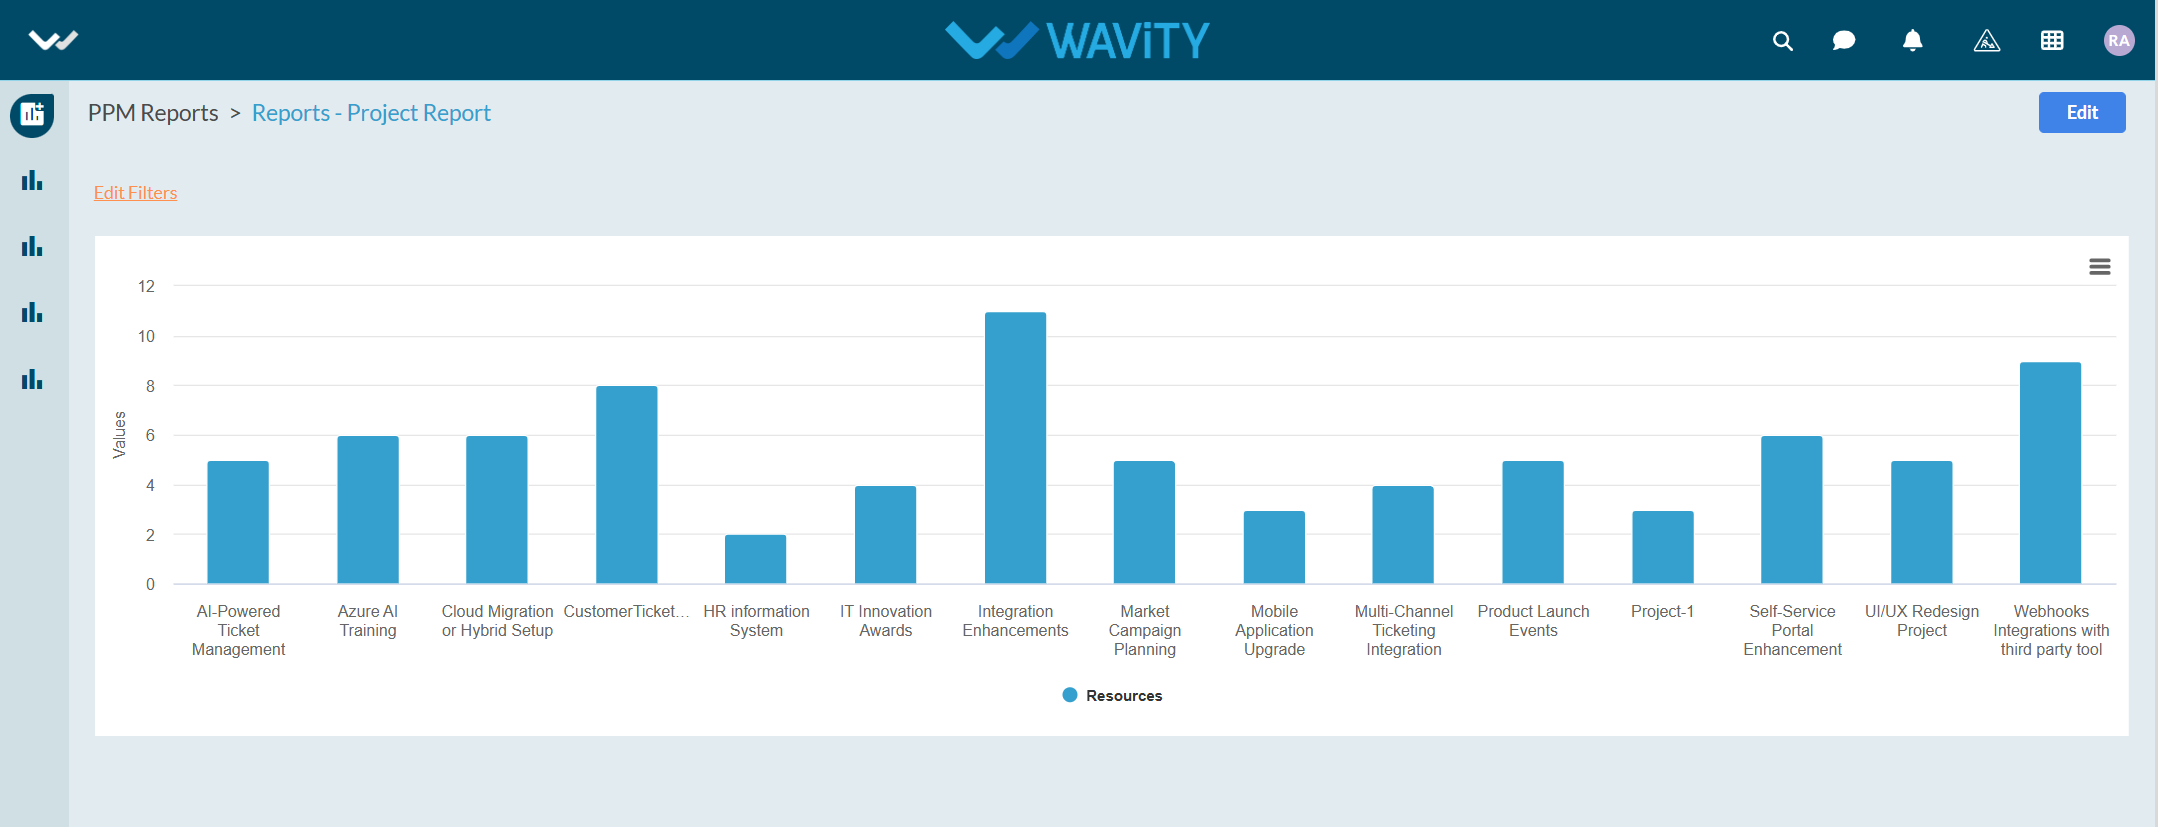
- Projects by Business Units – Filter and track projects under specific business units.
- Project Summary – Overview of all project-level insights.
- Tasks by Resources – Analyze how tasks are distributed across team members.
- Projects by Resources – See resource allocation across different projects.
- Tasks by Stage – Understand task progression across different project stages.
- Tasks Summary – Get a summarized view of all project tasks.
- Additional reports are available through the interface provided below.
- Project Budgets: Displays a bar chart representing the budgets allocated to each project. This visualization assists in comparing and tracking budget distribution across projects such as AI-Powered Ticket Management, HR Information System, Market Campaign Planning, and others.
- Resources Hourly Rate: A line chart illustrating the hourly rates of resources, supporting effective cost analysis and budget planning.
- Projects by Manager: Bar chart showing the number of projects handled by each manager.
- Projects by Priority: A donut chart categorizing projects by priority critical, high, moderate, and low helping PMOs and Leads prioritize effectively.
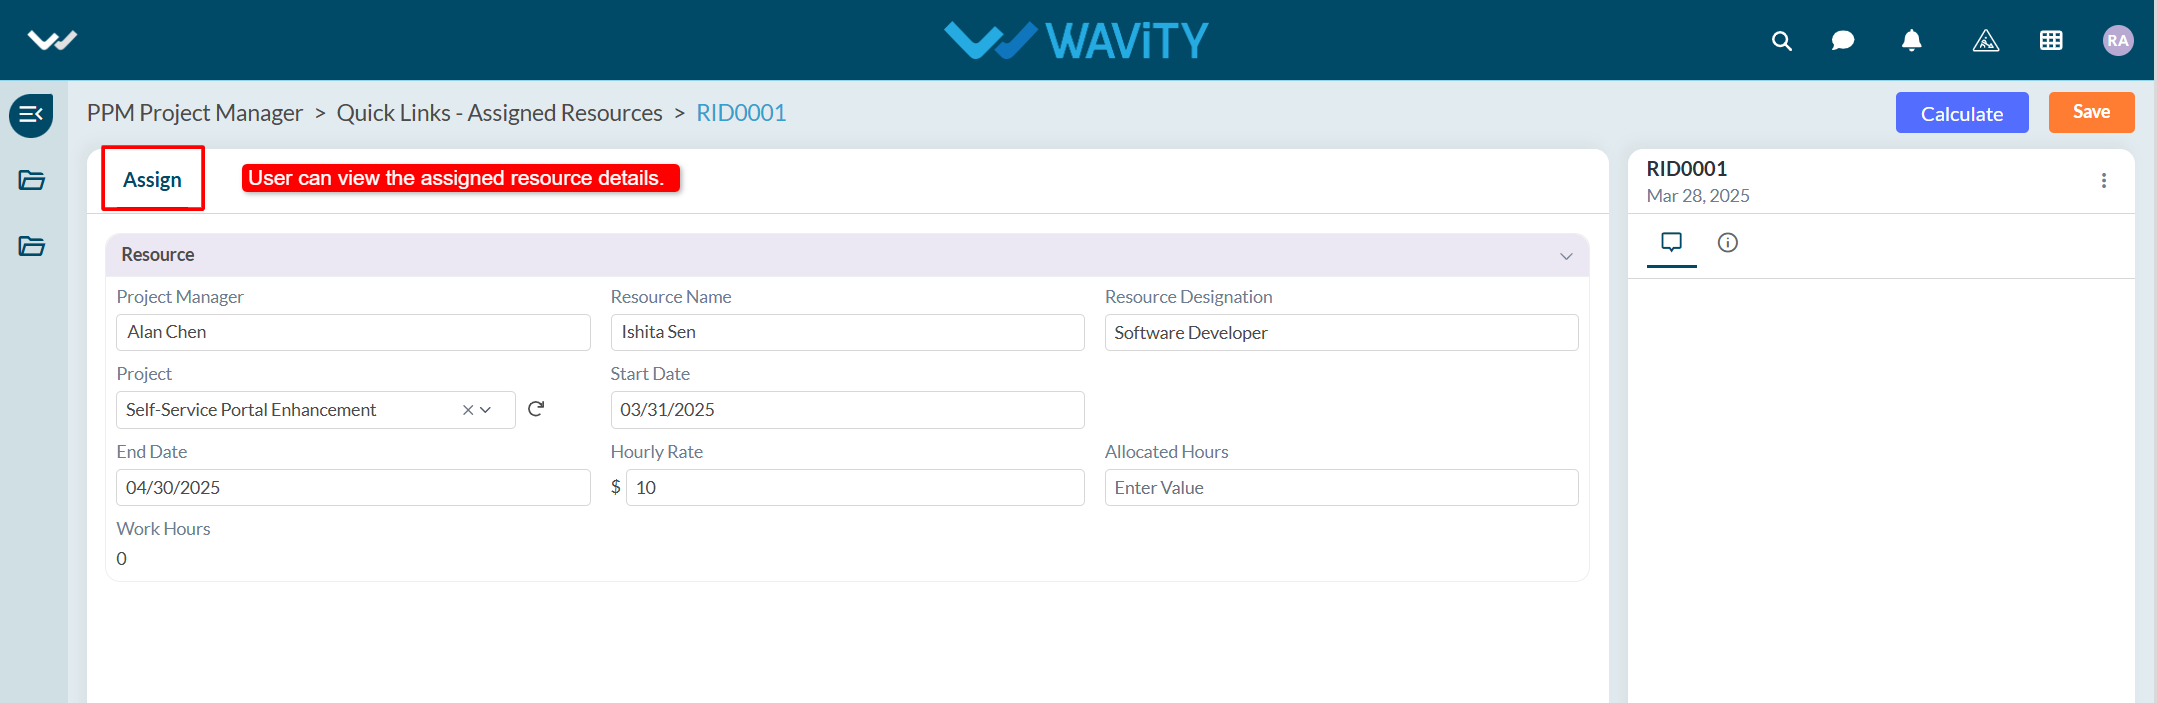
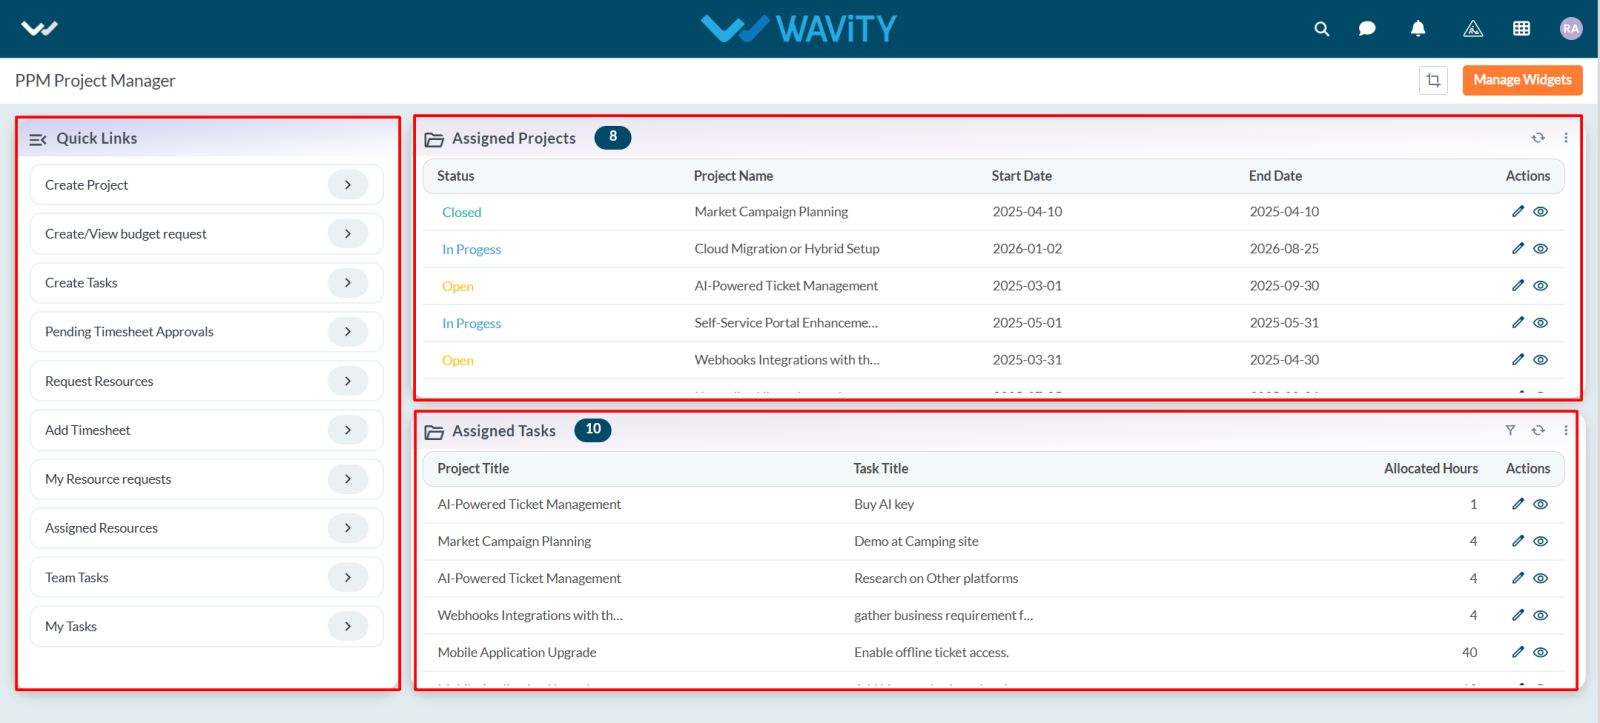
Project Manager Guide: Viewing Assigned Resources
- In the Wavity PPM Module, Project Managers can easily view the list of resources assigned to their projects.
- This functionality helps Project Managers monitor who is working on which project, assess workload distribution, and manage team assignments efficiently.
- Note: The following steps are sample instructions and can be customized as needed; however, the core workflow remains unchanged.
- Users with Project Manager access can log in using their credentials and will be directed to the Project Manager Interface.
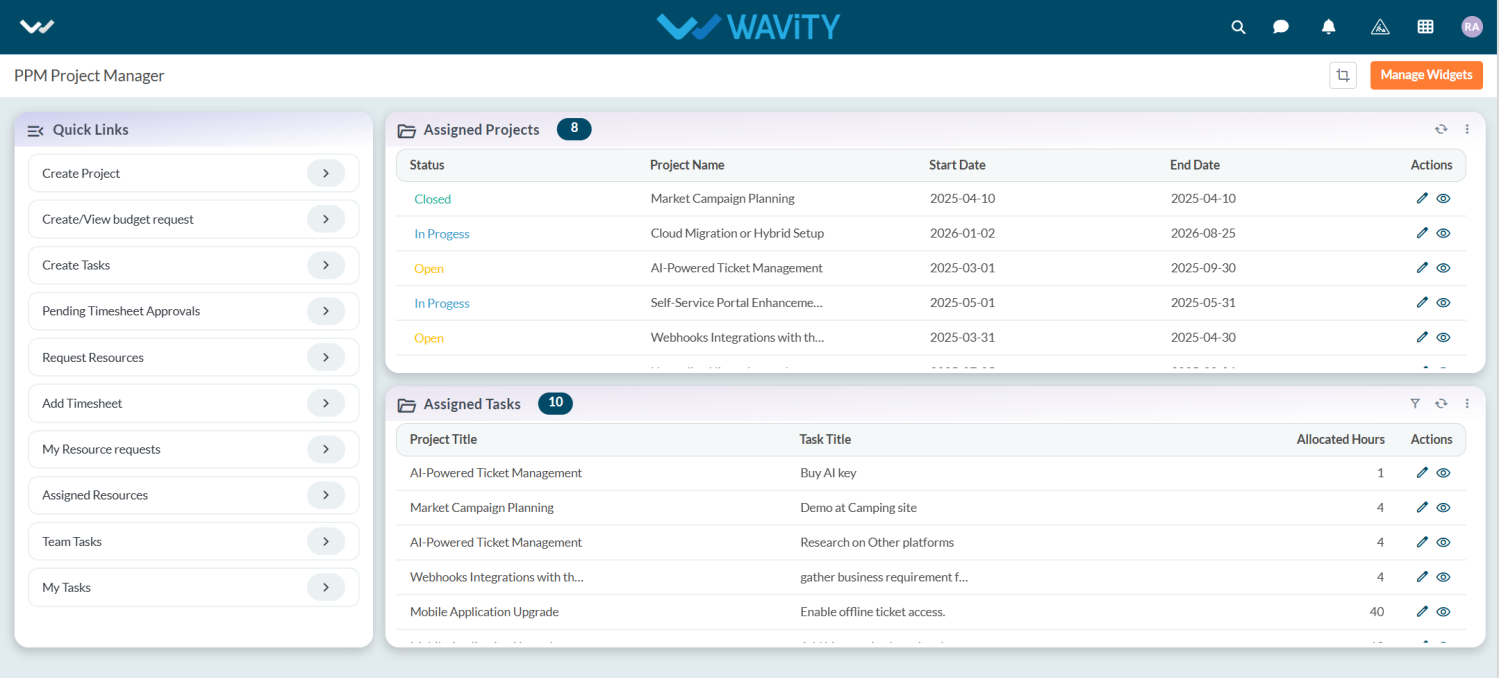
- To view assigned resources for a project, navigate to Assigned Resources under the Quick Links.
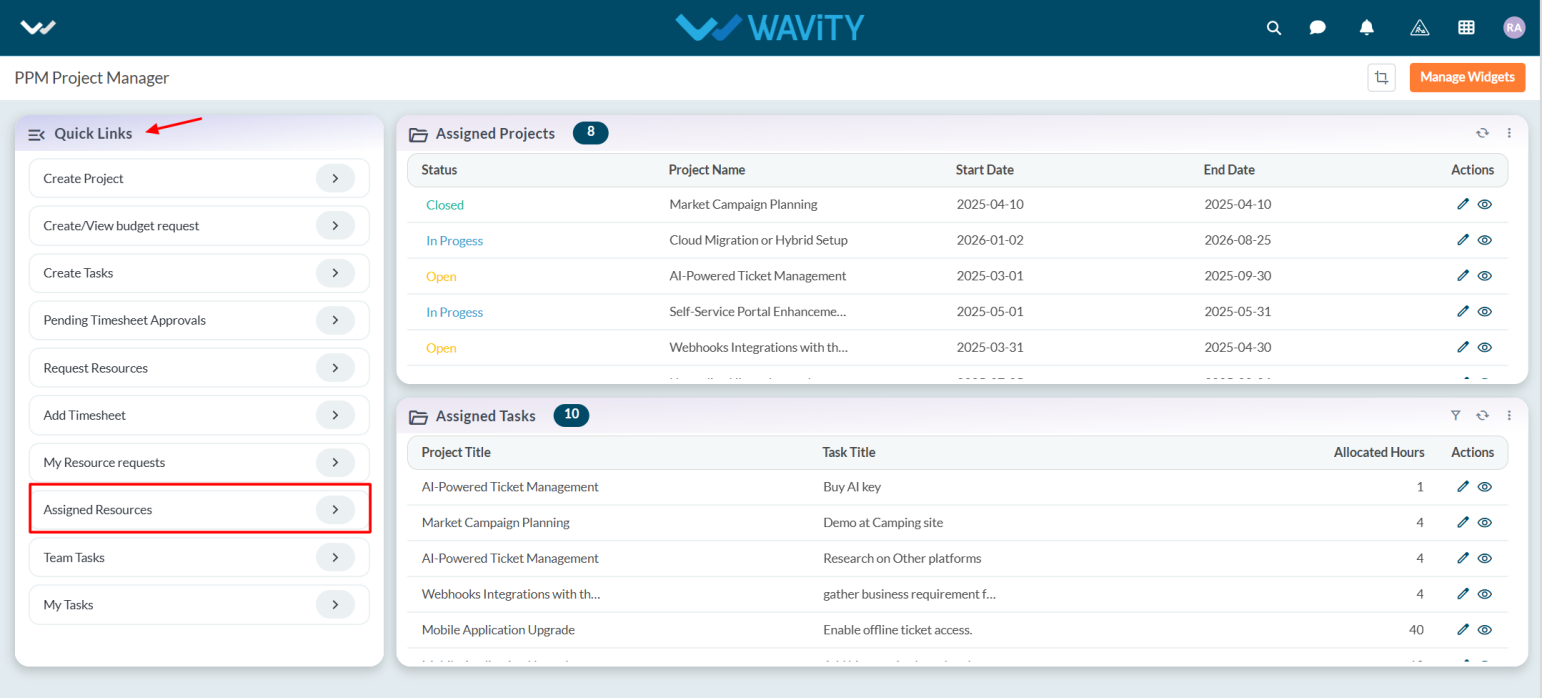
- From the displayed list, click on the desired resource to view detailed assignment information.
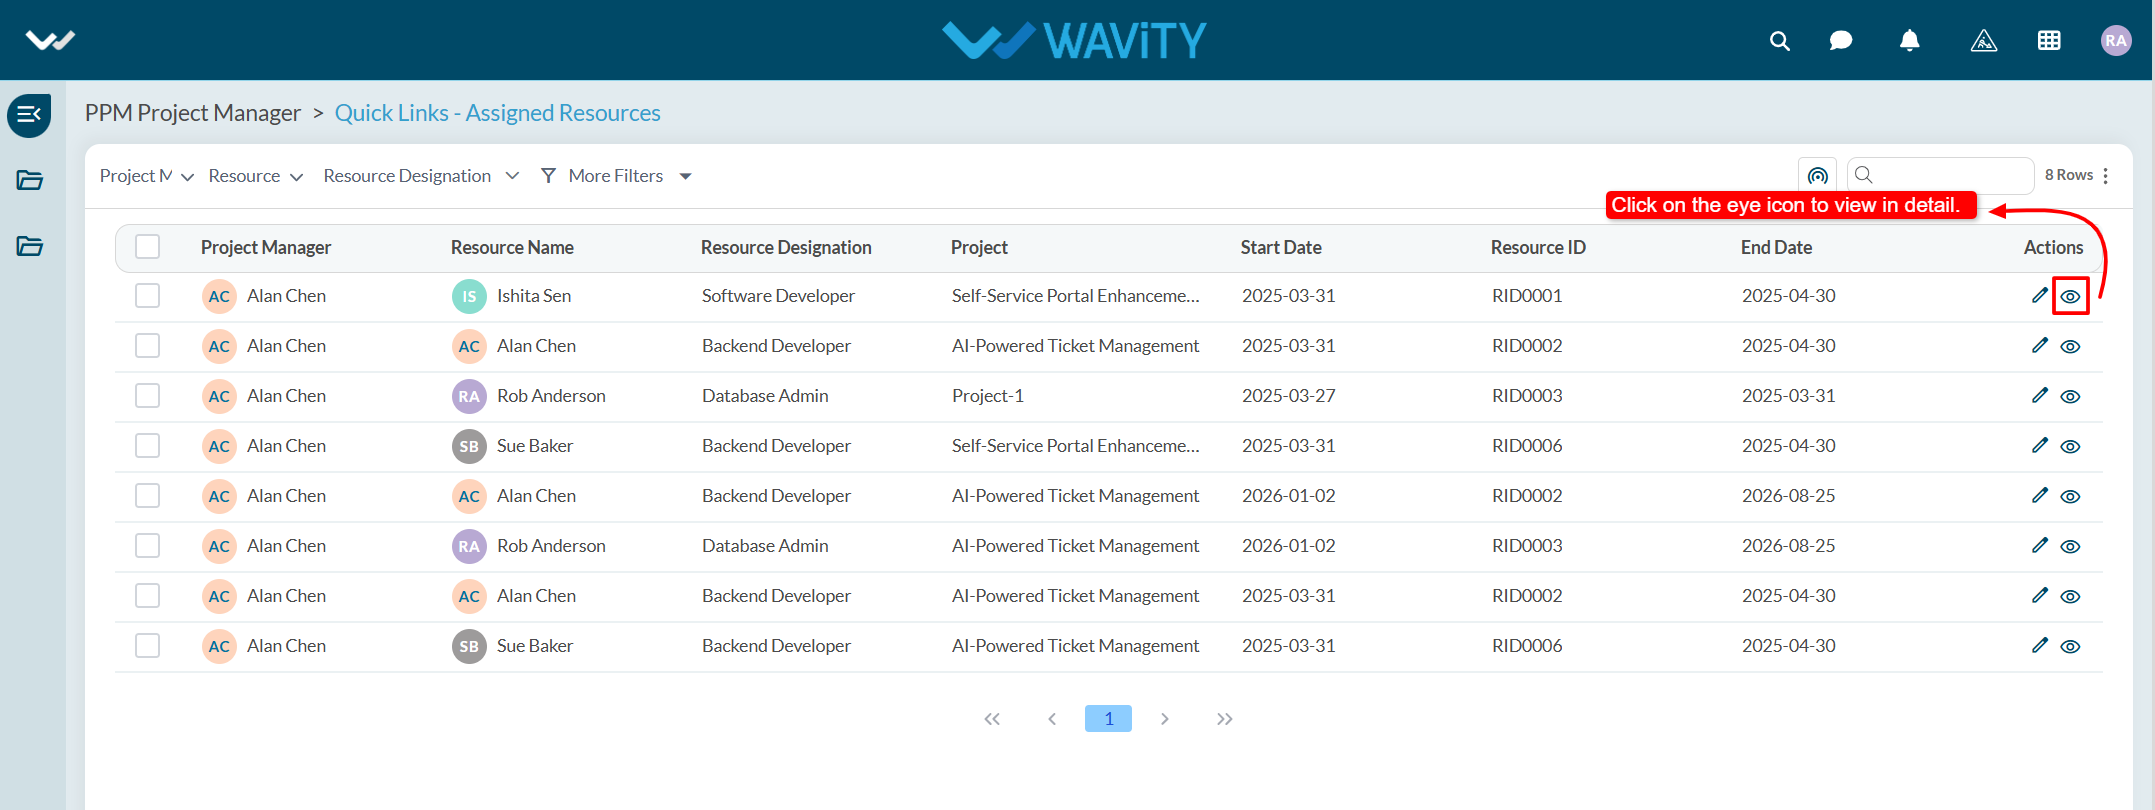
- The details view will show key information such as the resource’s name, role, hourly rate, start date, and allocated hours for the selected project. This view supports effective project planning, enhances communication, and enables timely follow-ups with team members.
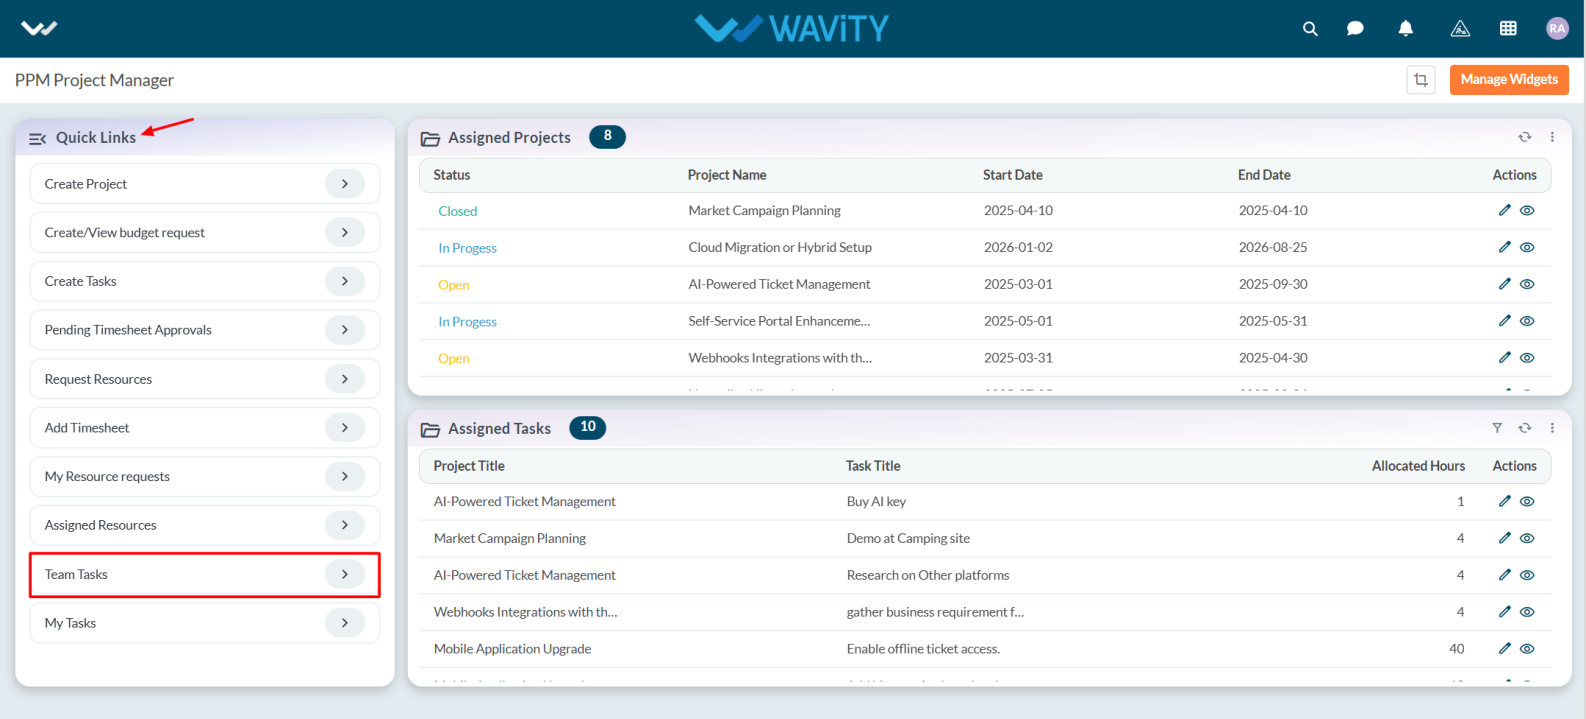
Project Manager Guide: Viewing Team Tasks
- In the Wavity PPM Module, Project Managers can conveniently view Team Tasks assigned to team members across multiple projects.
- This feature enables Project Managers to monitor team responsibilities, track task progress, and manage workloads more effectively.
- Note: These instructions serve as a general guide and can be tailored to your organization’s specific setup. However, the core steps remain consistent.
- Project Managers can log in using their credentials and will be redirected to the Project Manager Interface.
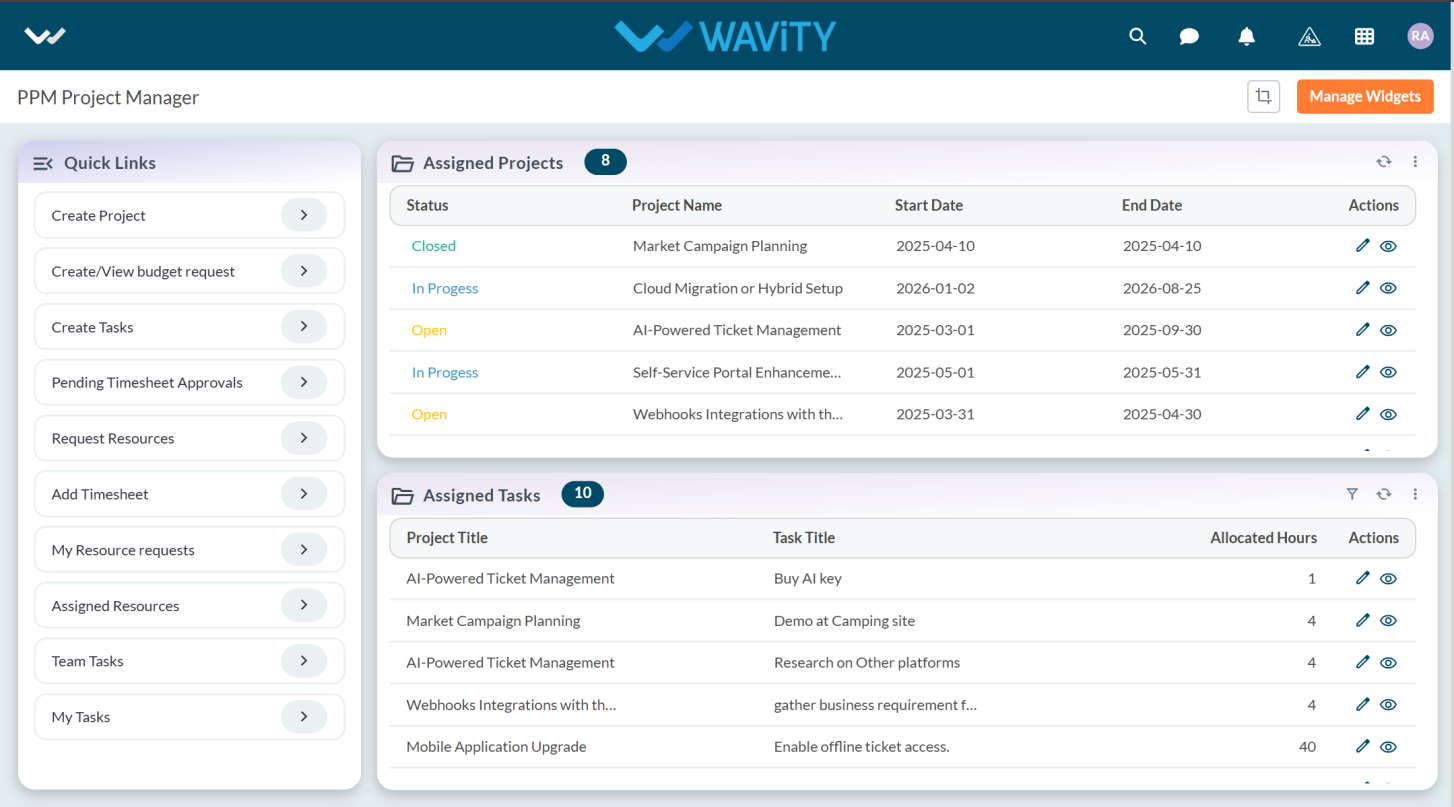
- To view Team Tasks, navigate to the "Team Tasks" under Quick Links on the left-hand panel.
- The Team Tasks displays a list of all tasks assigned by the Project Manager to their team member. Each task entry includes the following details:
- Project Title – The project to which the task is linked.
- Task Title – The description or objective of the task.
- Allocated Hours – The number of hours allotted to complete the task.
- To view more information or update a task, click the eye icon (to view) or pencil icon (to edit) under the Actions column.
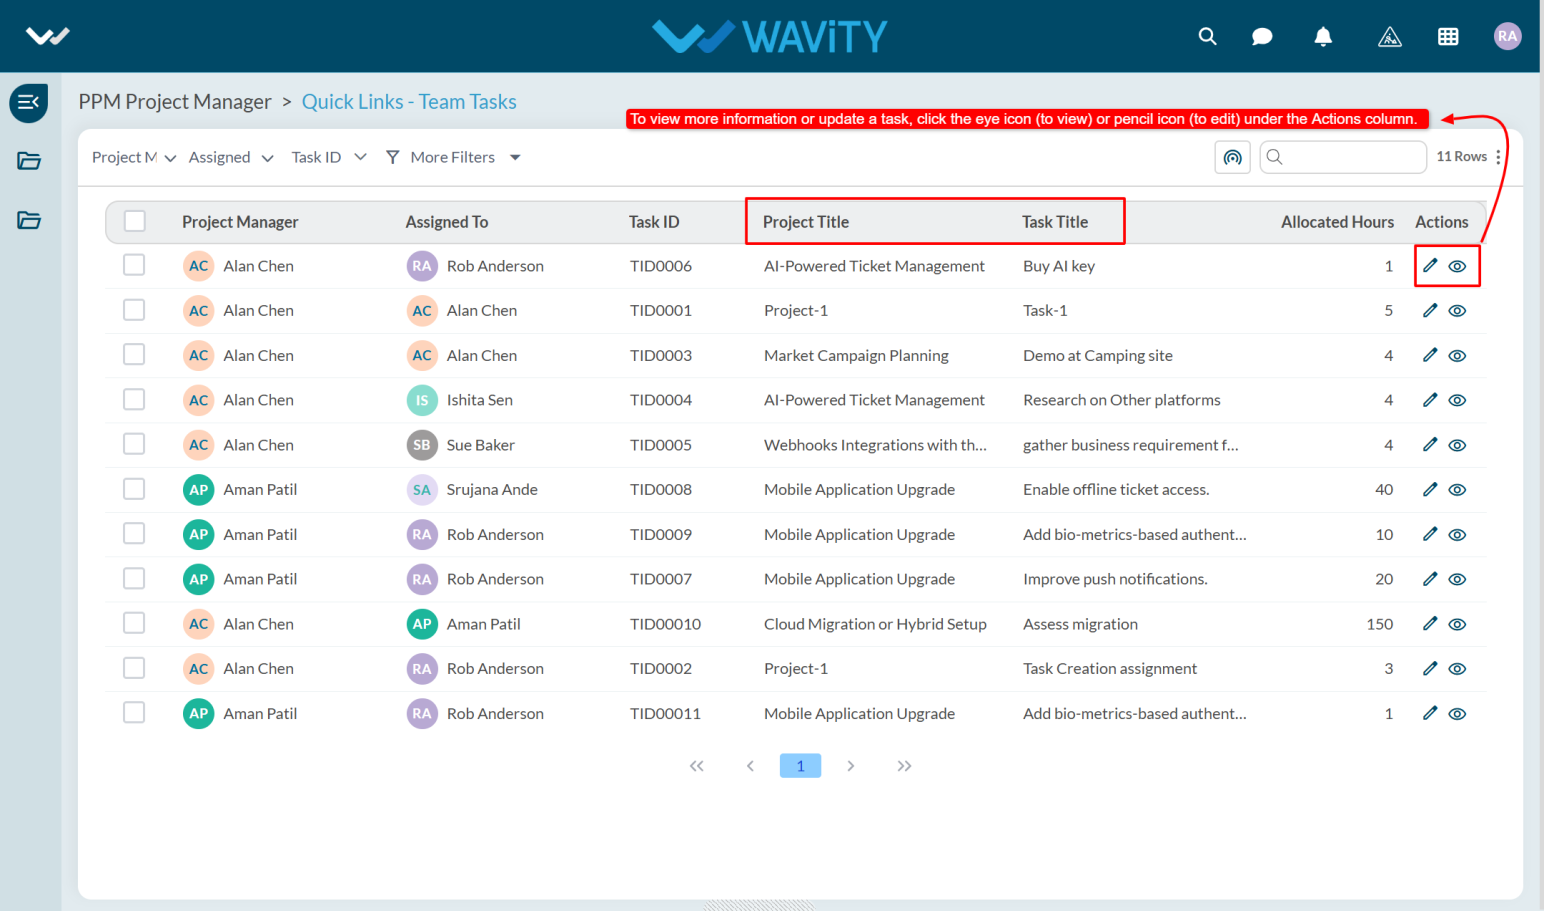
- The user can view Team Task details by clicking on the eye icon under the Actions column.
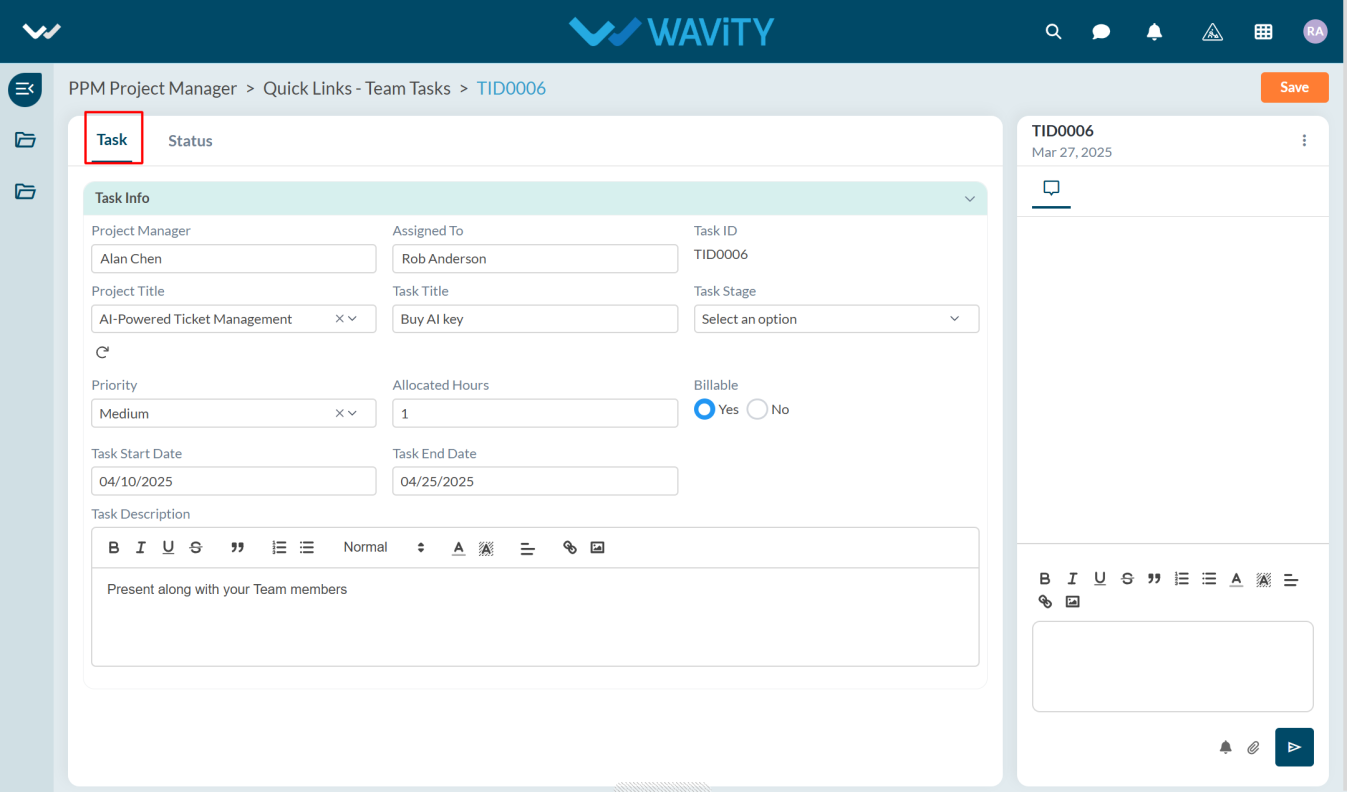
- Under Status tab user can view the Task Status, Start Date, and End Date.
- This view helps Project Managers maintain visibility over task assignments, prioritize team activities, and ensure timely project delivery.
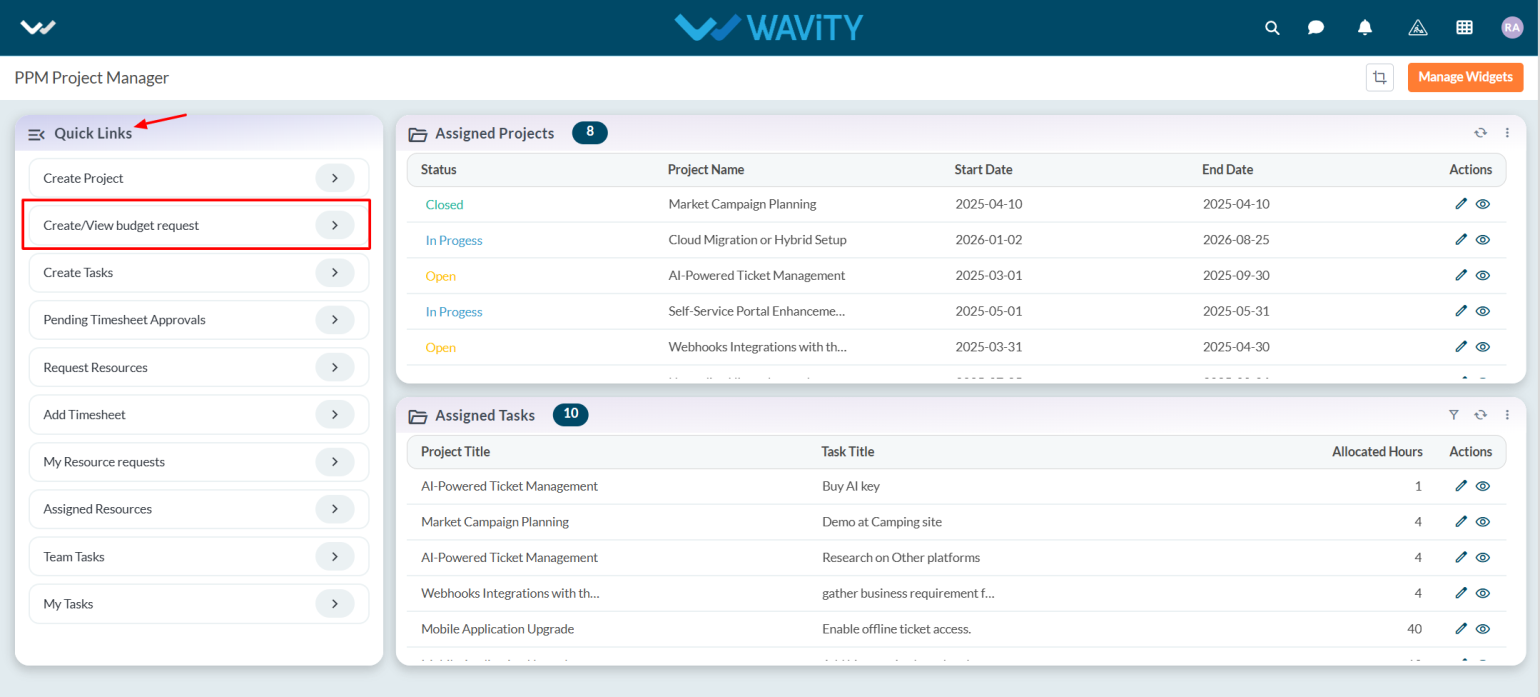
Project Manager Guide: Approving Budgets
- In the Wavity PPM Module, approving a budget as a Project Manager is a simple and straightforward process.
- Users with Project Manager access can log in using their credentials and will be directed to the Project Manager interface.
- Note: The steps provided below are sample instructions and can be tailored based on specific requirements; however, the core workflow remains consistent.
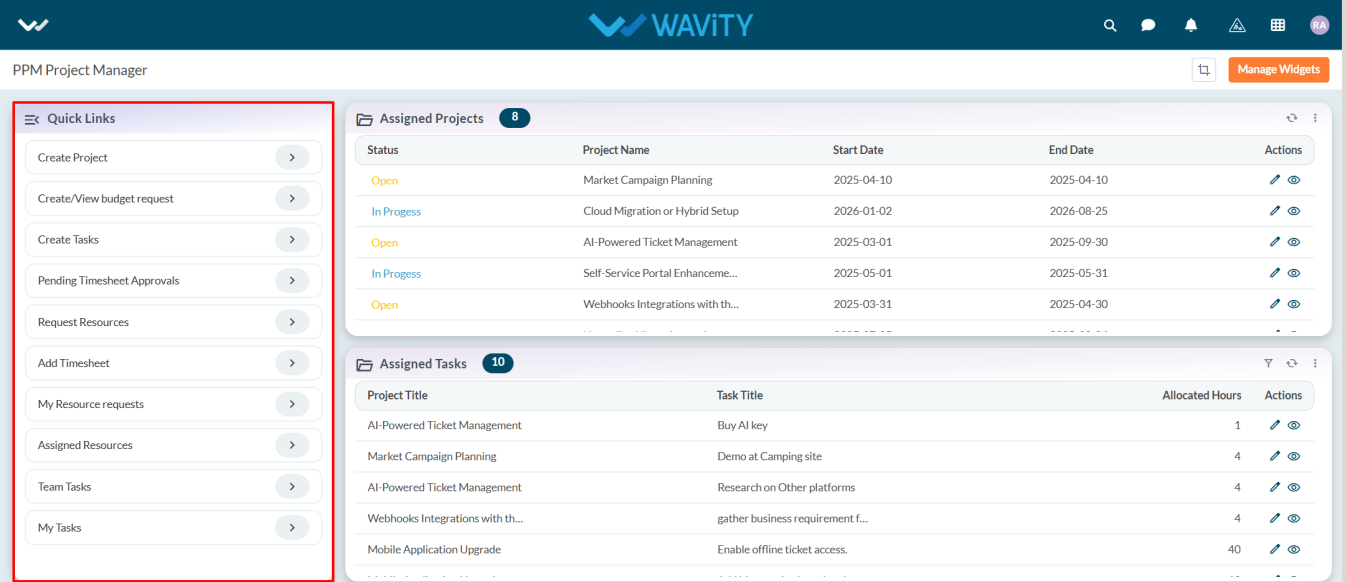
- Project Managers can create projects and tasks, request budgets, and add timesheets using the Quick Links.
- Assigned projects (assigned by the Portfolio Manager) can be viewed in the Assigned Projects table widget. Tasks created by the Project Manager will also be listed under Assigned Tasks.
- To approve a budget, click on Create/View Budget Request from the Quick Links.
- A list of budget requests will be displayed. Select any budget that is pending approval.
- Navigate to the Request tab to review the details, and then go to the Approval tab.
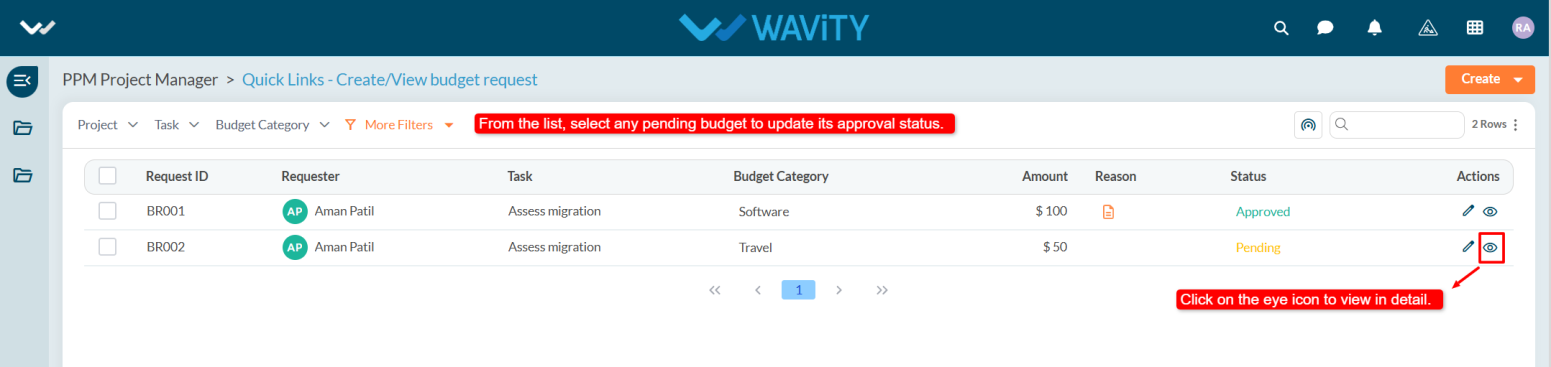
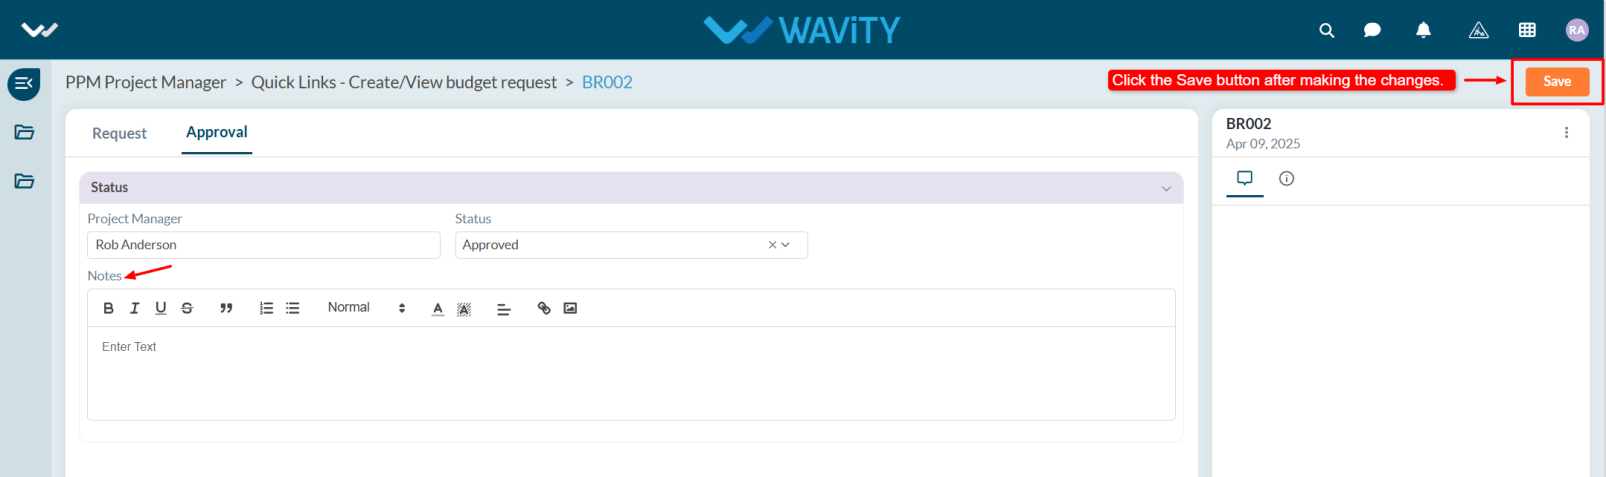
- In the Approval tab, select Approved from the status dropdown.
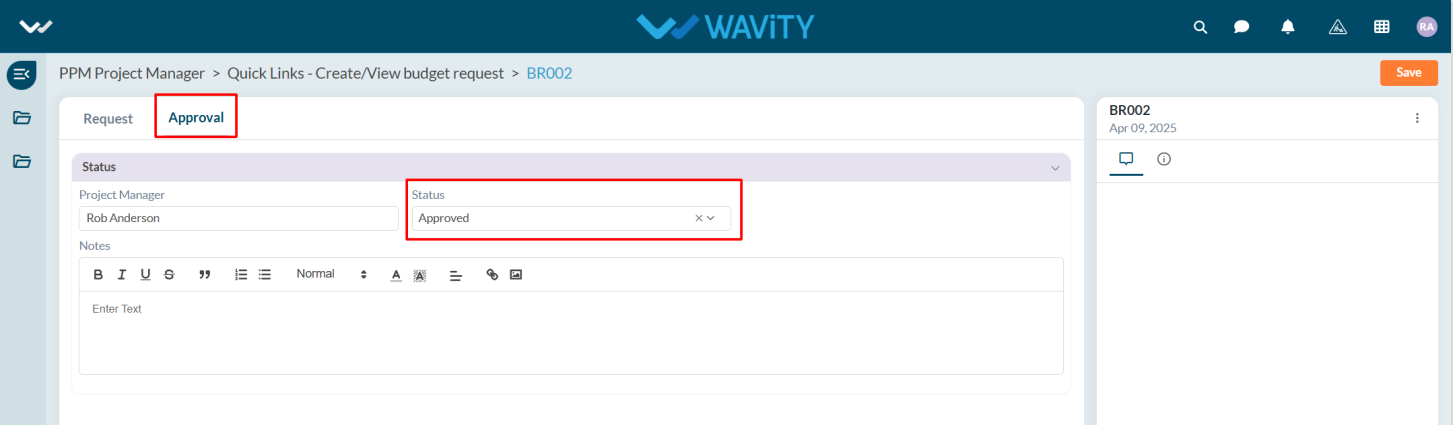
- Add comments if needed, and click the Save button to apply the changes.
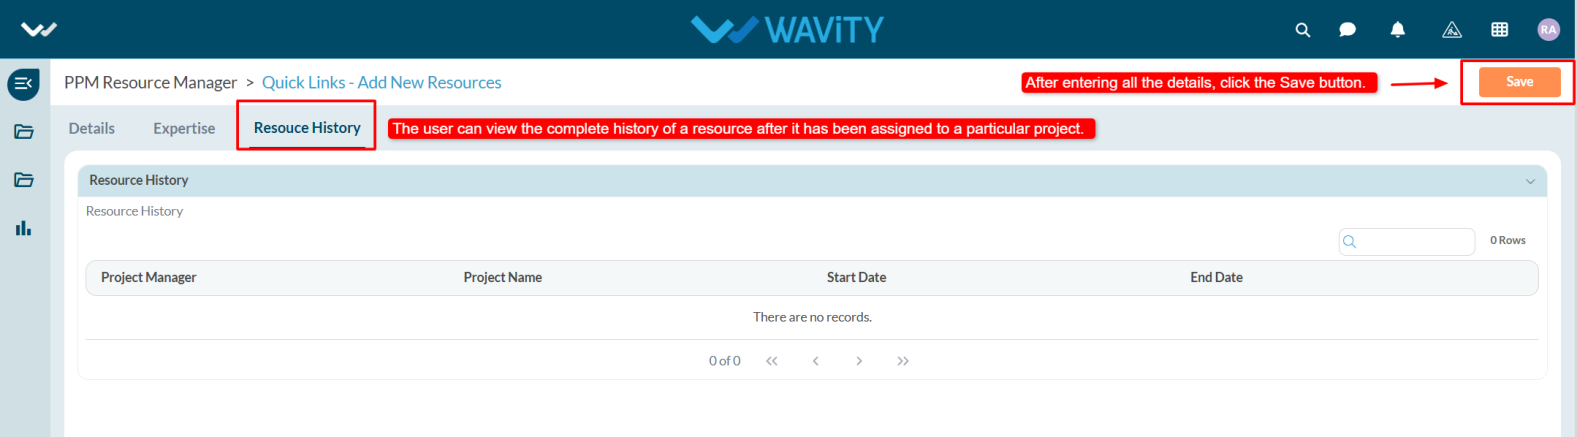
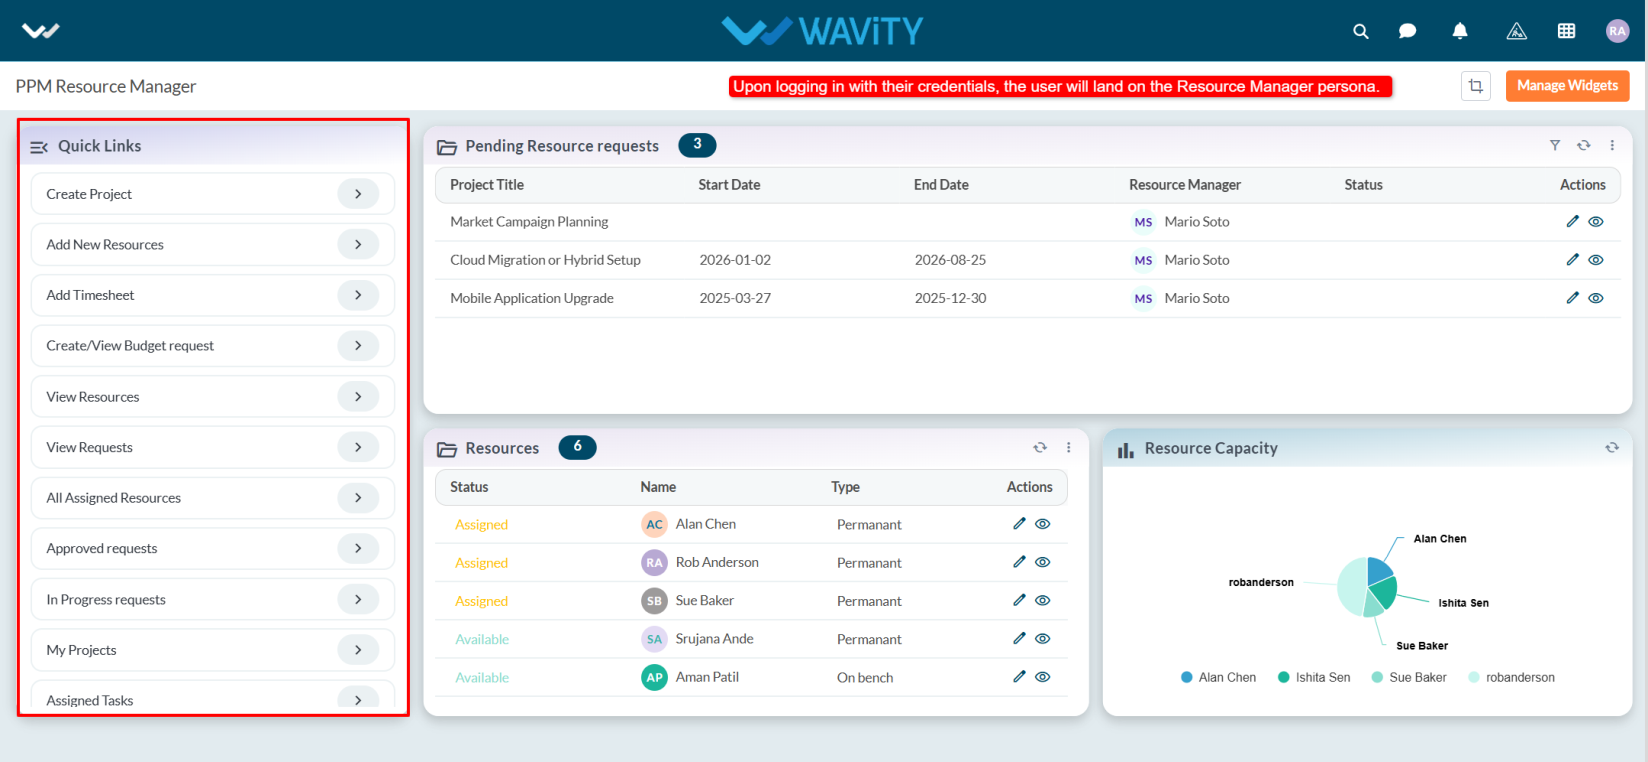
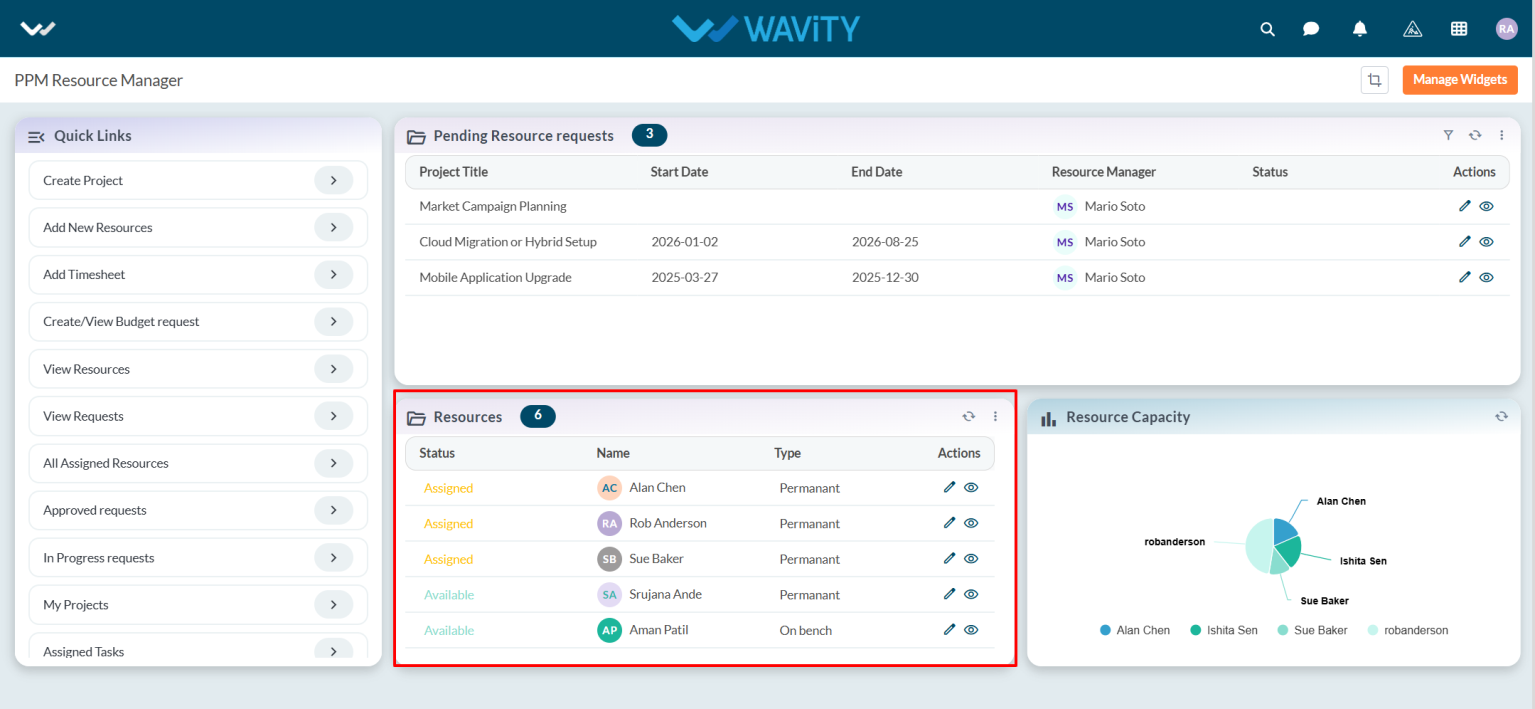
Resource Manager Guide: Viewing Resource History
- In the Wavity PPM Module, Resource Managers have the ability to view the complete assignment history of each resource.
- This feature helps Resource Managers track where and when a resource was assigned, monitor utilization, and support future project planning and decision-making.
- Note: The instructions provided here serve as general guidance and can be tailored based on specific organizational needs, but the core workflow remains the same.
- Users with Resource Manager access can log in with their credentials and will be directed to the Resource Manager Interface.
- To view a resource's assignment history, navigate to the Resource table widget.
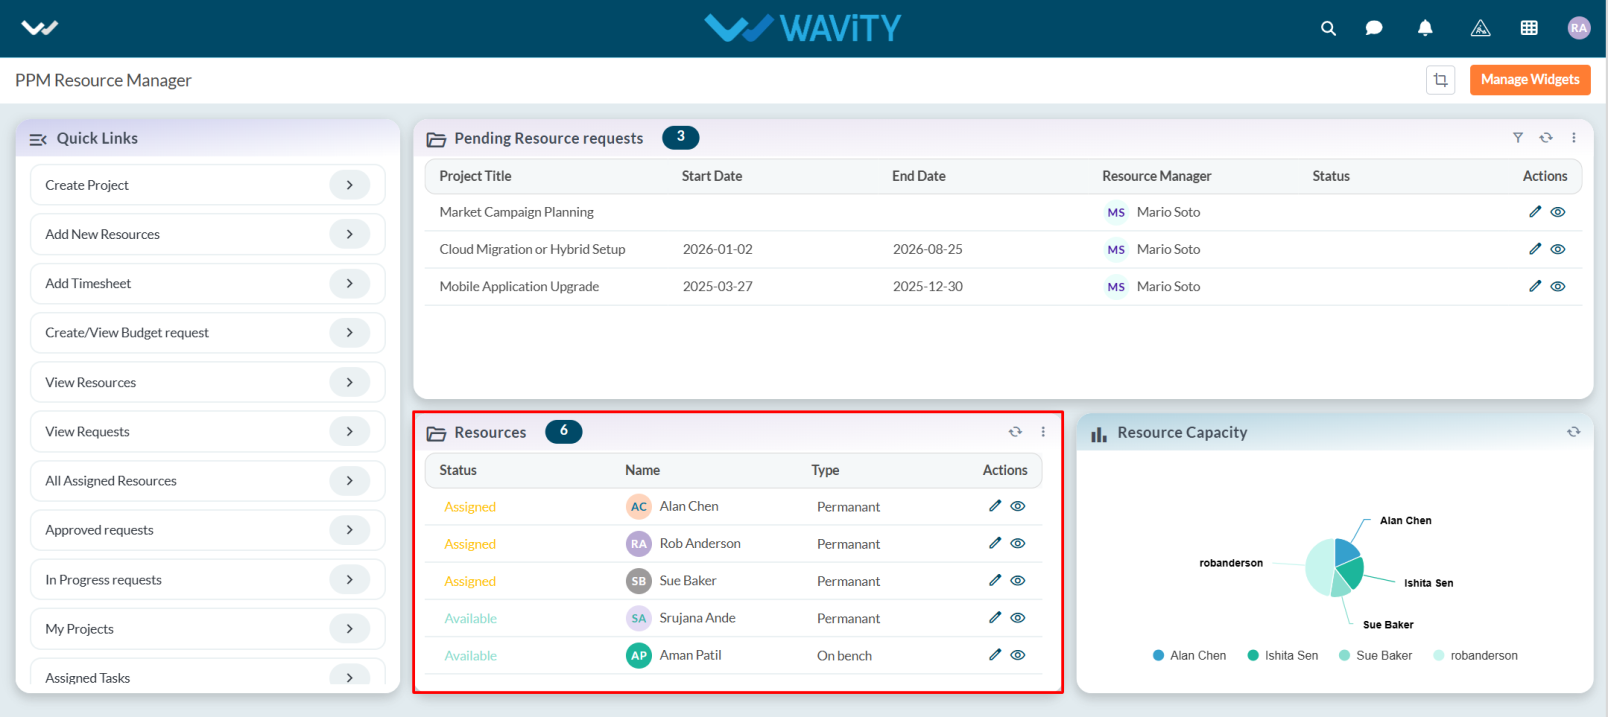
- From the list of resources, select the resource whose history you want to view
- Click the eye icon to open the detailed view of the selected resource.
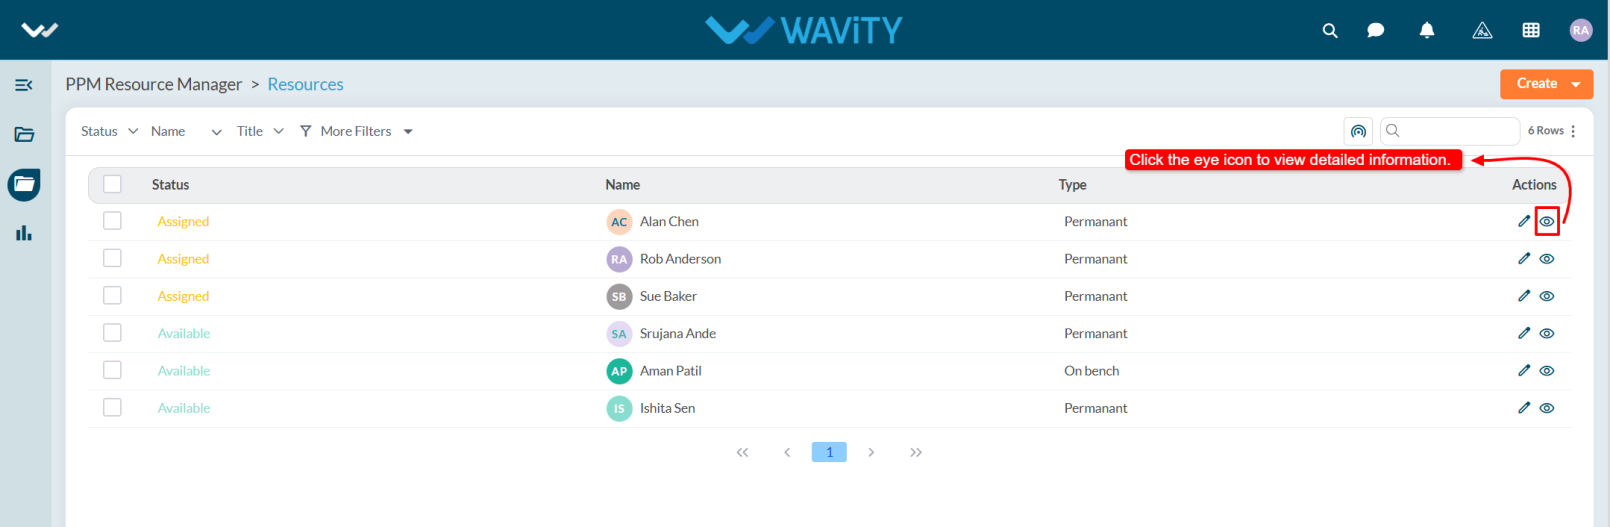
- Navigate to the Resource History section/tab.
- This section will display all past and current project assignments for that resource, including:
- Project Name
- Assignment Start and End Dates
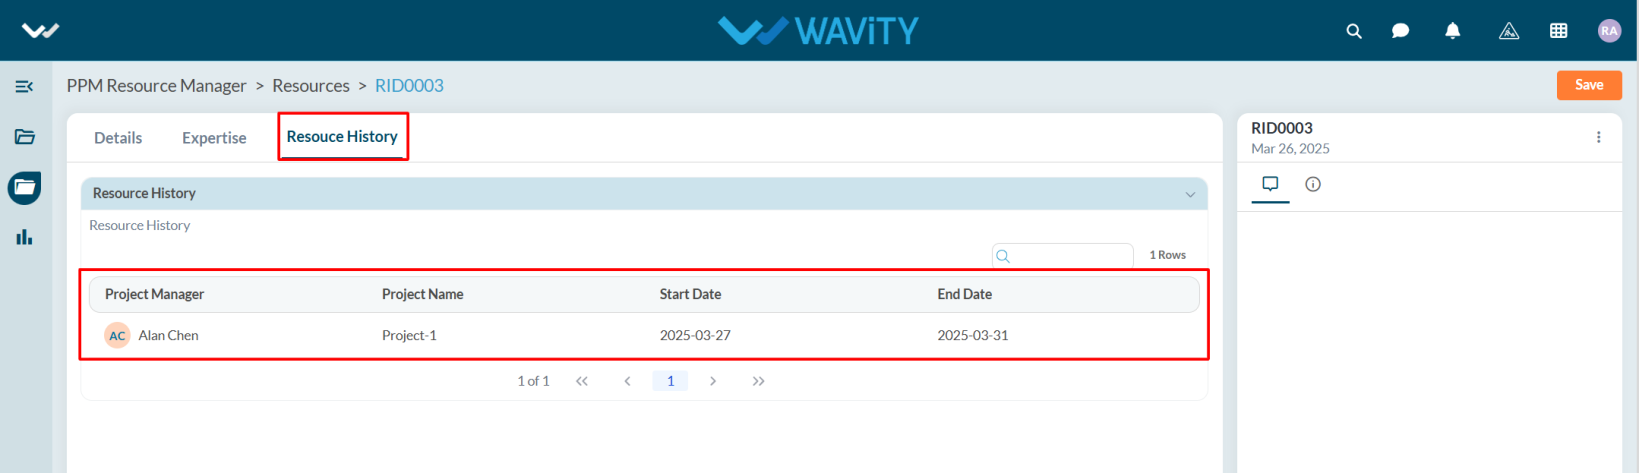
- The history view enables better resource planning and helps avoid over-allocation or underutilization of team members.
Resource Manager Guide: Viewing Assigned Tasks
- In the Wavity PPM Module, Resource Managers can view the tasks assigned to them by Project Managers.
- Users with Resource Manager access can log in using their credentials and will be navigated to the Resource Manager Interface.
- Note: The steps provided serve as sample instructions and can be customized based on specific business requirements. However, the core workflow remains the same.
- From the Quick Links panel, select Assigned Tasks.
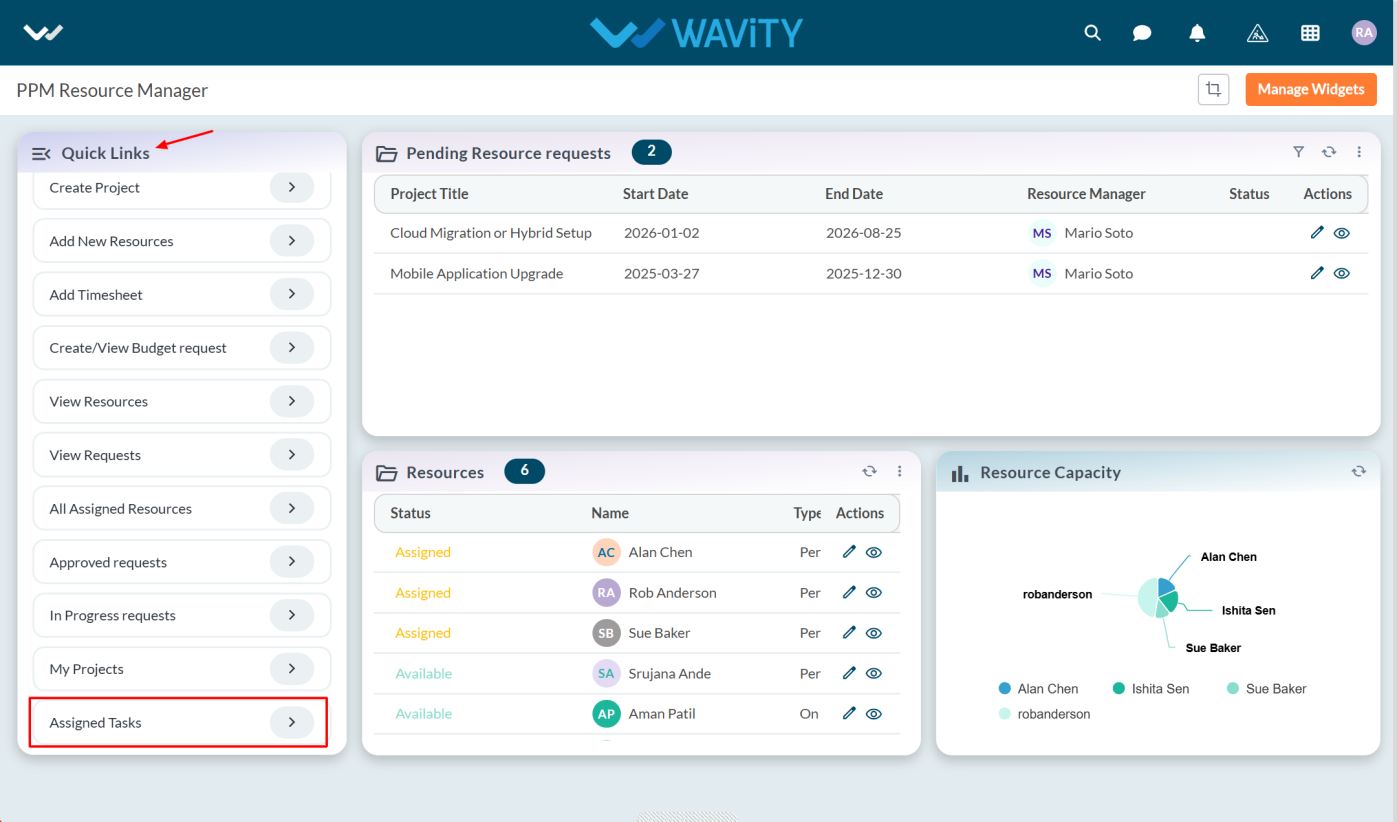
- The Assigned Tasks list will be displayed where users can view the Project Manager, Project Title, and other task details. To view a task in detail, click the eye icon in the Actions column.
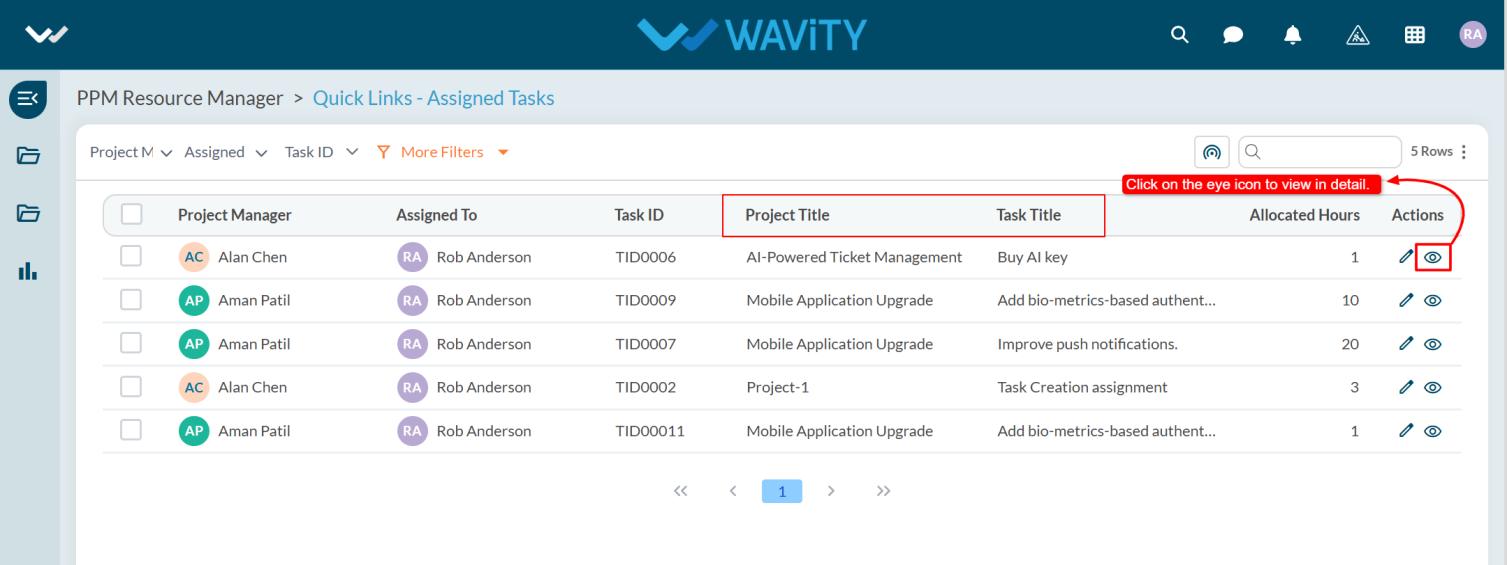
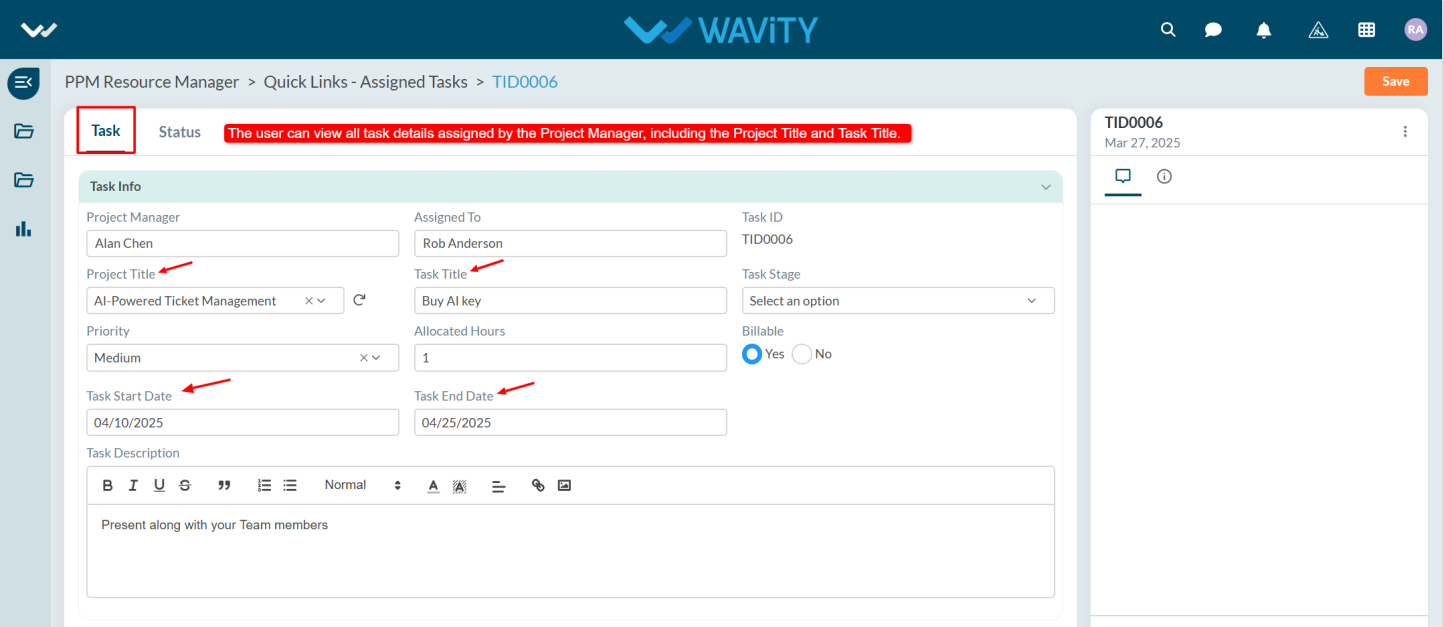
- Under Task tab user can view the details such as Project Title, Task Title, Start Date, End Date, and other relevant information.
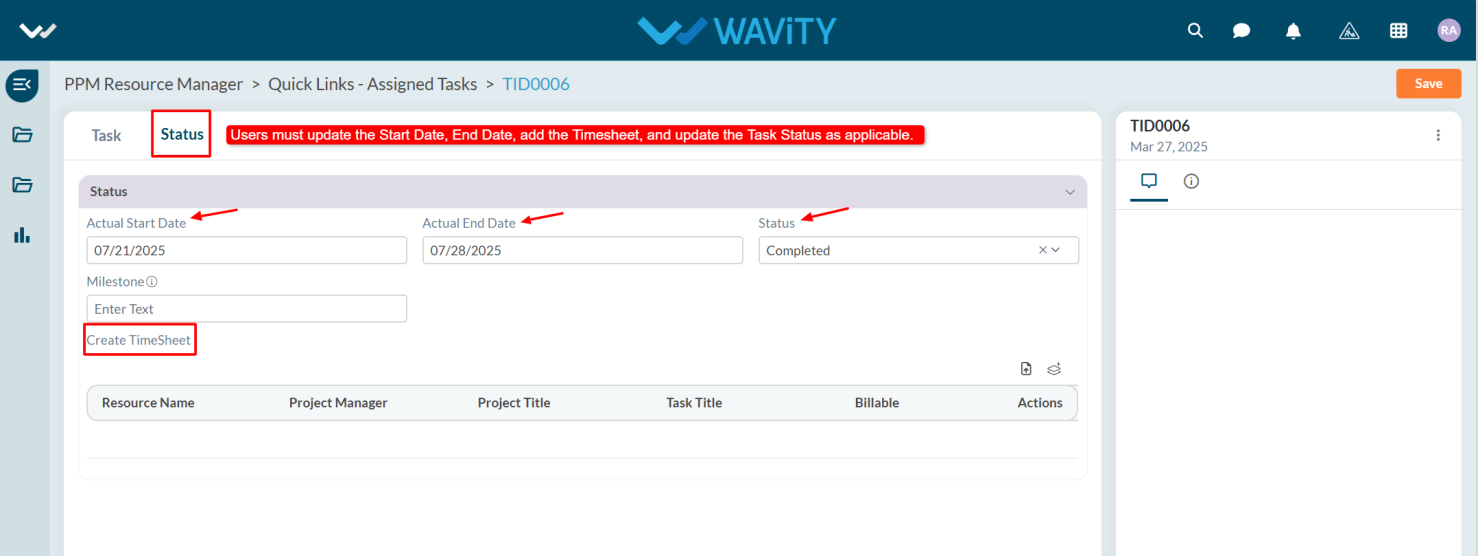
- User must update the task status, enter the start and end dates, and create a timesheet.
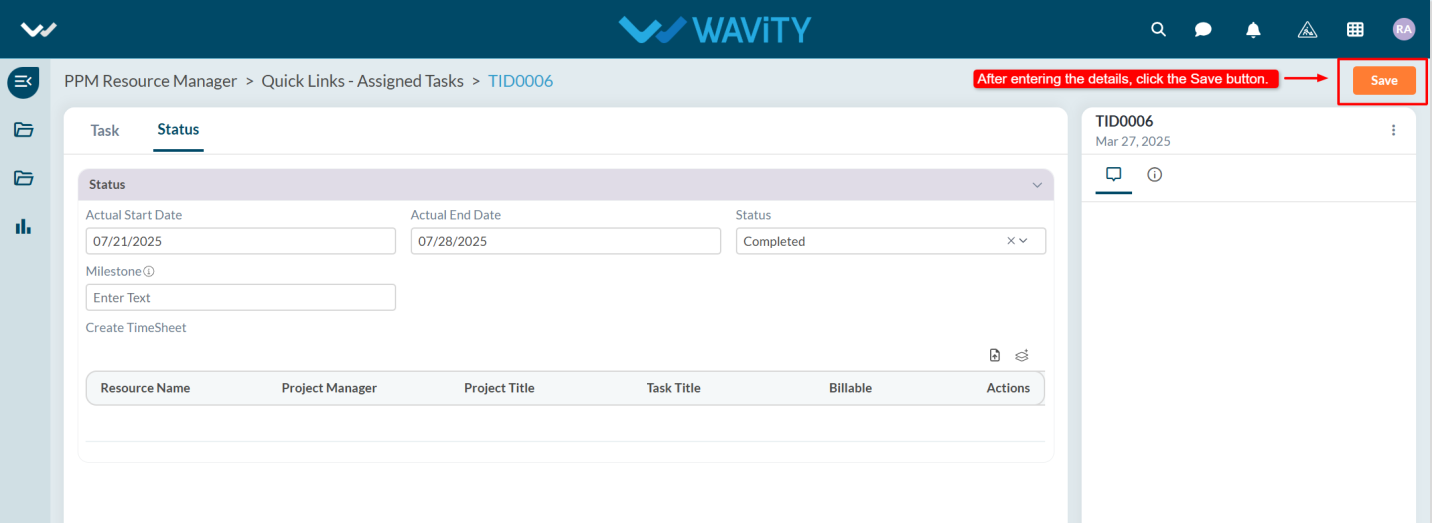
- After updating all required details, click the Save button.
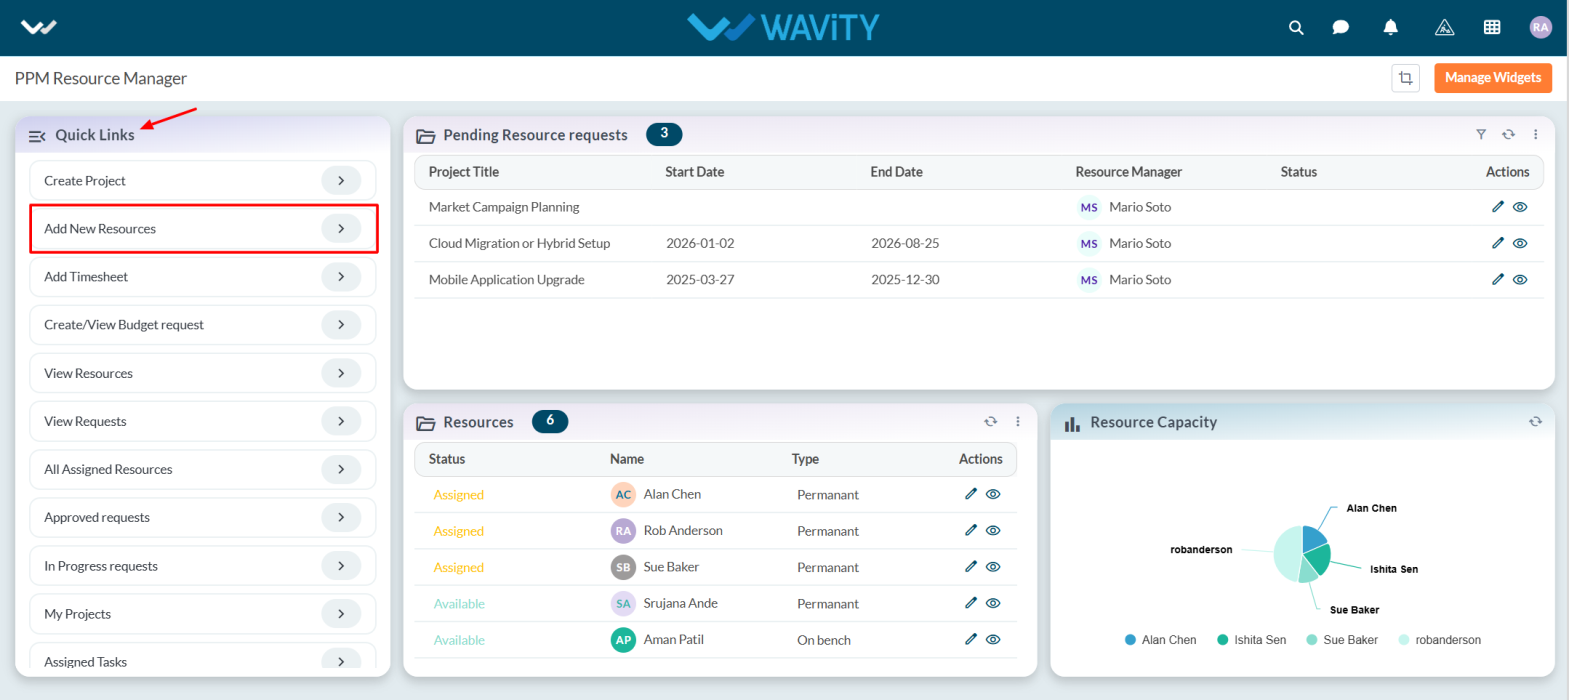
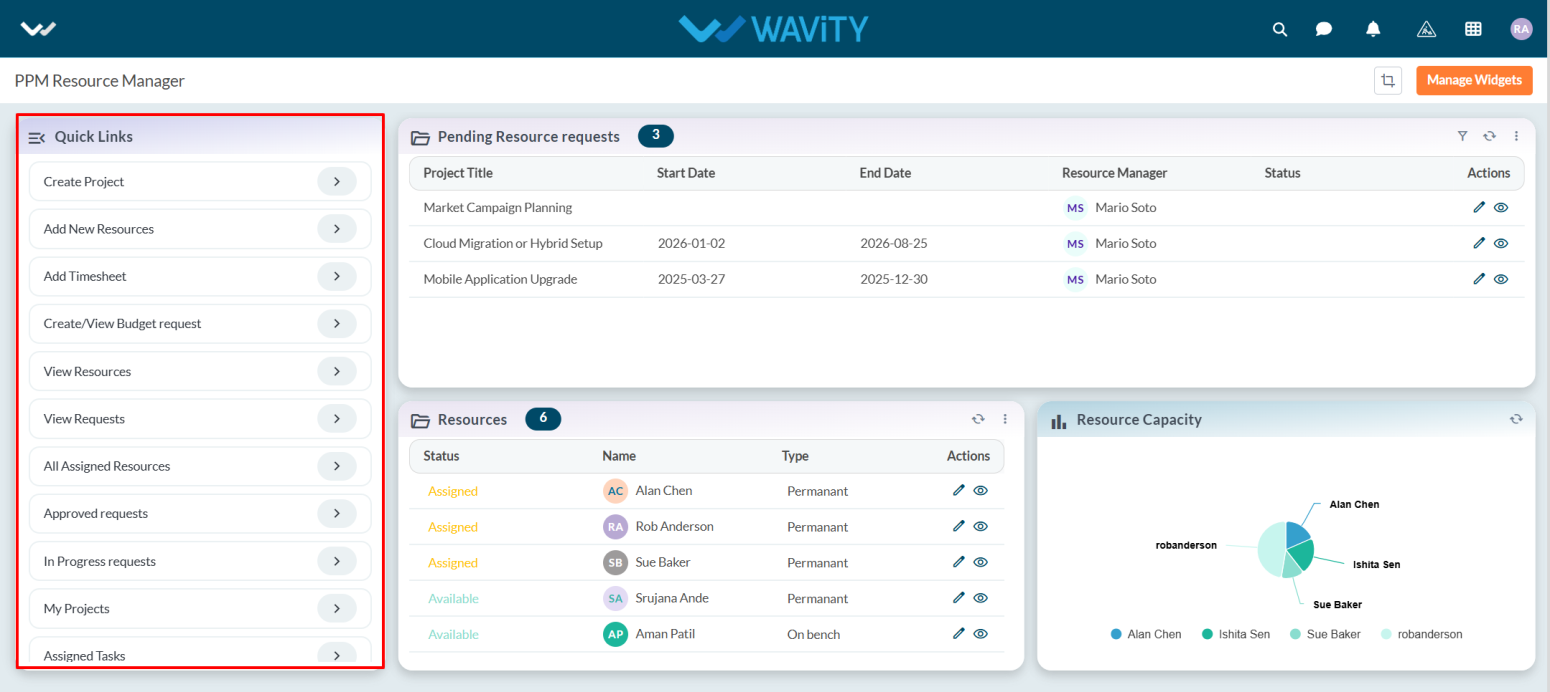
Resource Manager Guide: Adding New Resources
- In the Wavity PPM module, Resource Managers can easily add new resources.
- Only users with Resource Manager access can add resources.
- Note: The steps outlined below serve as sample instructions and can be customized to meet specific organizational needs; however, the core workflow remains unchanged.
- Upon logging in with their credentials, users with Resource Manager access will land on the Resource Manager interface.
- They can track the status of requested resources via Quick Links, view pending requests under "Pending Resource Requests," and access all existing resources in the “Resource” table widget.
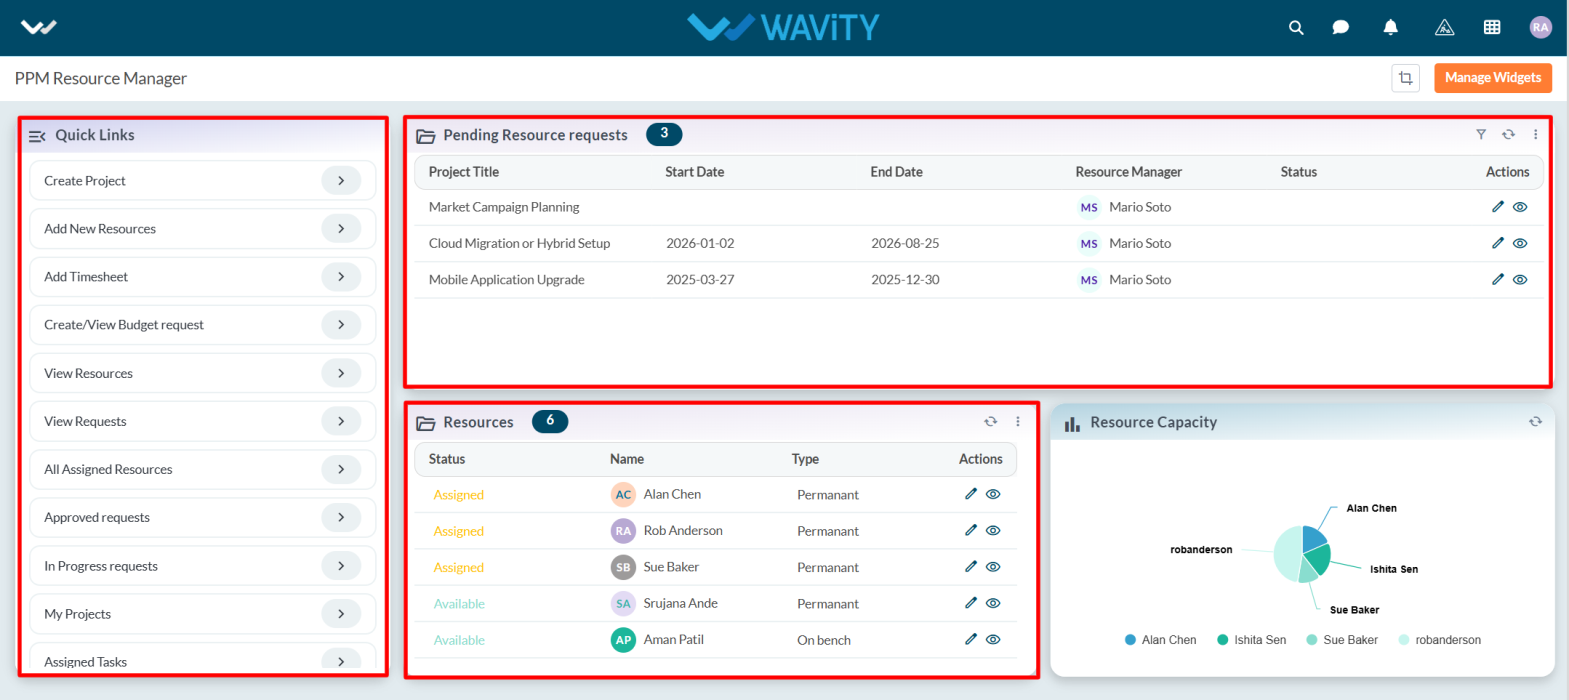
- To add a new resource, click on "Add New Resource" under Quick Links.
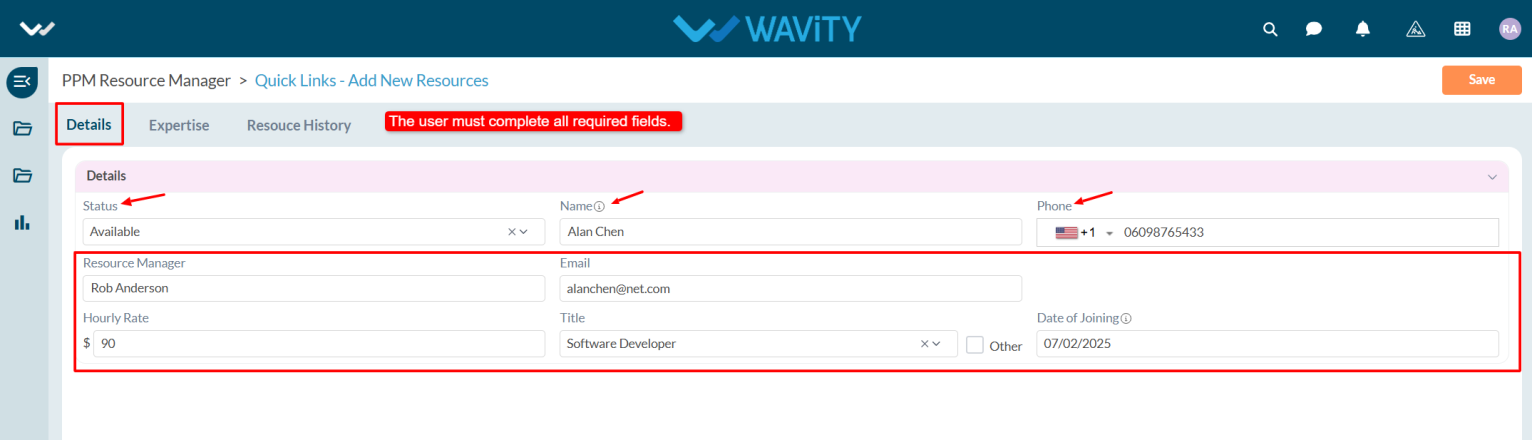
- The user will be navigated to the Details section, where they must fill in all required information.
- From the dropdown, select the status, enter the resource name in the Name field, specify the Resource Manager, provide the resource’s email address, set the hourly rate, choose the job title, and enter the Date of Joining.
- In the Expertise tab, select the resource's area of expertise and certifications from the dropdown menu, and choose the Type (Bench or Permanent).
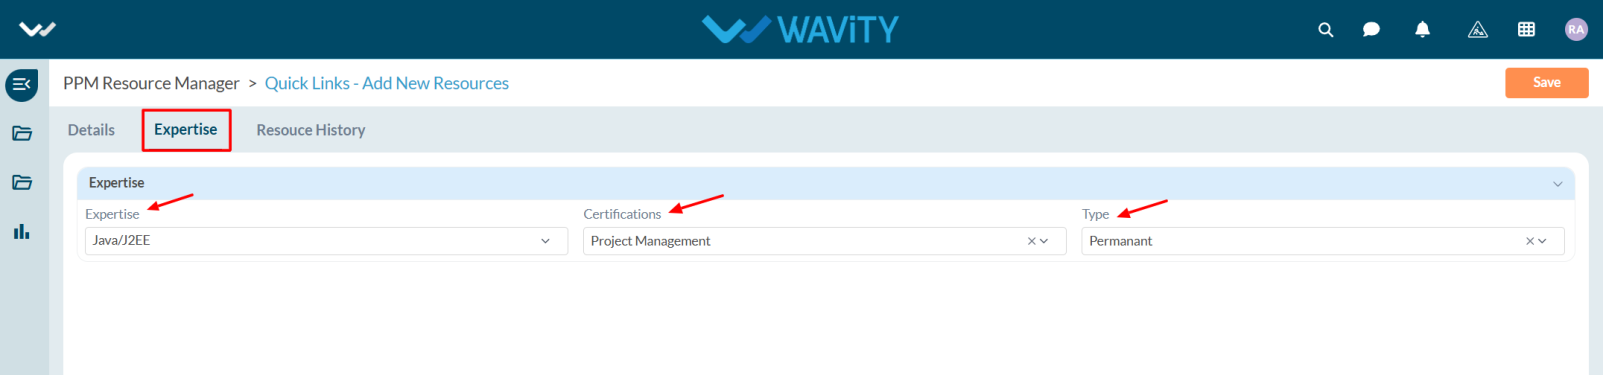
- After completing all required fields, click Save to add the new resource.
- Once the resource is assigned to a project, the complete assignment history will be captured and viewable in the Resource History section.
Team Member Guide: Viewing Timesheet Approval Status
- In the Wavity PPM Module, team members can easily view the approval status of their submitted timesheets for tasks assigned by the Project Manager.
- Users with Team Member access can log in using their credentials and will be directed to the Team Member interface.
- Note: The steps provided serve as general guidance and can be tailored to specific requirements; however, the core workflow remains consistent.
- Team Members can add timesheets, view the status of tasks (Completed or Pending), and access tasks assigned to them.
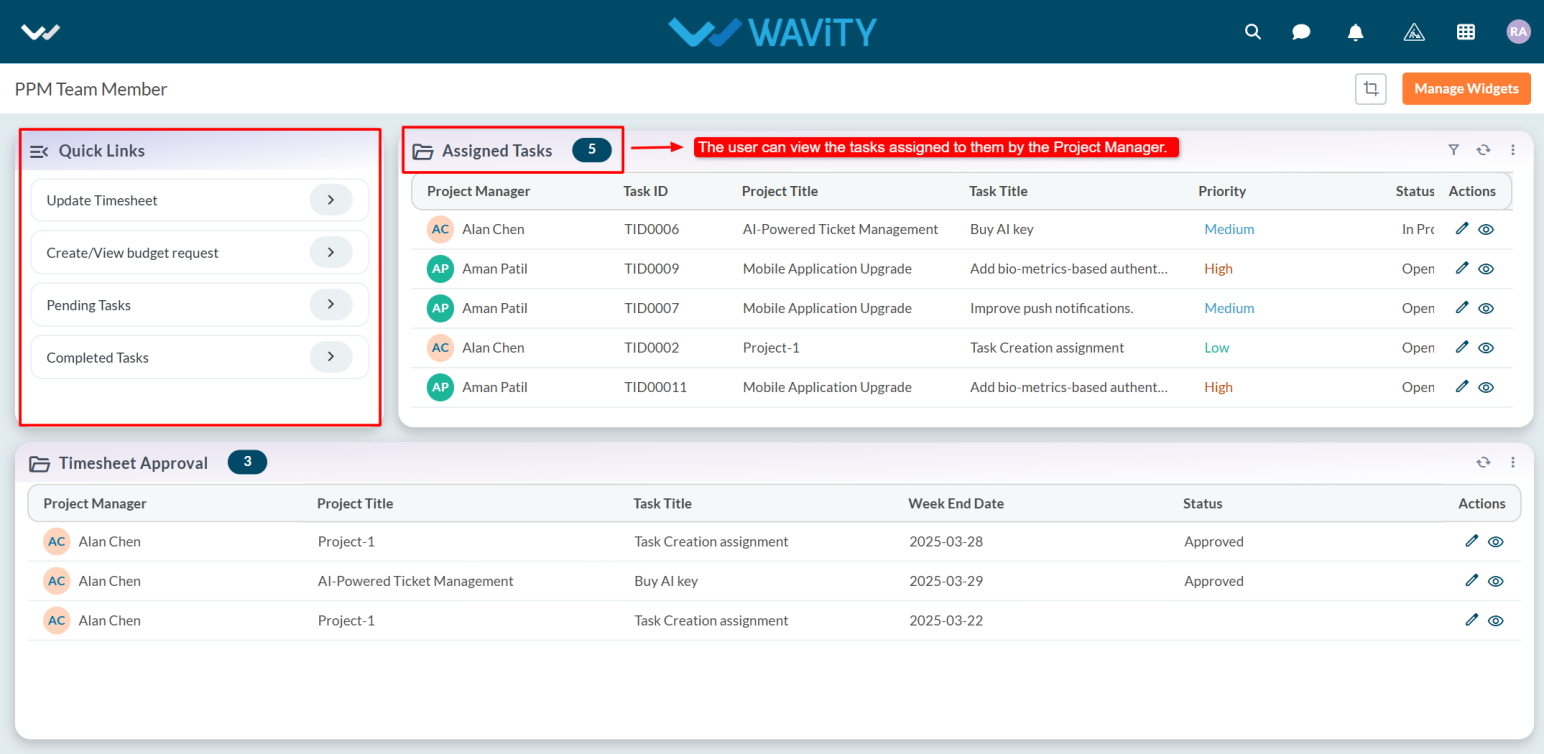
- To view the approval status of a timesheet, refer to the Timesheet Approval table widget on the dashboard.
- Select the relevant timesheet entry and click the eye icon to view detailed information.
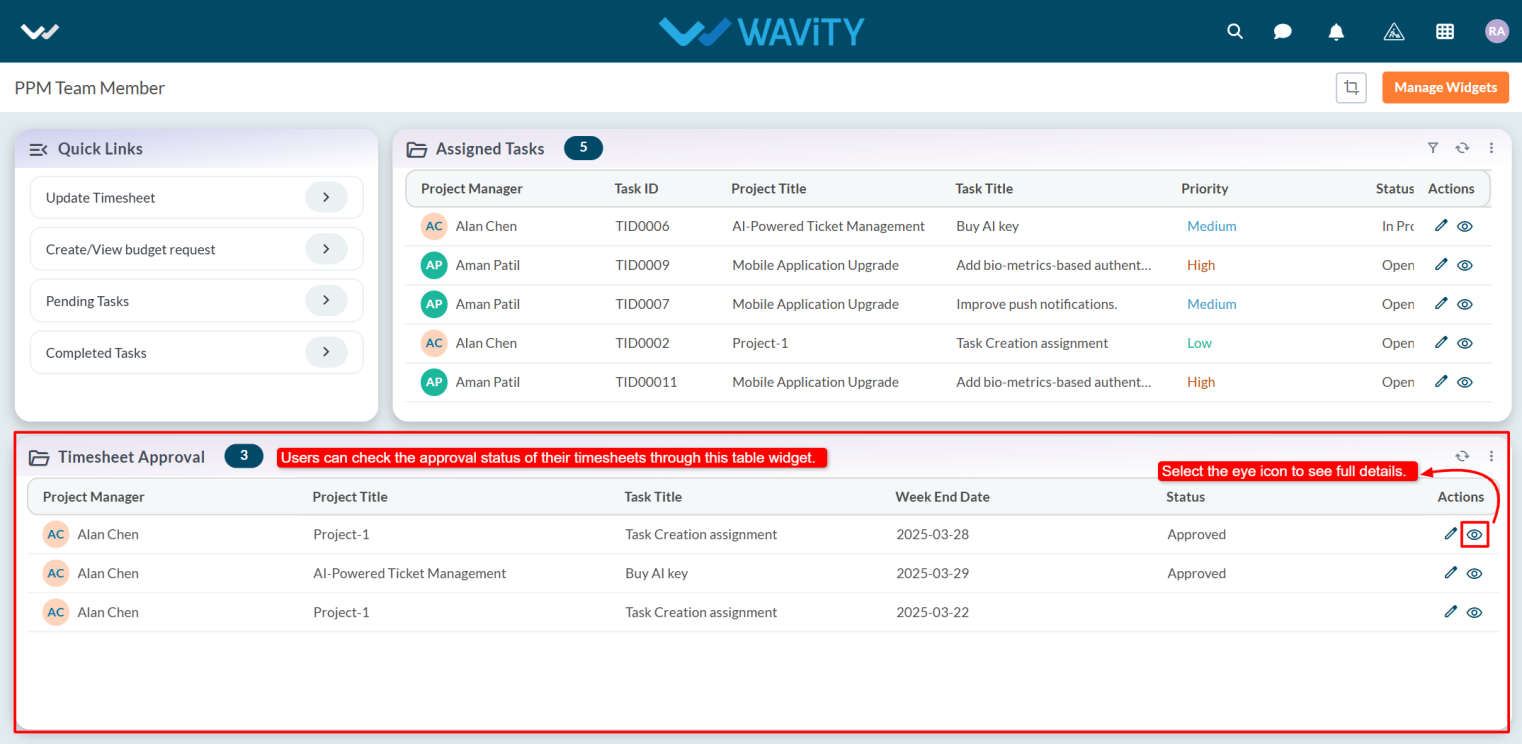
- Under the Status tab, the approval status will be displayed (e.g., Approved).
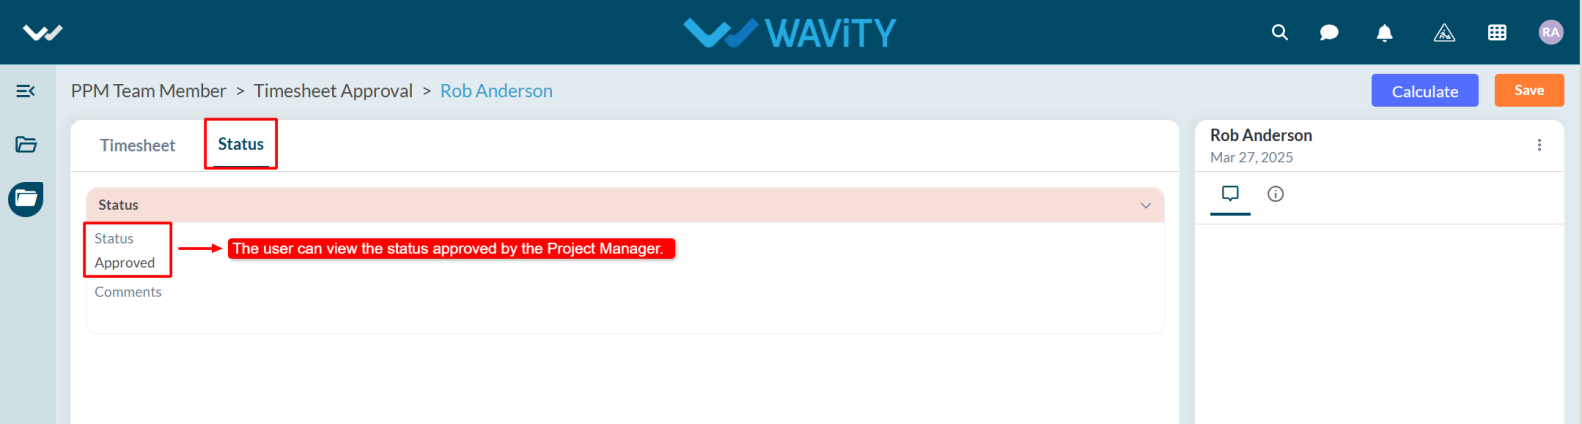
- Once a timesheet is approved by the Project Manager, the Team Member will receive a notification confirming the approval.
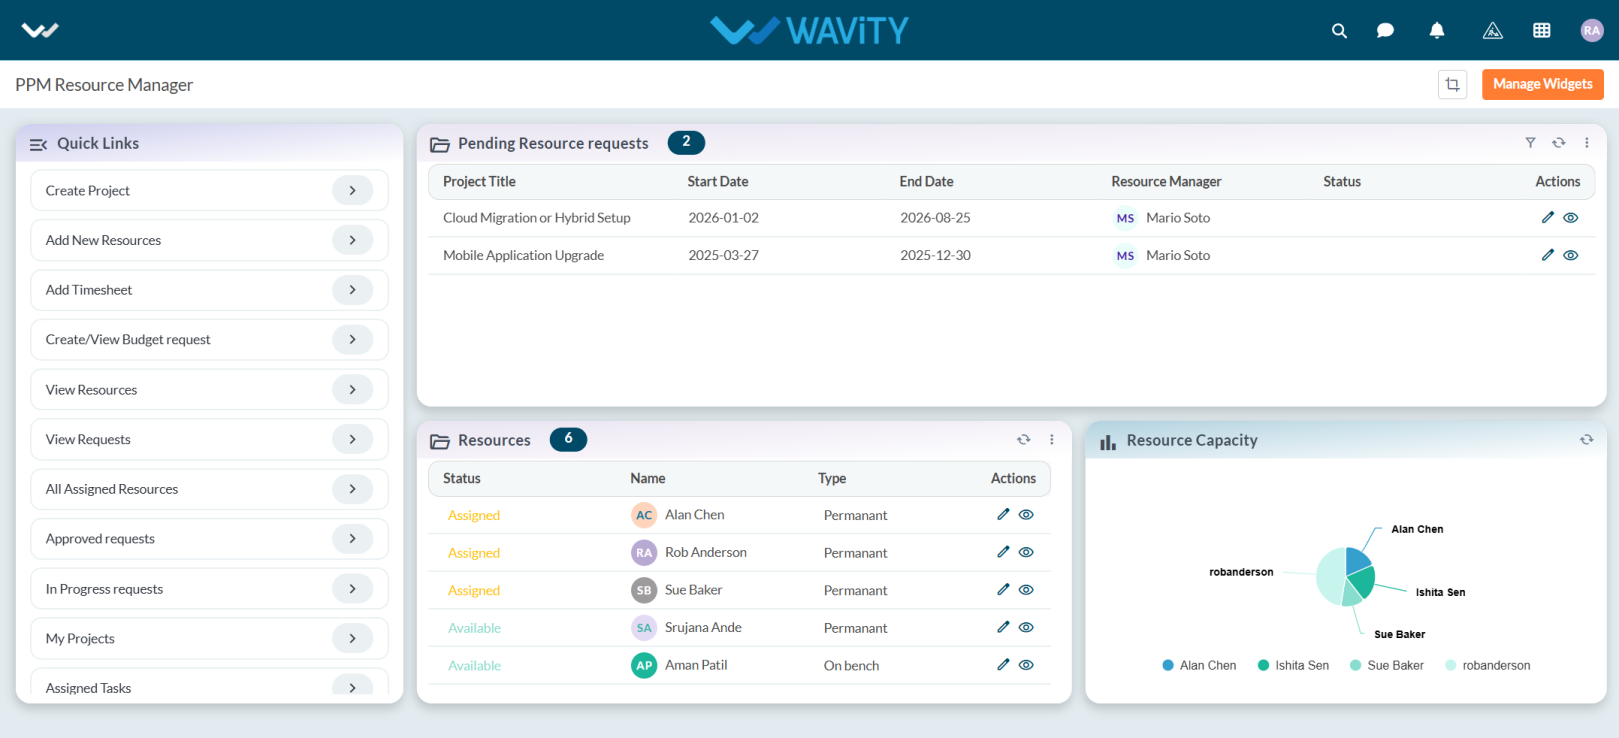
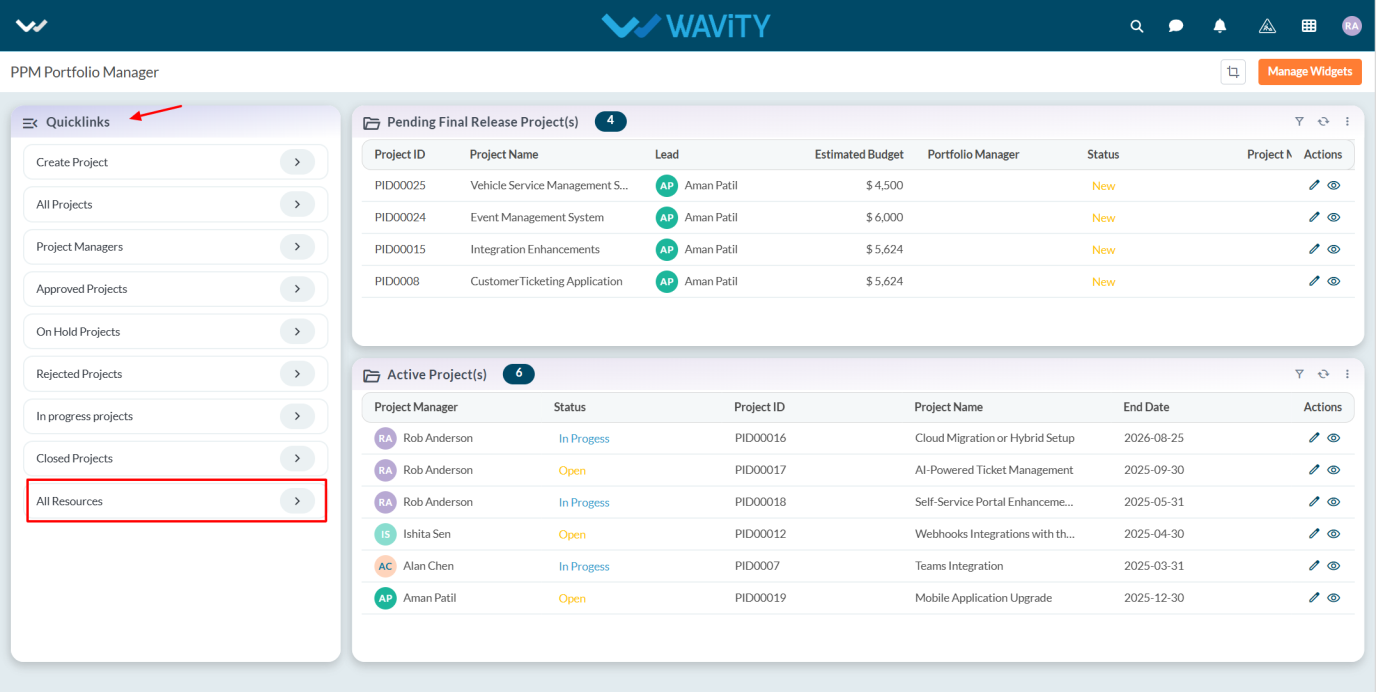
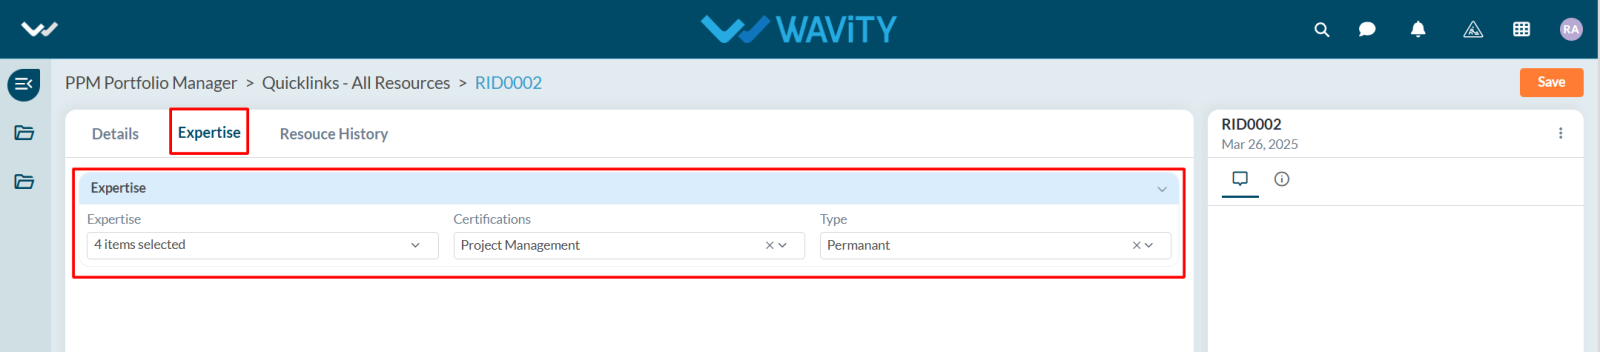
Portfolio Manager Guide: Viewing and Managing Resources
- In the Wavity PPM Module, Portfolio Managers can view and mange resources along with their details and current status.
- This helps Portfolio Managers assess resource availability and make informed project assignment decisions.
- Note: The following steps are sample instructions and can be customized to suit specific requirements; however, the core workflow remains consistent.
- Users with Portfolio Manager access can log in with their credentials and will be directed to the Portfolio Manager Interface.

- To view resource details, click on All Resources from the Quick Links.
- A complete list of resources will be displayed, including their availability status (e.g., Available, Assigned).
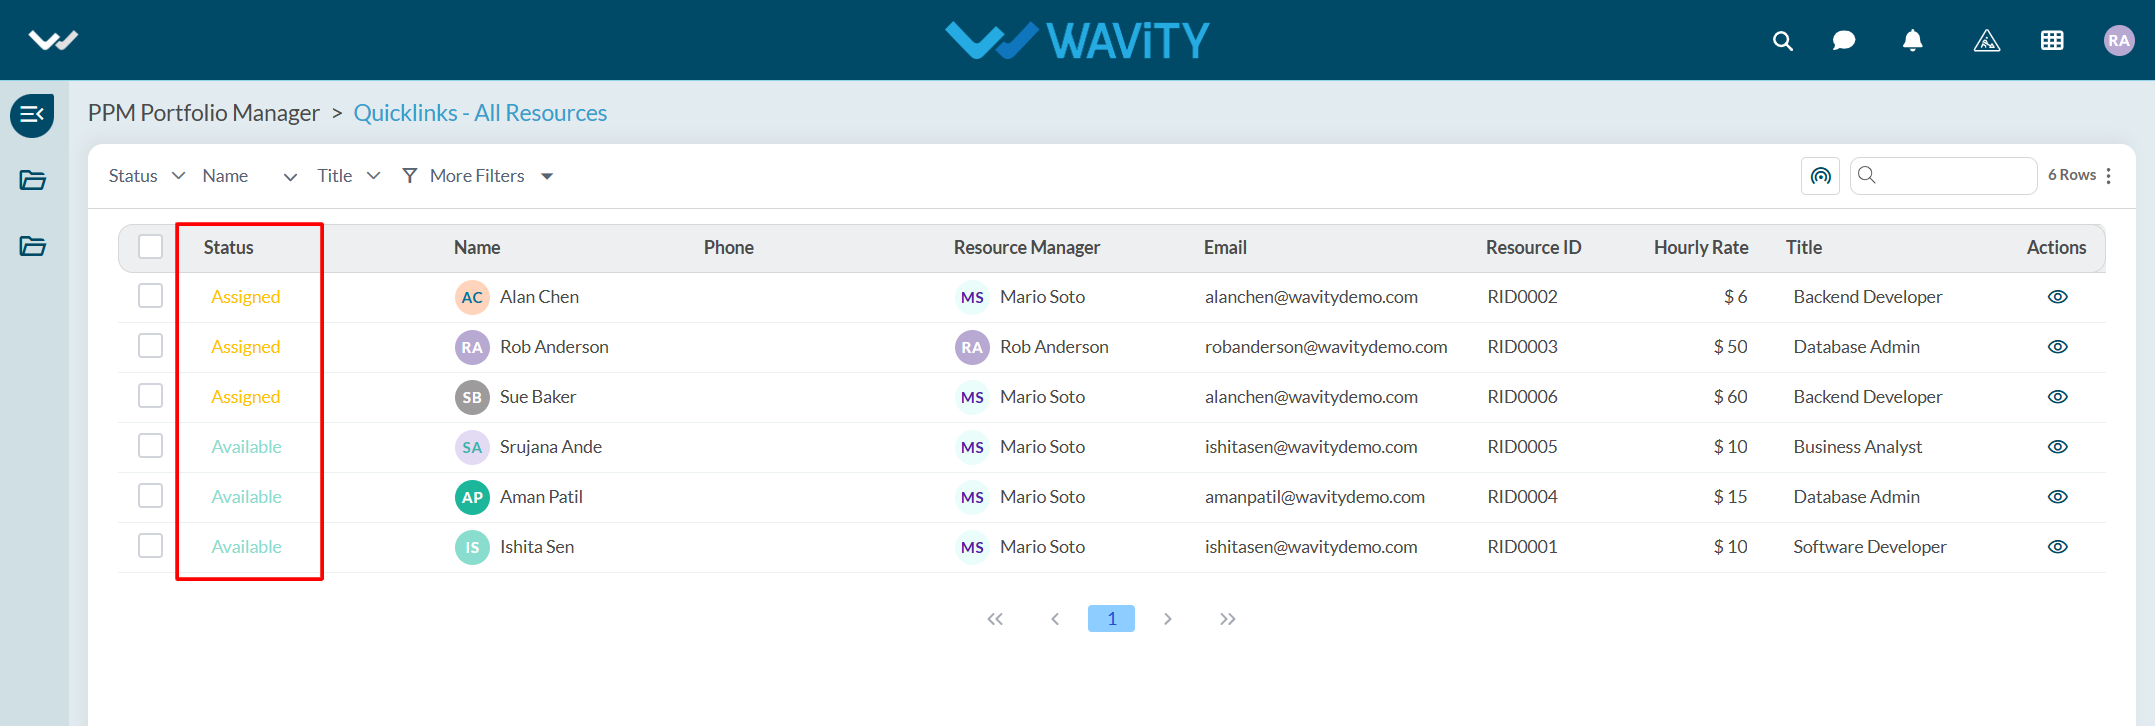
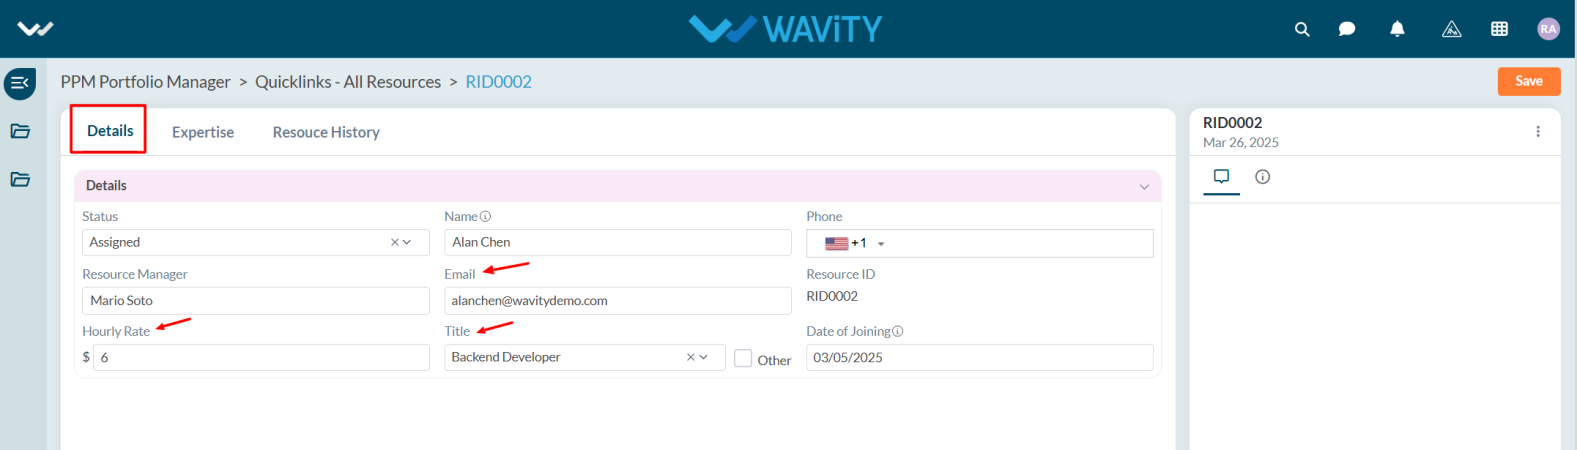
- To view more details about a specific resource, click the eye icon.
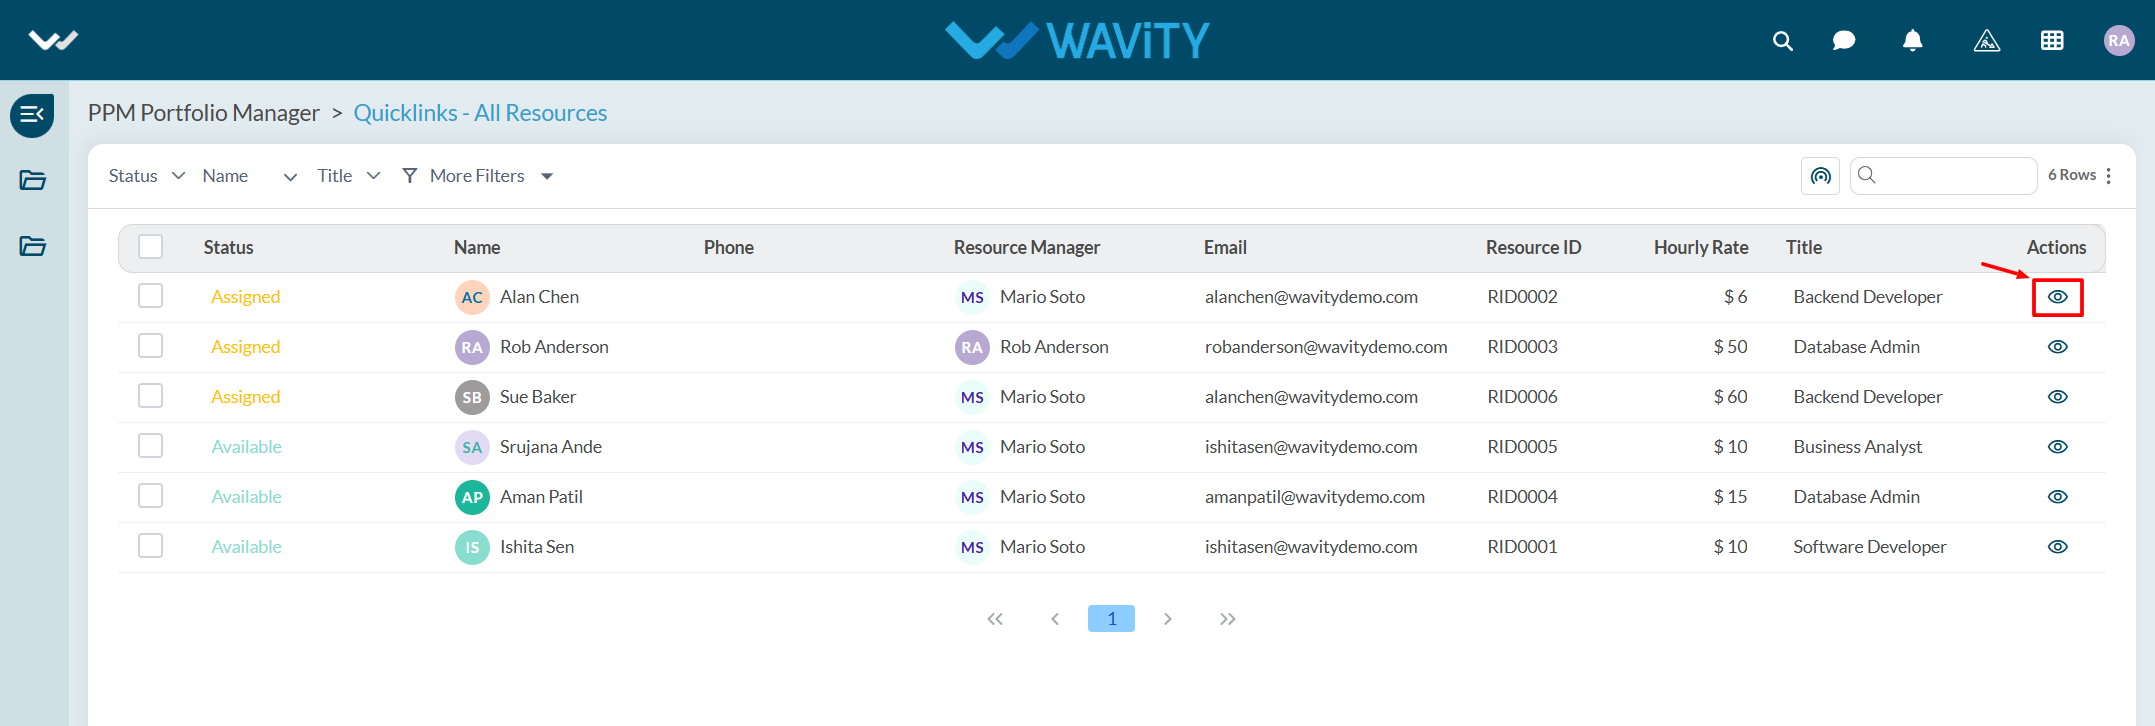
- The detailed view includes information such as hourly rate, title, date of joining, and email address.
- In the Expertise tab, users can also view the employment type (e.g., Bench or Permanent) and certifications held by the resource.
Agent Guide: How to Manage a Repair Request
- Managing repair requests on the Wavity ITSM platform is designed to be a simple and intuitive process for agents.
- Note: The steps outlined below serve as general instructions and can be customized to meet specific organizational needs; however, the core workflow remains the same.
- Agents with the appropriate access can log in using their credentials and will be directed to the Agent Interface.
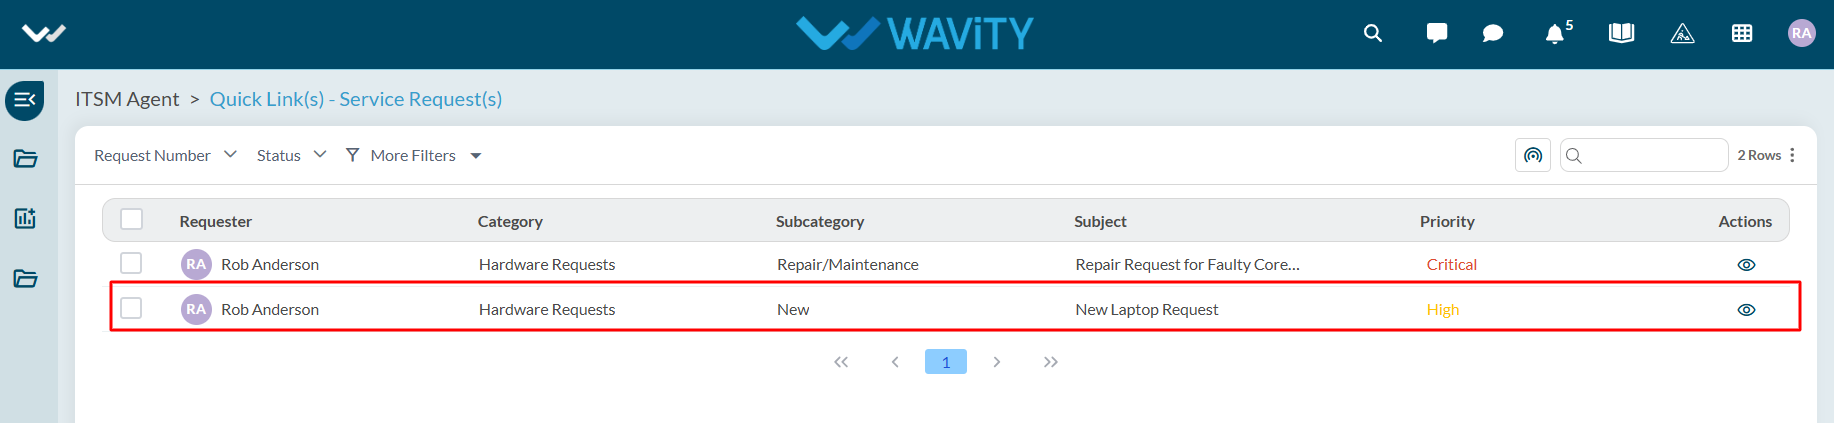
- From the Agent Interface, Click on ‘Service Requests’ from the quick links widget.
- Select the relevant repair request from the list to begin managing it.
- In the ‘Assigned to’ section, click the ‘link’ icon to associate the request with the appropriate asset belonging to the end user.
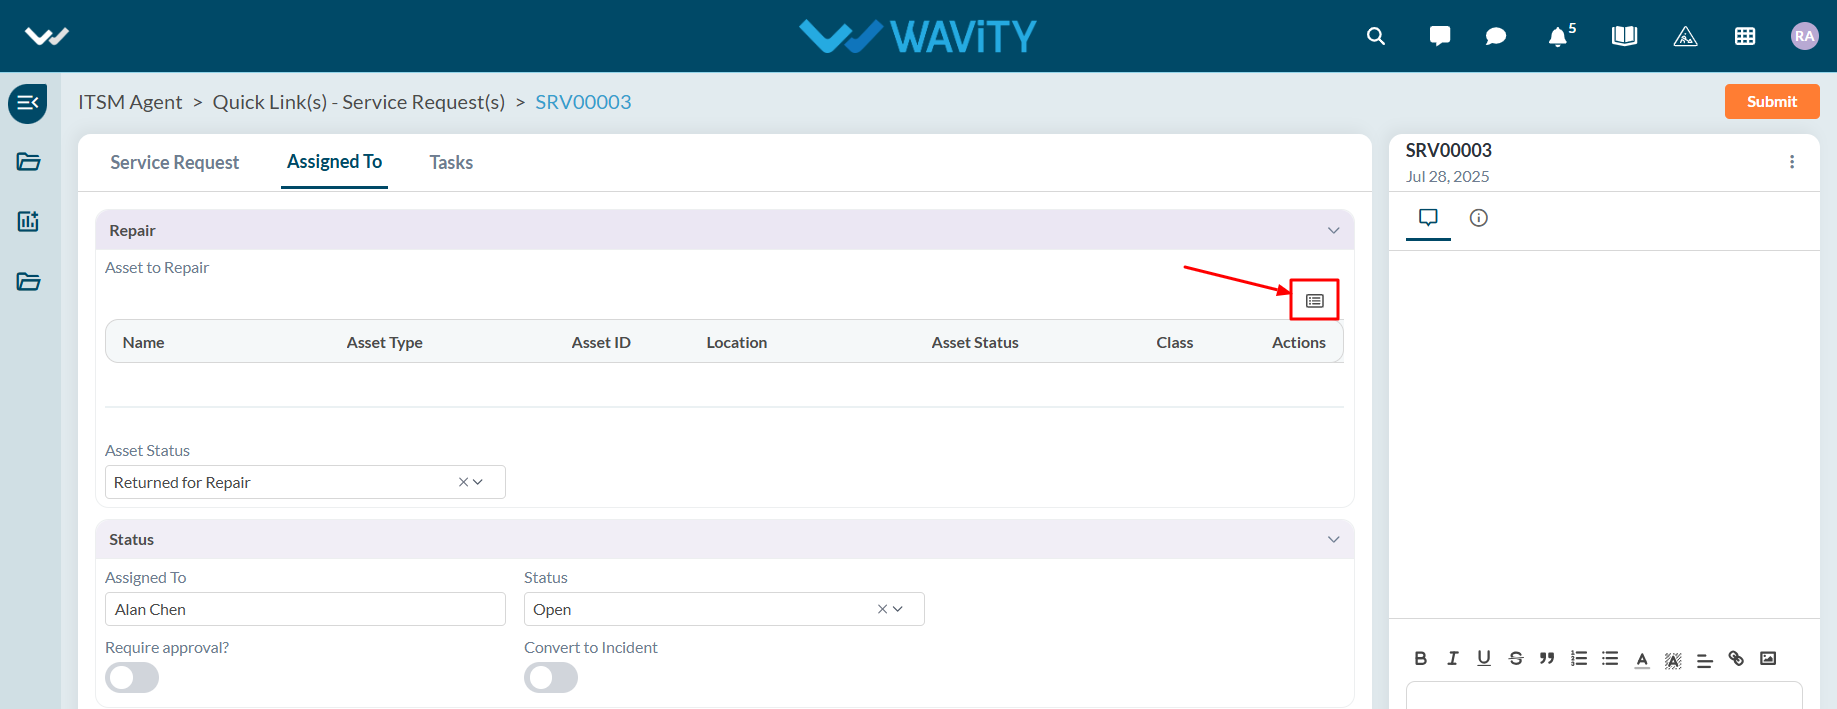
- A list of the end user’s current assets will be displayed. Choose the asset that requires repair.
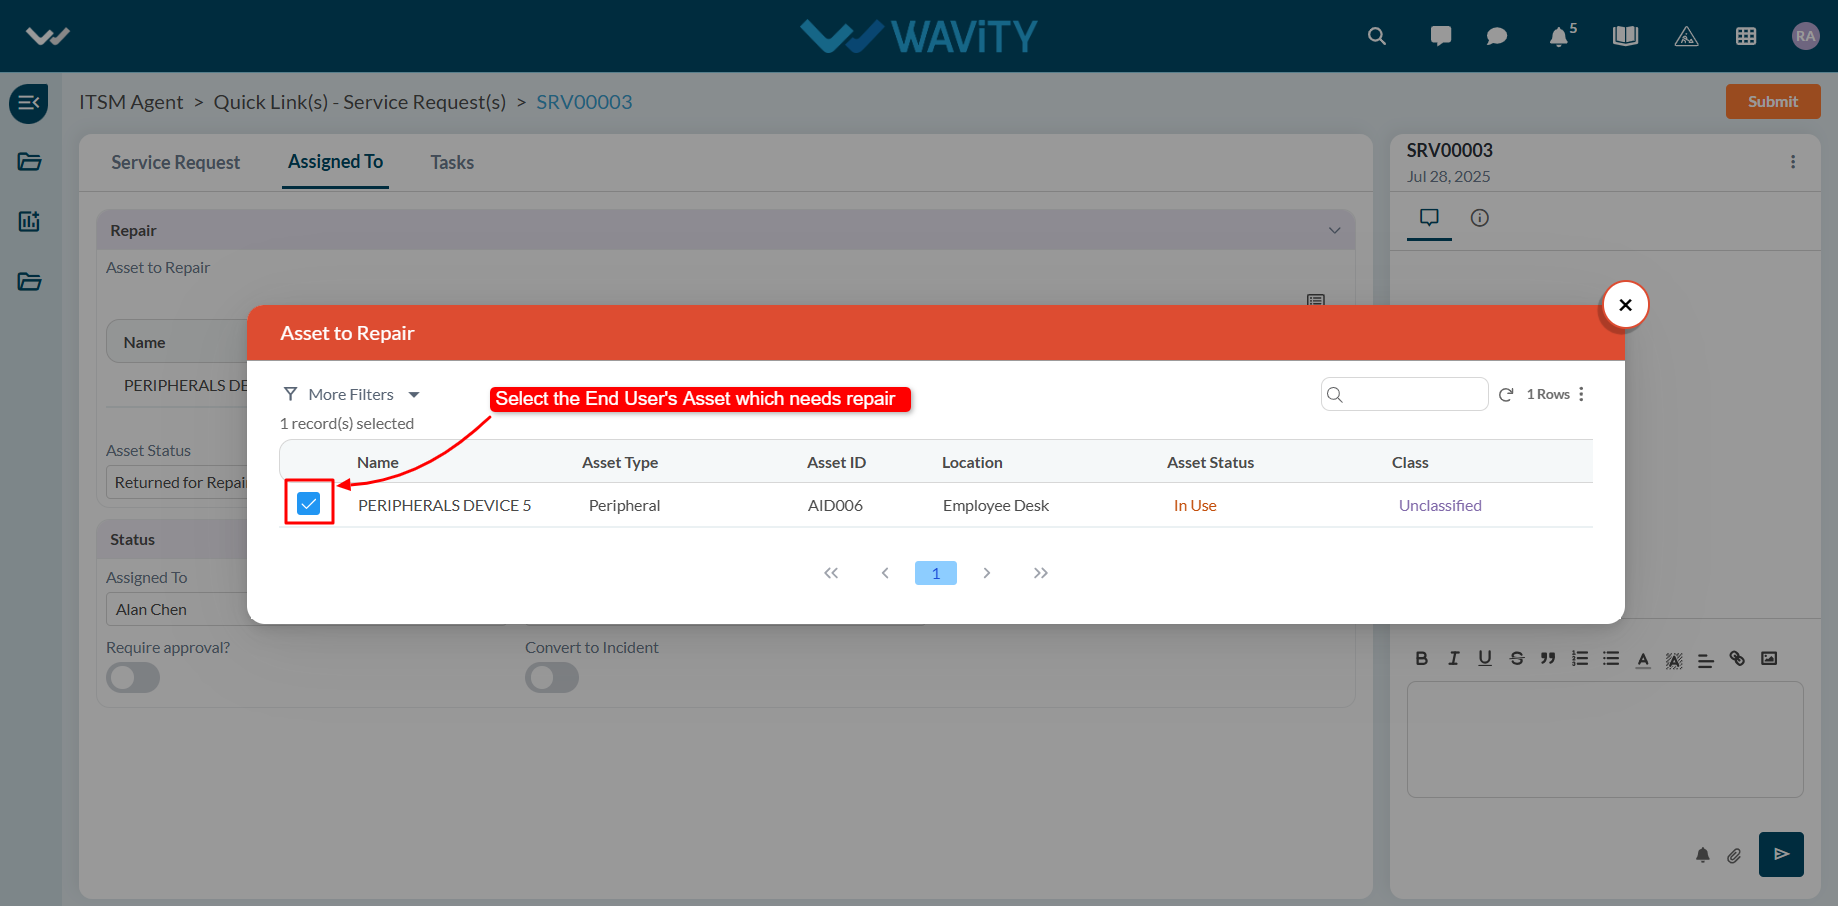
- If the asset has been returned by the user for servicing, update the asset status by selecting ‘Returned for repair’ from the dropdown.
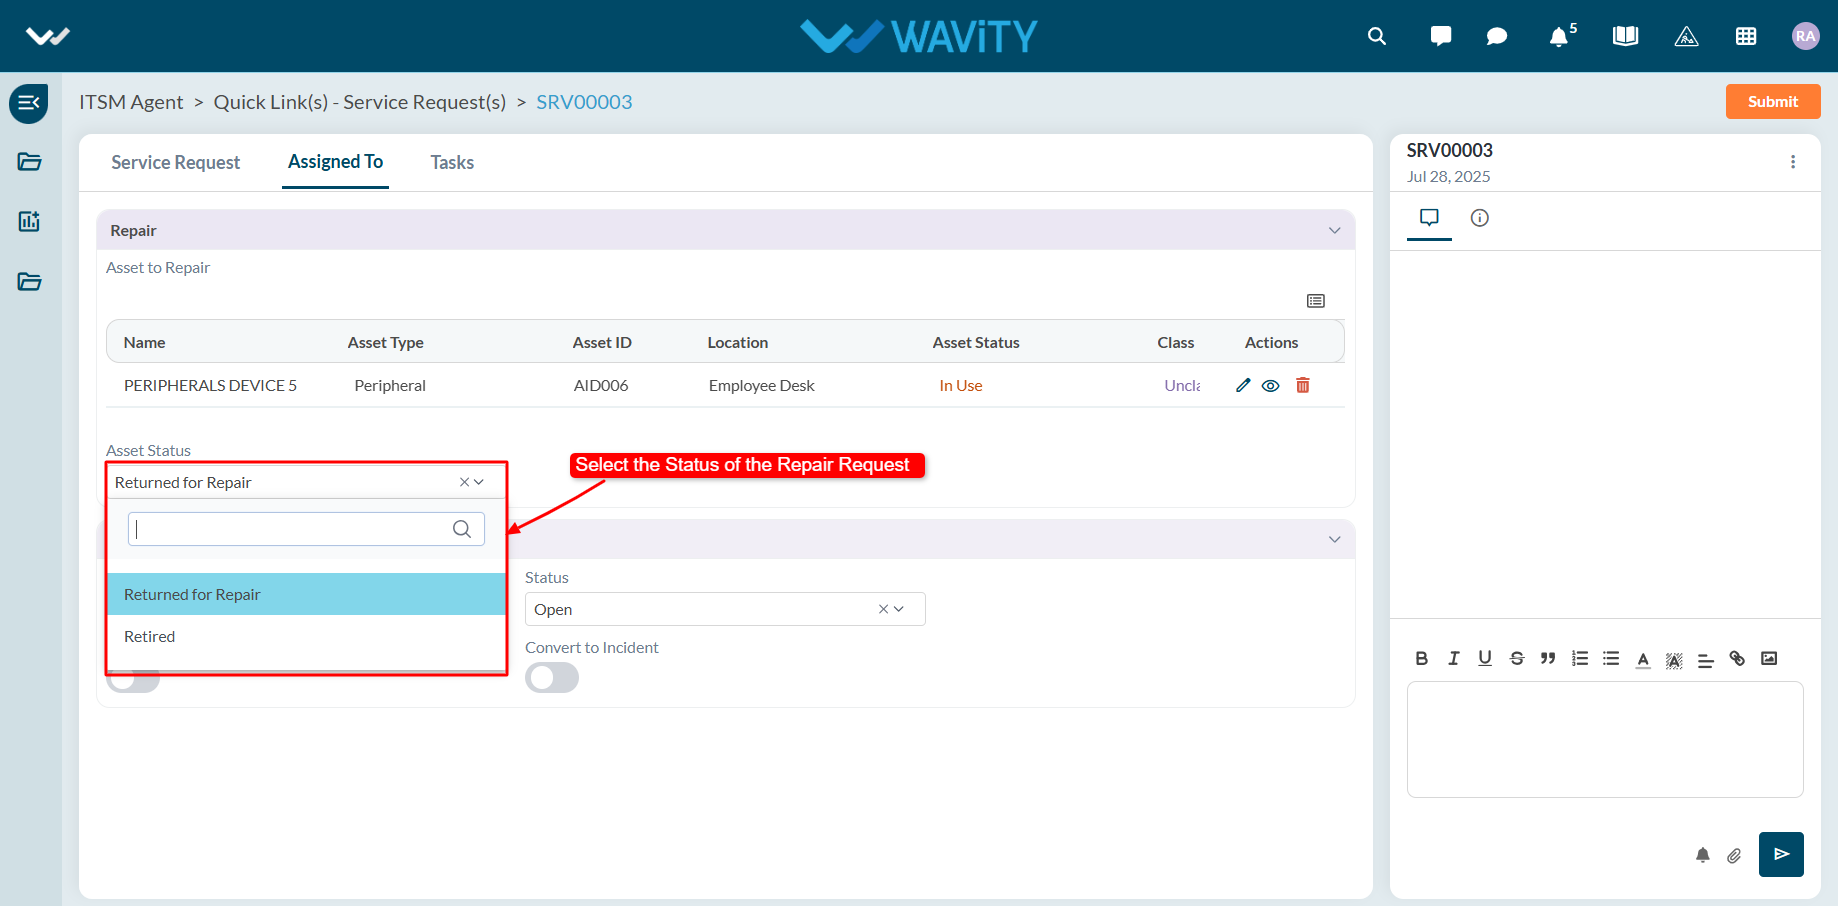
- Use the status dropdown to update the repair request. The end user will receive an email notification reflecting the updated status.
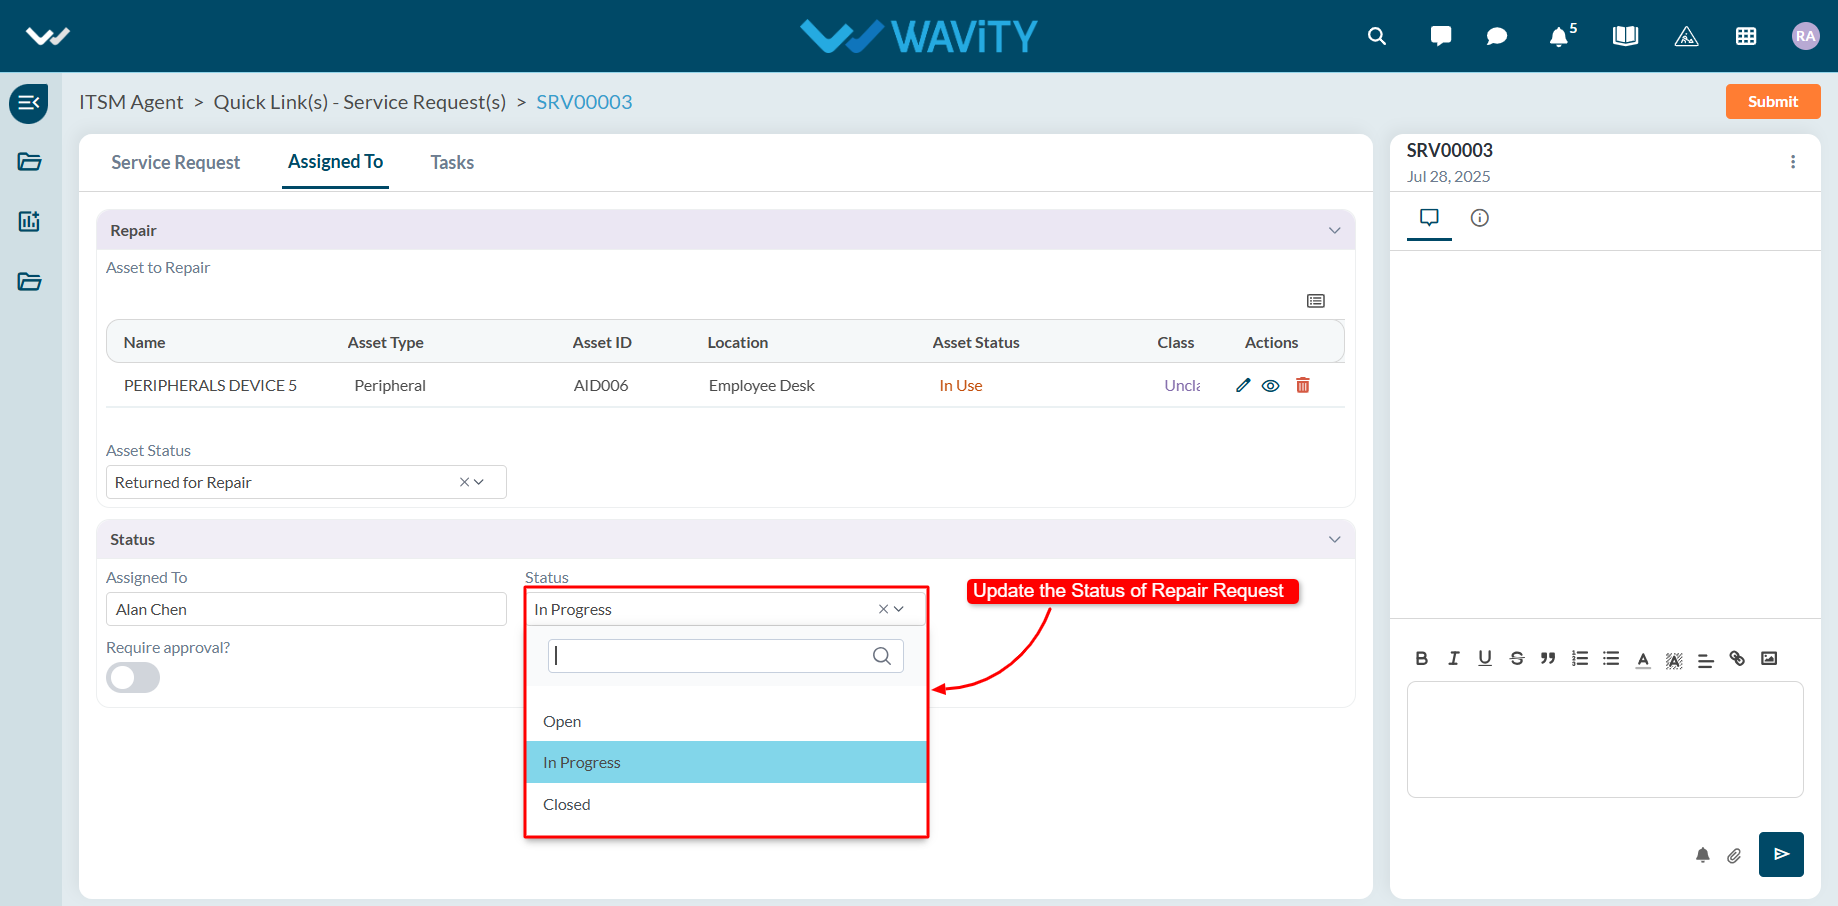
- If the request requires approval, toggle the approval switch to ON. Additional fields will appear for the approval workflow, allowing a manager or authorized user to update the approval status.
- Agents can use the comment box to communicate with other users regarding the repair request.
- Once all updates are made, click on "Submit" to save changes and complete the process.
End User Guide: How to Report an Incident via Email
- Reporting an incident via email on the Wavity platform is quick and convenient. Simply send an email to the designated email address integrated with the Wavity system.
- Open your preferred email client (e.g., Gmail), click on "Compose," and enter the configured support email address in the "To" field.
- Use a clear and relevant subject line and describe the issue in detail in the body of the email.
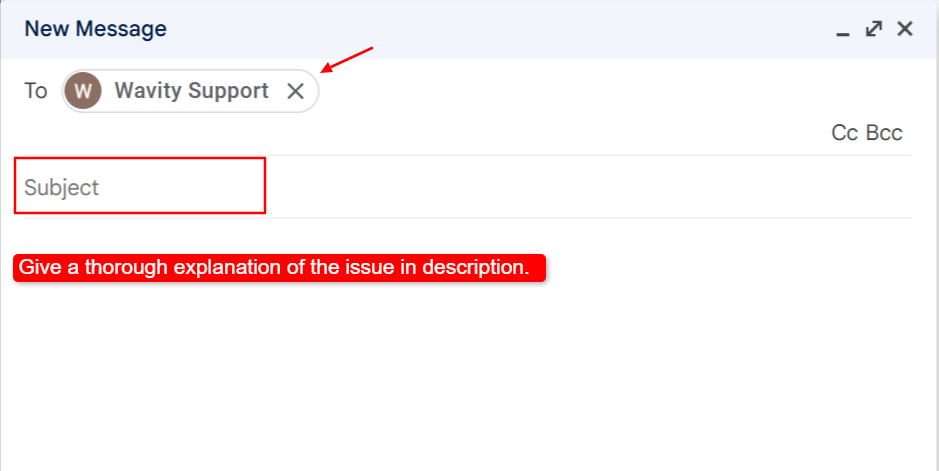
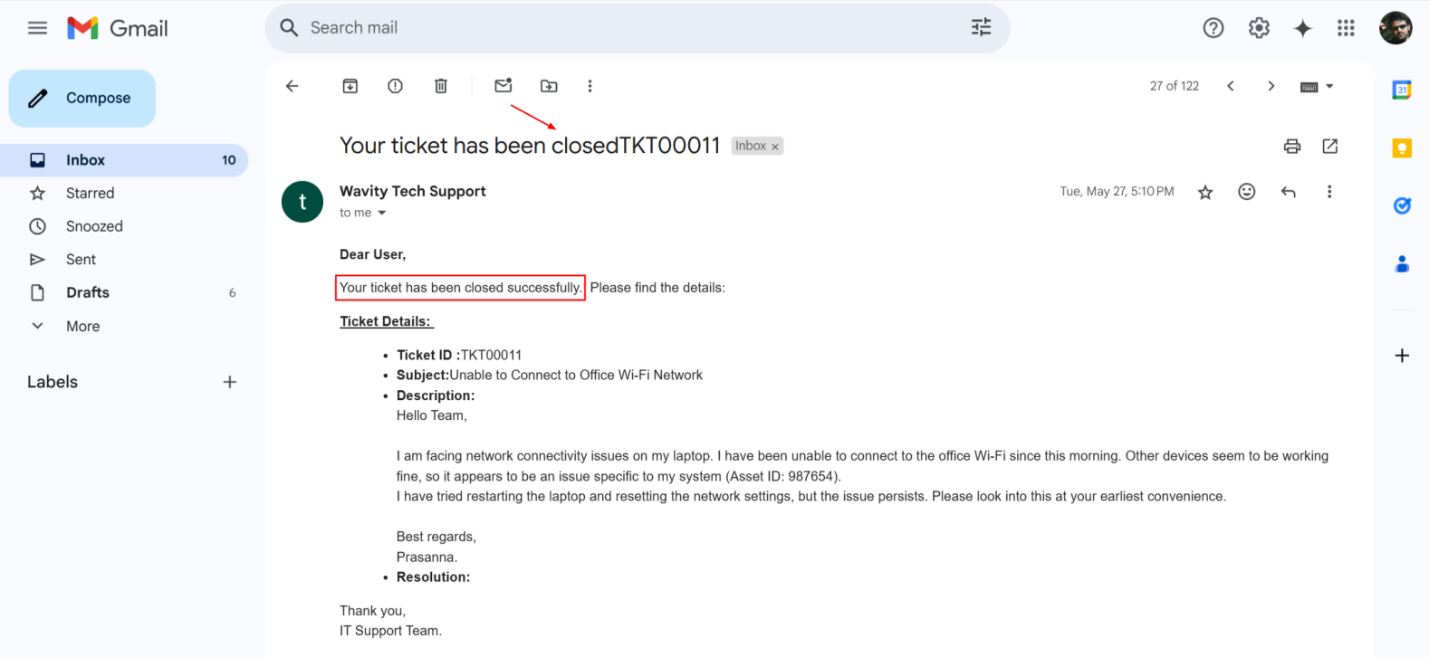
- Once all necessary details are included, click "Send" to submit your incident report.

- After submission, you will receive a confirmation email indicating that your incident has been successfully created.

- You can reply to this confirmation email with any follow-up questions or additional information. Attach images or screenshots if needed to better explain the issue.

- You will be notified via email whenever there is an update to your incident, including status changes or when the ticket is marked as resolved.
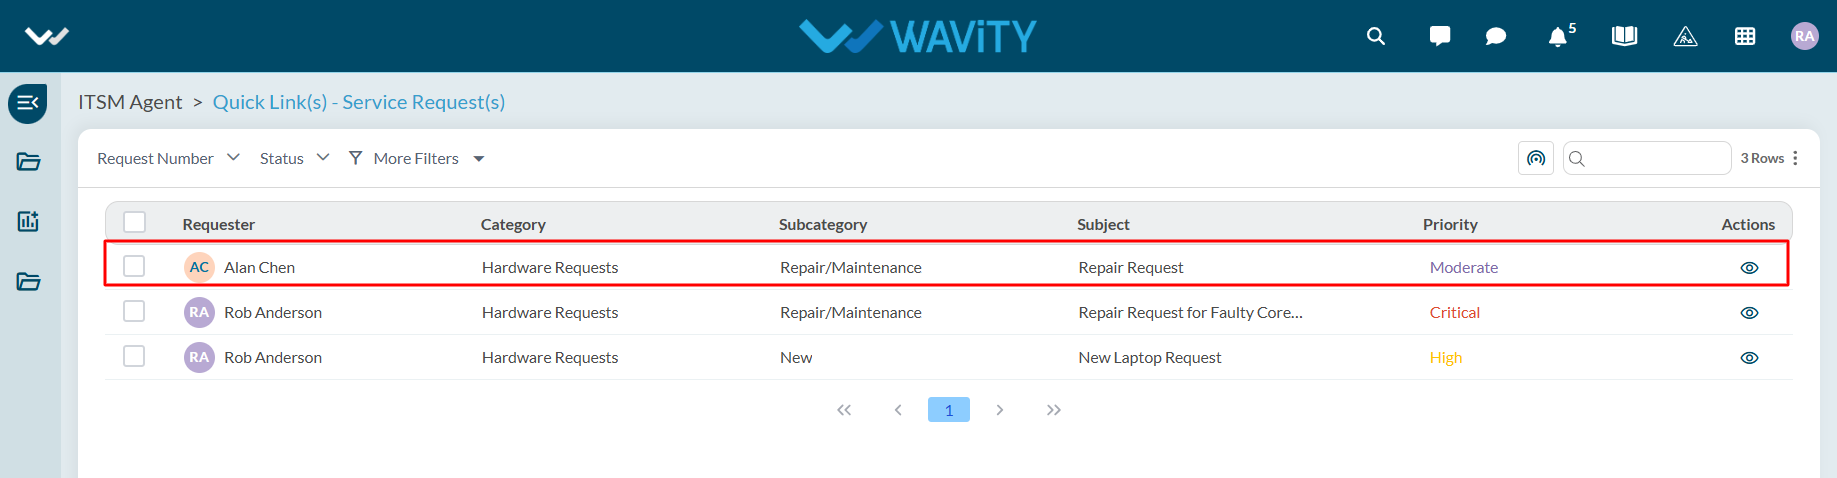
Agent Guide: How to manage a new Service Request
- Managing new service requests on the Wavity ITSM platform is straightforward and user-friendly for agents.
- Note: The steps outlined below serve as general instructions and can be customized to meet specific organizational needs; however, the core workflow remains the same.
- Agents with the appropriate access can log in using their credentials and will be directed to the Agent Interface.
- From the Agent Interface, Click on ‘Service Requests’ from the quick links widget.
- Select a relevant service request from the list to begin managing it.
- In the ‘Assigned to’ section, click the ‘link’ icon to associate the request with an asset.
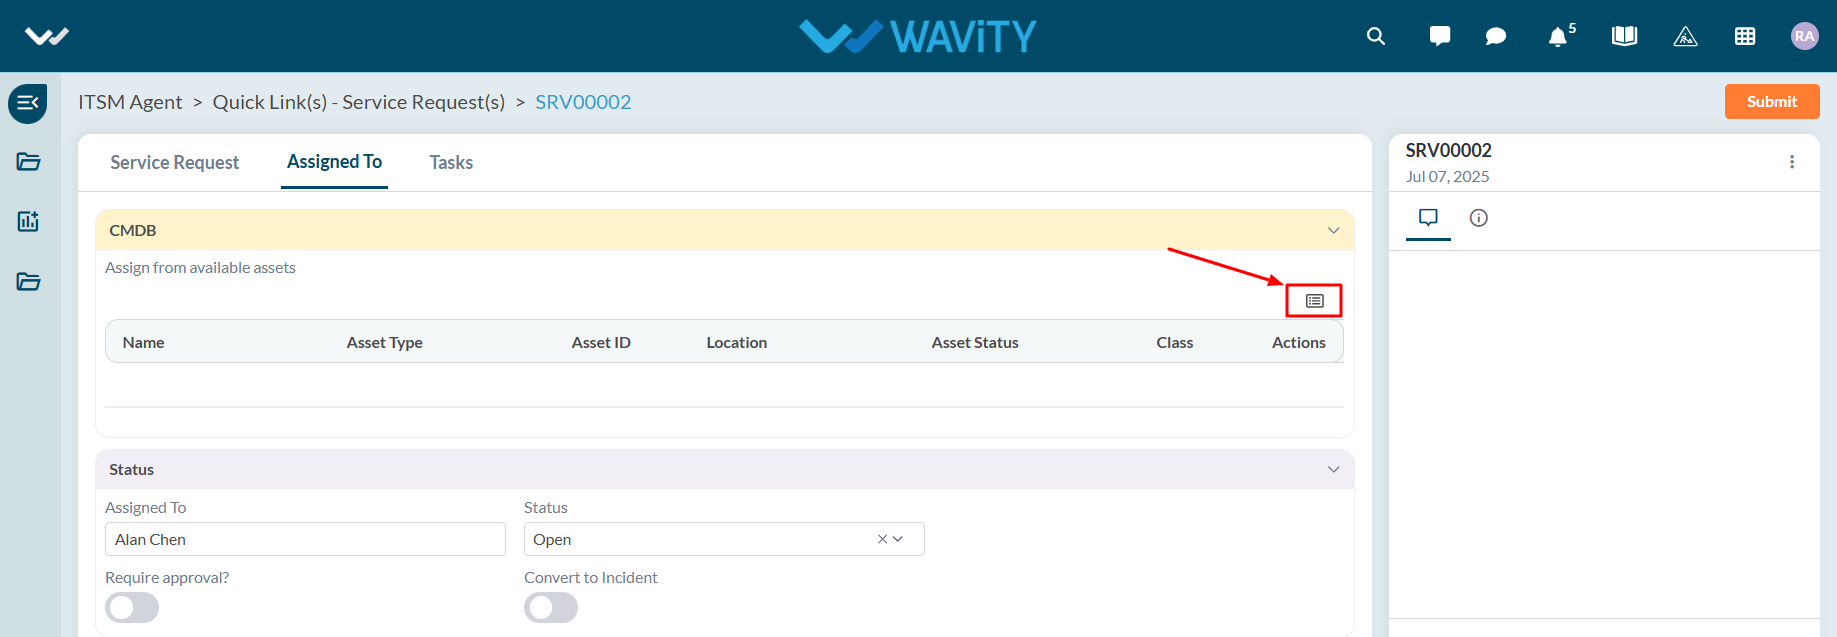
- A list of all available assets in the inventory will appear. Select the asset that matches the request.
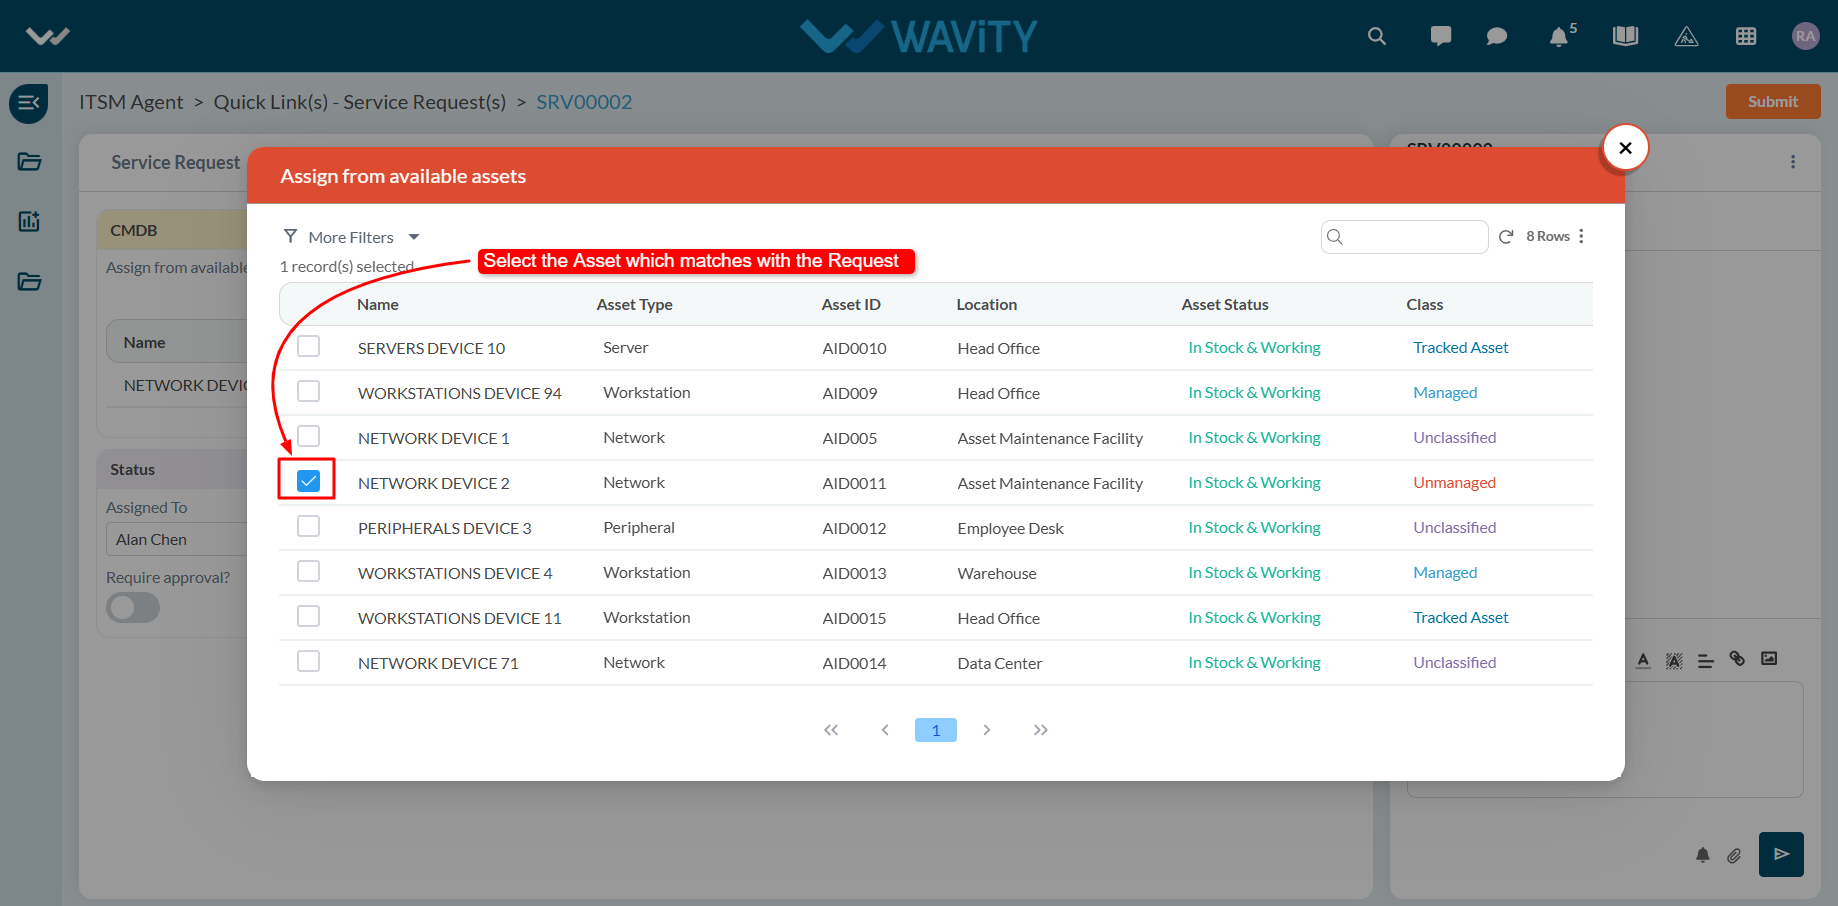
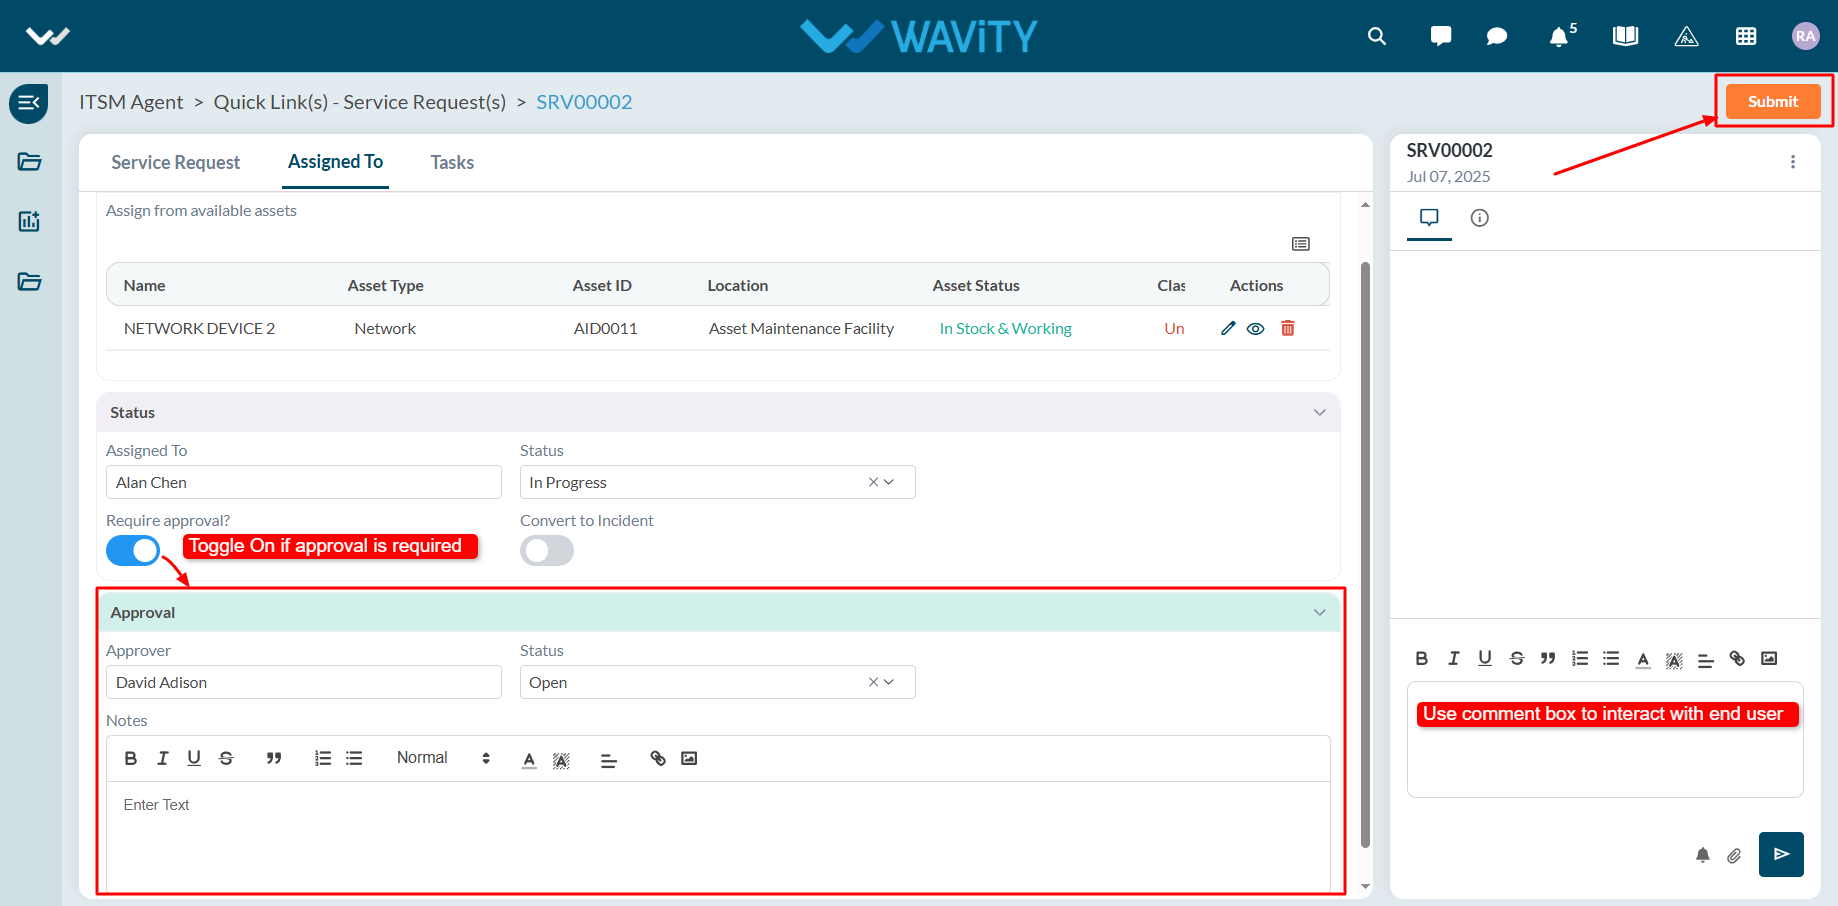
- Update the service request status using the dropdown menu. The end user will receive an email notification reflecting the new status.
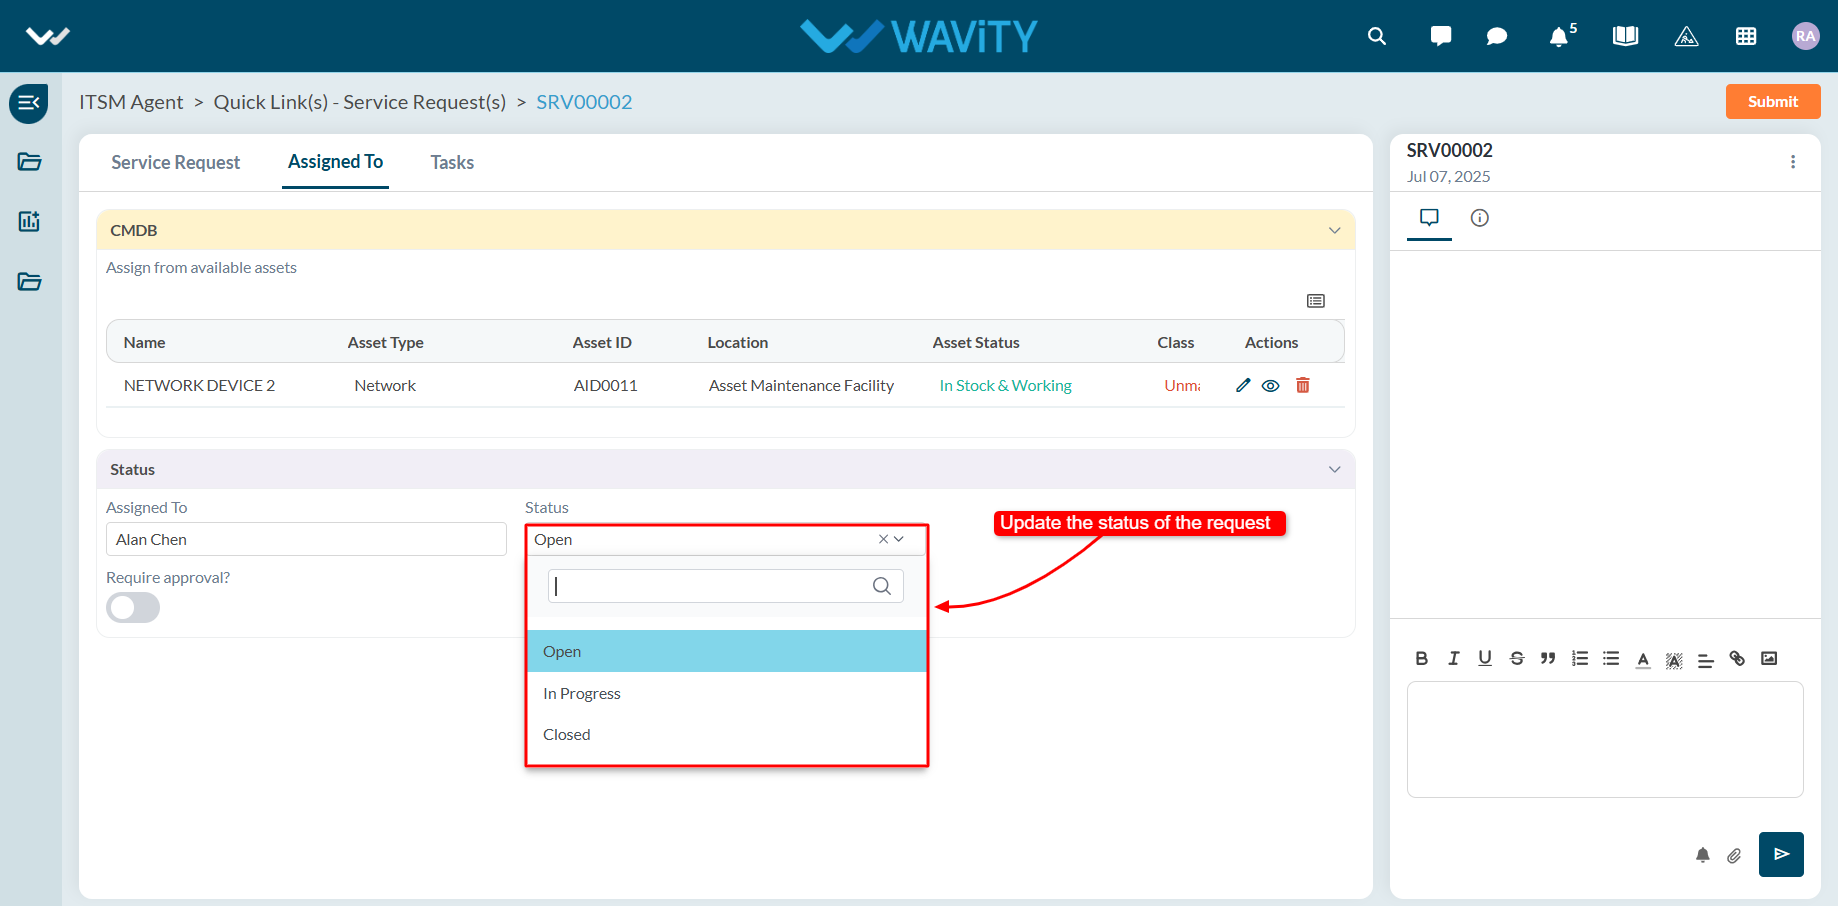
- If approval is required for the request, toggle the approval option to ON. Additional fields will appear for the approval process. A user with manager-level access can then update the approval status.
- Agents can use the comment box to communicate and collaborate with other users regarding the request.
- After all necessary actions are completed, click "Submit" to save the changes and complete the process.
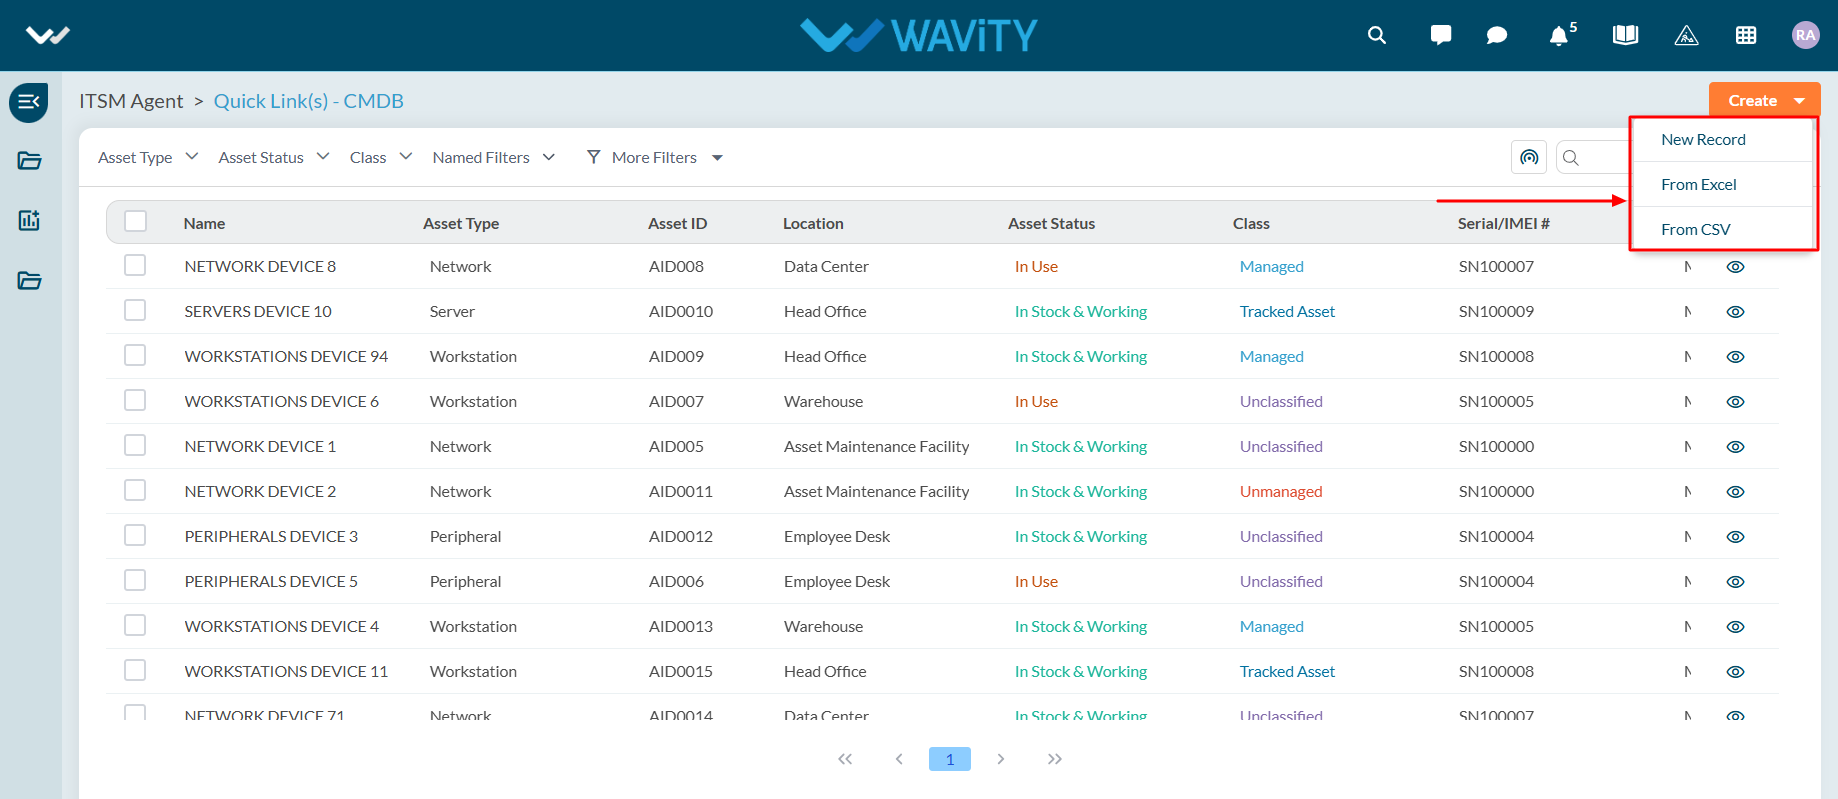
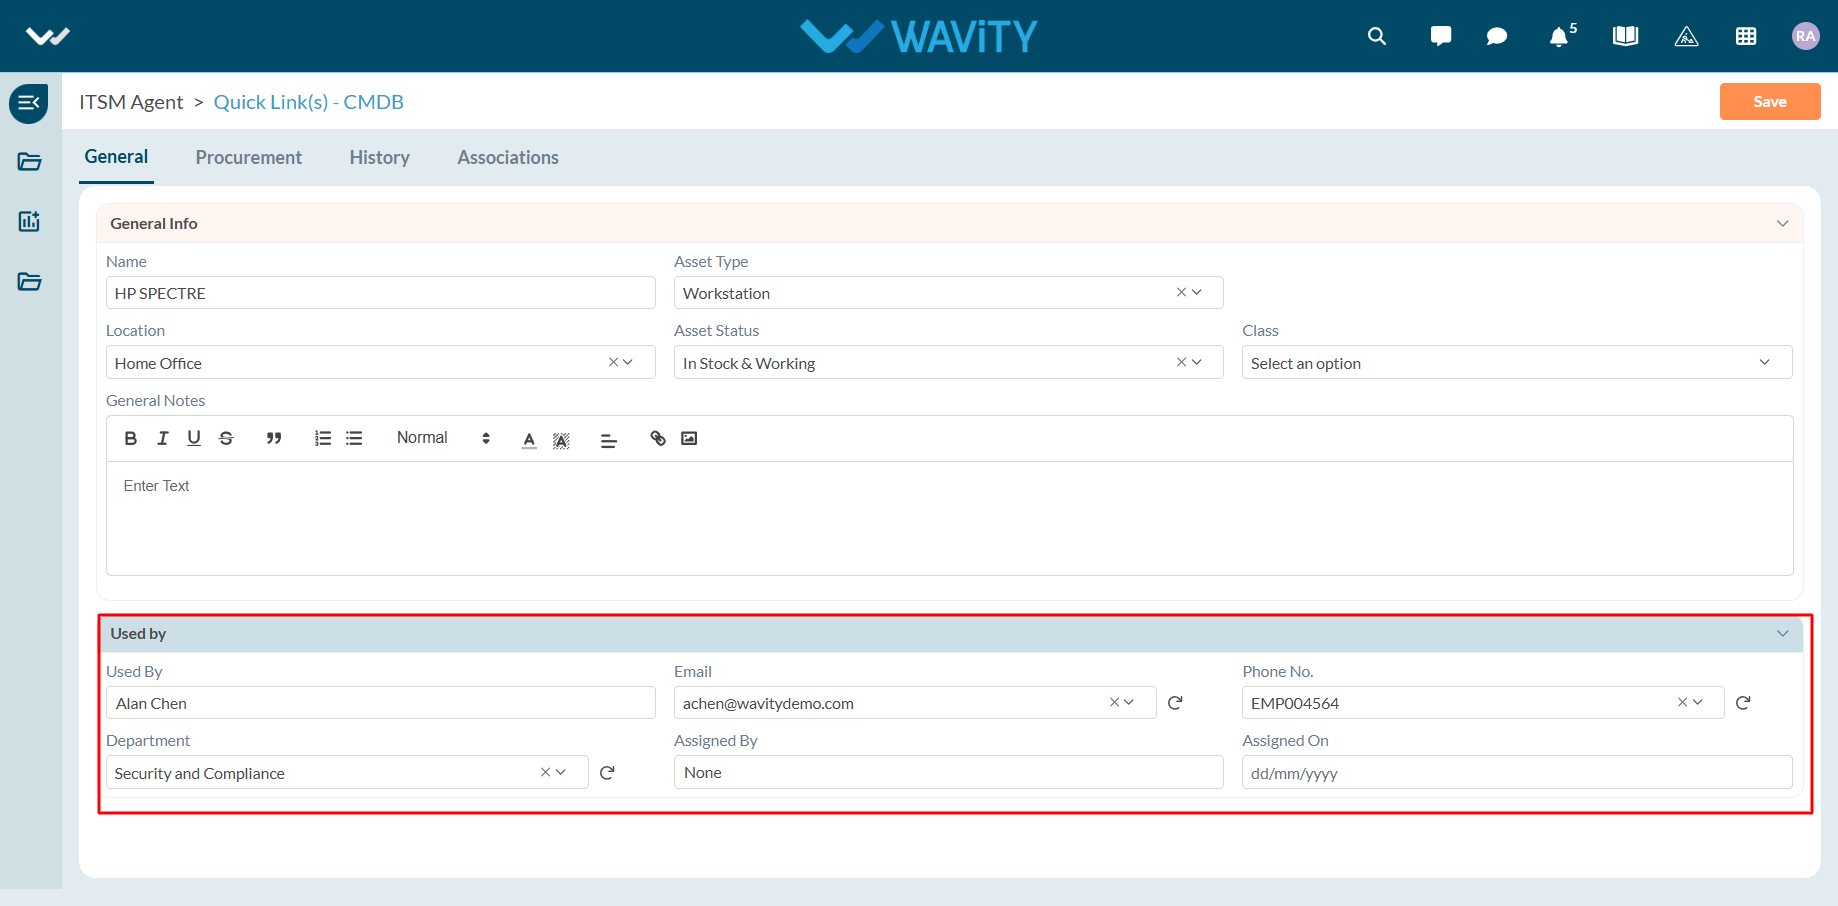
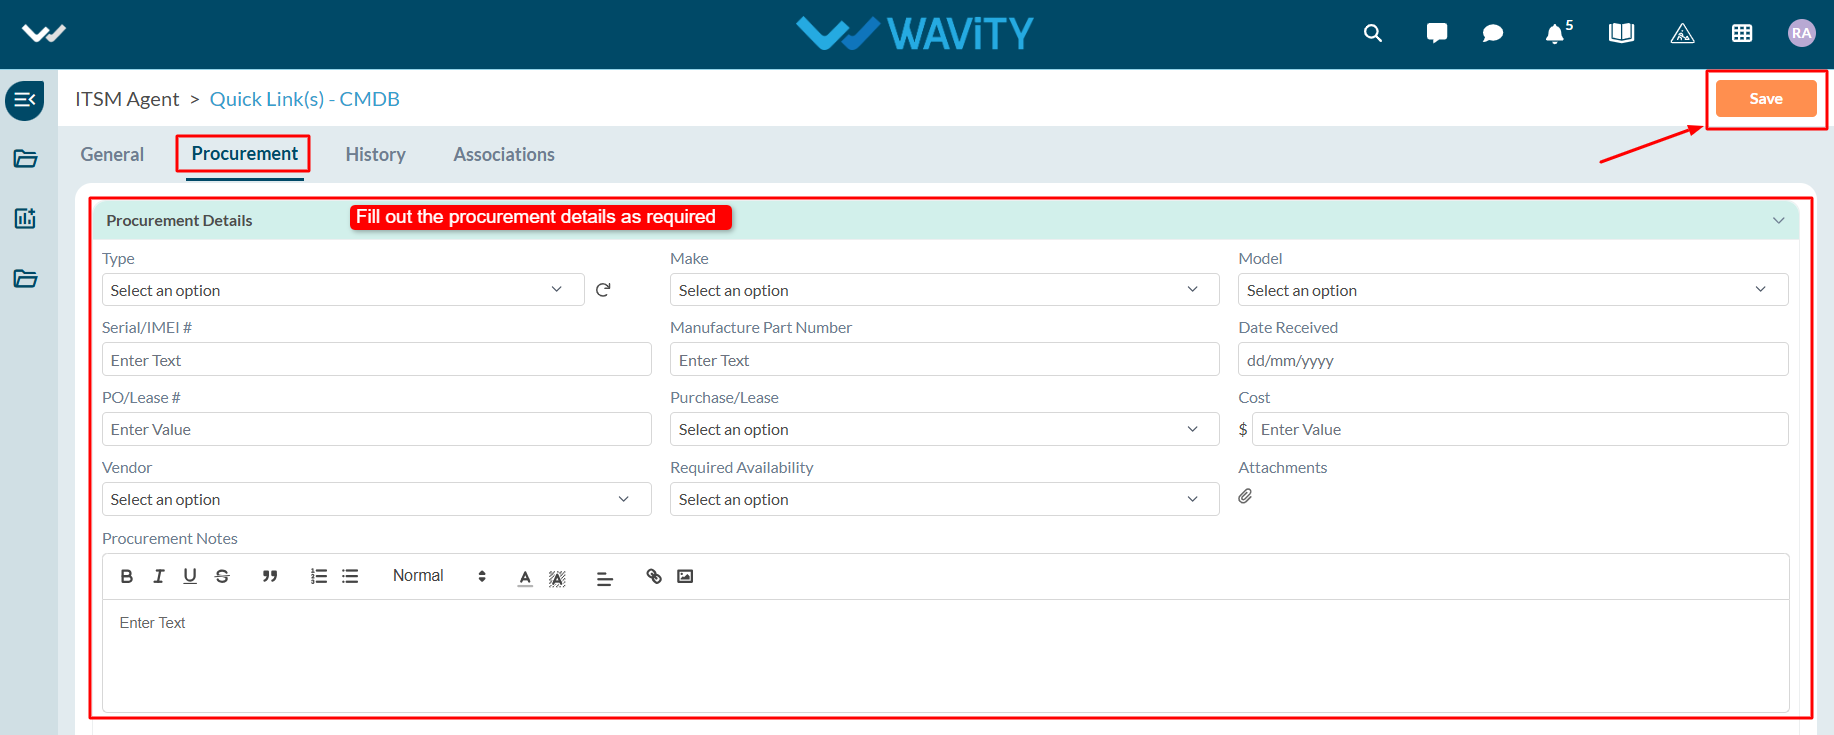
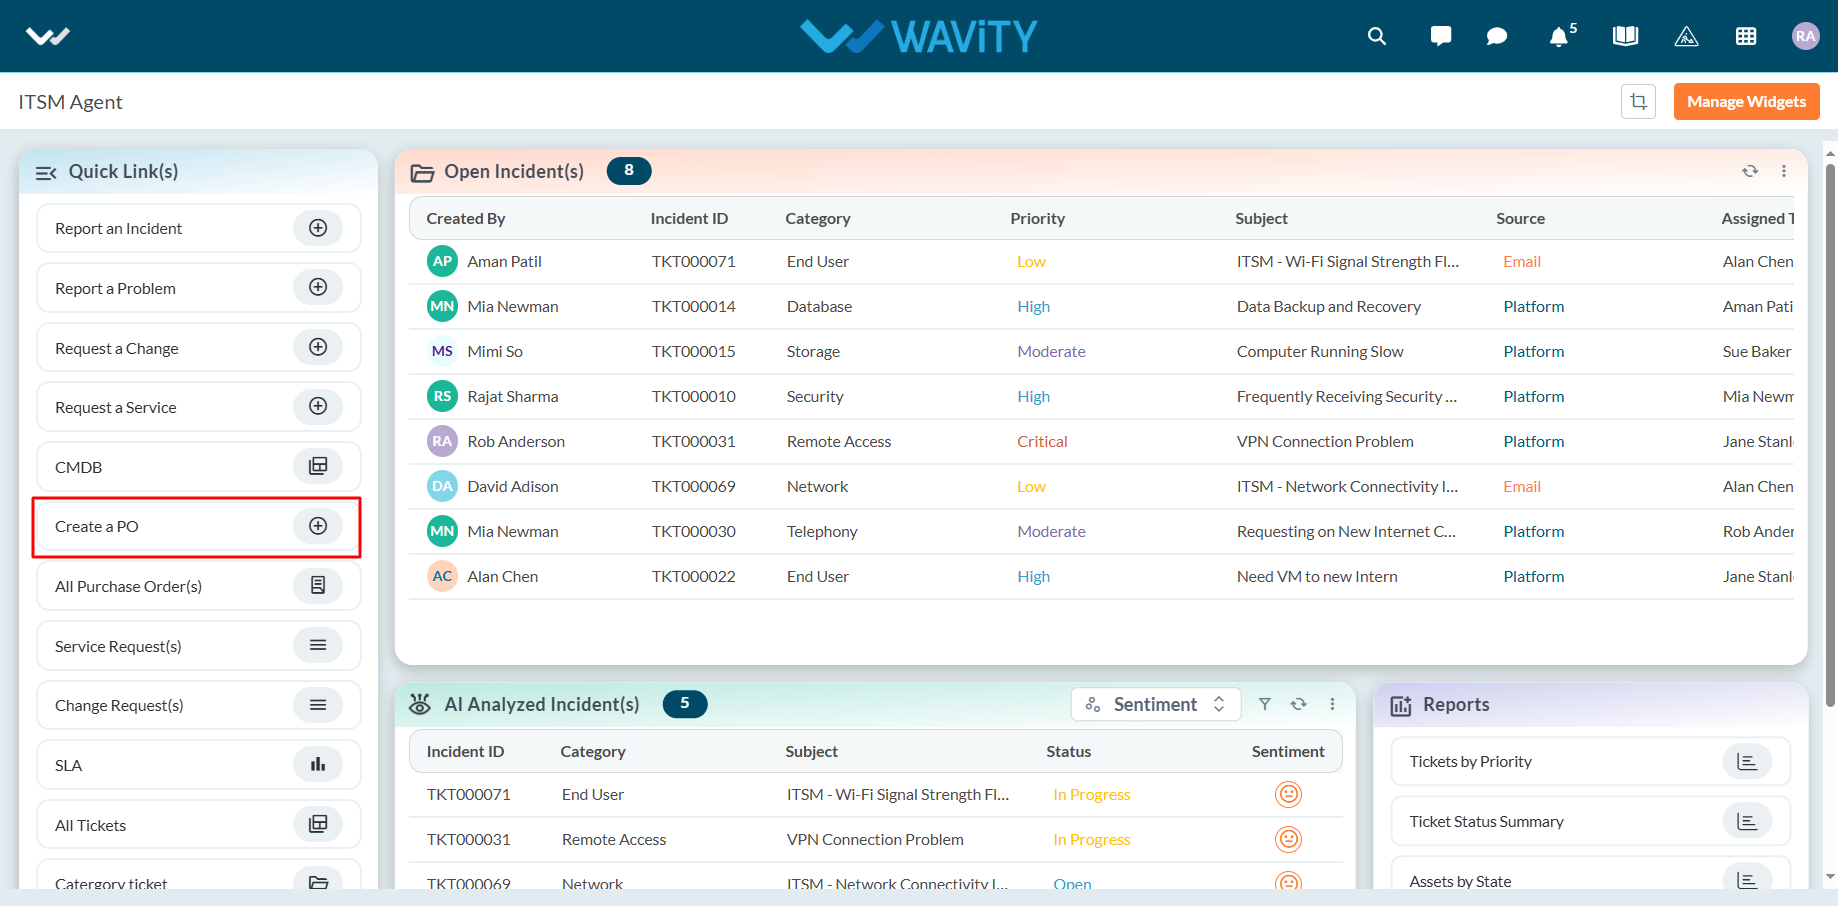
Agent Guide: How to add a new CMDB record
- Adding or managing Configuration Management Database (CMDB) records on the Wavity ITSM platform is designed to be straightforward and user-friendly for agents.
- Note: The steps outlined below serve as general instructions and can be customized to meet specific organizational needs; however, the core workflow remains the same.
- Agents with the appropriate access can log in using their credentials and will be directed to the Agent Interface.
- From the Agent Interface, Click on ‘CMDB’ from the quick links widget.
- You can create new CMDB records either manually or by importing data in bulk using Excel or CSV files. Click on "New Record" to begin adding a CMDB entry manually.
- Enter the name or title of the asset and select the appropriate asset type for the record.
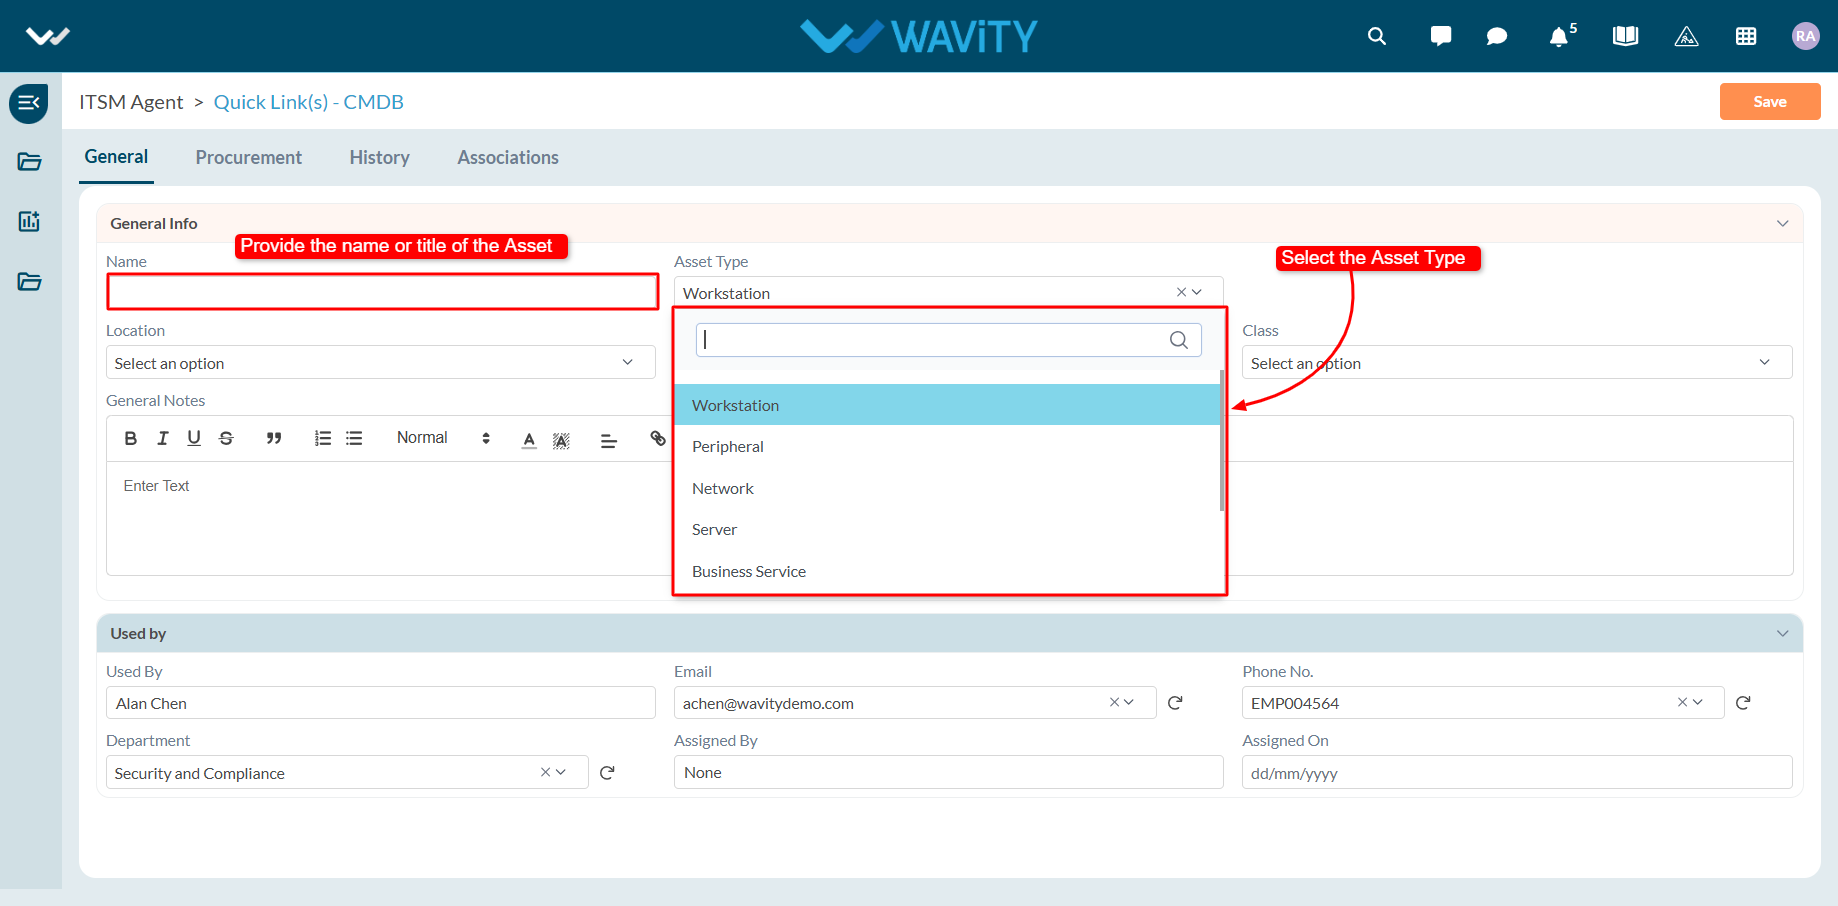
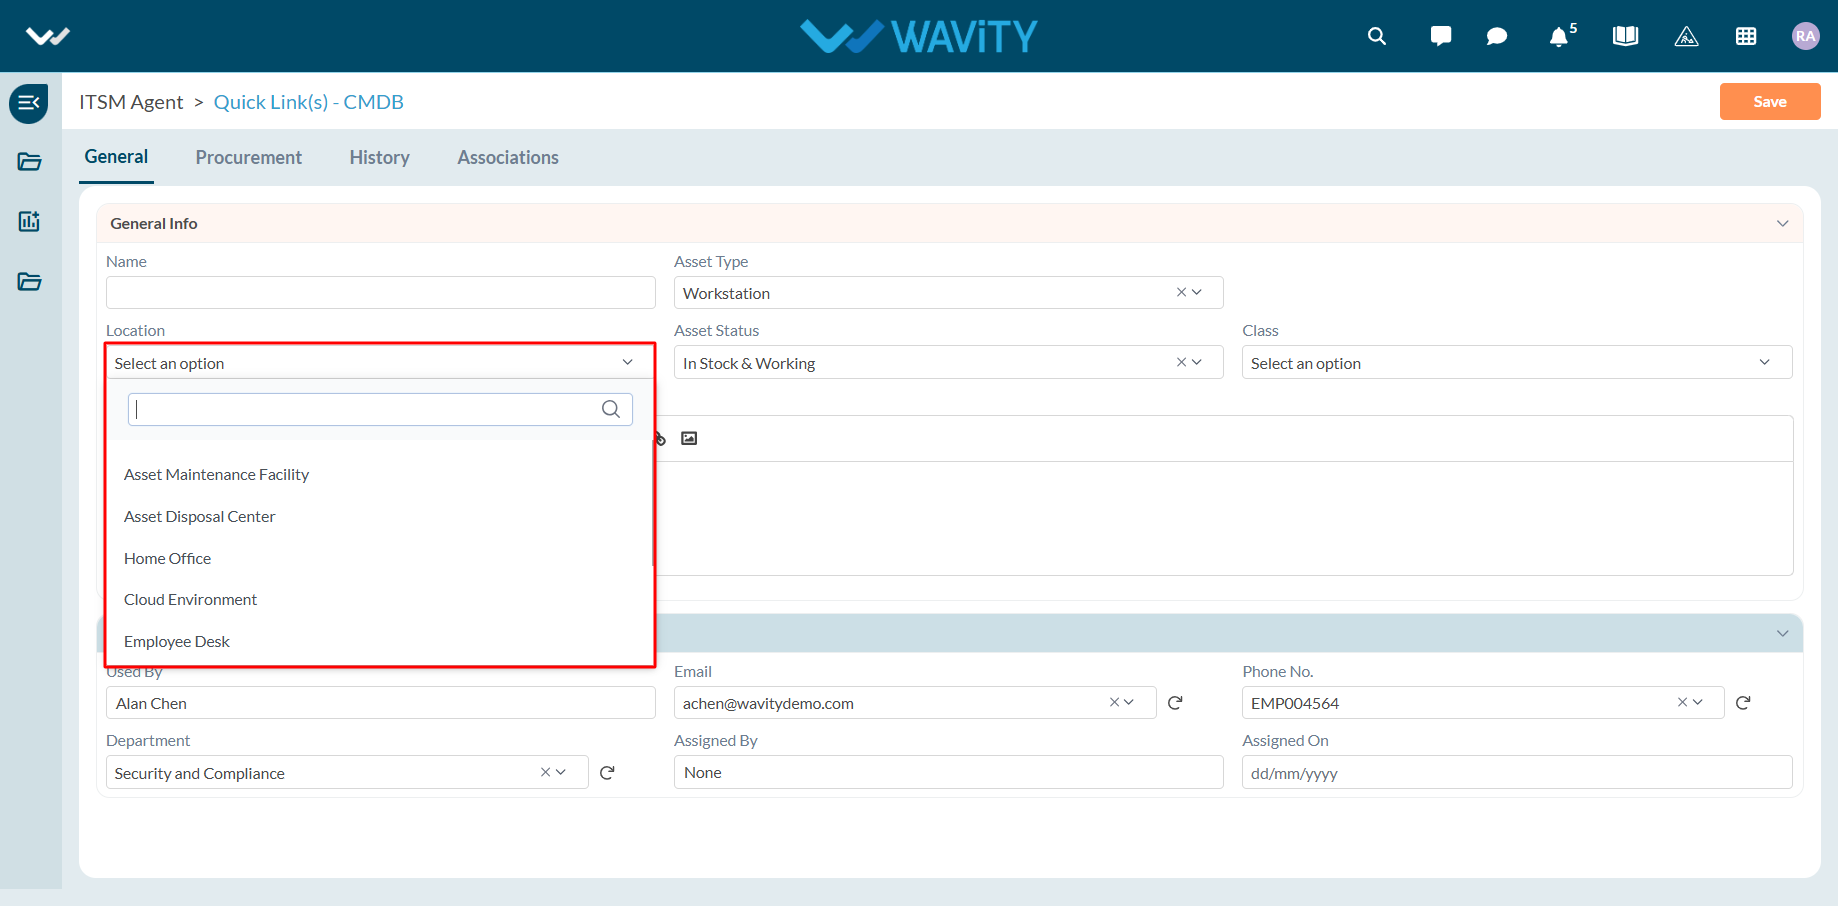
- Choose the asset’s location from the dropdown menu.
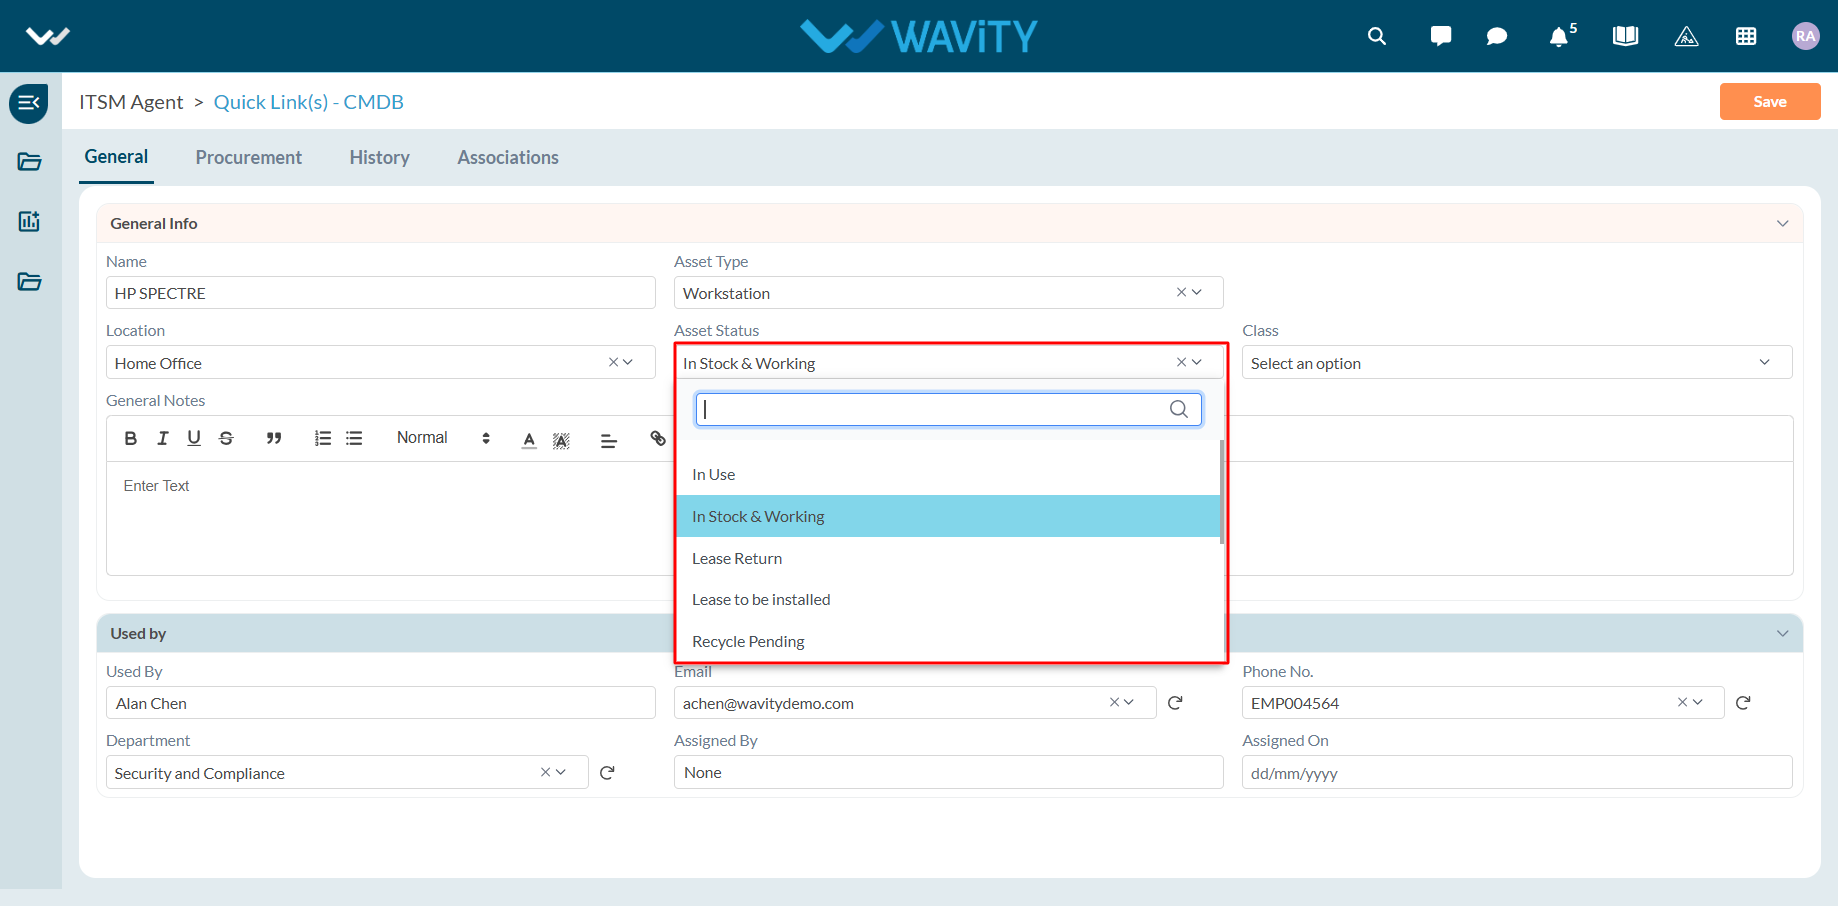
- Select the current status of the asset using the available dropdown options.
- Specify the asset’s classification—whether it is managed or unassigned. Use the description box to add any relevant notes or context.
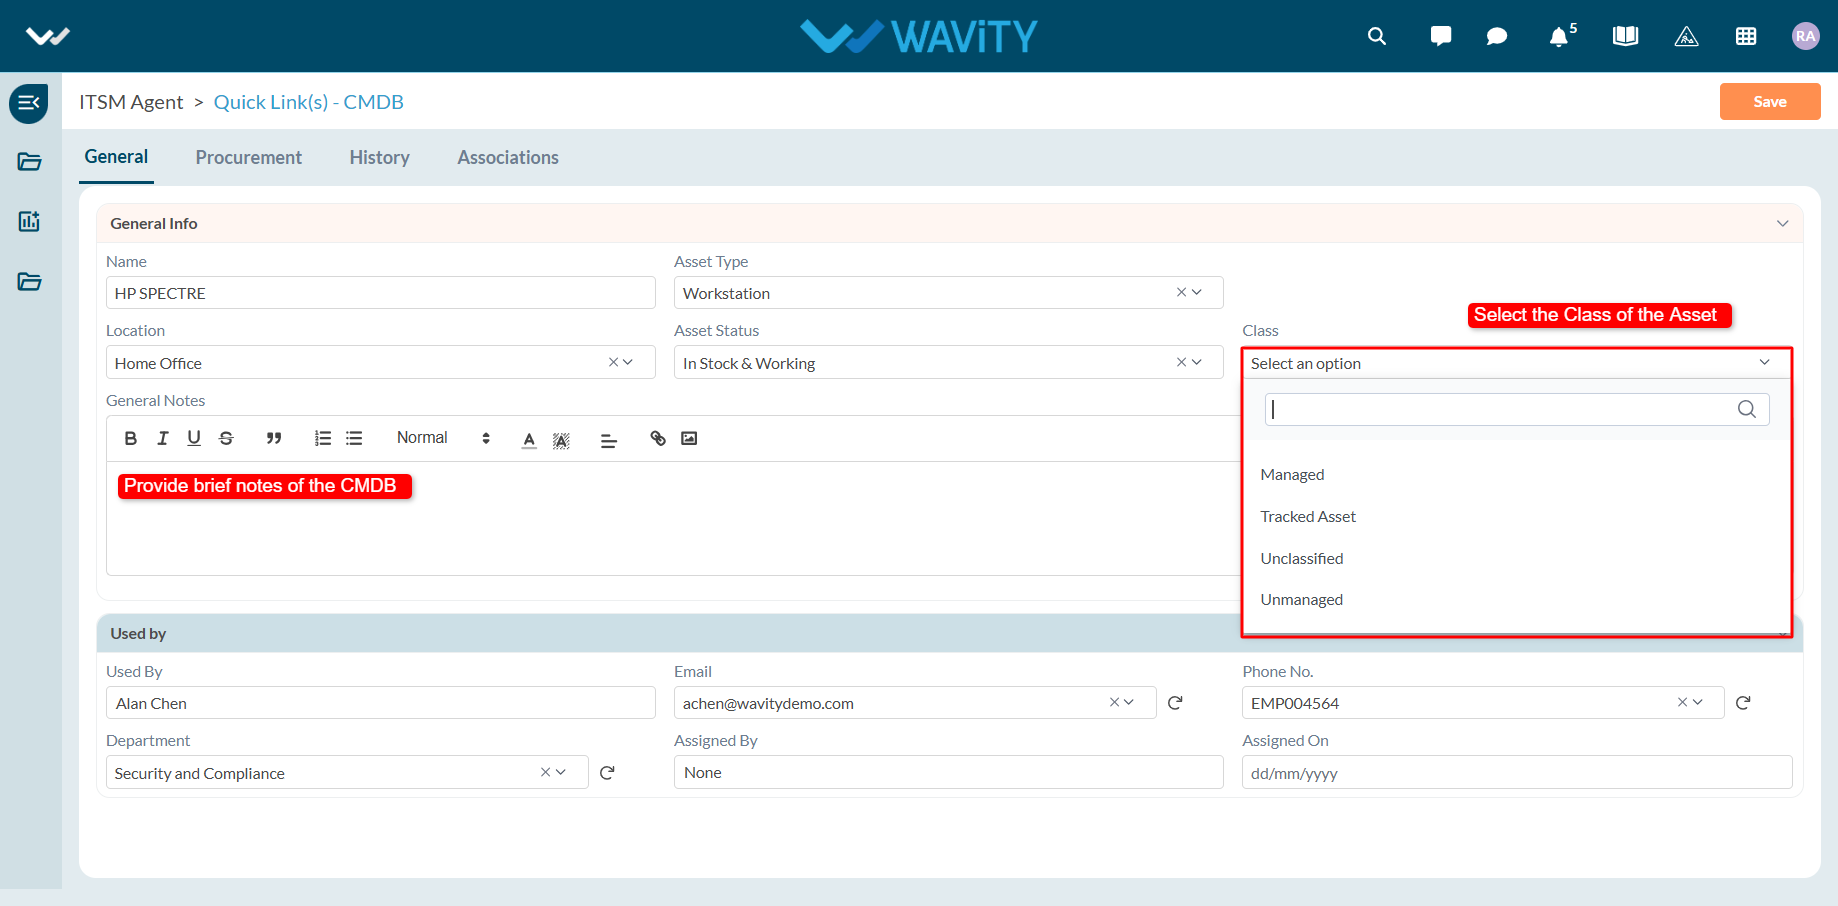
- If the asset is assigned to a user, input the user’s details. Once a name is selected, related user information will auto-populate.
- Complete the procurement section with details such as procurement type, vendor, make, serial number, and any additional vendor information.
- After all required fields are completed, click "Save" to finalize and create the new CMDB record.
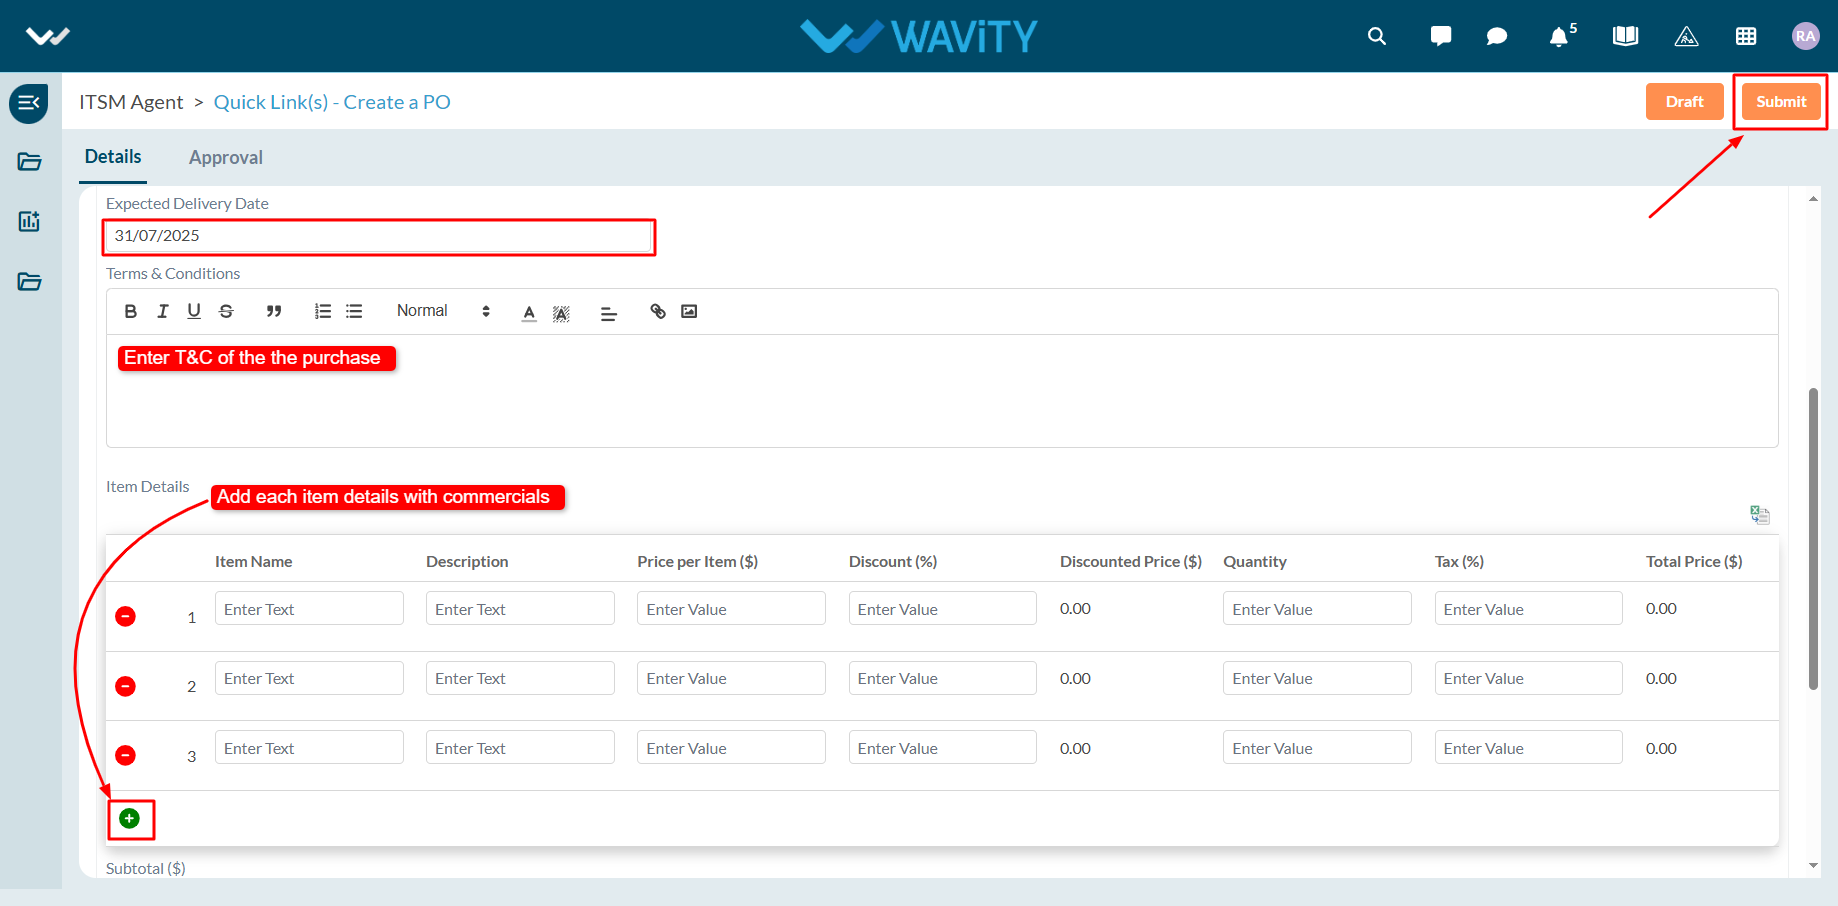
Agent Guide: How to create a new P.O
- Creating a new Purchase Order (P.O.) in the Wavity ITSM platform is designed to be a simple and intuitive process for agents.
- Note: The steps outlined below serve as general instructions and can be customized to meet specific organizational needs; however, the core workflow remains the same.
- Agents with the appropriate access can log in using their credentials and will be directed to the Agent Interface.
- From the Agent Interface, Click on ‘Create a PO’ from the quick links widget.
- Select the vendor name from the dropdown menu. The vendor’s contact name and phone number will automatically populate based on the master data.
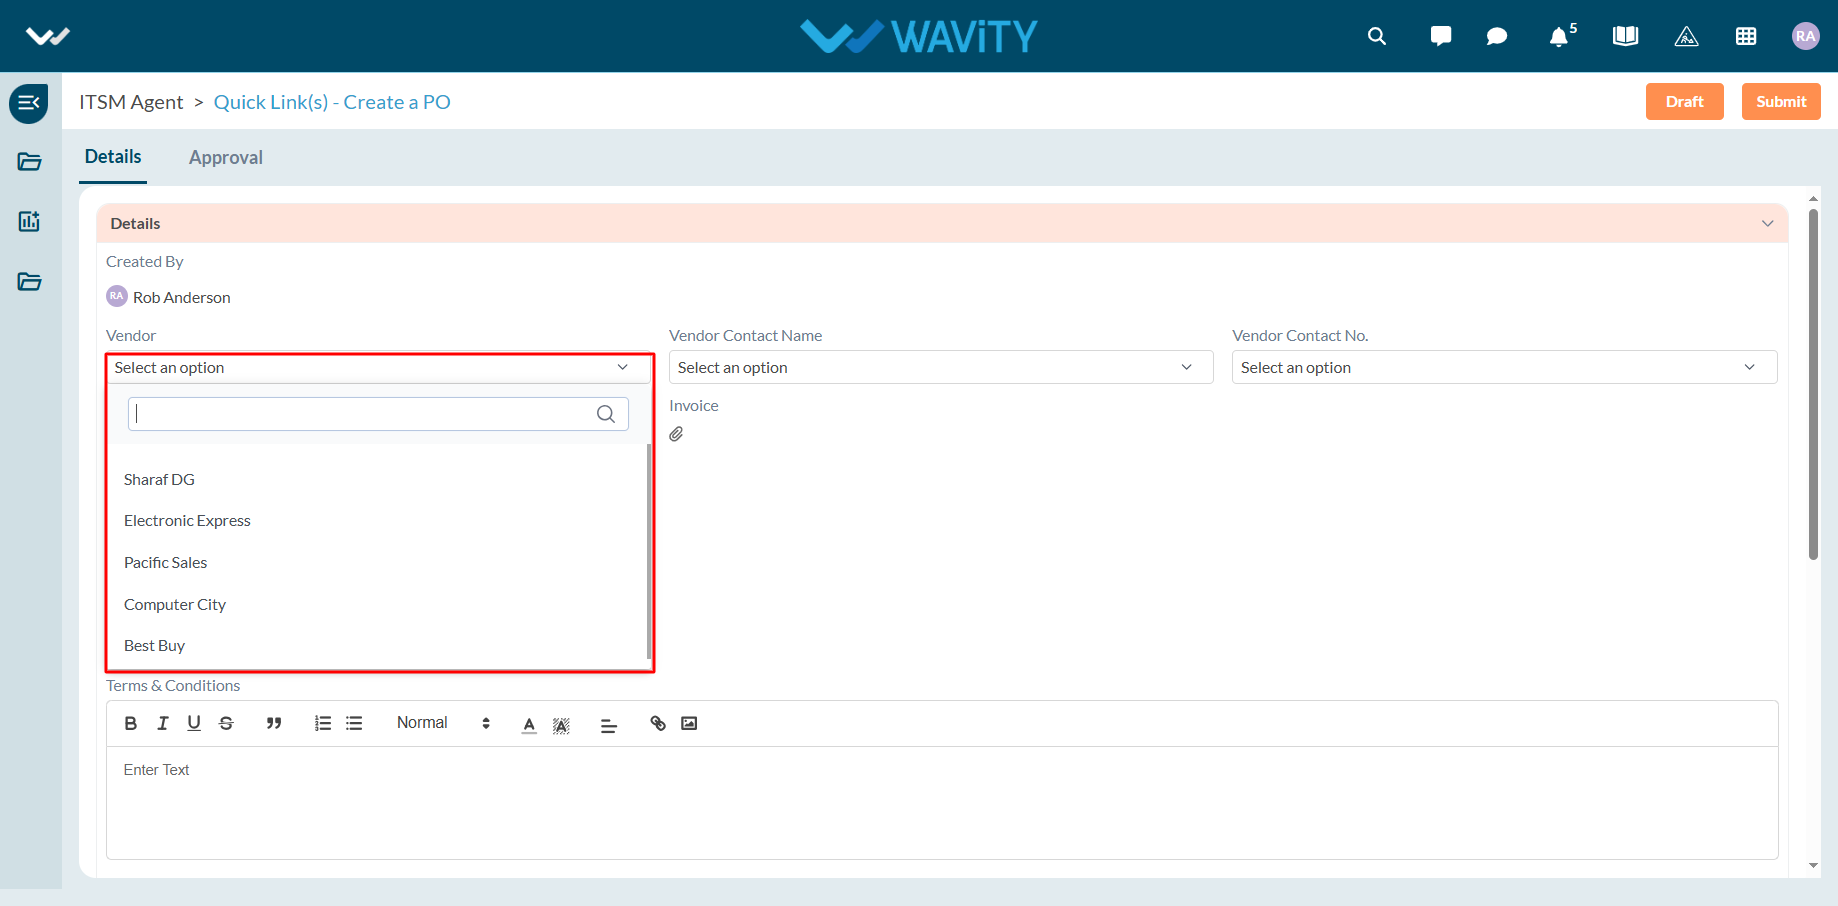
- If the vendor is new, select ‘Yes’ in the ‘Add new vendor?’ field. You can attach an invoice copy from your local system or connect through cloud storage services like Google Drive or OneDrive.
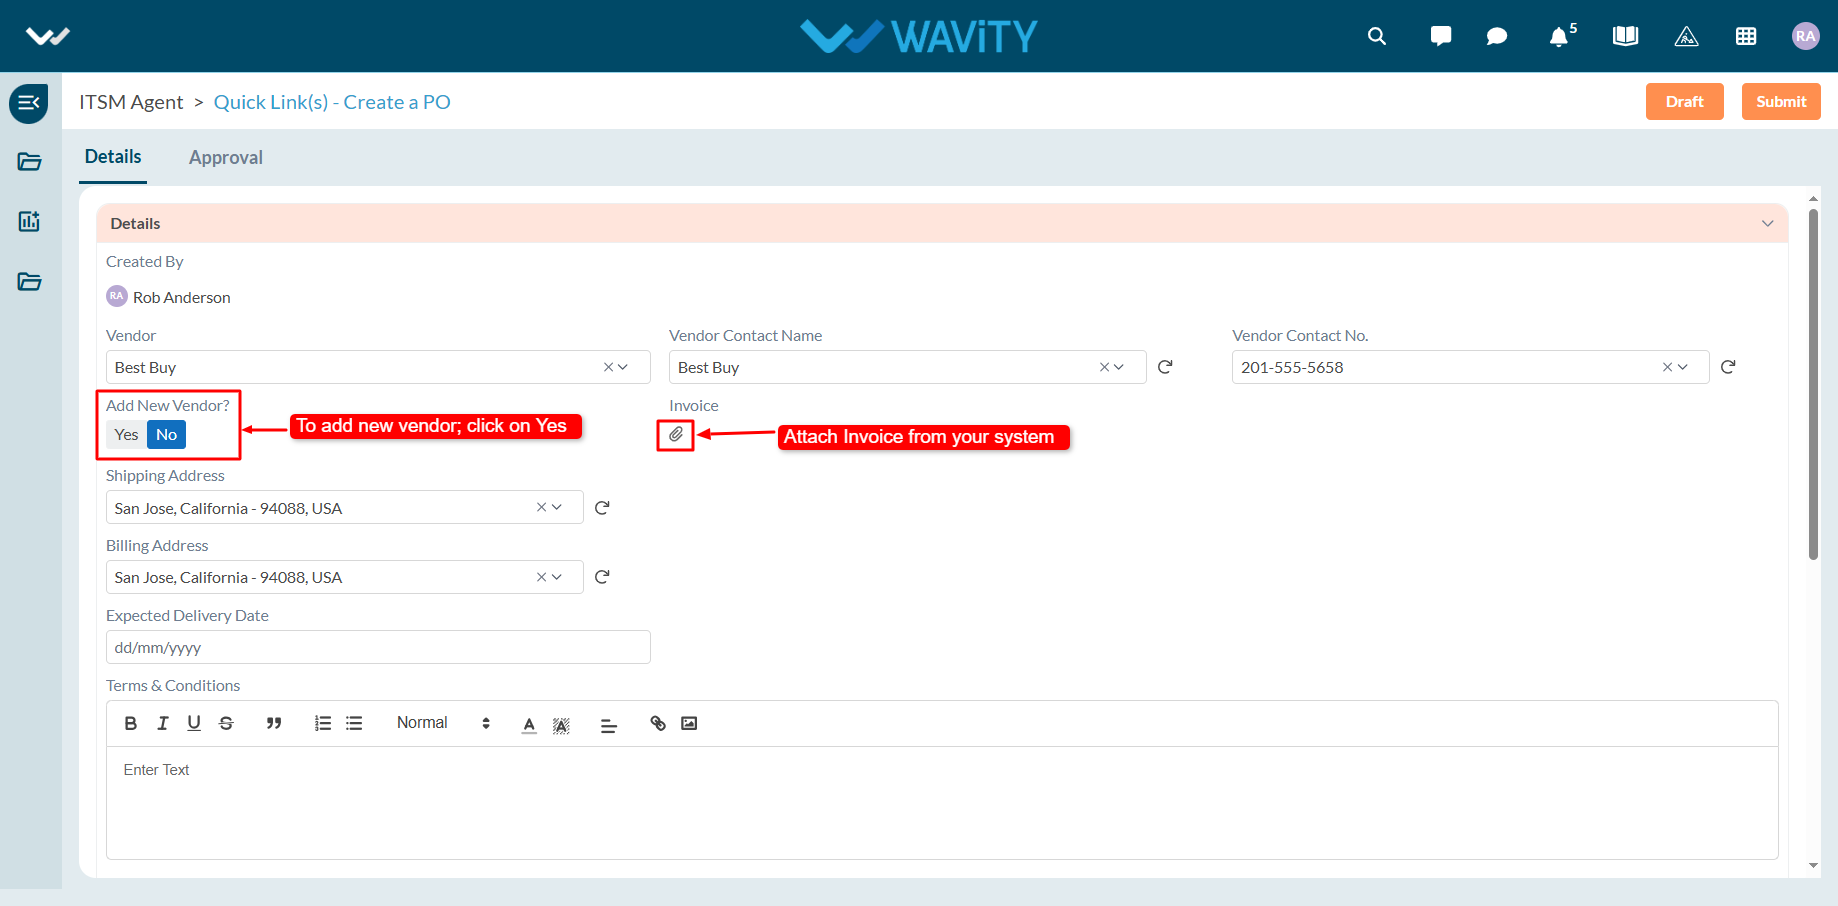
- Choose the expected delivery date for the order and enter the terms and conditions in the description box.
- Add item details along with their commercial information by clicking the plus (+) symbol for each line item.
- Once all the required details are entered, click "Submit" to generate the new Purchase Order.
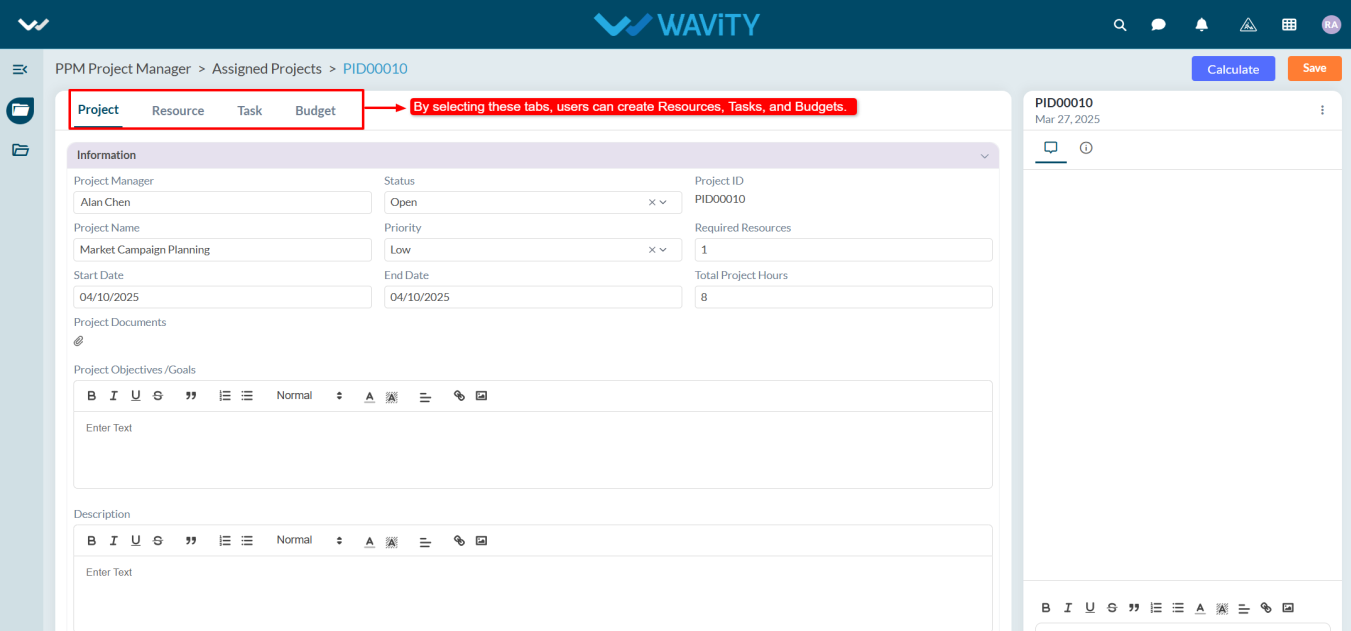
Project Creation in PPM: Overview
- Wavity enables manager’s to create and manage a comprehensive Project Portfolio Management (PPM) system, allowing organizations to oversee multiple projects, prioritize initiatives, allocate resources effectively, and ensure alignment with strategic objectives.
- Through Wavity intuitive interface, managers can track project performance, monitor progress, and make informed decisions across the entire project portfolio.
- In Wavity Project Portfolio Management module, each key role including the PMO (Project Management Office), Portfolio Manager, Project Manager, Resource Manager, and Team Member is associated with its own dedicated persona, allowing for tailored access, workflows, and responsibilities specific to their function within the project lifecycle.
- Note: The steps provided serve as sample instructions and can be customized based on specific requirements; however, the core workflow will remain the same.
PMO (Project Management Office)
- Users with PMO access can log in using their credentials and will be directed to the PMO persona.
- The PMO can create a new project via the Quick Links.
- Under the Project tab, navigate to the Information section, fill in all required details.
- The system will automatically capture the requester's name and the submission date.
- Select the appropriate Business Unit from the dropdown menu.

- While creating a project in Wavity, users must provide key timeline details, including the total estimated project hours, the proposed start date, and the estimated completion date.
- If you have any supporting documents, you can attach them under Project Documents. Optionally, you may also include the project’s Objectives/Goals and Description.
- Once all details are entered, click the Save button to apply the changes.
Portfolio Manager
- The Portfolio Manager has the authority to create and approve projects, as well as assign a Project Manager.
- Users with Manager access can create projects.
- Managers can initiate project creation by selecting Create a Project from the Quick Links.

- Under the Project tab, the Manager enters the necessary details and clicks Save to record the project.
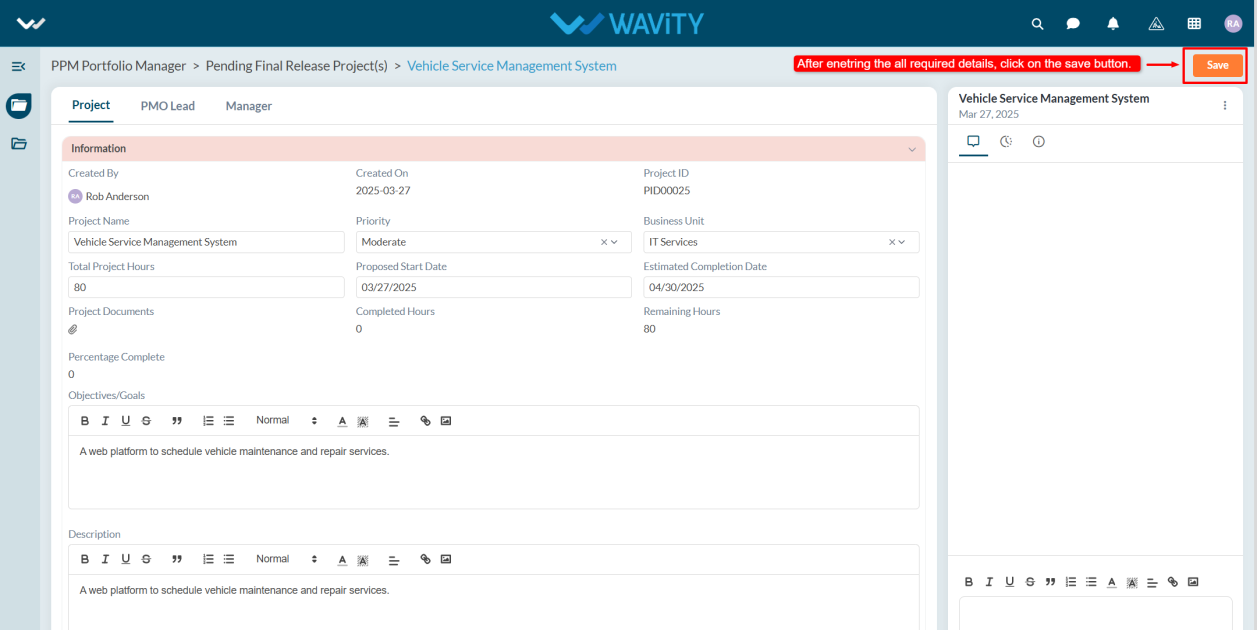
- In the Manager tab, the Portfolio Manager approves the project after it has been approved by the PMO Lead in the PMO Lead tab, assigns a Project Manager, specifies the required number of resources, and saves the record.
Project Manager
- The Project Manager has access to create projects, assign tasks, manage and view the budget, submit and approve timesheets, and request resources.
- From the Quick Links section, the Project Manager can create a project by selecting Create Project, similar to the Portfolio Manager and PMO.
- The Project Manager works on assigned projects and can request resources, assign tasks, and submit budget requests for those projects.
Resource Manager
- A user with Resource Manager access is responsible for approving resource allocations for specific projects. They can also add new resources, create projects, and creates timesheets.
- In the Pending Resource Requests table under the Manager tab, the Resource Manager approves requests by changing the status to Approved.
Team Member
- Team Members work on assigned tasks, update timesheets, and have access to create budgets.
- Team Members do not have access to create projects.
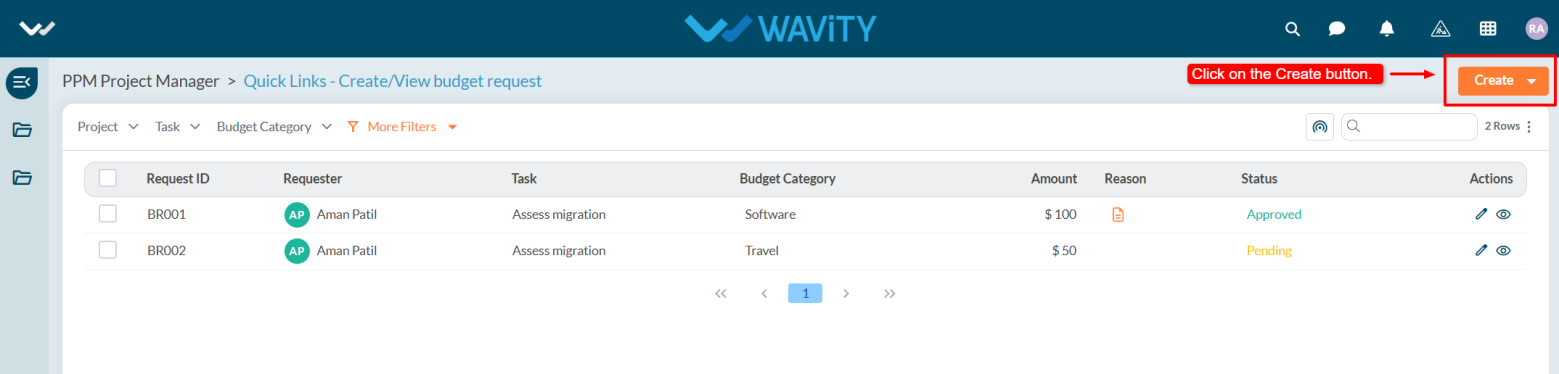
Managing Budget Requests
- Project Managers, Resource Managers, and Team Members have access to create and view budget requests in Wavity Project Portfolio Management Solution.
- Upon logging in with their credentials, users will land on their respective personas (e.g., Project Manager Persona).
- Note: The steps provided serve as sample instructions and can be customized based on specific requirements; however, the core workflow will remain the same.
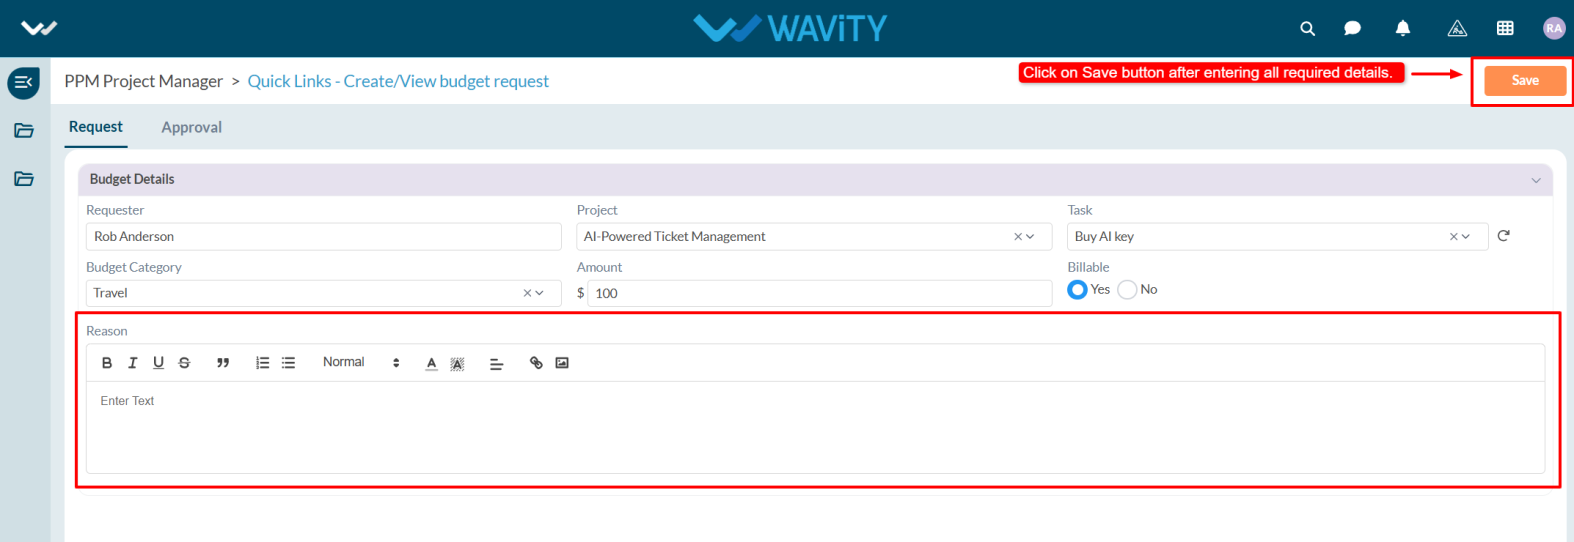
- From the Quick Links, select Create/View Budget Request.

- After selecting the link, users can view any pending requests or click the Create button to submit a new budget request.
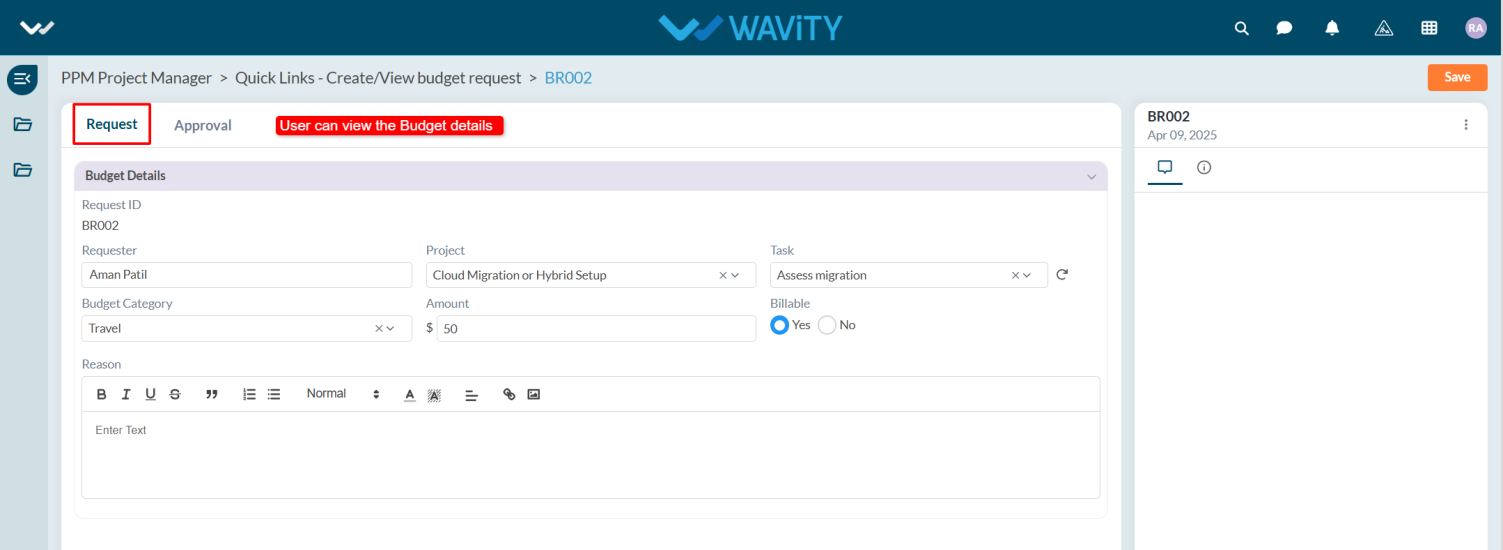
- In the Request tab, under the Budget Details section, the system will automatically populate the Requester field with the user's name.
- Select the Project Title from the dropdown. When a project is selected, the Task field will automatically capture the relevant task title if tasks are associated with the project.
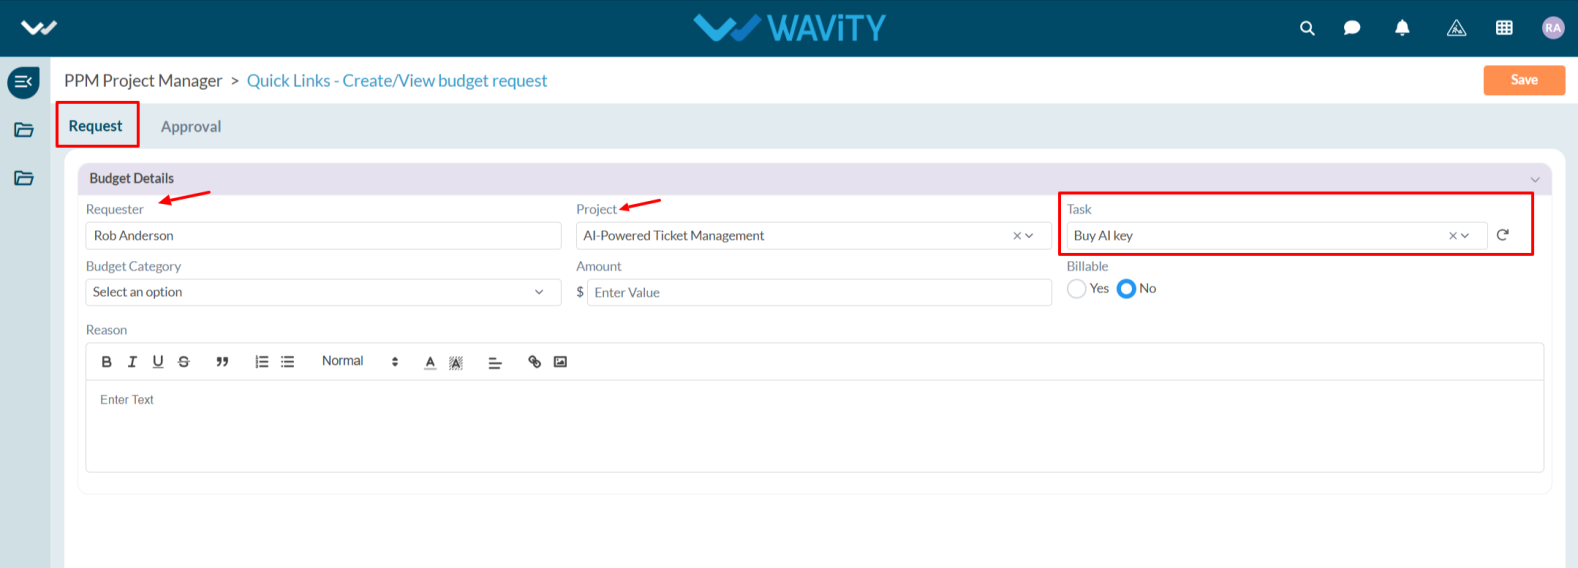
- Choose the appropriate Budget Category from the dropdown, enter the Amount, and select Yes if it is billable.
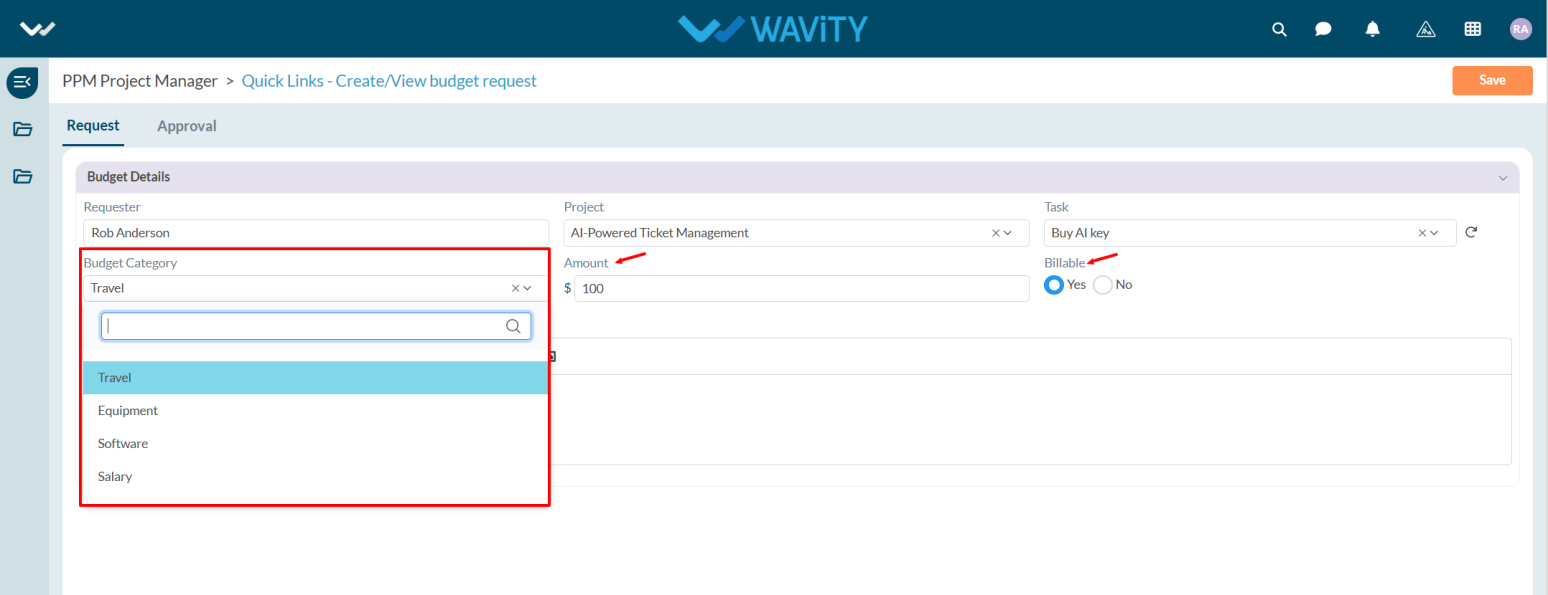
- Provide a Reason for the budget request and click the Save button.
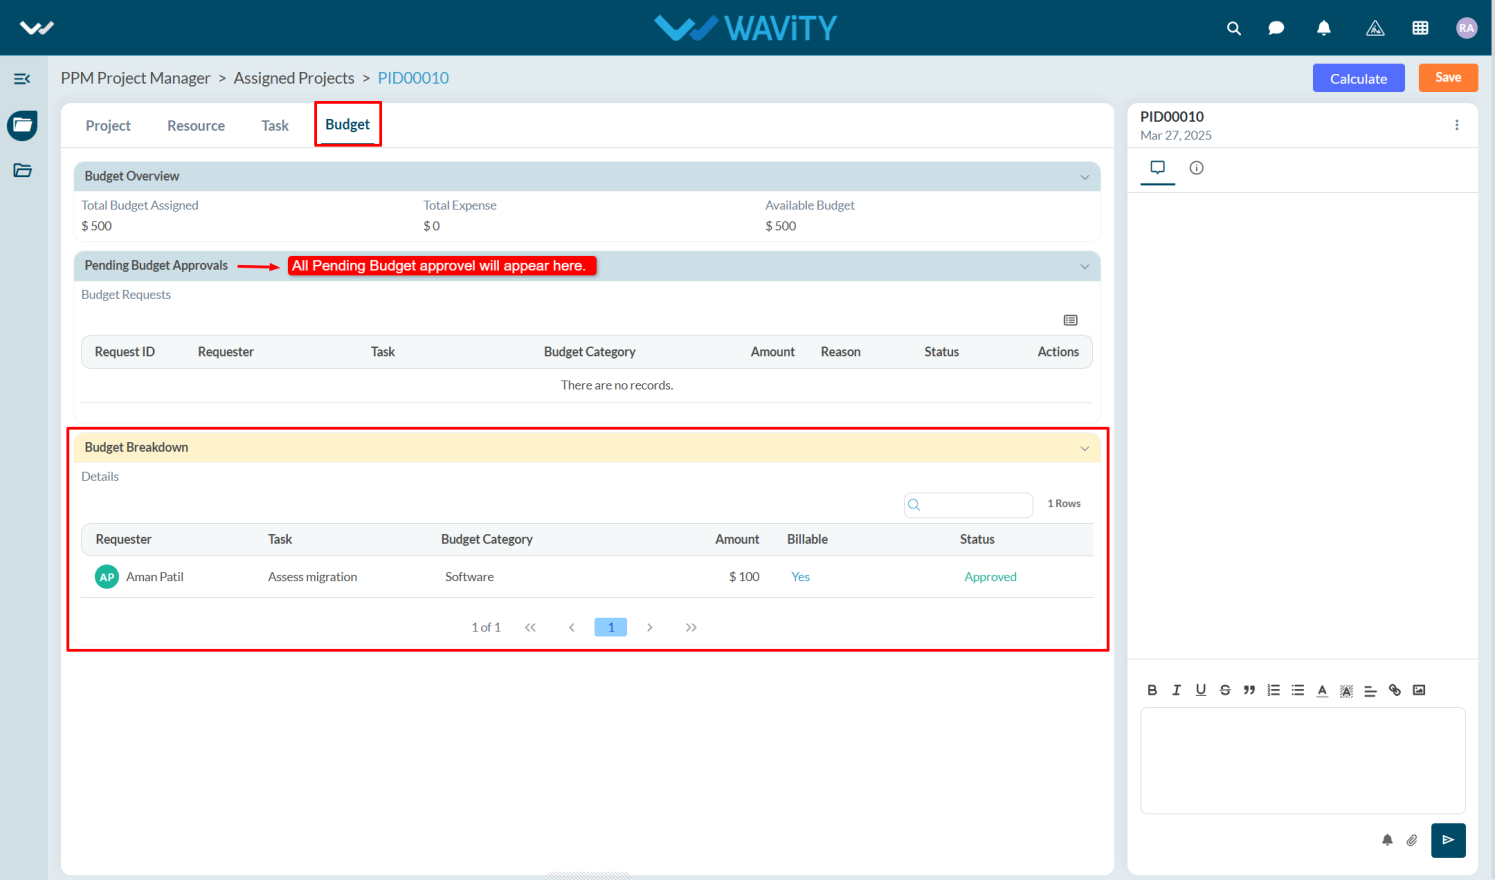
- Users can track the status of their request in the Assigned Project table widget by selecting the project for which the budget was requested.

- Go to the Budget tab. Under Pending Budget Approval, users can view their pending requests. In the Budget Breakdown section, approved budgets will be displayed.
- Similarly, Resource Managers and Team Members can request budgets within their respective personas by navigating to Quick Links.
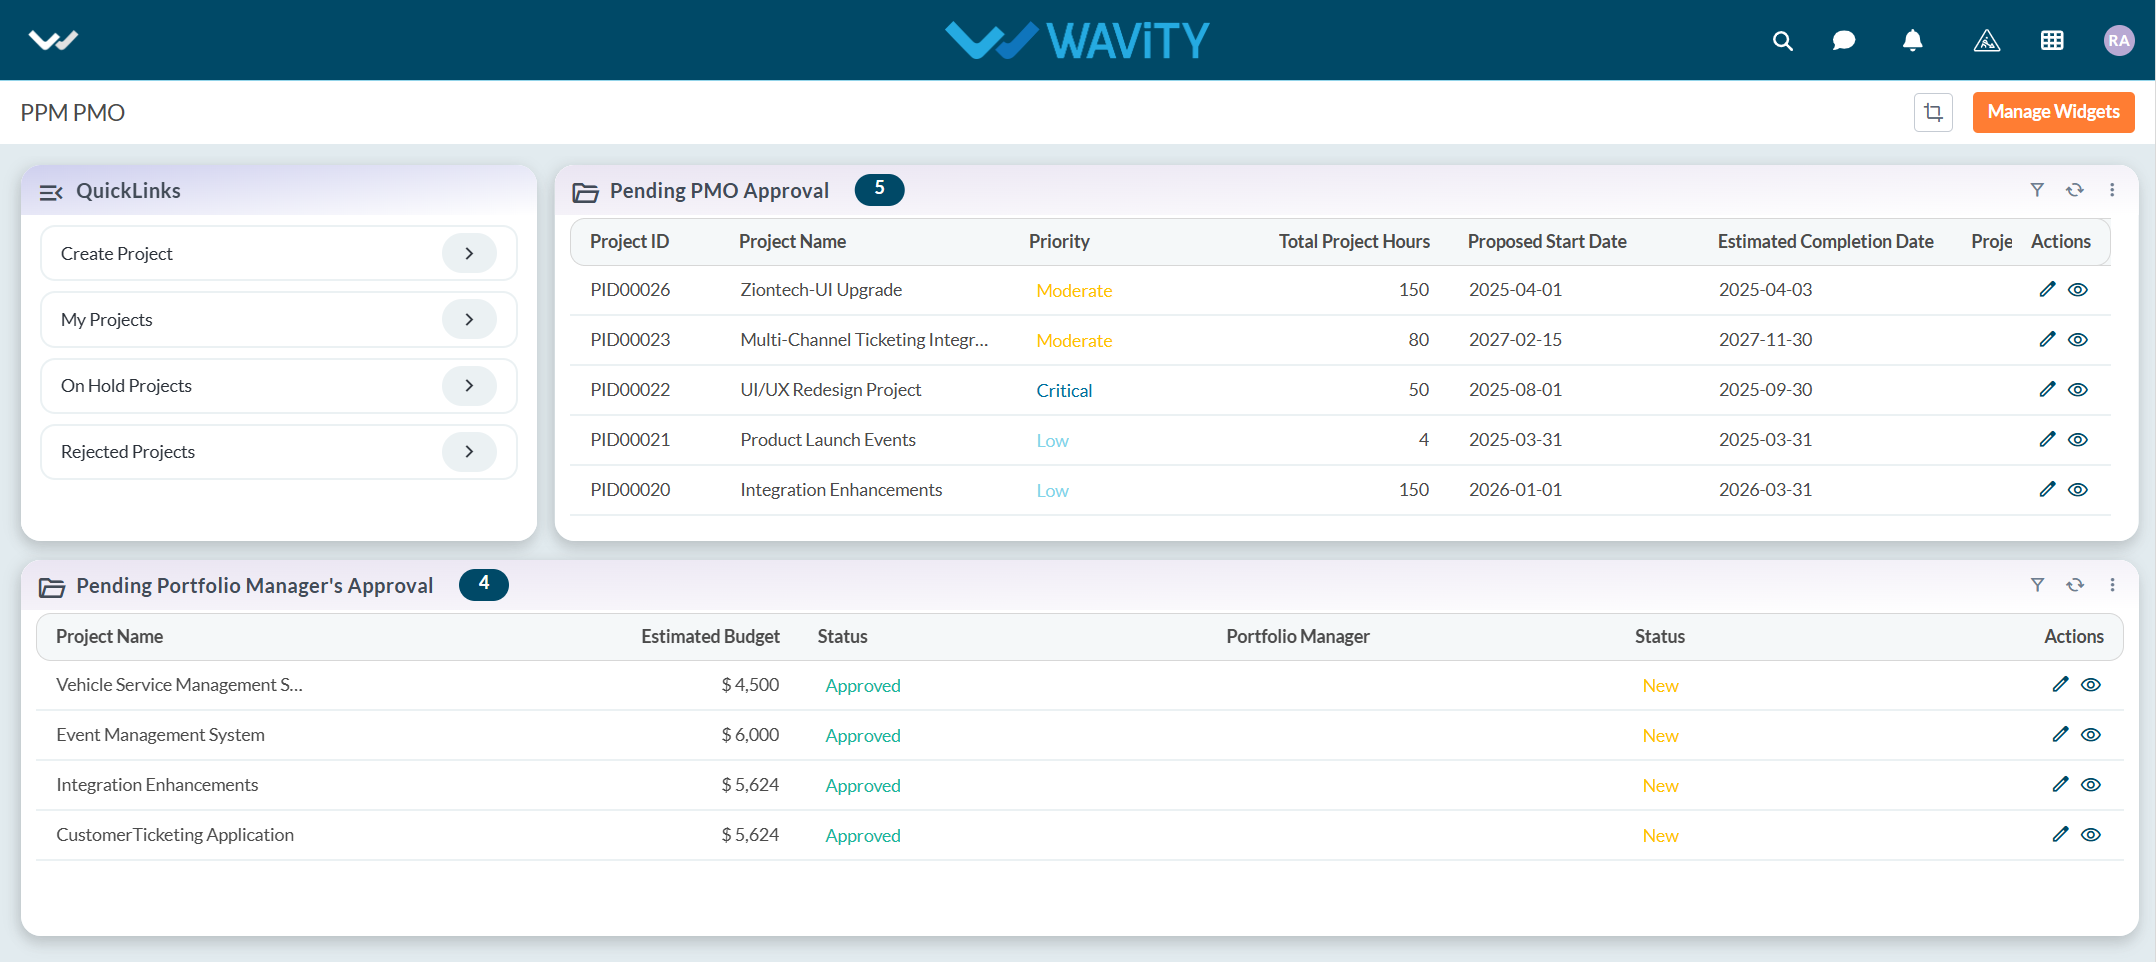
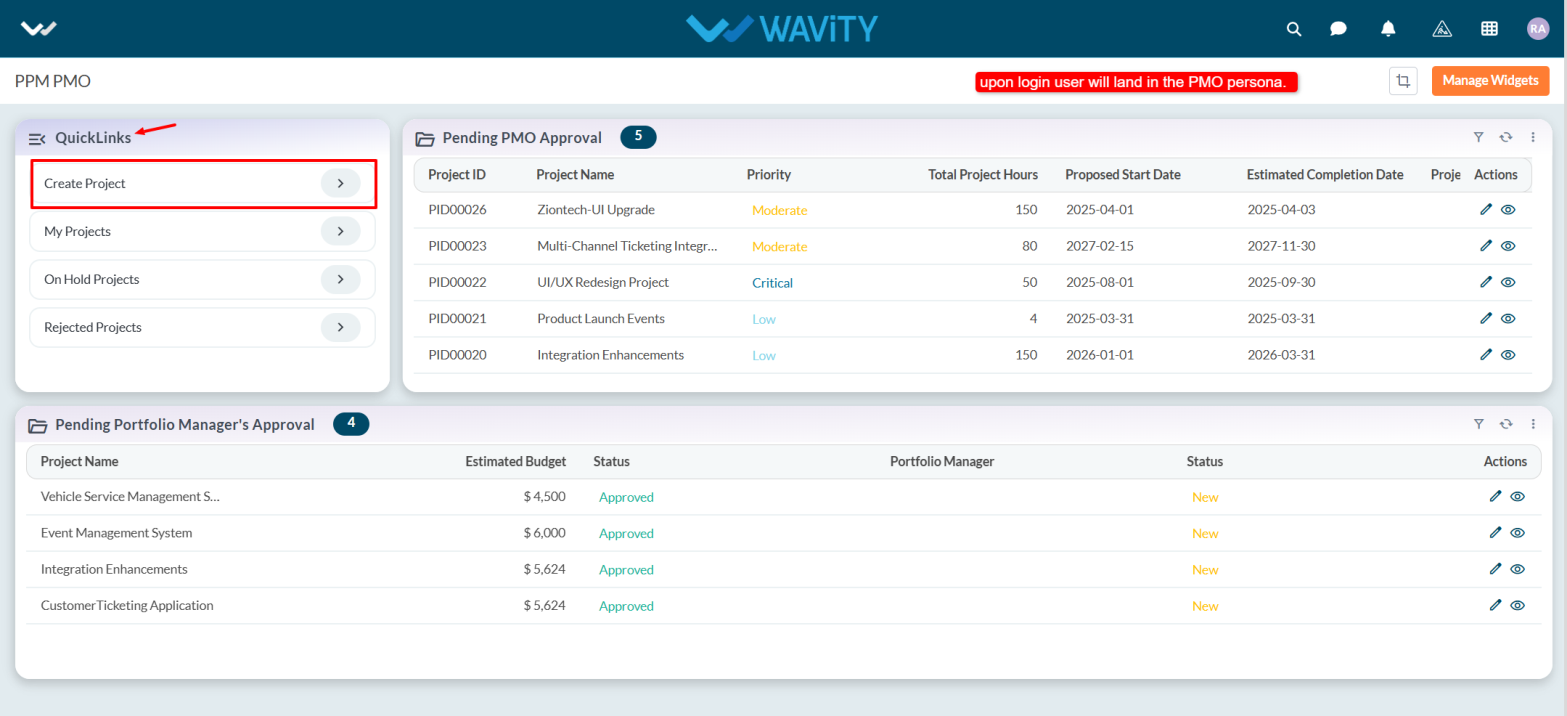
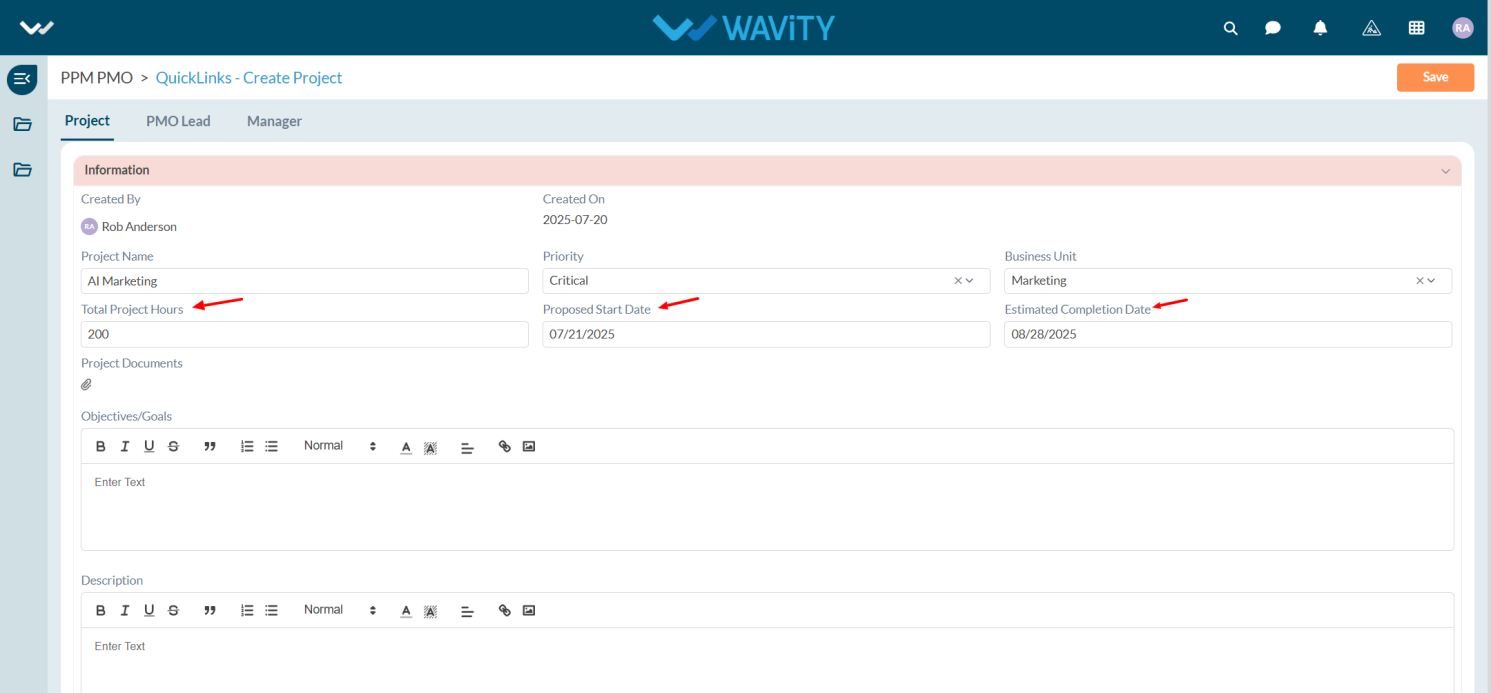
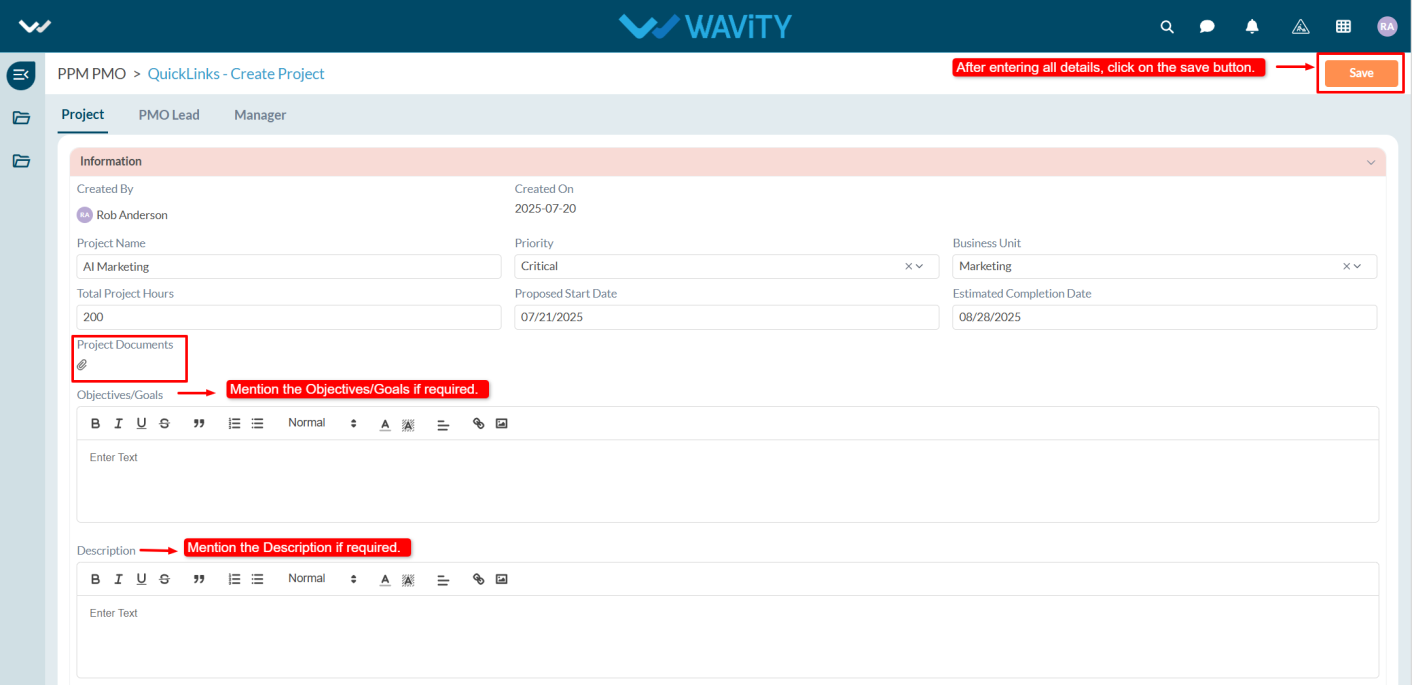
Project Management Office: Creating a Project
- Creating a project on the Wavity Project Portfolio Management Solution is a straightforward and user-friendly process.
- Users with PMO Manager access have the ability to create new projects.
- Note: The following steps serve as sample instructions and can be customized based on specific requirements. However, the core workflow remains consistent.
- After logging in with their credentials, users will land on the PMO Persona dashboard.
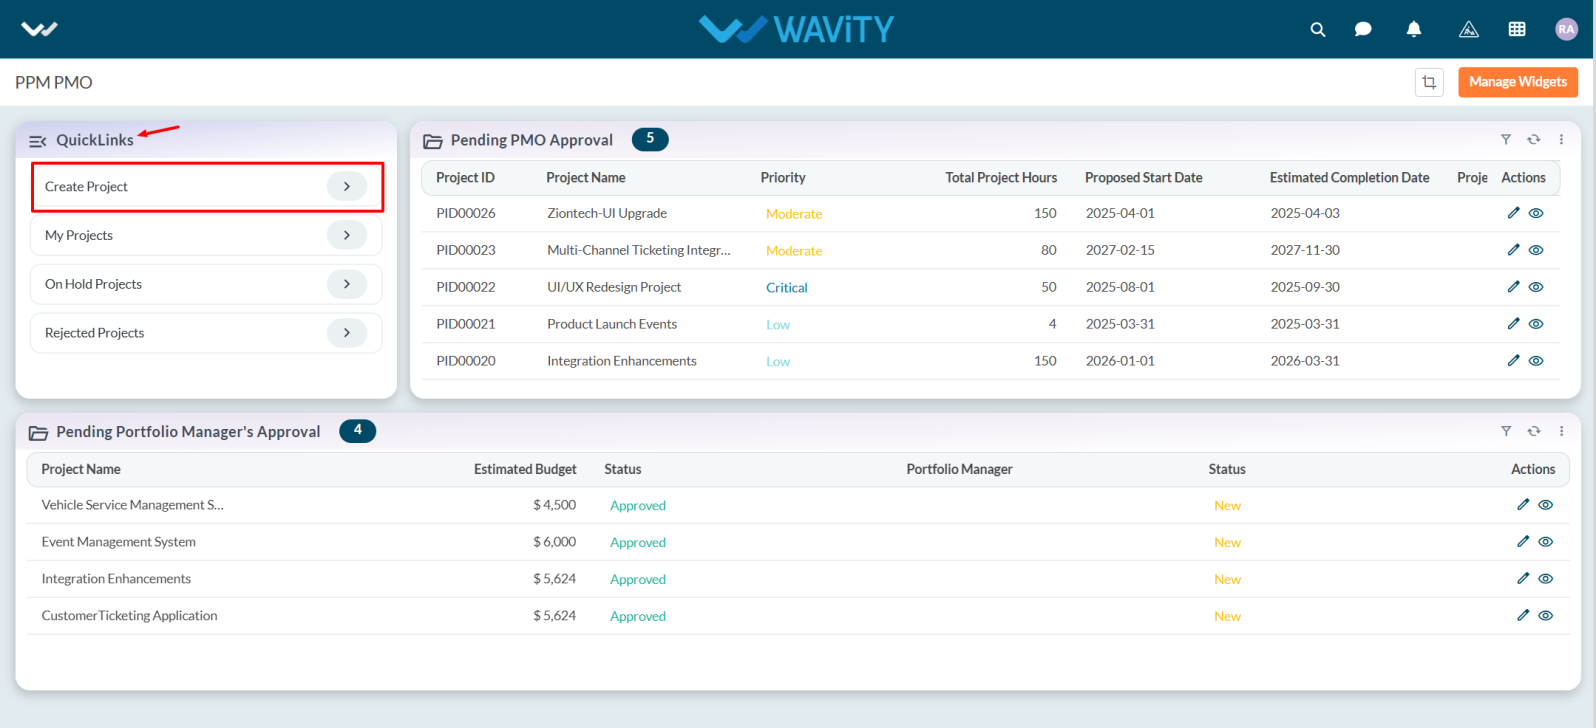
- From the Quick Links, users can create new projects, view pending projects, and review projects they have created.
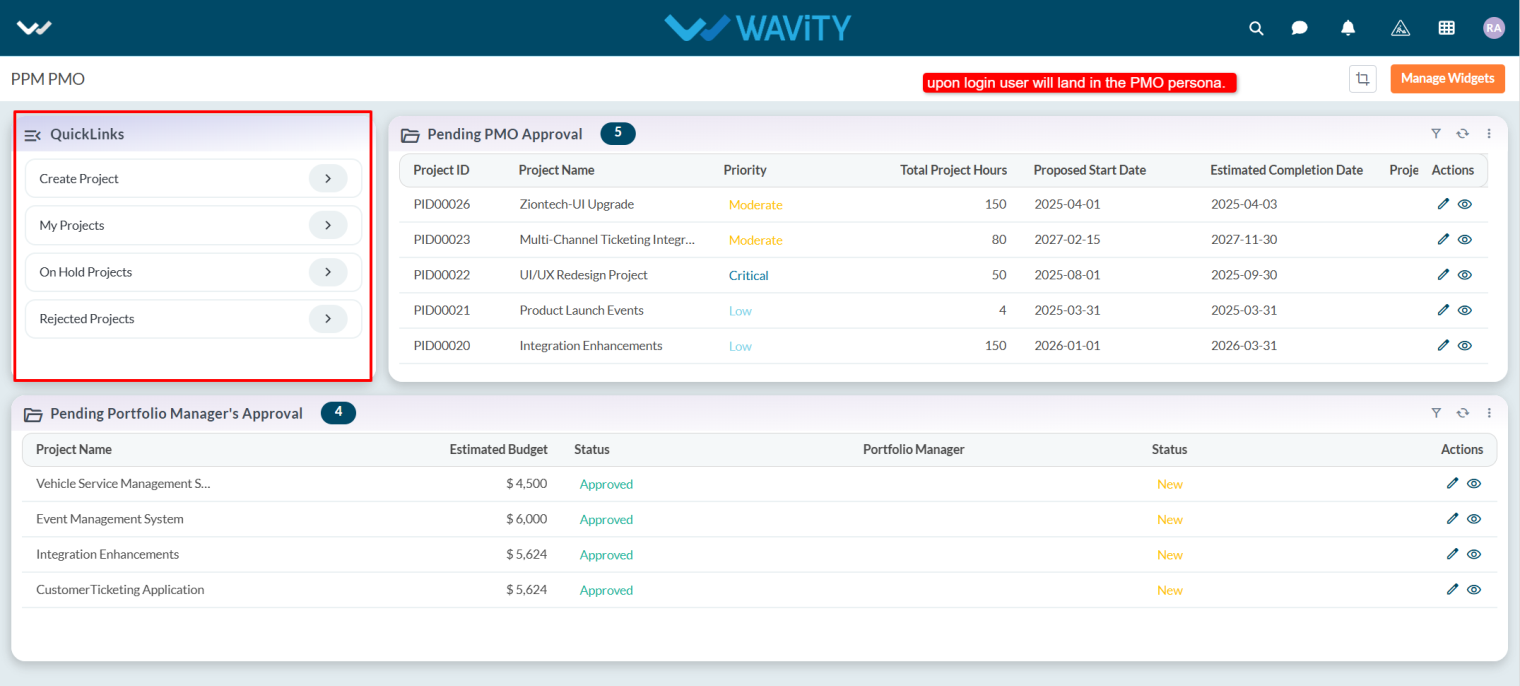
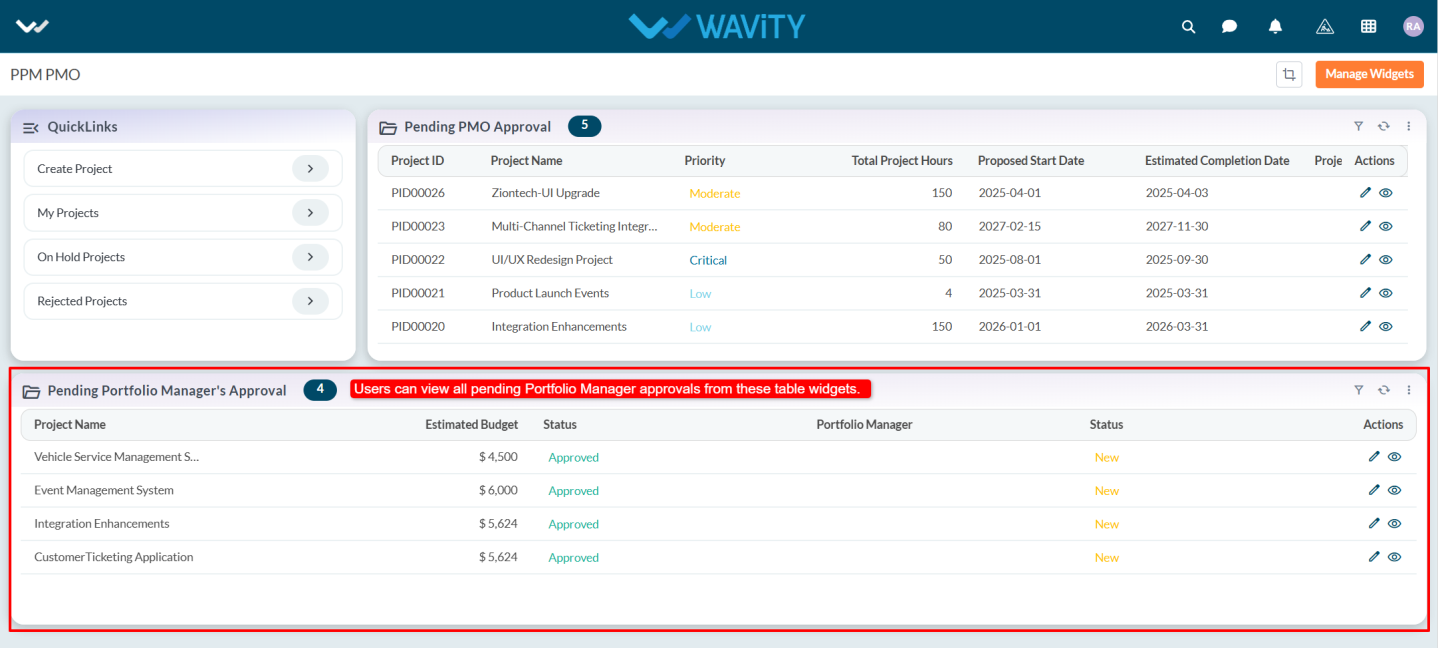
- In the Pending PMO Approval table widget, a PMO Manager can approve projects submitted by other PMO users.
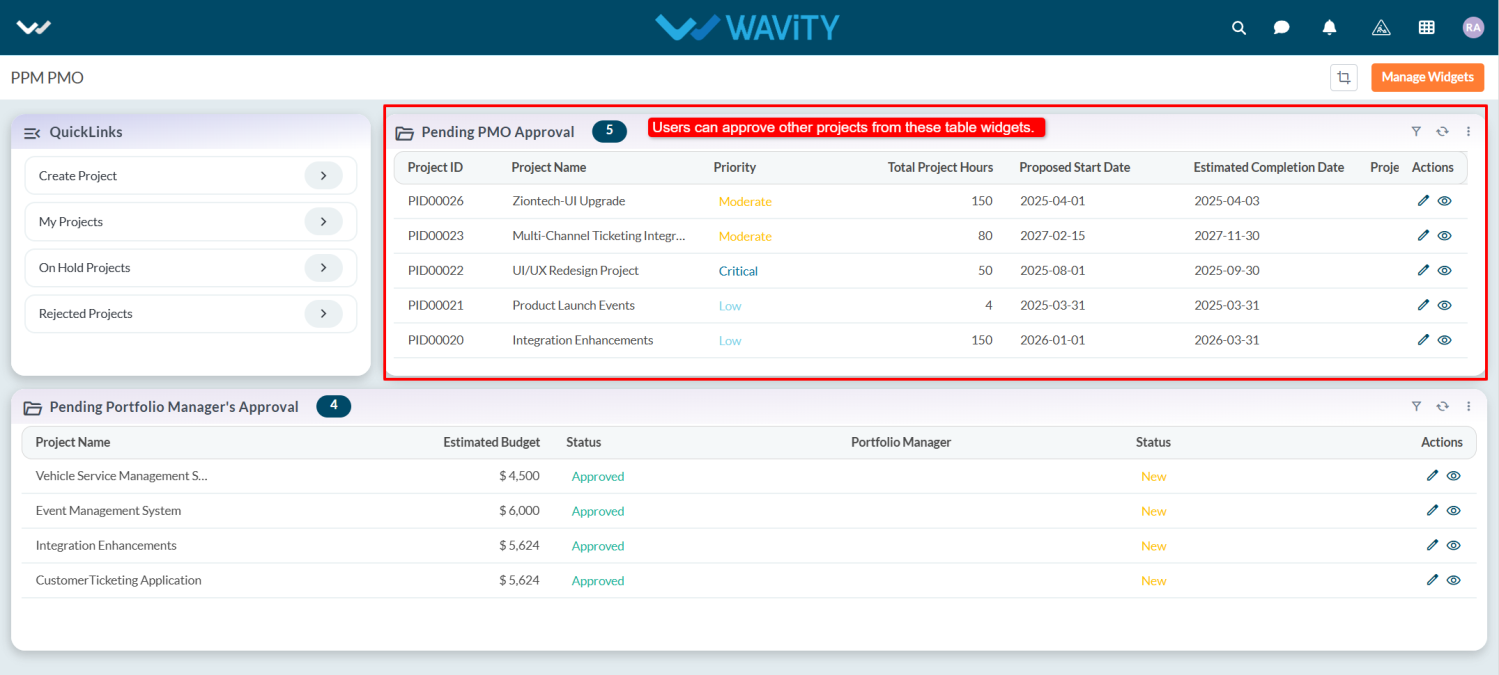
- From Pending Portfolio Manager’s Approval table widget lists all projects awaiting approval by the Portfolio Manager.
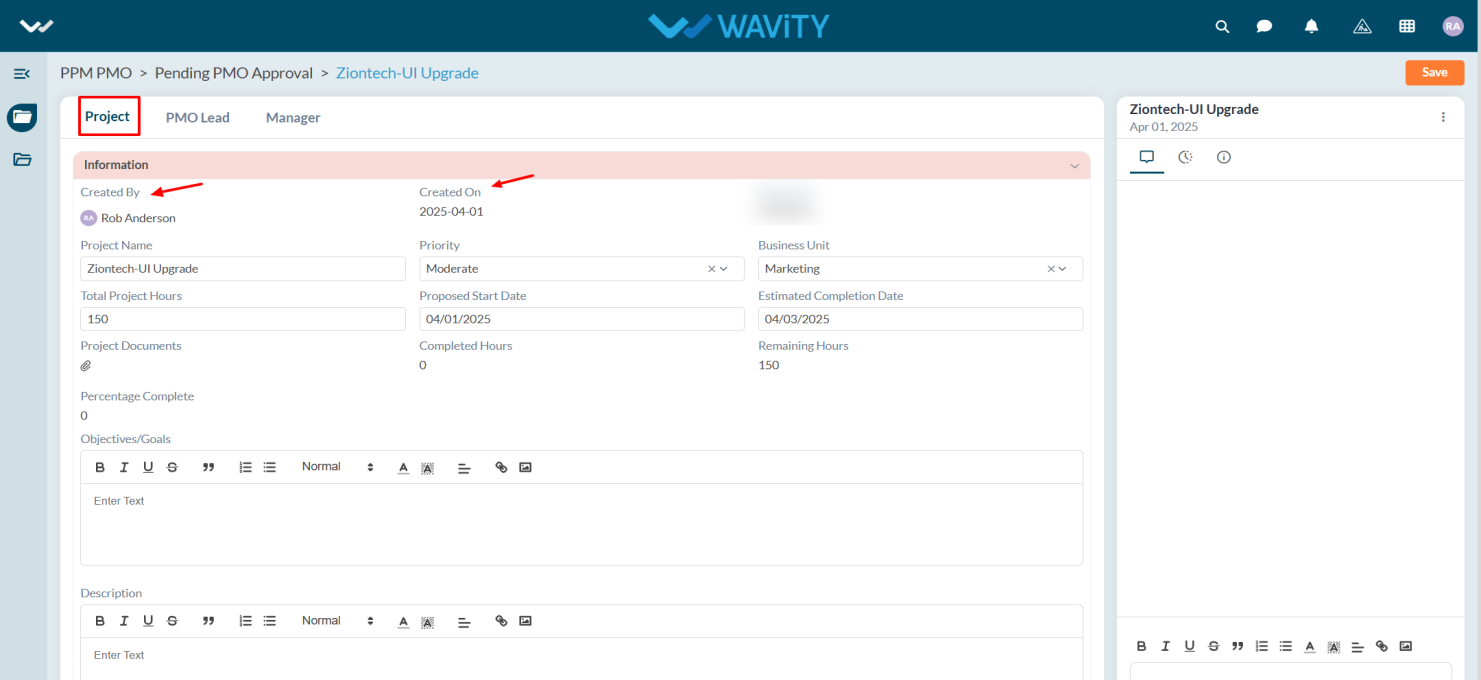
- To create a project, click on Create Project from the Quick Links.
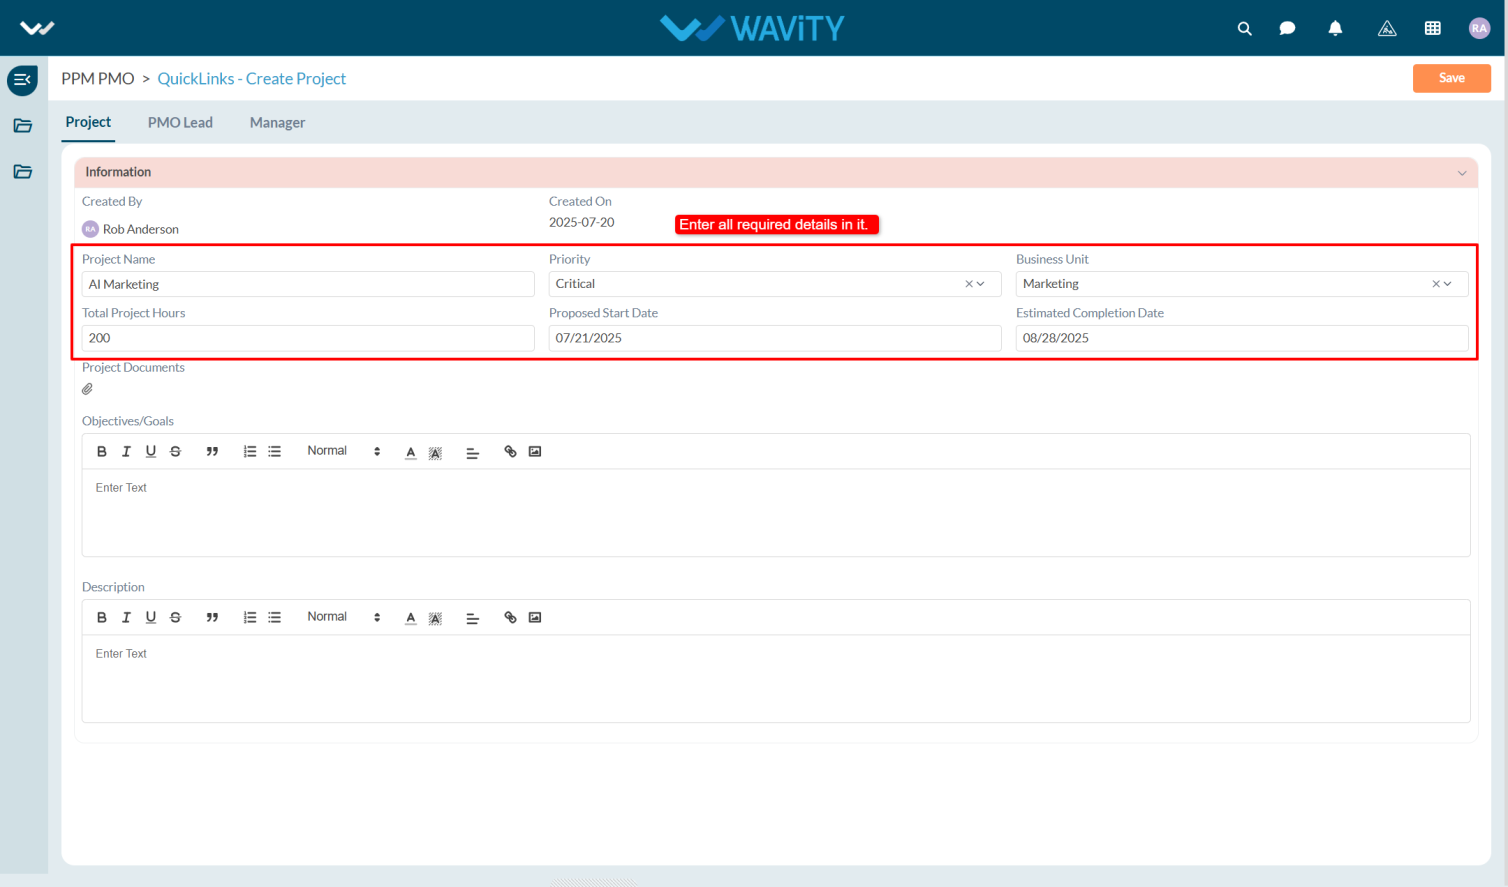
- In the Project tab, under the Information section, users must fill in all required details.
- When creating a project, the system automatically populates the Created By field with the user’s name and the Created On field with the current date.
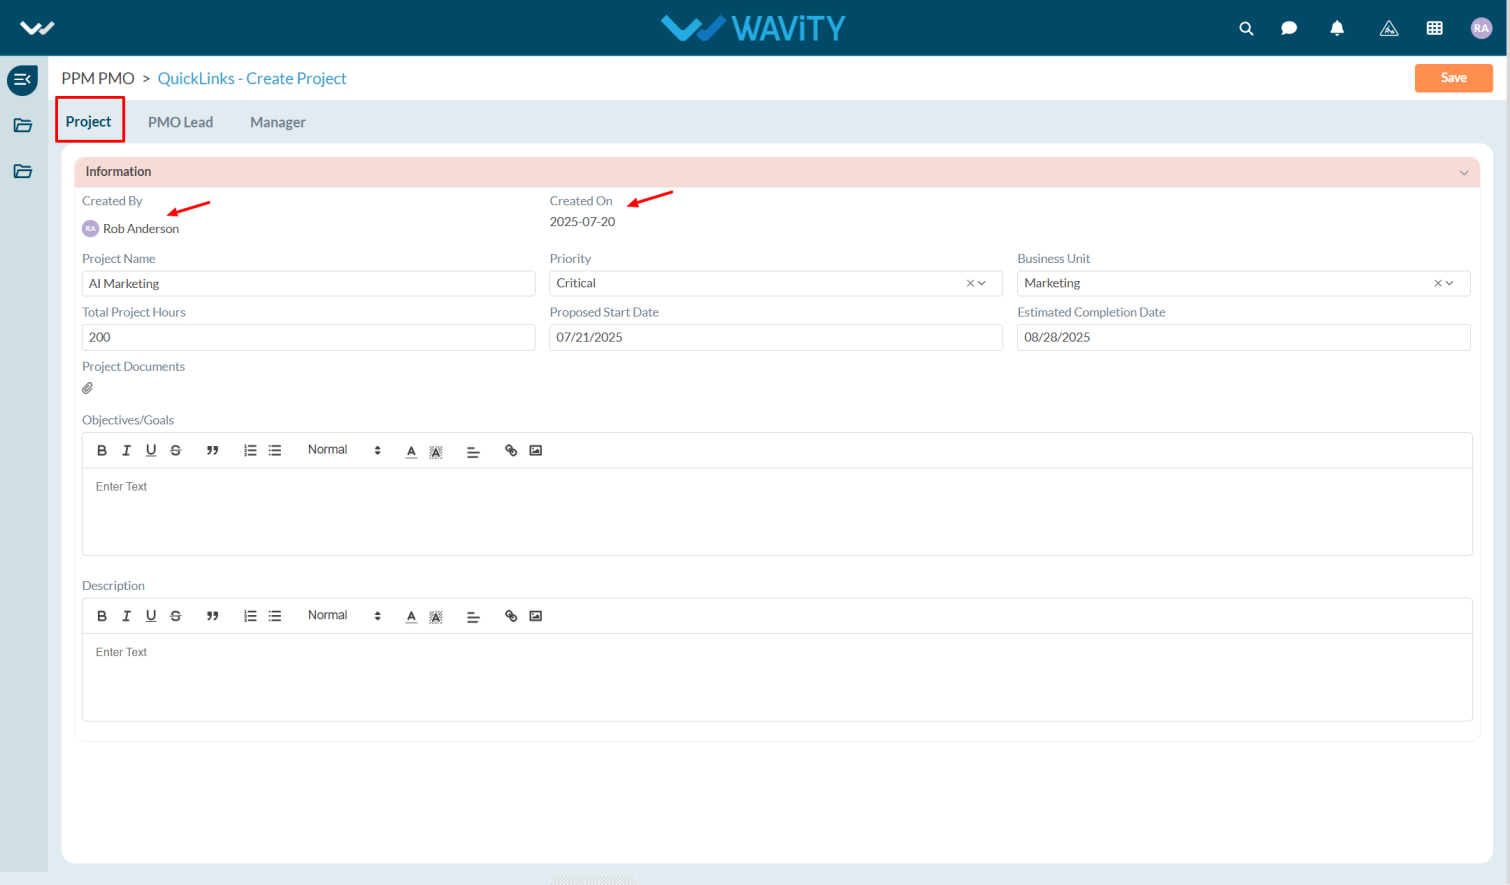
- Enter the Project Name in the field and select the Project Priority from the dropdown.
- Choose the appropriate Business Unit from the dropdown, and enter the Total Project Hours required to complete the project.
- Select the Proposed Start Date and the Estimated Completion Date.
- If there are any relevant documents, they can be uploaded under Project Documents. Additionally, users may enter the Objectives/Goals and Description of the project.
- Once all required information is filled in, click the Save button to create the project.
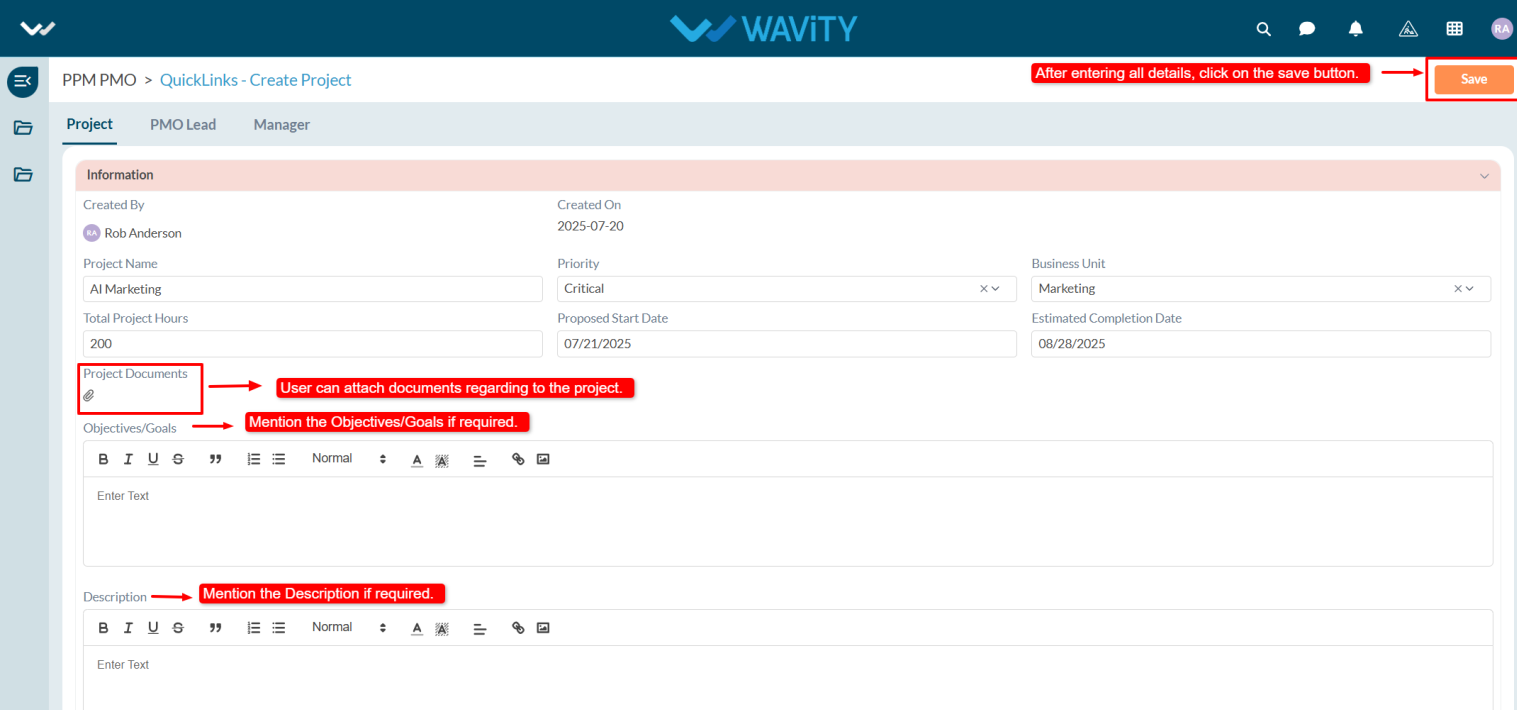
- Any other user with PMO Manager access can review and approve the newly created project.
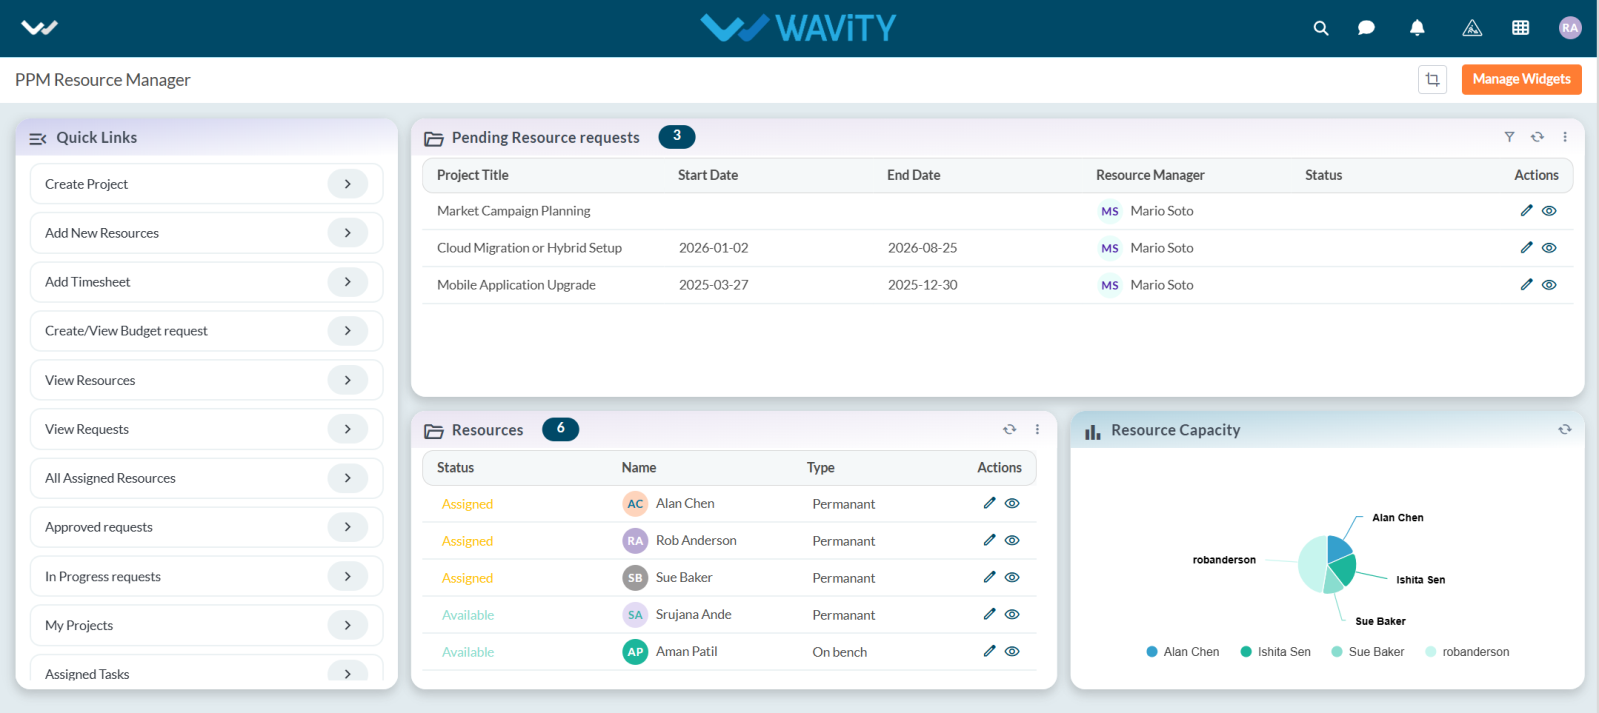
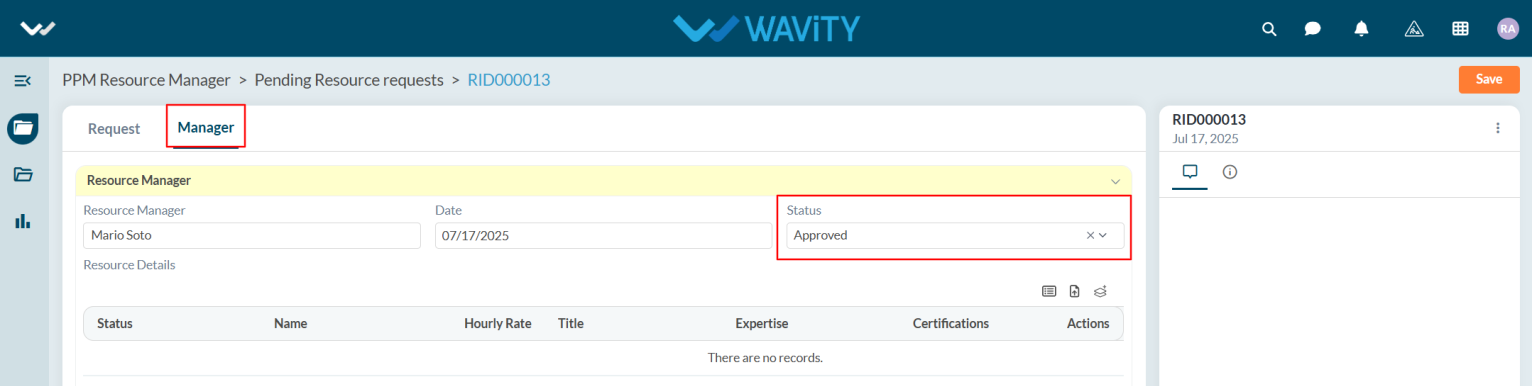
Resource Manager Guide: Assigning for a Project
- In the Wavity Project Portfolio Management Solution, Assigning a resource person to a project is a simple and streamlined process.
- Users with Resource Manager access can assign resource persons to specific projects.
- Upon logging in with their credentials, users are directed to the Resource Manager Persona.
- Note: The steps provided serve as sample instructions and can be customized based on specific requirements; however, the core workflow will remain the same.
- From the Quick Links, the Resource Manager can create a project, add a new resource, add a timesheet, and view or track project status.
- In the Resource table widget, users can view the complete list of available resources.
- In the Pending Resource Requests table widget, users can approve resource requests. Select any pending request from the list.
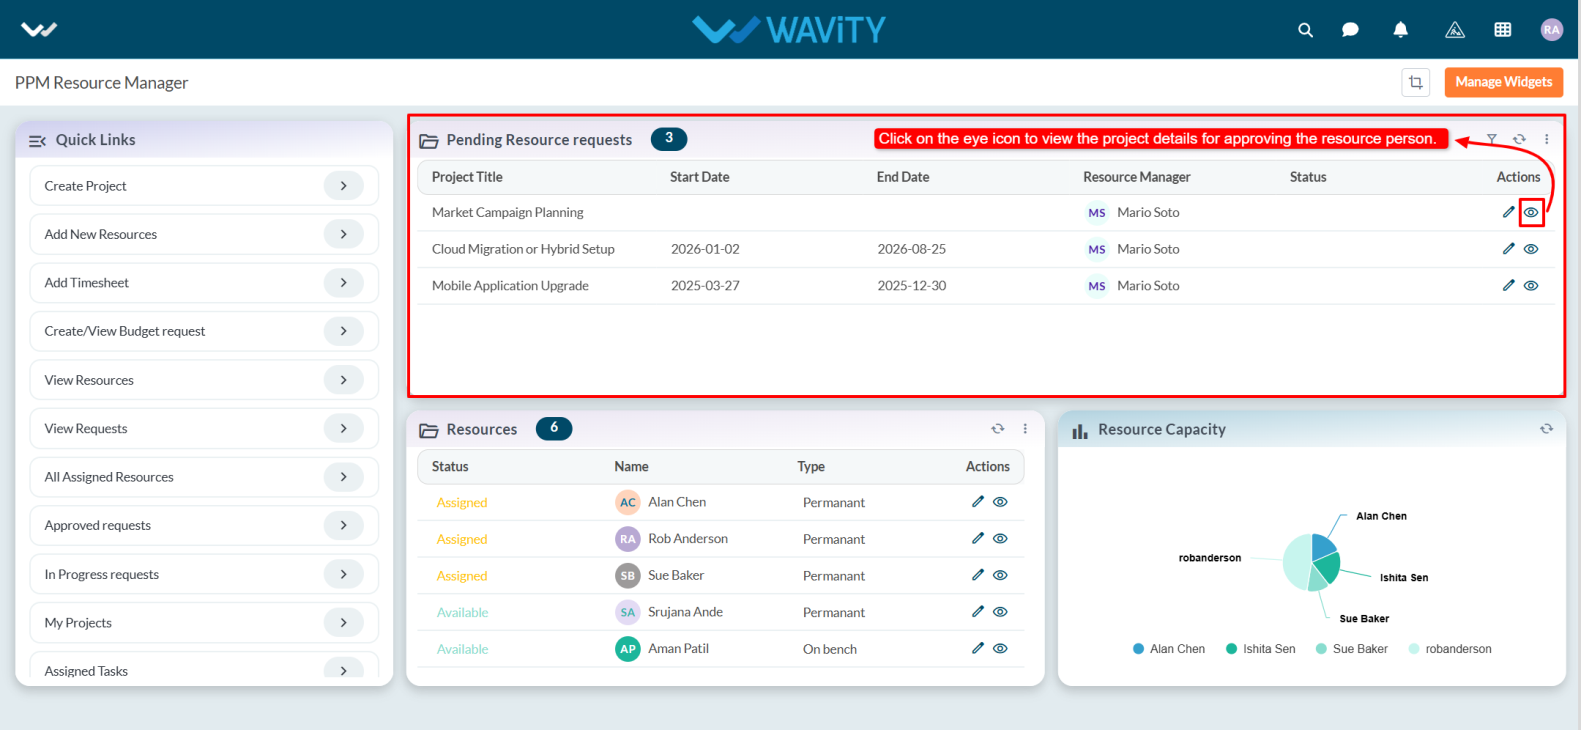
- In the Request tab, users can view detailed information about the resource request.
- In the Manager tab, under the Resource Manager section, the system will automatically populate the Resource Manager’s name.
- Select the Approval Date and update the Status to Approved.
- Under Resource Details, create the resource by clicking the Create New Records icon.
- In Details tab, enter all required details related to the resource person and click on the Save button.

- To assign a resource, click the Select More Records icon.
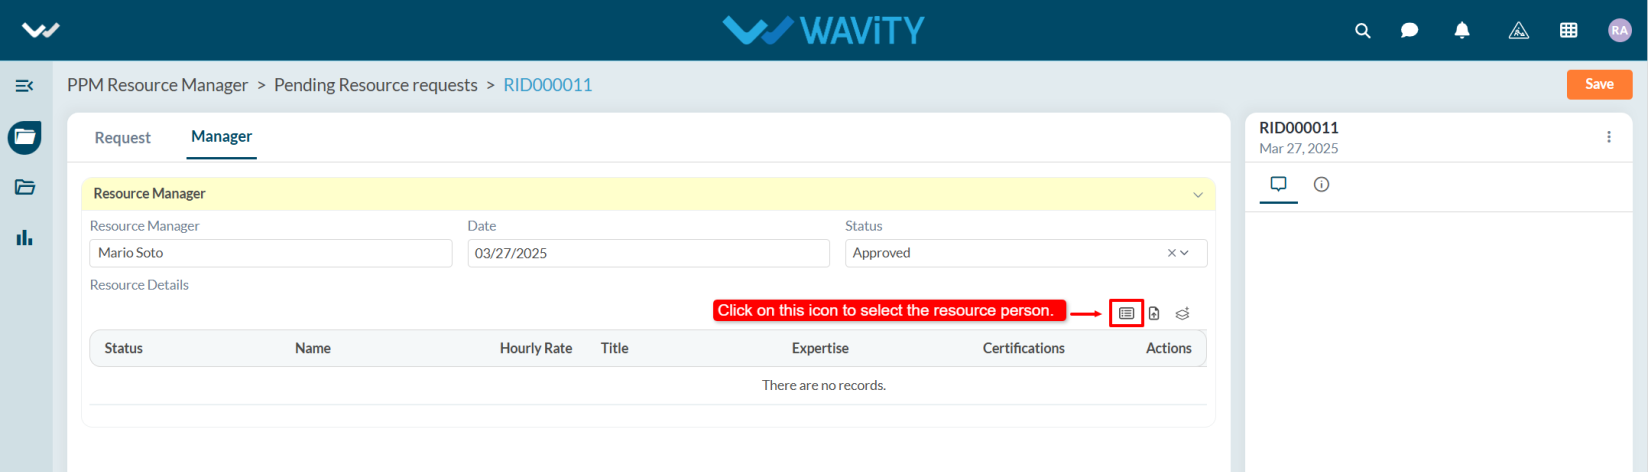
- Select the Resource Person from the list.
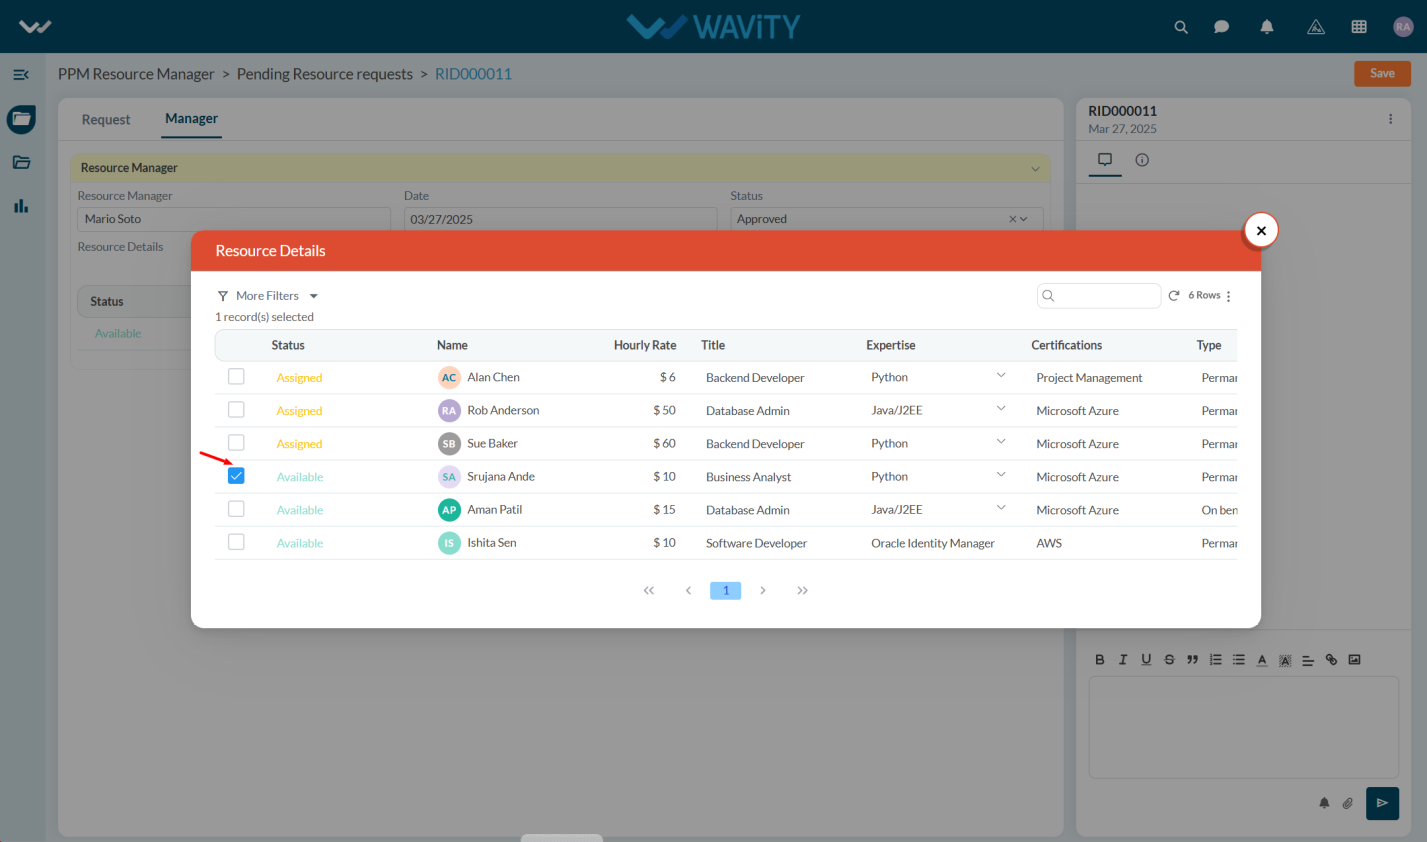
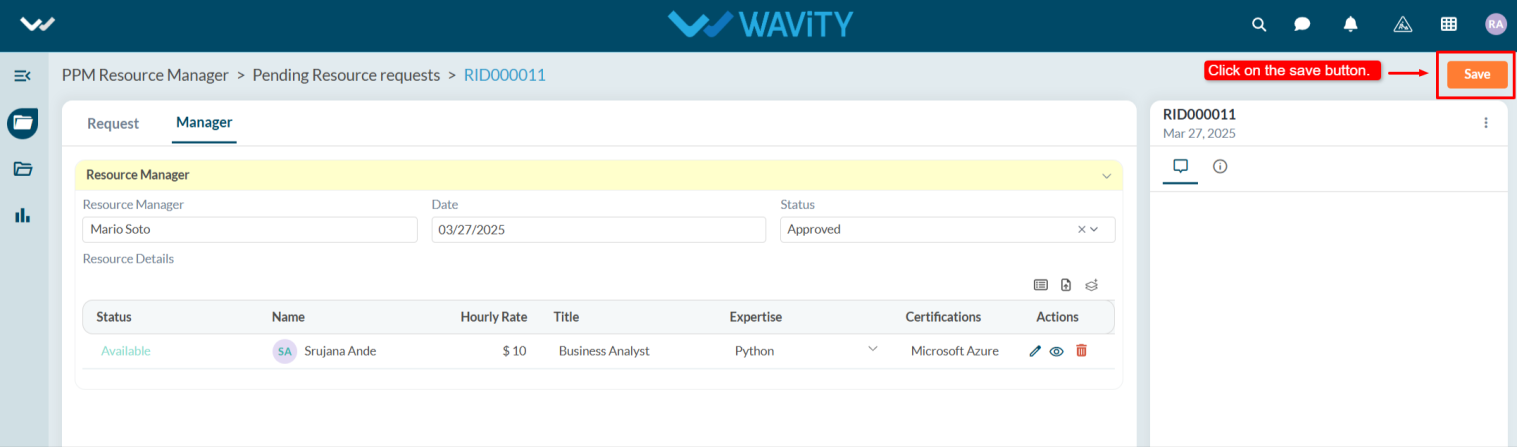
- After entering the details click on the Save details.
Project Manager Guide: Approving a Timesheet
- Approving a timesheet in the Wavity Project Portfolio Management Solution is a simple and straightforward process.
- Project Managers are responsible for approving timesheets submitted by Team Members.
- Users with Project Manager access can log in using their credentials and will be directed to the Project Manager Persona.
- Note: The steps provided serve as sample instructions and can be customized based on specific requirements; however, the core workflow will remain the same.
- From the Quick Links, select Pending Timesheet Approvals.
- Choose any pending timesheet from the list that you wish to approve.
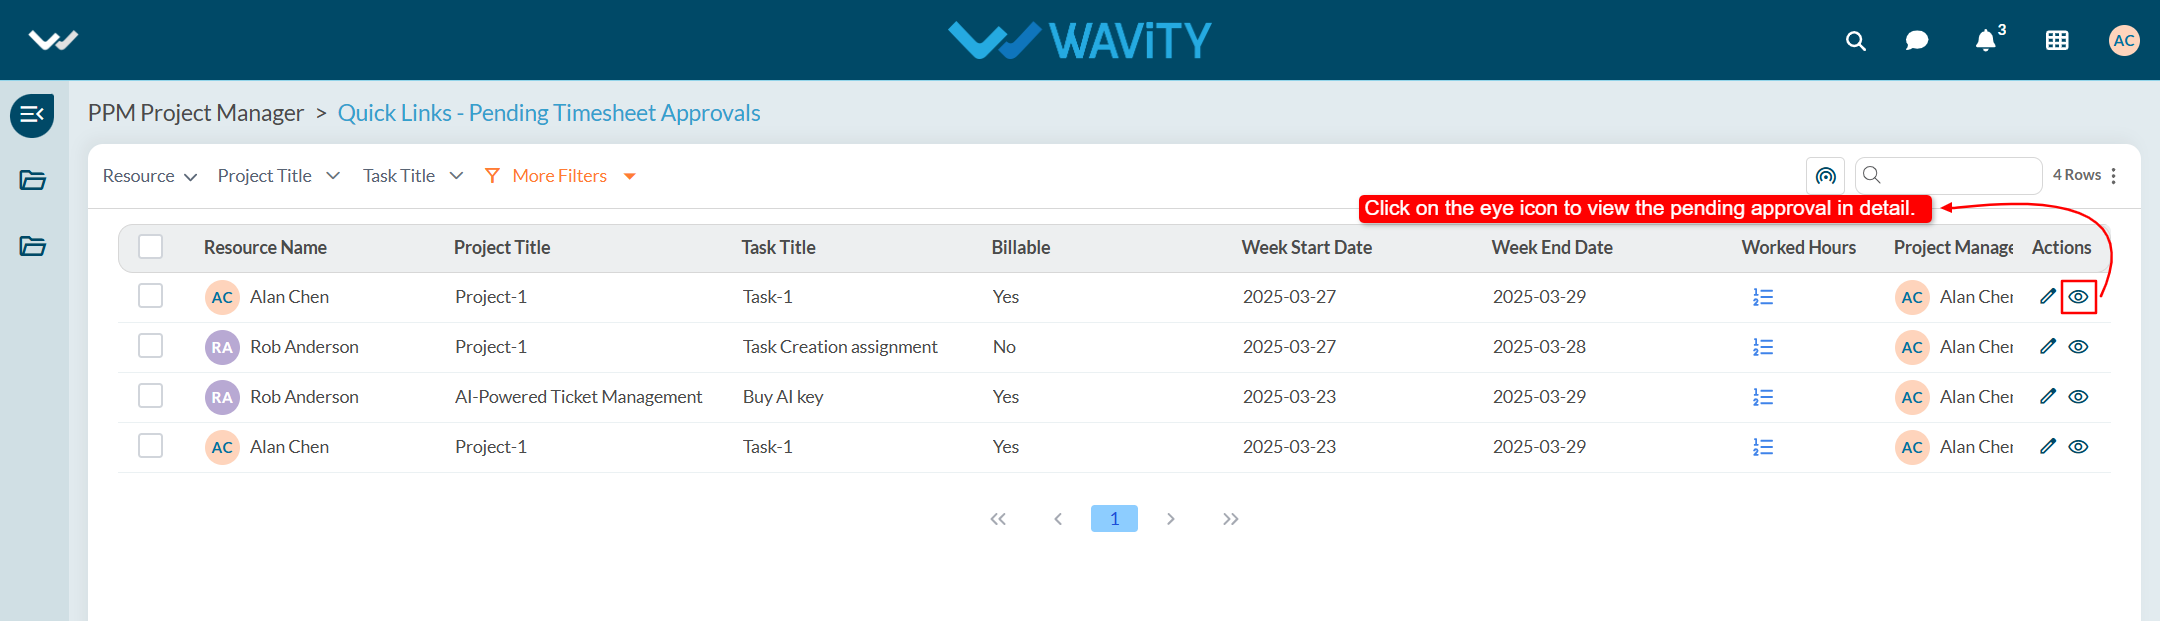
- Go to the Status tab. Under the Status section, the system will automatically capture the Manager Name.
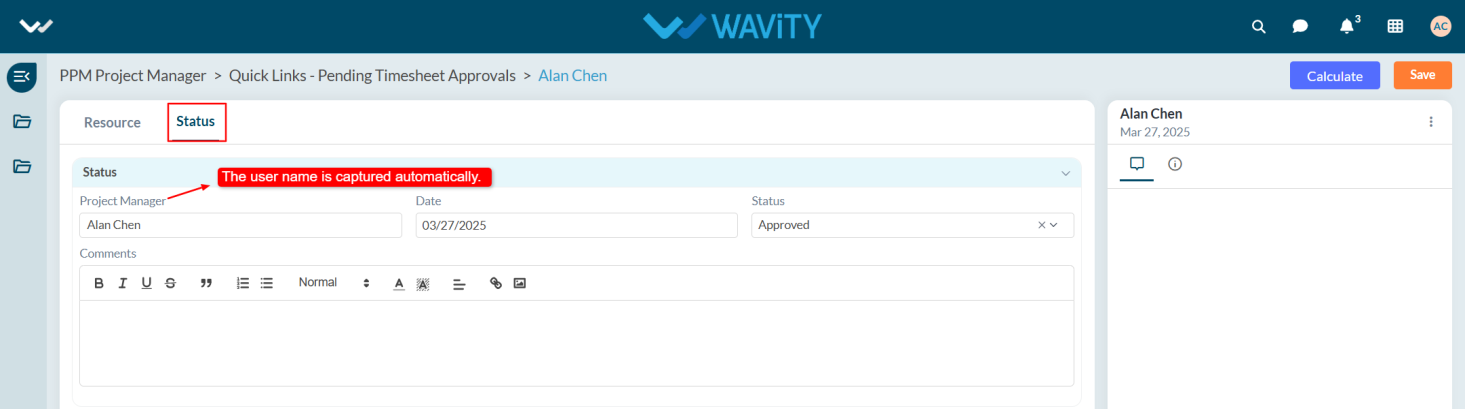
- Select the Date and update the Status to Approved.
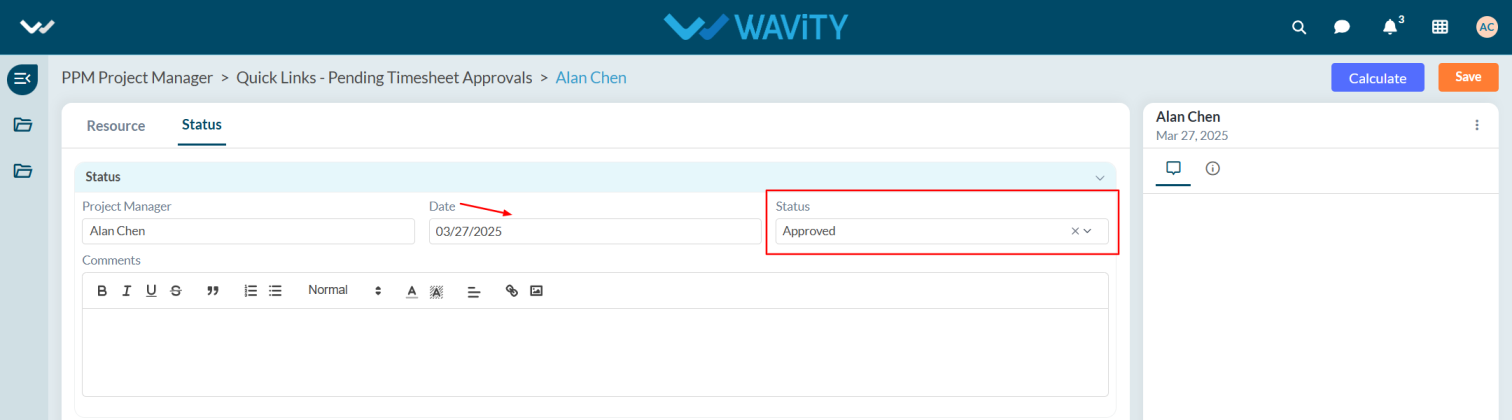
- If necessary, add comments in the Comments section and click the Save button.
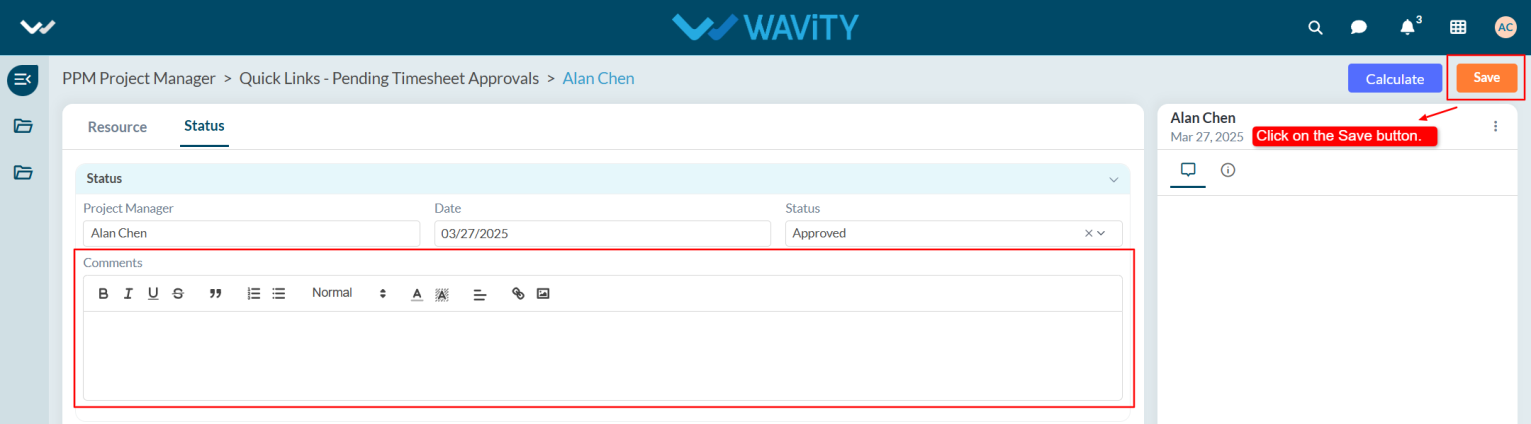
- After saving, the Total Cost will be displayed under the Status section.
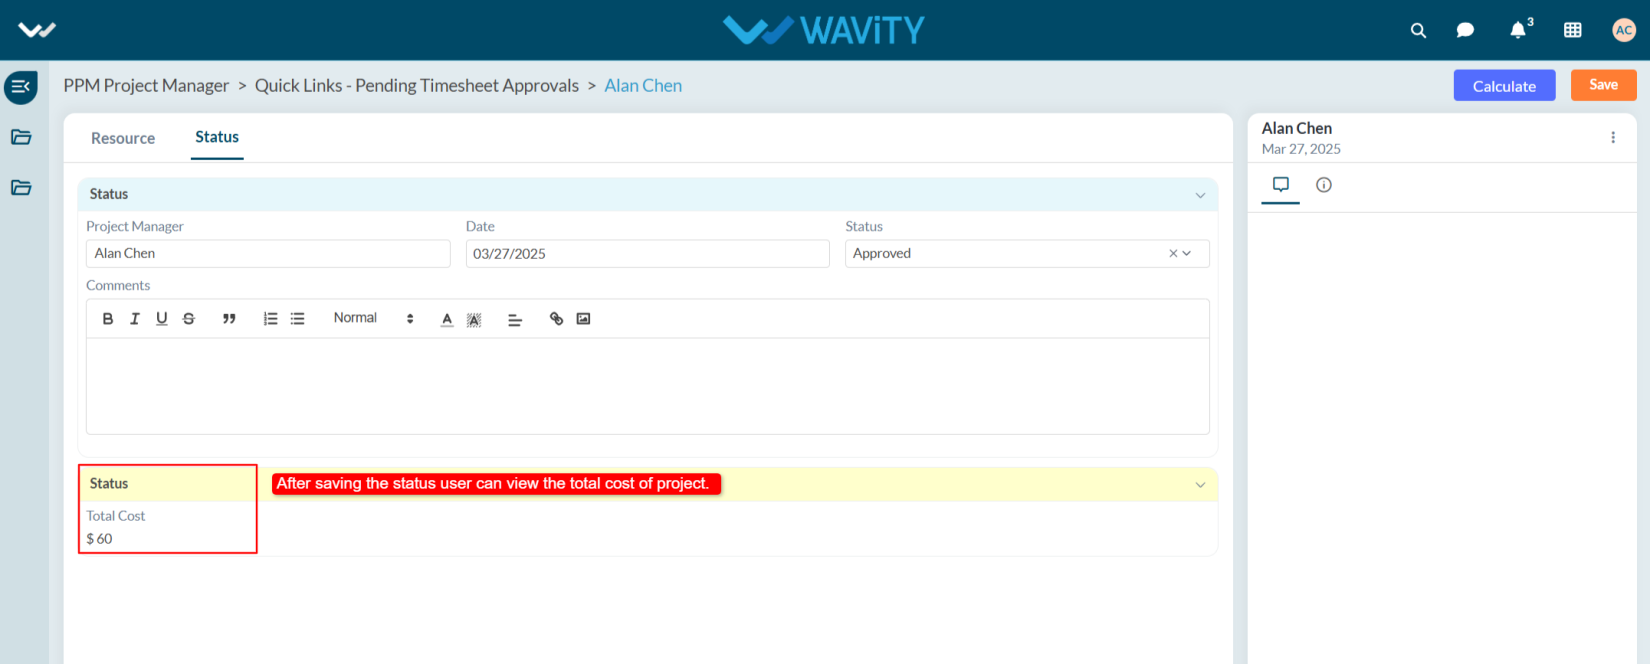
Project Management Office: Approving a Project
- In Wavity Project Portfolio Management Solution, Approving a project as a PMO Manager is a simple and user-friendly process.
- Users with PMO access have the ability to approve pending projects.
- Note: The following steps serve as sample instructions and can be customized based on specific requirements. However, the core workflow remains consistent.
- Upon logging in, PMO user will be directed to the PMO Persona.

- Within the persona, user can view the Pending PMO Approval table widget and select the project you wish to approve.
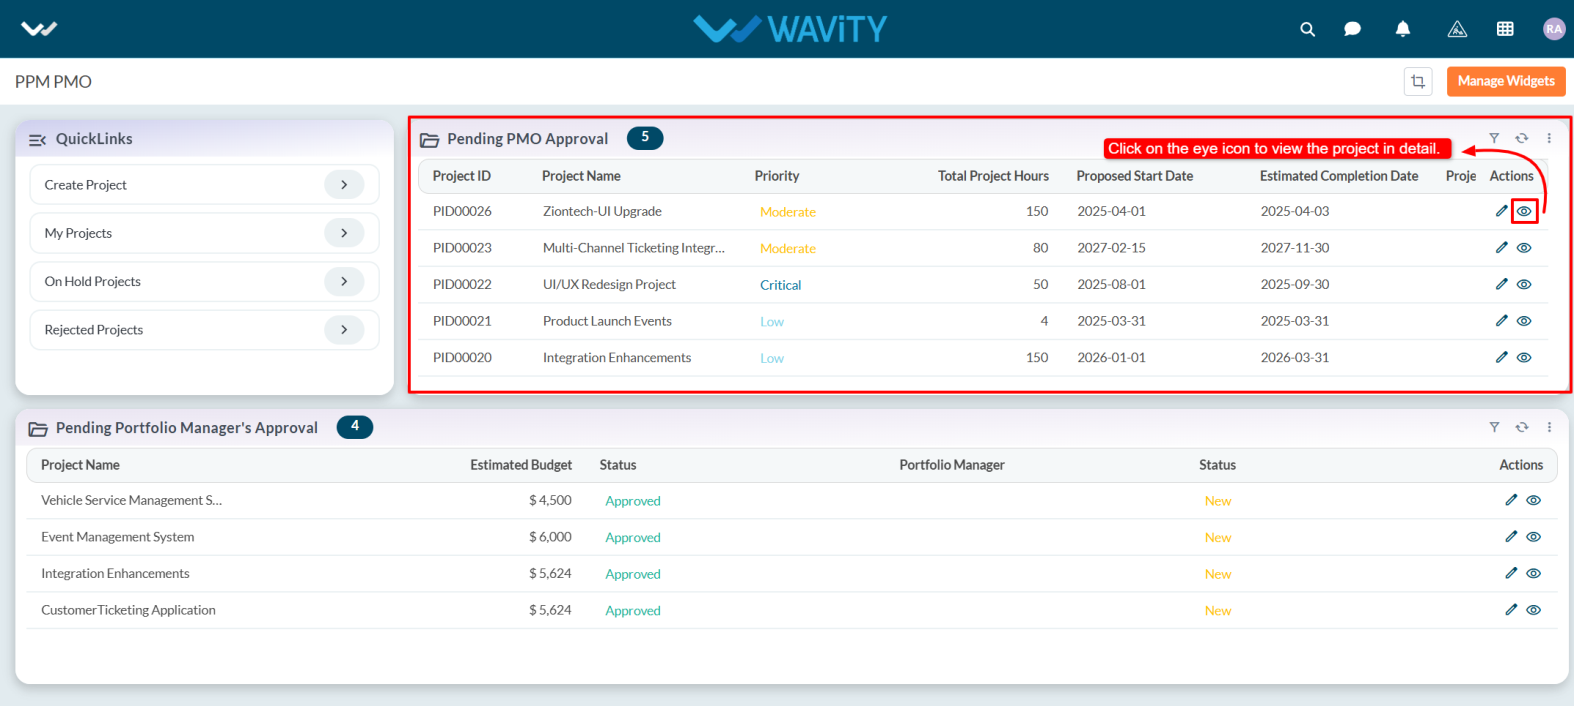
- To review the project details, go to the Project tab. Then, switch to the PMO Lead tab to proceed with the approval.

- In the PMO Lead, under Evaluation & Approval section, the user selects their name in the Lead field.
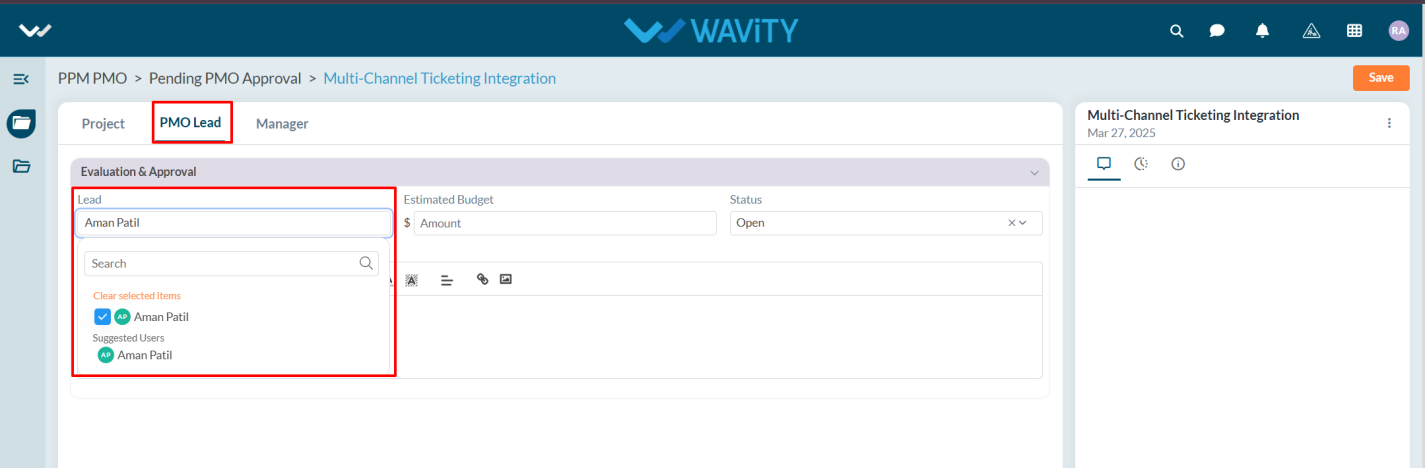
- The user enters the estimated budget for the project, selects "Approved" from the status dropdown, adds Notes if necessary, and clicks the Save button to approve the project.
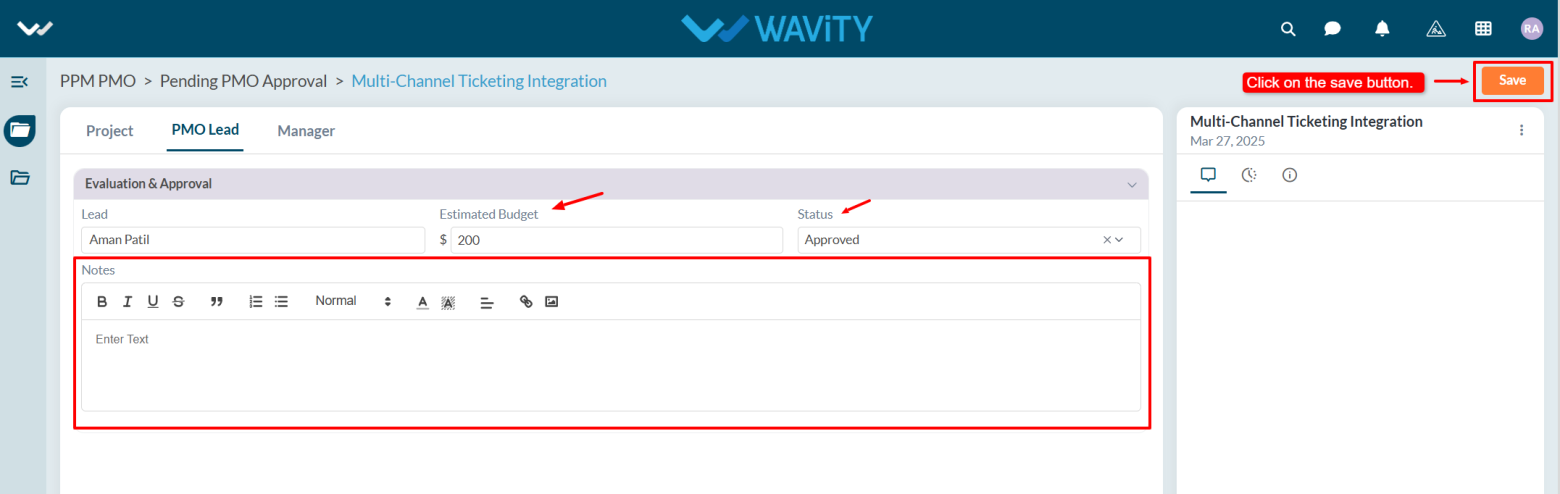
Portfolio Manager Guide: Approving a Pending Project
- In the Wavity Project Portfolio Management Solution, approving a project as a Portfolio Manager is a simple and intuitive process.
- A user with Portfolio Manager access can approve any project that is currently pending.
- Log in using your credentials. Upon logging in, you will land on the Portfolio Manager persona.
- Note: The steps provided serve as sample instructions and can be customized based on specific requirements; however, the core workflow will remain the same.
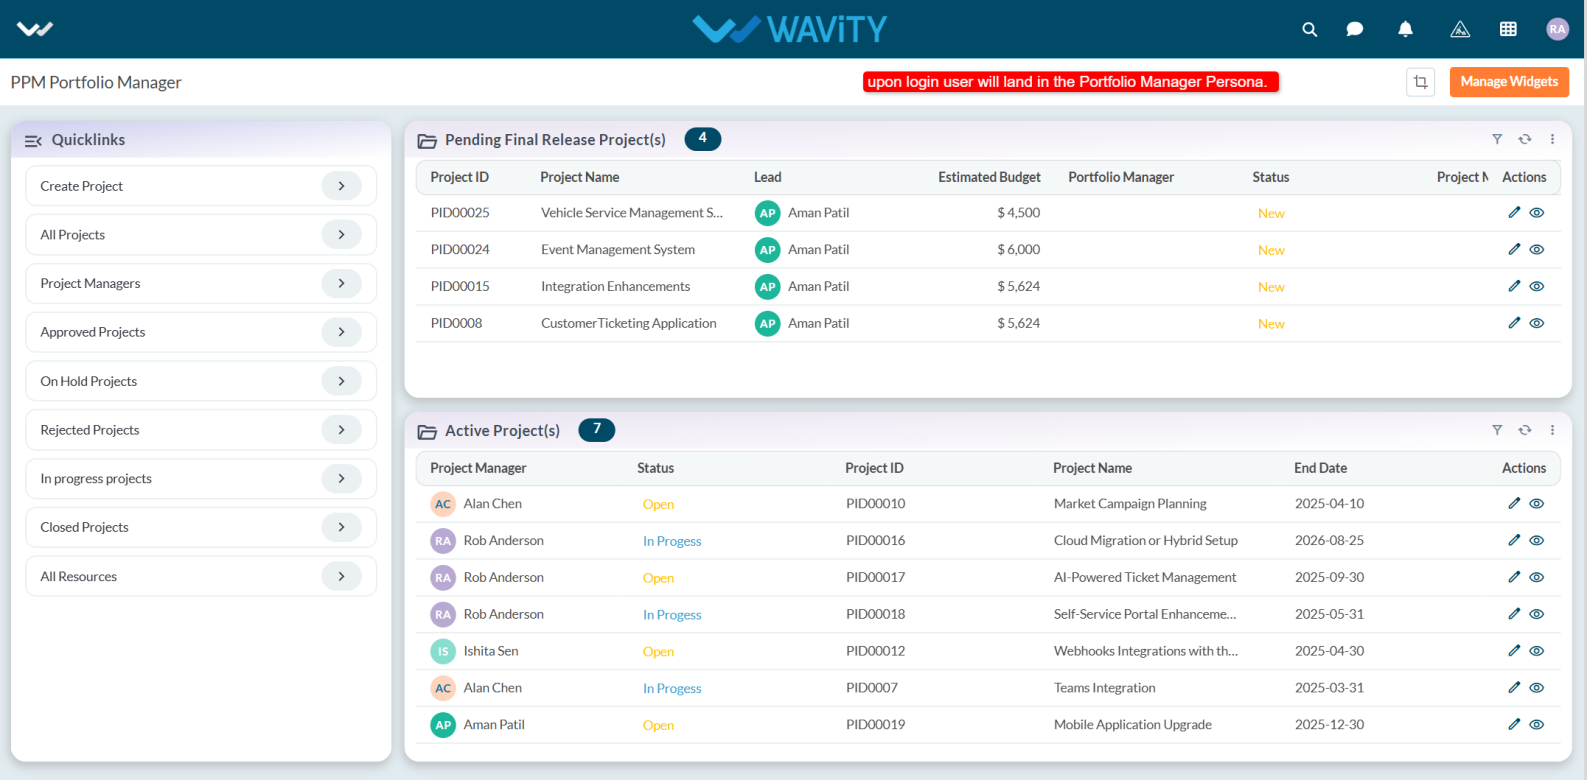
- In the Pending Final Release Project(s) table widget, you can view all pending projects. Select the project you wish to approve.
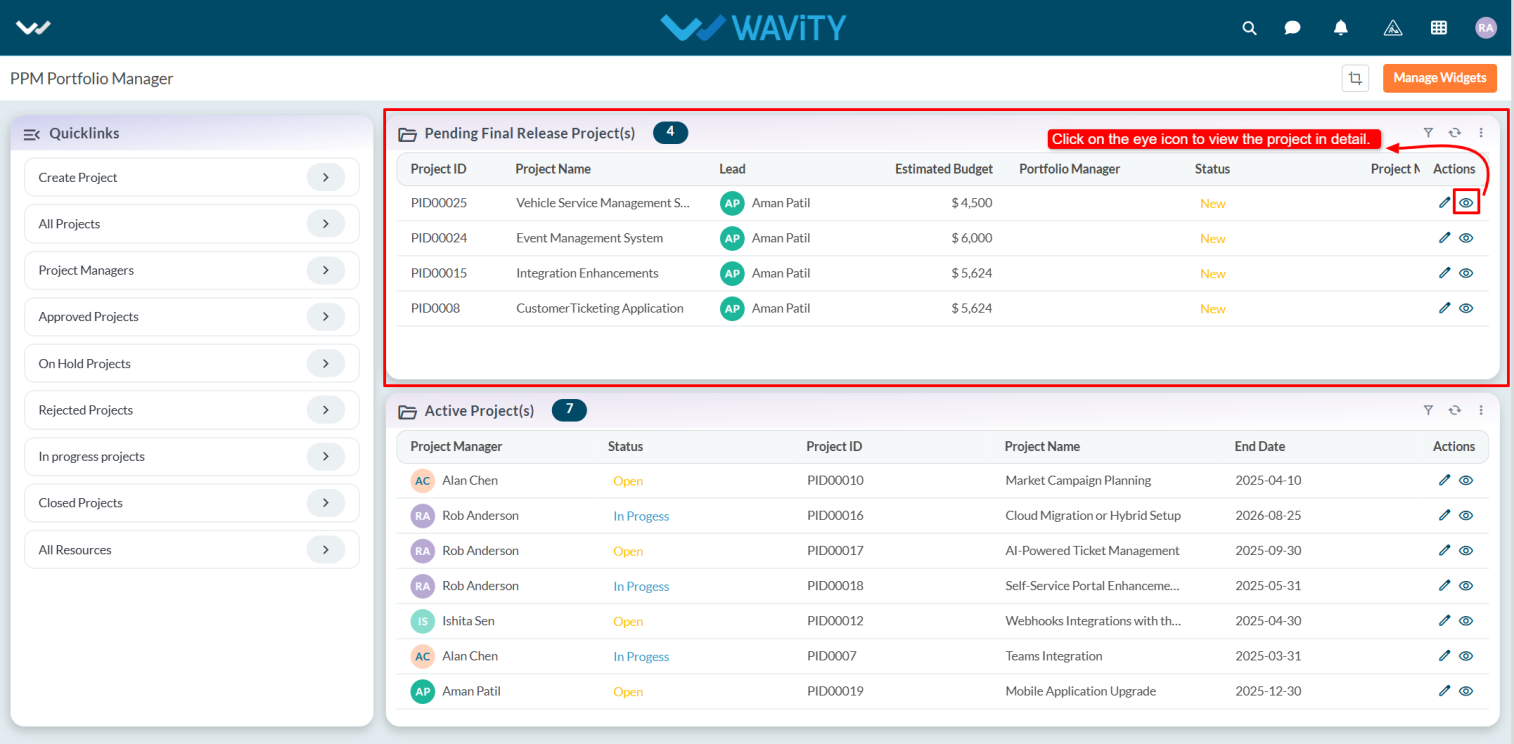
- After selecting the project, you can view the complete project details under the Project and PMO Lead tabs.
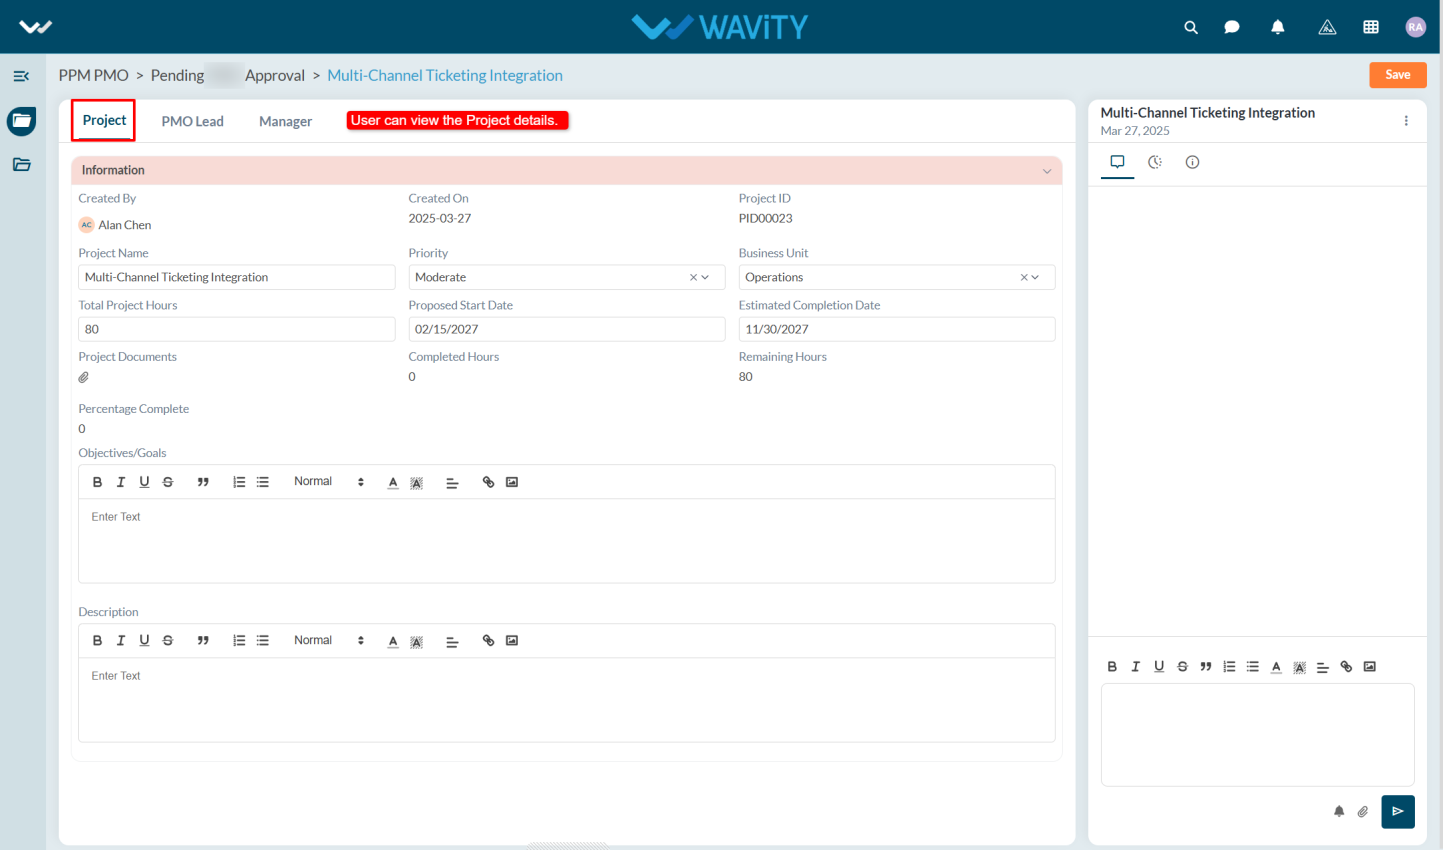
- Navigate to the Manager tab. Under the Planning and Assignment section, select your name in the Portfolio Manager field and update the project status to Approved.
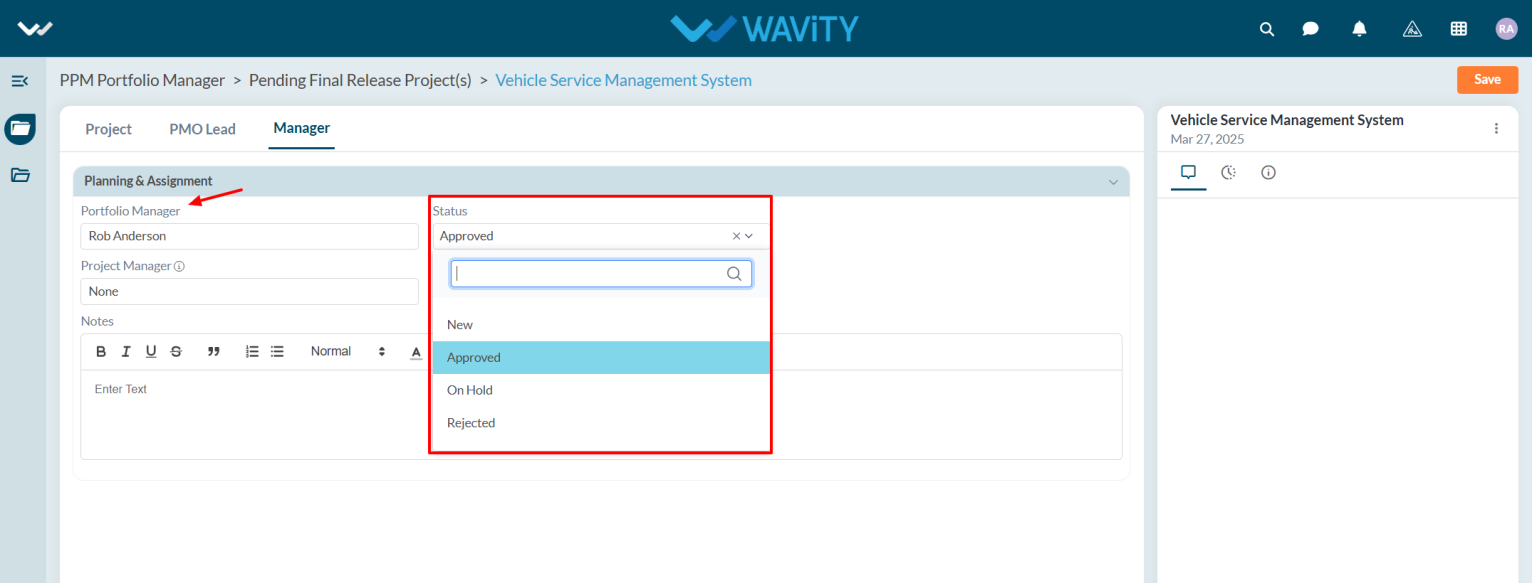
- Assign a Project Manager and specify the number of resources required for the project.
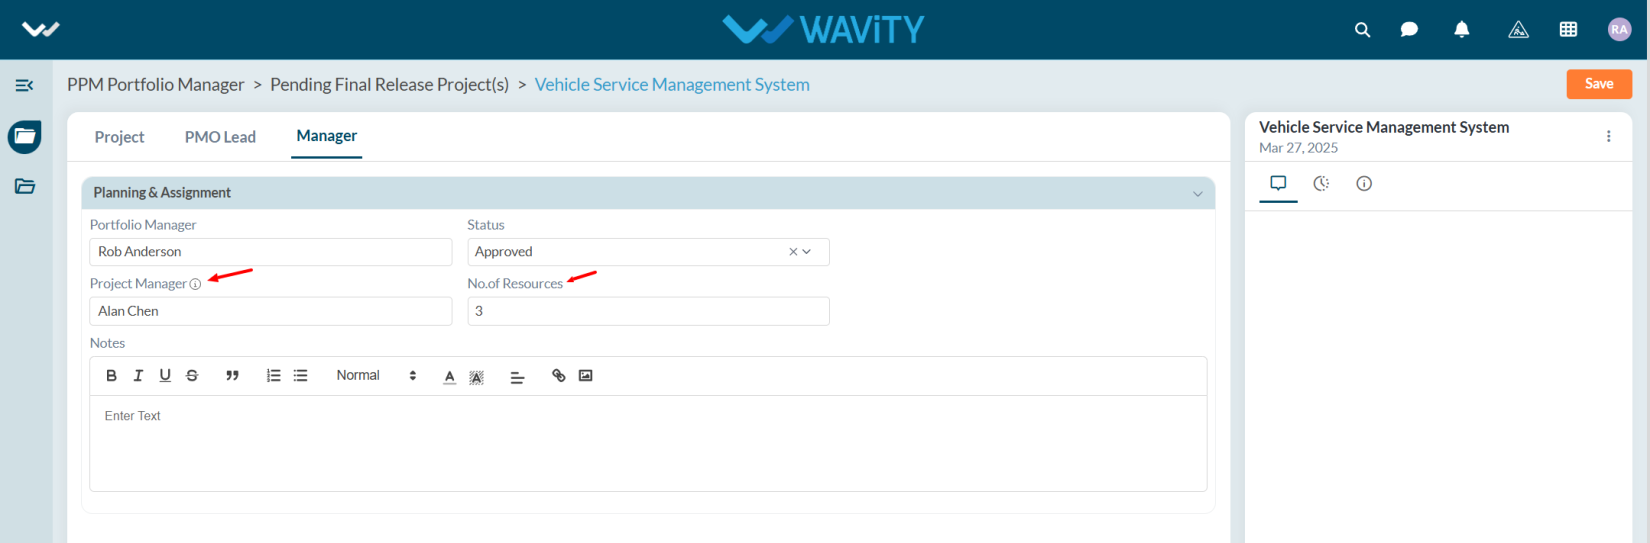
- If necessary, add any relevant notes, then click on the Save button to finalize the approval.
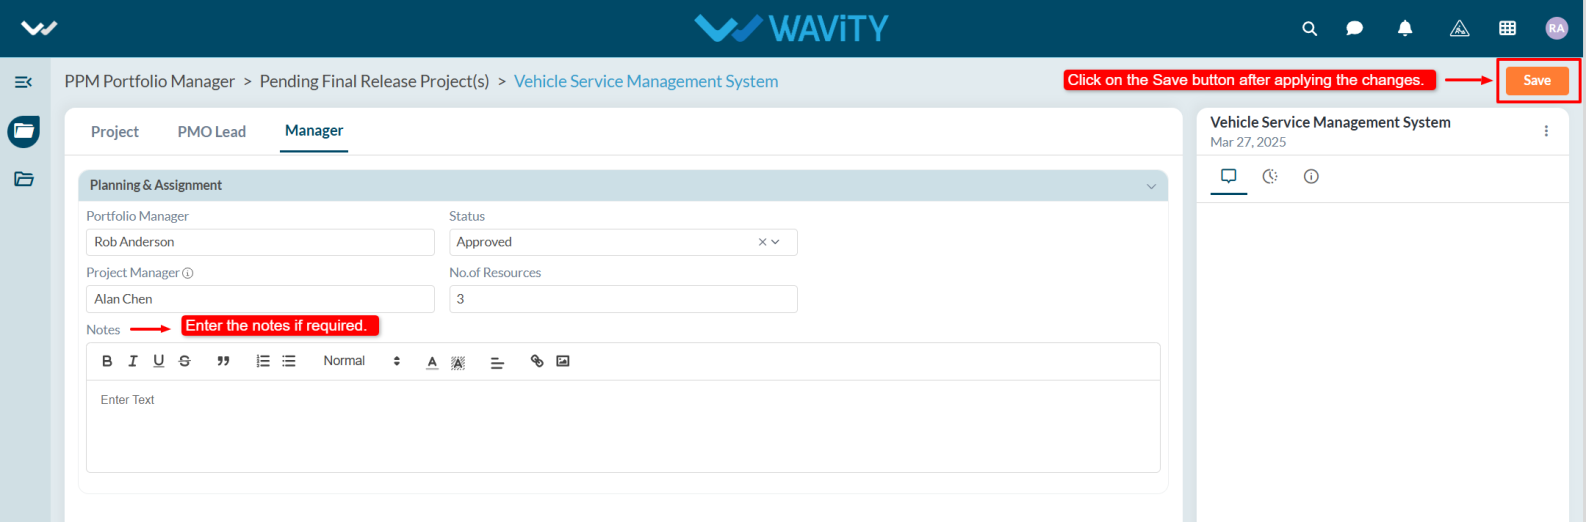
Project Manager Guide: Requesting Resources for a Project
- In the Wavity Project Portfolio Management Solution, requesting a resource person for a project is a straightforward process.
- Users with Project Manager access can log in using their credentials and will be directed to the Project Manager Persona.
- Note: The steps provided serve as sample instructions and can be customized based on specific requirements; however, the core workflow will remain the same.
- Users can request a resource by clicking on Request Resources from the Quick Links.
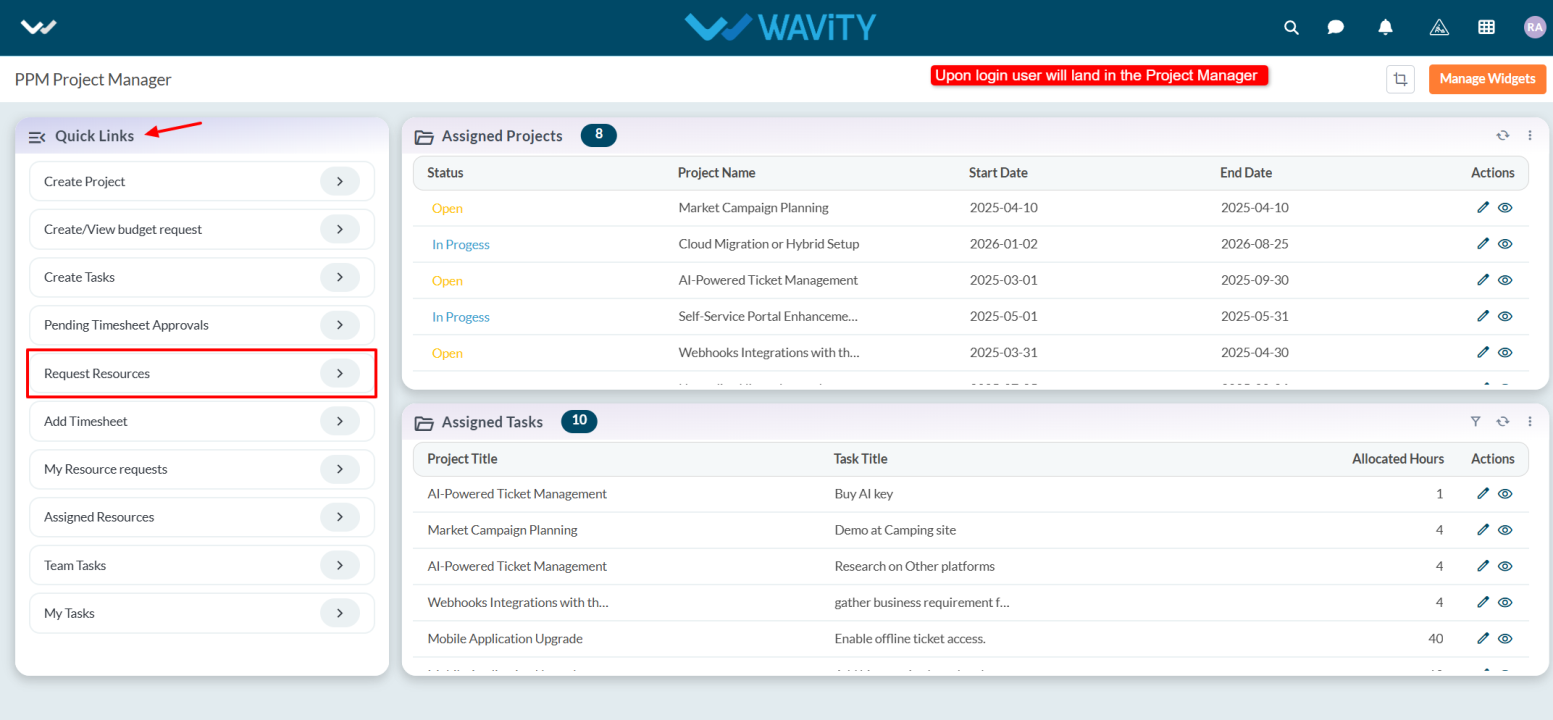
- In the Assigned Tasks table widget, select any assigned project.
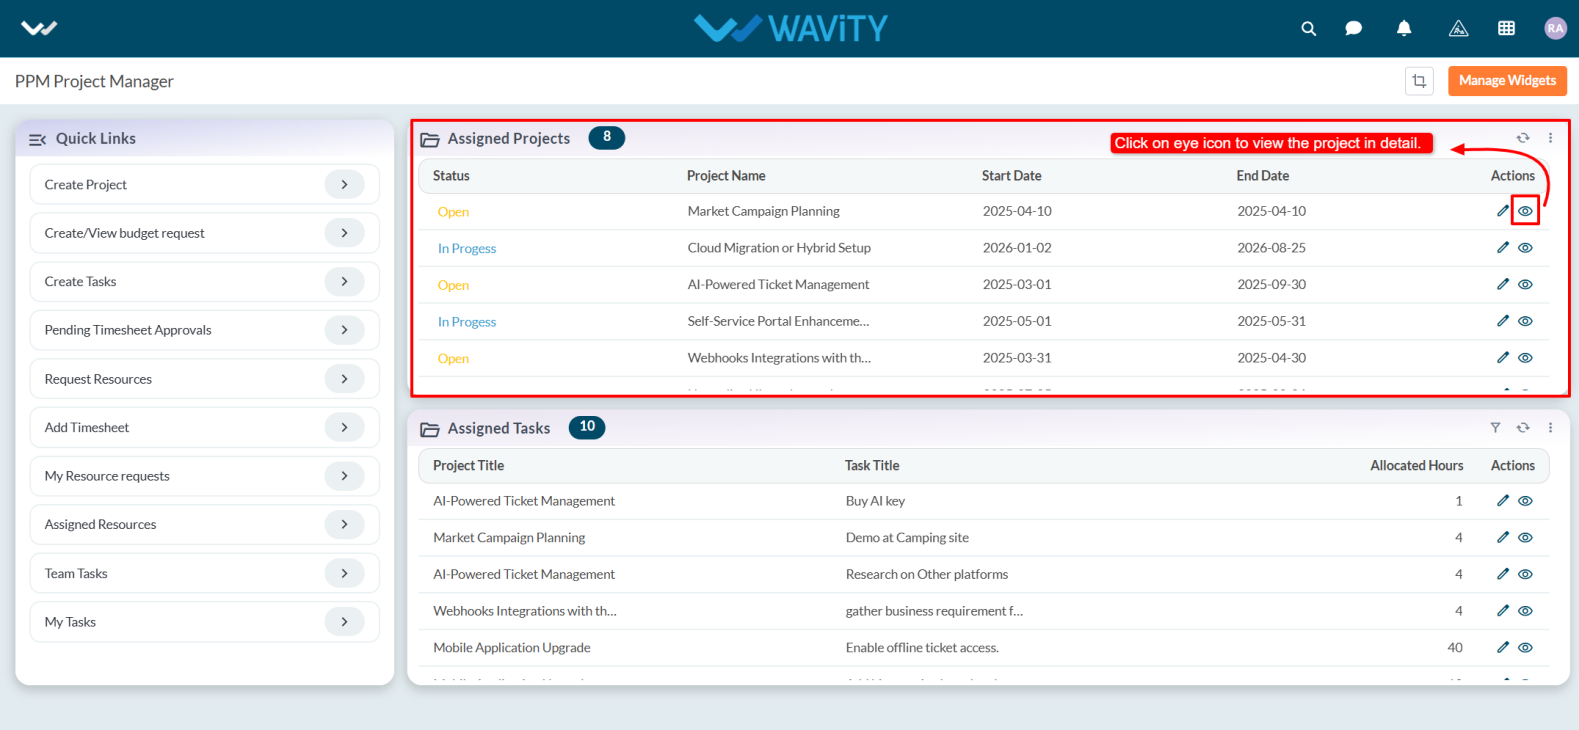
- Go to the Resource tab and enable Request Resource. The Create Resource Request field will appear automatically.
- Click on the icon Create New Records as shown in the image below.
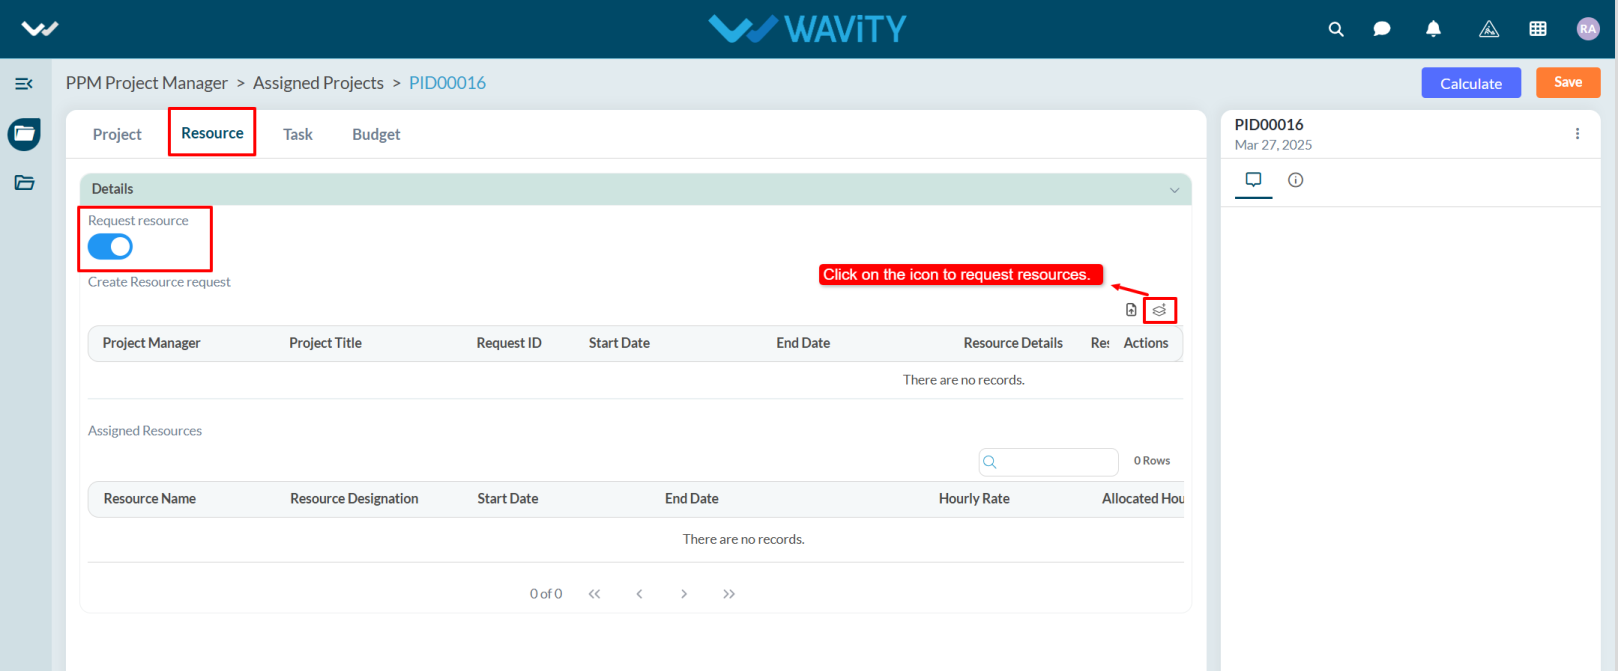
- The Project Manager, Project Title, Start Date, End Date, and Total Required Resources will be populated automatically.
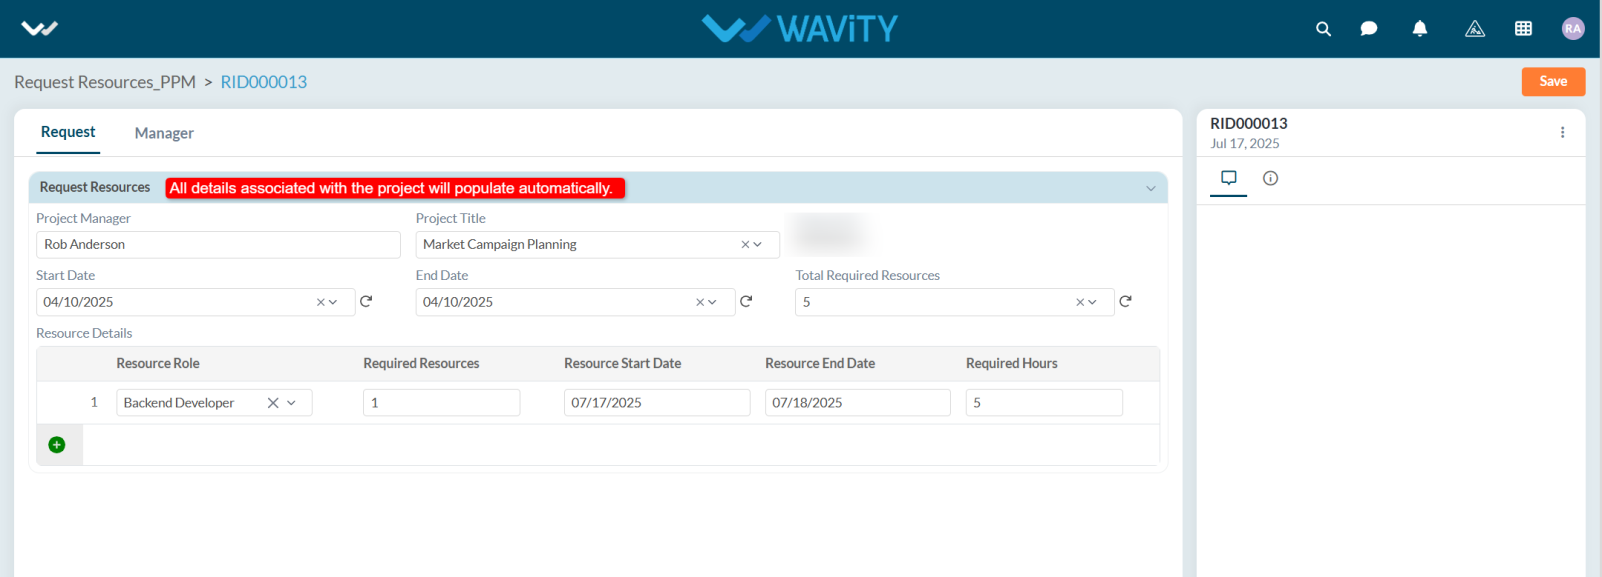
- Under Resource Details, select the Resource Role; enter the Start and End Date, and the Required Hours. To request additional resource roles, click the Add (+) symbol and then click the Save button.
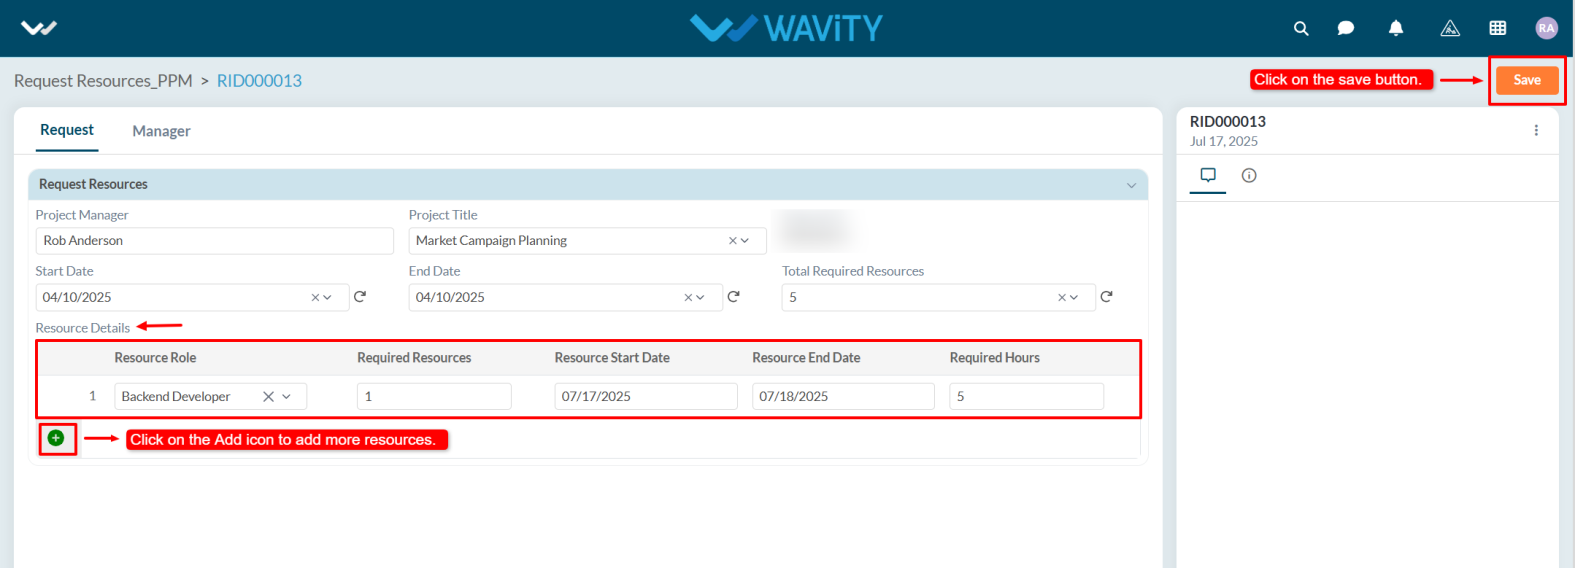
- Once the resource is assigned, their details will appear under the Assigned Resource Persons section in the Assigned Resources field.
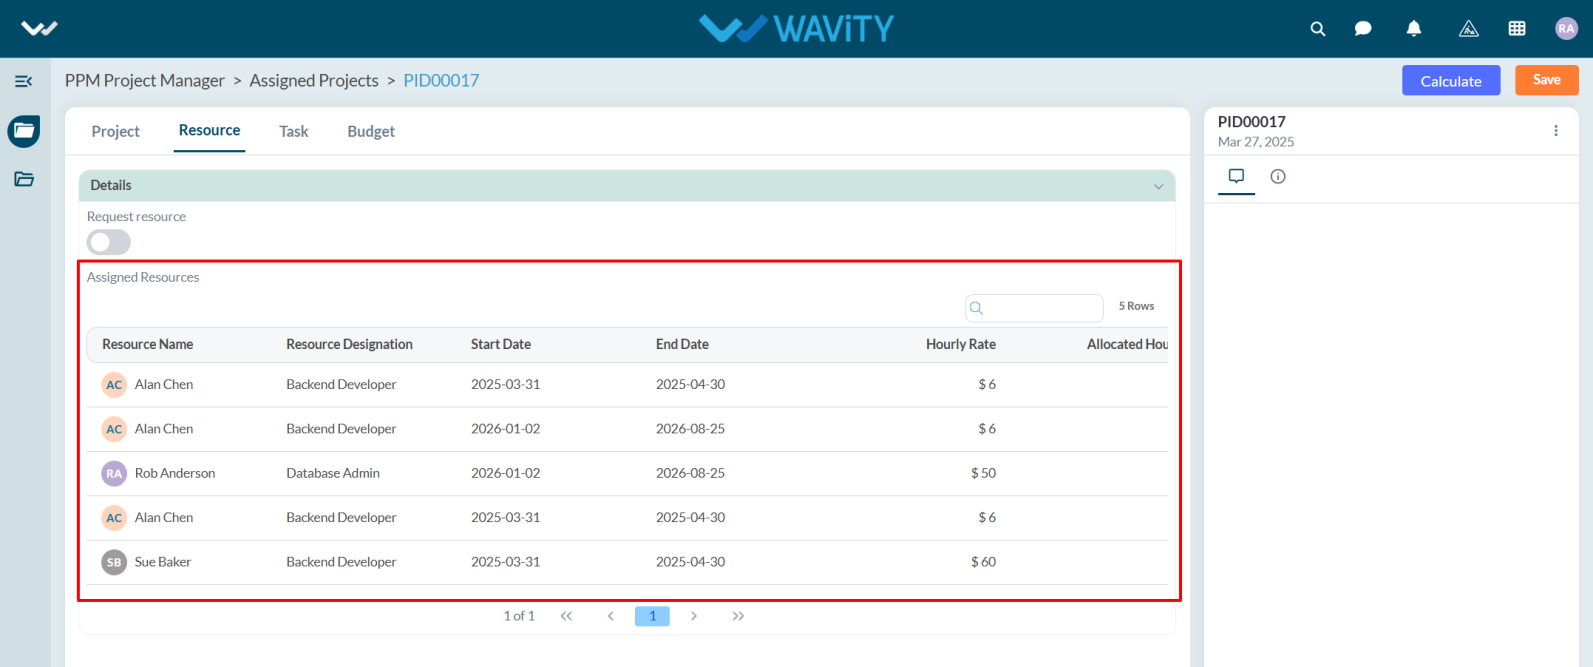
Project Manager Guide: Task Creation Process
- In the Wavity Project Portfolio Management Solution, Project Managers can easily create and assign tasks to other users.
- Users with Project Manager access can log in using their credentials and will be directed to the Project Manager Persona.
- Note: The steps provided serve as sample instructions and can be customized based on specific requirements; however, the core workflow will remain the same.
- Tasks can also be created from Quick Links by selecting Create Tasks.
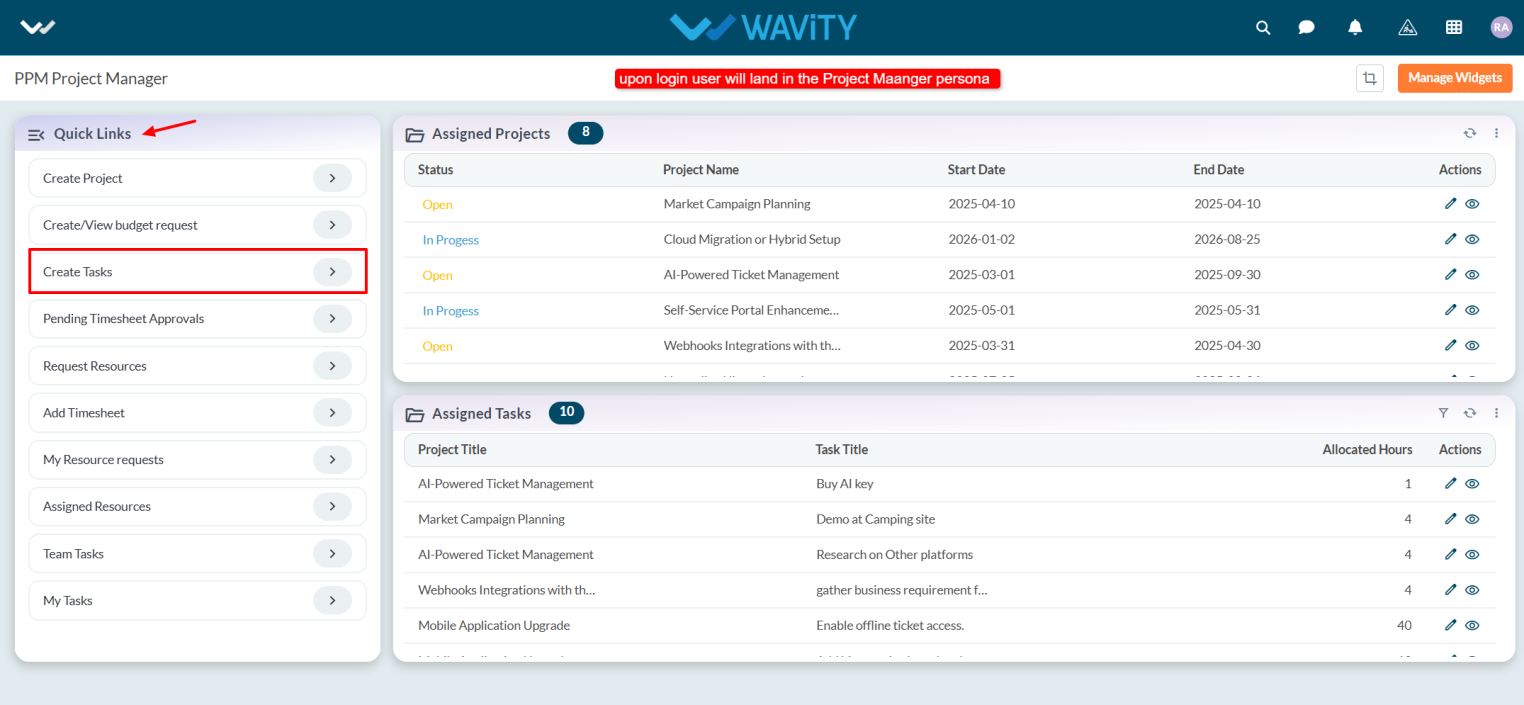
- In the Assigned Projects table widget, select the project for which you want to create a task.

- Navigate to the Task tab. Under the Associated Tasks section, click the Create New Records icon.
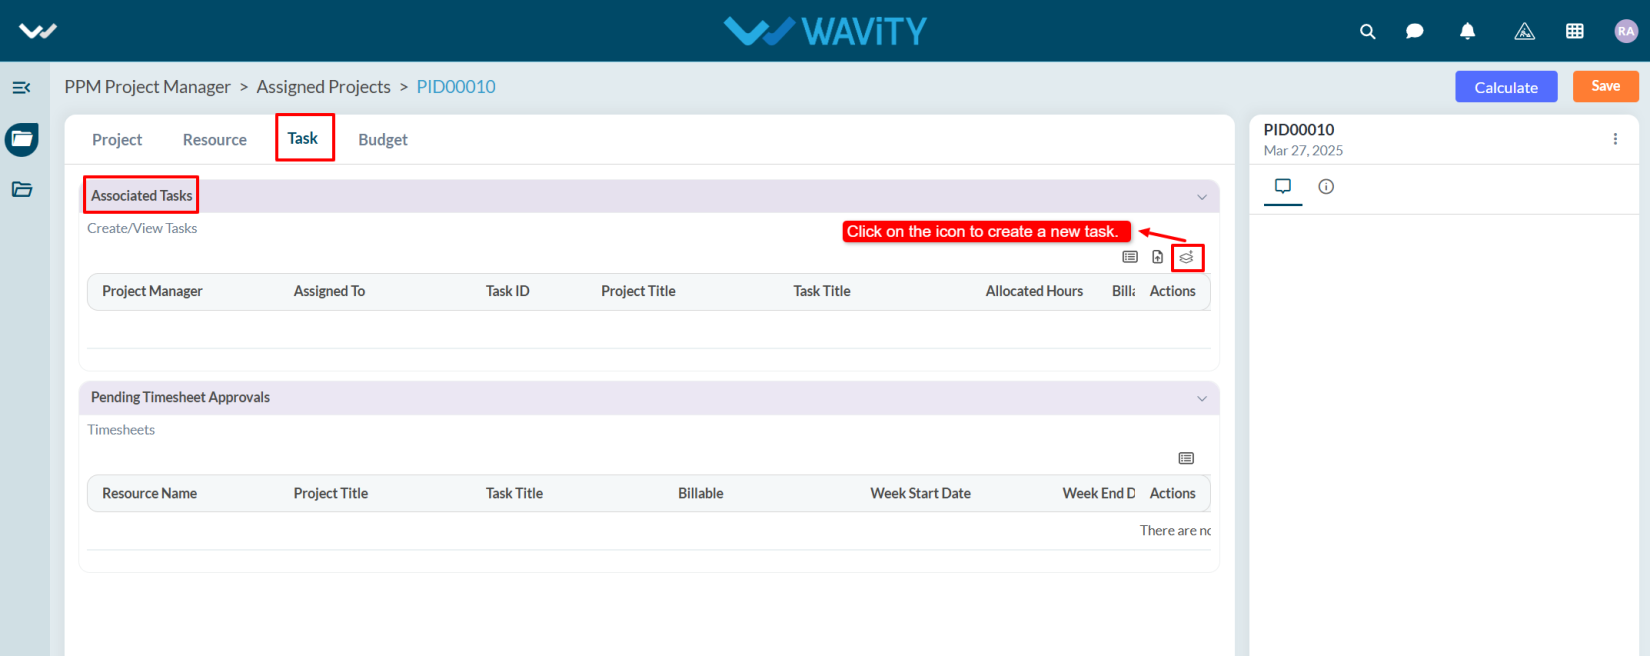
- In the Task tab under Task Info, the Project Manager field is automatically populated. In the Assigned To field, select the user you want to assign the task.
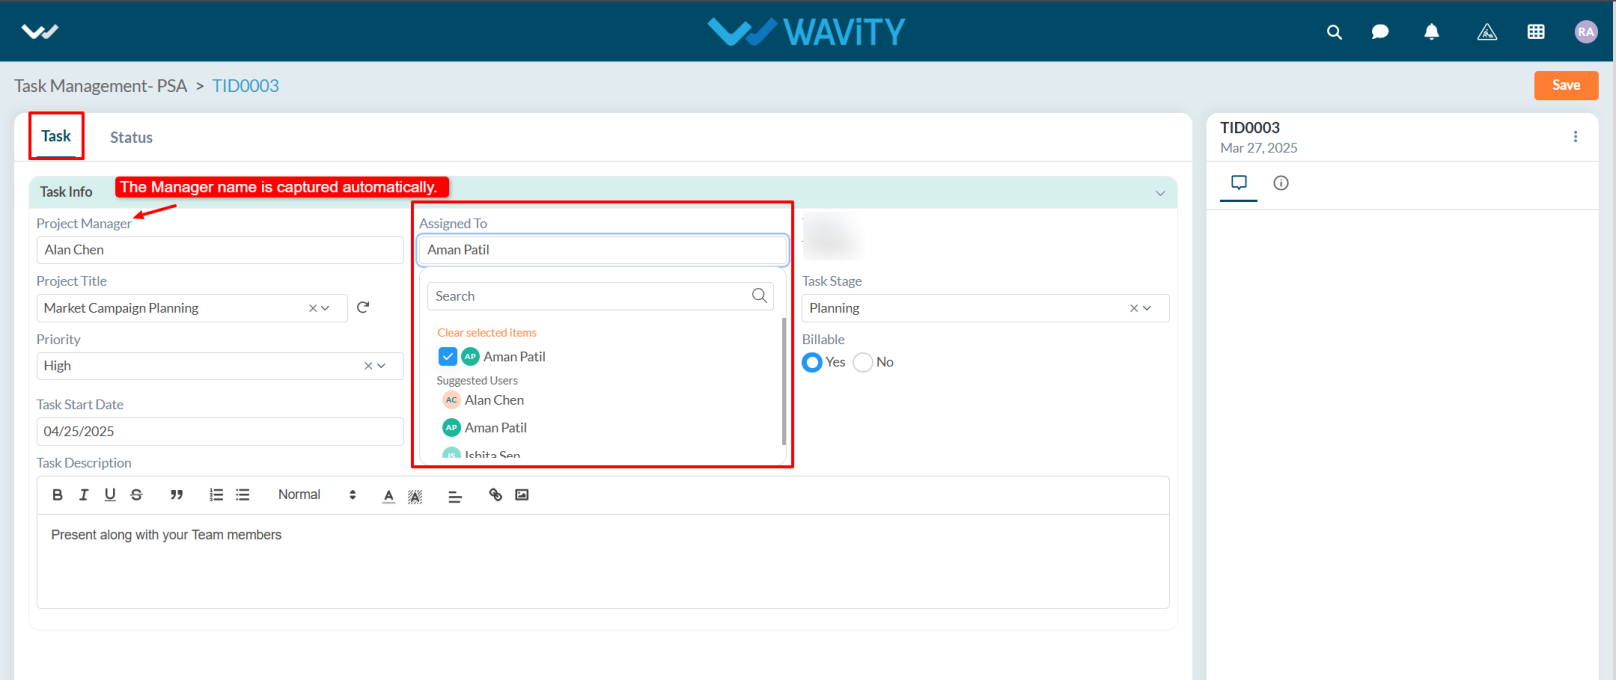
- The Project Title will be auto-filled. Enter the Task Title and choose the Task Stage from the dropdown.
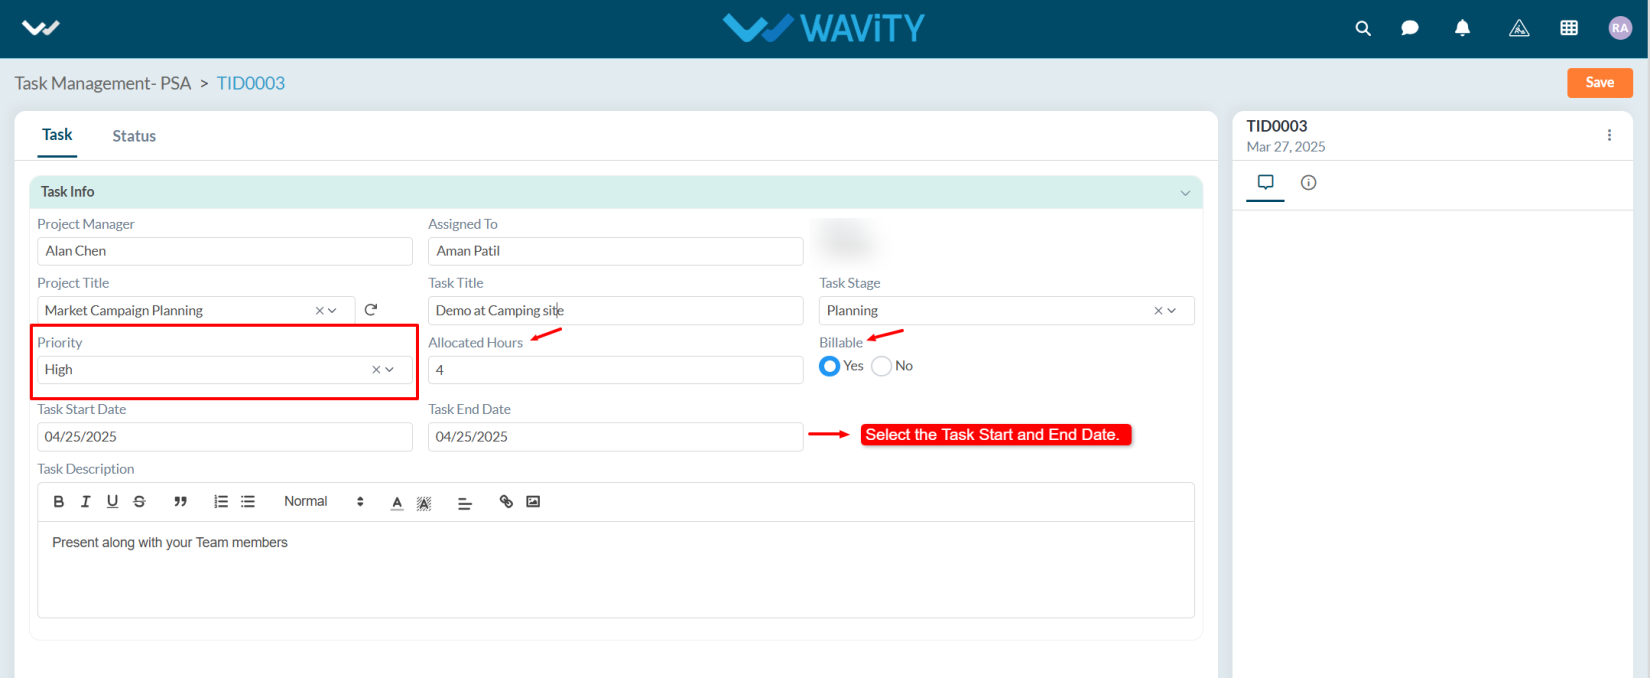
- Set the Priority, specify the Allocated Hours, and if billable, select Yes. Choose the Start Date and End Date for task completion.
- If needed, add any relevant details in the Description box. Once all details are filled in, click the Save button to complete the task creation.
- Once a task is created, the assigned user will receive a notification and is responsible for working on the task and updating its Status accordingly.
Team Member Guide: Updating Timesheet
- Team Members can update their timesheets based on their assigned tasks.
- Users with Team Member access can log in using their credentials and will be directed to the Team Member Persona.
- Note: The steps provided serve as sample instructions and can be customized based on specific requirements; however, the core workflow will remain the same.
- From the Quick Links, select Update Timesheet.
- In the Timesheet tab, under the Information section, the system will automatically capture the Requester Name. The user must select the Project Manager.
- Based on the selected Project Manager, the Project Title, Task Title, and Billable fields will populate automatically.
- If the Project Manager assigns multiple tasks, user needs to select the Project Title from the dropdown.
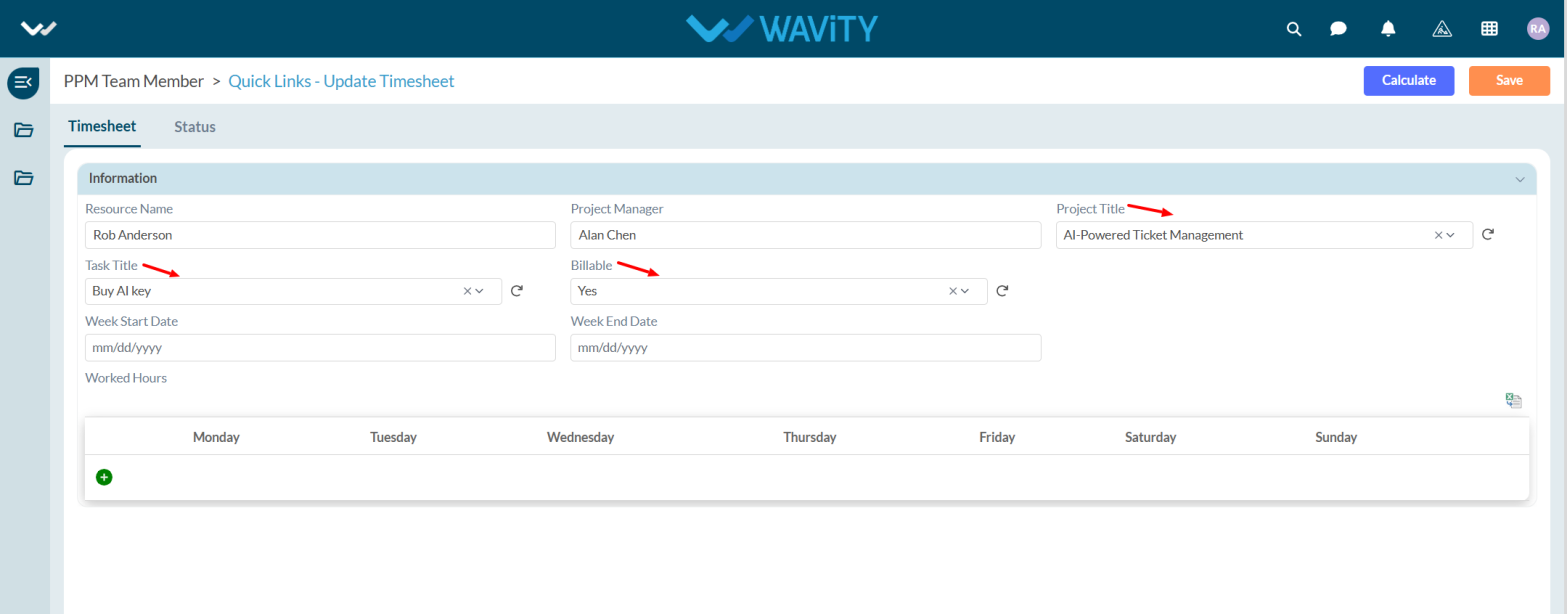
- Enter the Week Start Date and End Date. Add the Work Hours by clicking the Add icon
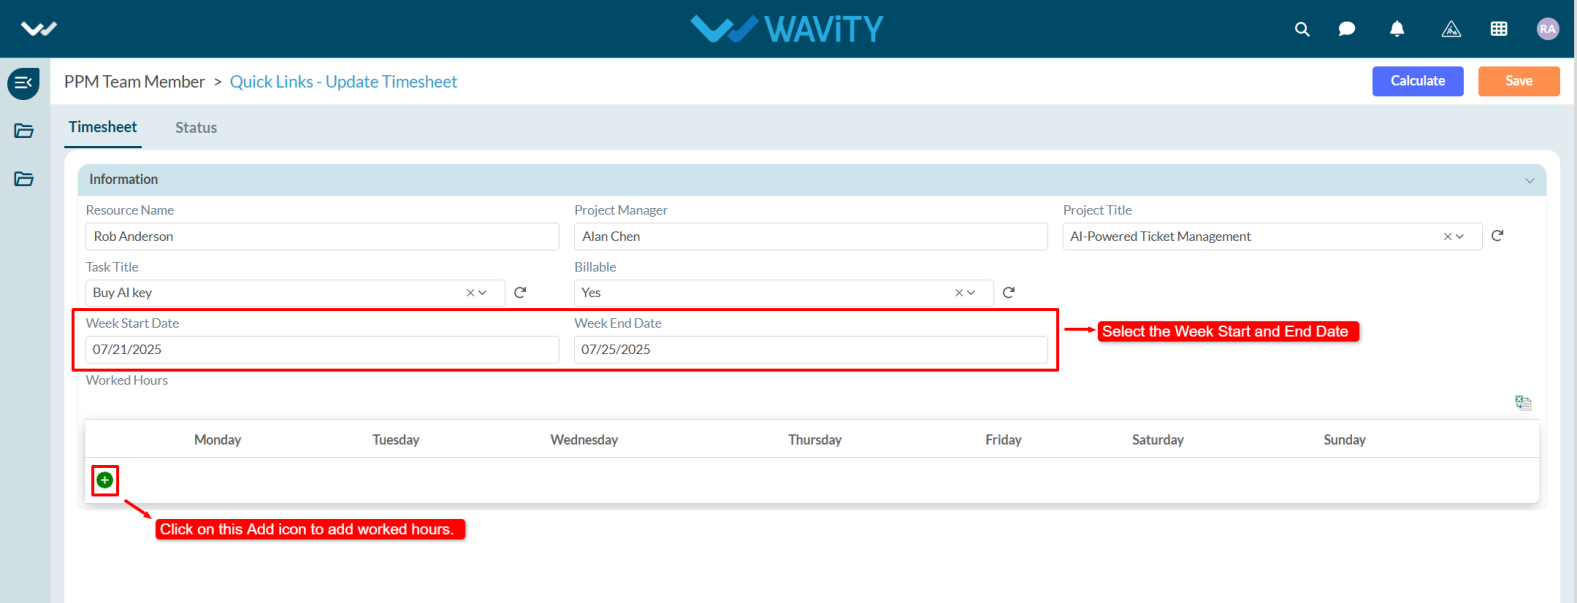
- Click the Save button to complete the entry.
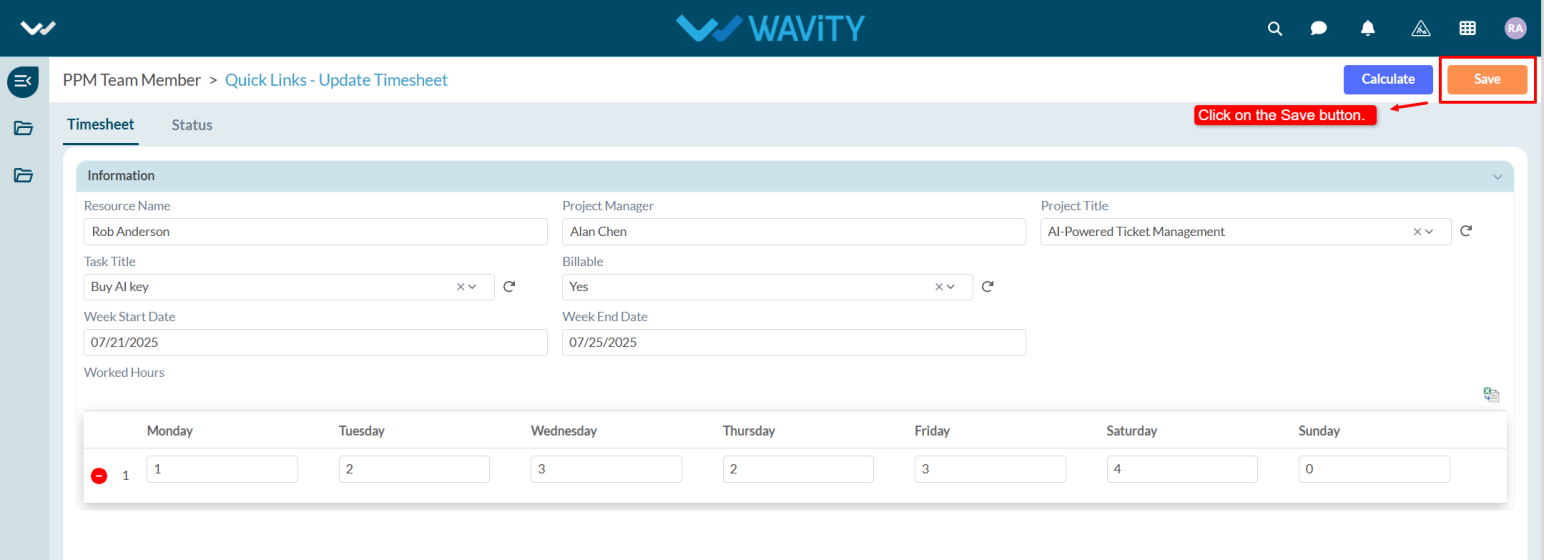
Team Member Guide: Viewing and Managing Assigned Tasks
- In Wavity Project Management Solution, Viewing and managing assigned tasks as a Team Member is a straightforward process.
- Team Member can view the tasks assigned to them by the Project Manager.
- Note: The steps provided serve as sample instructions and can be customized based on specific requirements; however, the core workflow will remain the same.
- Users with Team Member access can log in using their credentials and will land on the Team Member Persona.
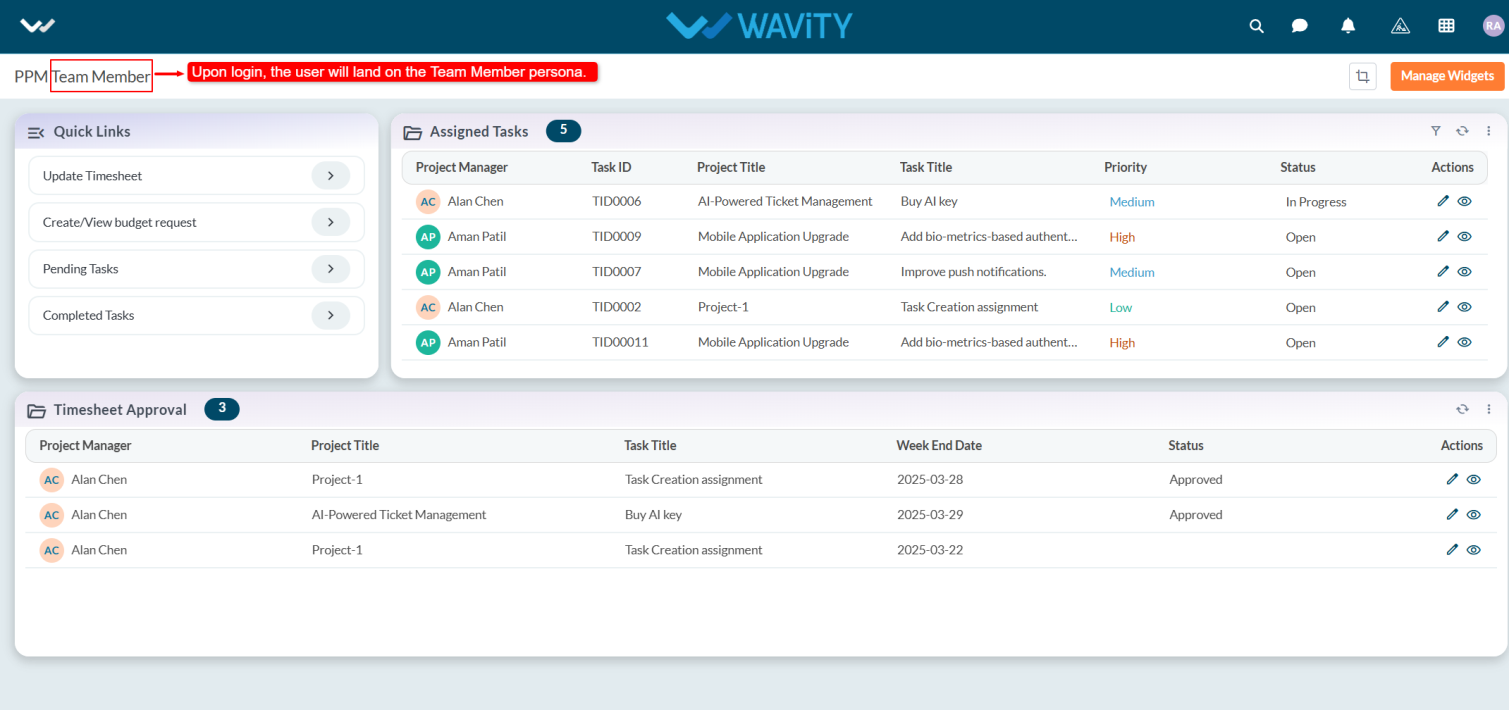
- In the Quick Links, users can create or update their timesheet, create or view the budget, and view both pending and completed tasks.
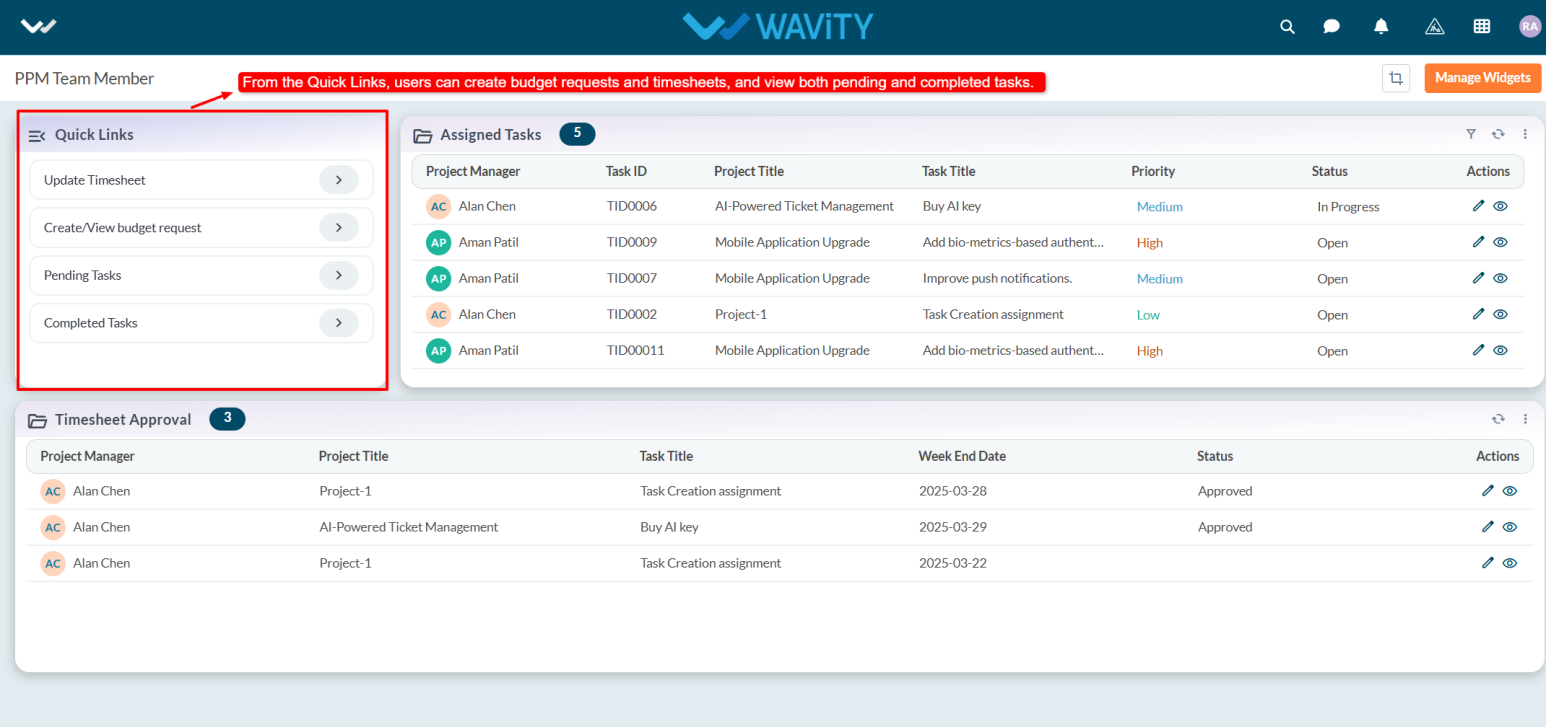
- In the Assigned Task table widget, users can see all tasks assigned to them.

- Select any task from the list to view or update its details.

- In the Task tab, under the Task Info section, users can view complete task details.
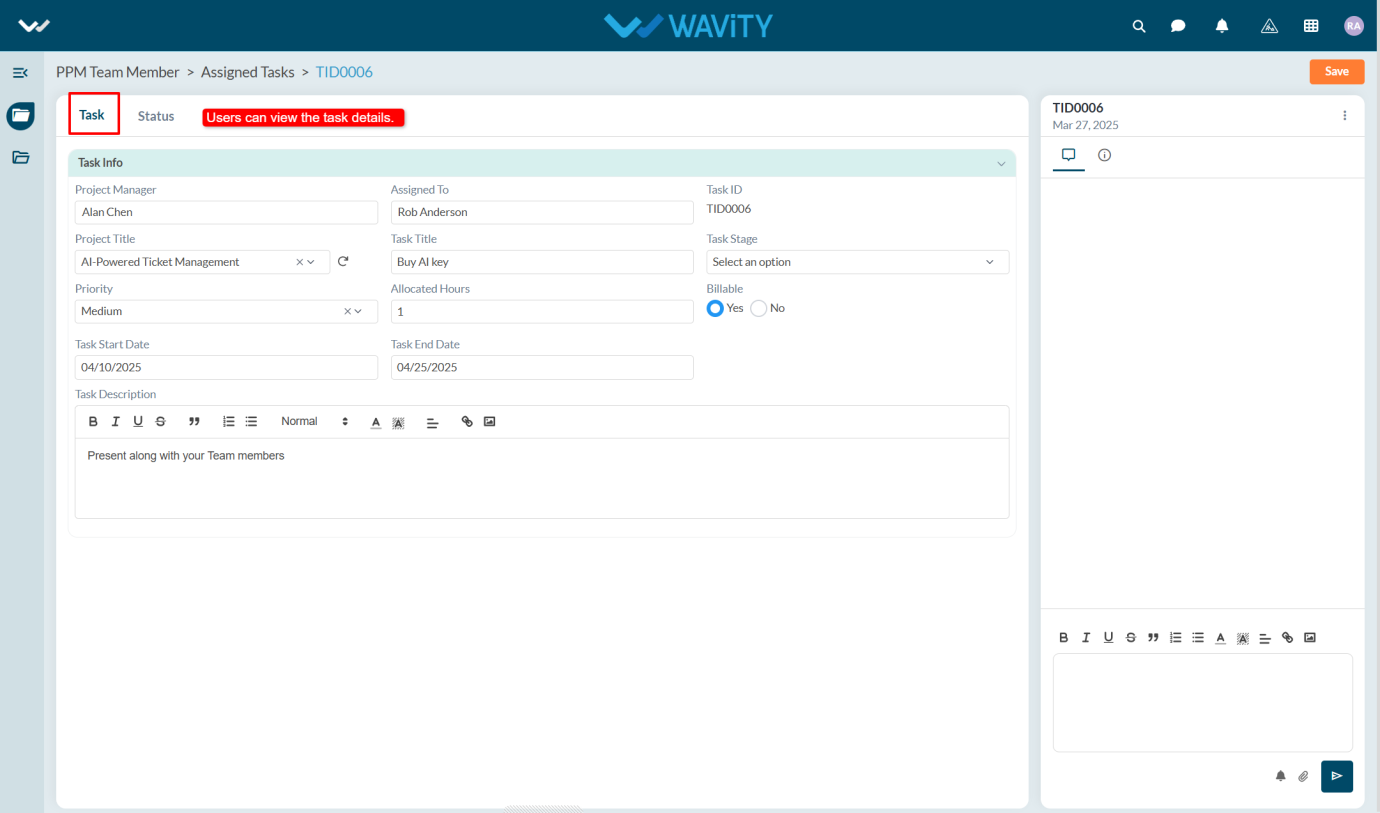
- Under the Status section, users need to enter the Start and End Date of the task. Once the task is completed, they must update the status to Completed.
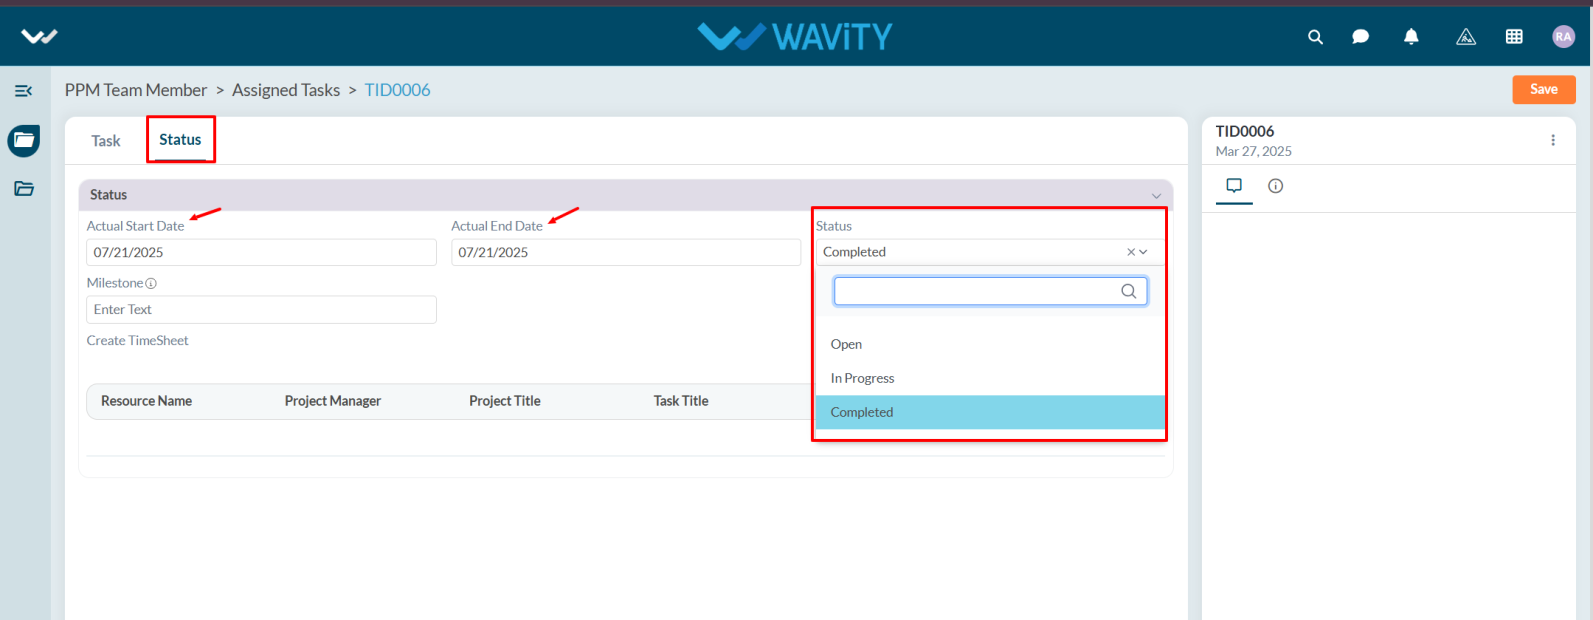
- Mention the Milestone of the project. A milestone represents a key achievement or a sequence of important events leading to project completion. Users can create the timesheet by clicking the Create New Record icon.
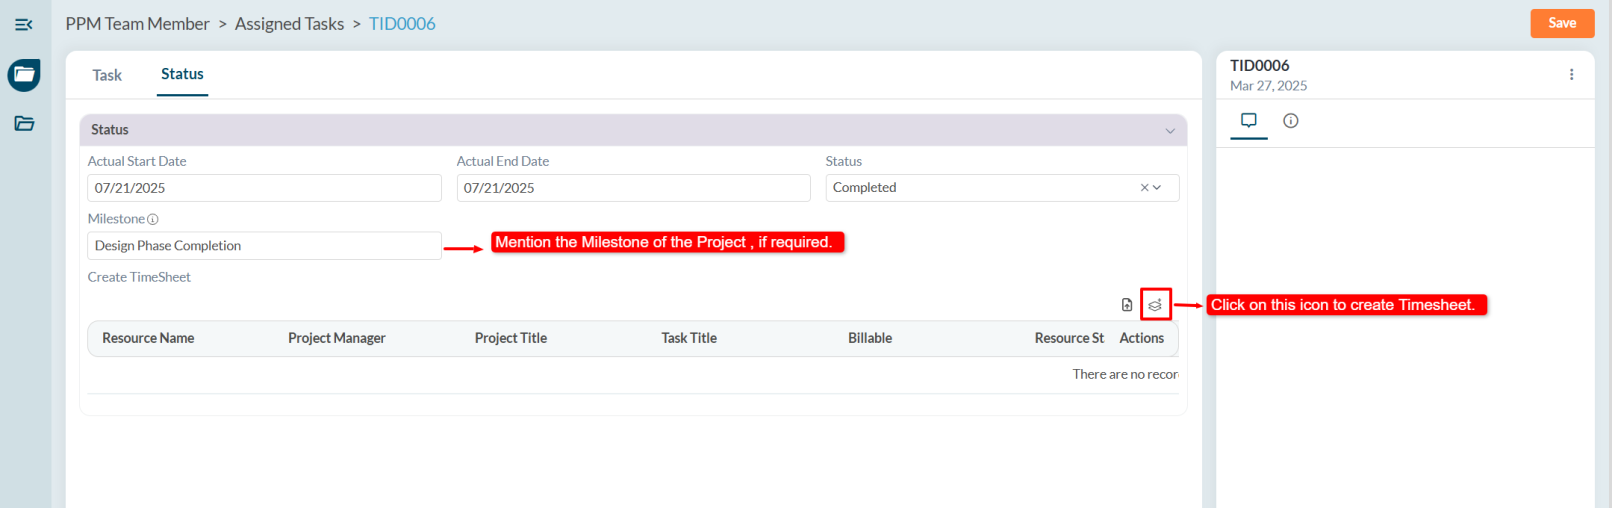
- In the timesheet, enter all the required details and click the Save button to complete the entry.
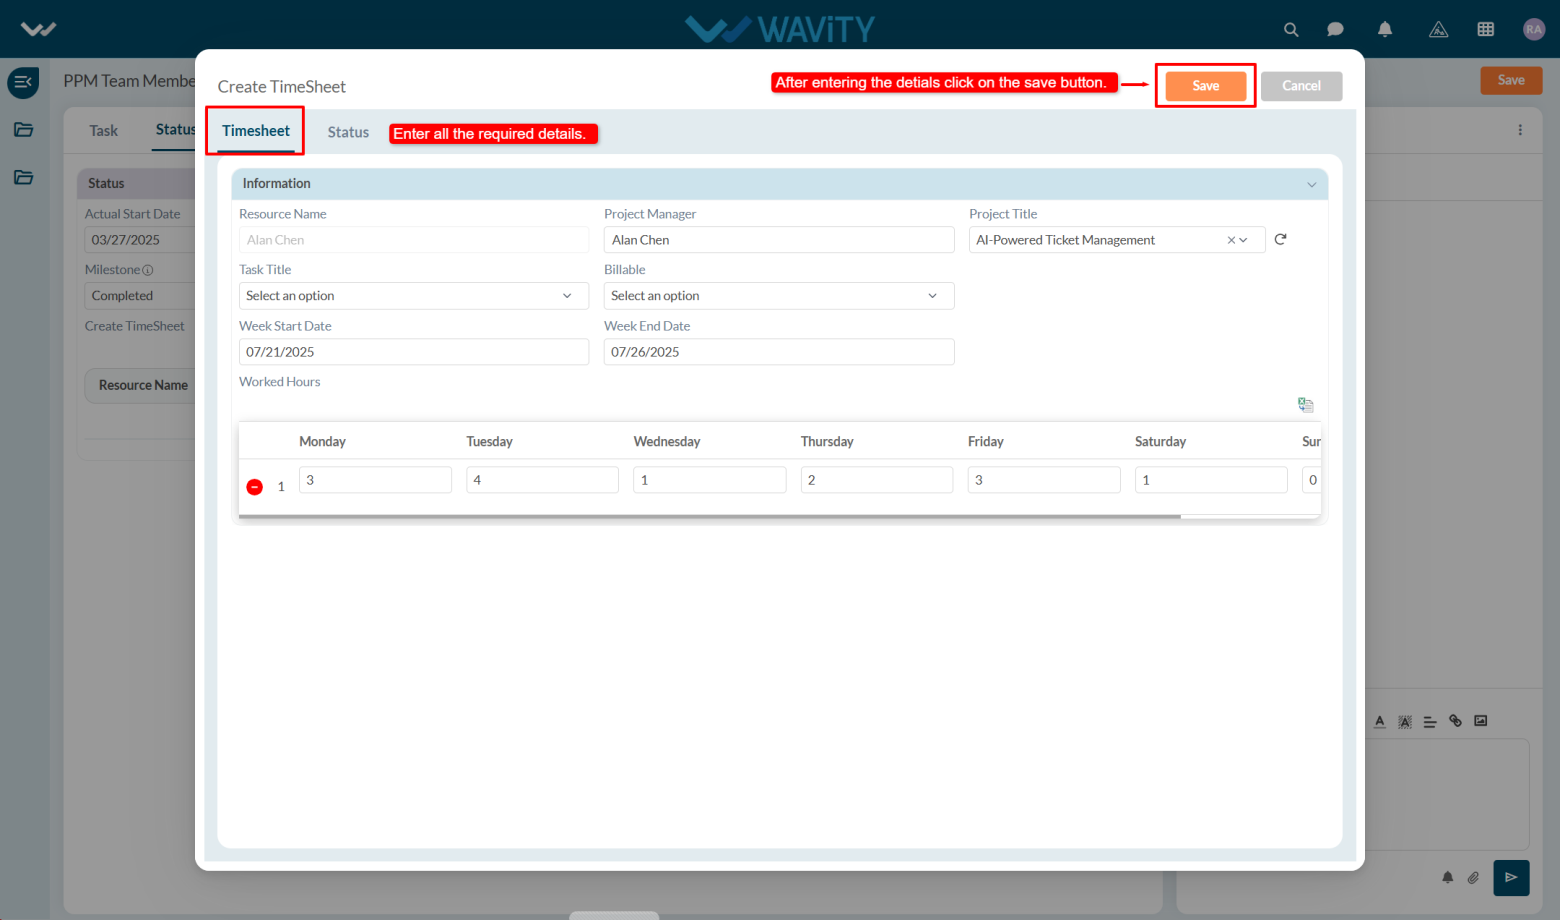
End User Guide: Reporting Problem in Wavity
- Reporting a problem in Wavity is simple, user-friendly, and accessible via Wavity Help & ServiceDesk.
- Note: The steps provided below are sample instructions and can be customized to suit specific organizational requirements; however, the core workflow remains consistent.
- Users can log in with their credentials on the Wavity platform, which will direct them to the End User Interface.
- From the Quick Links widget, users should click on ‘Report a Problem’ to initiate the process.
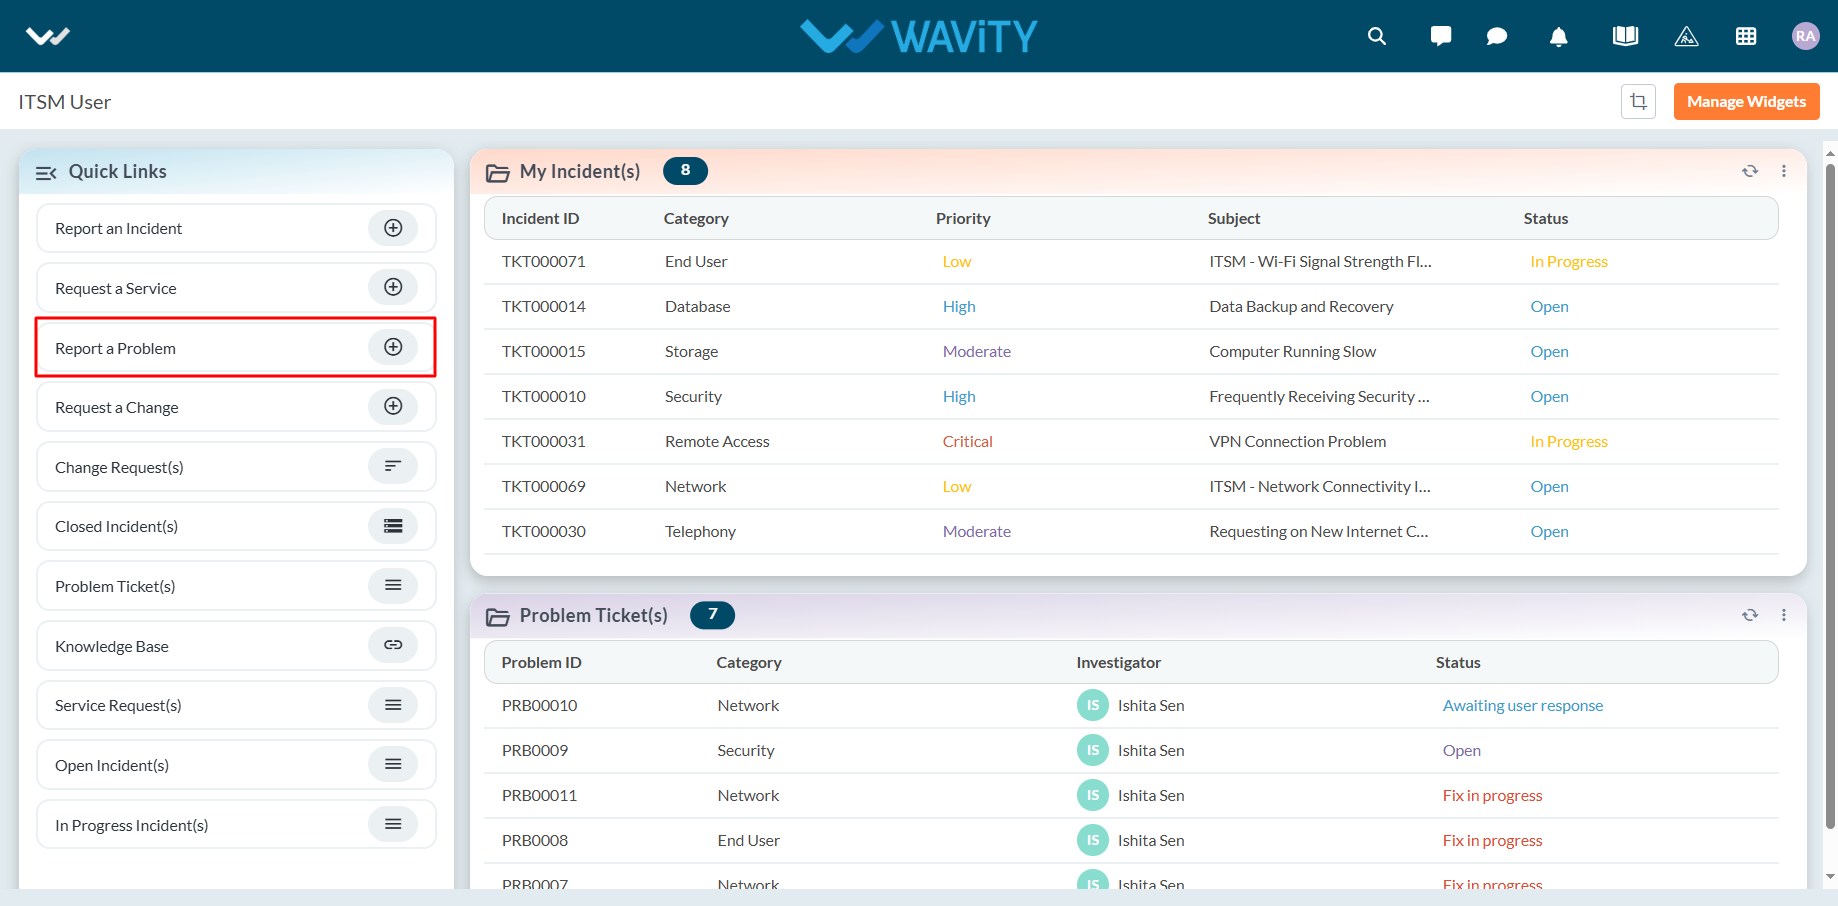
- Select appropriate values from the dropdown menus for Impact, Urgency, Priority, Category, and Sub-Category fields.

- Enter the Subject and a detailed description of the problem. Attach files if necessary.
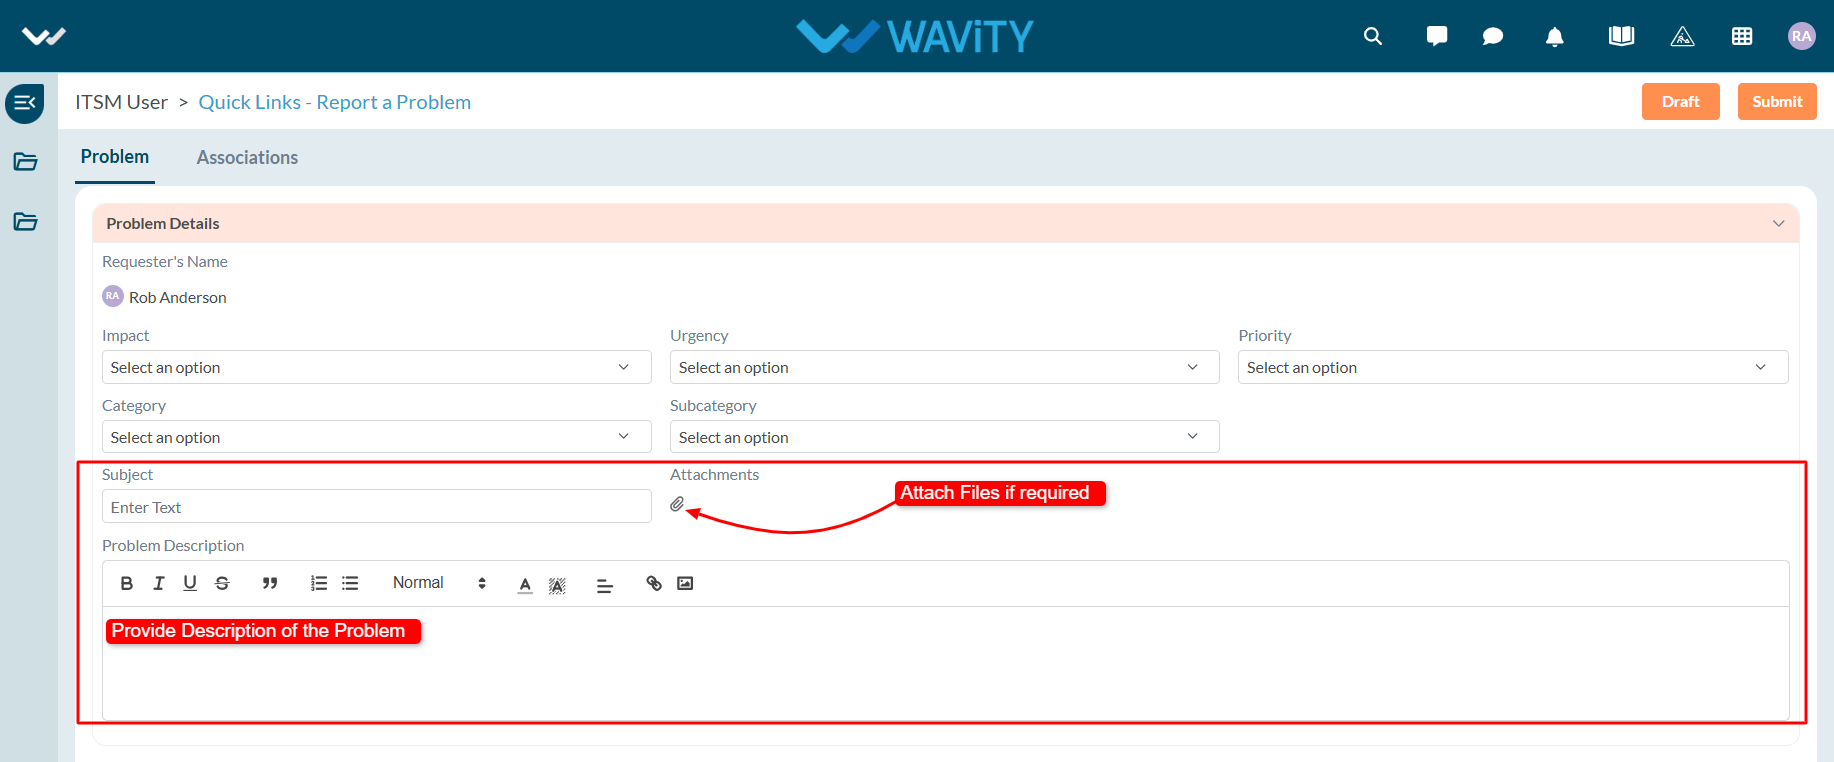
- In the Association section, you can link existing incidents and assets while reporting the problem.
- Click on the ‘Link’ icon to associate relevant incidents.
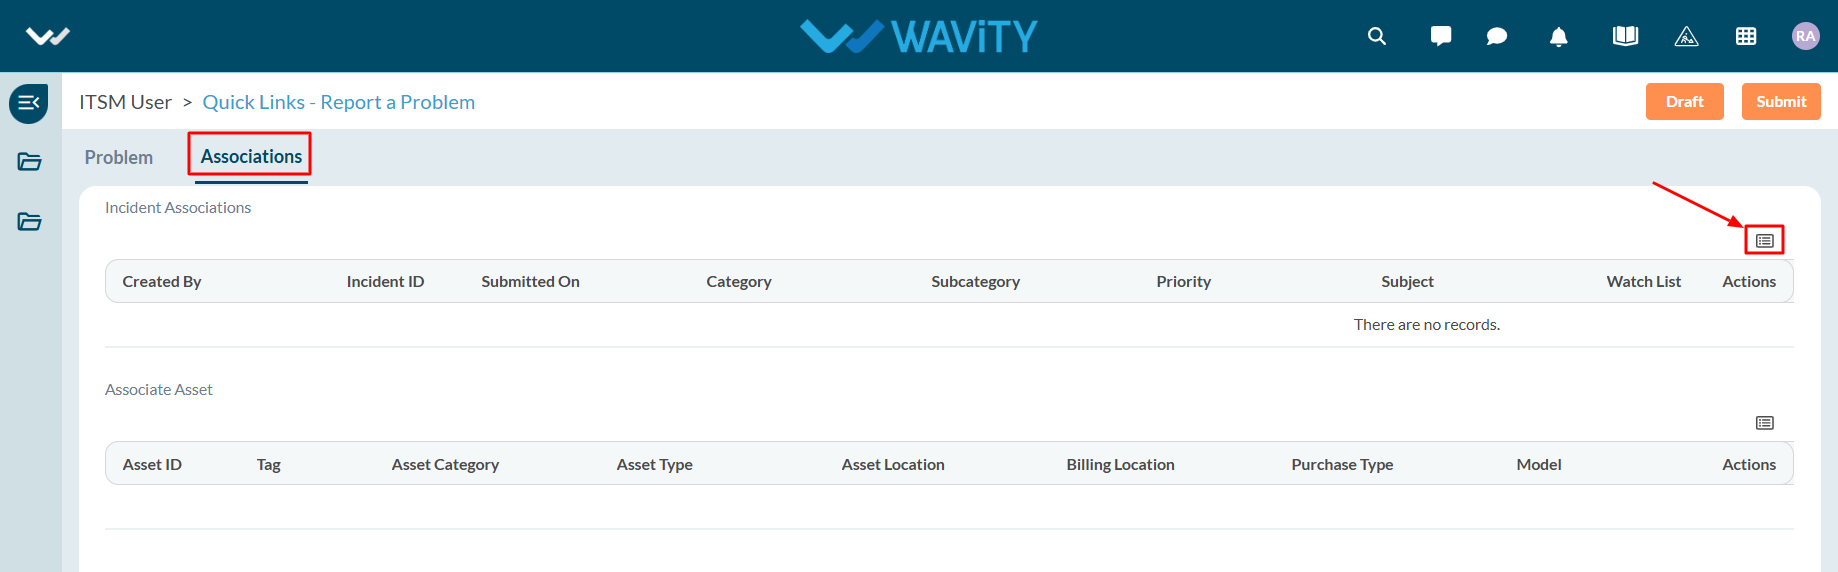
- Select the incidents you wish to link. Similarly, link assets if applicable.
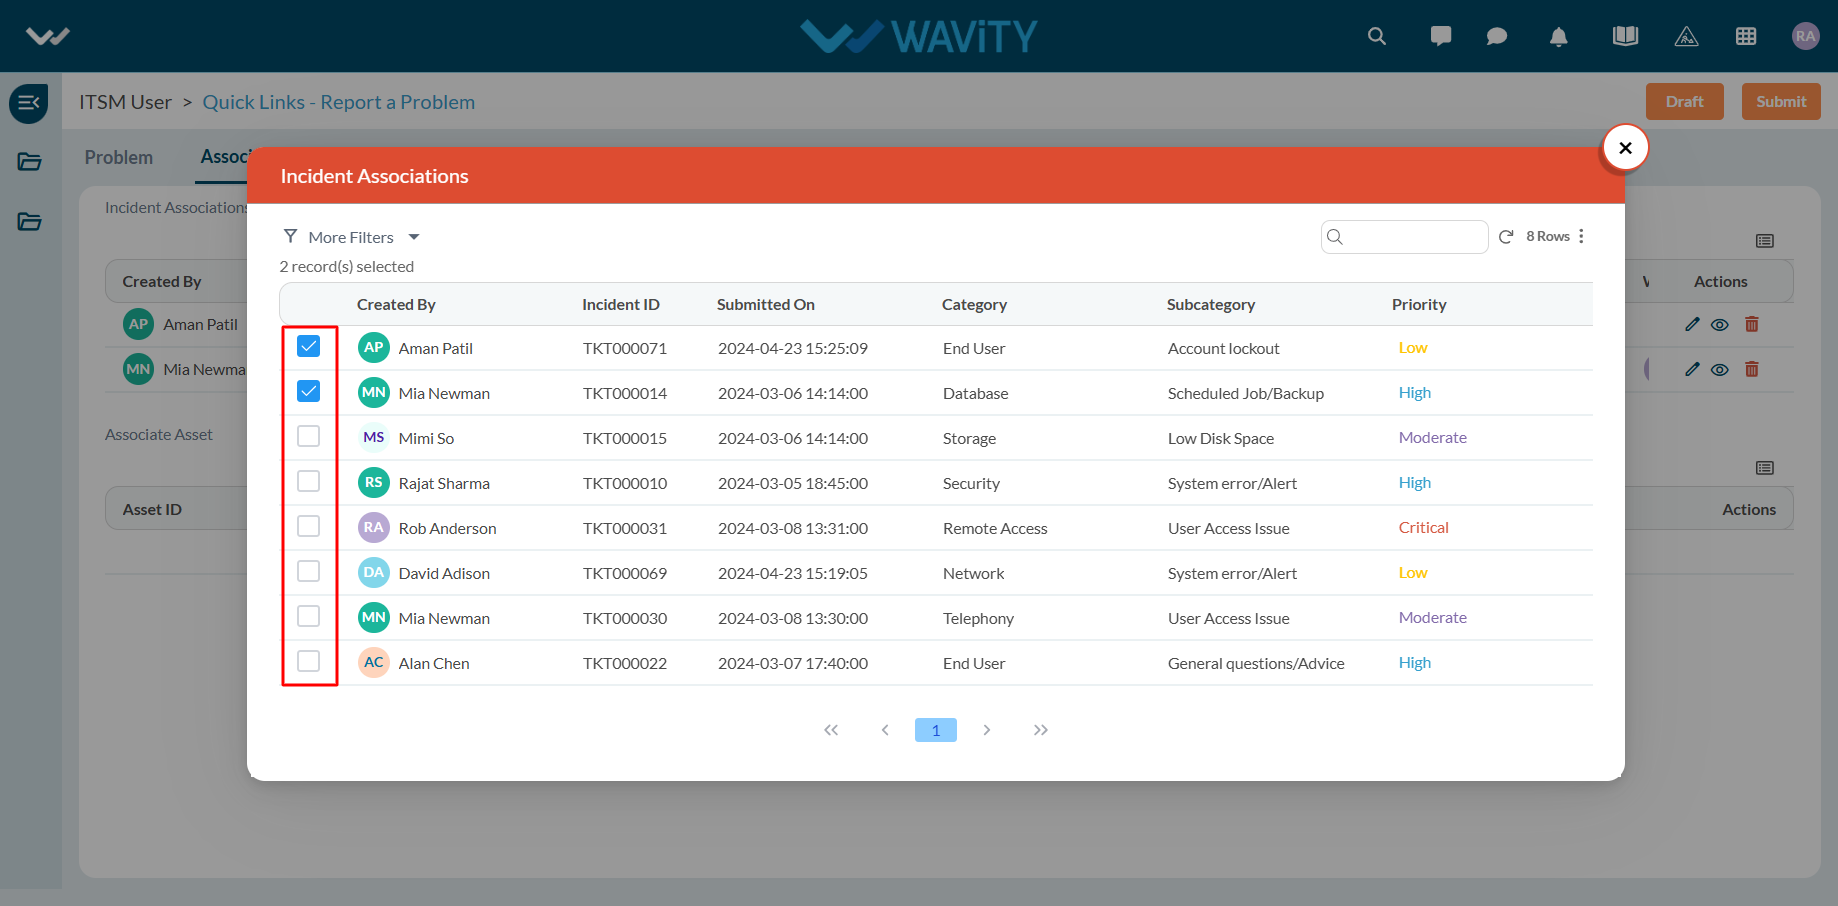
- Once all details are filled in and associations are made, click Submit to complete the process.
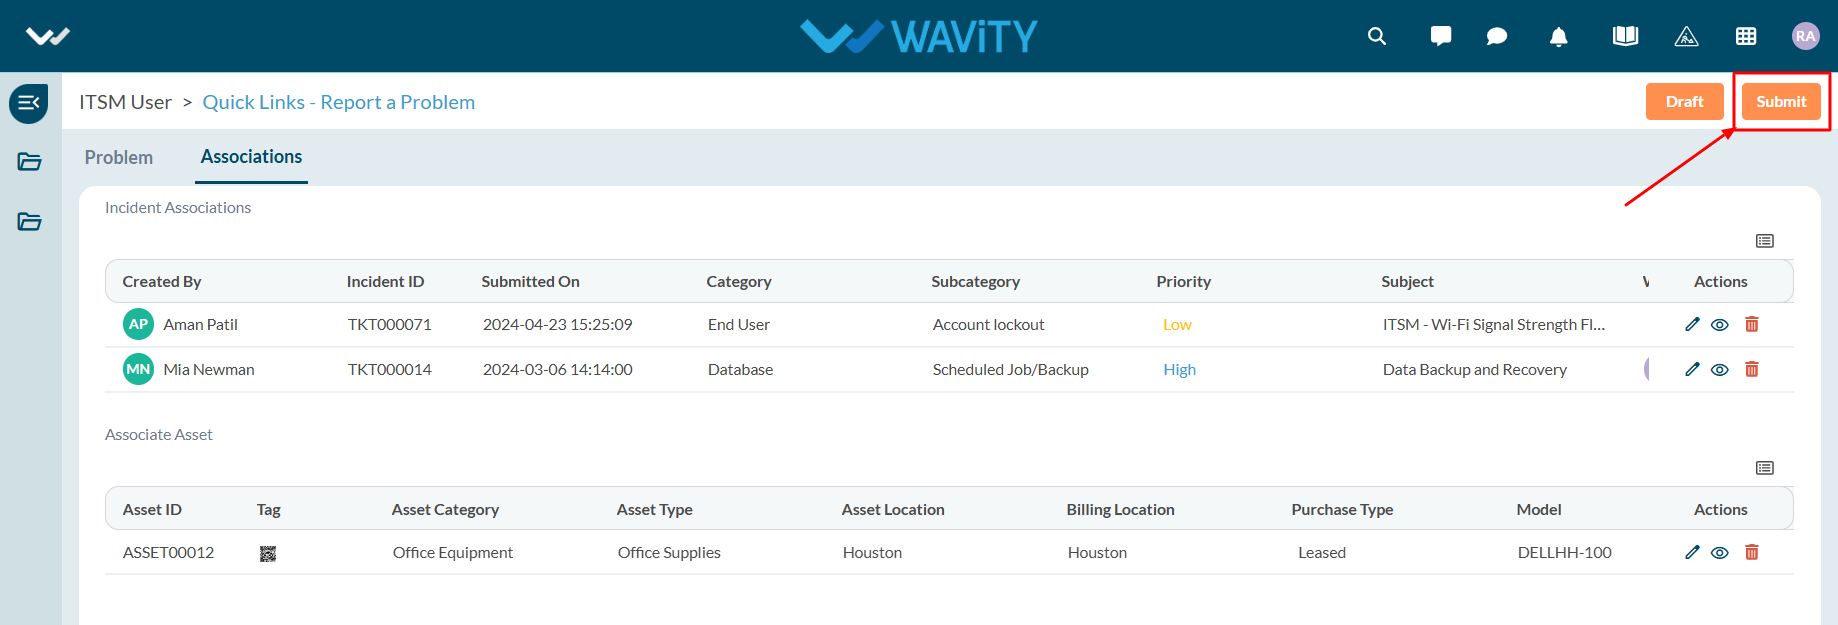
End User Guide: Service Requests in Wavity
- Service requests in Wavity is simple, user-friendly, and accessible via Wavity Help & ServiceDesk.
- Note: The steps provided below are sample instructions and can be customized to suit specific organizational requirements; however, the core workflow remains consistent.
- Users can log in with their credentials on the Wavity platform, which will direct them to the End User Interface.
- From the Quick Links widget, click on ‘Request a Service’ to begin the process.
- Select the appropriate Category value from the dropdown. Based on the selected Category, Sub-Category values will auto-populate.
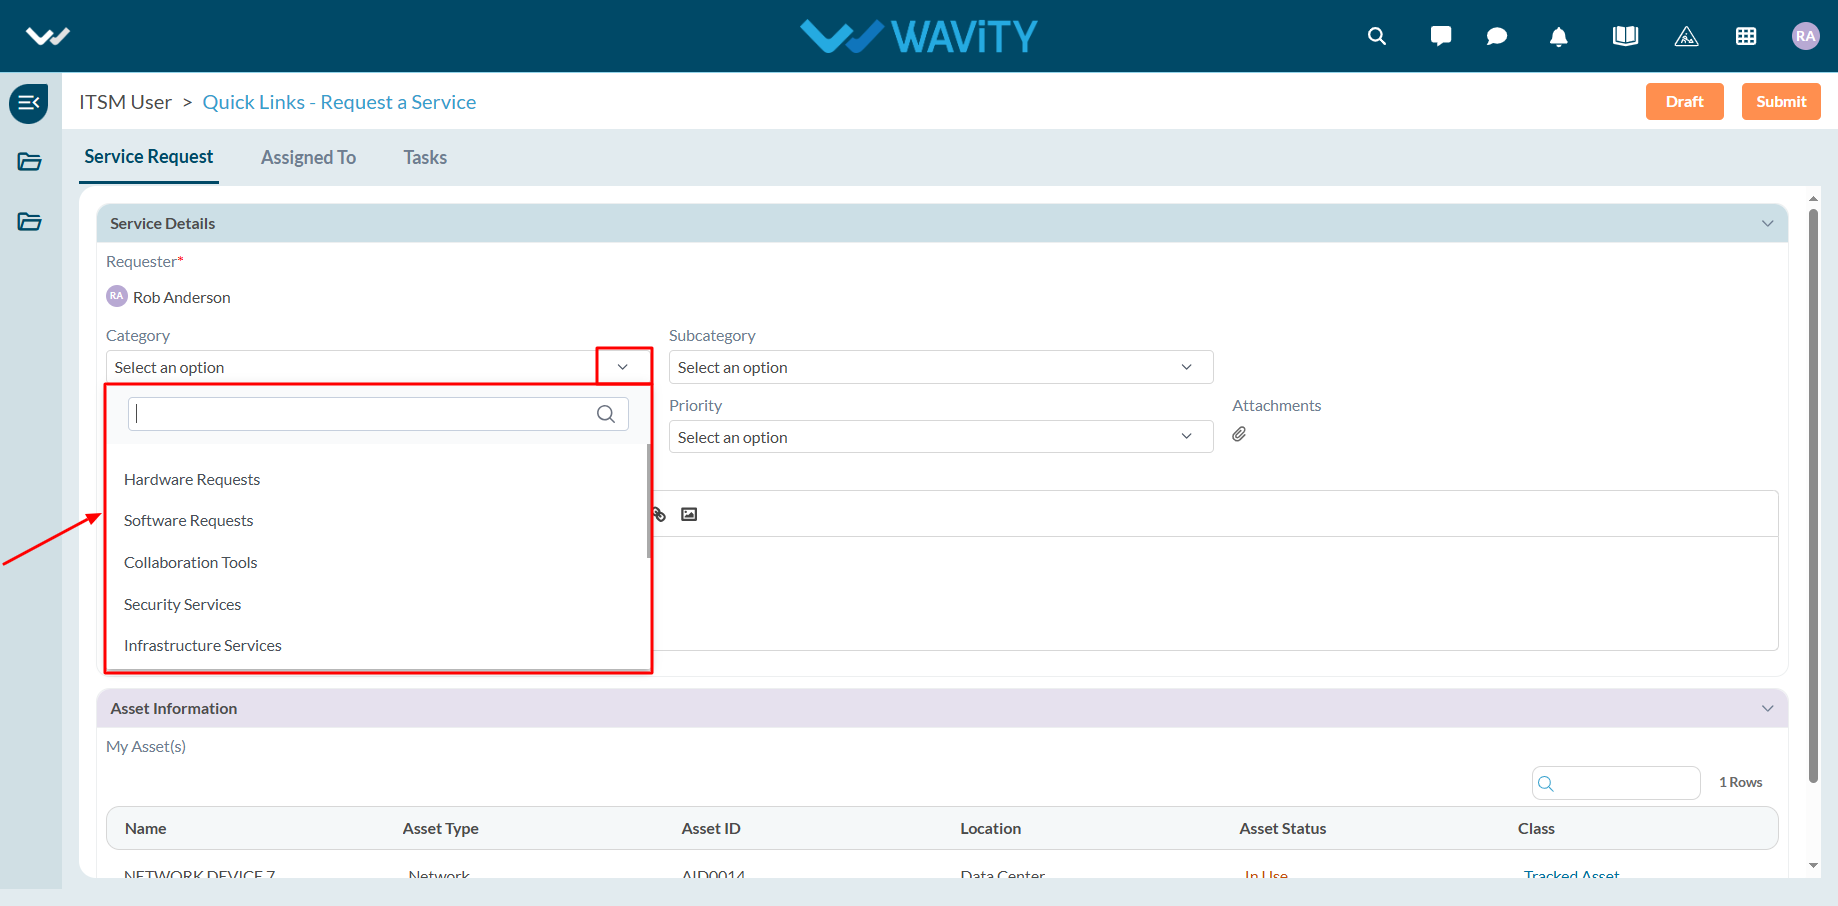
- Select the appropriate Sub-Category for your request.
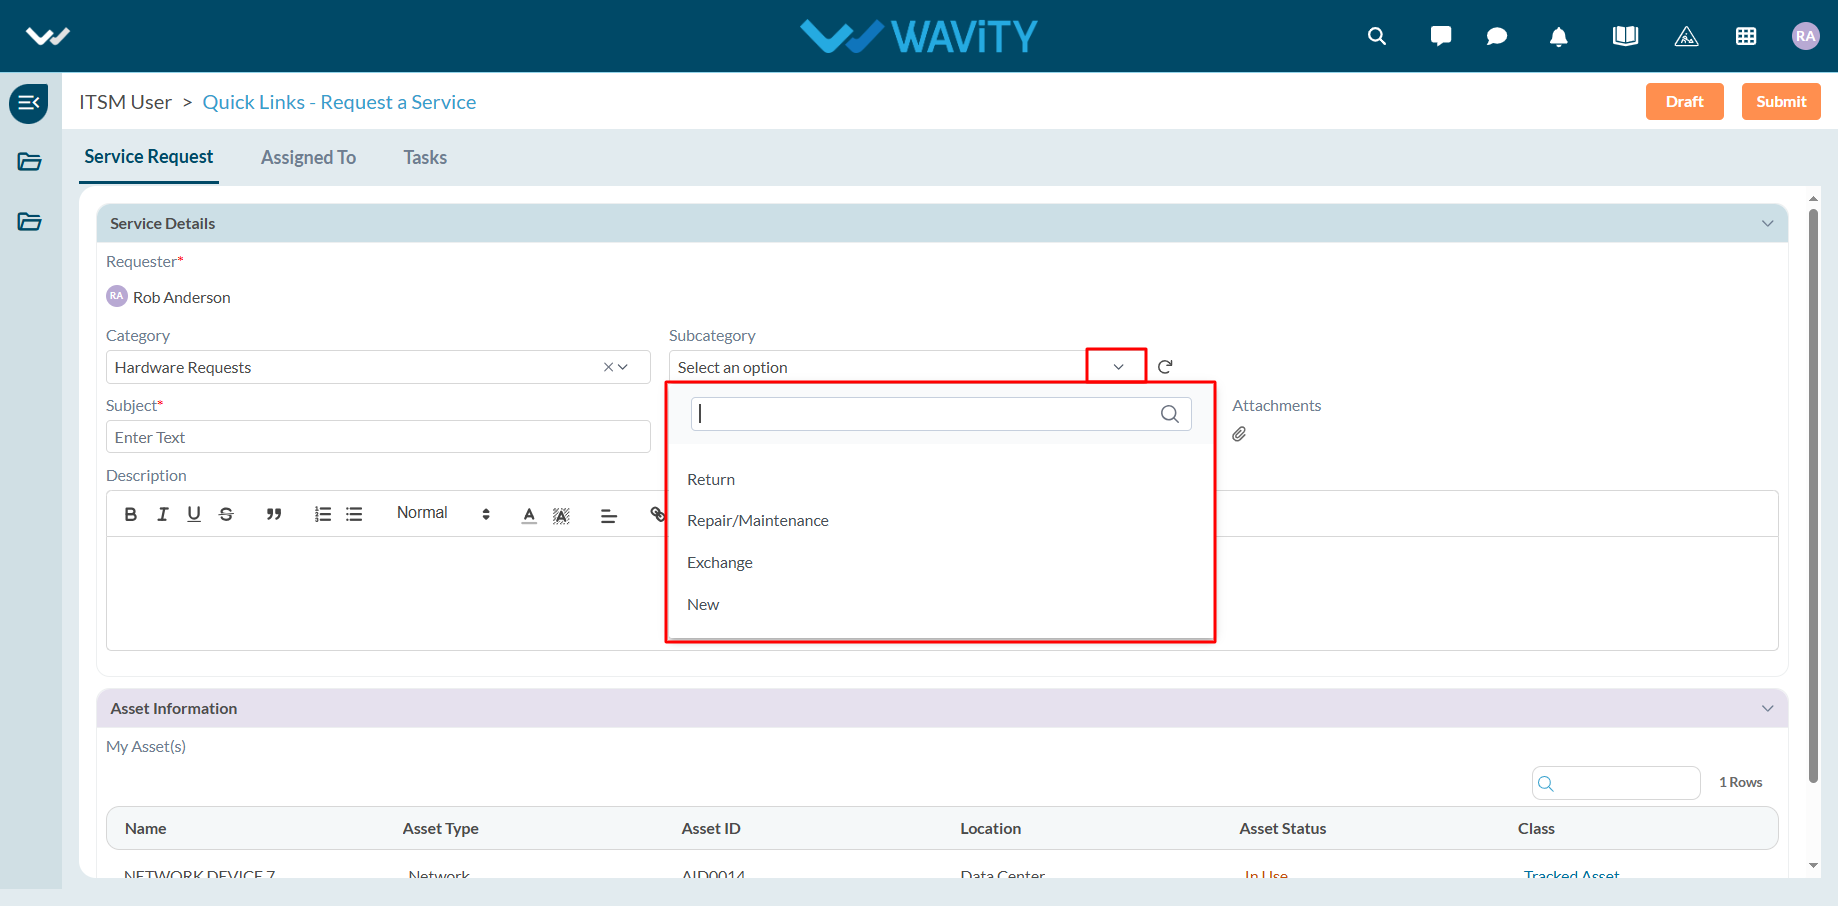
- Enter the Subject and a detailed description of your service request. Attach files if necessary.
- Choose the appropriate Priority level from the dropdown.
- Click Submit to complete the request process.
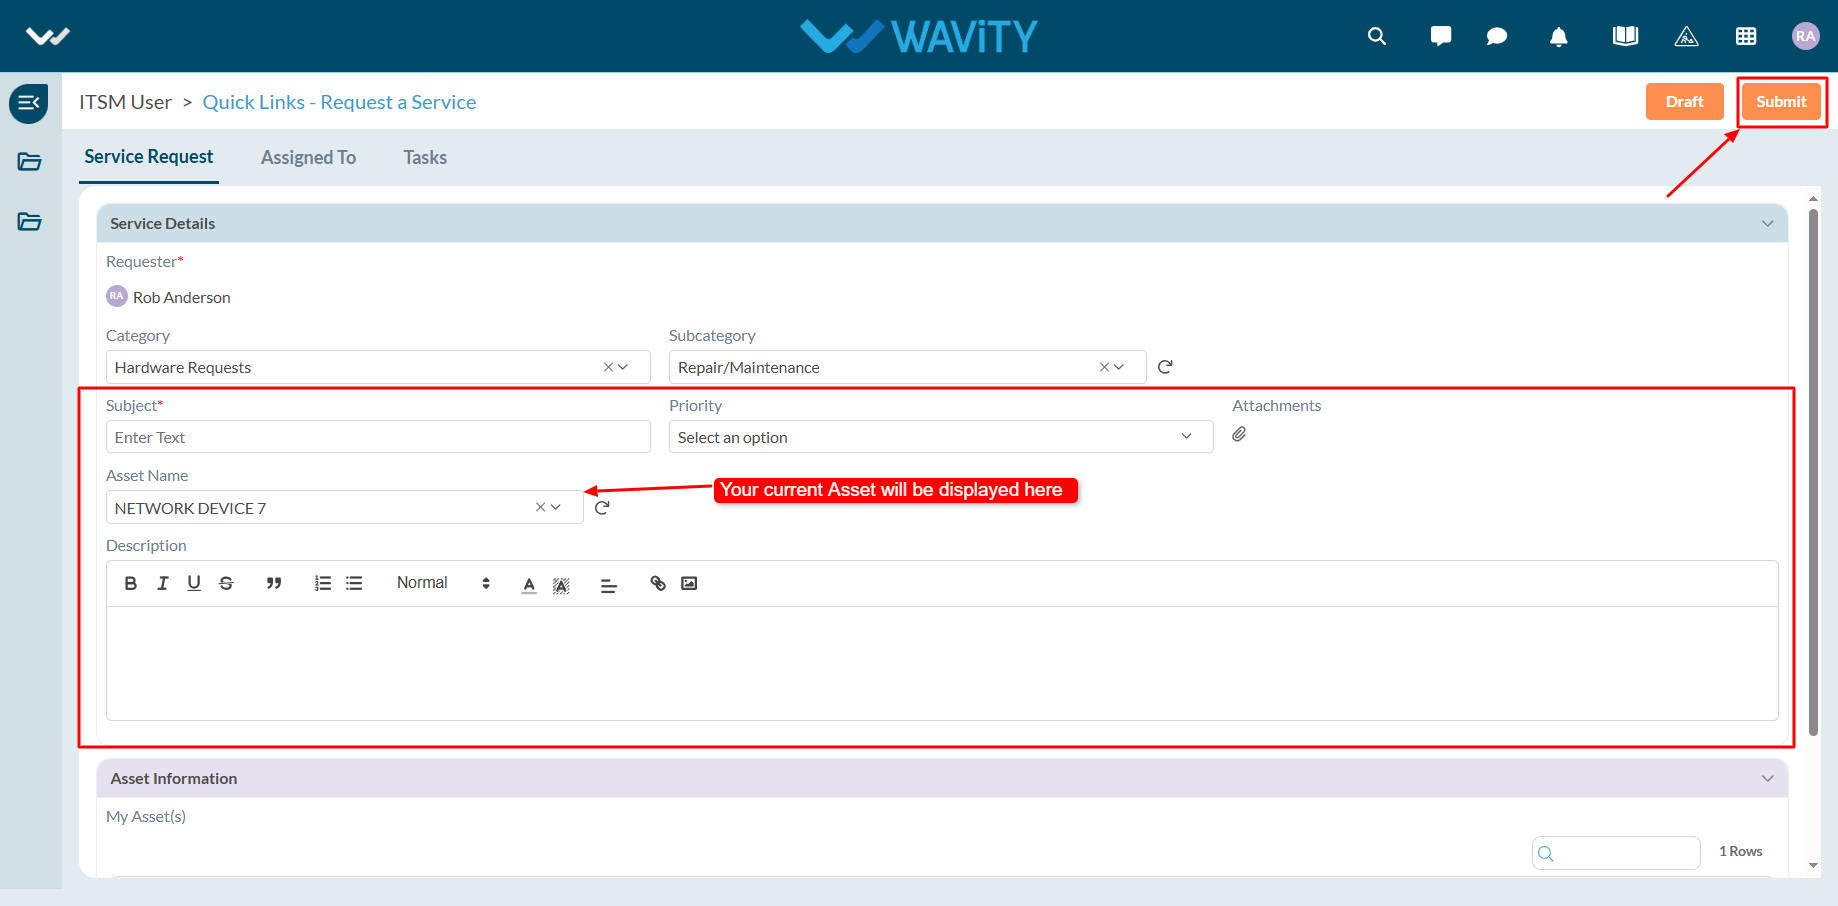
End User Guide: Software Requests in Wavity
- Service requests in Wavity is simple, user-friendly, and accessible via Wavity Help & ServiceDesk.
- Note: The steps provided below are sample instructions and can be customized to suit specific organizational requirements; however, the core workflow remains consistent.
- Users can log in with their credentials on the Wavity platform, which will direct them to the End User Interface.
- From the Quick Links widget, click on ‘Request a Service’ to begin the process.
- Select Software Requests from the Category dropdown menu. Based on the selected Category, Sub-Category values will auto-populate.
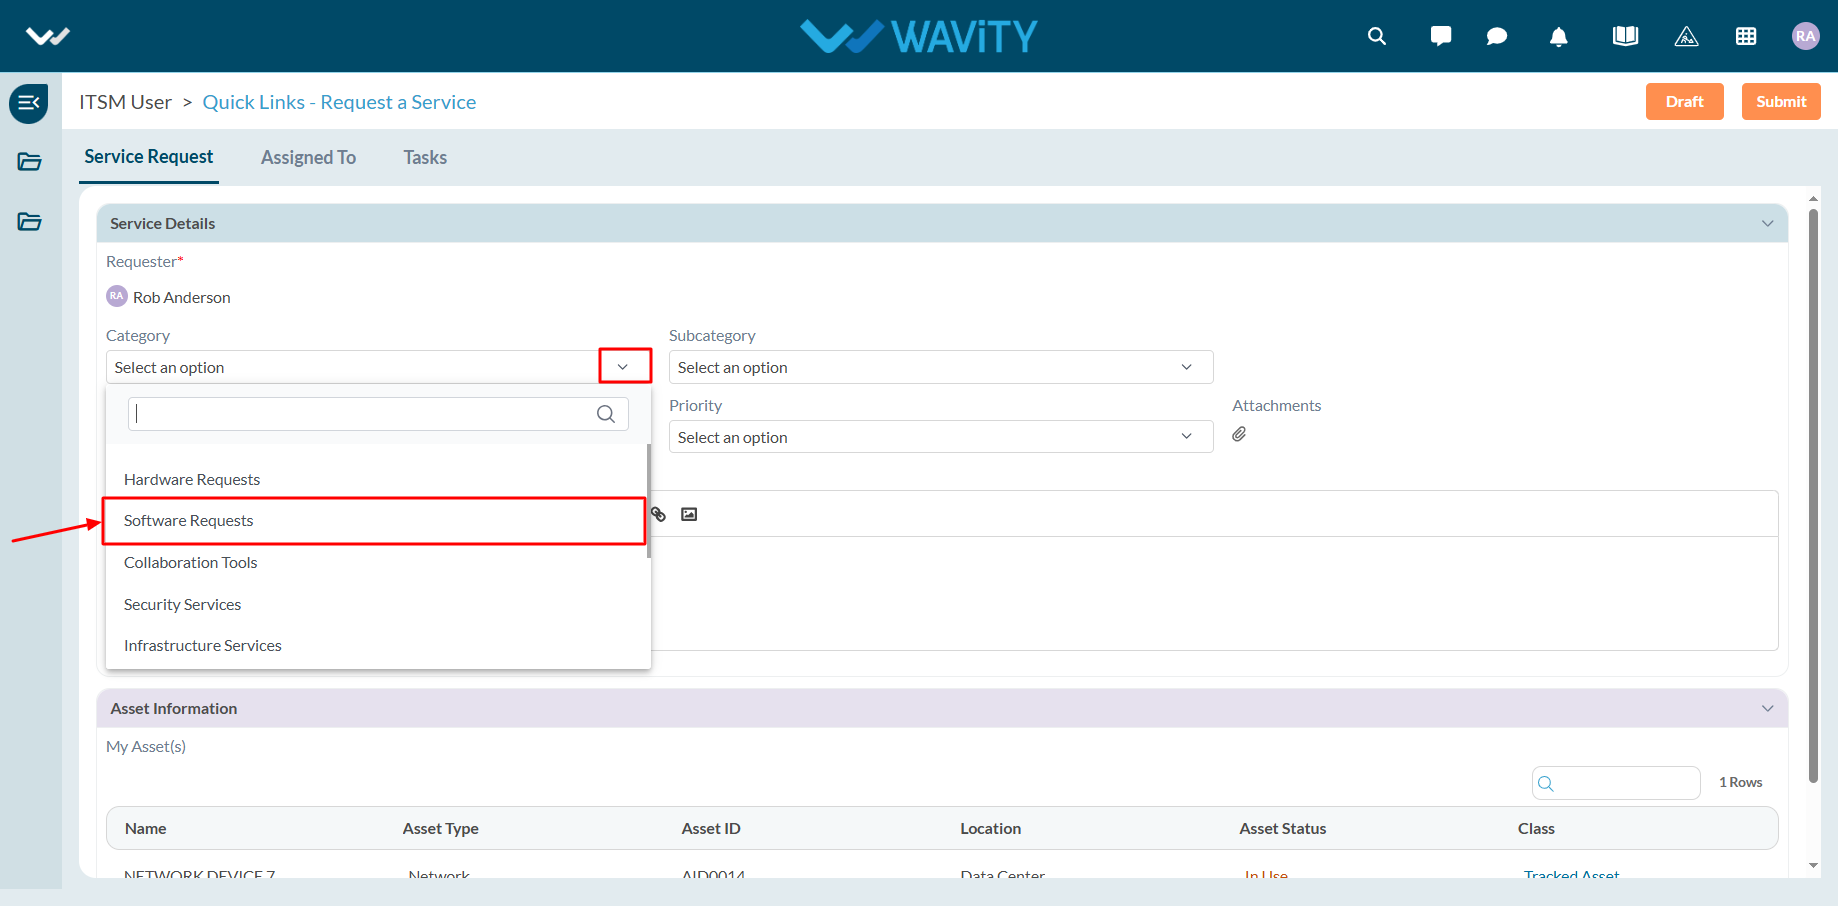
- Select the appropriate Sub-Category for your request.
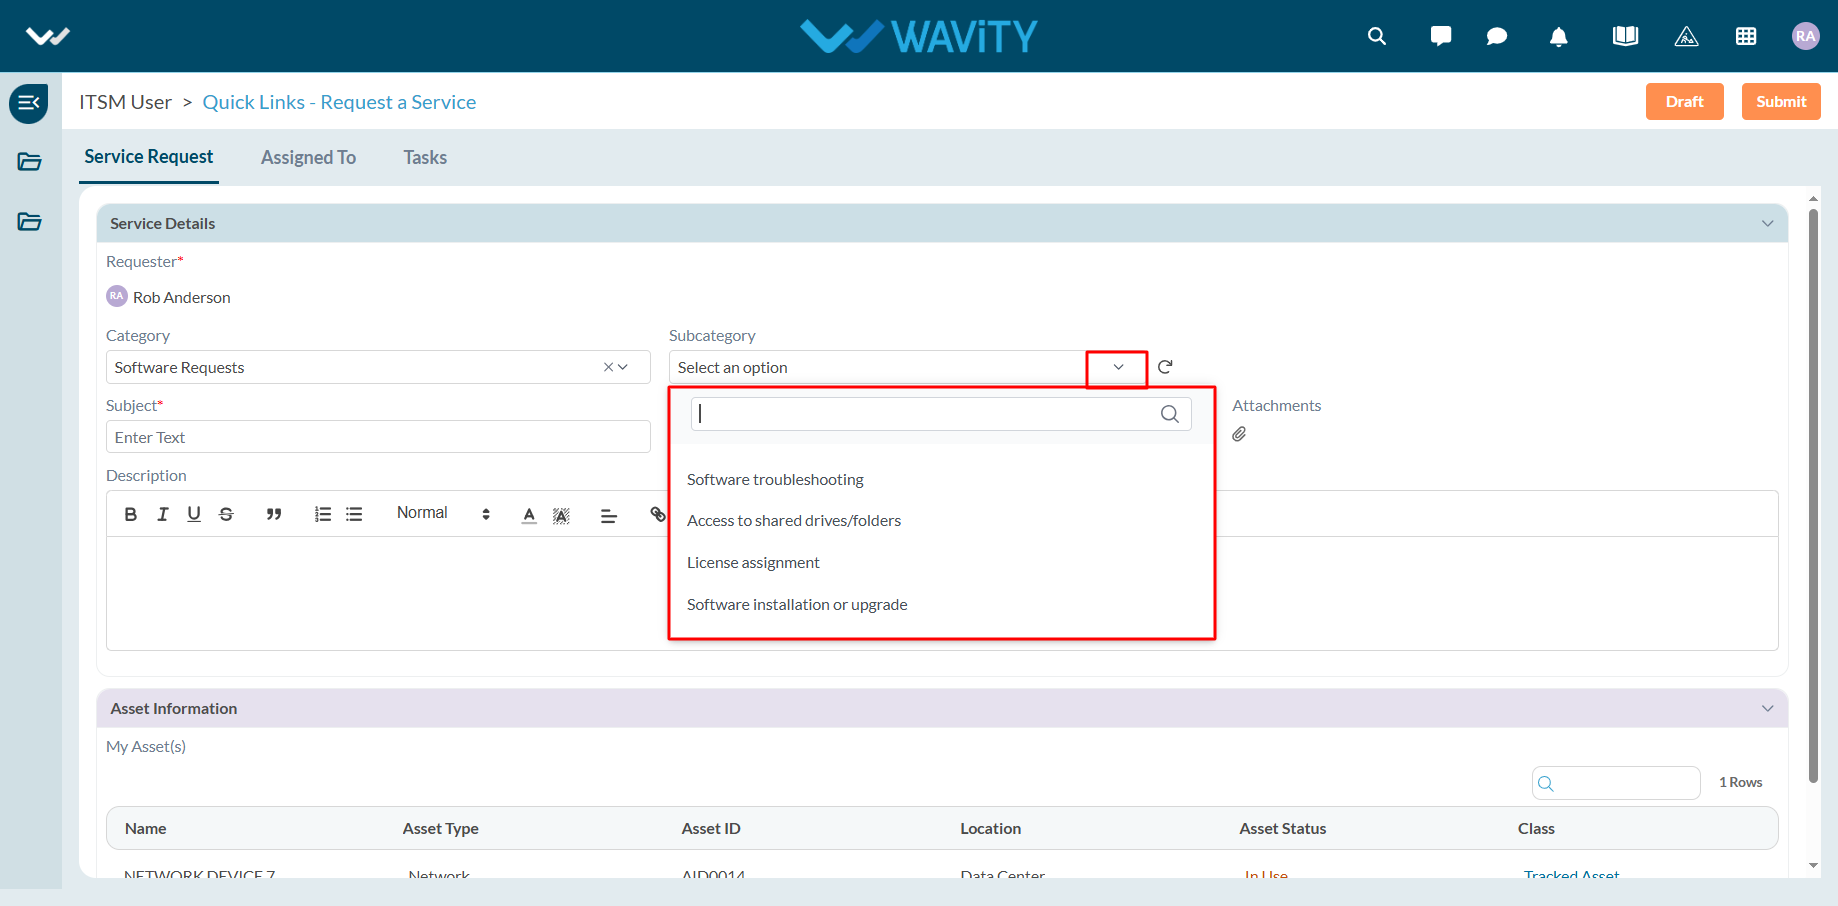
- Enter the Subject and a detailed description of your service request. Attach files if necessary.
- Choose the appropriate Priority level from the dropdown.
- Click Submit to complete the request process.
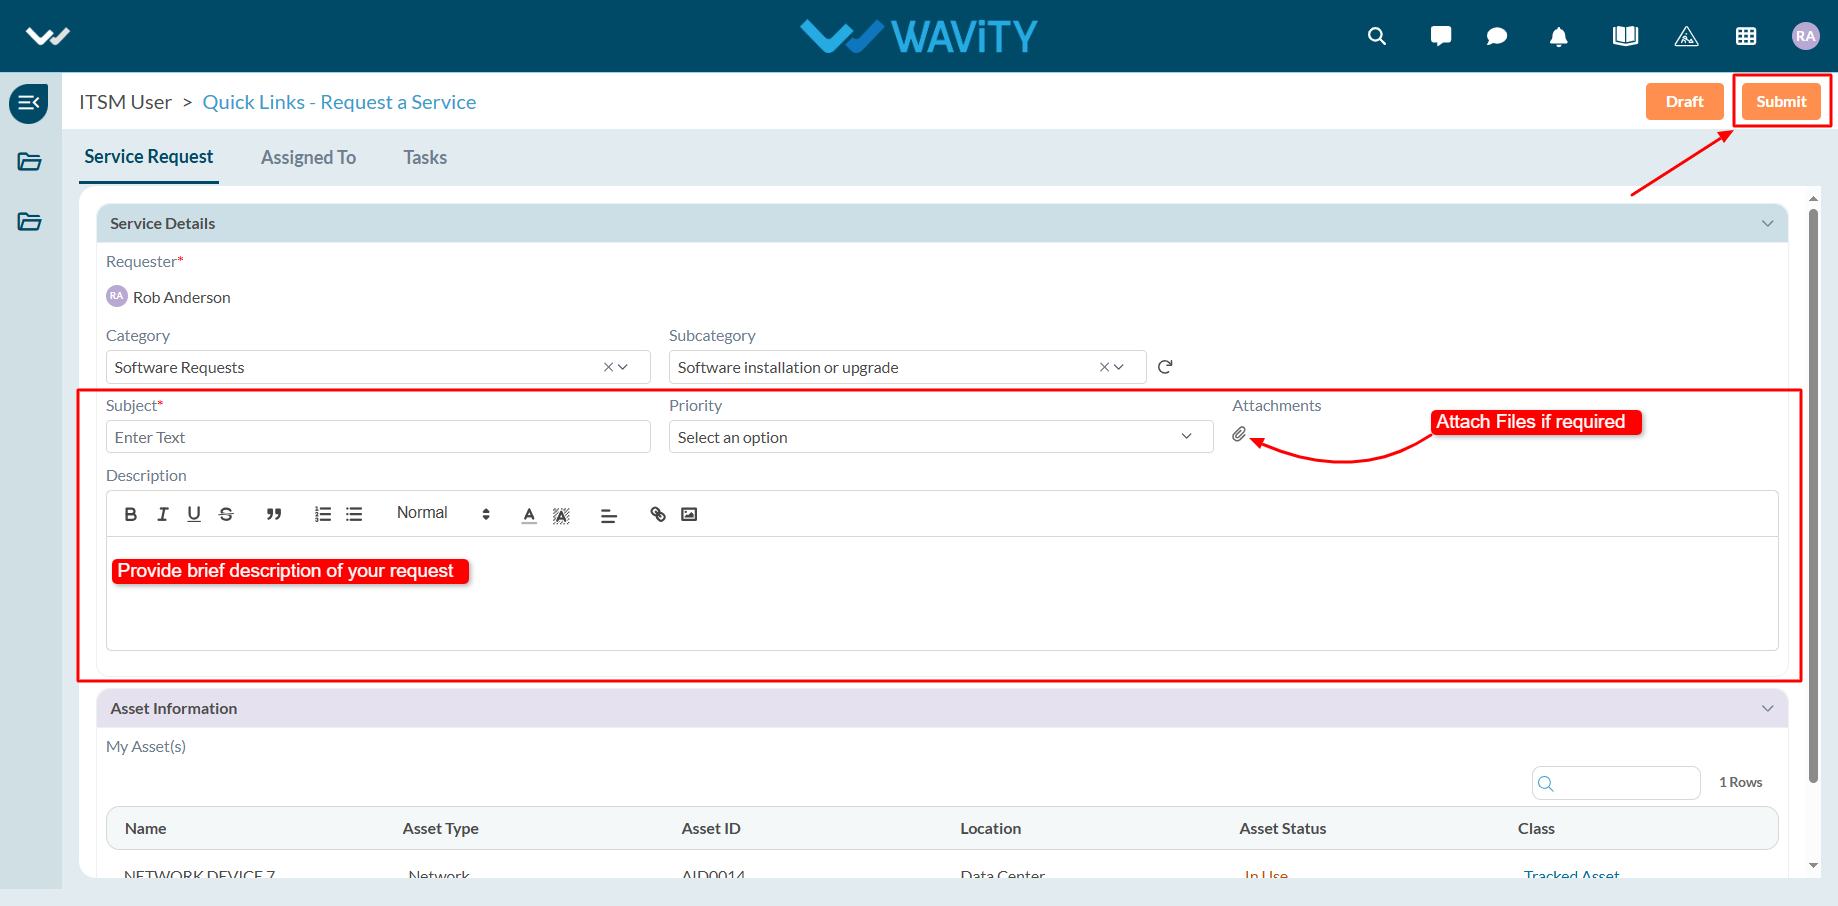
End User Guide: Retrieving Incidents in Wavity
- Retrieving Incidents in Wavity is a simple, user-friendly, and accessible via Wavity Help & ServiceDesk.
- Note: The steps provided below are sample instructions and can be customized to suit specific organizational requirements; however, the core workflow remains consistent.
- Users can log in with their credentials on the Wavity platform, which will direct them to the End User Interface.
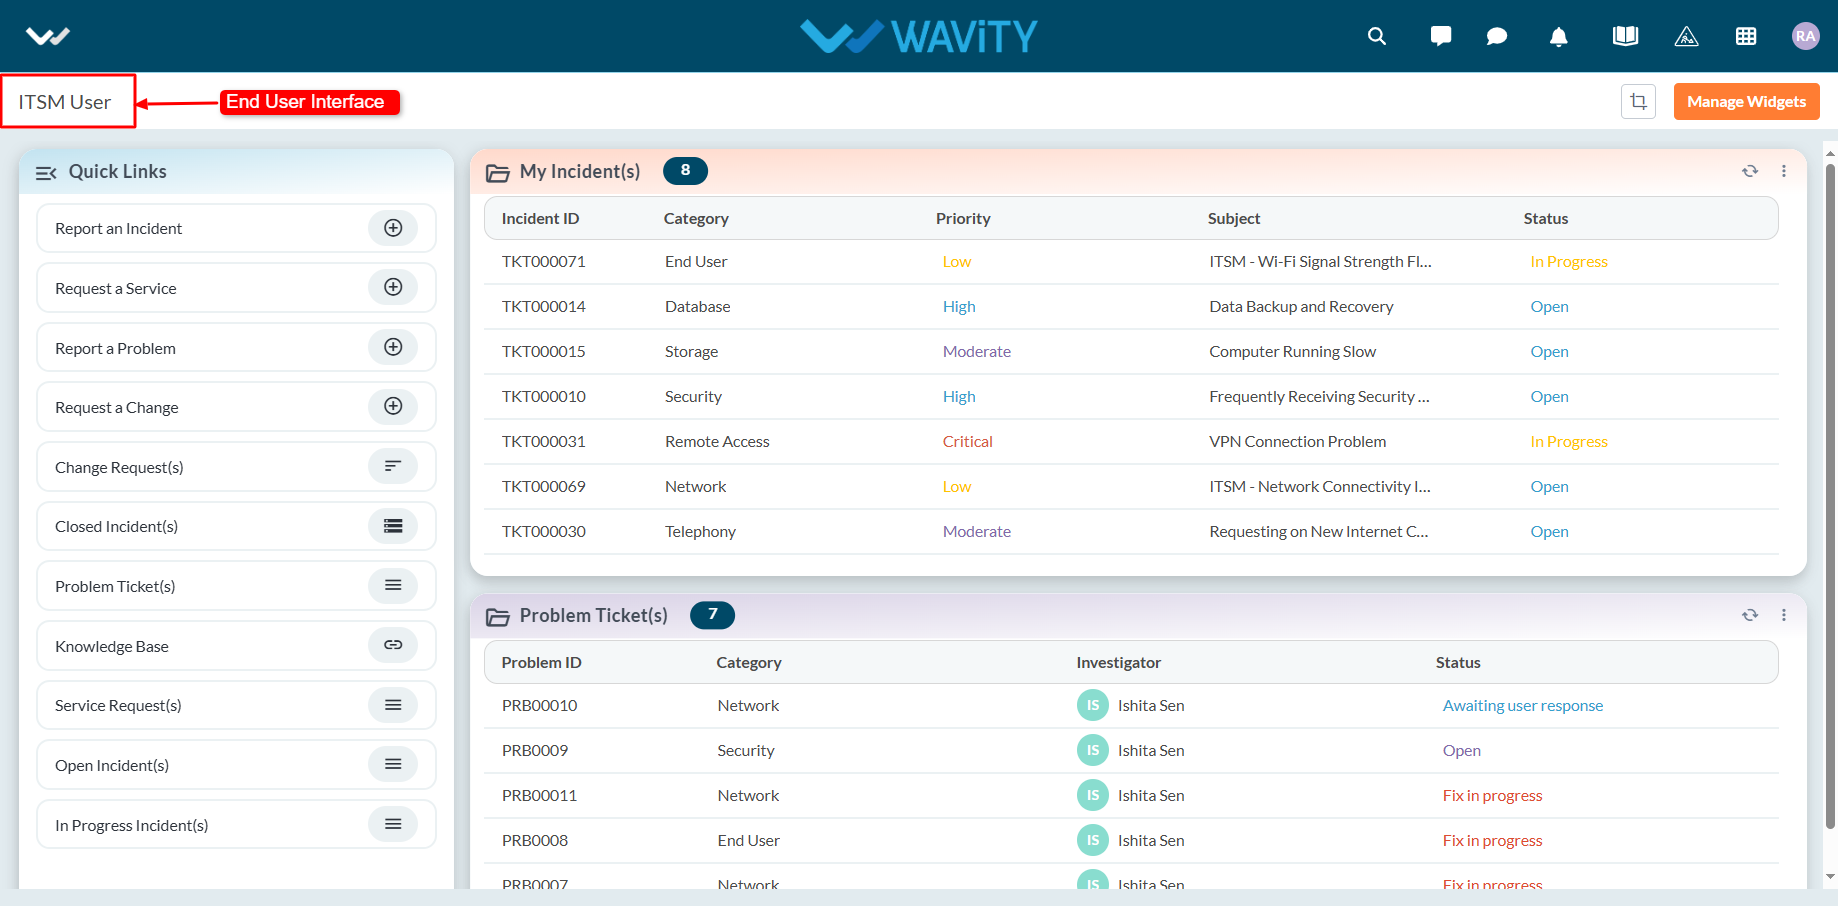
- Click on the ‘My Incidents’ table widget to view all incidents created by you that are not yet closed. Click on any listed incident to view its detailed information.
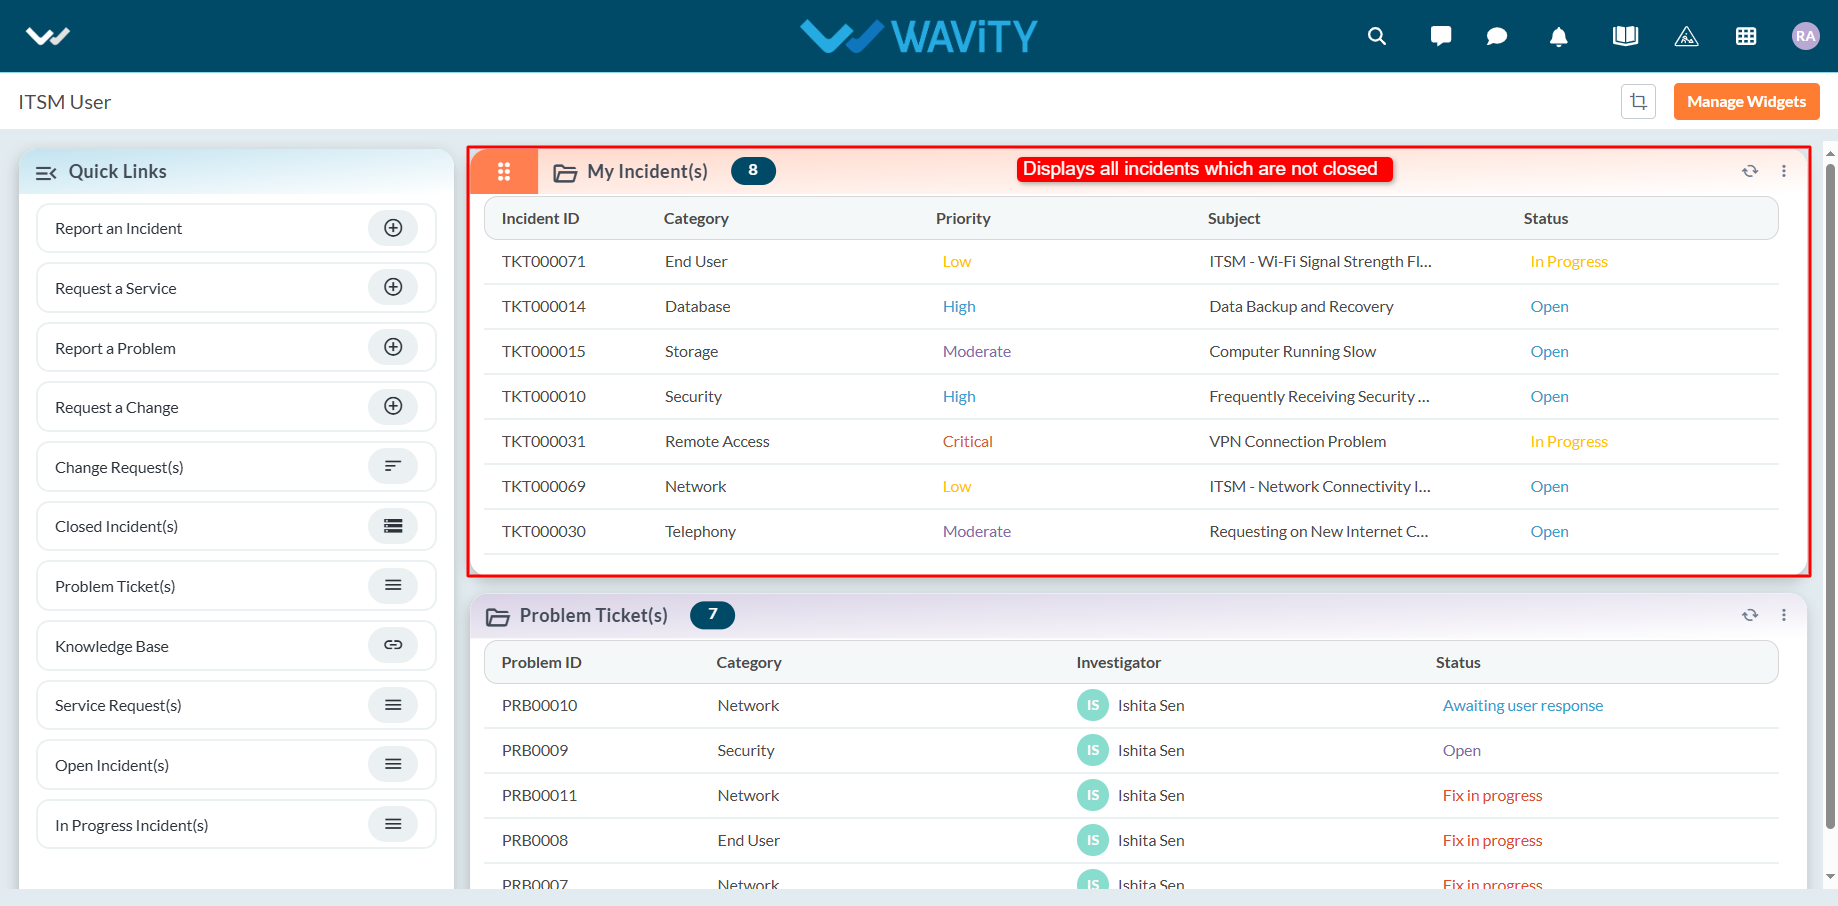
Agent Guide: How to create New SLA in ServiceDesk
- Creating and updating SLAs in the Wavity platform is a simple and intuitive process for agents.
- Note: The steps outlined below serve as general instructions and can be customized to meet specific organizational needs; however, the core workflow remains the same.
- Agents with the appropriate access can log in using their credentials and will be directed to the Agent Interface.
- From the Quick Links widget in the Agent Interface, click on SLA.
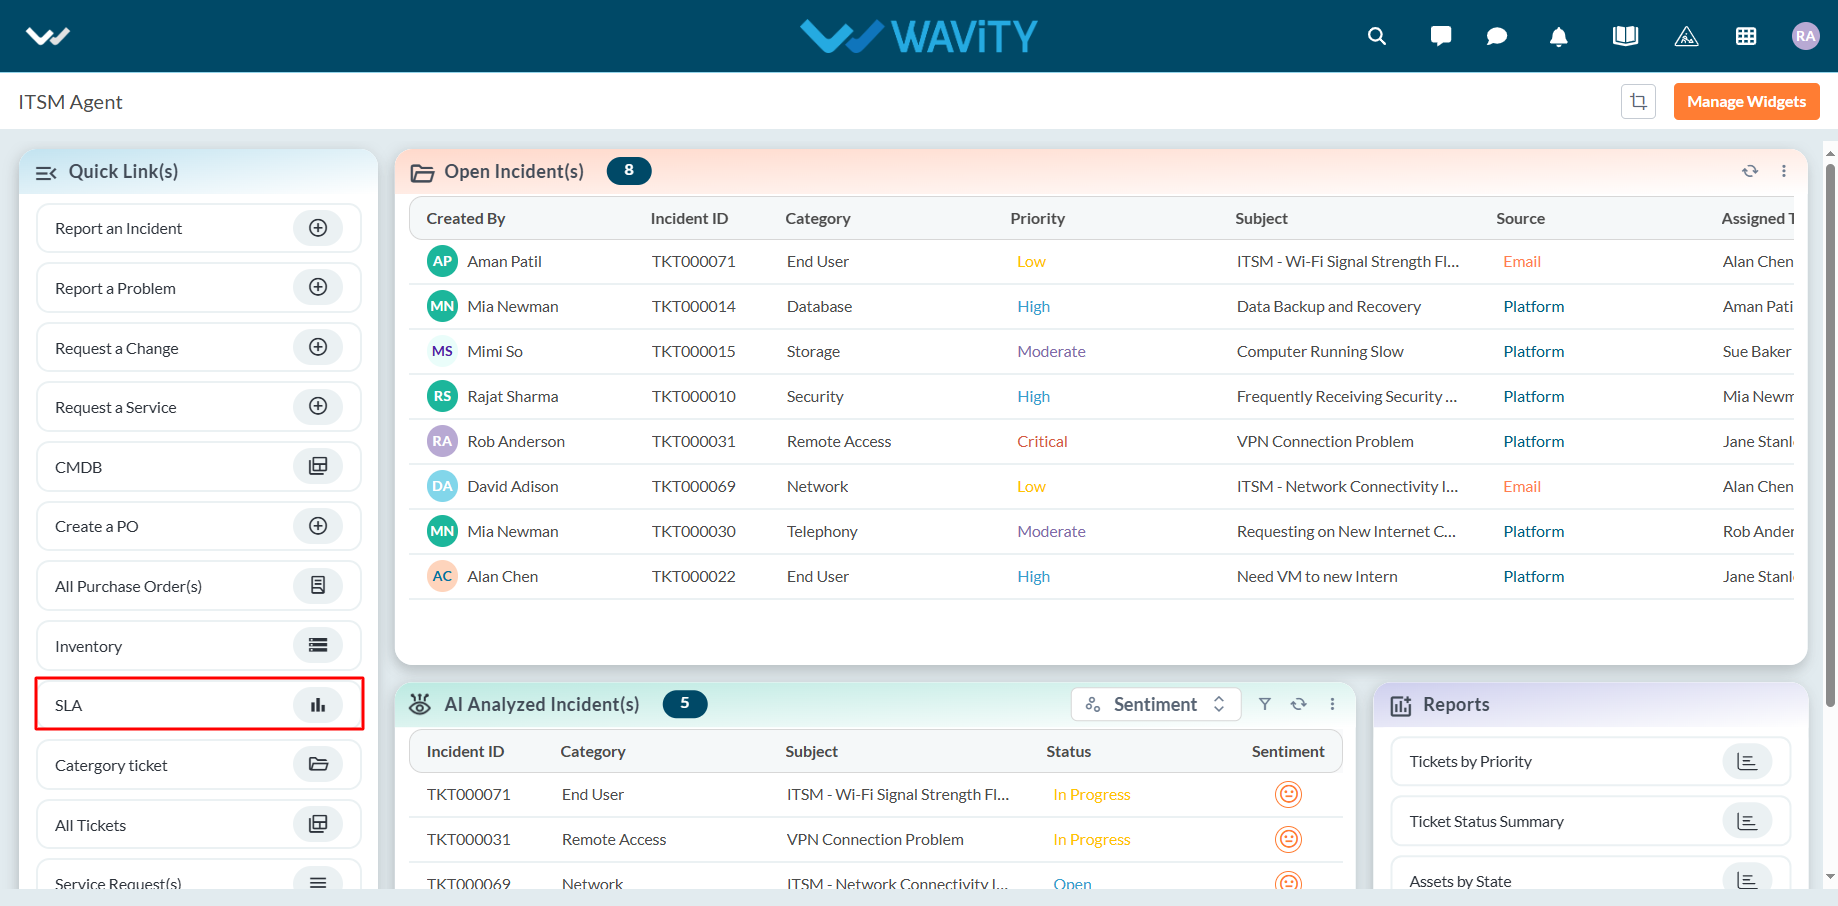
- Click on New Record to begin creating a new SLA.
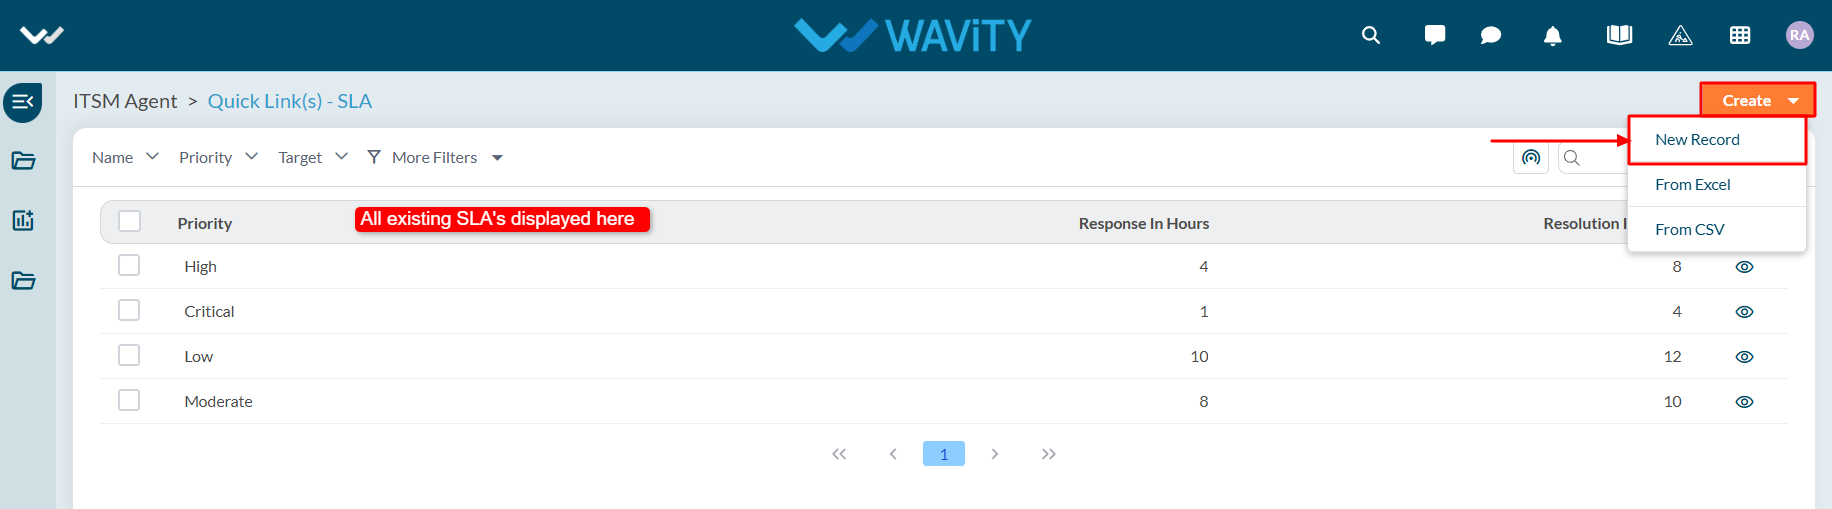
- Enter the necessary SLA details, including Response Time and Resolution Time. Click Save to complete the process.
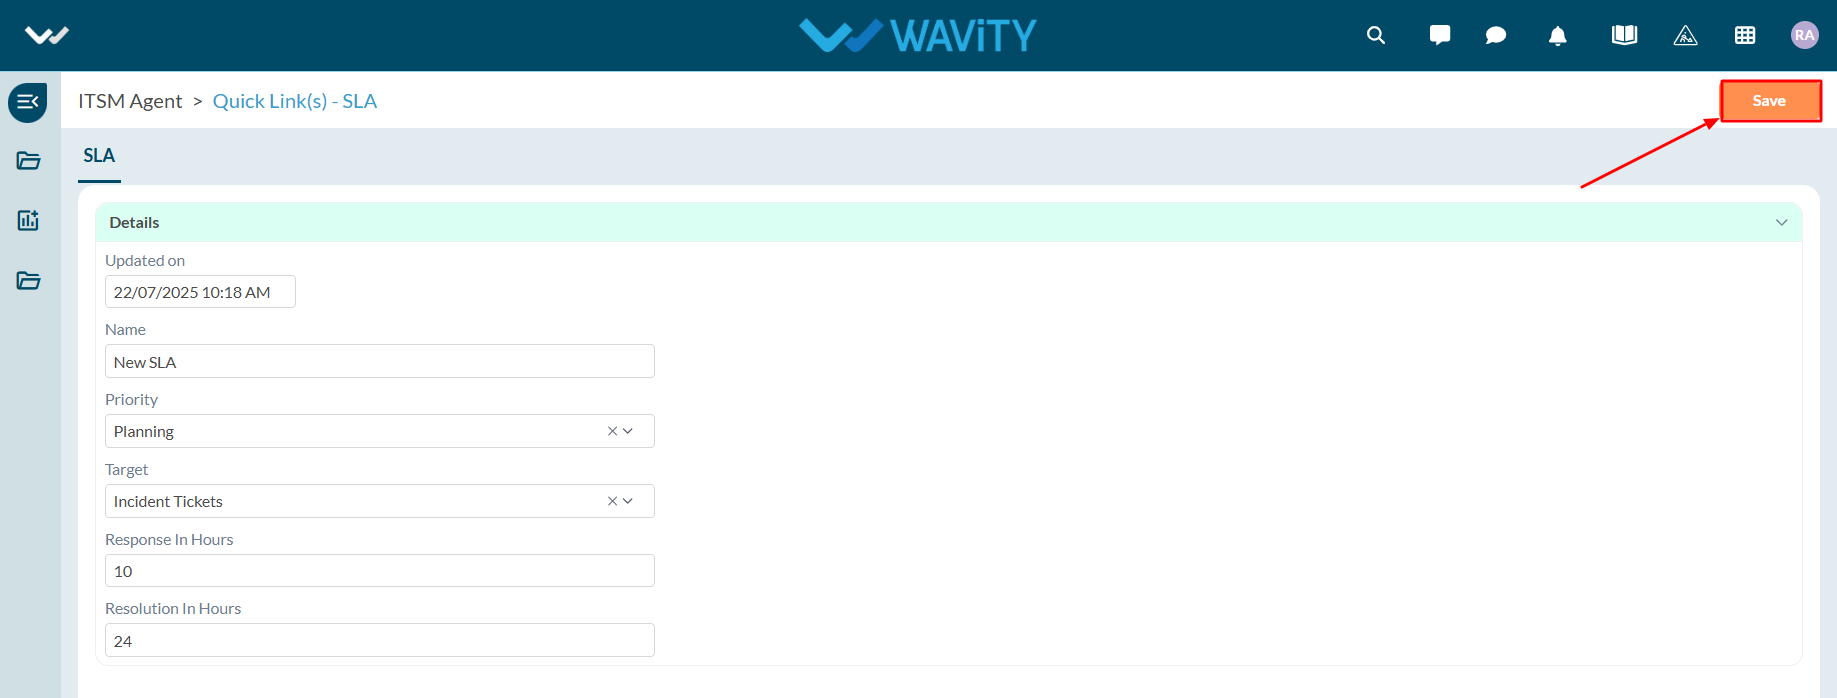
Agent Guide: How to update an existing SLA in ServiceDesk
- Creating and updating SLAs in the Wavity platform is a simple and intuitive process for agents.
- Note: The steps outlined below serve as general instructions and can be customized to meet specific organizational needs; however, the core workflow remains the same.
- Agents with the appropriate access can log in using their credentials and will be directed to the Agent Interface.
- From the Quick Links widget in the Agent Interface, click on SLA.
- All existing SLAs will be displayed in a list format. Click on the SLA you wish to update.
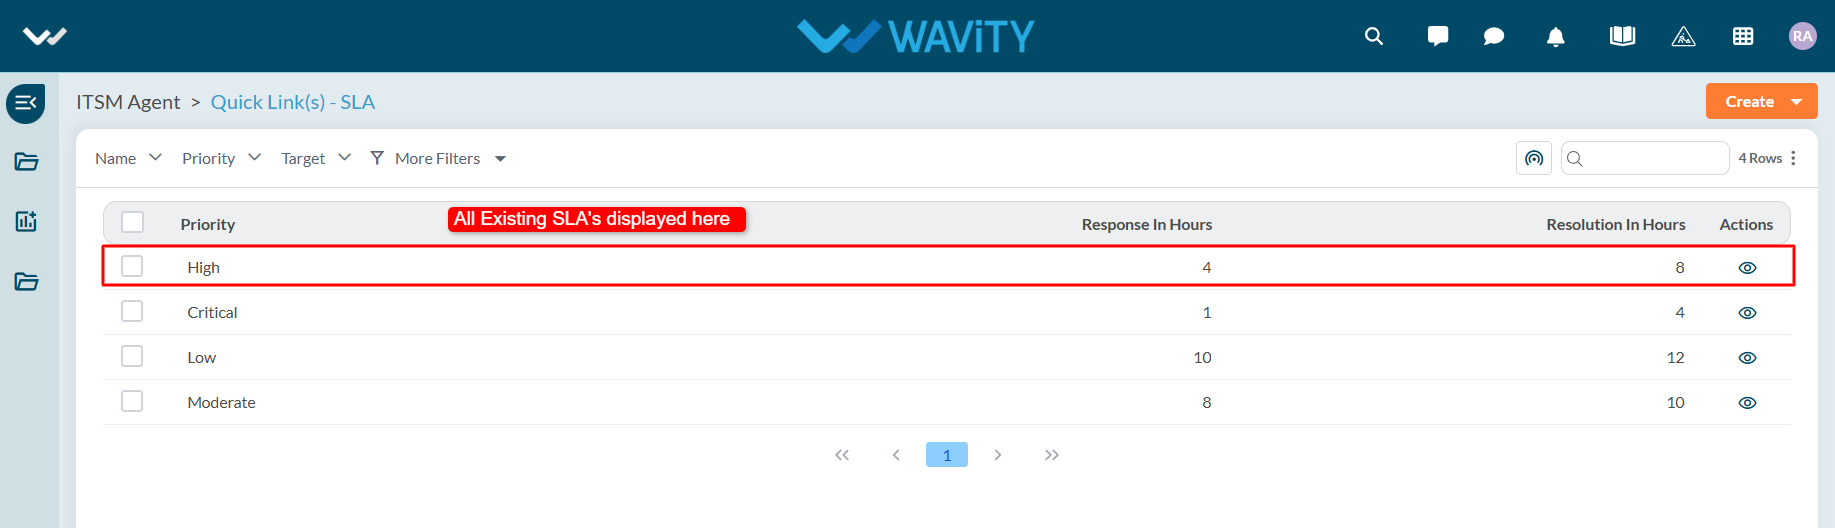
- Make the necessary changes to the SLA details, including Response Time and Resolution Time. Click Save to complete the update process.
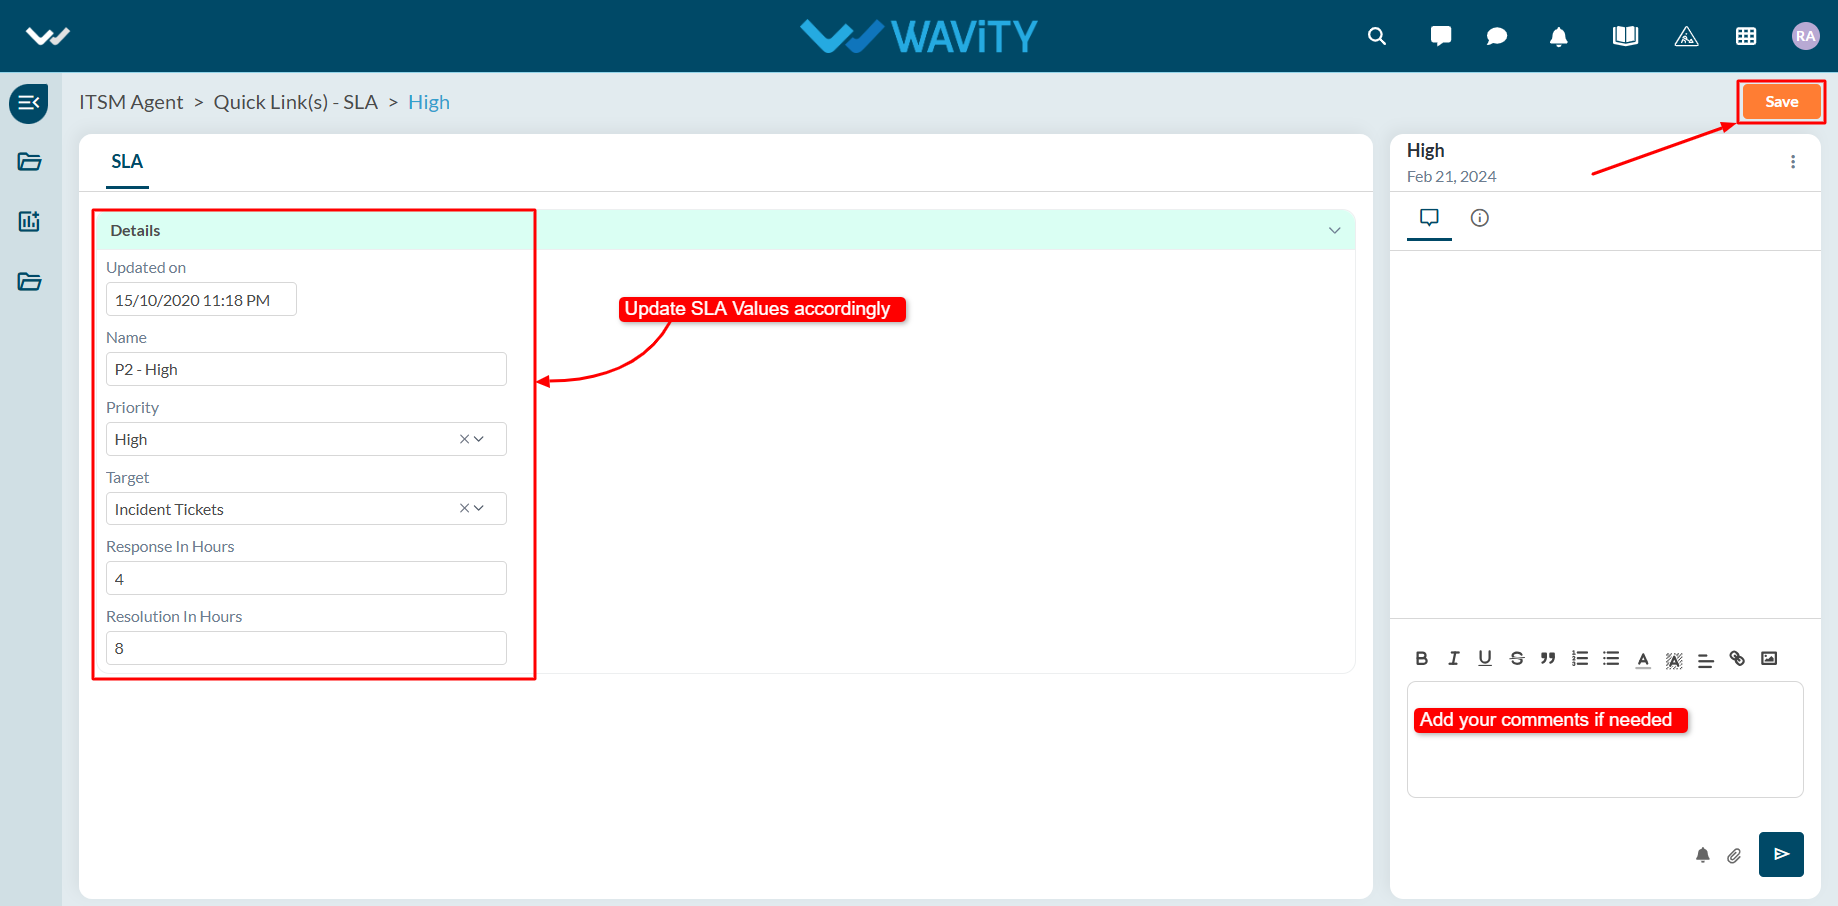
Agent Guide: How to Clone an Incident
- In the Wavity platform, handling and updating incidents as an agent is a simple and intuitive process.
- Note: The steps outlined below serve as general instructions and can be fully customized to meet specific organizational needs; however, the core workflow remains the same.
- Agents with the appropriate access can log in using their credentials and will be directed to the Agent Interface.
- From the Agent Interface, Click on any of the open incidents.
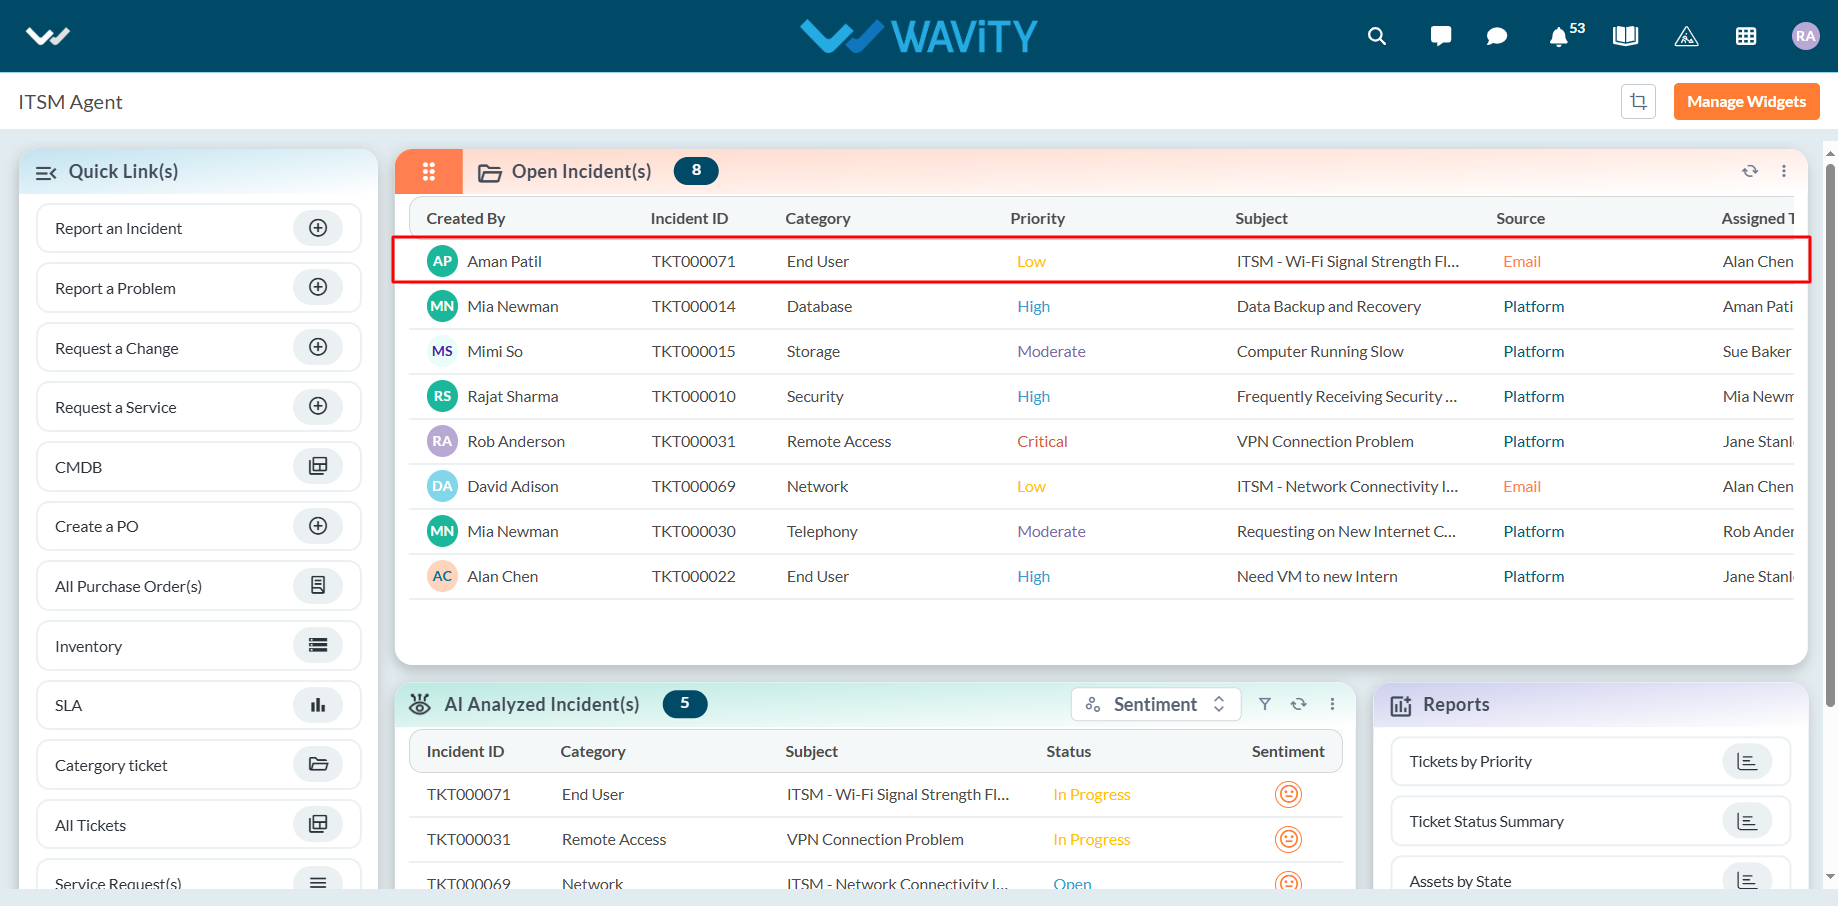
- Click on the three dots (⋮) in the top-right corner of the incident view.
- From the dropdown menu, select the clone option.
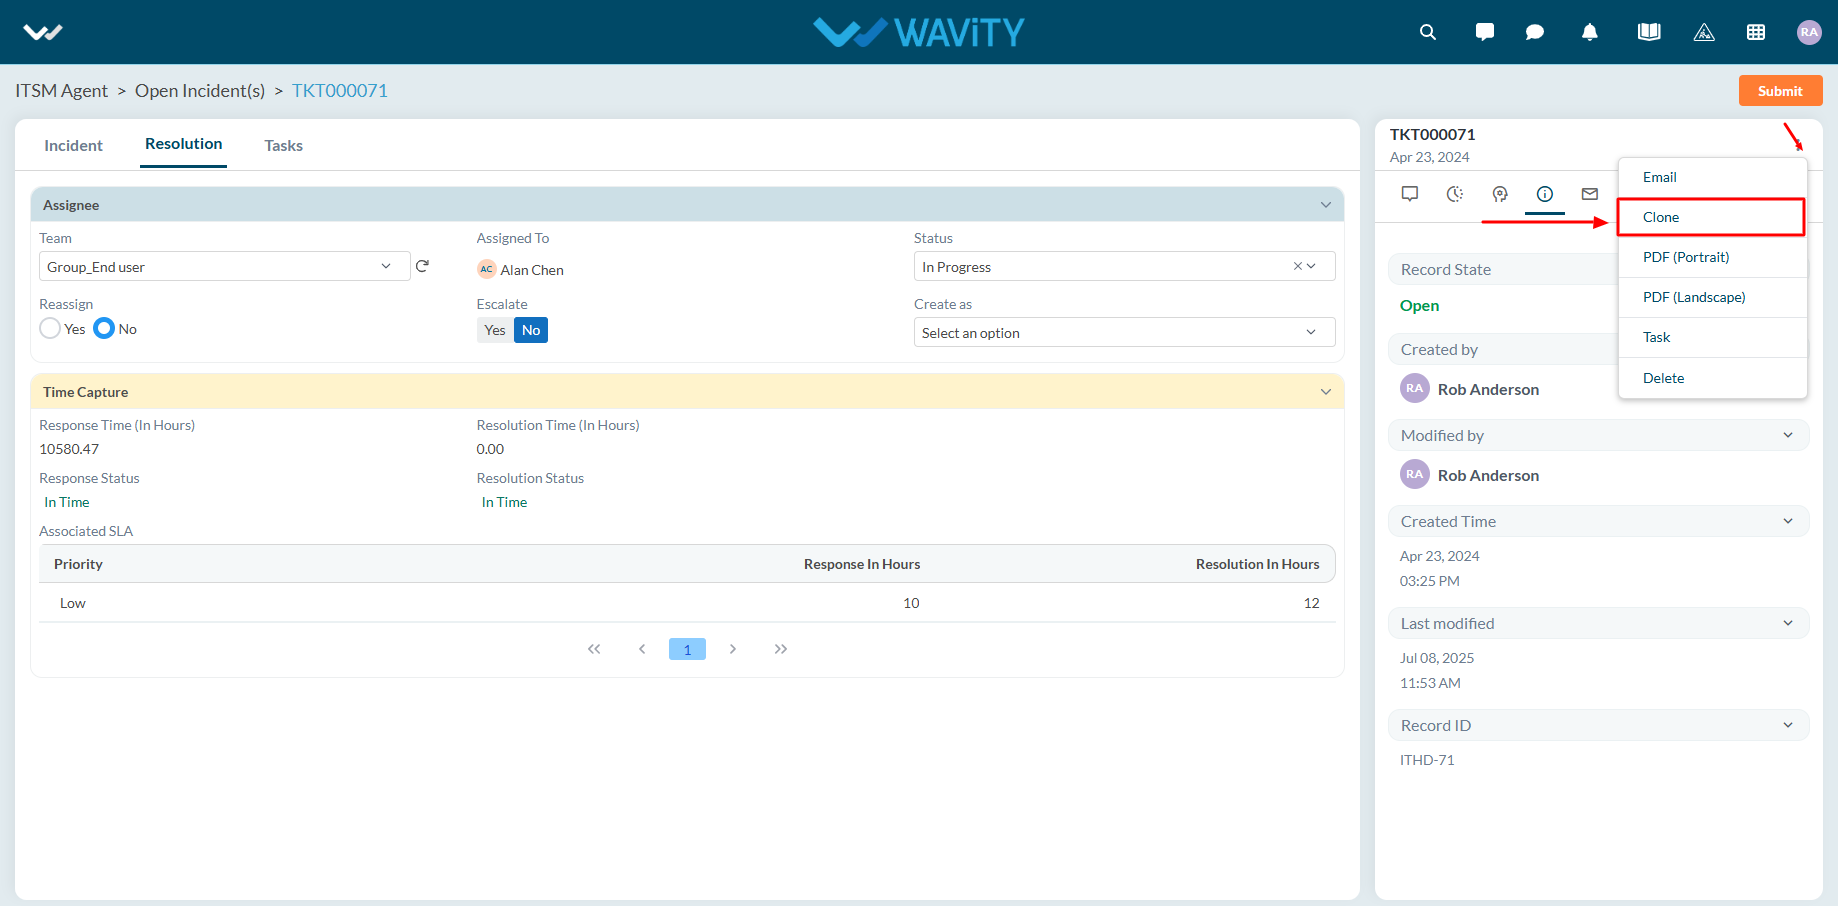
- A pop-up window will appear where you can make necessary changes to create a new incident using clone feature.
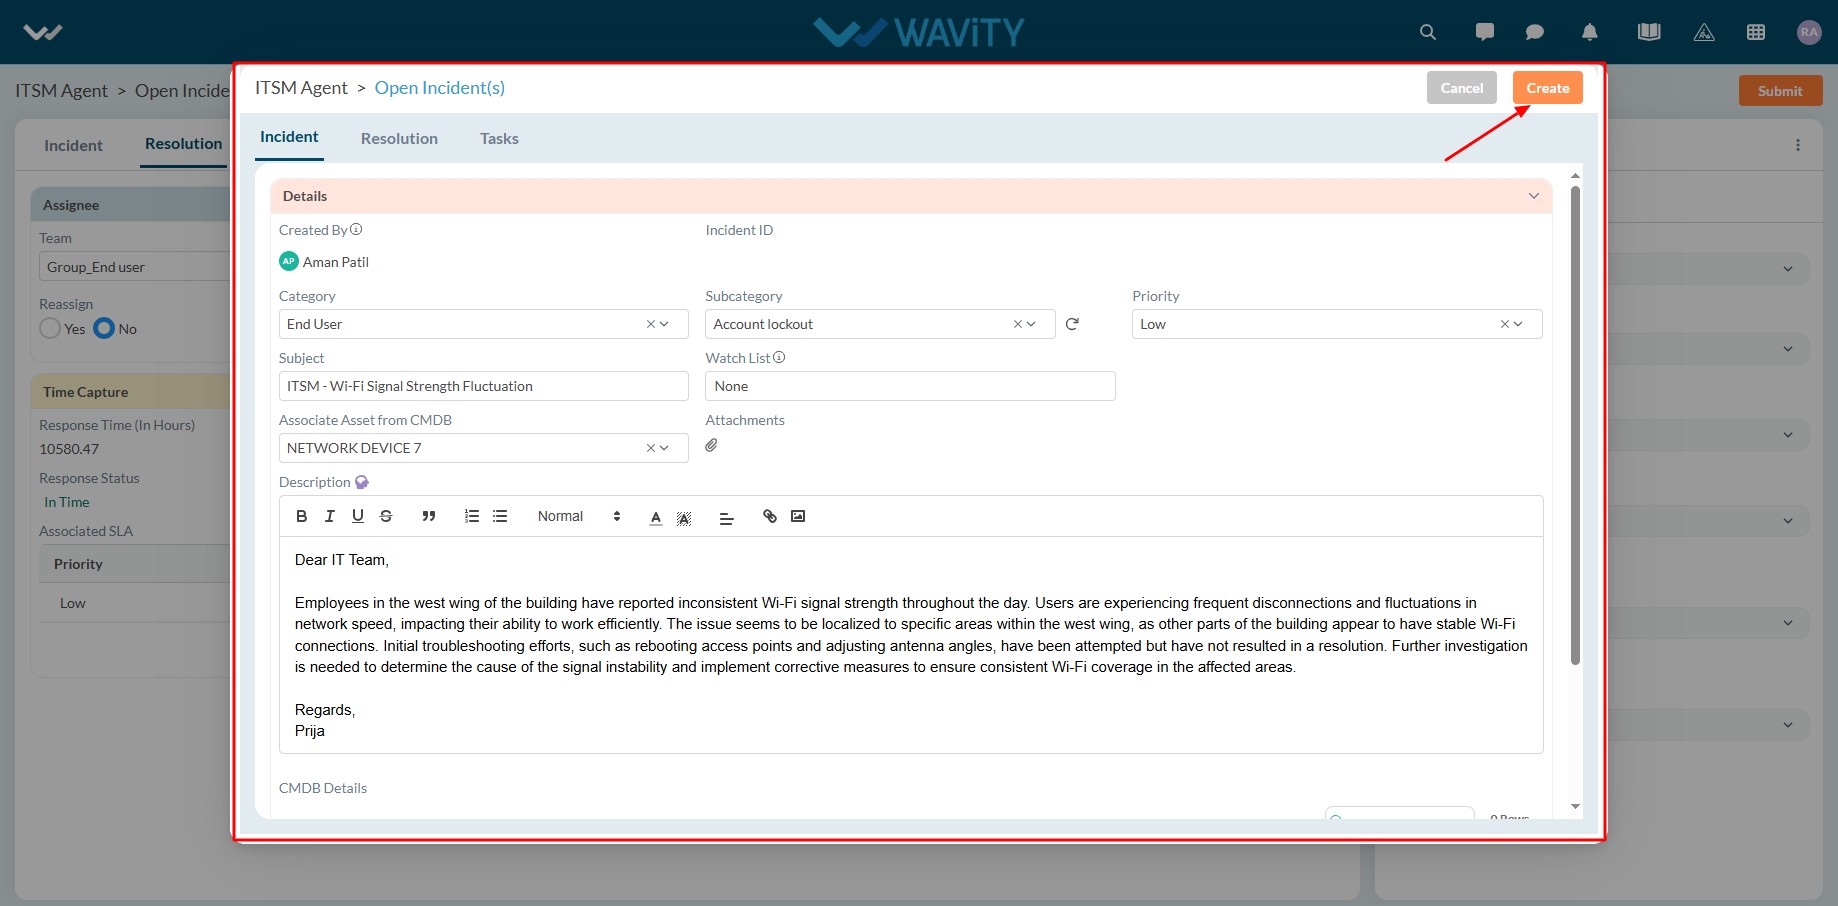
Agent Guide: How to send Incident details through email
- In the Wavity platform, handling and updating incidents as an agent is a simple and intuitive process.
- Note: The steps outlined below serve as general instructions and can be fully customized to meet specific organizational needs; however, the core workflow remains the same.
- Agents with the appropriate access can log in using their credentials and will be directed to the Agent Interface.
- From the Agent Interface, Click on any of the open incidents.
- Click on the three dots (⋮) in the top-right corner of the incident view.
- From the dropdown menu, select the email option. A pop-up window will appear where you can enter the email address of the recipient to send the incident details via email.
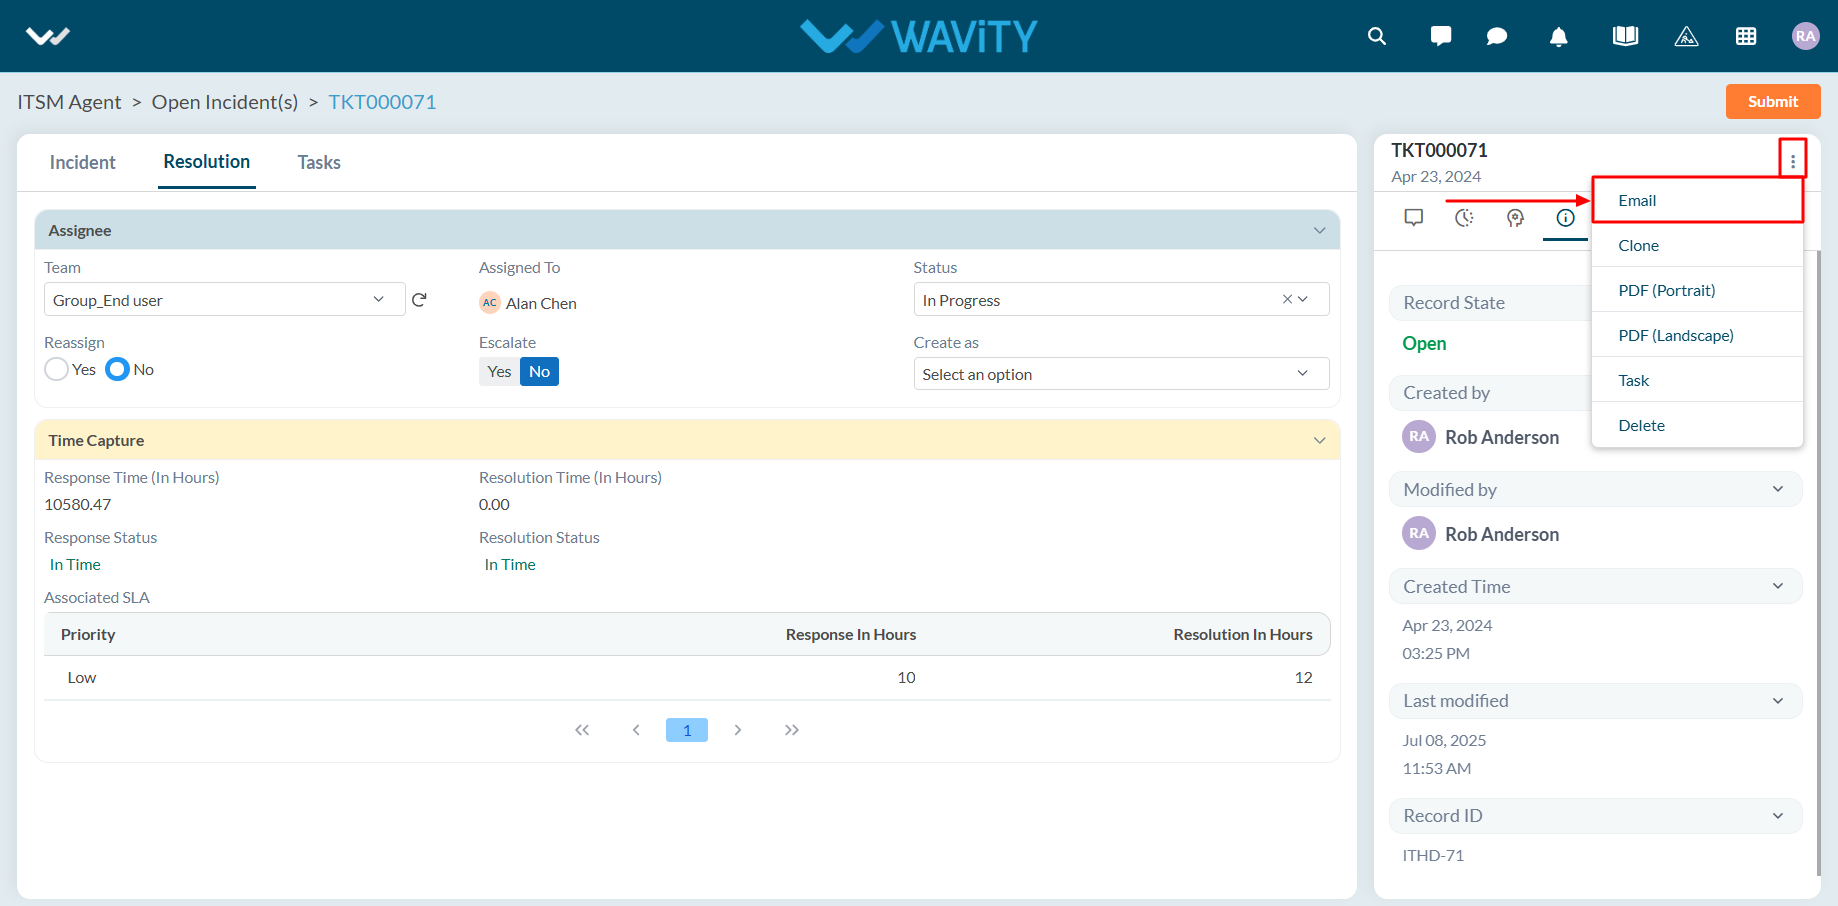
How to Update Employee Directory
- In the Wavity platform, updating employee directory is a simple and intuitive process. It can be done automatically through the SCIM process or manually by an Admin, Manager, or HR, depending on organizational policy.
- Note: The steps outlined below serve as general instructions and can be fully customized to meet specific organizational needs; however, the core workflow remains the same.
- Managers or HR personnel with the appropriate access must log in using their credentials to access the Manager/HR Interface.
- Click on Employee Directory from the Quick Links in your interface.
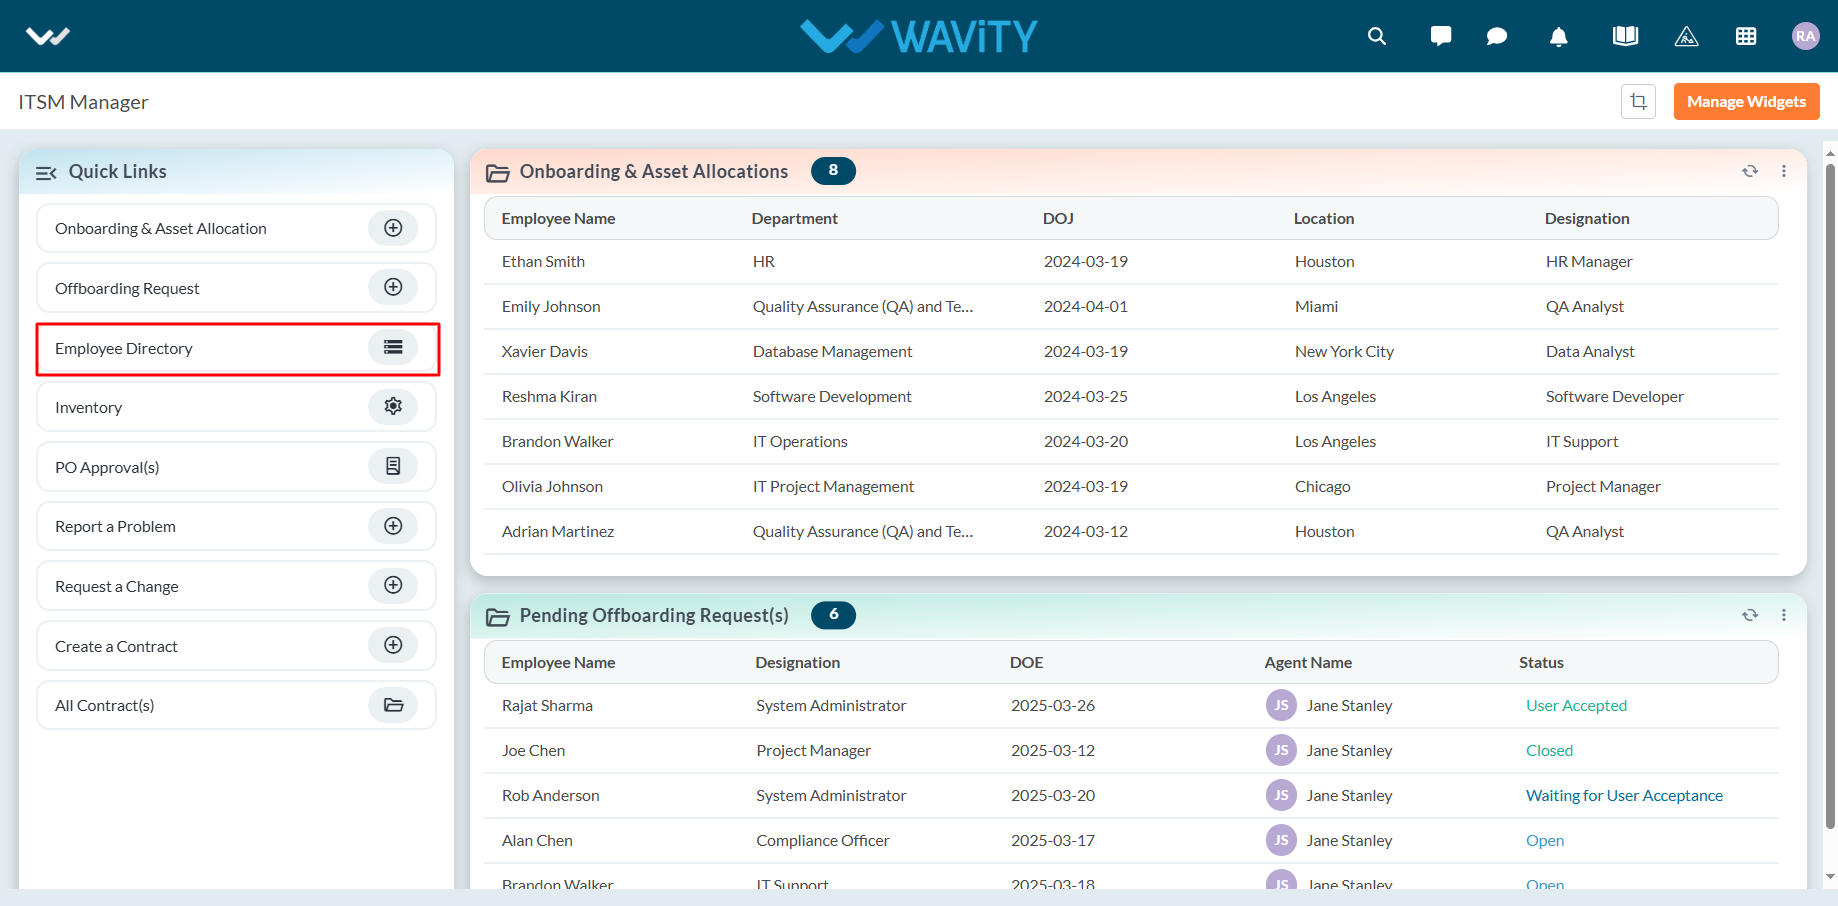
- Click on the employee whose information you wish to update.
- Make the necessary updates to the employee’s information. Click Save to apply and update the changes.
How Managers can Approve or Reject a Request
- In the Wavity platform, Approval process can be customized based on your organizational policy.
- Note: The steps outlined below serve as general instructions and can be fully customized to meet specific organizational needs; however, the core workflow remains the same.
- Managers personnel with the appropriate access shall log in using their credentials to access the Manager Interface.
- Click on PO approvals from the Quick Links in your interface.
- Select the request you wish to approve or reject.
- Make the necessary changes to the approval status. Click Submit to apply and update the changes.
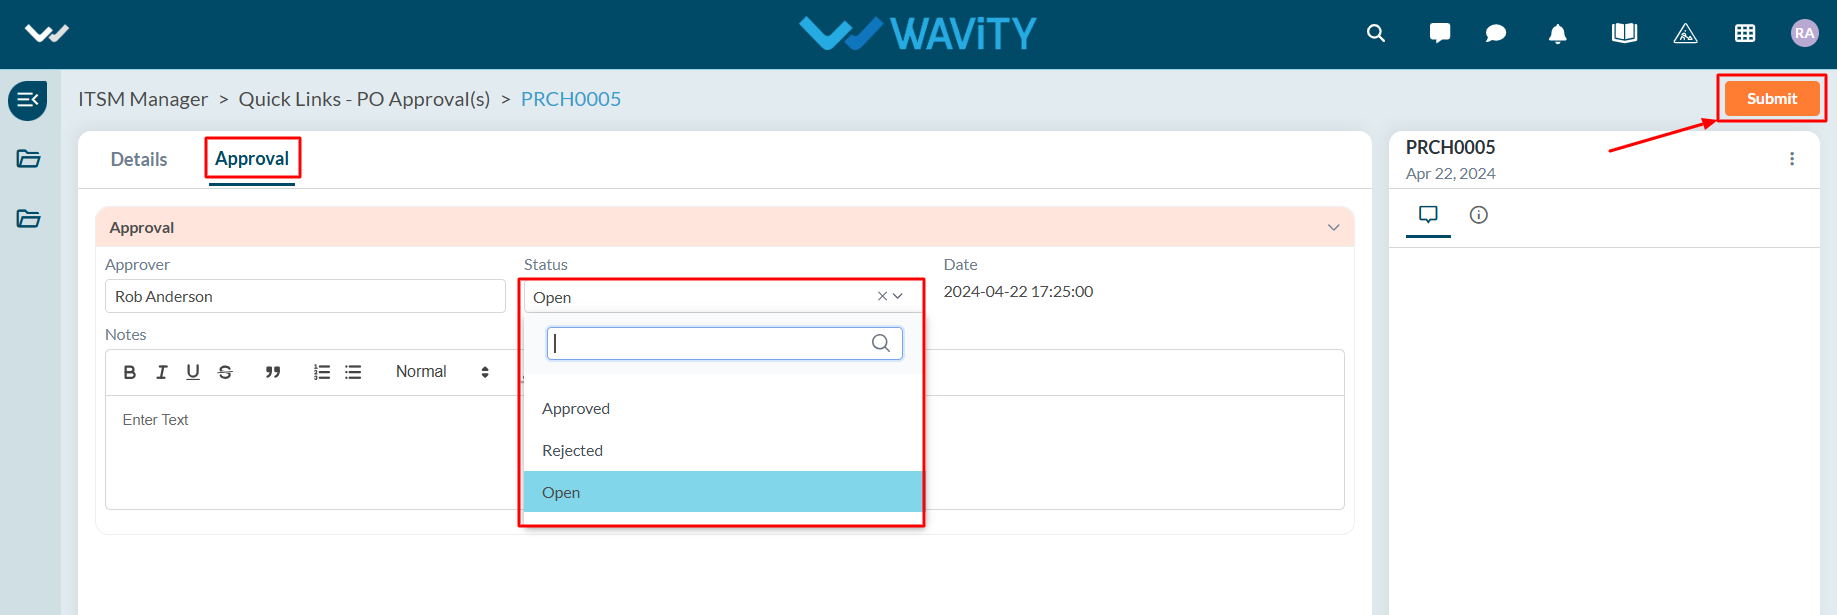
Agent Guide: How to Update the Status of an Incident
- In the Wavity platform, handling and updating incidents as an agent is a simple and intuitive process.
- Note: The steps outlined below serve as general instructions and can be customized to meet specific organizational needs; however, the core workflow remains the same.
- Agents with the appropriate access can log in using their credentials and will be directed to the Agent Interface.
- From the Agent Interface, Click on any open incidents to update the status.
- In the Resolution section of the incident:
- Select the desired status from the dropdown menu.
- Click Submit to save the changes.
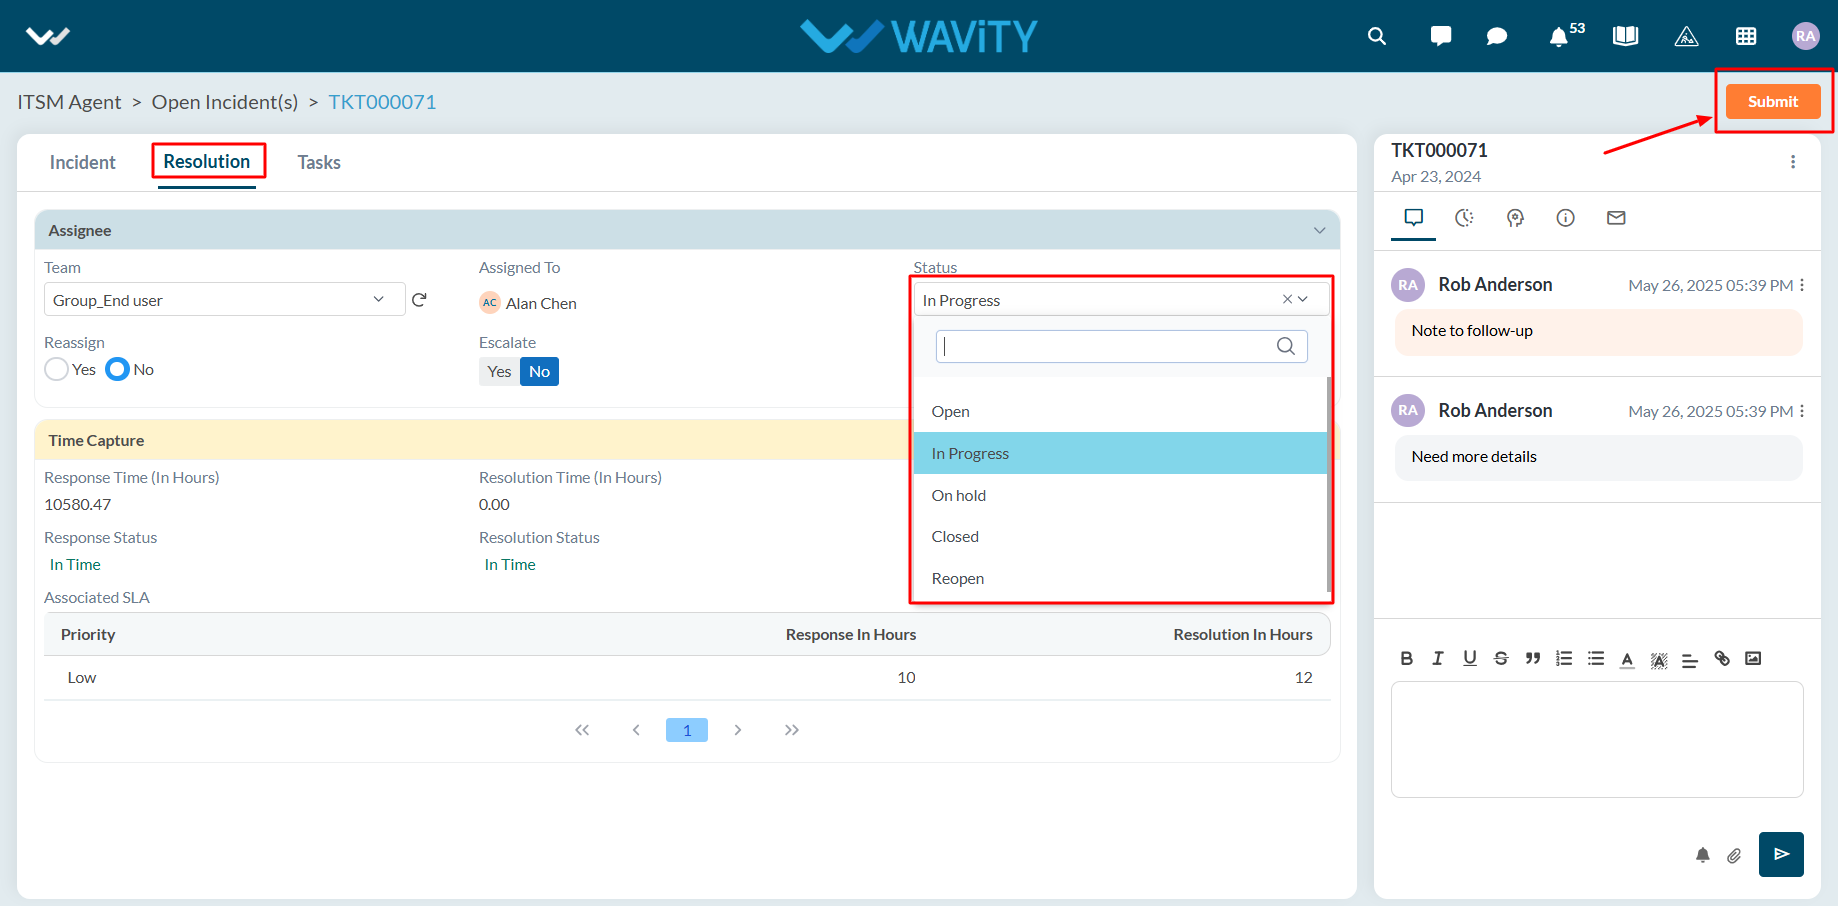
Agent Guide: How to Re-Assign an Incident
- In the Wavity platform, handling and updating incidents as an agent is a simple and intuitive process.
- Note: The steps outlined below serve as general instructions and can be customized to meet specific organizational needs; however, the core workflow remains the same.
- Agents with the appropriate access can log in using their credentials and will be directed to the Agent Interface.
- From the Agent Interface, Click on any of the open incidents.
- In the Resolution section of the incident: Click on Yes to re-assign the incident.
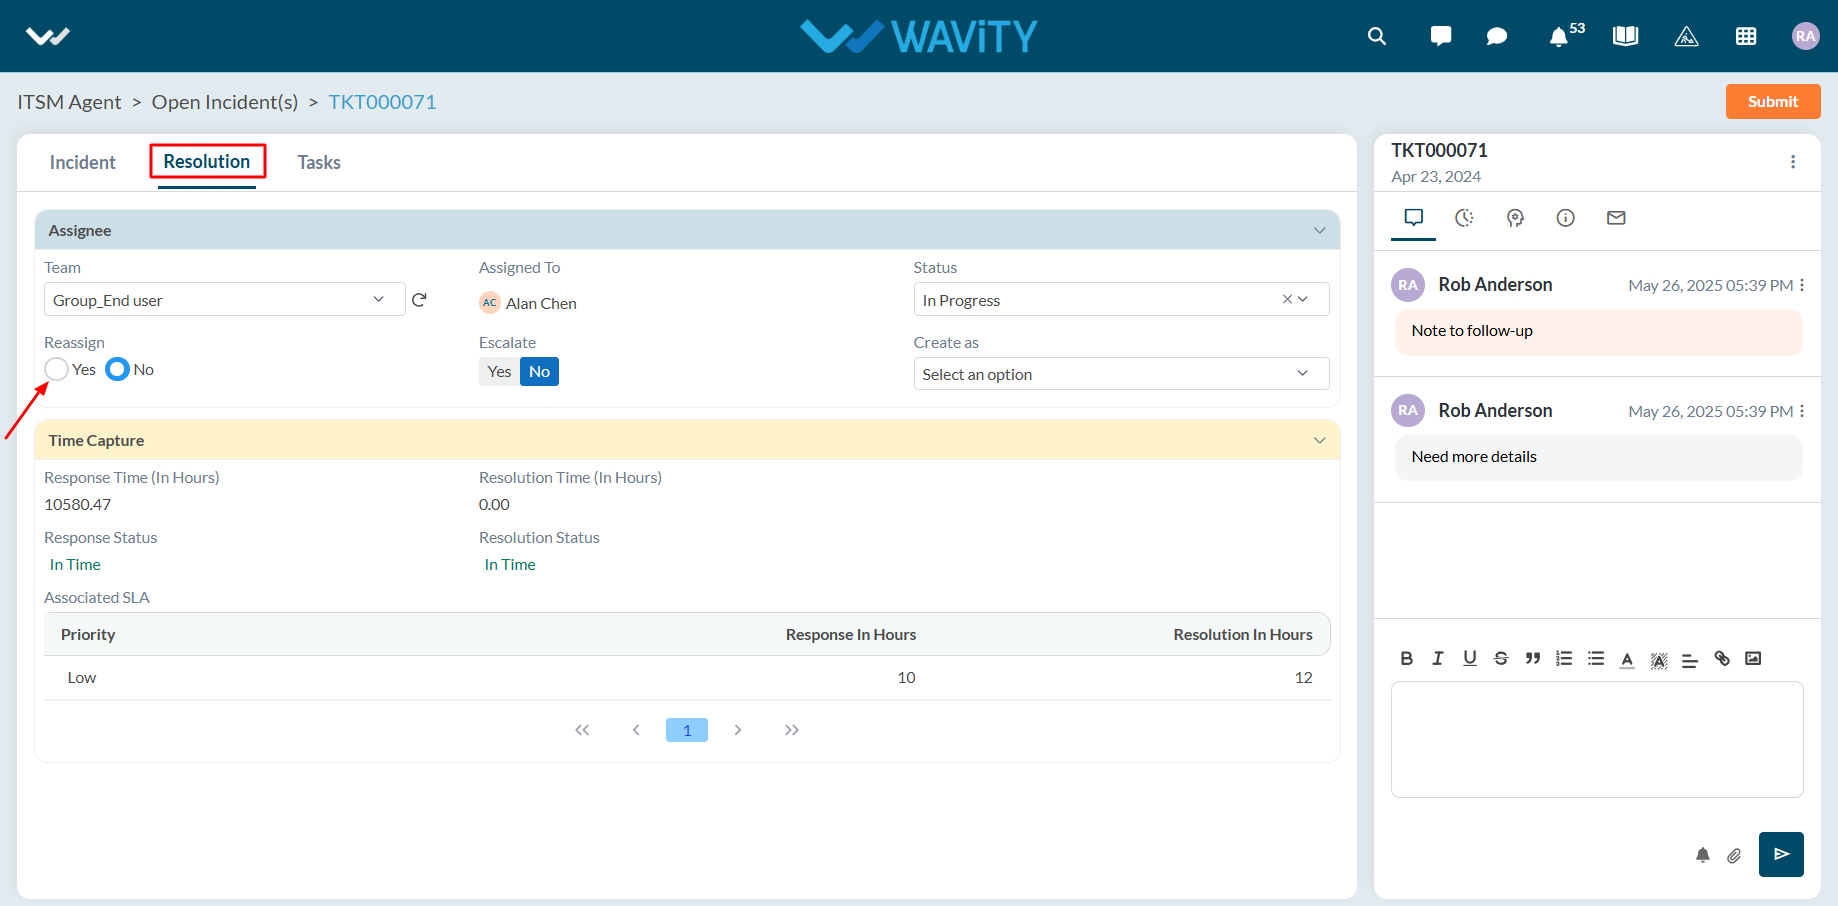
- A new input section will appear. Choose the agent to whom the incident should be re-assigned.
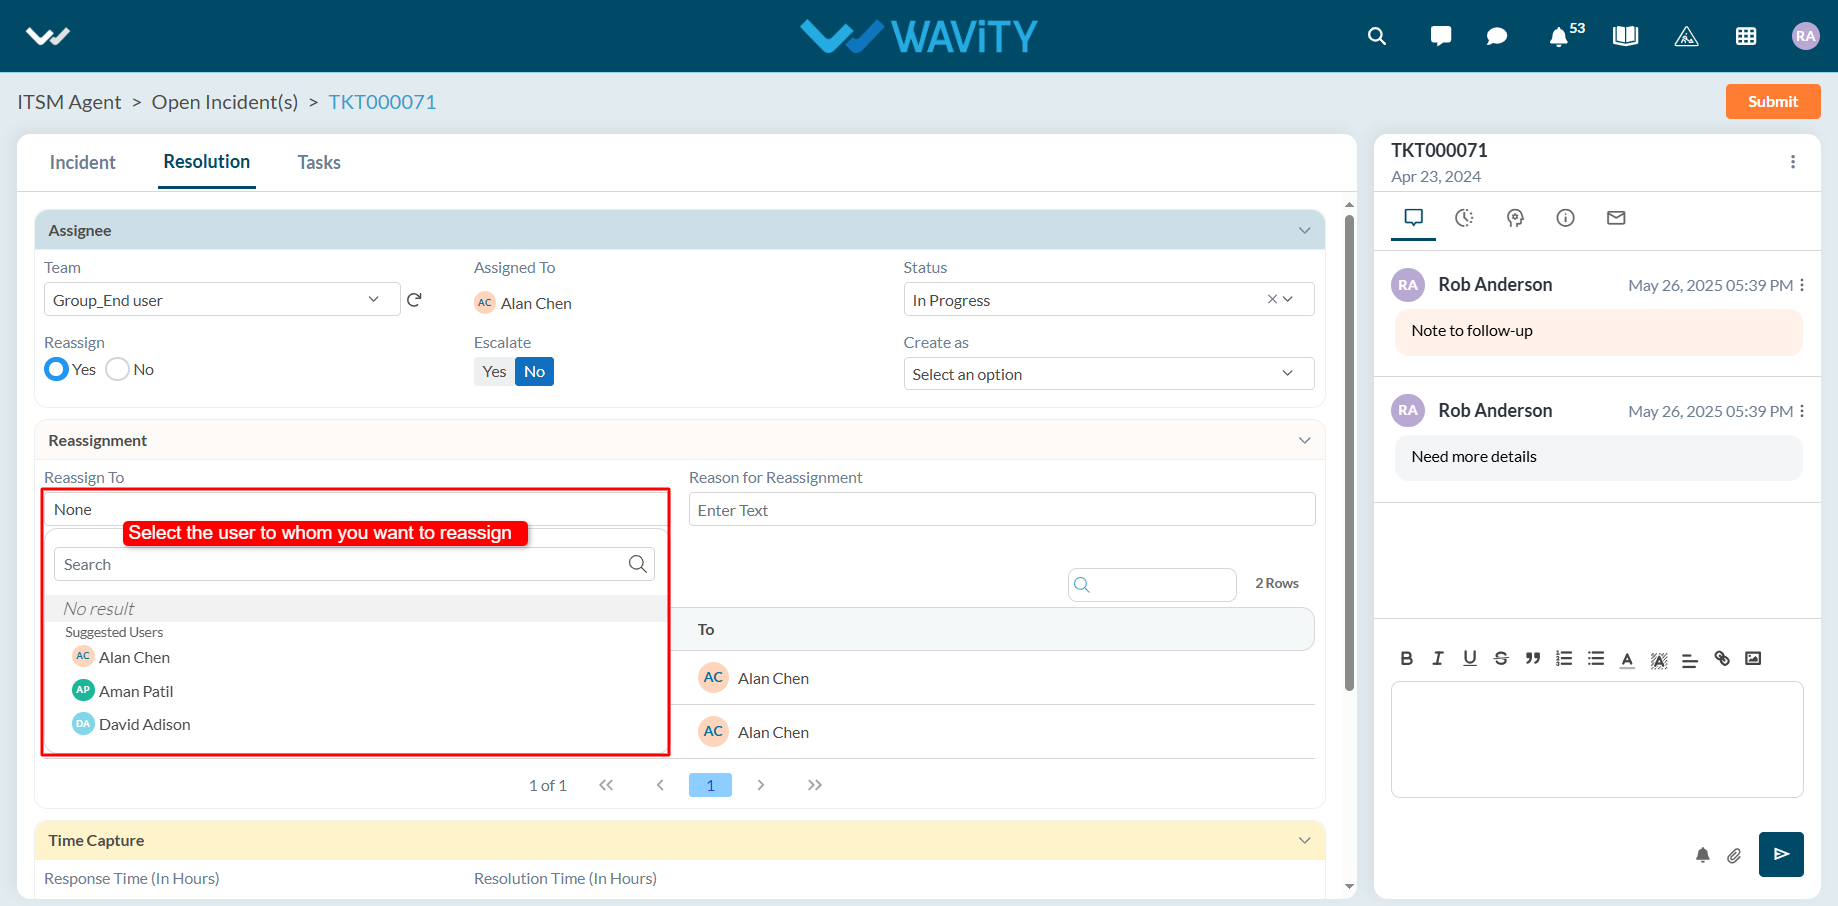
- Provide a brief reason for the re-assignment in the designated field.
- Click Submit to finalize the re-assignment.
Agent Guide: How to Escalate an Incident
- In the Wavity platform, handling and updating incidents as an agent is a simple and intuitive process.
- Note: The steps outlined below serve as general instructions and can be fully customized to meet specific organizational needs; however, the core workflow remains the same.
- Agents with the appropriate access can log in using their credentials and will be directed to the Agent Interface.
- From the Agent Interface, Click on any of the open incidents.
- In the Resolution section of the incident: Click on Yes to Escalate the incident. Note that the Wavity ITSM platform also supports automatic escalation based on predefined rules.
- Select the level of escalation from the dropdown.
- Provide a brief reason for the re-assignment in the designated field. Click Submit to complete the process.
End User Guide: How to use Pre-Built templates to Report an Incident
- In Wavity, reporting an incident is simple, user-friendly, and accessible through multiple channels including the Wavity Platform, Customer Portal, AI Chatbot, Email, Slack, Microsoft Teams and Whats App.
- Note: The steps provided below are sample instructions and can be customized to suit specific organizational requirements; however, the core workflow remains consistent.
- Users can log in with their credentials on the Wavity platform, which will direct them to the End User Interface.
- From the Quick Links widget, users should click on ‘Report an Incident’ to initiate the process.
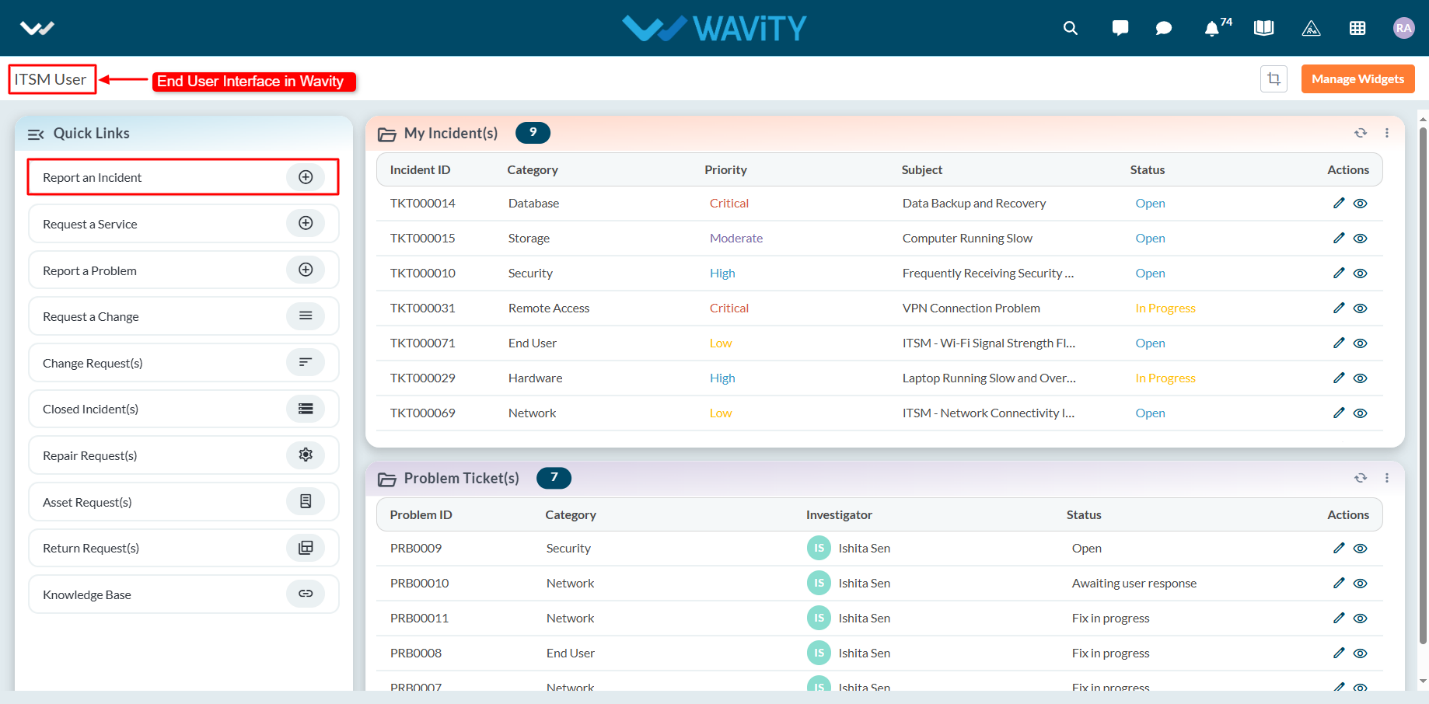
- Select the appropriate pre-built template from the dropdown menu.
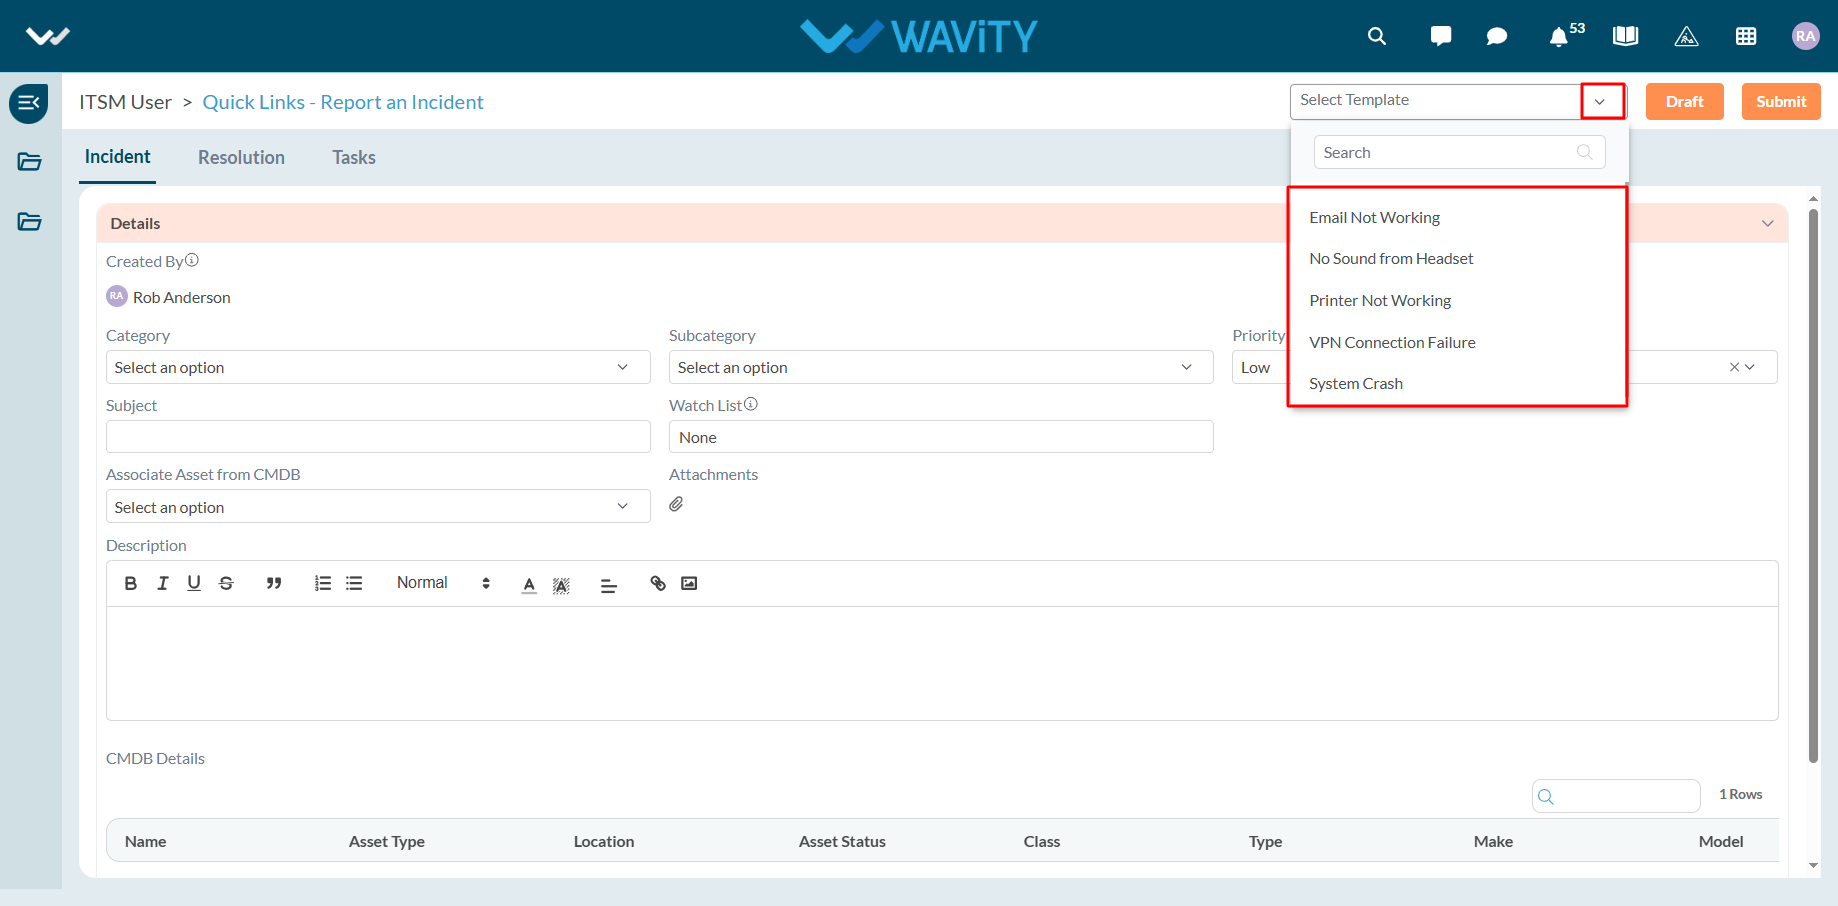
- Click Yes in the confirmation pop-up to prepopulate the template fields.
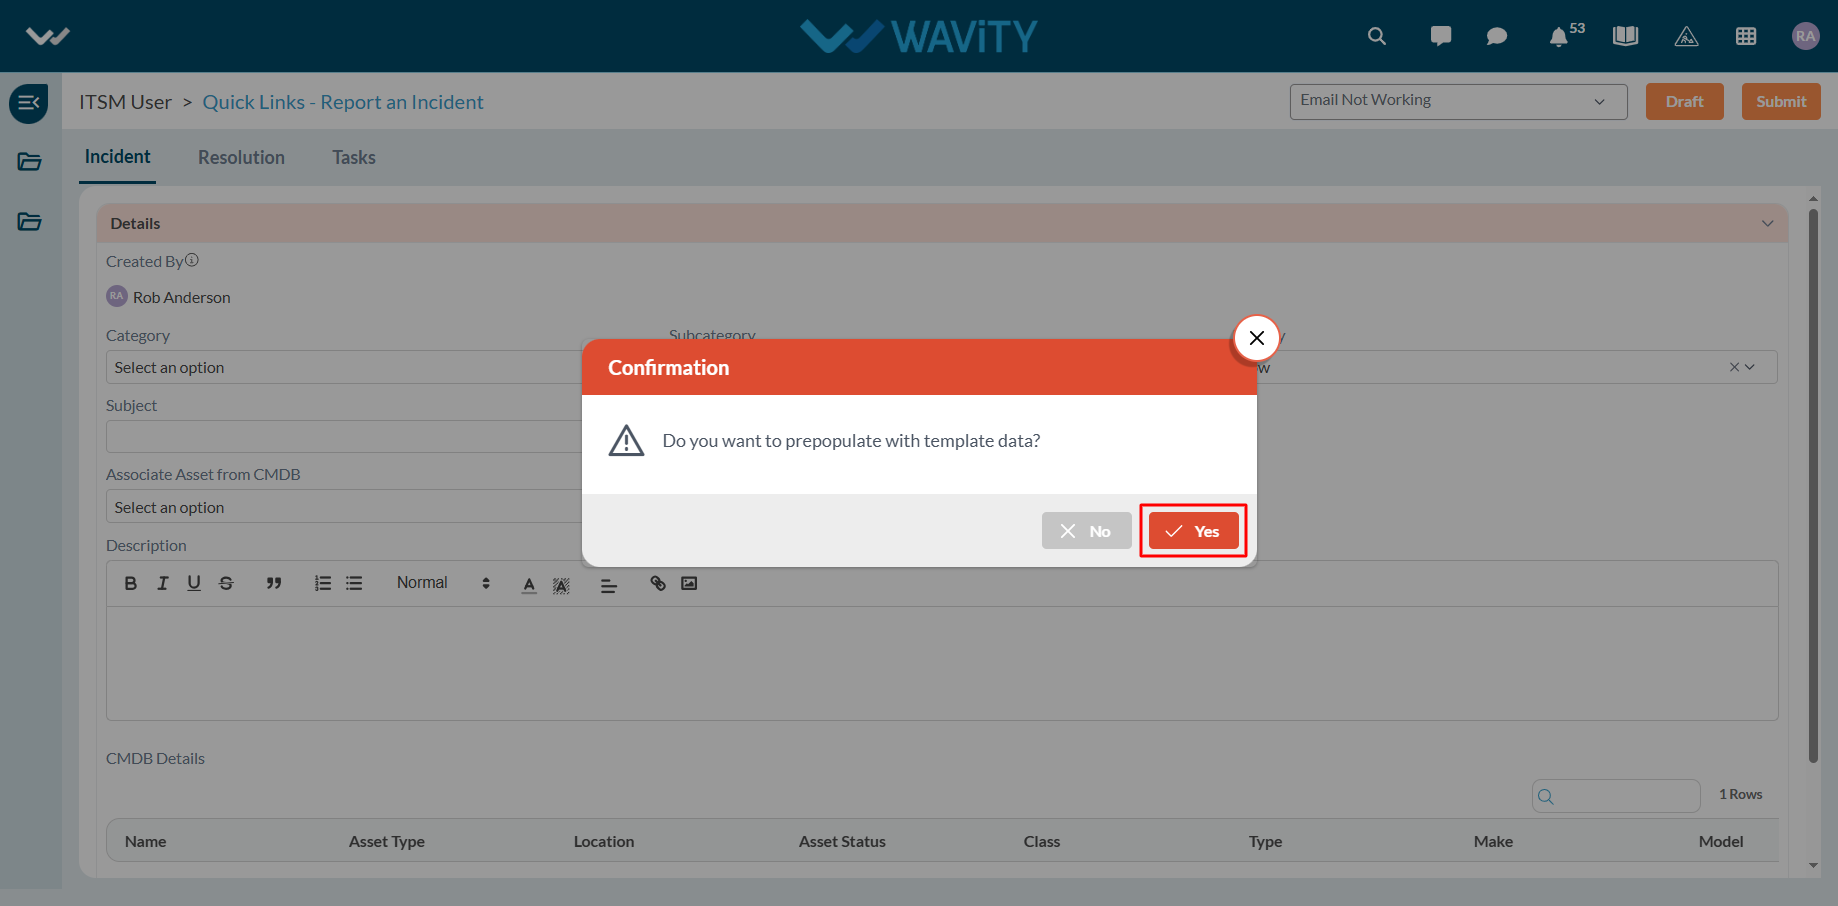
- All relevant fields will be auto-filled based on the selected template.
- Review the information, then click Submit to complete the incident report.
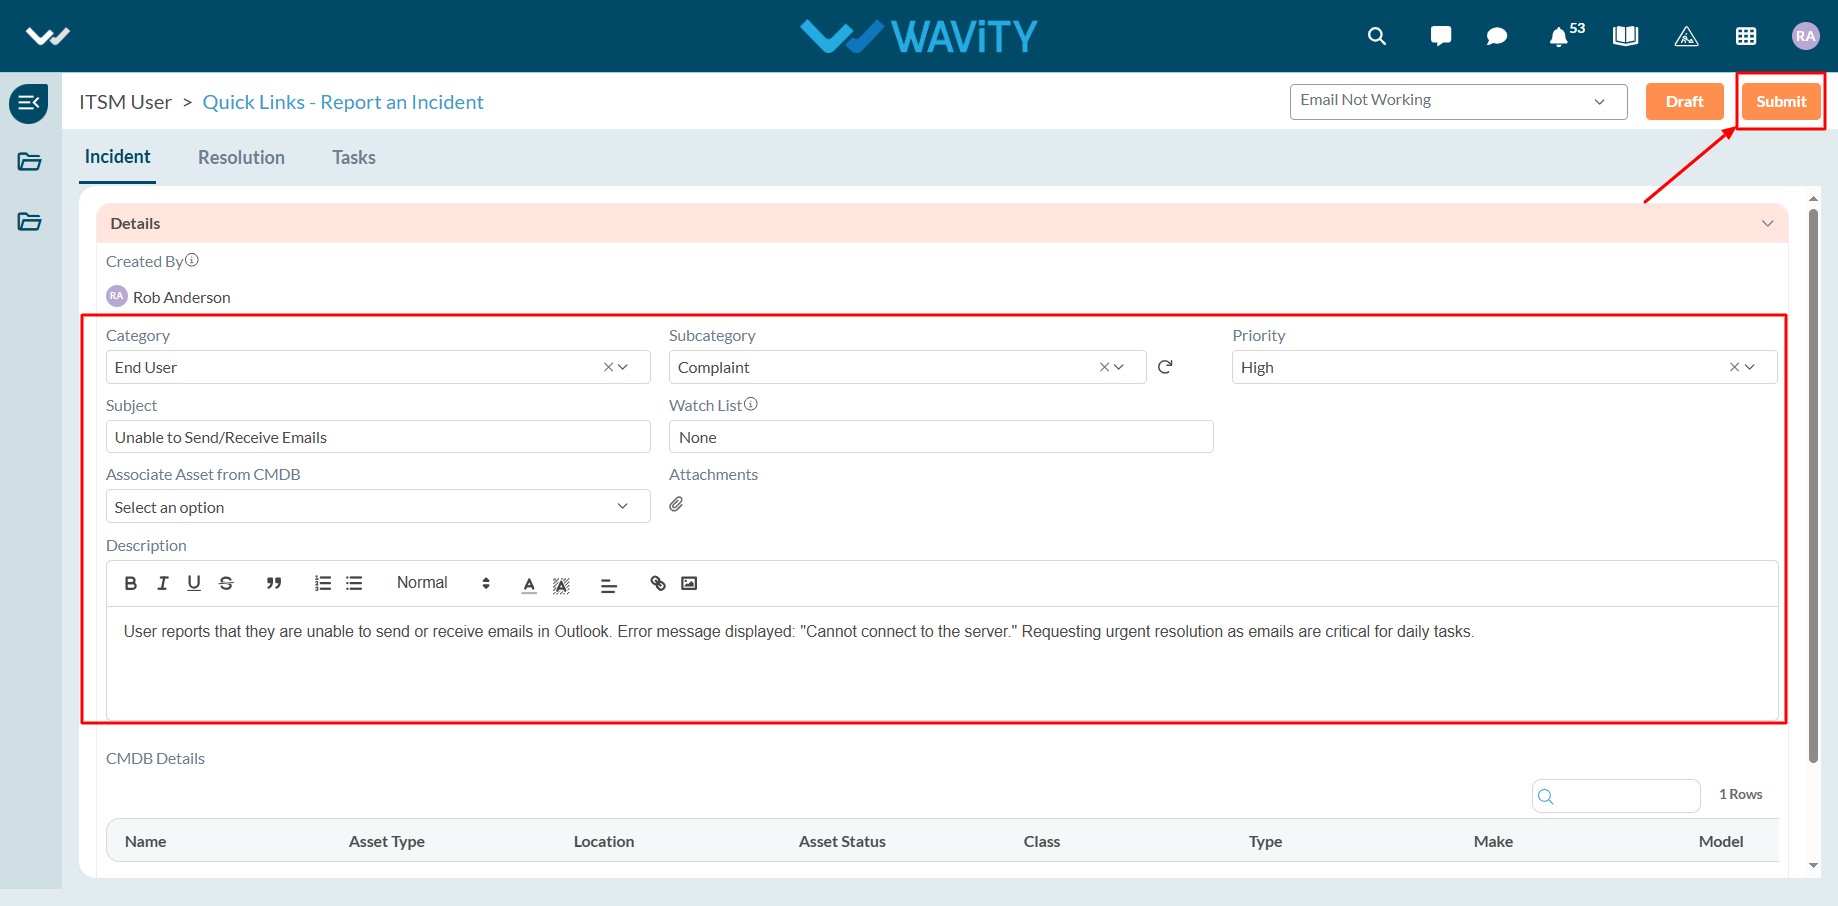
Agent Guide: How to Reply Back to the Requestor for an Incident
- In the Wavity platform, handling and updating incidents as an agent is a simple and intuitive process.
- Note: The steps outlined below serve as general instructions and can be fully customized to meet specific organizational needs; however, the core workflow remains the same.
- Agents with the appropriate access can log in using their credentials and will be directed to the Agent Interface.
- From the Agent Interface, Click on any of the open incidents.
- Click the Message icon to open the reply interface.
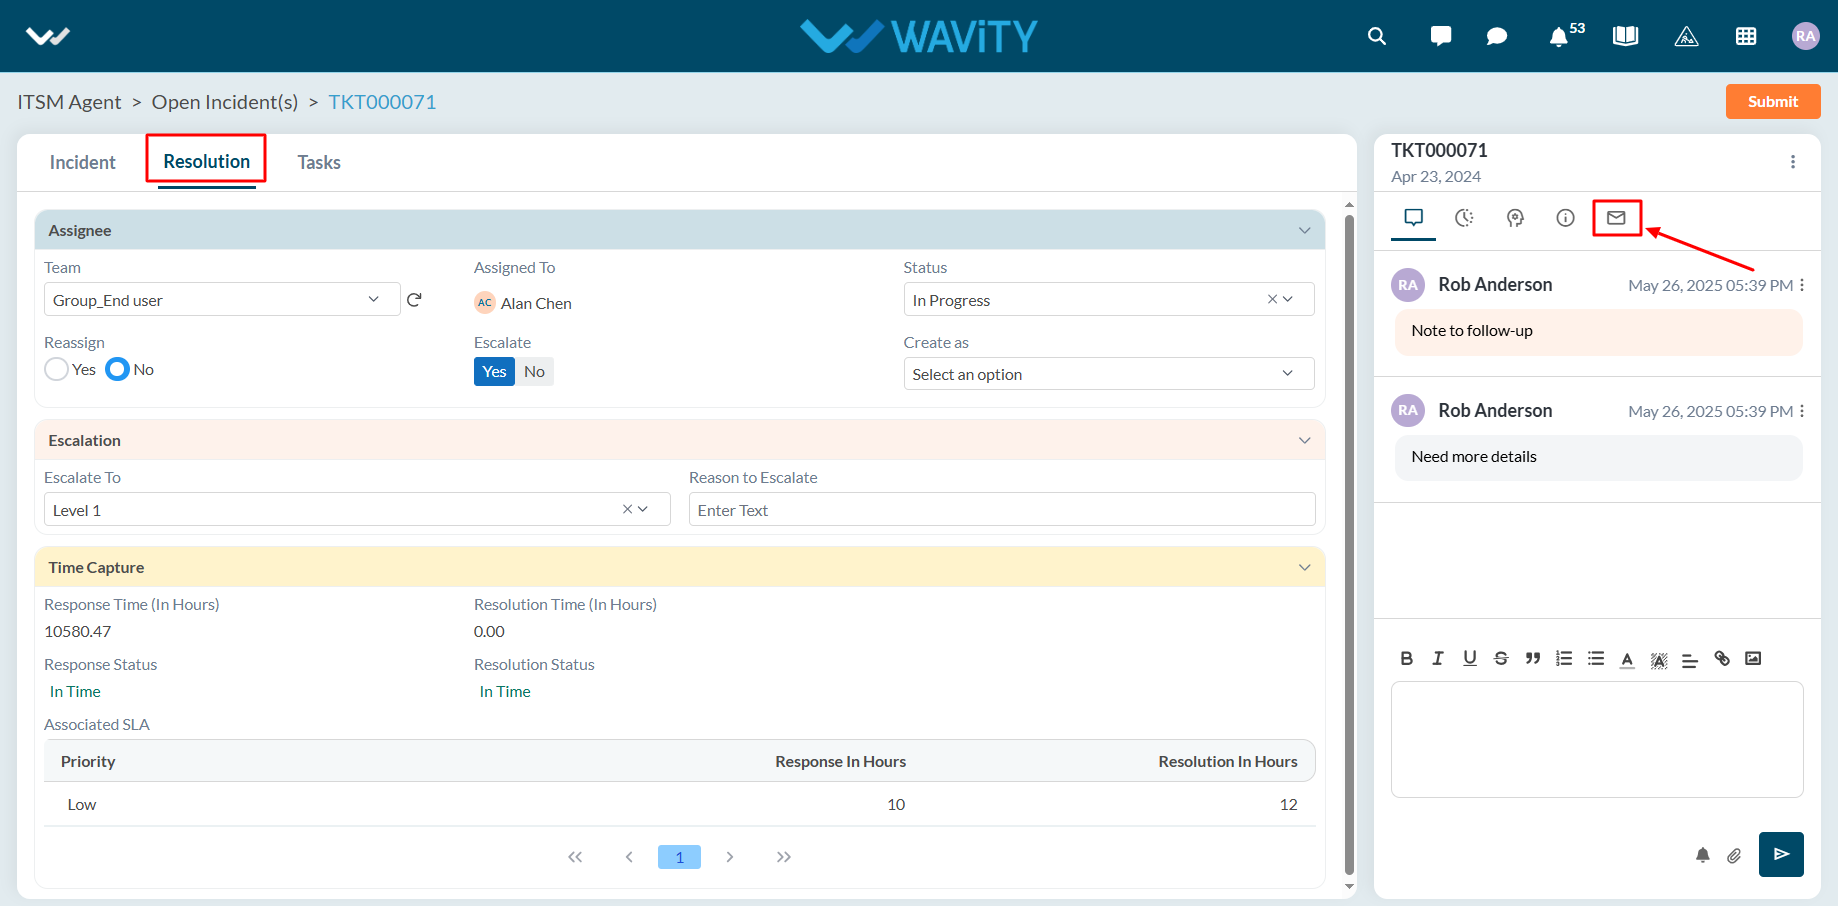
- Enter the response message for the requestor.
- Click Send to deliver the message.
- The requestor will receive an email notification containing the reply.
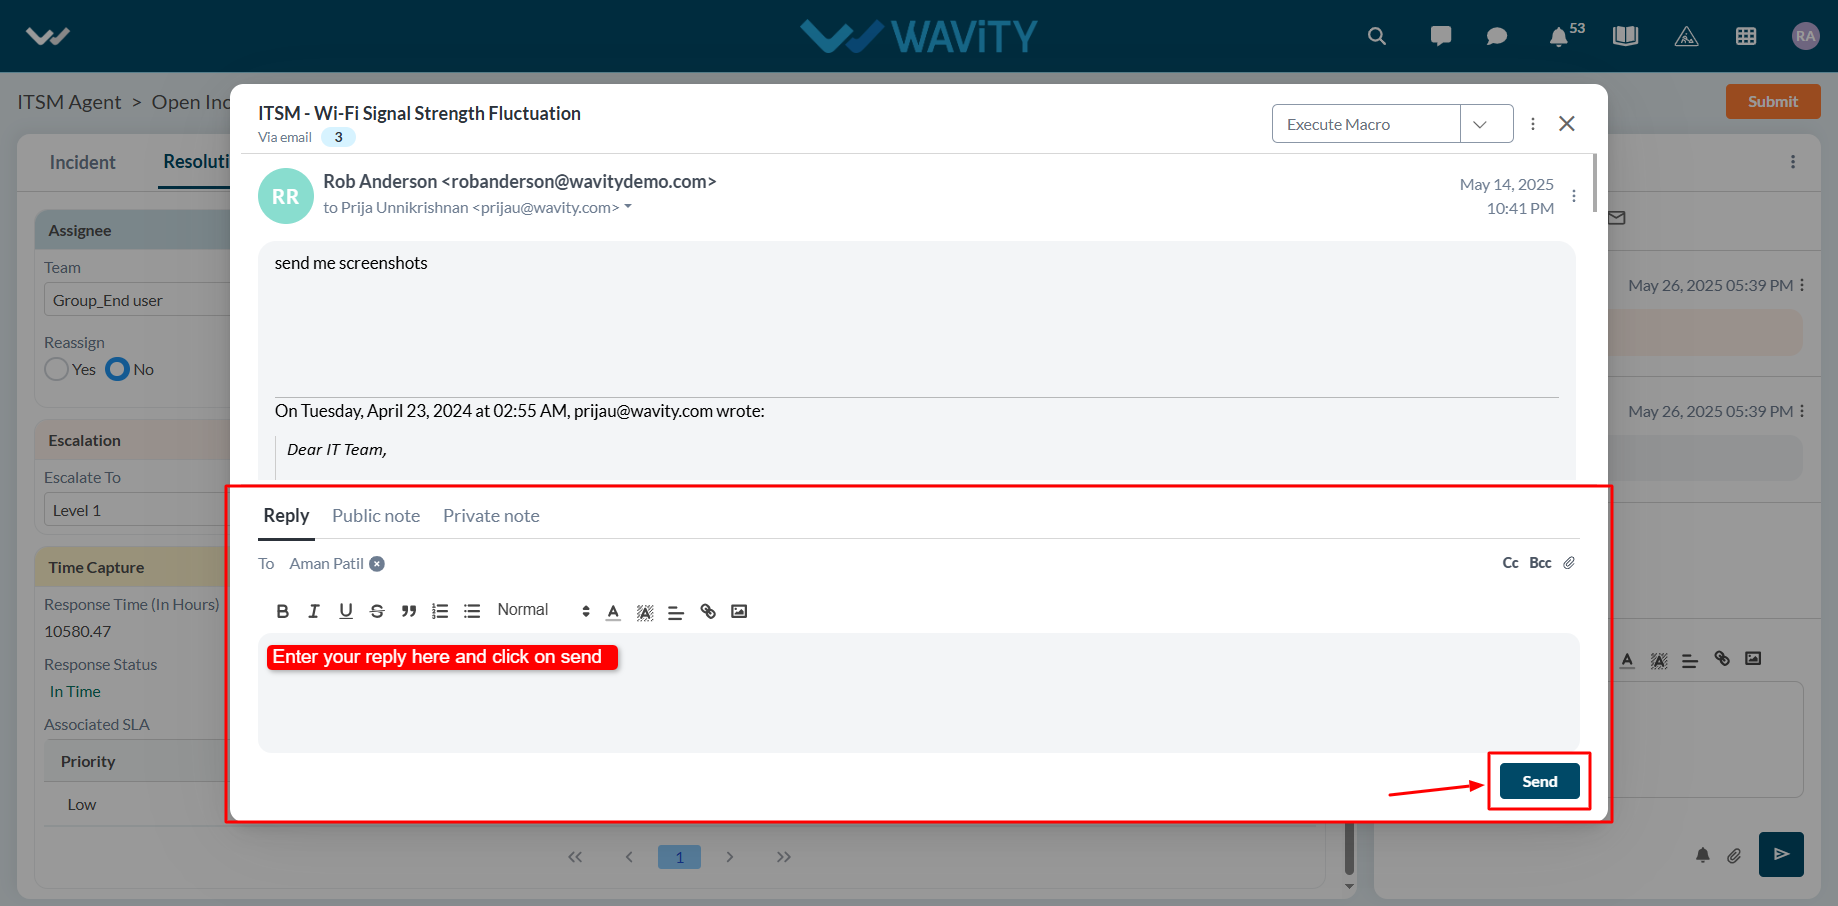
Agent Guide: How to Track Activities related to an Incident
- In the Wavity platform, handling and updating incidents as an agent is a simple and intuitive process.
- Note: The steps outlined below serve as general instructions and can be fully customized to meet specific organizational needs; however, the core workflow remains the same.
- Agents with the appropriate access can log in using their credentials and will be directed to the Agent Interface.
- From the Agent Interface, Click on any of the open incidents.
- Click the Activity icon to open the activity tracker.
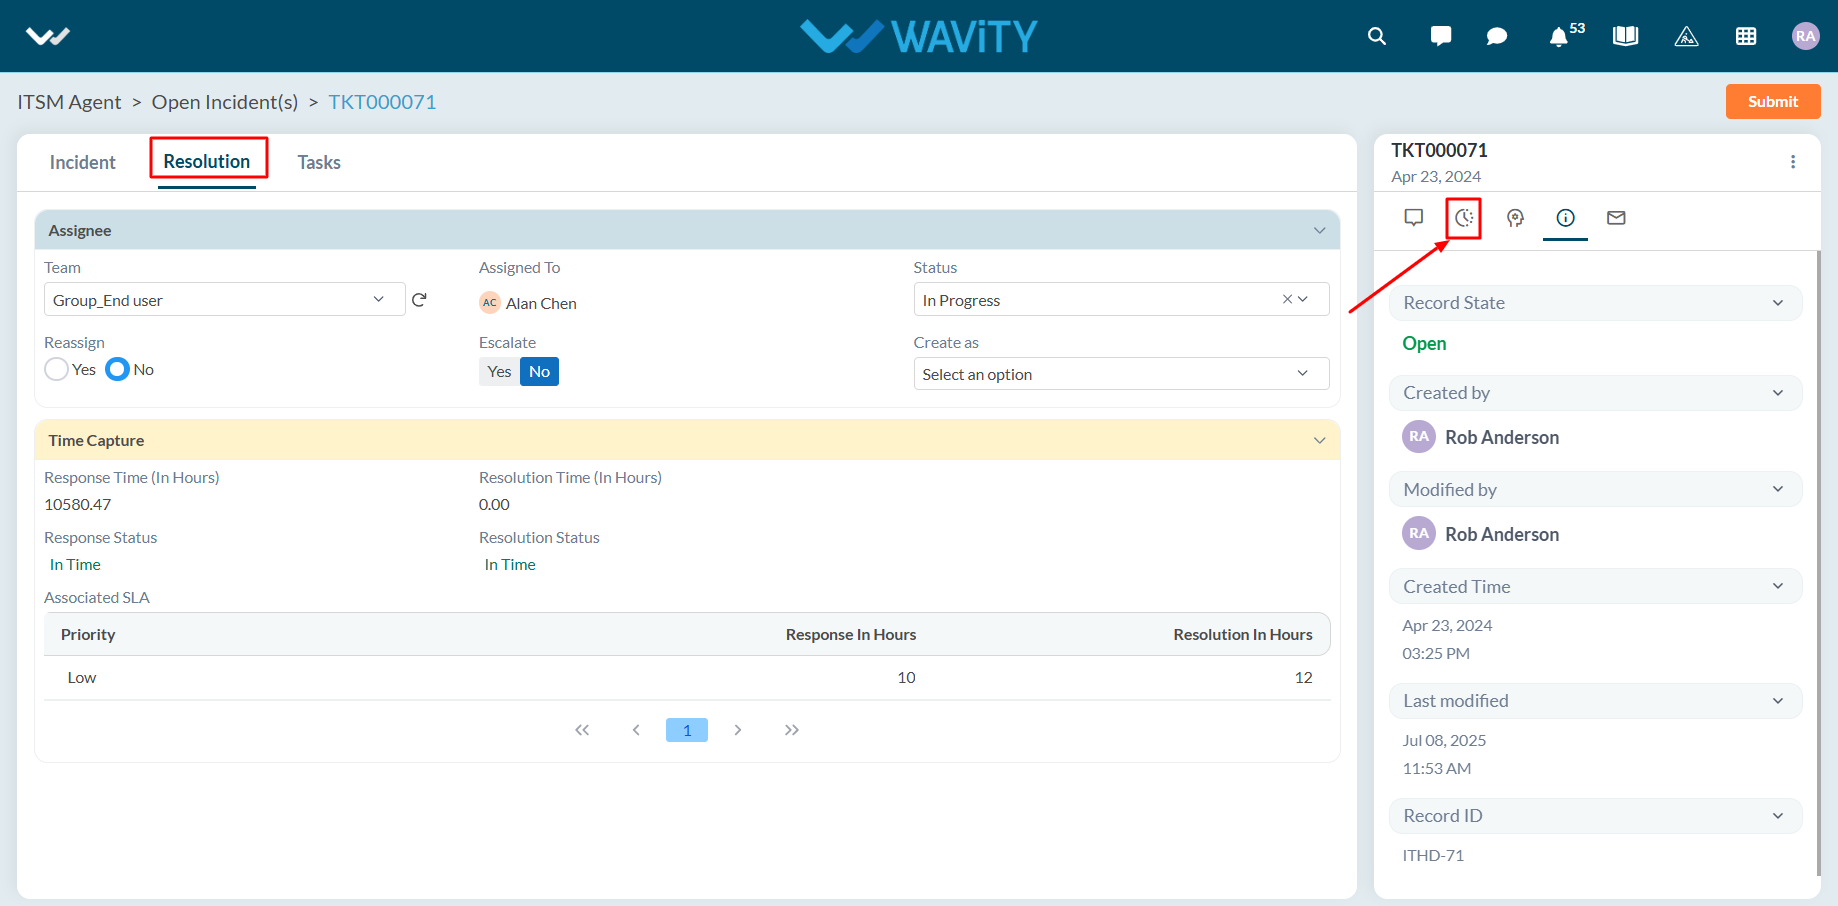
- All activities related to the incident will be displayed with timelines.
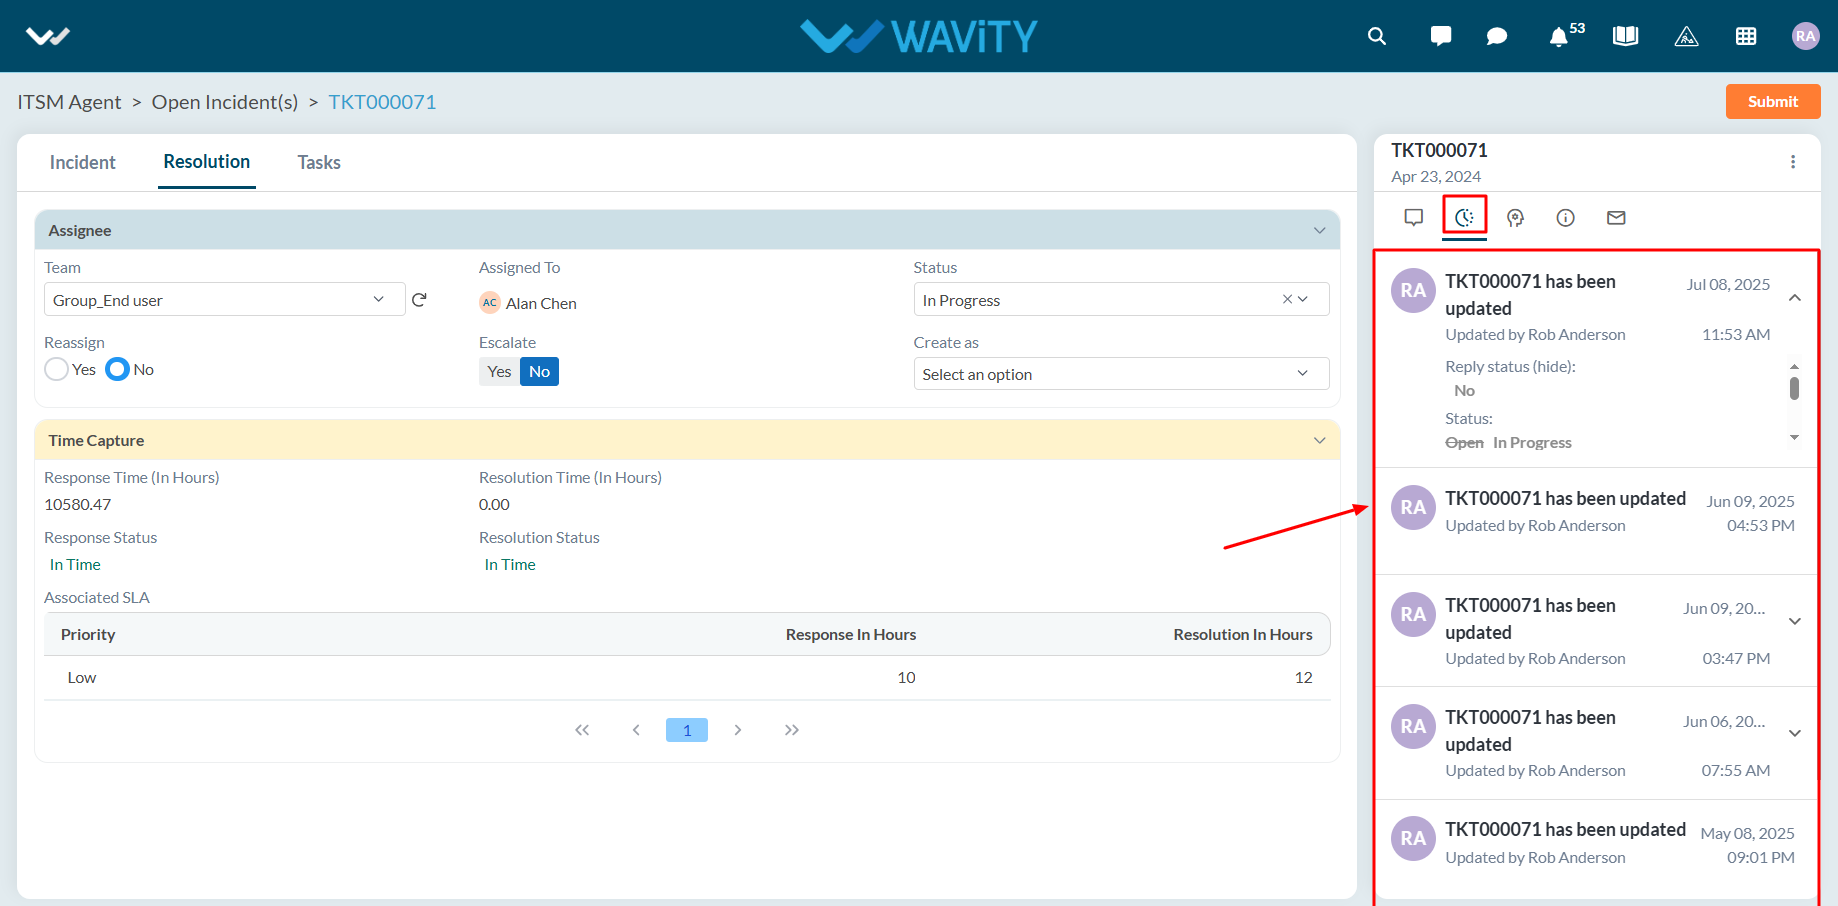
Agent Guide: How to Convert an Incident into a Change Request
- In the Wavity platform, handling and updating incidents as an agent is a simple and intuitive process.
- Note: The steps outlined below serve as general instructions and can be fully customized to meet specific organizational needs; however, the core workflow remains the same.
- Agents with the appropriate access can log in using their credentials and will be directed to the Agent Interface.
- From the Agent Interface, Click on any of the open incidents.
- In the Resolution section of the incident:
- Select Change from the ‘Create As’ dropdown menu.
- Click Submit to save the changes.
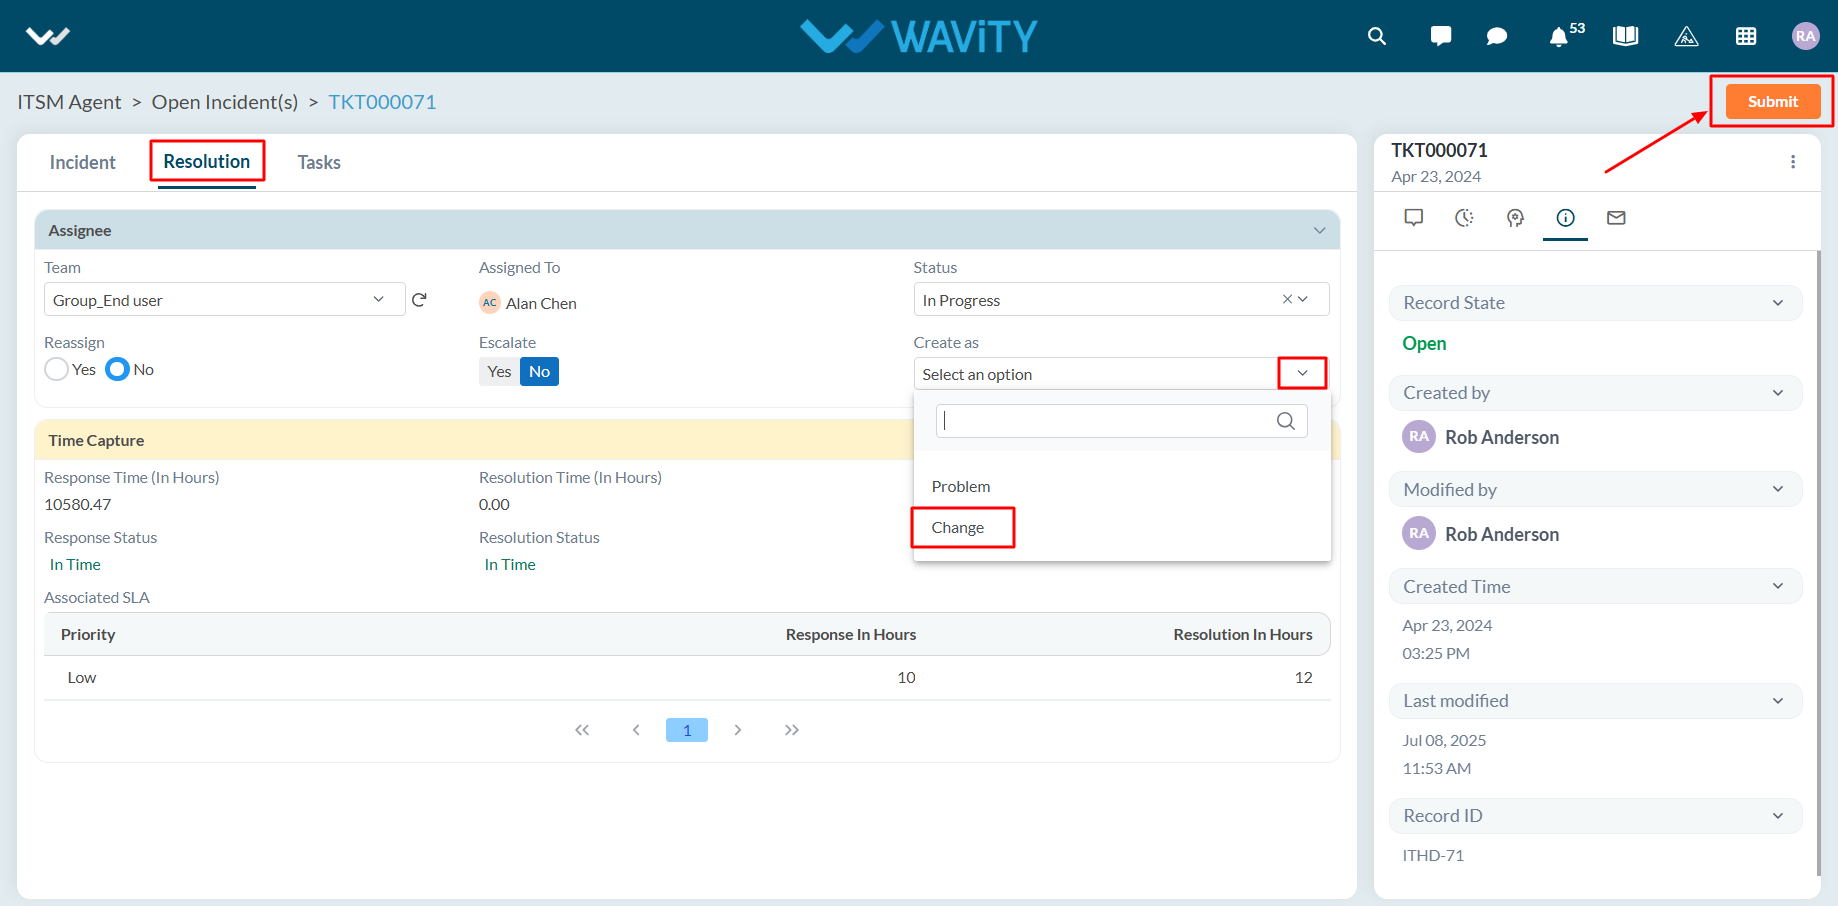
Agent Guide: How to Convert an Incident into a Problem Request
- In the Wavity platform, handling and updating incidents as an agent is a simple and intuitive process.
- Note: The steps outlined below serve as general instructions and can be fully customized to meet specific organizational needs; however, the core workflow remains the same.
- Agents with the appropriate access can log in using their credentials and will be directed to the Agent Interface.
- From the Agent Interface, Click on any of the open incidents.
- In the Resolution section of the incident:
- Select Problem from the ‘Create As’ dropdown menu.
- Click Submit to save the changes.
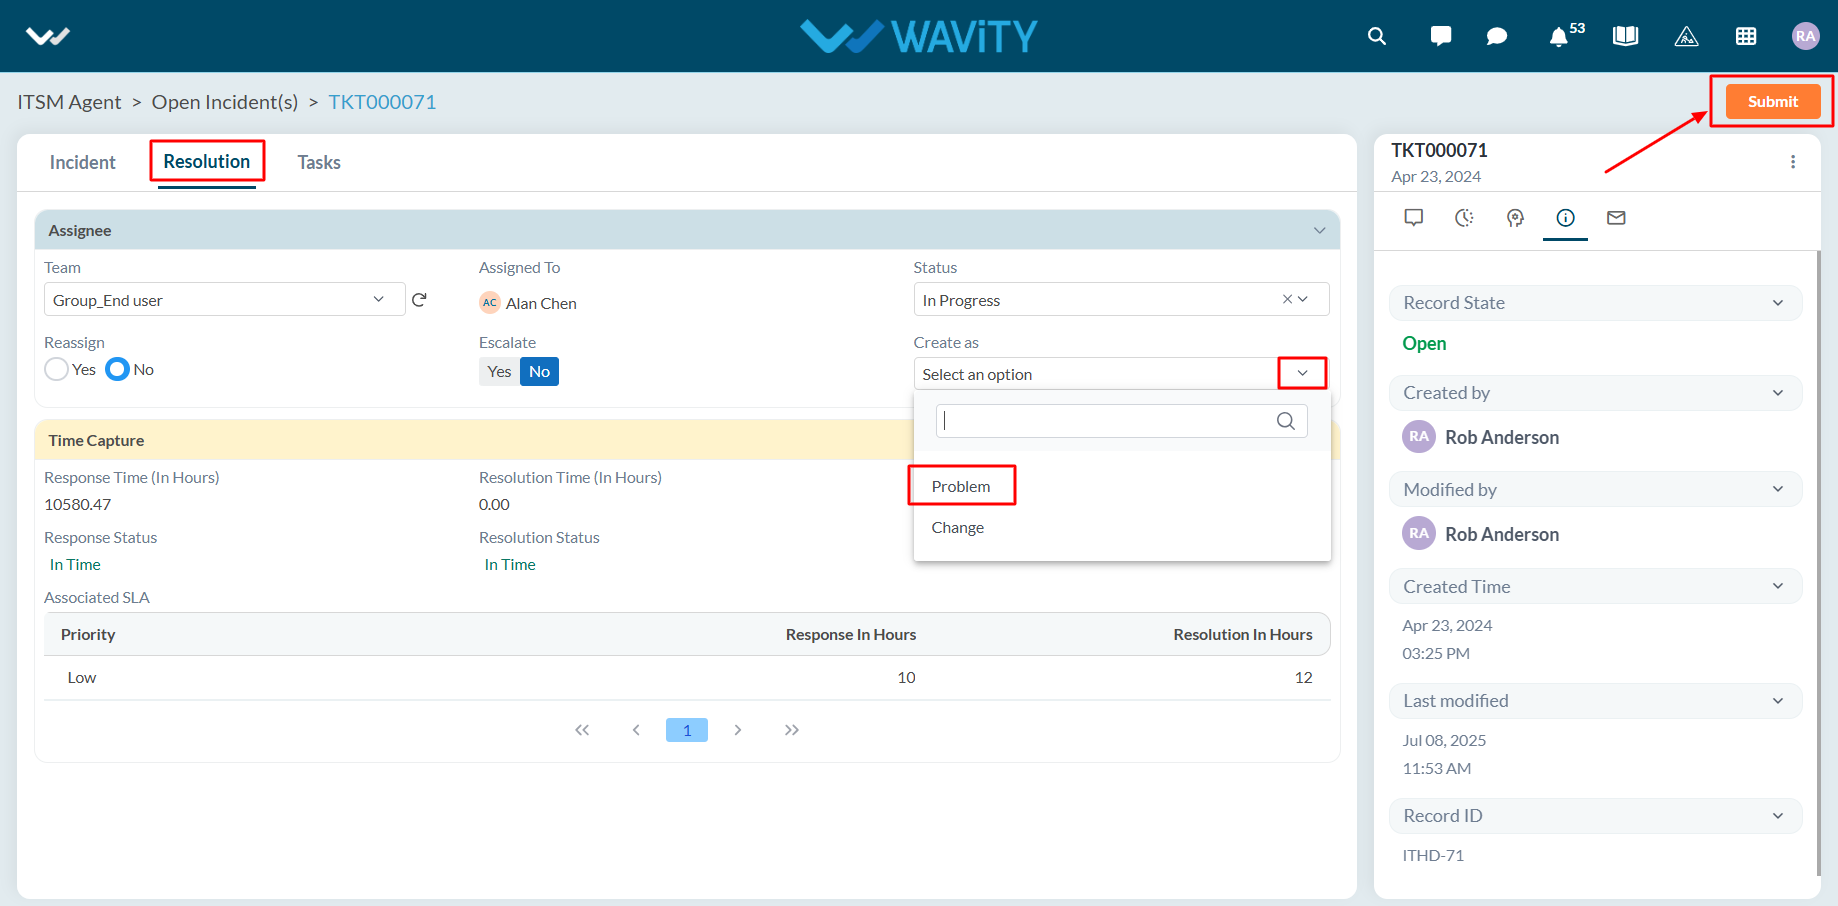
Agent Guide: How to Create a Task on an Incident
- In the Wavity platform, handling and updating incidents as an agent is a simple and intuitive process.
- Note: The steps outlined below serve as general instructions and can be fully customized to meet specific organizational needs; however, the core workflow remains the same.
- Agents with the appropriate access can log in using their credentials and will be directed to the Agent Interface.
- From the Agent Interface, Click on any of the open incidents.
- In the Task section of the incident: Click on Create icon as shown in the below image.
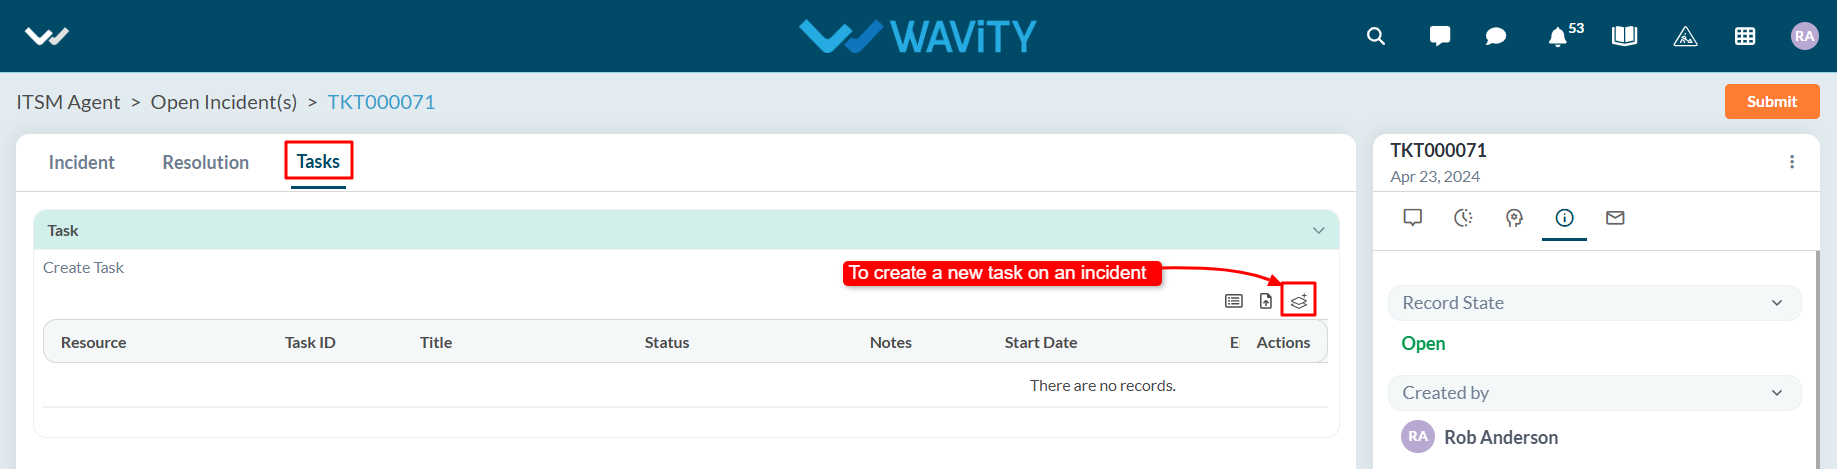
- Enter the required details in the Task form and click on Save to update the changes.
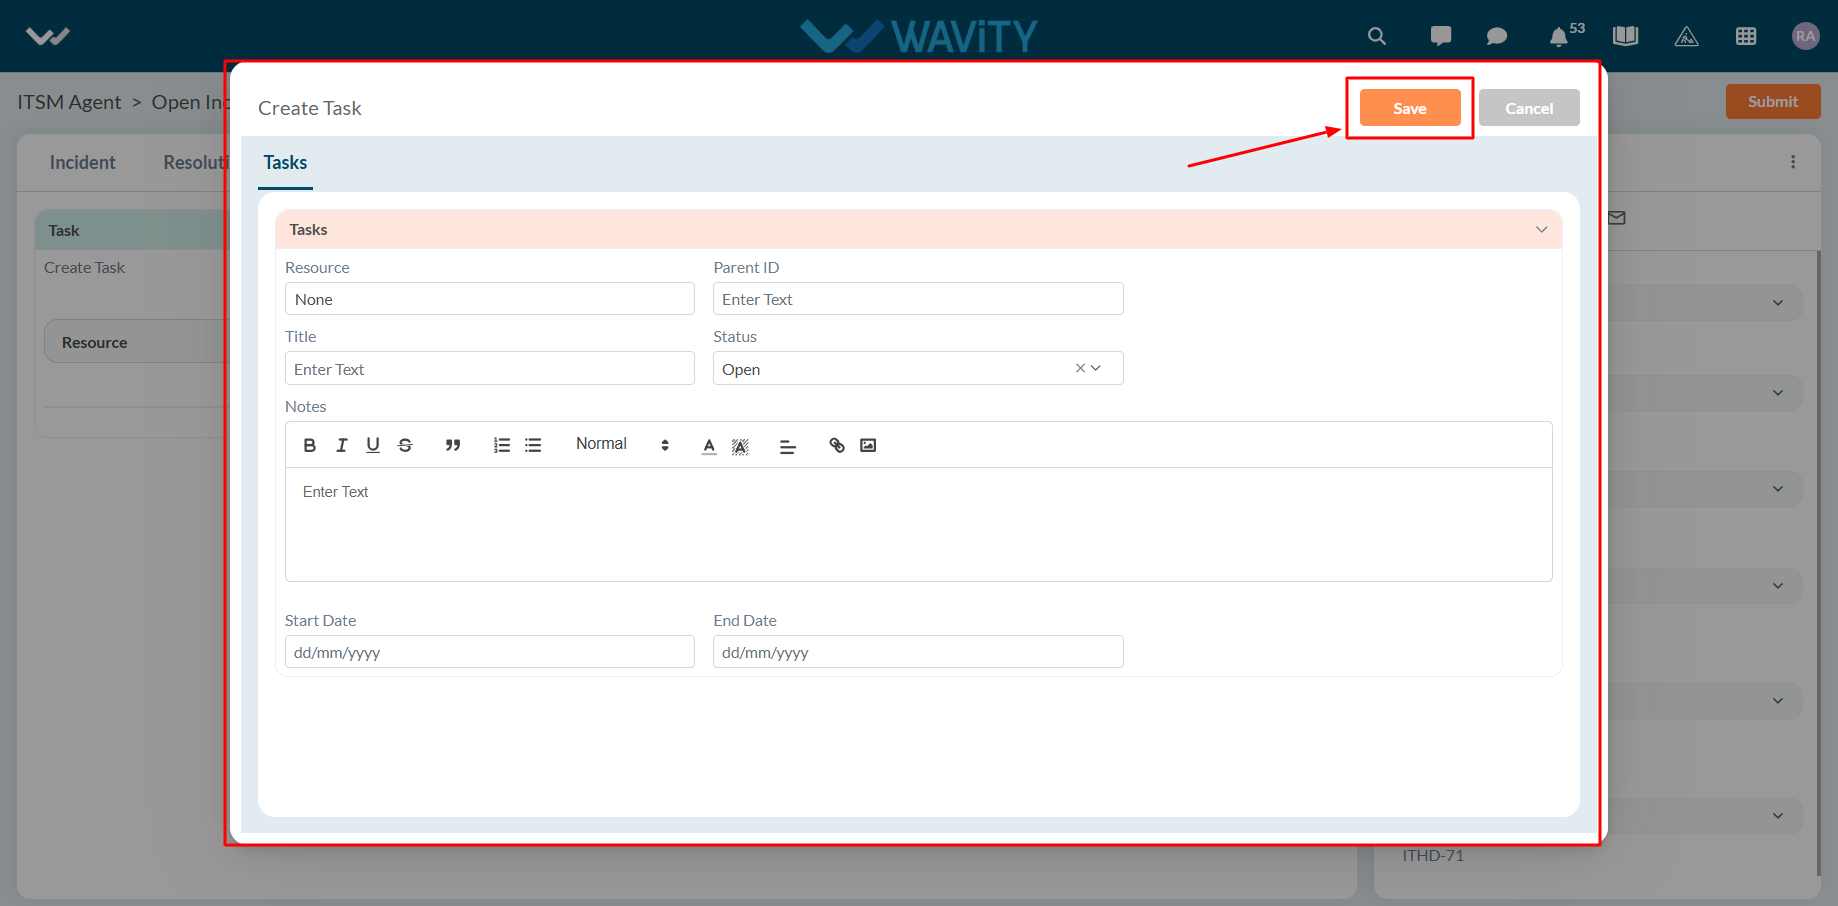
Agent Guide: How to Export an Incident into PDF format
- In the Wavity platform, handling and updating incidents as an agent is a simple and intuitive process.
- Note: The steps outlined below serve as general instructions and can be fully customized to meet specific organizational needs; however, the core workflow remains the same.
- Agents with the appropriate access can log in using their credentials and will be directed to the Agent Interface.
- From the Agent Interface, Click on any of the open incidents.
- Click on the three dots (⋮) in the top-right corner of the incident view.
- From the dropdown menu, select the appropriate PDF format option.
- The incident will automatically download in the selected PDF format.

Agent Guide: Handling Incidents in Wavity ServiceDesk
- In the Wavity platform, handling and updating incidents as an agent is a simple and intuitive process.
- Note: The steps outlined below serve as general instructions and can be customized to meet specific organizational needs; however, the core workflow remains the same.
- Agents with the appropriate access can log in using their credentials and will be directed to the Agent Interface.
- From the Agent Interface, agents should click on ‘Open Incidents’ to view all incidents assigned to them.

- A list of assigned incidents will be displayed. Agents can click on any incident to view its details.

- The Incident section will display the information initially submitted by the end user.

- The Resolution section is where the agent works on the incident. The status can be updated using the provided dropdown menu.

- If the agent needs to reassign the incident, they can select ‘Yes’ in the Reassign field. A pop-up will appear allowing the agent to:
- Select another agent
- Provide a reason for reassignment

- Agents can also manually escalate an incident when necessary. Note that the Wavity ITSM platform also supports automatic escalation based on predefined rules.

- The system will automatically capture and track key timestamps such as:
- First Response Time
- Resolution Time- These metrics are updated in real-time and aligned with the associated SLAs.

- To communicate with the requester, agents can click on the ‘Message’ icon to initiate a conversation.

- Agents can respond to the requester using the reply box, and they may also use macros for inserting prebuilt, standardized responses (canned responses).

- After making any updates, agents can click ‘Save’ or ‘Submit’ to finalize changes to the incident.

End User Guide: Reporting Incidents in Wavity
- In Wavity, reporting an incident is simple, user-friendly, and accessible through multiple channels including the Wavity Platform, Customer Portal, AI Chatbot, Email, Slack, Microsoft Teams and Whats App.
- Note: The steps provided below are sample instructions and can be customized to suit specific organizational requirements; however, the core workflow remains consistent.
- Users can log in with their credentials on the Wavity platform, which will direct them to the End User Interface.
- From the Quick Links widget, users should click on ‘Report an Incident’ to initiate the process.

- Users can select the appropriate Category, Sub-category, and Priority from the dropdown menus.

- A Subject line should be entered to briefly summarize the issue.
- Users may attach relevant files either from their local device or through Google Drive and OneDrive integration.
- Additional users can be added to the Watchlist, ensuring they receive notifications about updates on the incident.

- A detailed explanation of the issue can be entered in the Description field.
- The CMDB/Asset currently in use by the user will be automatically displayed to provide context.
- Users can optionally use pre-built templates (which are customizable) to streamline the reporting process.
- After all details have been entered, users should click ‘Submit’ to log the incident.

- Upon submission, a confirmation email is sent to the user, and any subsequent updates to the incident will be automatically communicated via email.
How to Manage a Change Request in Wavity ServiceDesk
- In the Wavity platform, Managing a change request is a simple and intuitive process designed to support structured change management.
- Note: The steps below represent standard instructions and can be tailored to meet specific organizational requirements. The overall workflow remains consistent.
- Agents with appropriate permissions can log in using their credentials and will be directed to the Agent Interface.
- Navigate to the Change Management section and open the specific Change Request you wish to manage.

- The RFC (Request for Change) section will display all key details of the change request for initial reference.

- The Association section will show all related items, including:
- Linked Incidents
- Linked Assets
- Linked Problems

- In the Evaluation section, the Change Management team can update fields such as:
- Potential Risks
- Mitigation Strategies
- Business Justification

- In the CAB (Change Advisory Board) section, the CAB can review and either approve or reject the change request based on its impact and risk.

- Once approved, the Implementation Team can:
- Assign required resources
- Define the Implementation Start Date and End Date
- Create and assign Tasks related to the change execution
- After making any updates or changes, click ‘Save’ or ‘Submit’ to apply the updates to the change request.

How to Create a Change Request in Wavity ServiceDesk
- In the Wavity platform, creating a change request is a simple and intuitive process designed to support structured change management.
- Note: The steps below represent standard instructions and can be tailored to meet specific organizational requirements. The overall workflow remains consistent.
- Agents with appropriate permissions can log in using their credentials and will be directed to the Agent Interface.
- From the Quick Links section, click on ‘Request a Change’ to initiate a new change request.

- Use the Change Classification dropdown to select the type of change: Emergency, Normal CAB Process, Standard Pre-Approved.

- Populate relevant fields using dropdown menus fields such as impact, urgency, priority, category. Attach any supporting files relevant to the change using the file upload option.
- Enter a Subject for the change request.

- Provide a brief and clear Description of the change in the designated field.

- Now, to link an incident to the change request, agent can click on the ‘Link’ icon as shown in below image.
- To link related incidents: Click on the ‘Link’ icon.

- Select the appropriate incidents from the list.

- Linked incidents will be displayed under the change request for reference. Once all details are completed, click ‘Save’ or ‘Submit’ to log the change request.
- Upon submission, the Change Manager will be automatically notified to review and take further action.

- Alternatively, agents can also convert an incident into a change request by following these steps:
- Open an incident assigned to the agent.

- Navigate to the Resolution section. Use the dropdown to select the option to Convert to Change Request.

Adding and Managing Categories in Wavity Asset Master Data
- In the Wavity platform, adding Asset categories and subcategories is a simple and user-friendly process.
- Only users with agent access are permitted to add categories and subcategories on the platform.
- Note: The steps provided serve as sample instructions and can be customized based on specific requirements; however, the core workflow will remain the same.
- Click on Categories from Quick Links in Agent Persona.
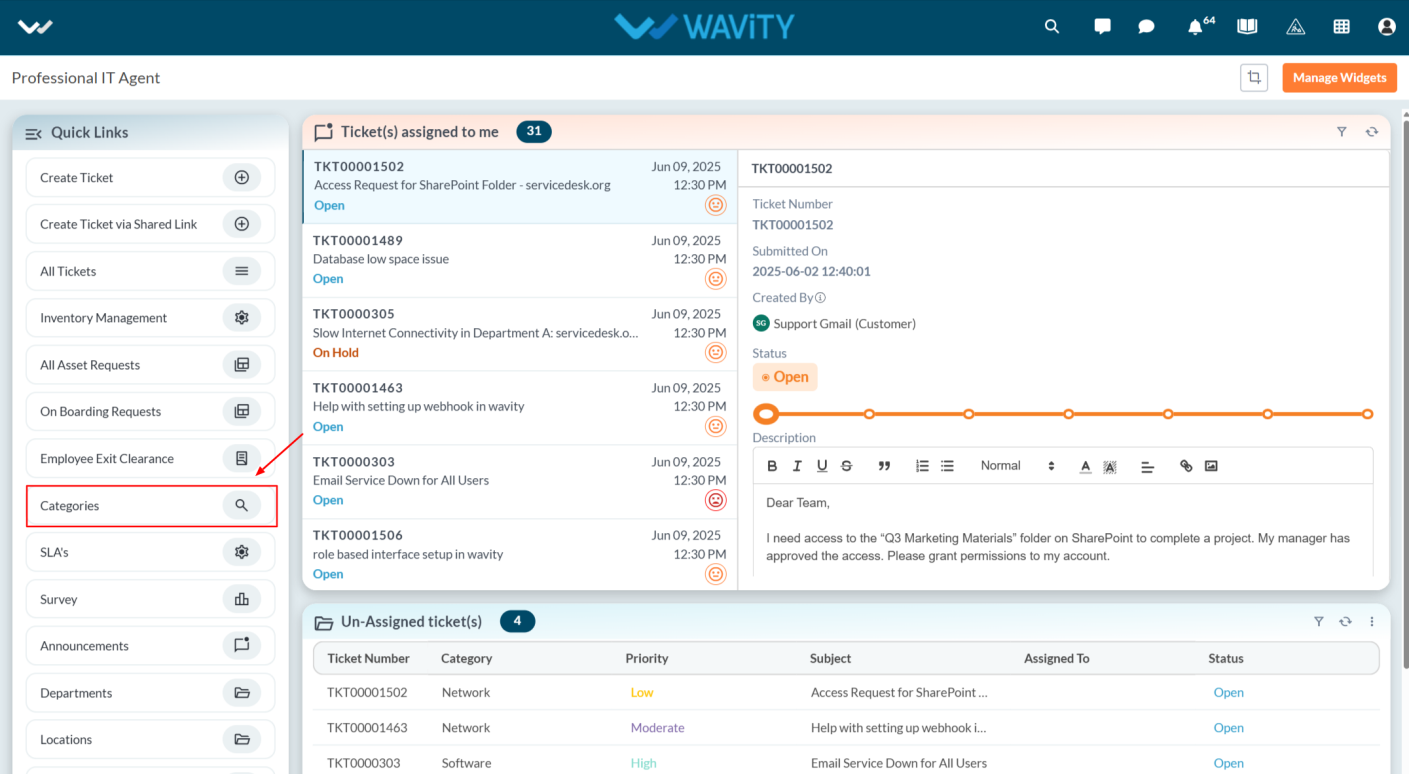
- Agents can add asset categories and subcategories either manually or by uploading Excel sheets.
- For manual entry, click on New Record as shown below.
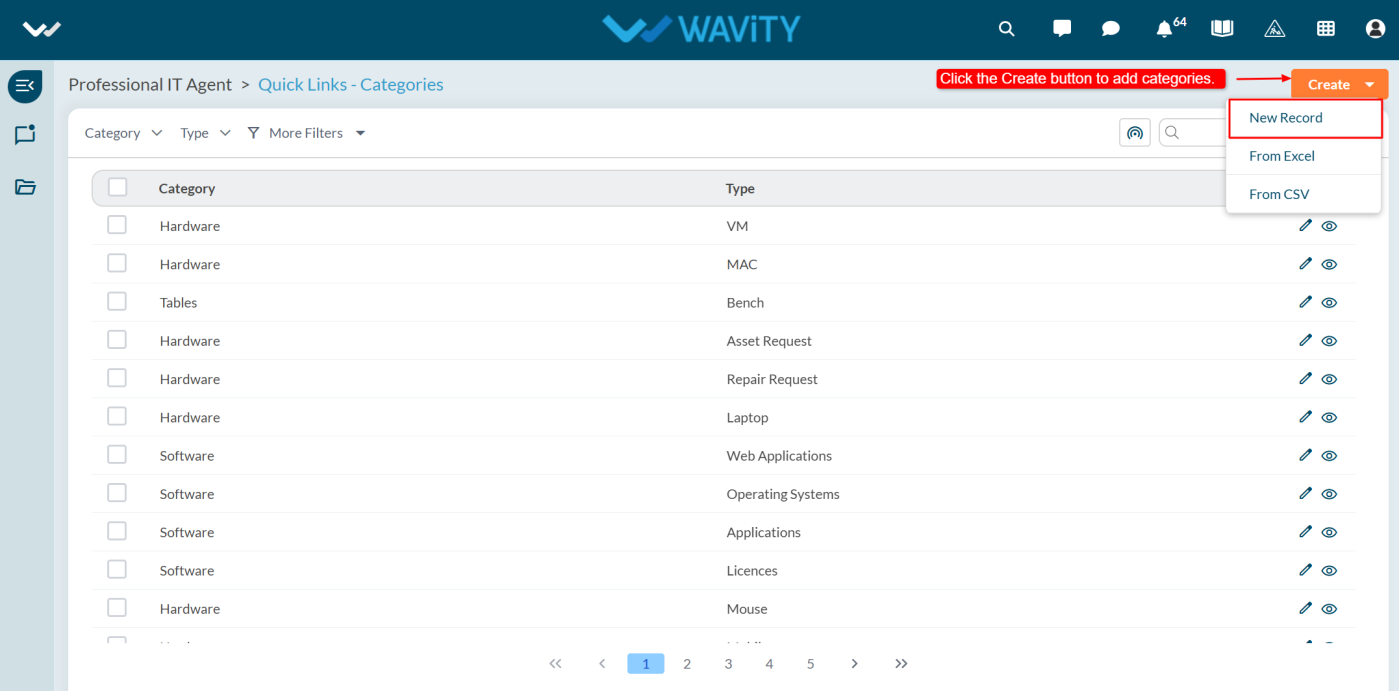
- User will navigate to the Creation page, enter the Category Name and Type, then click Save. The Category Name represents the Category and Type represents the Subcategory as part of the master data. The Subcategory values will be dependent on the Category selected by the user during the asset request process.
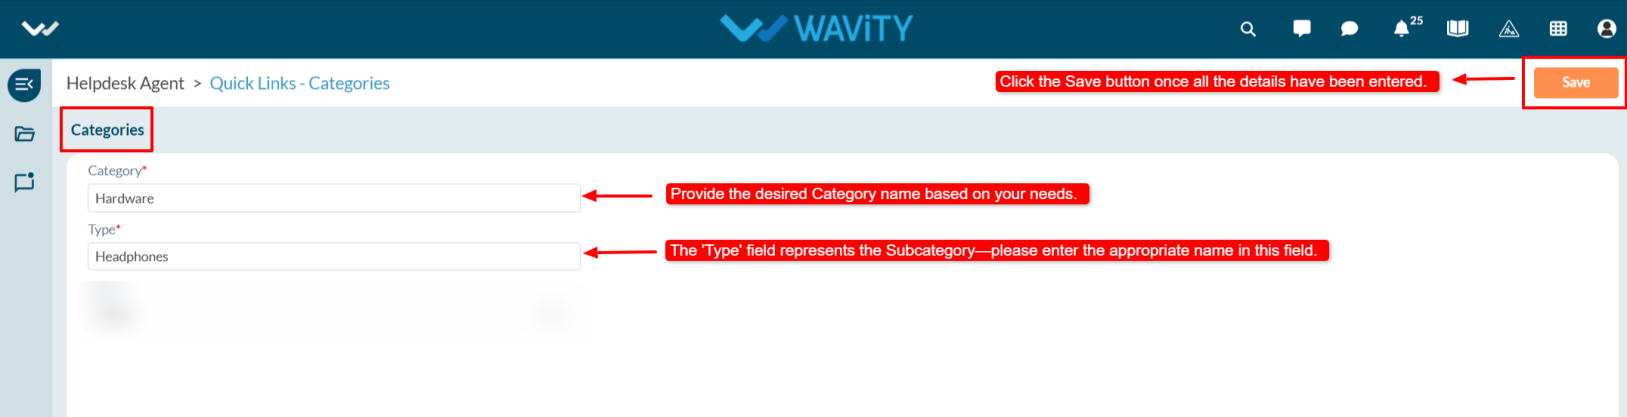
Inventory Management: Asset Return Procedure
- In Wavity, returning an asset is a straightforward process that can be easily completed within the platform.
- The agent can update the status for an asset return by clicking on Inventory Management from the agent dashboard.
- Note: The steps provided serve as sample instructions and can be customized based on specific requirements; however, the core workflow will remain the same.
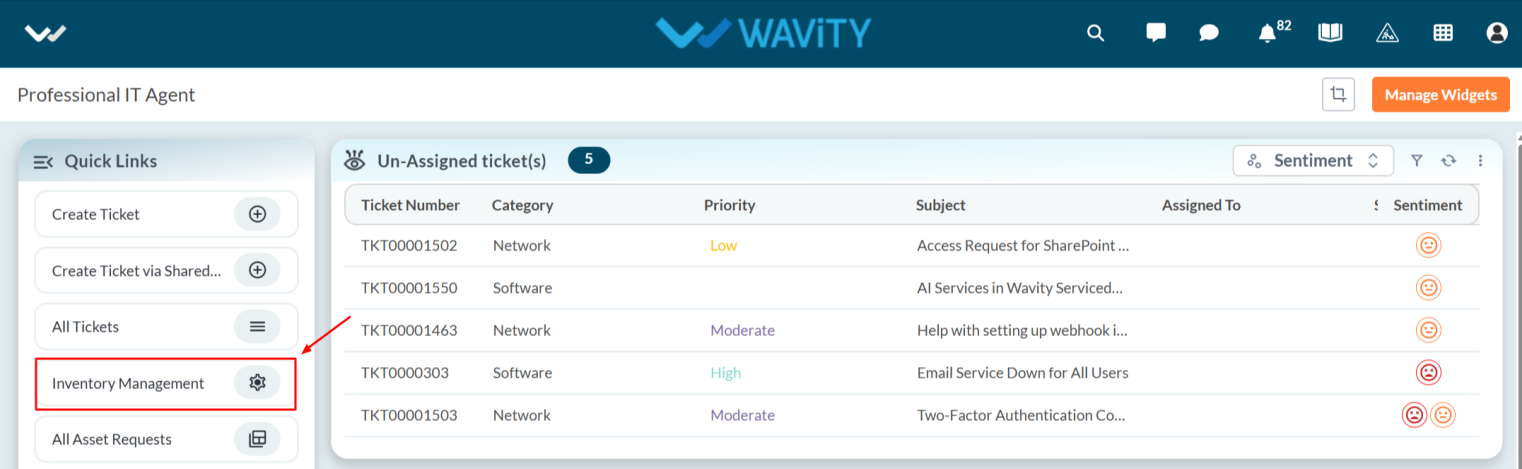
- Click on “Eye Icon” as shown below to view/edit the asset details.
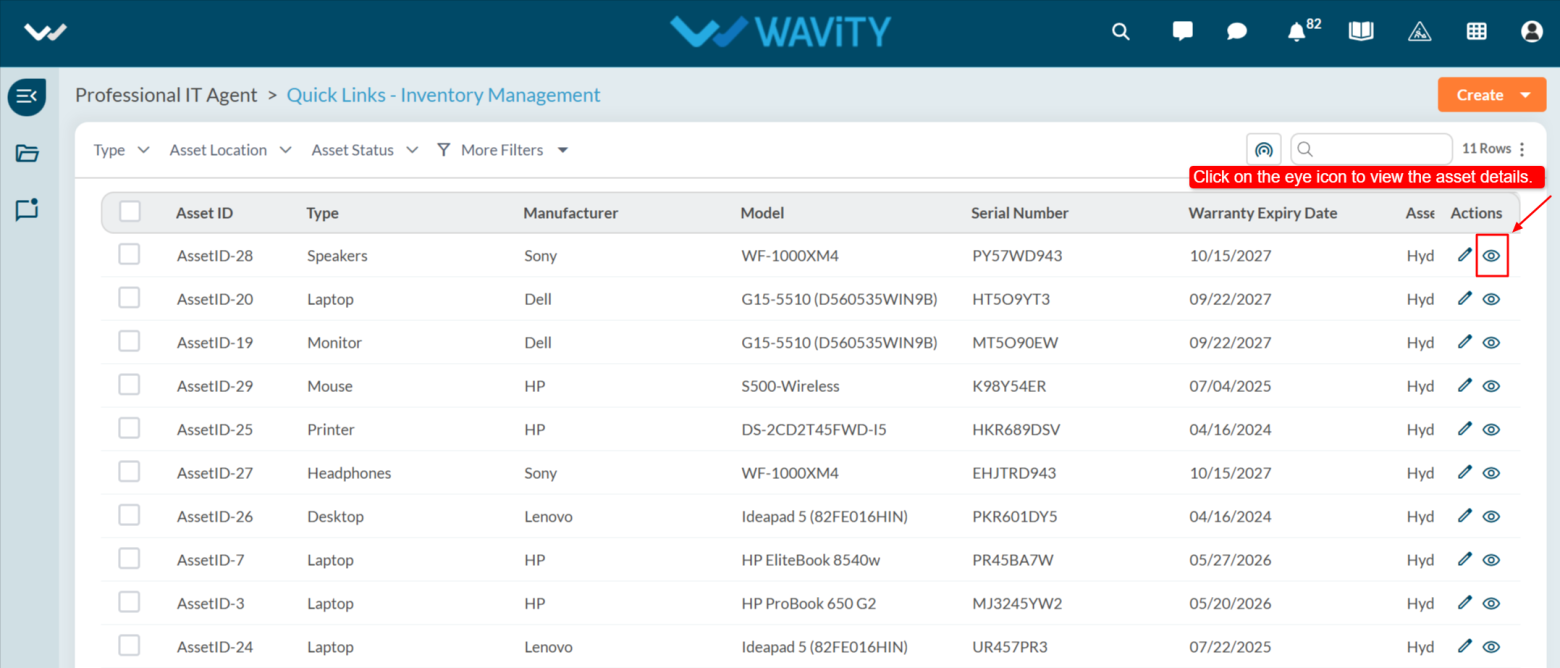
- Update the return date on the Assigned To page.
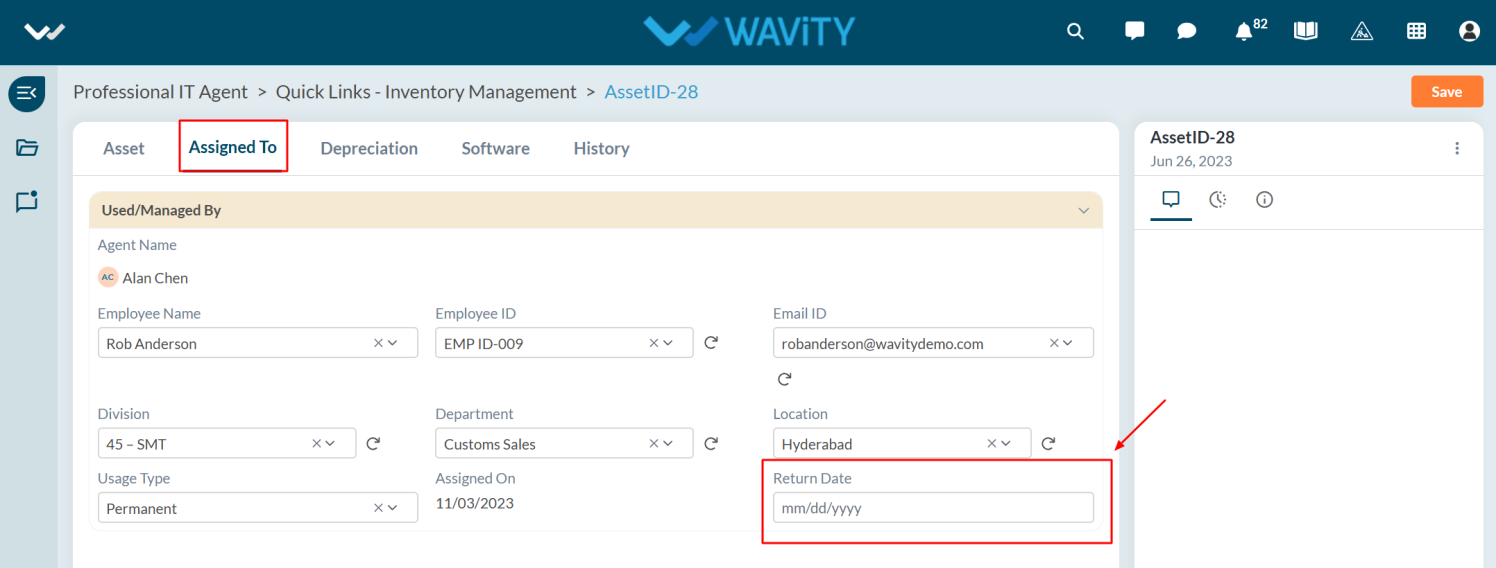
- Once the asset is returned to the IT Team, the user should update the status to Returned.
- The asset state will automatically change to Available in Asset tab once the return is confirmed and updated by the user.
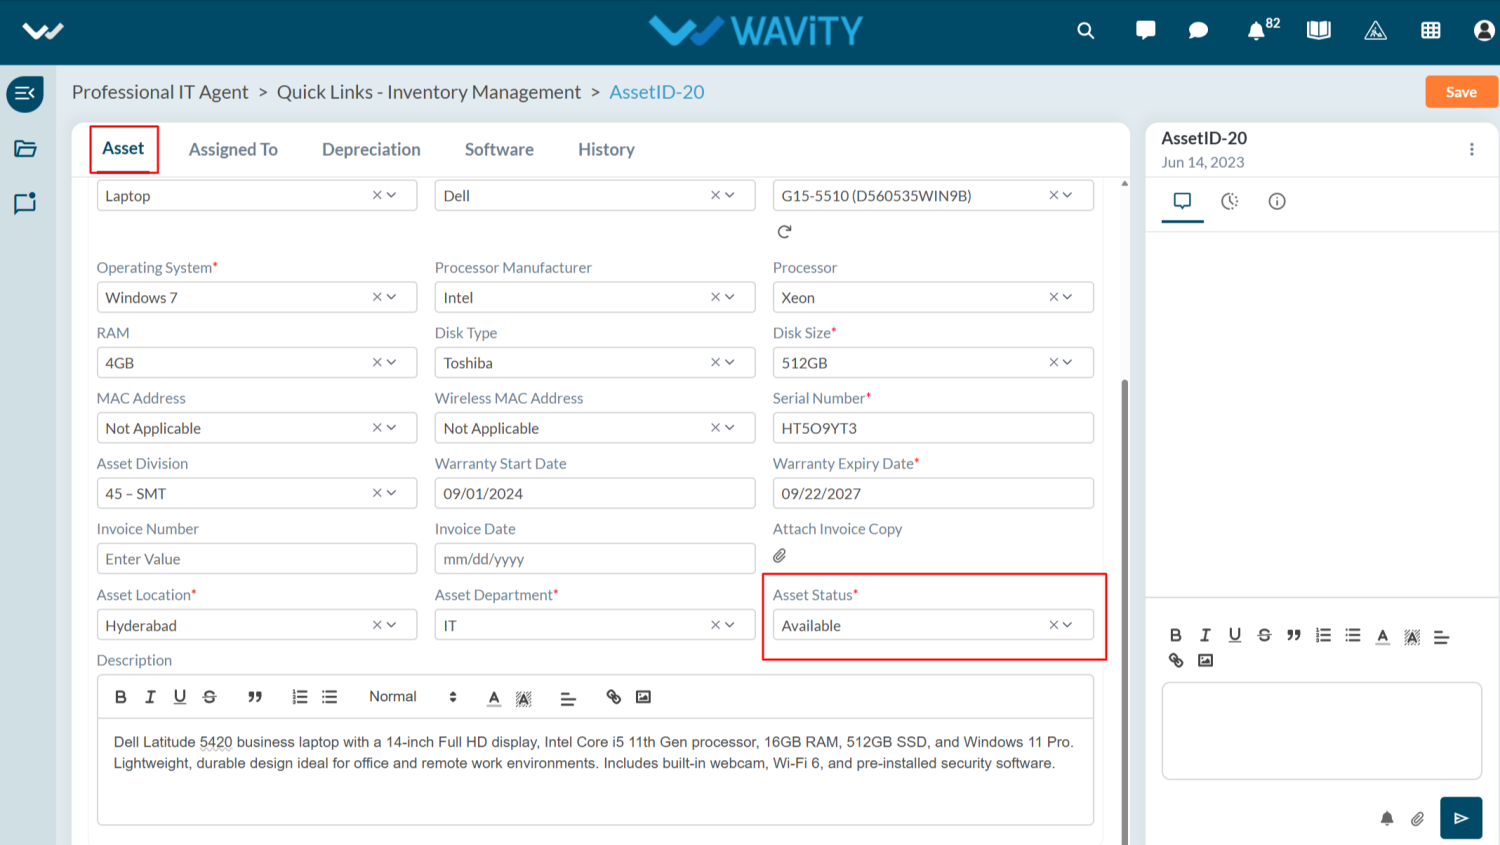
How to add an Asset in Inventory?
- In Wavity, adding an asset is a simple and straightforward process that can be easily completed within the platform.
- User with agent access has access to add assets to the inventory. Assets can be added to the inventory in two ways:
- Manually – by entering asset details directly into the system.
- Import via Excel – by uploading asset information using the Excel Sheets import function.
- Note: The steps provided serve as sample instructions and can be customized based on specific requirements; however, the core workflow will remain the same.
- For Manual entry, Click on the Inventory Management from the quick links.
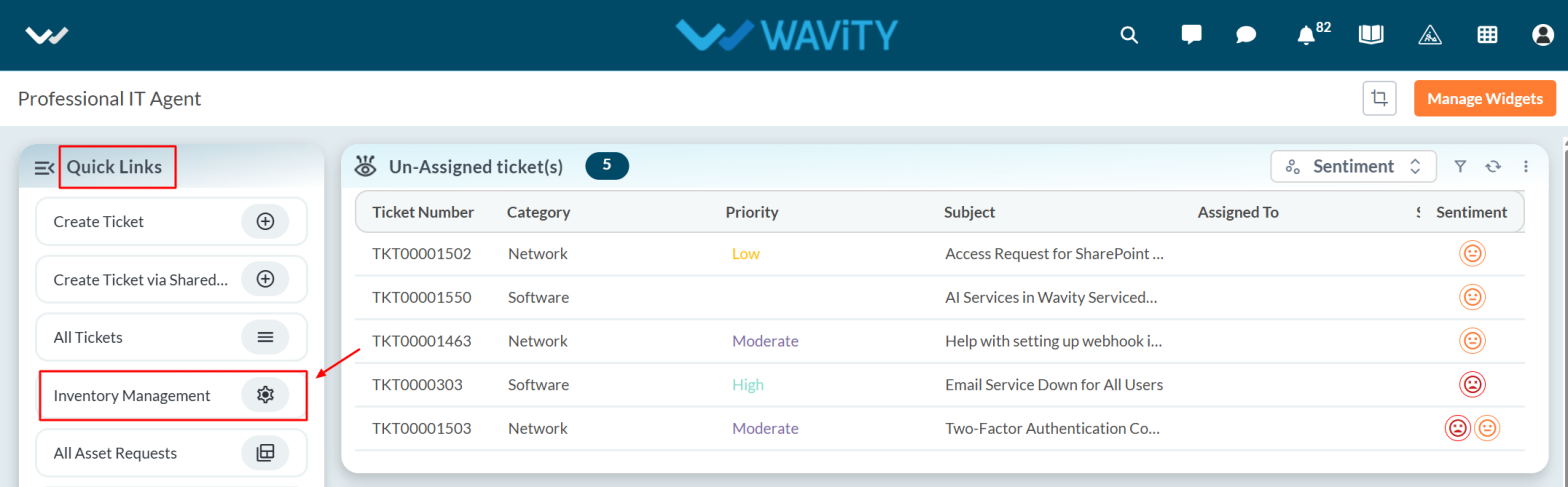
- Click on Create to add a new asset to the inventory.
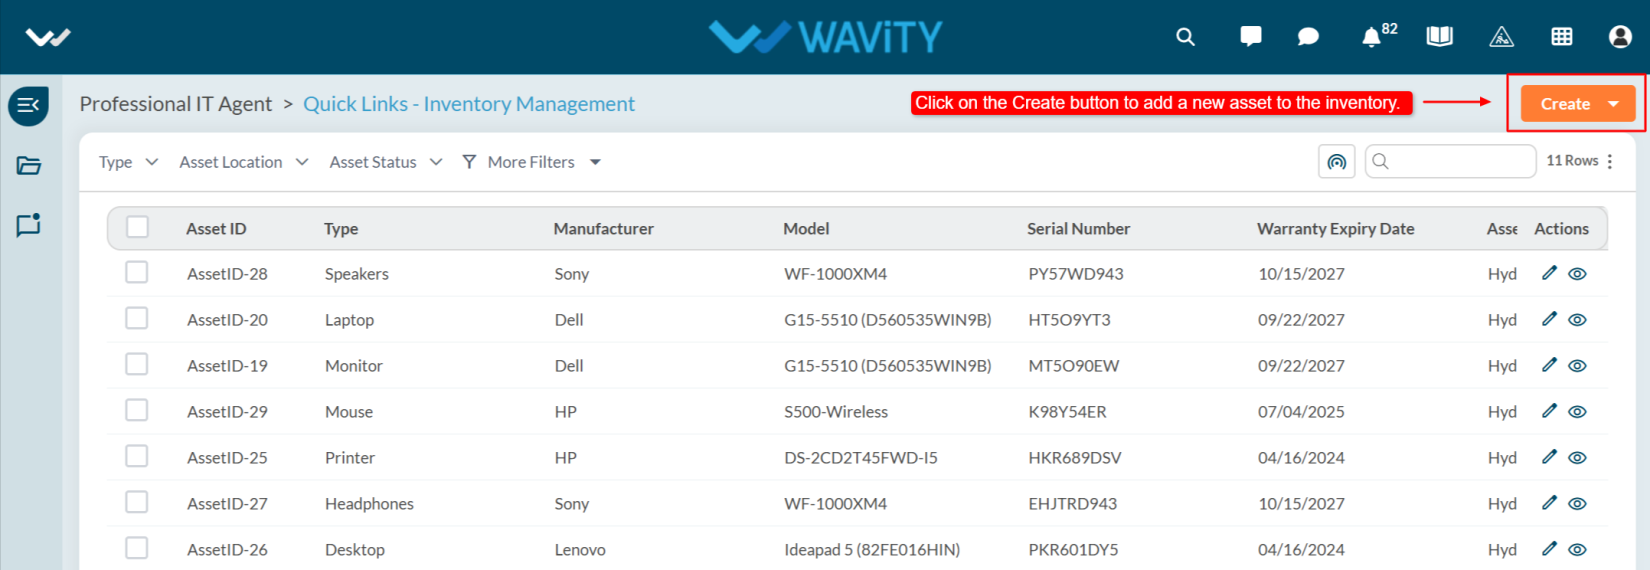
- The agent must fill in all the required details in the Asset tab. After entering the information, click on the Save button to complete the process.
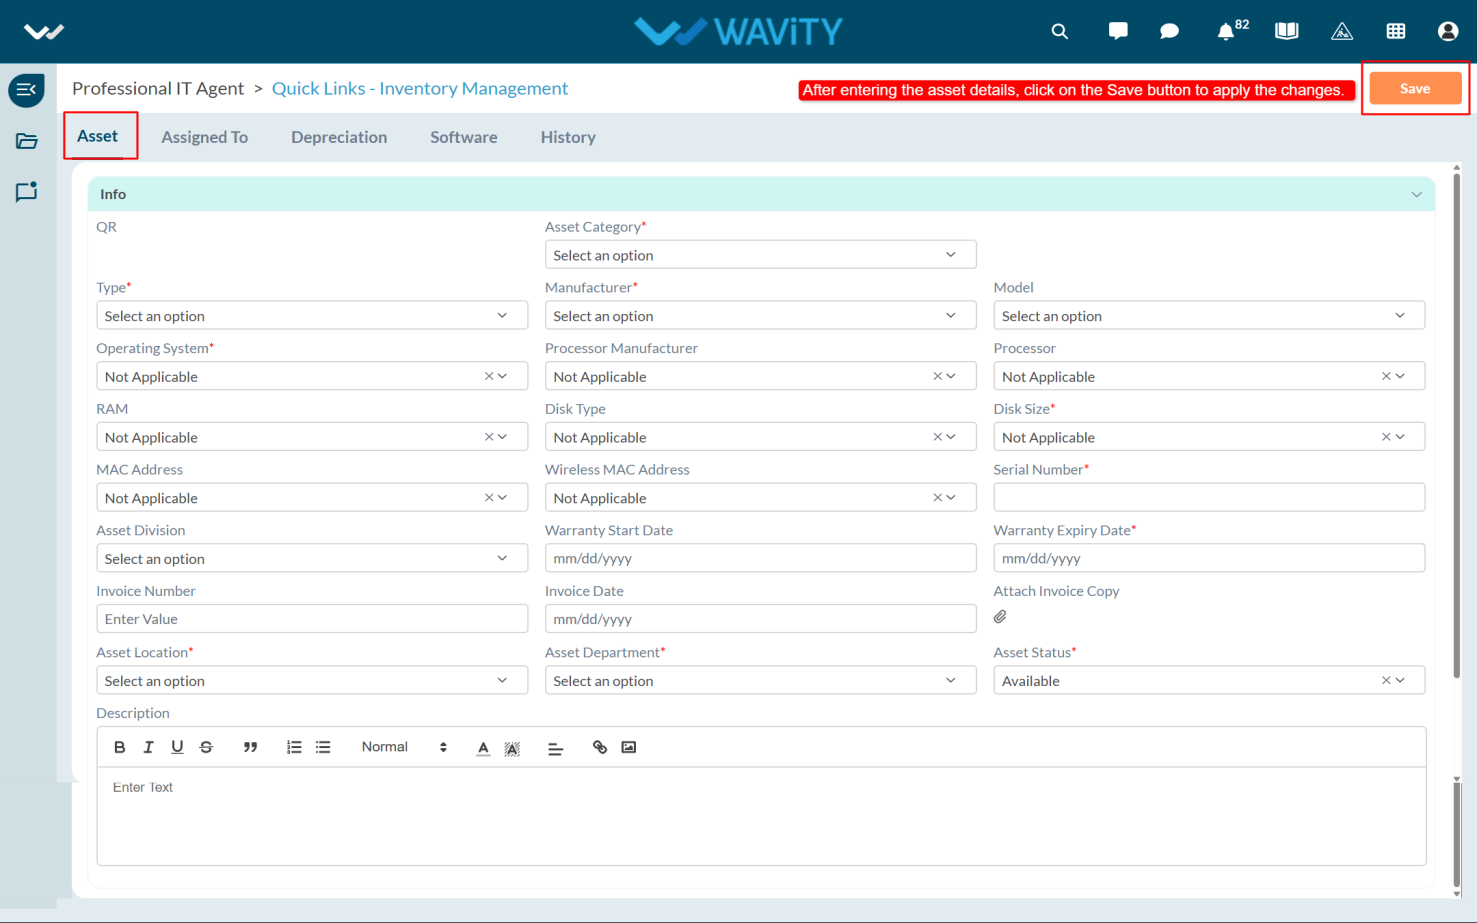
- Under the Assigned To tab, agents can directly assign an asset to a user while adding the asset to the Inventory.
- If an asset is already assigned, the existing user details will be displayed under the Assigned To tab.
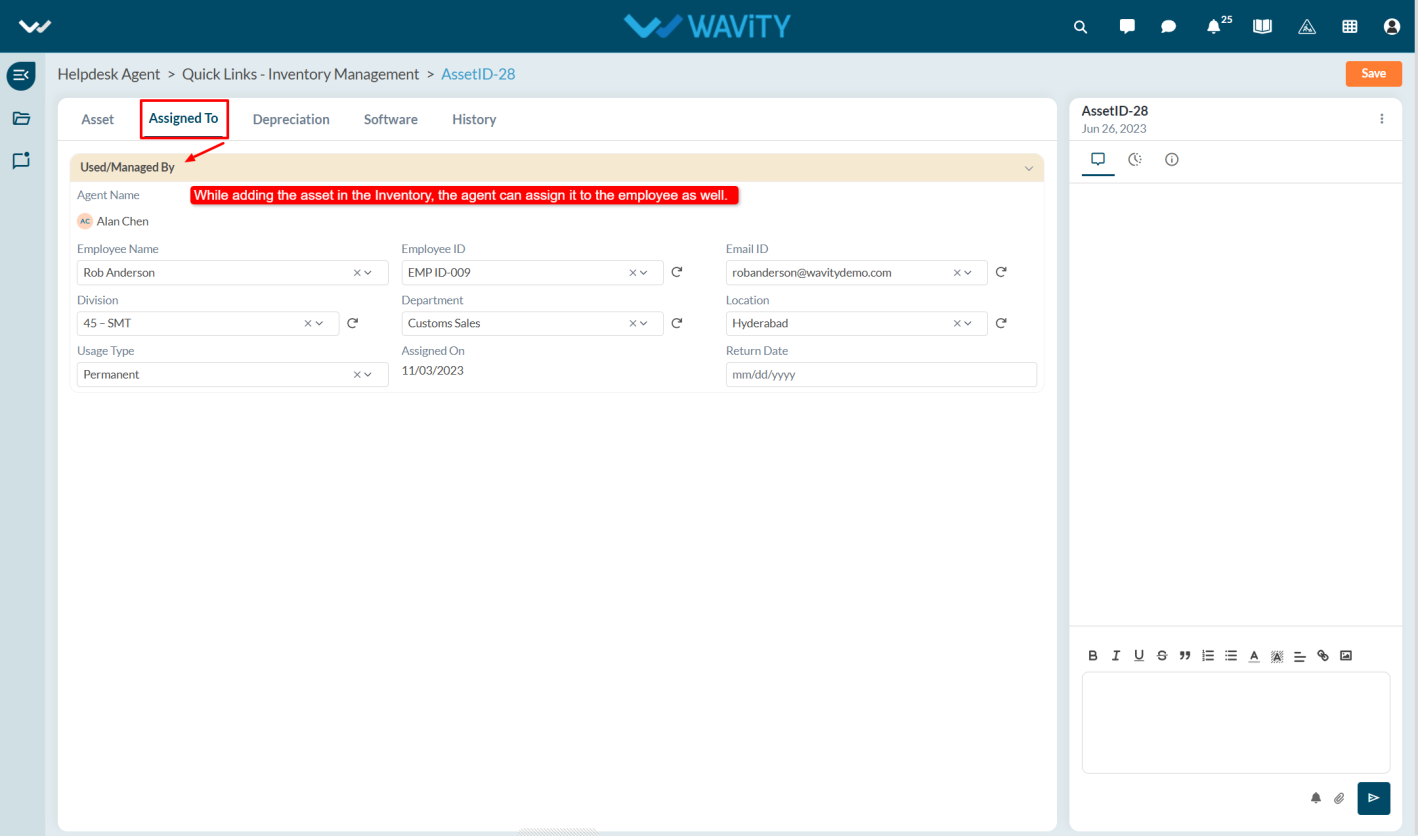
- Asset depreciation can be calculated from the Depreciation tab. To do so, enter the Cost Value, select the Depreciation Type (e.g., Straight Line or Declining Balance), and specify the Asset Life and Depreciation Rate. The system will automatically calculate and display the current value of the asset.
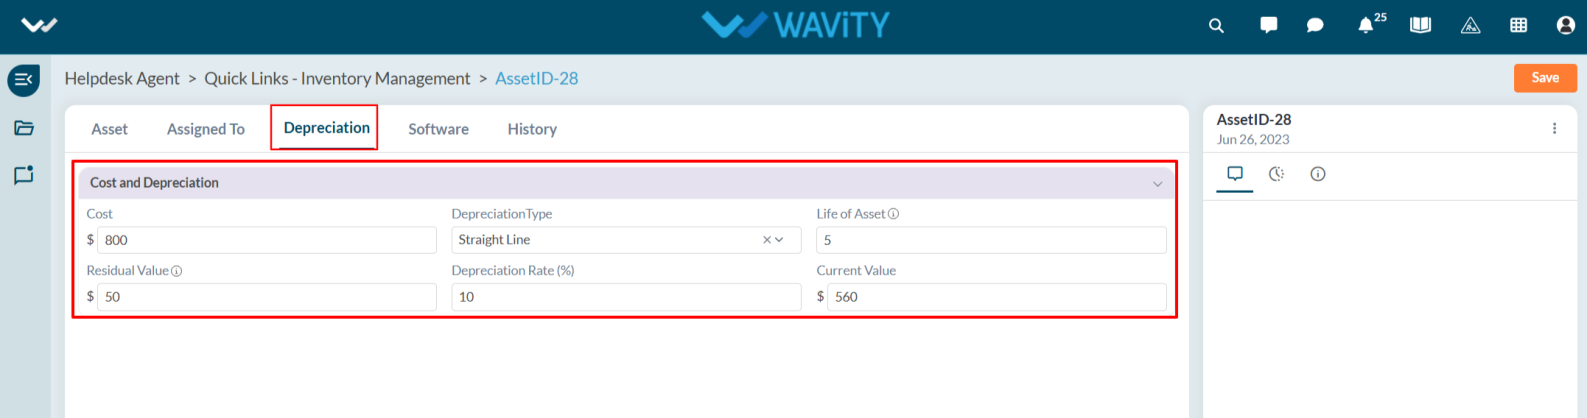
- In the Software tab, agents can view the software already assigned to the user, or assign software while adding the asset to the inventory.
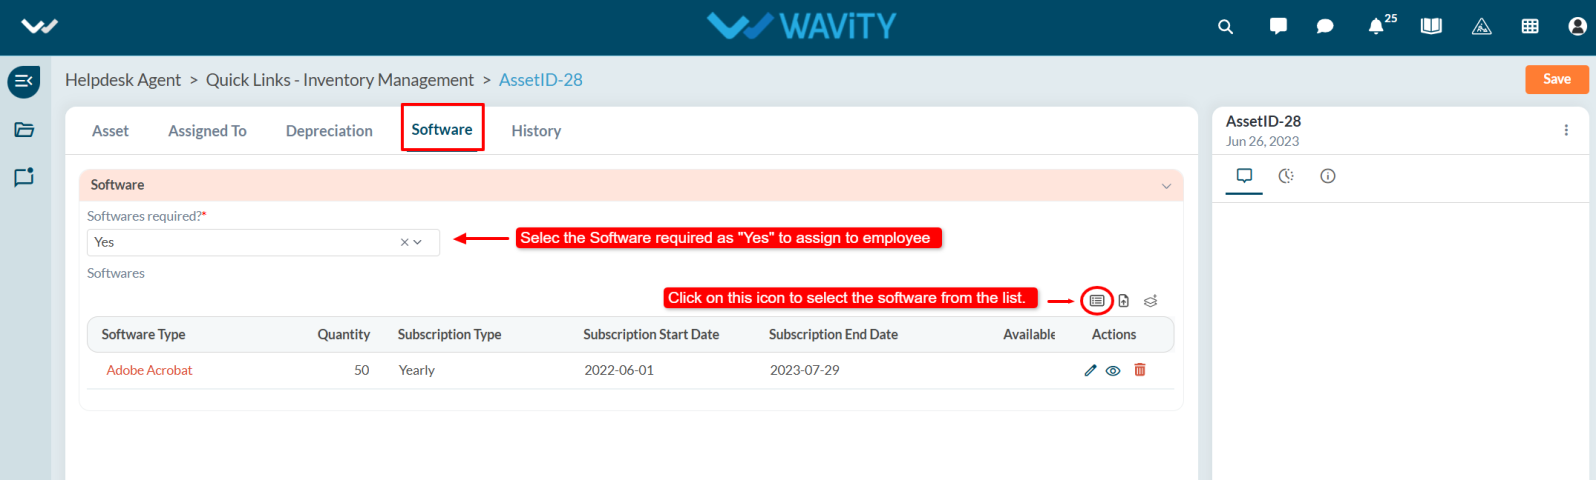
- Agents can also view and track the complete asset status under the History tab including assignments to users and returns by end users. All activity related to the asset is recorded and accessible for review.
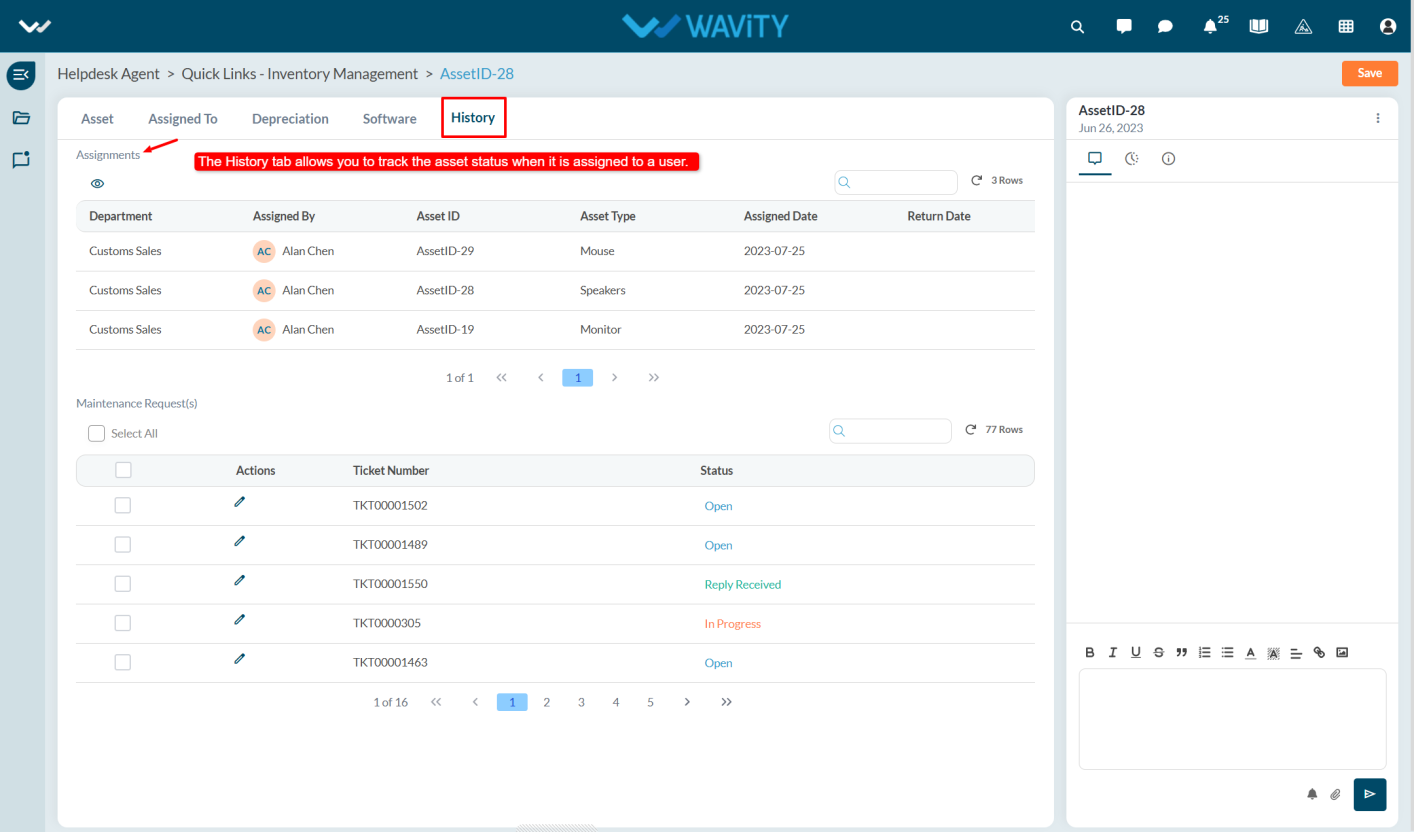
- After an asset is added to the inventory, an Asset ID and QR Code Tag are automatically generated as shown below.
- You can print the QR code and attach it to the corresponding asset. By scanning the QR code using the Wavity Mobile App, you can access complete asset information, including the manufacturer, model, purchase date, description, serial number, asset location, quantity, warranty, and asset state.
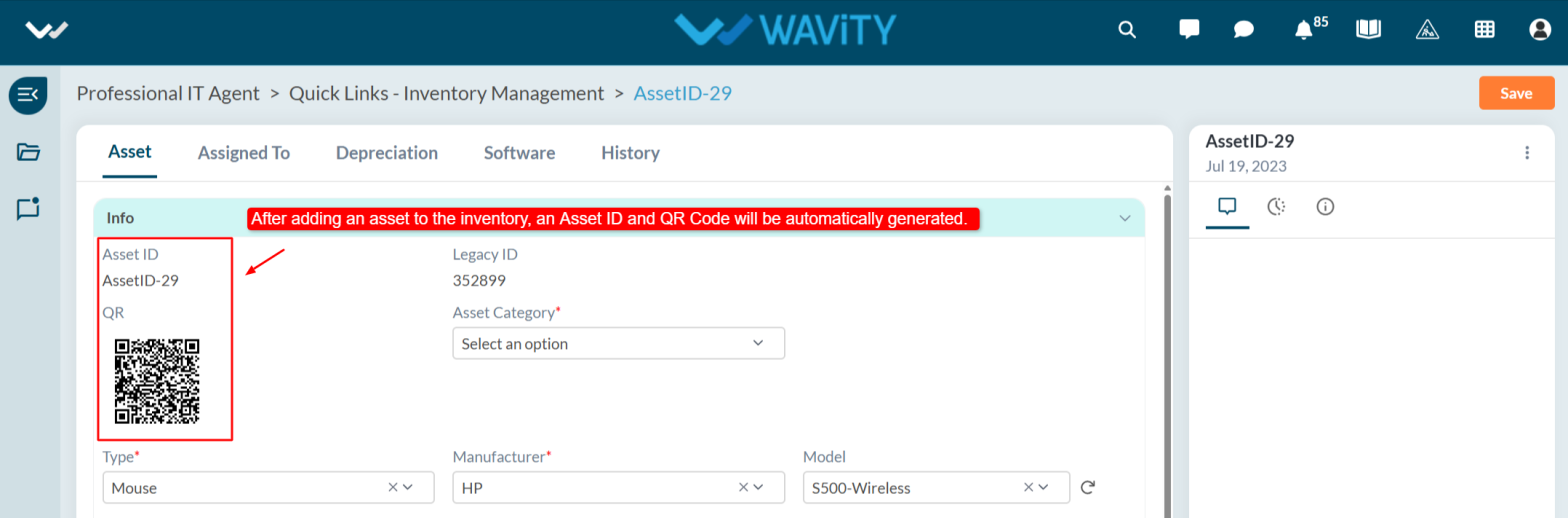
Employee Exit Clearance and Asset Return Process
- The Wavity platform offers a simple and user-friendly process for returning assets during employee offboarding.
- An agent (with appropriate access) initiates the process by creating an Offboarding Request.
- Note: The following steps serve as a general guide and can be customized as needed. However, the core workflow remains consistent.
- In the Agent Persona, go to Quick Links and select Employee Exit Clearance.
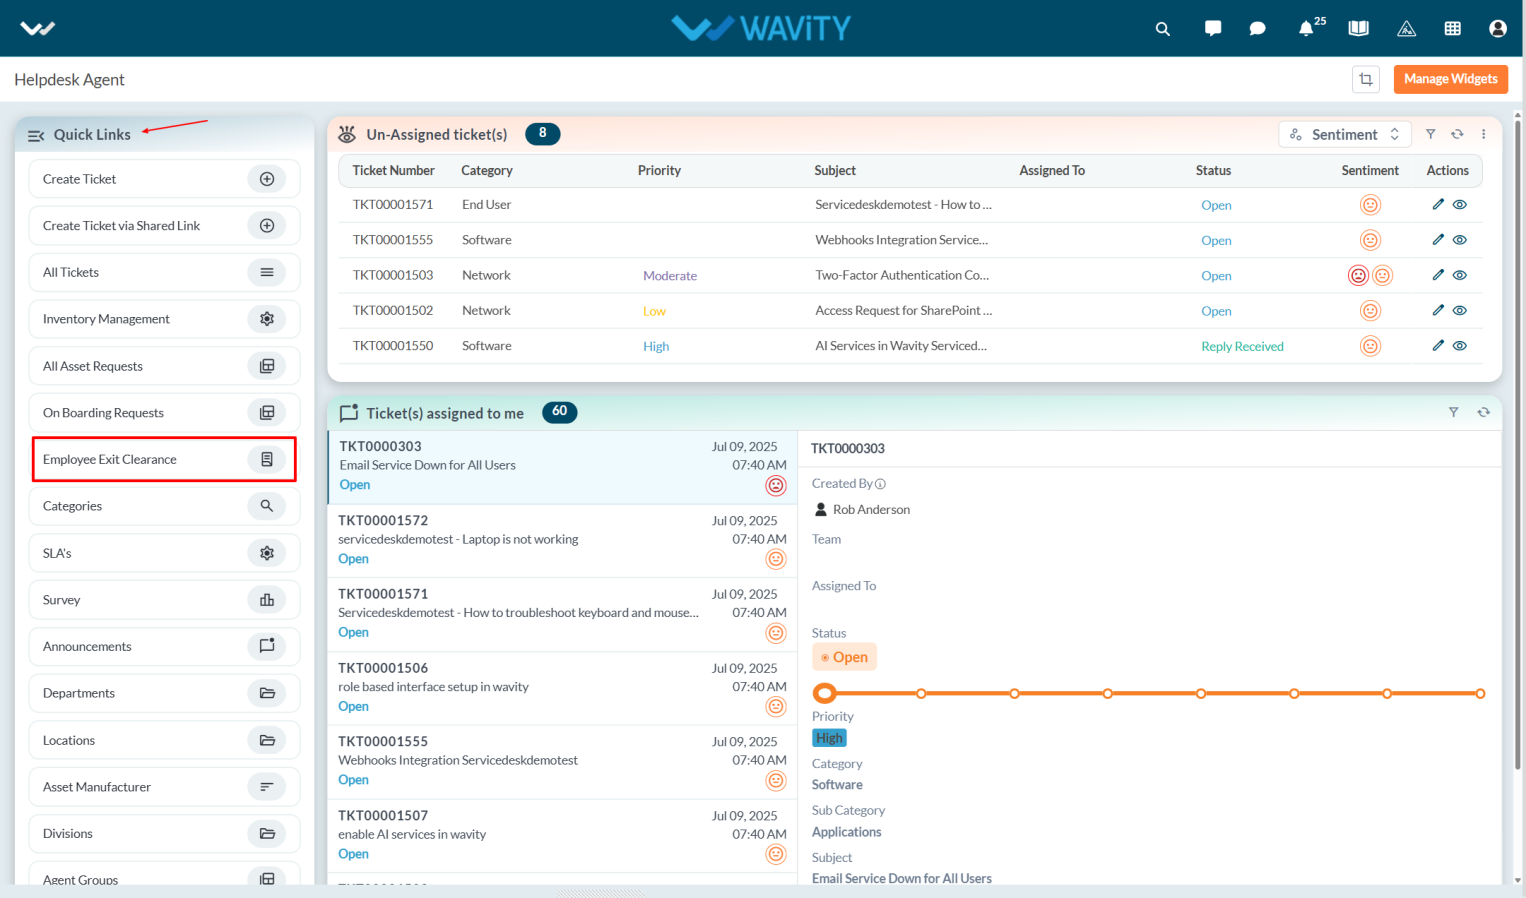
- Click the Create button to initiate a new Employee Exit Clearance request.
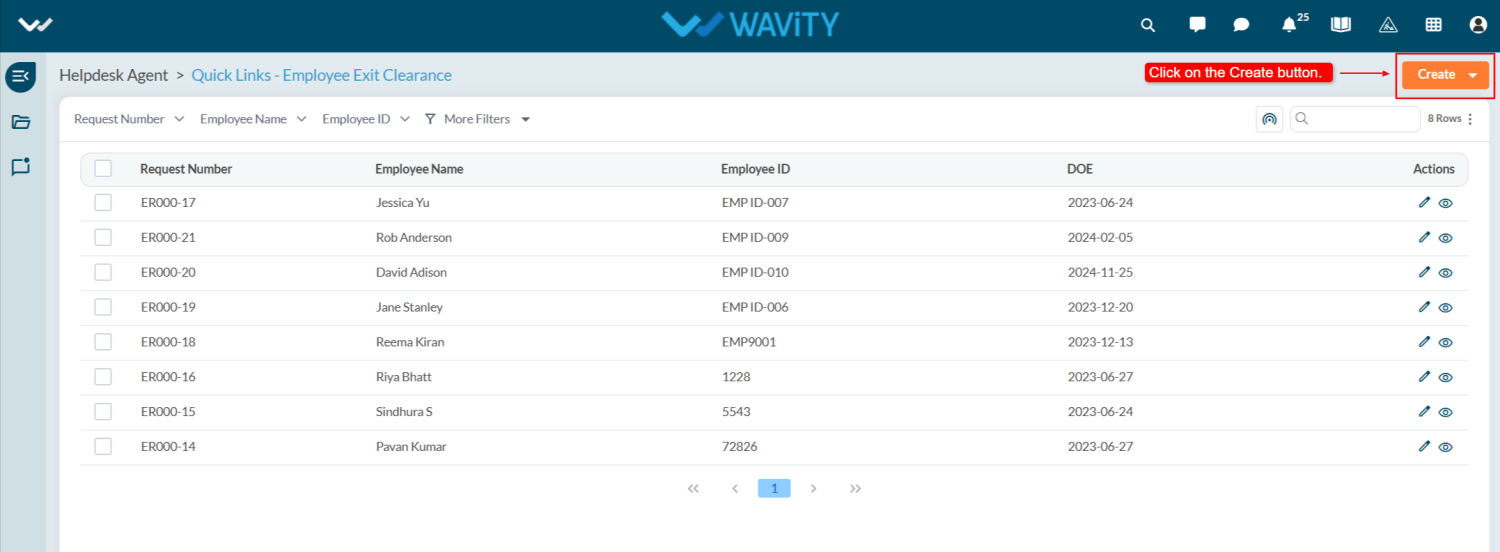
- You will be redirected to the Return Form under the Request tab.
- Select the Employee Name. Once selected, details like Employee ID, Email ID, and Designation will auto-populate.
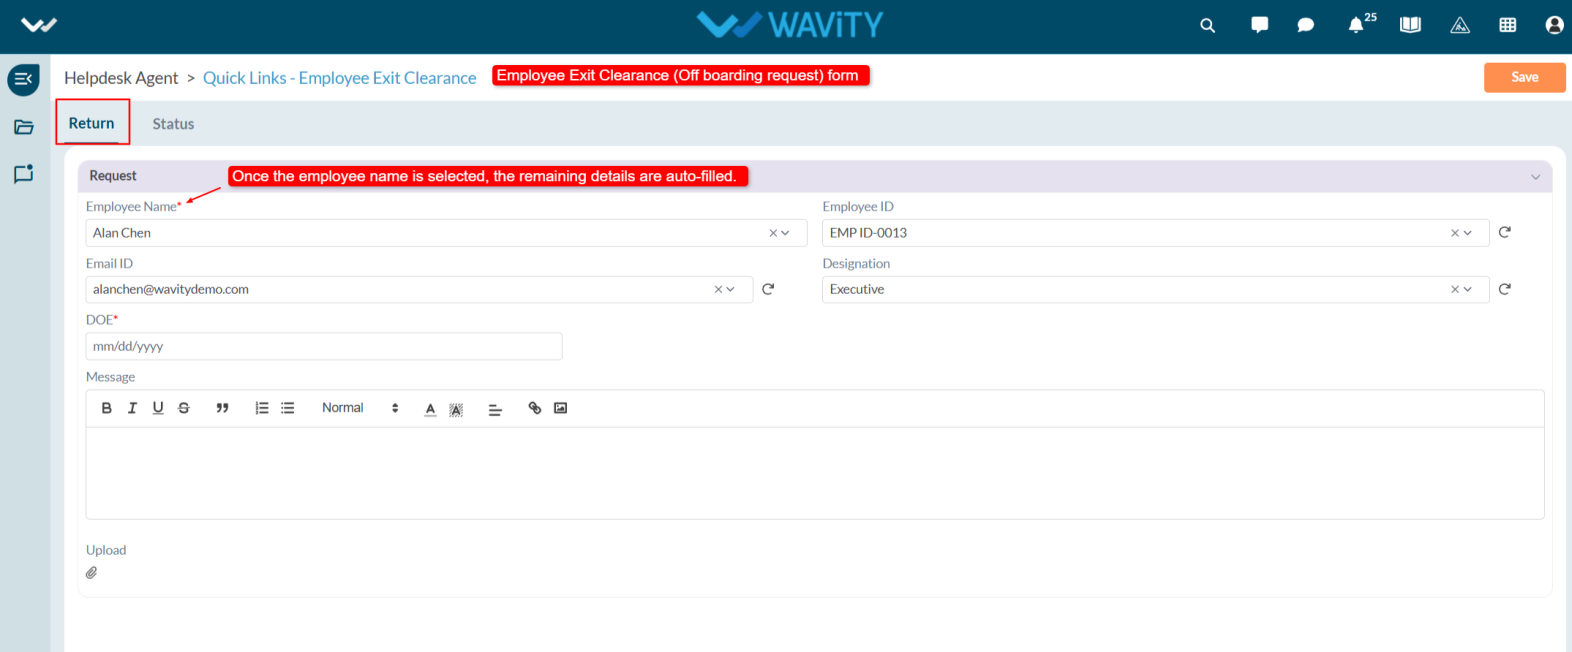
- Choose the Date of Exit (DOE), enter any additional notes in the Description box, and upload relevant attachments if required.
- Click Save to submit the request.
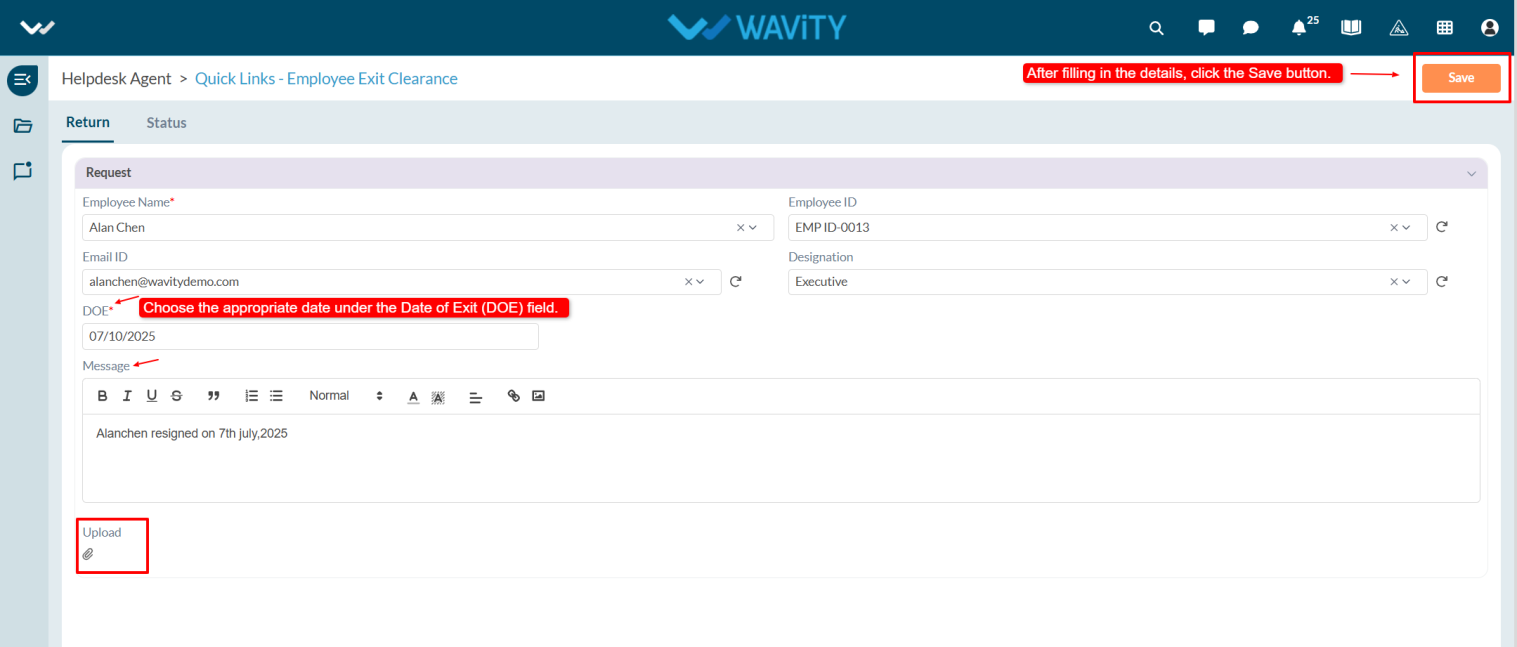
- In the Status tab under Assignee Details, the agent selects the asset(s) assigned to the employee in Asset field. Click on the select more records icon.
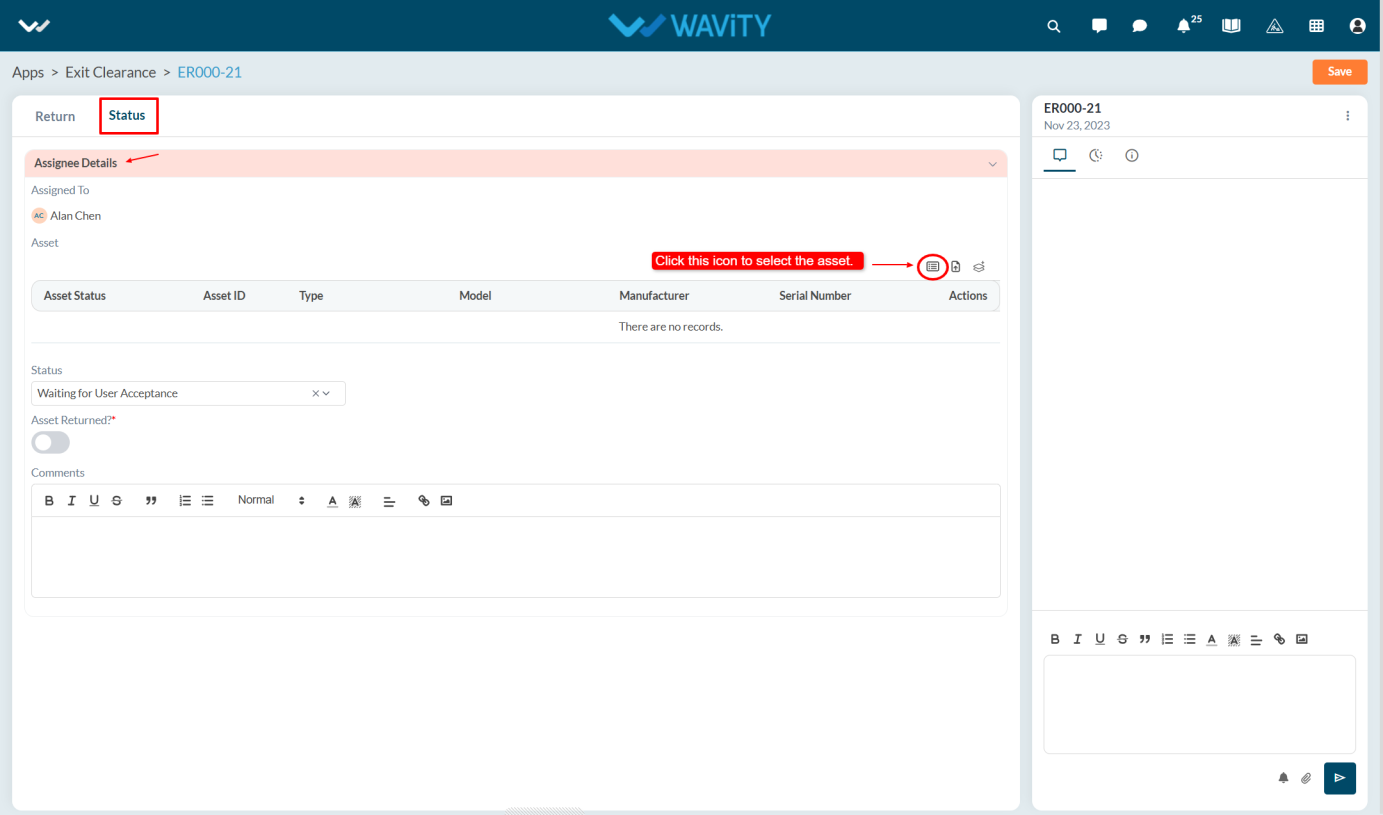
- Select the asset from the Asset list.
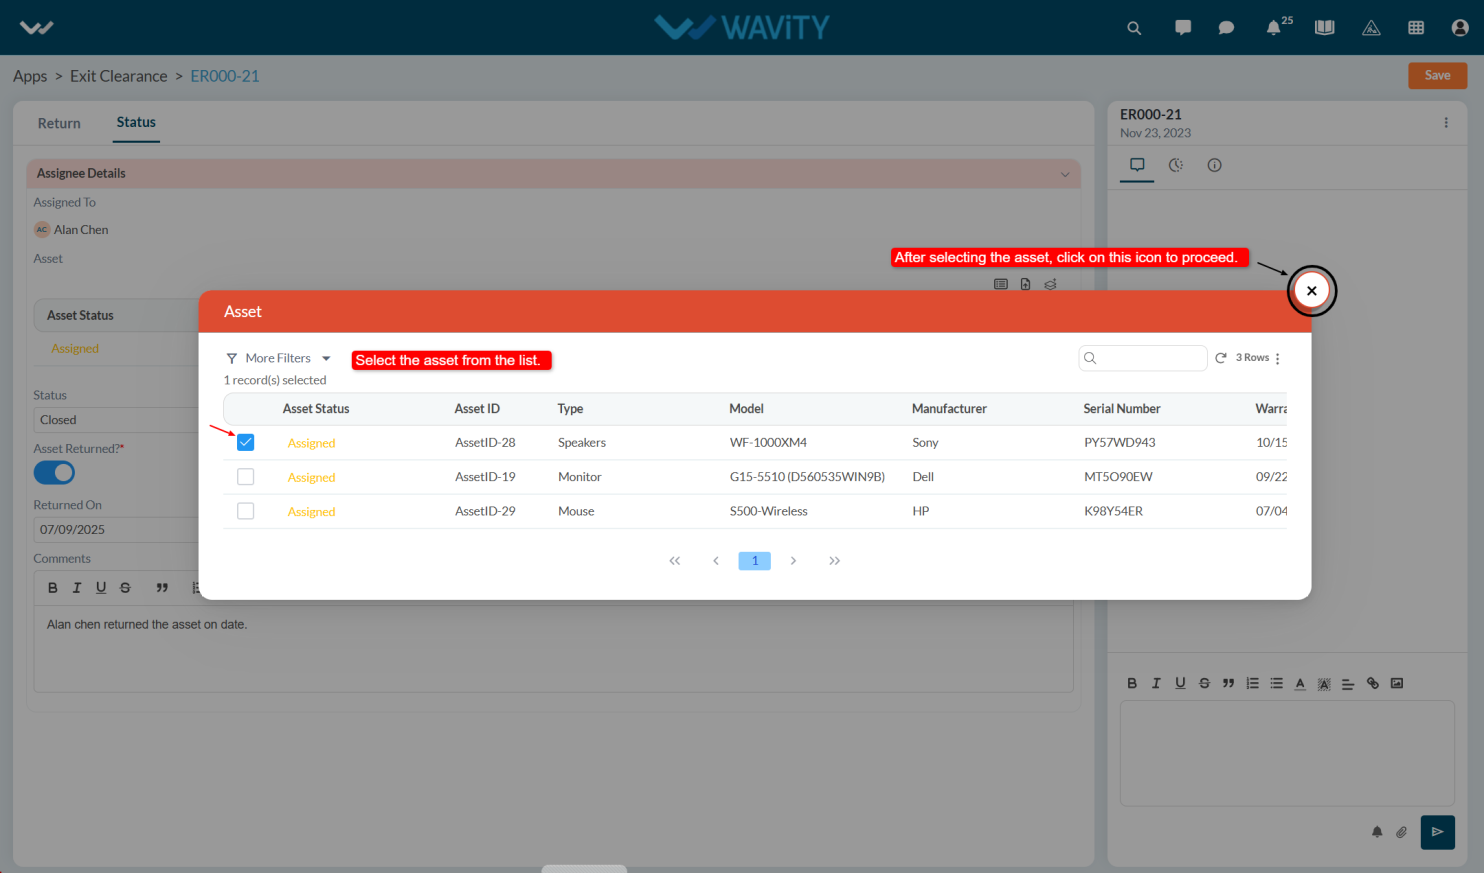
- Change the status, set the Asset Returned toggle to Yes the Return Date will populate automatically
- Agent can add comments and click Save to update the record.
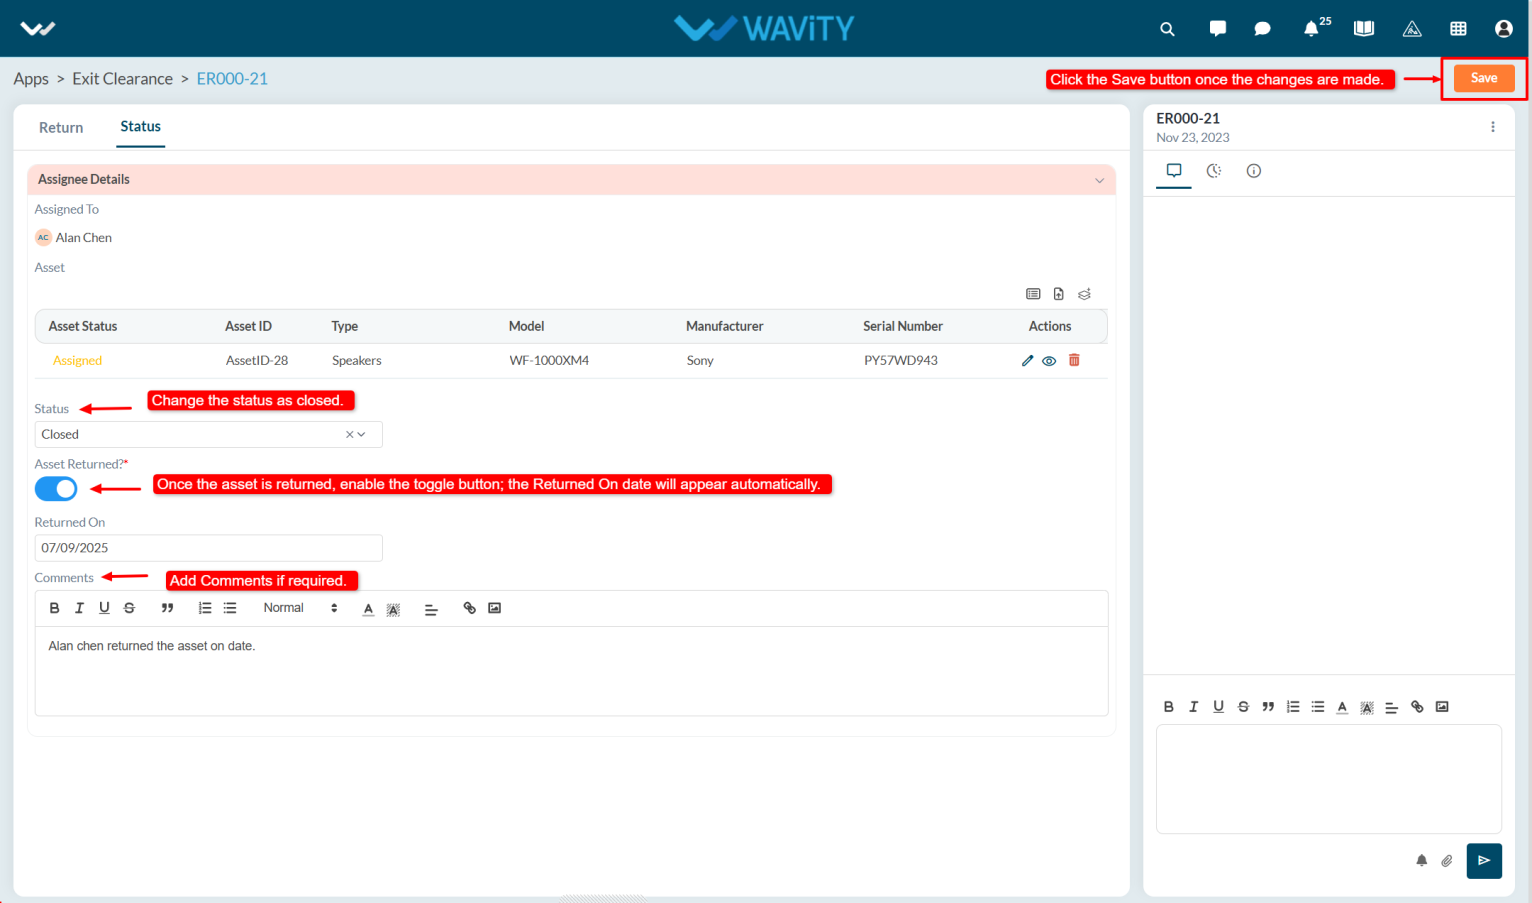
- The asset's status in the Inventory will automatically update to Available.
- All asset history and assignment history will be logged and viewable under the History tab in the Inventory.
Agent Guide: Creating and Managing Onboarding Requests
- The Wavity platform offers a simple and user-friendly process to On board a new user.
- An agent (with appropriate access) initiates the process by creating an Onboarding Request.
- Note: The following steps serve as a general guide and can be customized as needed. However, the core workflow remains consistent.
- In the Agent Persona, go to Quick Links and select On Boarding Requests.
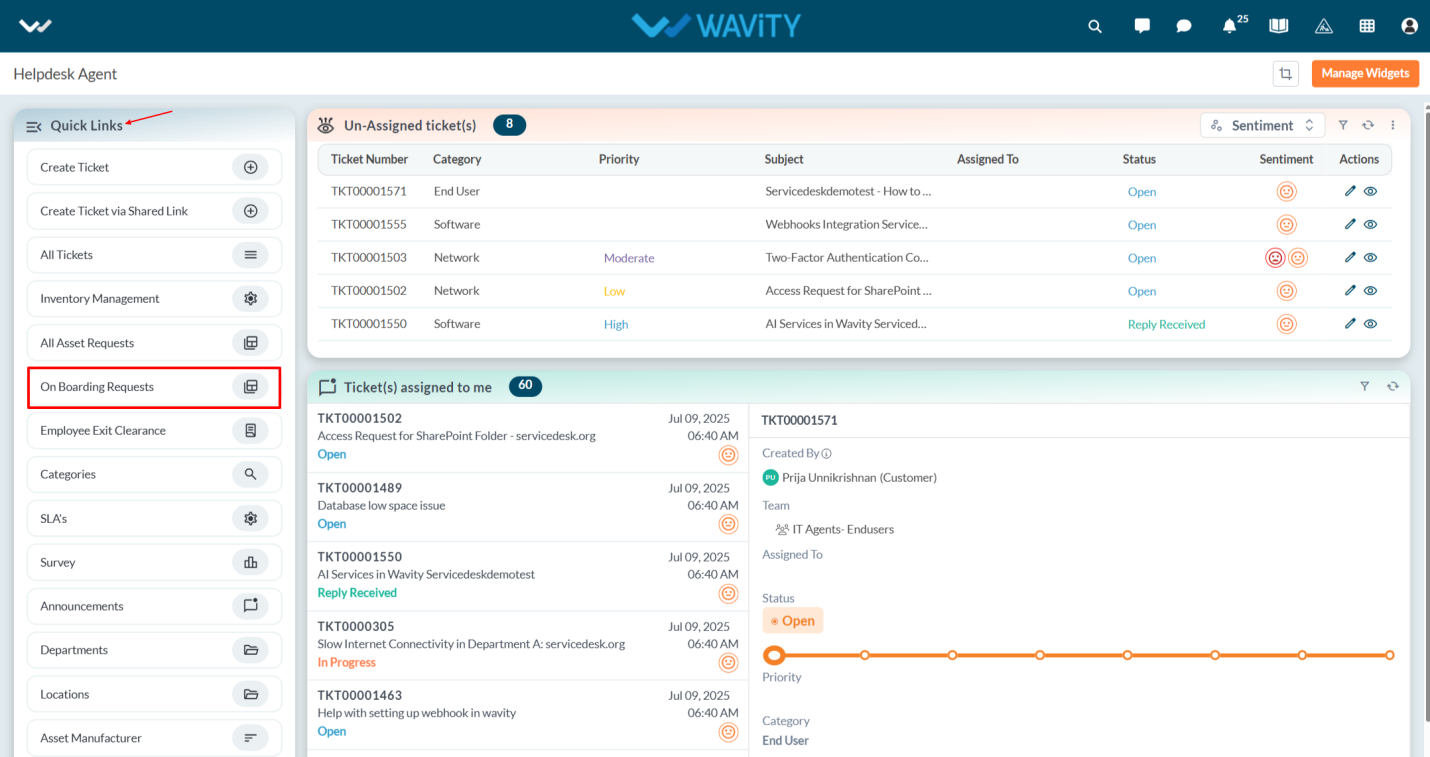
- Click the Create button to initiate a new On Boarding Requests.
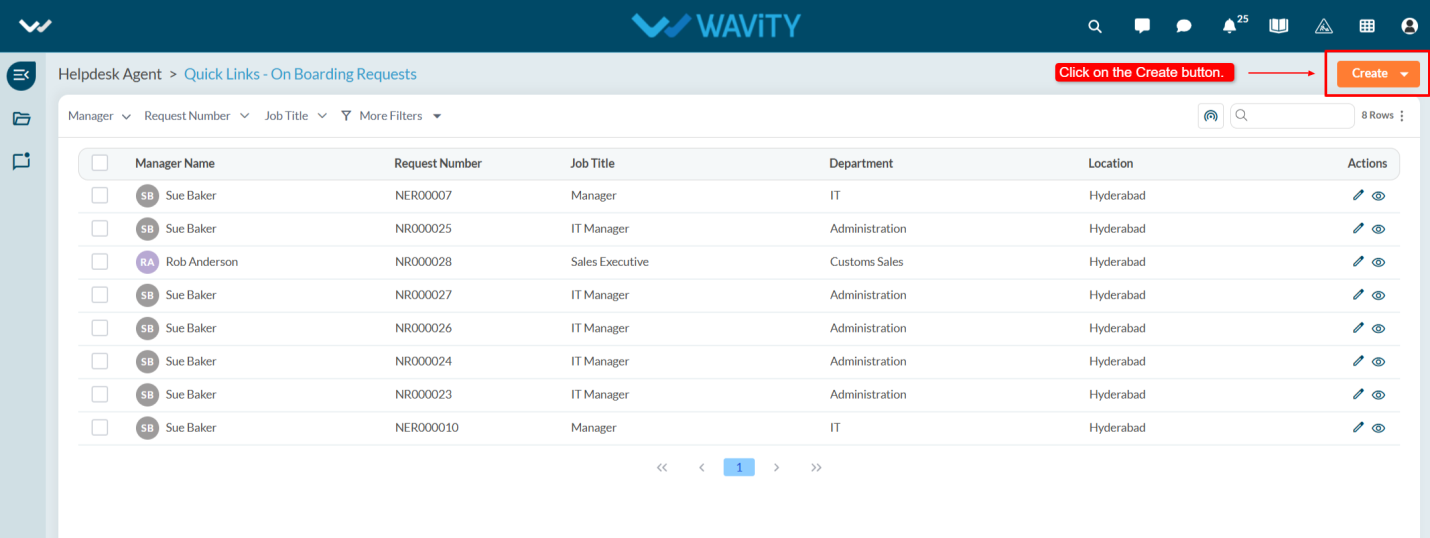
- You will be redirected to the Requester Information and Employee Details under the Requester tab.
- In the Requester Information section, the manager details will be fetched automatically.
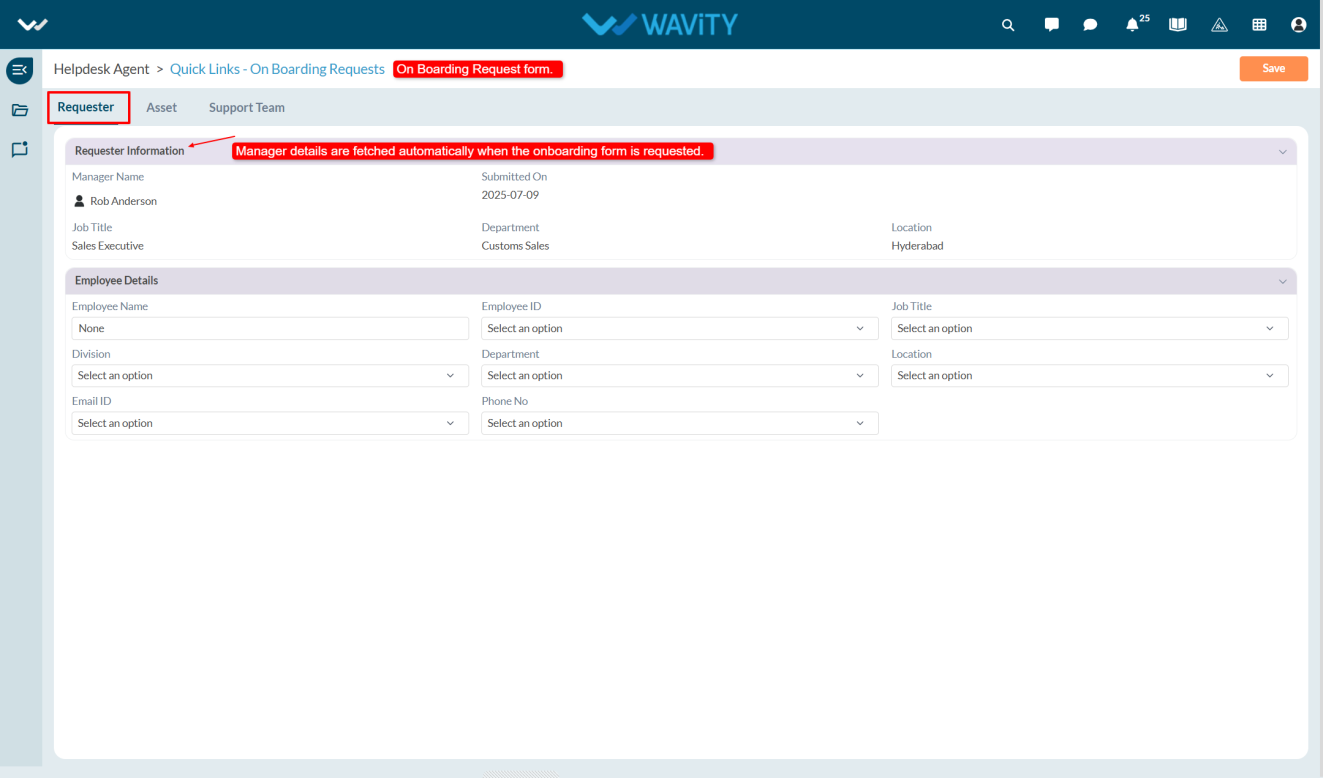
- In the Employee Details section, select the employee name from the dropdown list once selected, related details such as Employee ID, Email ID, and Designation will be populated automatically.
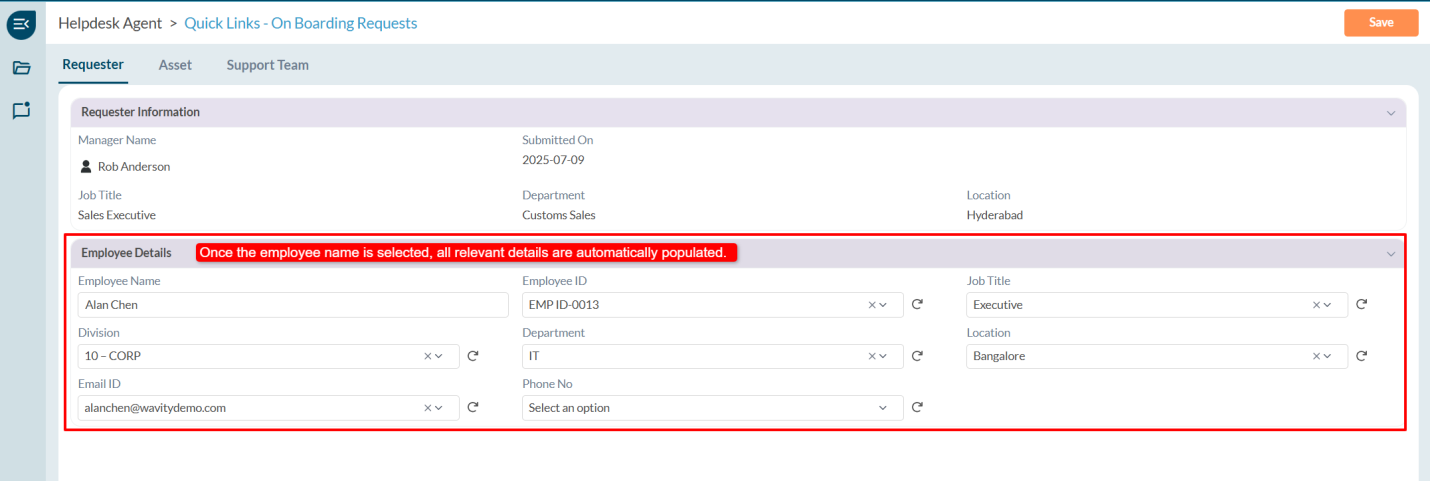
- In the Asset tab, you can view all available assets. If the agent wants to provide software access to the new joiner, they must set Software Required to Yes and then select the desired software from the dropdown list.
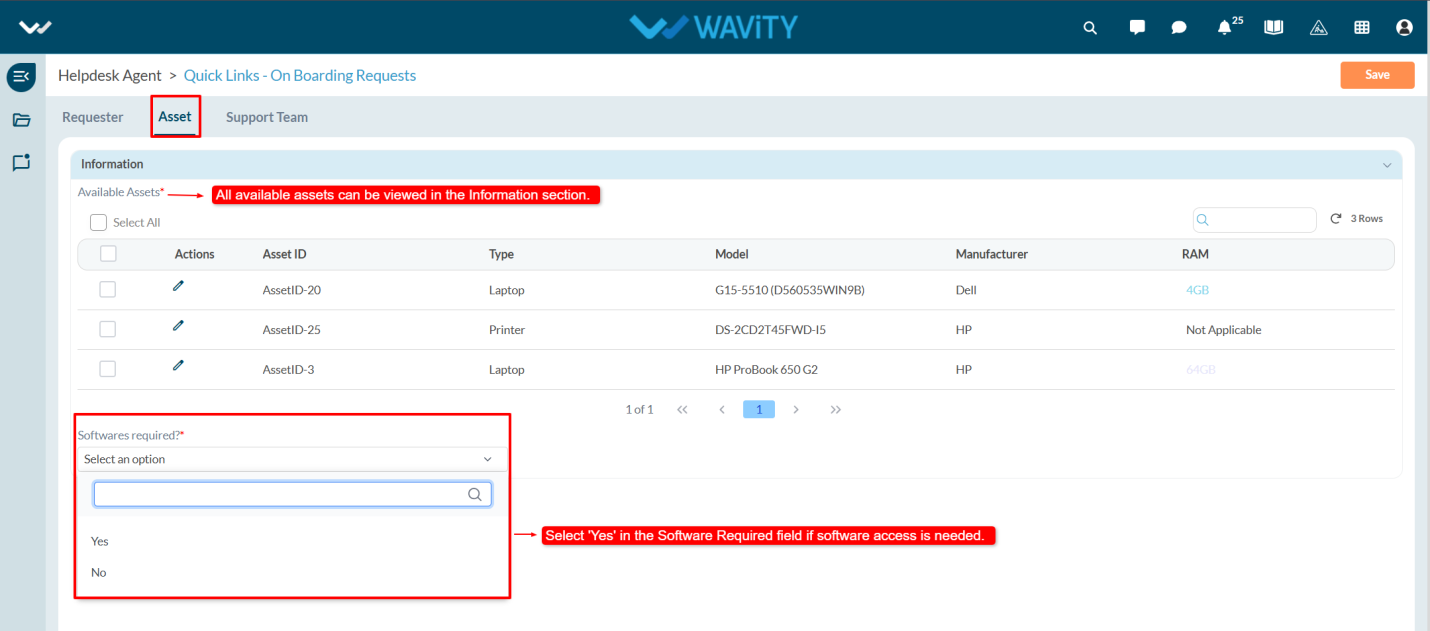
- In the Support Team tab under the IT Team, the agent changes the status, selects the asset assignment date, and enables the toggle Assign Asset. The agent must then select the required asset to assign to the employee by clicking on the Select More Records icon
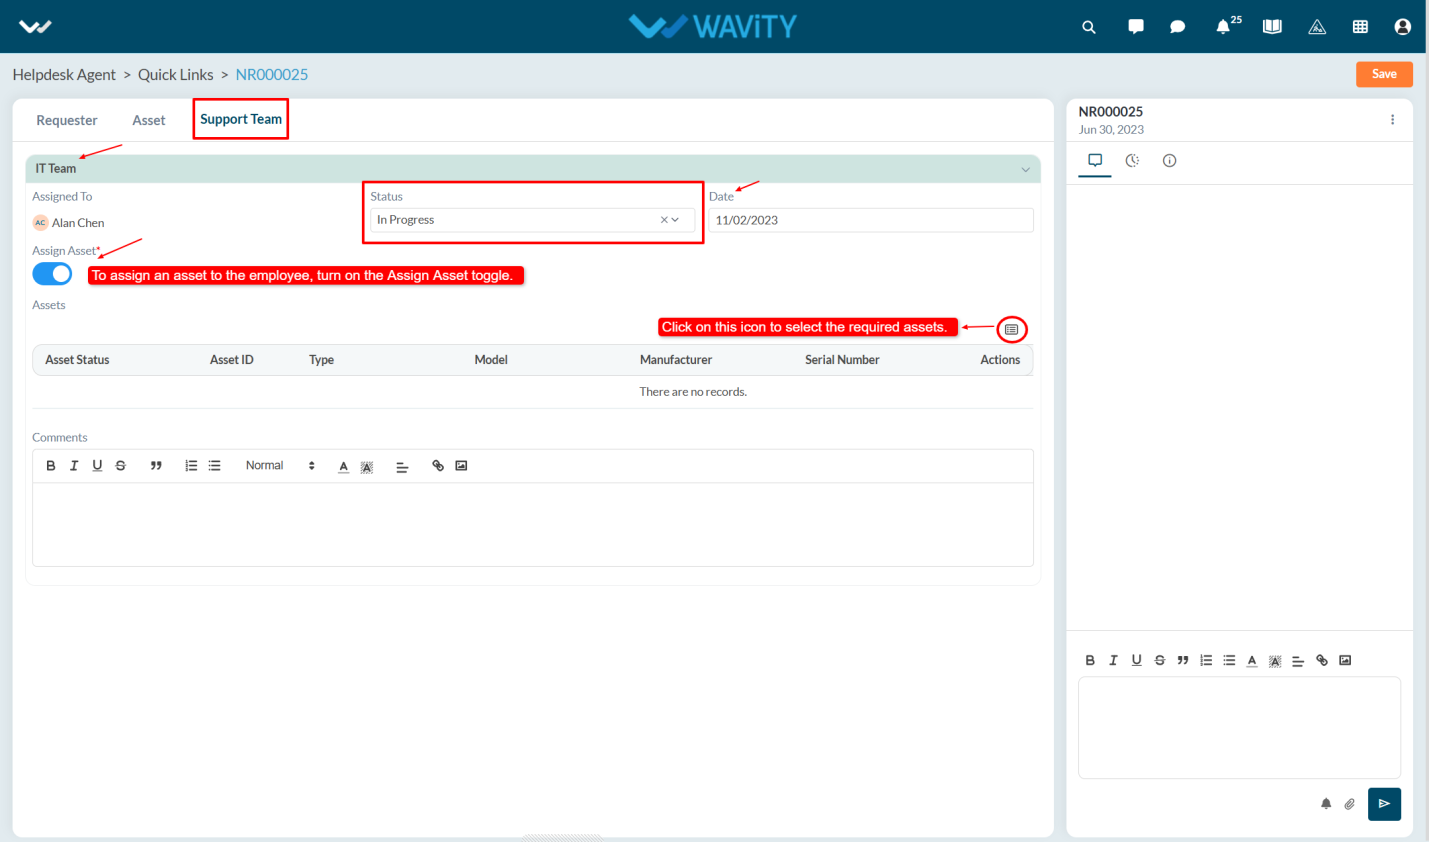
- Select the asset from the list to assign it to the employee.
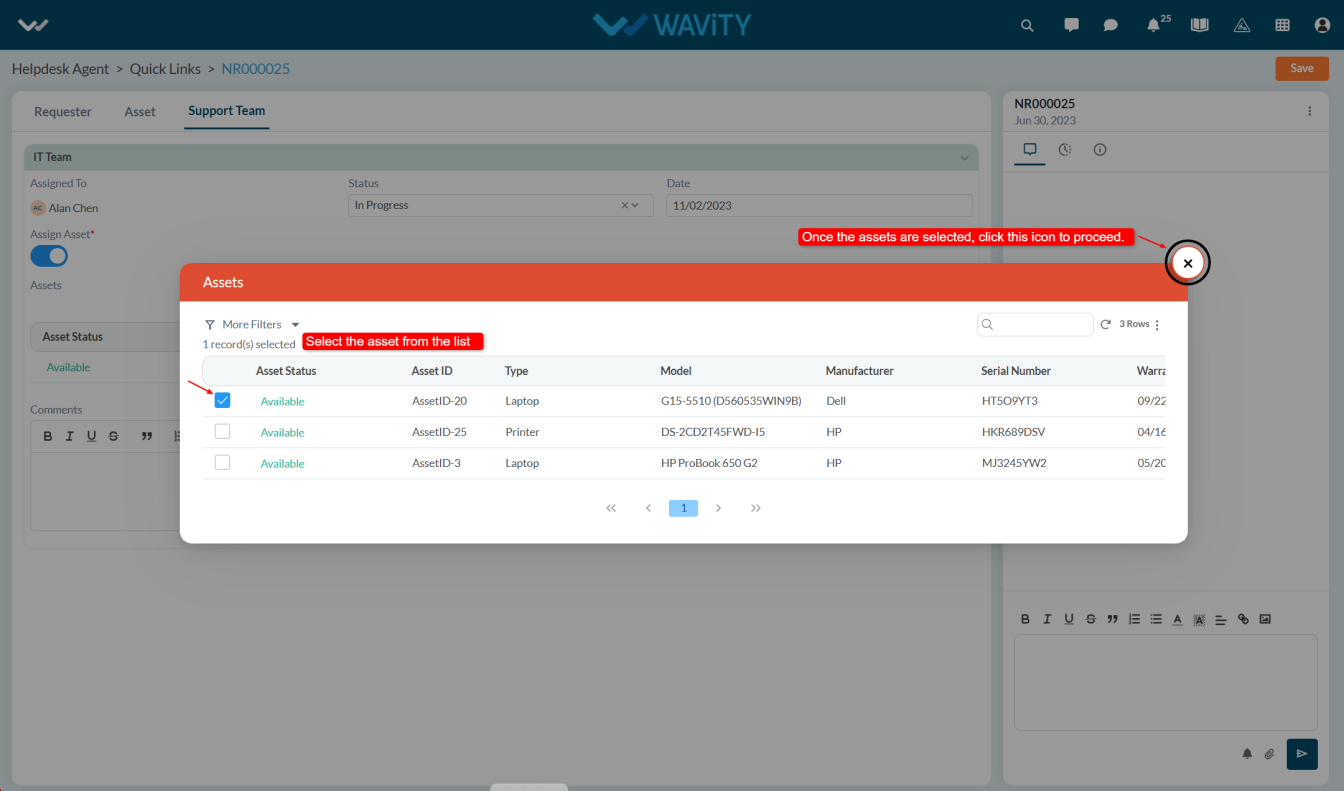
- Optionally, the agent can add comments and click the Save button to apply the changes.
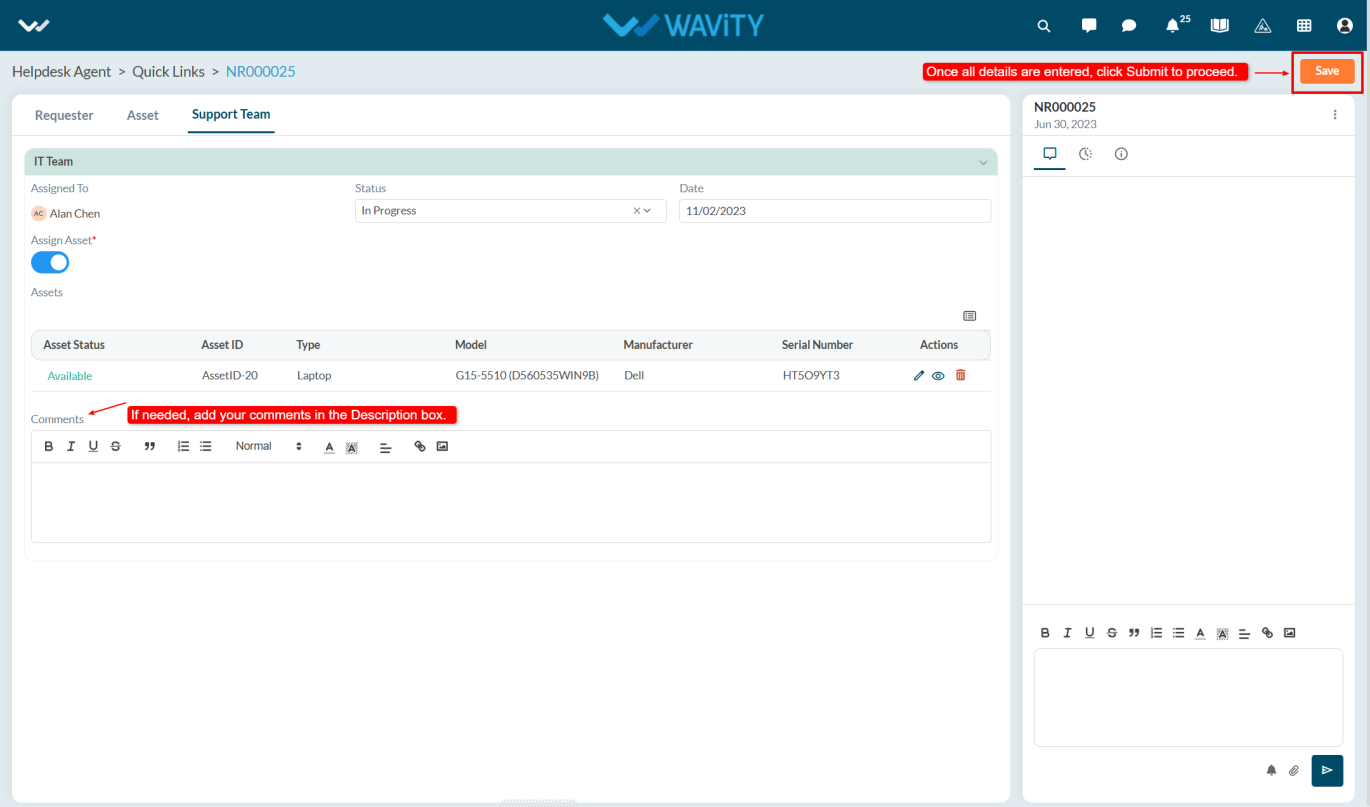
How to Calculate and Track Asset Depreciation
- Wavity makes calculating asset depreciation simple and efficient. The platform enables organizations to track the current book value of each asset and automatically calculate depreciation based on predefined methods and asset lifecycle data.
- Note: The steps provided serve as sample instructions and can be customized based on specific requirements; however, the core workflow will remain the same.
- Only users with agent have access to calculate asset depreciation within the Inventory.
- Click on Inventory Management from Quick Links in Agent Persona.
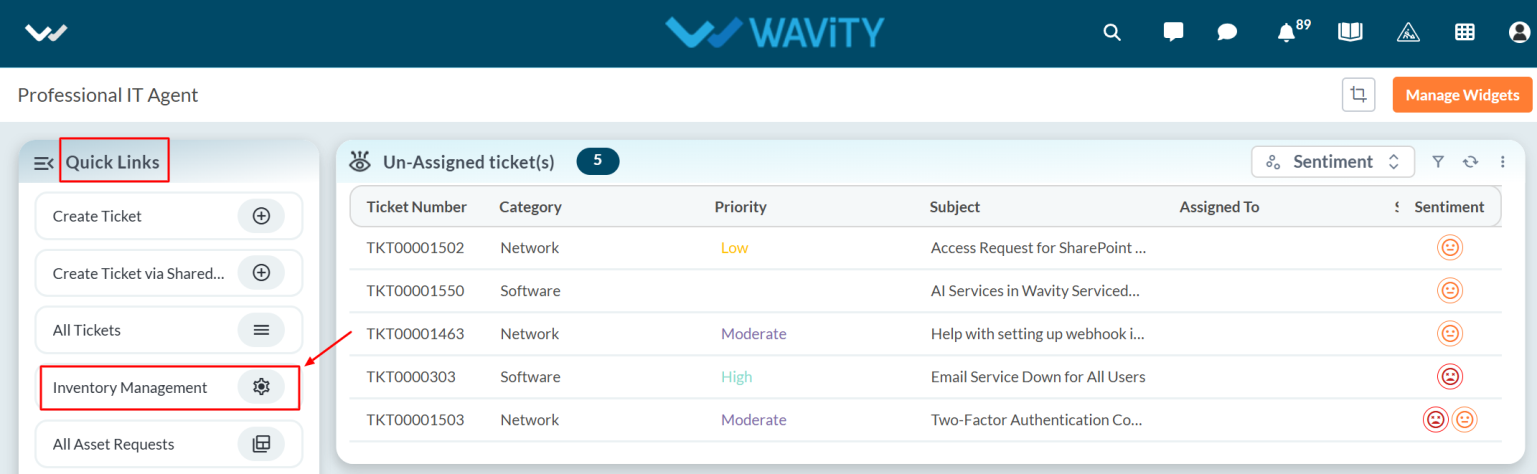
- Select the asset for which you want to calculate depreciation from the Inventory Management, and then click the Eye icon to view its details.
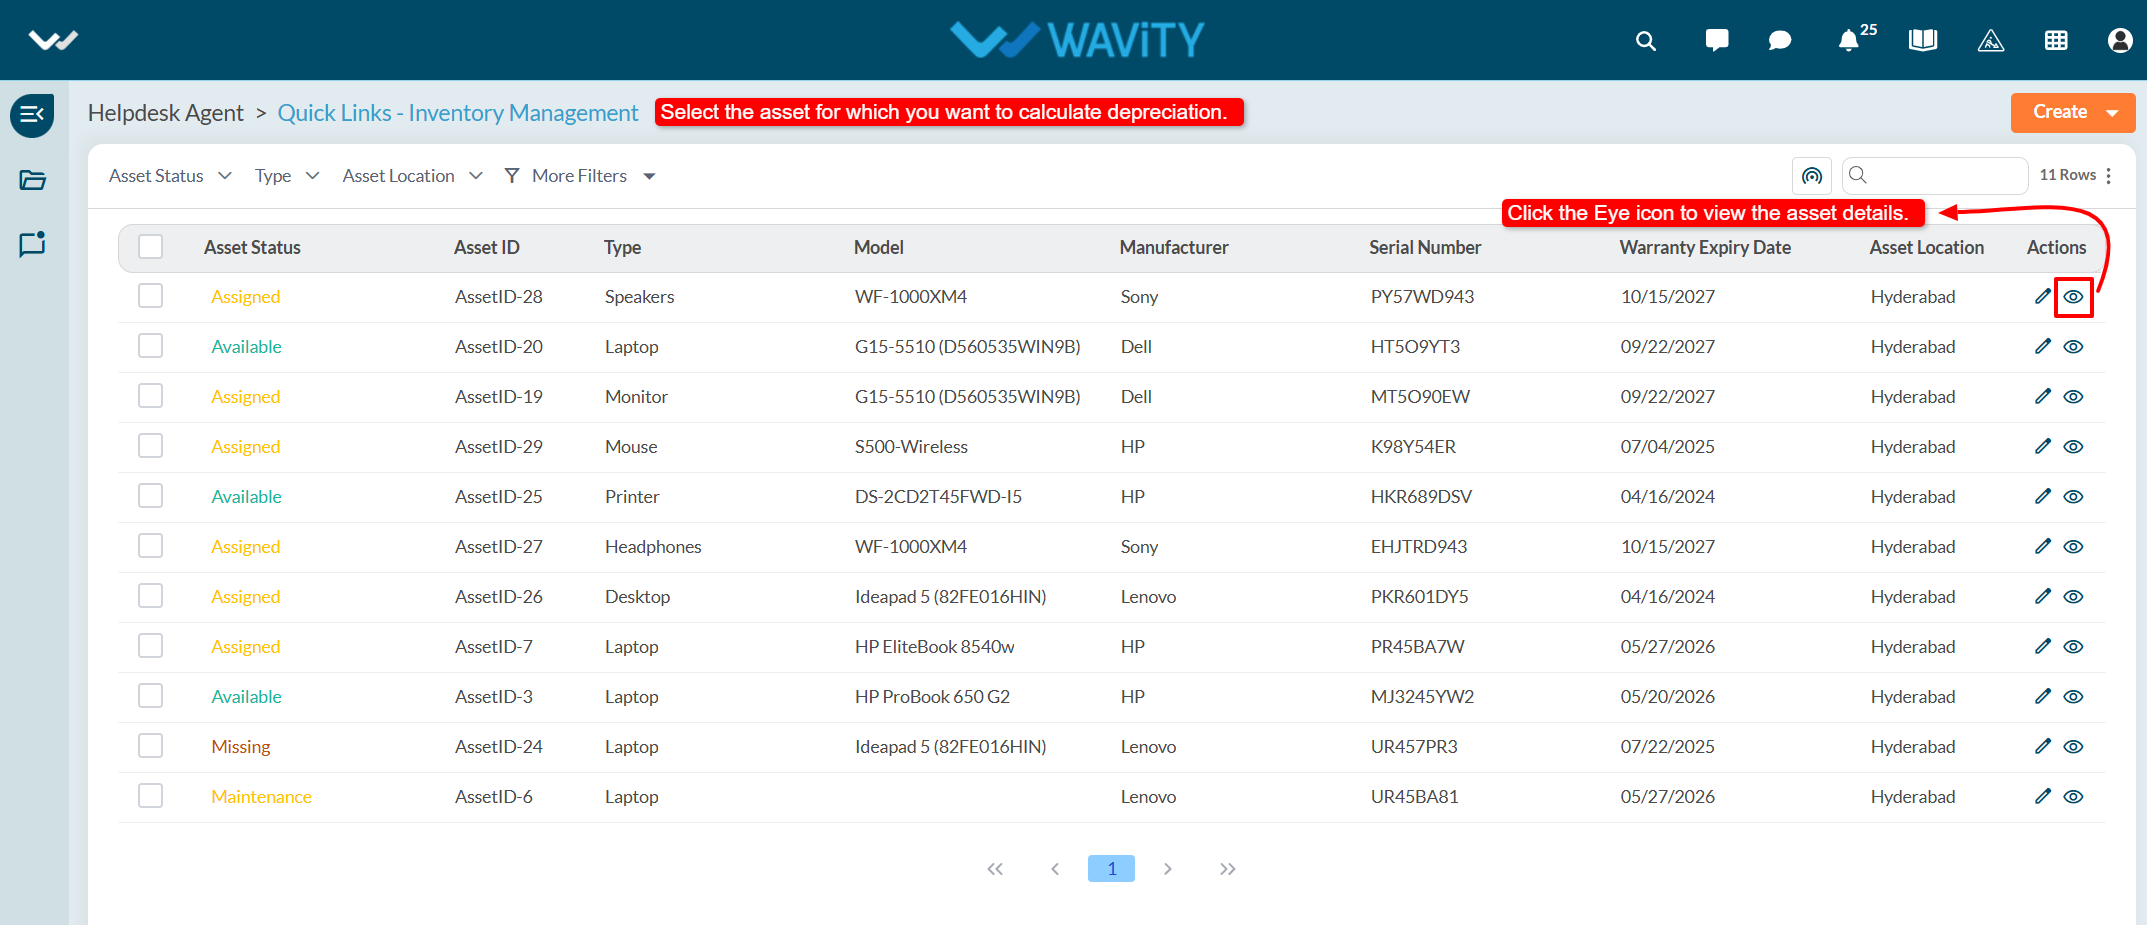
- Navigate to the Depreciation tab, where details such as the asset's cost, depreciation type, and other related information will be displayed.
- Enter the Cost of the asset in Cost field and select depreciation type such as Straight line or Declining Balance.
- Enter the Life of Asset (e.g., 3 or 4 years) along with the Residual Value.
- Enter the depreciation rate (in percentage) and click on the Calculate button to generate the current value.
- Based on the depreciation method and depreciation rate applied, the system will automatically display the current value of the asset.
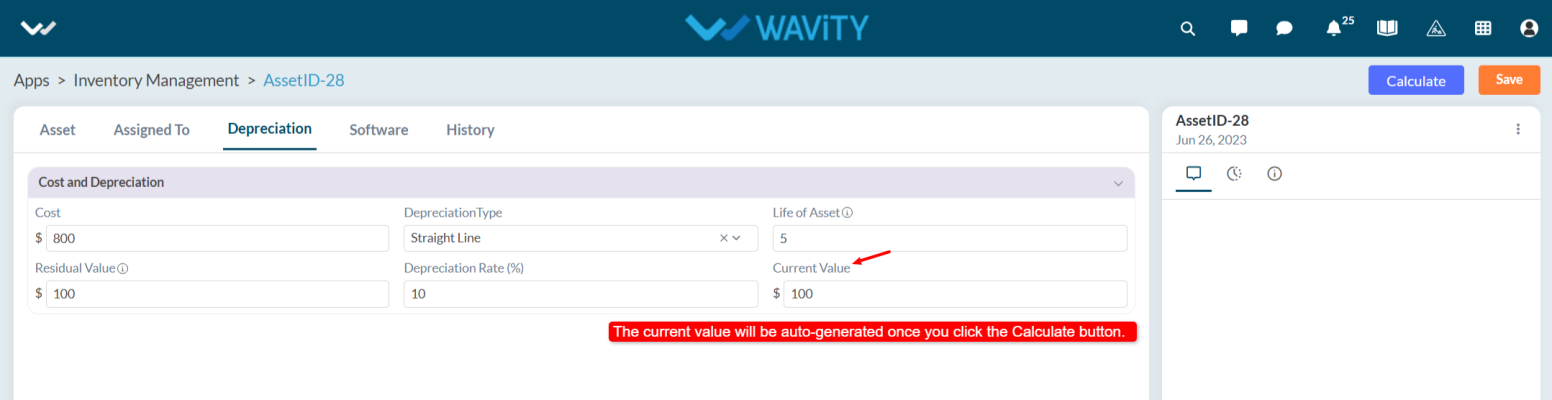
- After entering the details, click on the Save button to finalize the entry.
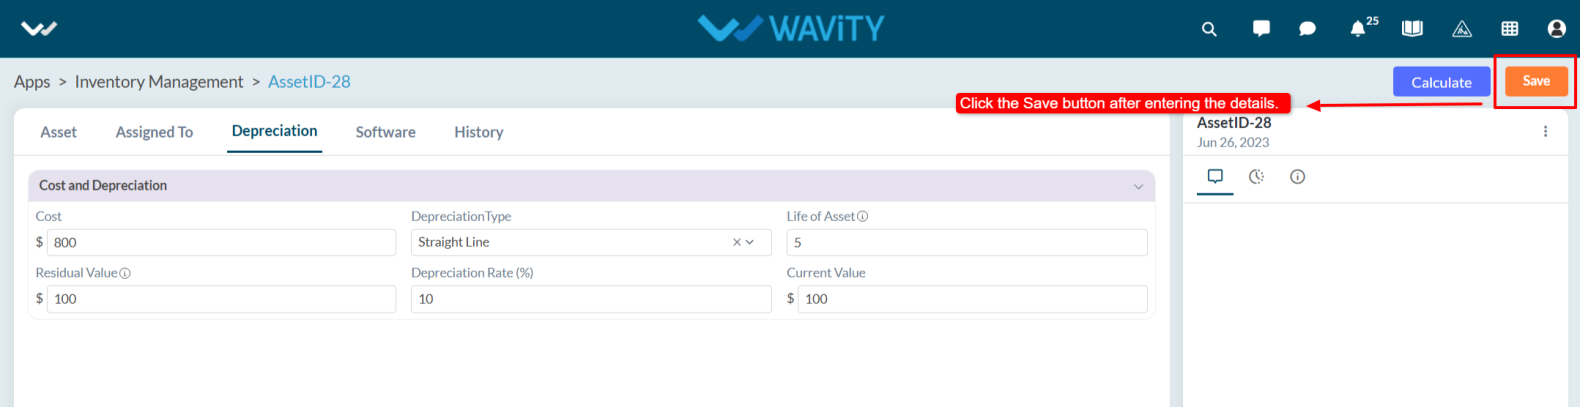
How to View Asset Assignment History
- The Wavity platform allows you to maintain and track the complete history of each asset in the Inventory.
- Whenever an asset is assigned to an end user, sent for repair, or returned to the agent, the system automatically tracks the status changes. All updates and assignment history can be viewed under the History tab within the Inventory.
- Note: The following steps serve as a general guide and can be customized as needed. However, the core workflow remains consistent.
- Users with Agent access can log in using their credentials and will land on the Agent Persona.
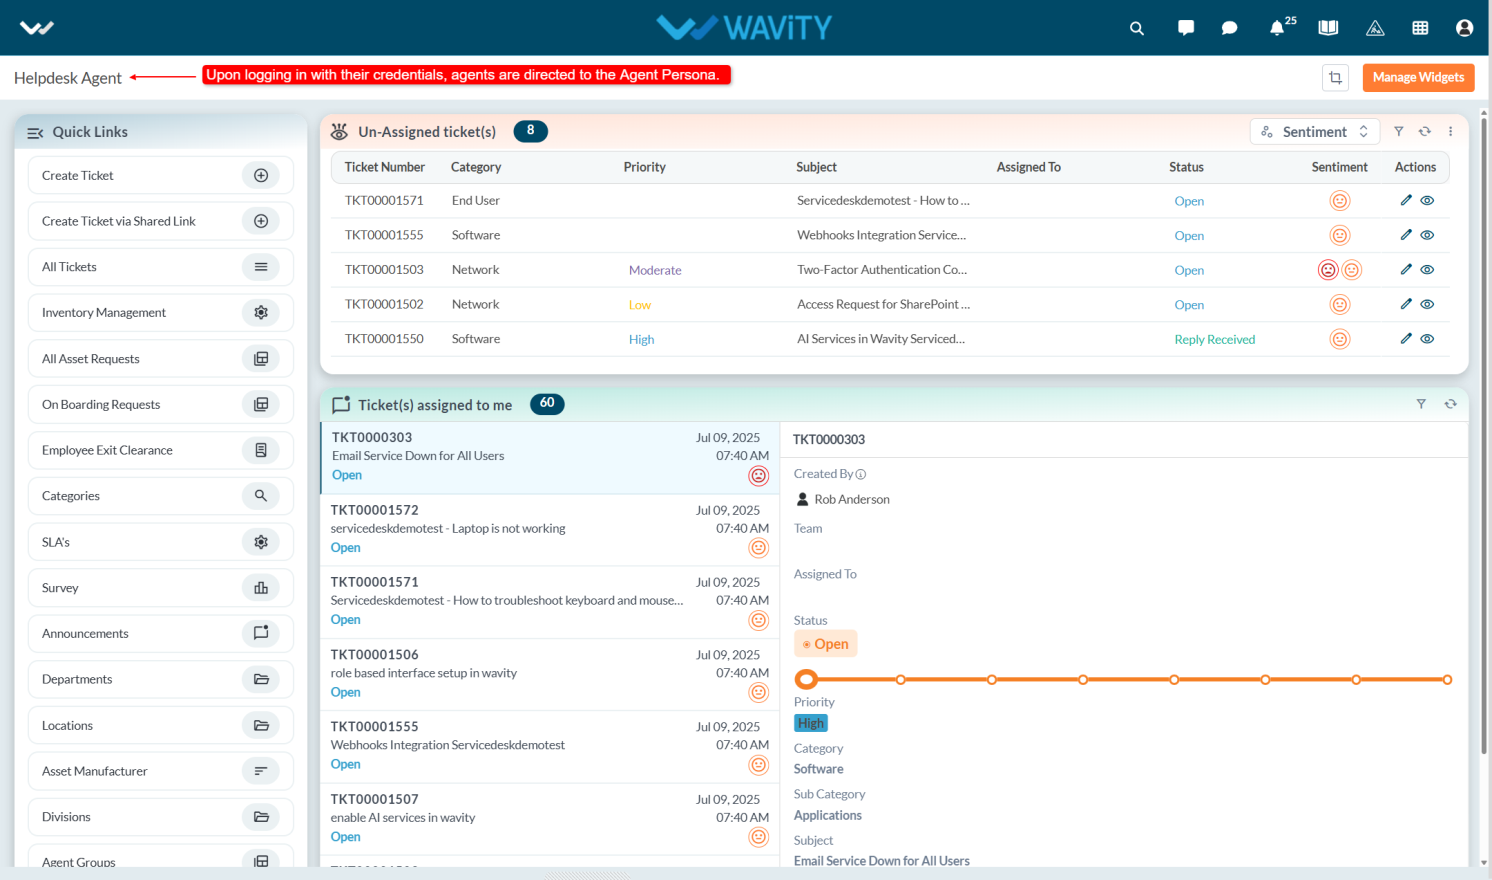
- From the Quick Links, select Inventory to access the list of assets.
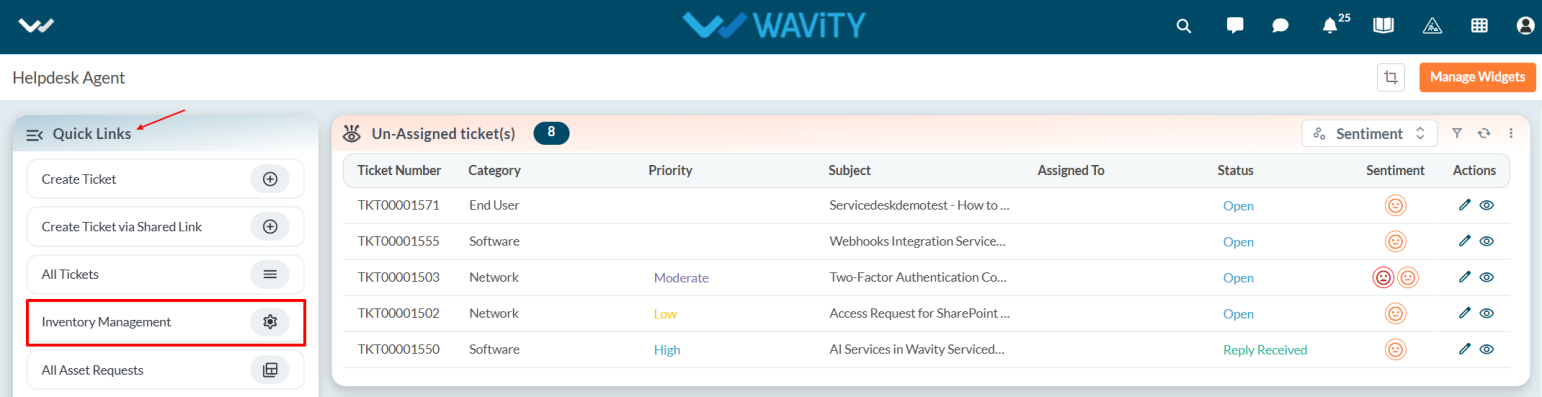
- Choose the specific asset for which you want to view the history.
- Click on the History tab. Under the Assignments section, you can view detailed information such as the asset's assignment history, assigned dates, assigned agents, asset ID, and more.
How to Import Assets through Spreadsheets?
- In Wavity, adding an asset in the Inventory Management is a simple and straightforward process that can be easily completed within the platform.
- User with agent access has access to add assets to the inventory. Assets can be added to the inventory in two ways.
- Manually – by entering asset details directly into the system.
- Import via Excel – by uploading asset information using the Excel Sheets import function.
- To add assets from Inventory using Excel, select the Inventory from Quick Links in Agent Persona.
- Click on Create dropdown symbol and select the option From Excel.
- Select the file from your system to upload (import) it into the application. If the data is successfully processed, a confirmation message will appear on the platform.
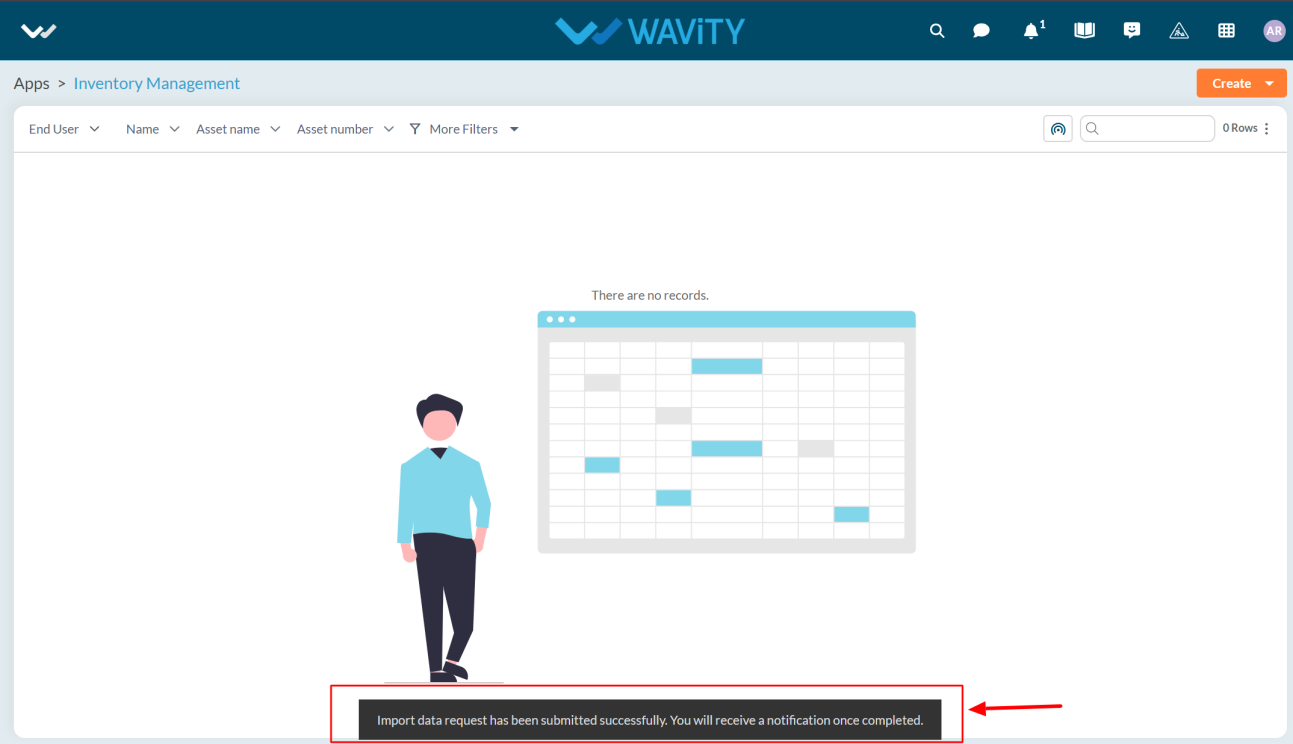
- If the imported file is incorrect, you will receive a notification saying Records import failed.
- To avoid import failure, ensure the following conditions are met:
- All data and the template match the selected application.
- All required fields are filled out in the correct format.
- Column data matches the corresponding columns in the template.
- The first row of your file matches the first row of the template sheet.
How to process a procurement request?
- Click on “Procurement Request” from the procurement dashboard to view all the assets which are to be procured.
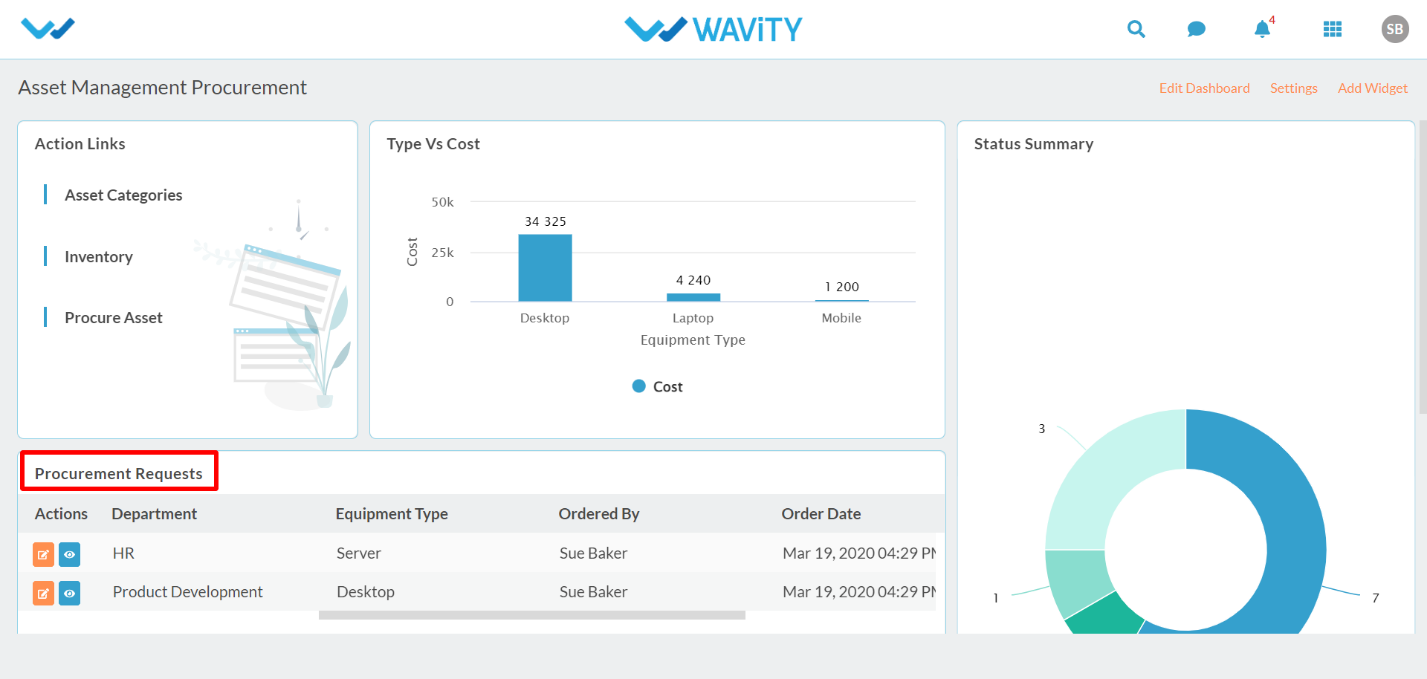
- Click on “Blue Icon” to view a particular Procurement request.

- In the “Requester” section of the “Procurement Request” page, you can view details like Request number, Requester name, Department, Location to be shipped, Equipment type and description and Manager’s approval for the request.
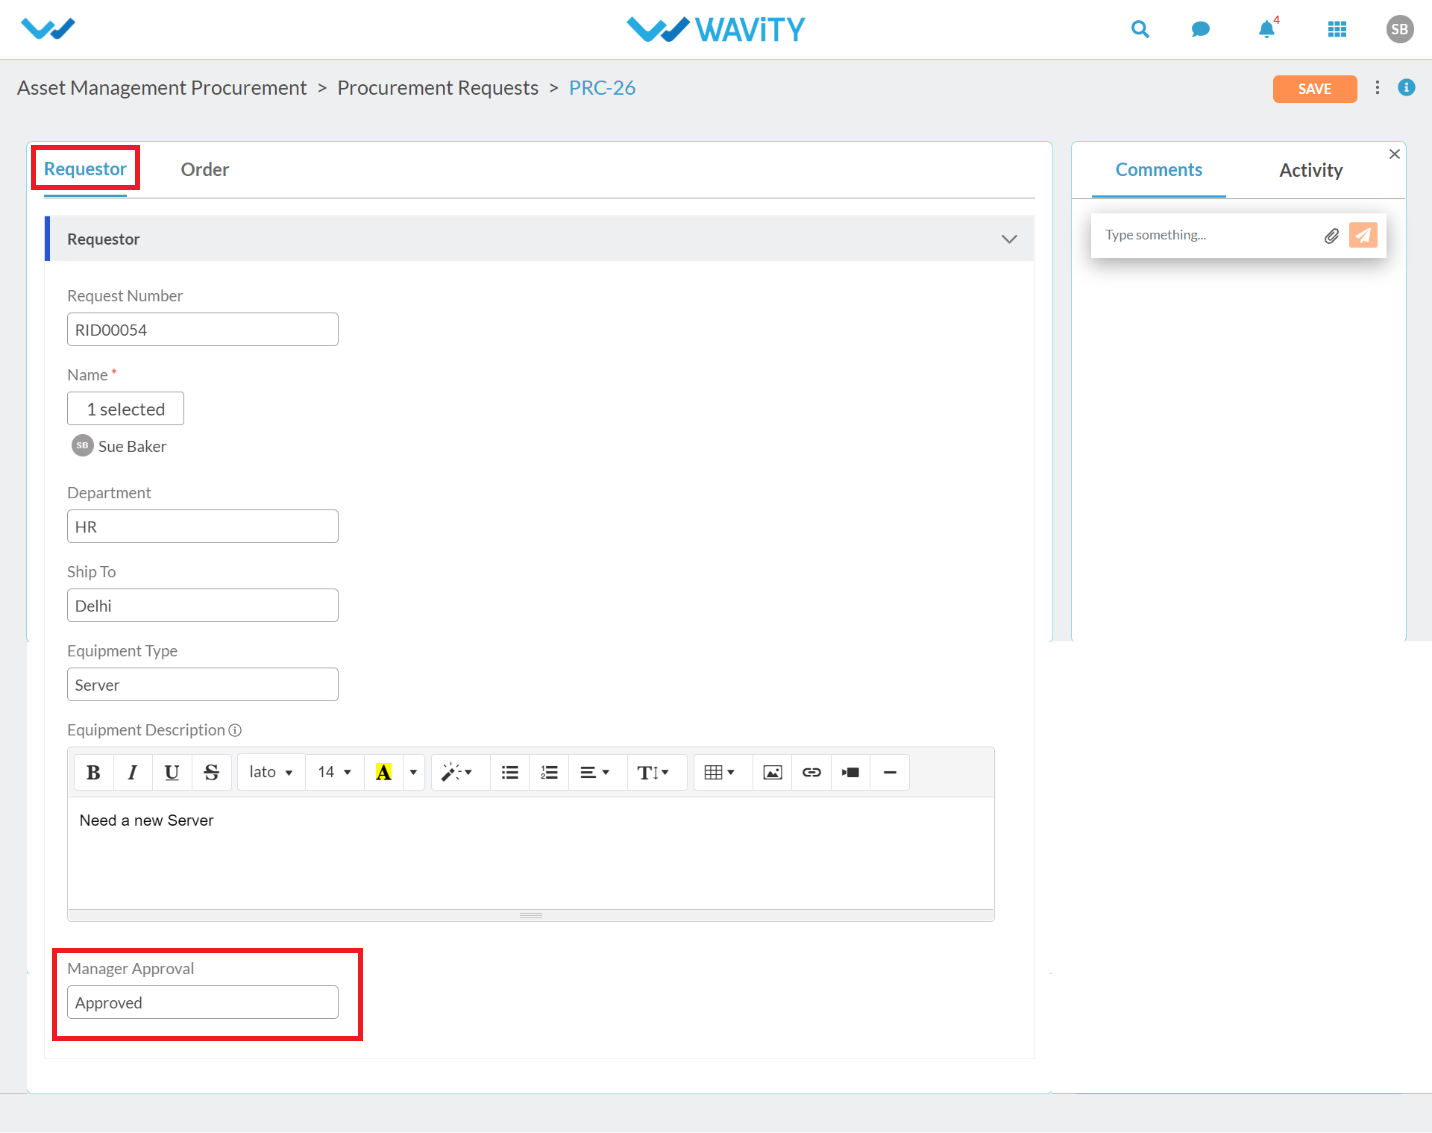
- In the “Order” section of the “Procurement Request” page, you can view and edit details like Name of Agent, Order number (Auto Generated), Order date, Status of the procurement request, Cost of the Asset to be procurement and the cost center. Click on ‘Save’ button to create the record.
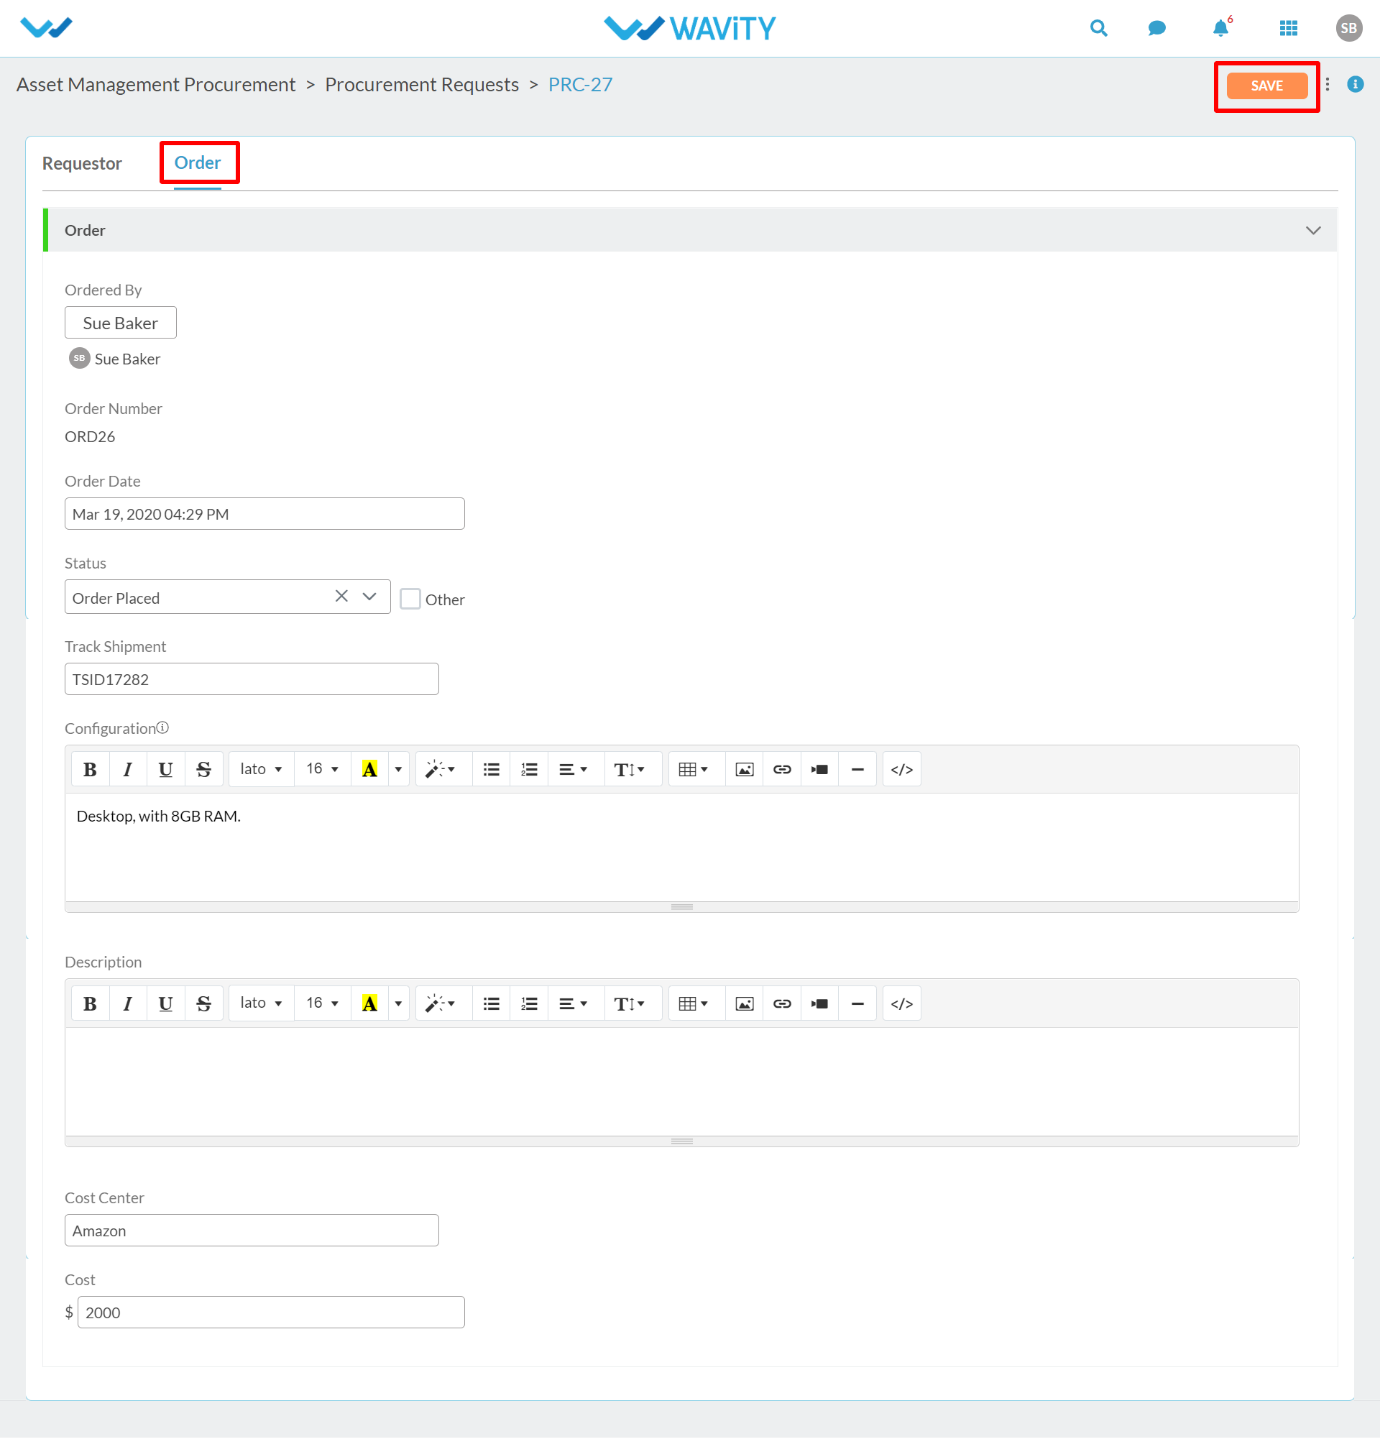
How can an agent assign an asset to user?
- Click on “Processing Request” for agent to view all the pending asset requests assigned to him/her.
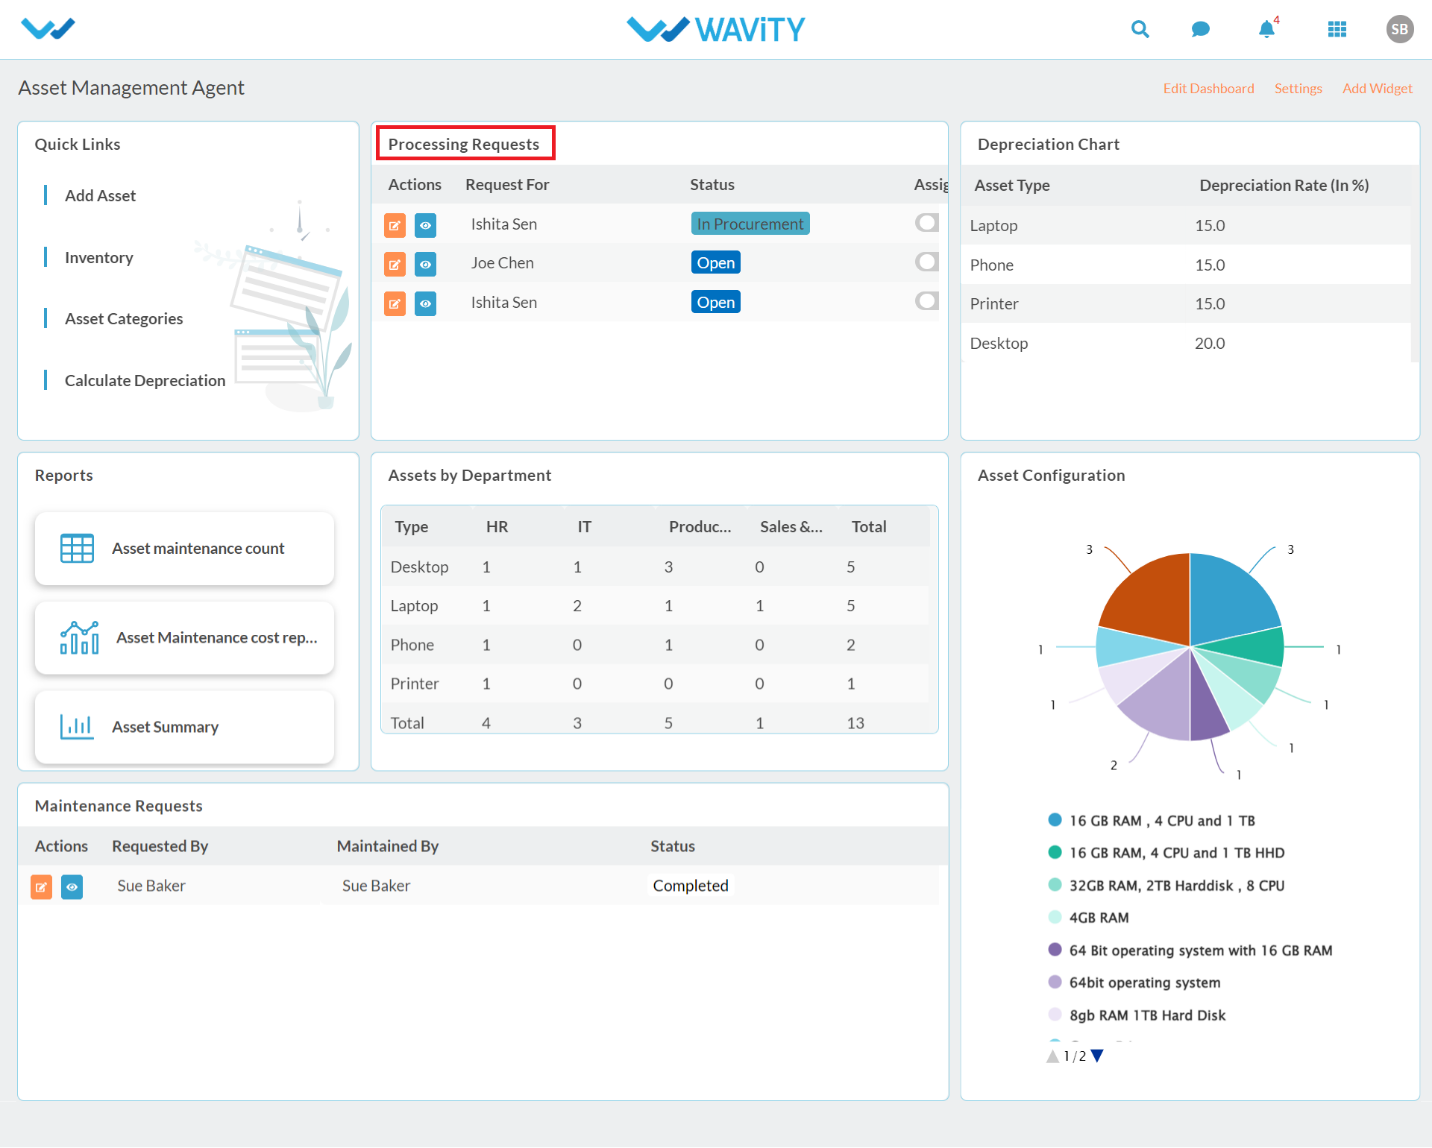
- Click on ‘Blue Icon’ to view/edit the details.
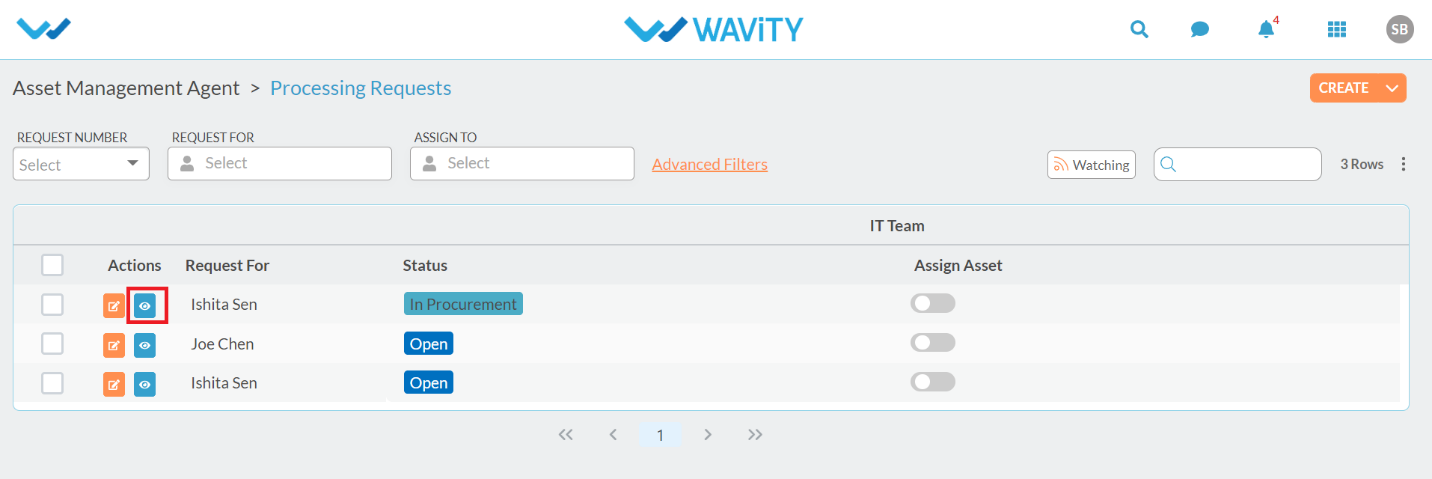
- Asset Request number and requester (user) information will be auto generated. In the Request control, Click the link as shown below.
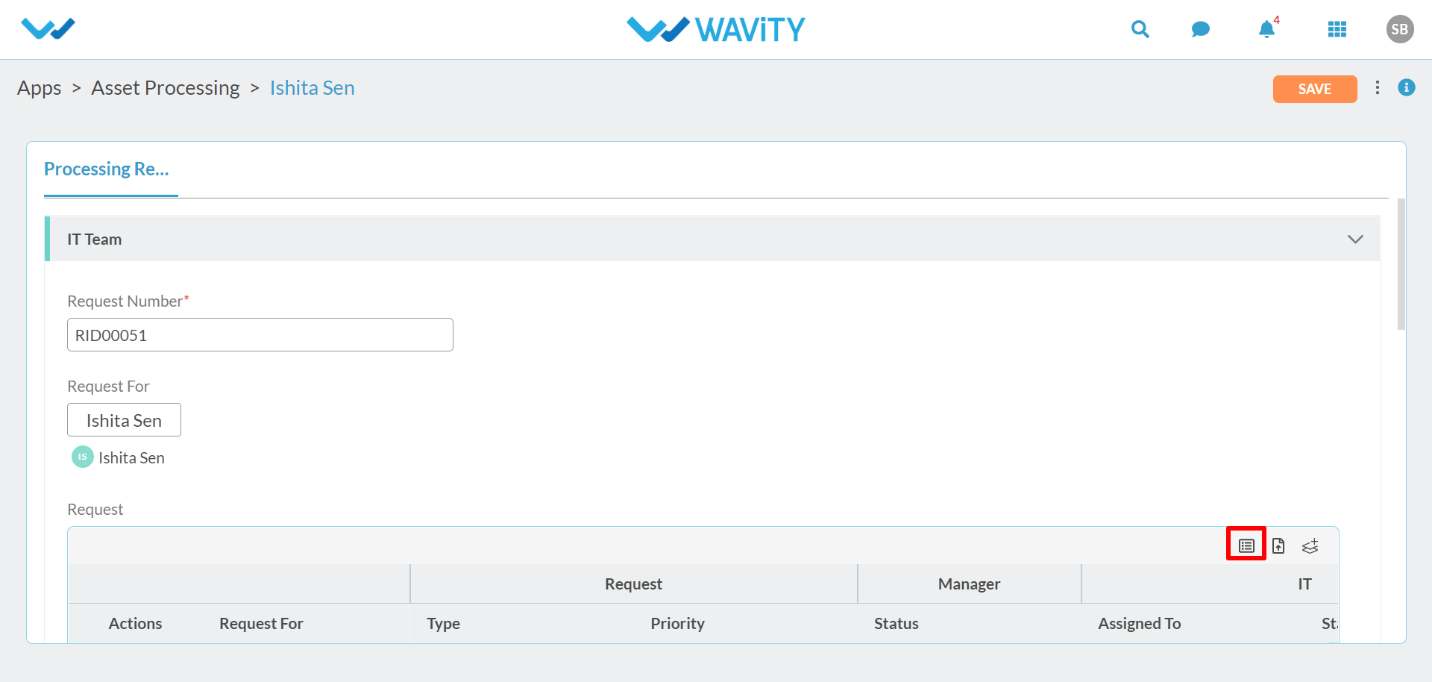
- Here, Agent can view all the details of asset request and whether the Manager has approved the asset request.
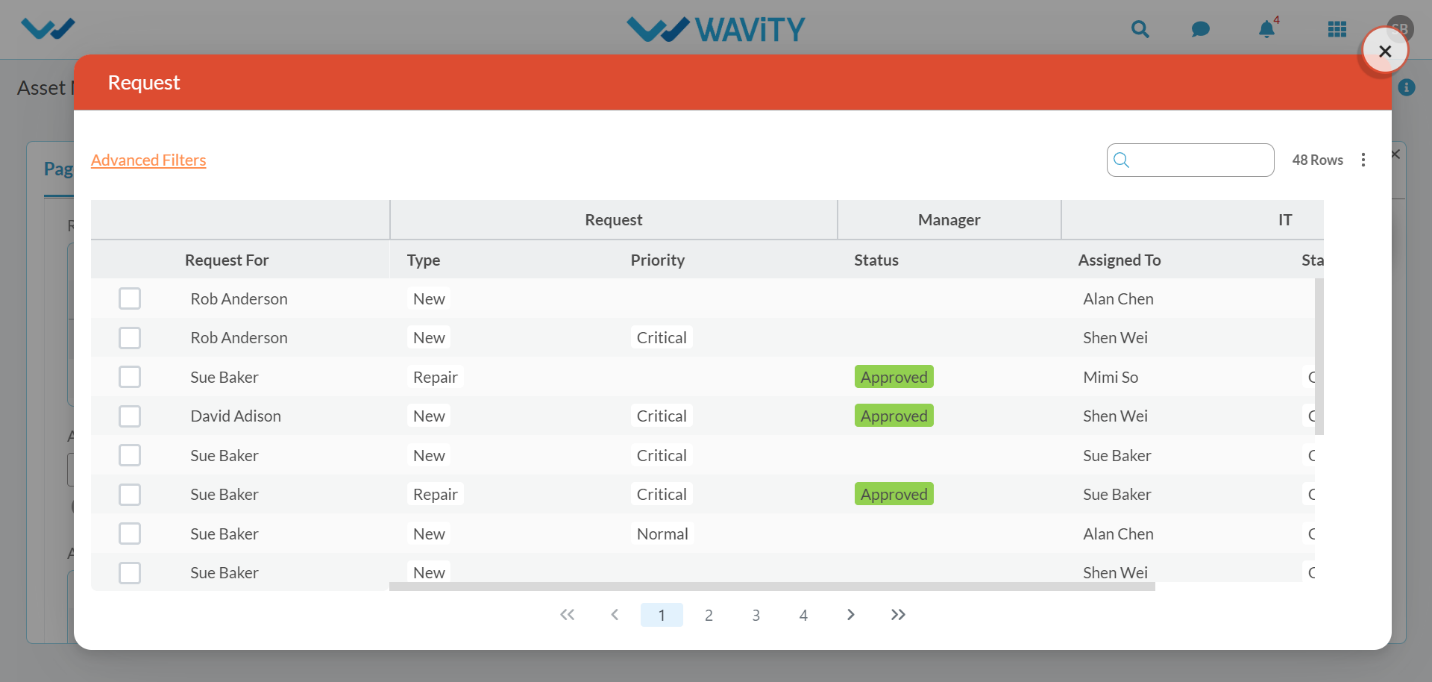
- In the Asset control, Click the below link as shown below to view all the available assets in the inventory which matches with the request.
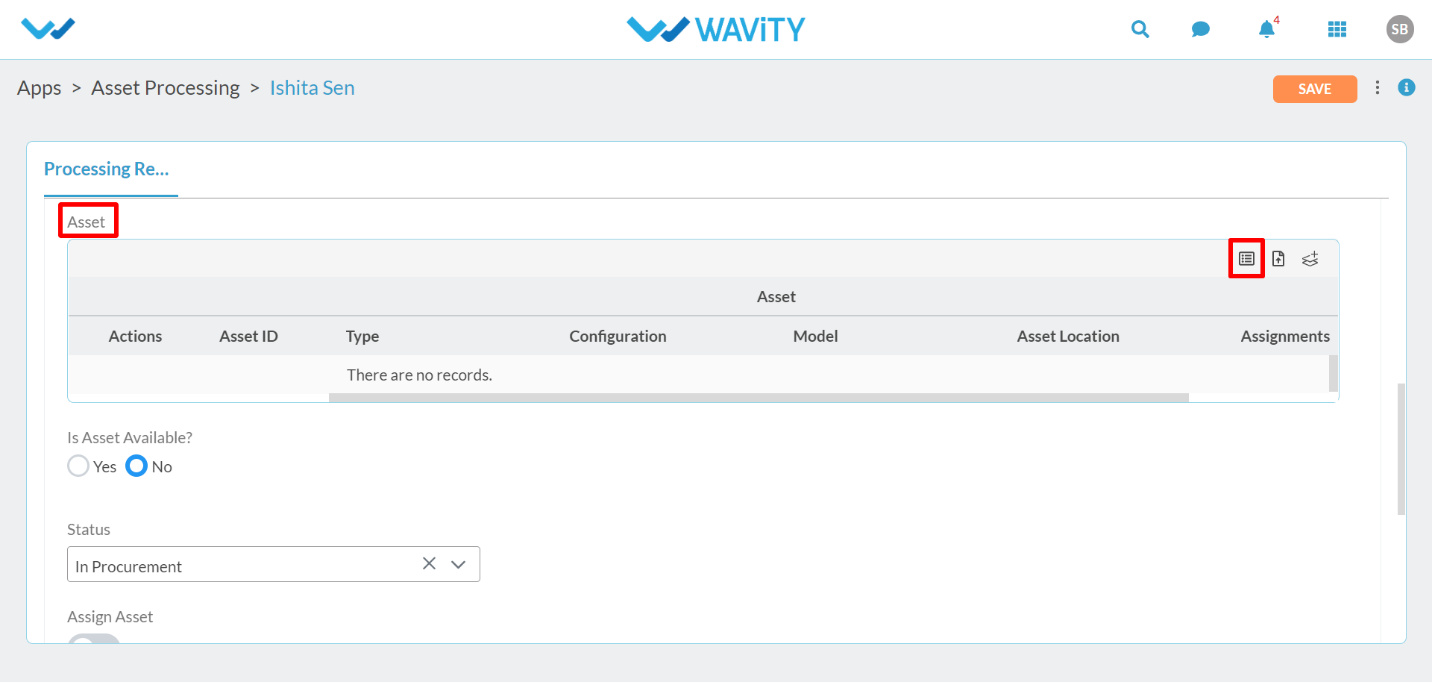
- Select the Asset (As shown below) which matches with the Asset request.
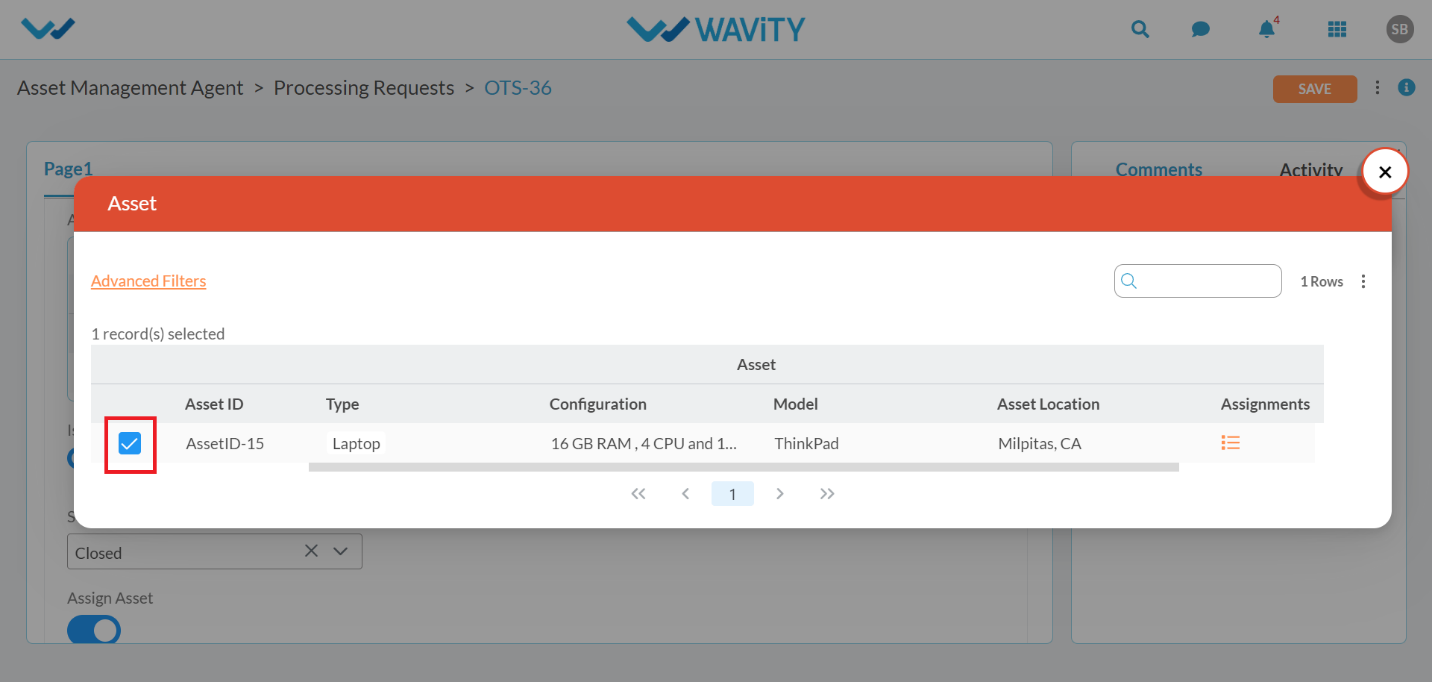
- Click on ‘Yes’ if the Asset is available and matches with the request. You can select the status as closed. Turn the “Assign Asset” toggle on to assign this asset to the requester. Requester (User) will be notified through email.

How can a manager approve an Asset request?
- After submission of Asset Request by End user, Manager can click on “Approve Request’” from user dashboard.
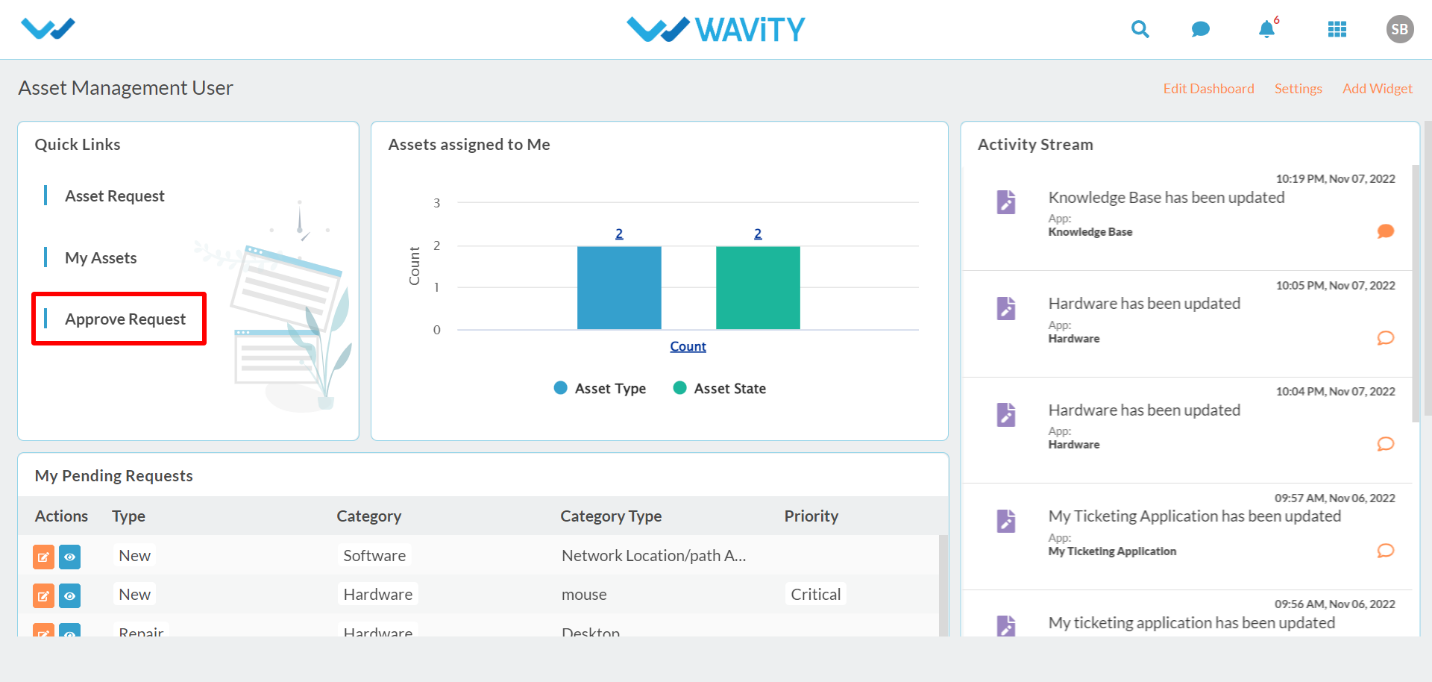
- Click on ‘Blue Icon’ to view/edit the details for an individual request.

- Manager can update the status of the Asset Request whether it is approved or declined. Click on ‘Save’ button to update the status. Similarly, Manager can click on the link from email notification received upon submission of Asset Request by end user.
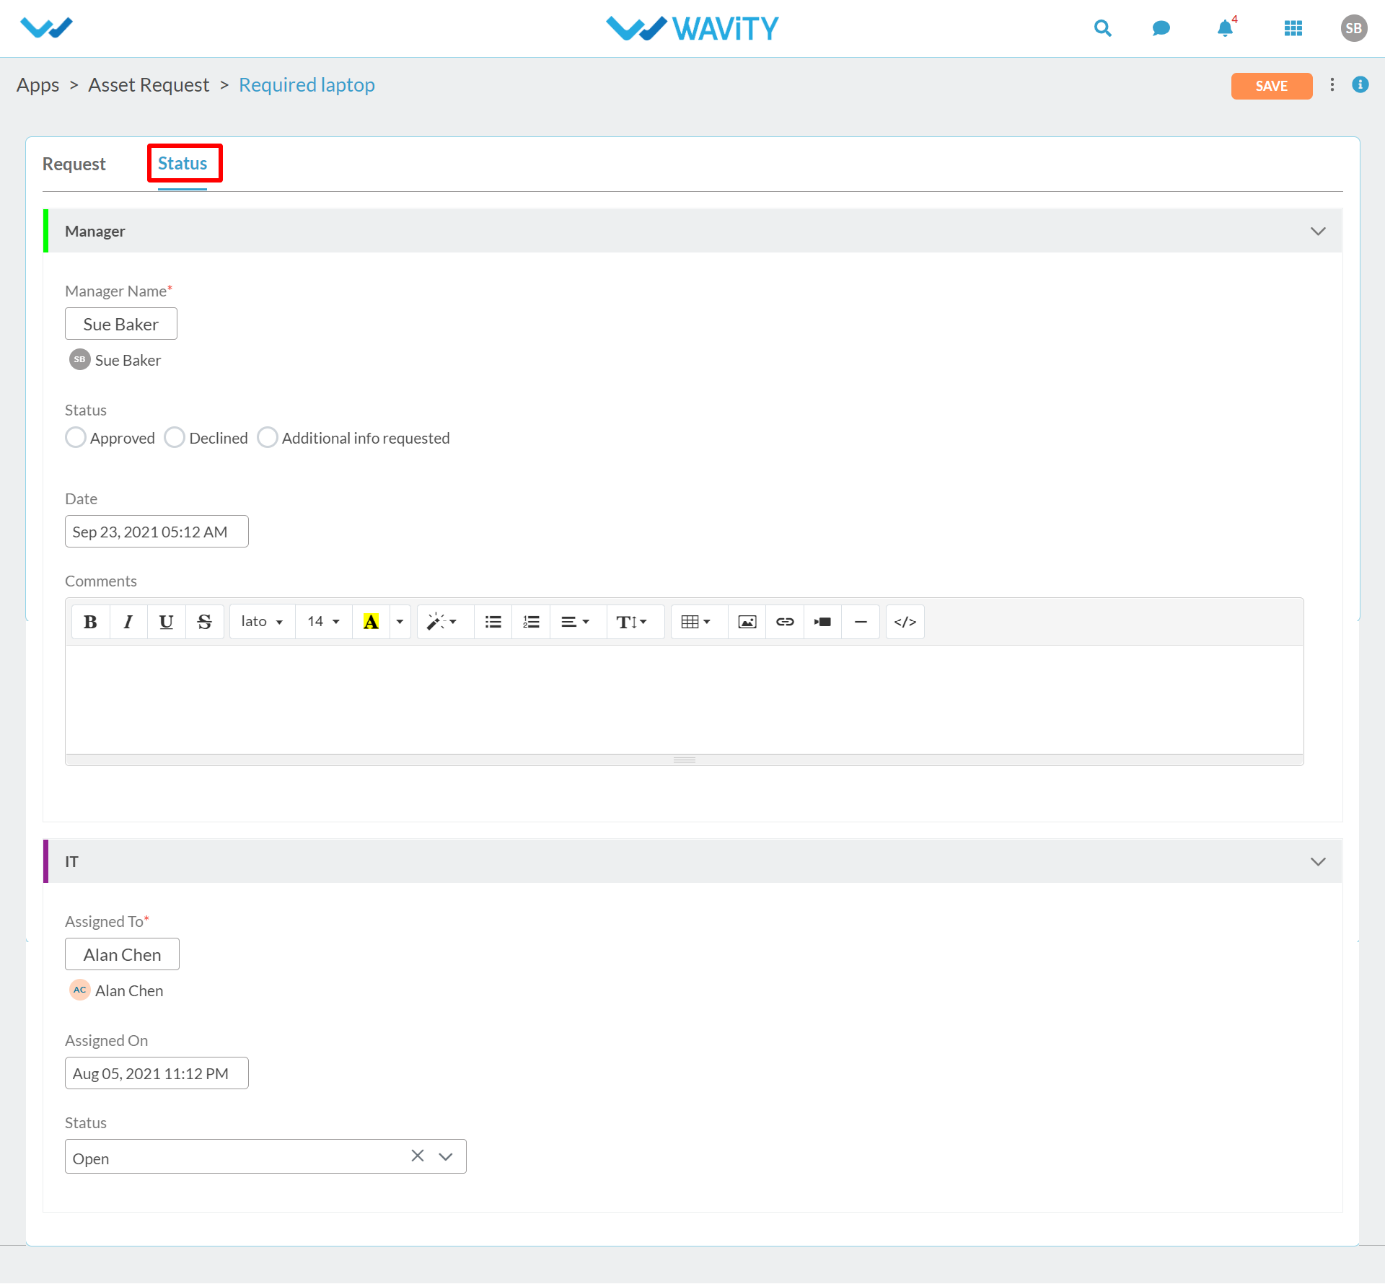
Where can I view my assets?
- User can view all the assigned Assets by clicking on “My Assets” quick links from User dashboard.
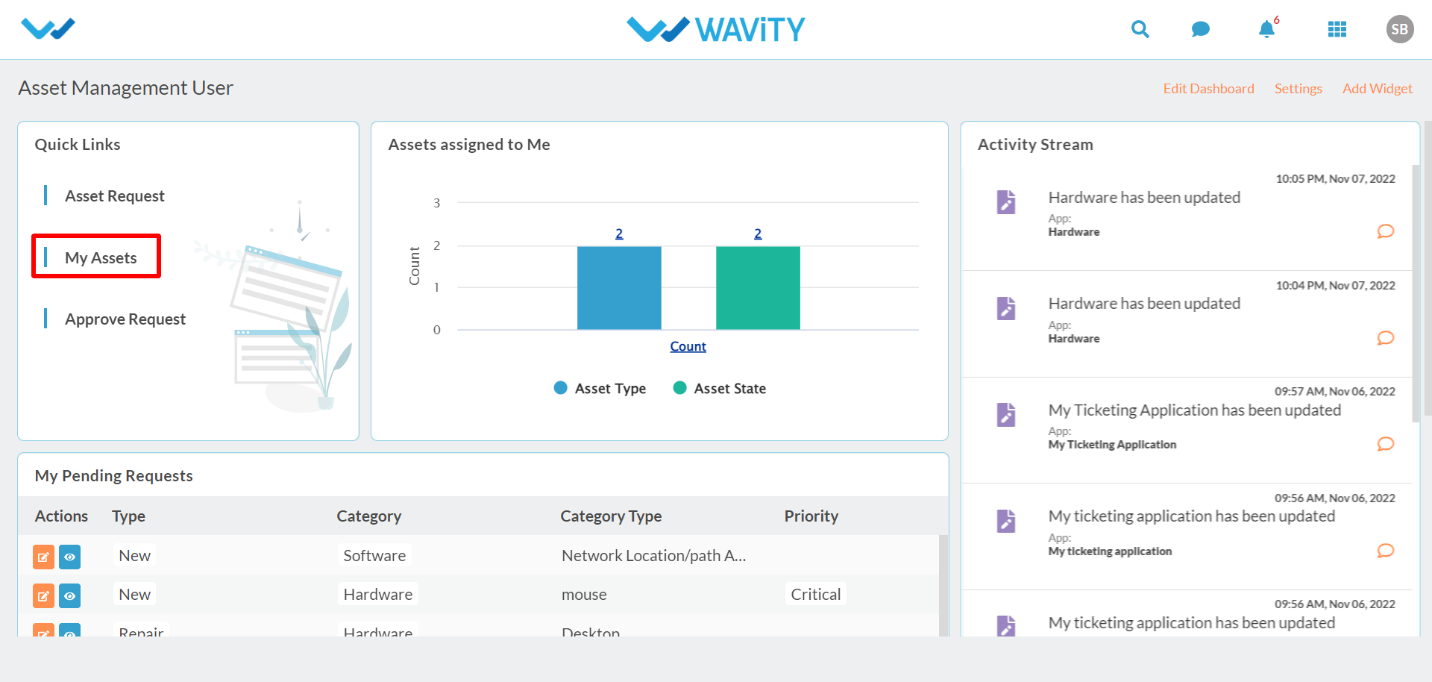
- It will display all the assigned assets to the individual user.
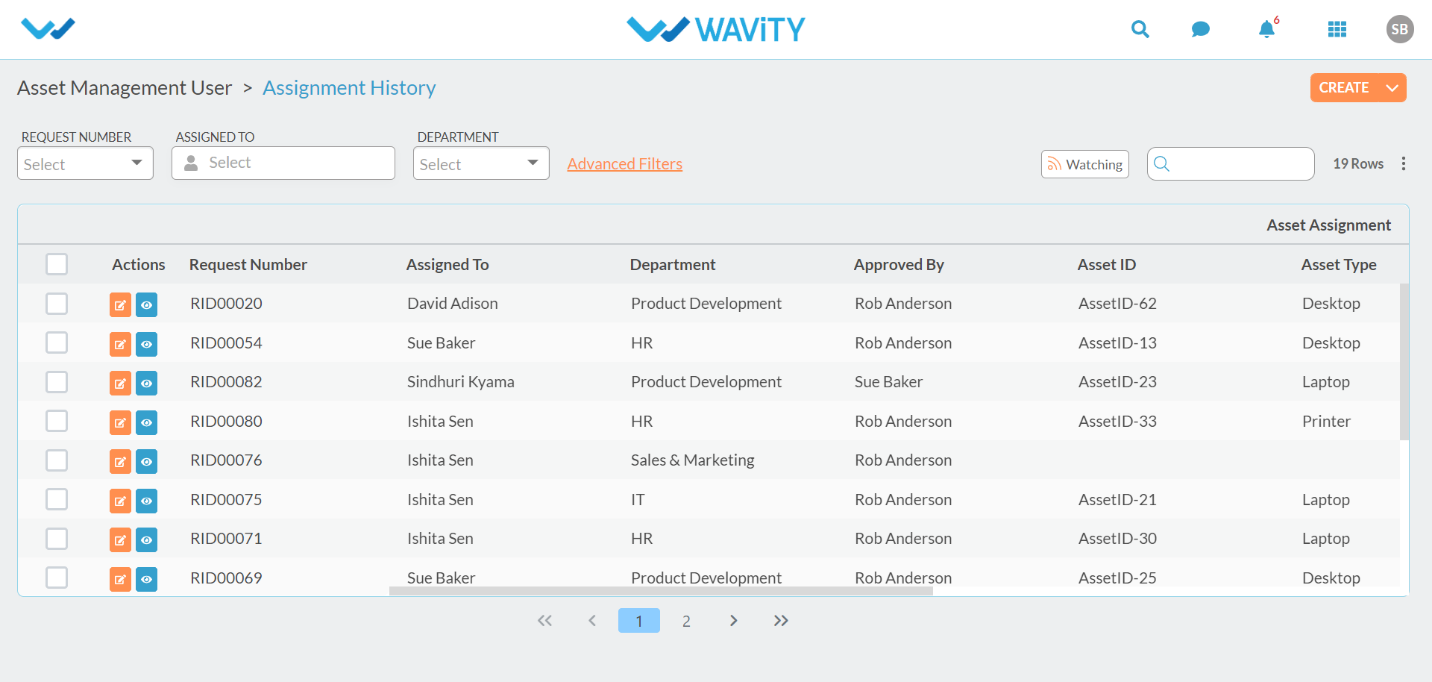
Where to view status of my Asset request?
- Click on “My Pending Requests” in the User dashboard as shown below.
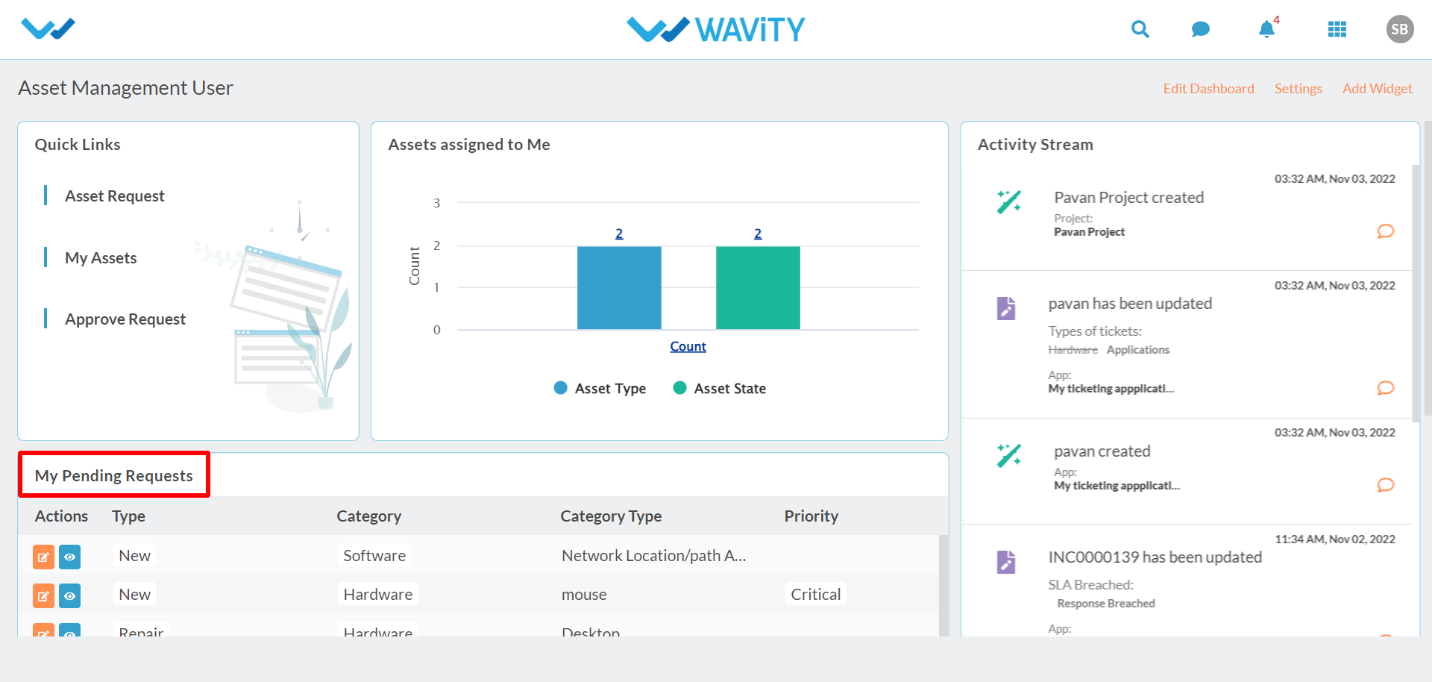
- Following page will display all the pending asset request for the user.
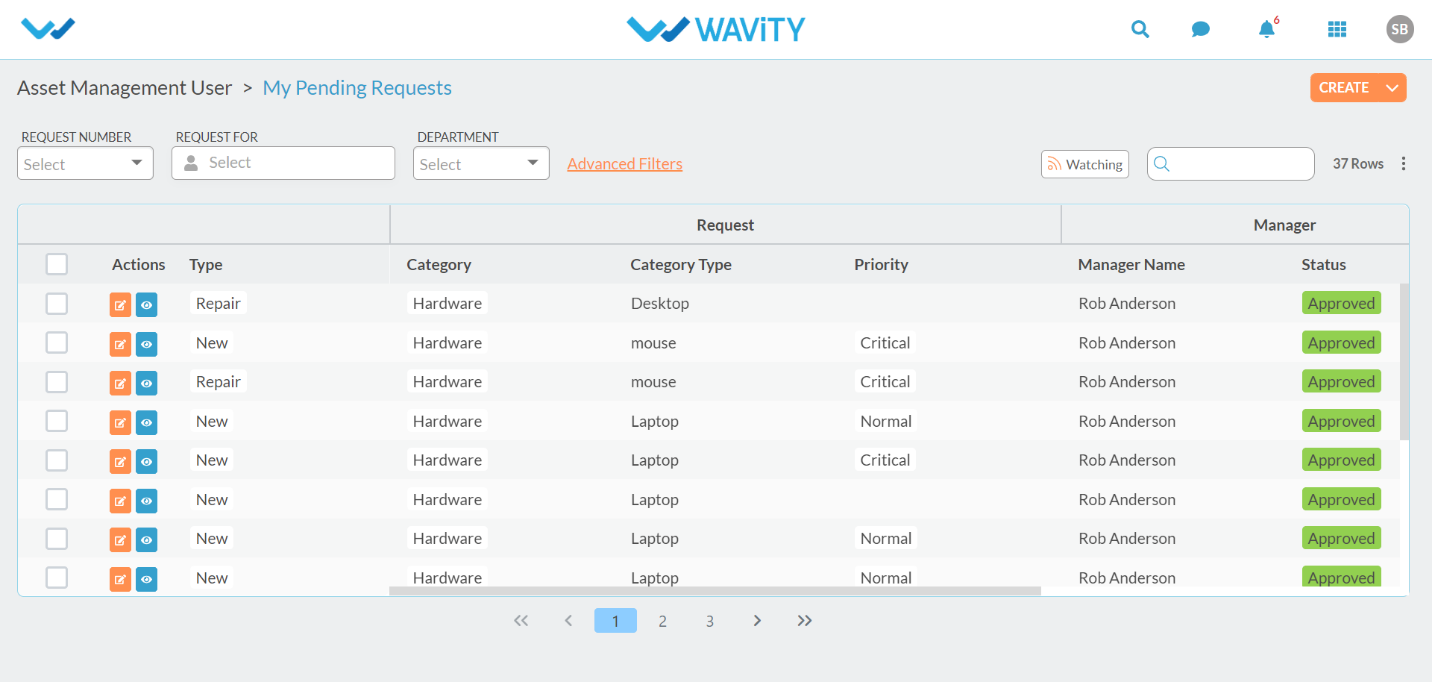
- Scroll right to view the status of Asset request. It will denote whether the Manager has approved the asset request and whether the agent has closed the request. (Refer below image).
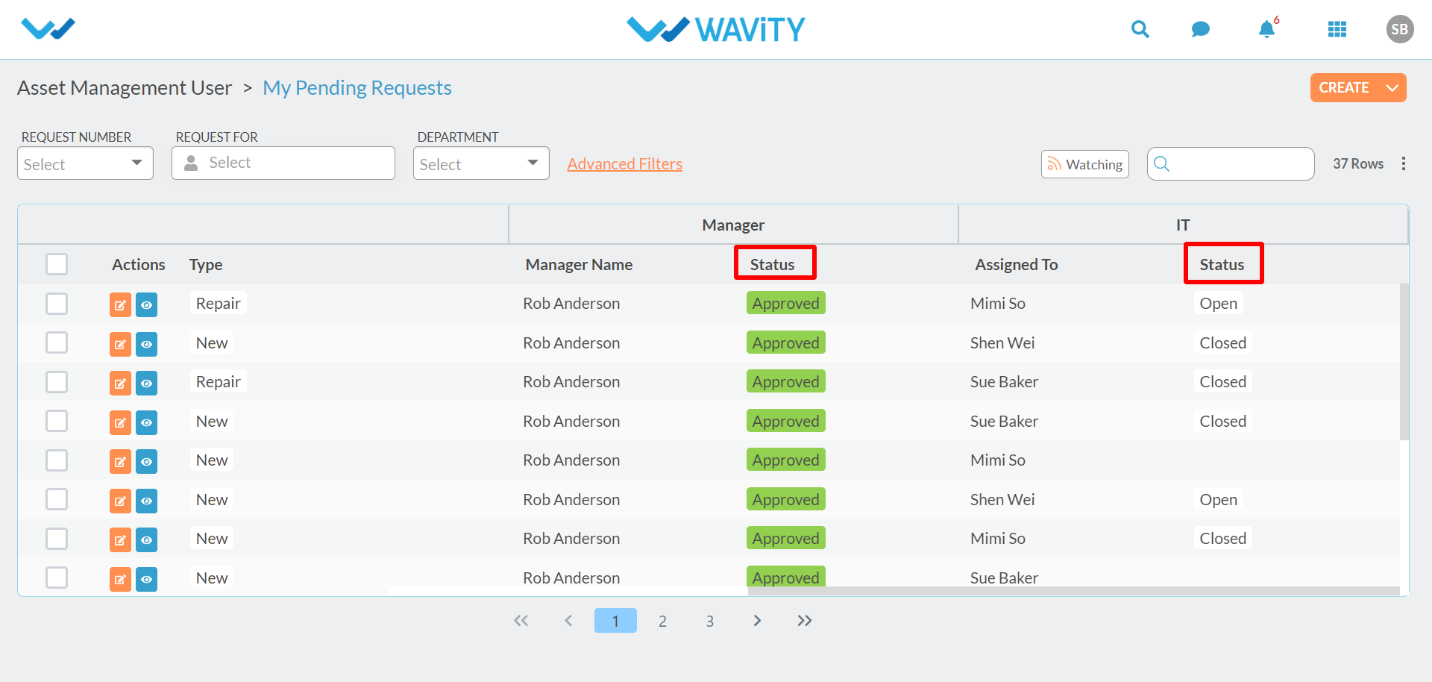
End User Guide: How to Request for an Asset?
- Requesting an asset on the Wavity platform is a simple and user-friendly process.
- End users can log in with their credentials and will be directed to their User Persona upon login.
- On the dashboard, users will see Quick Links and Table Widgets that allow them to create tickets, request services, and track the status of their existing tickets.
- Note: The steps provided serve as sample instructions and can be customized based on specific requirements; however, the core workflow will remain the same.
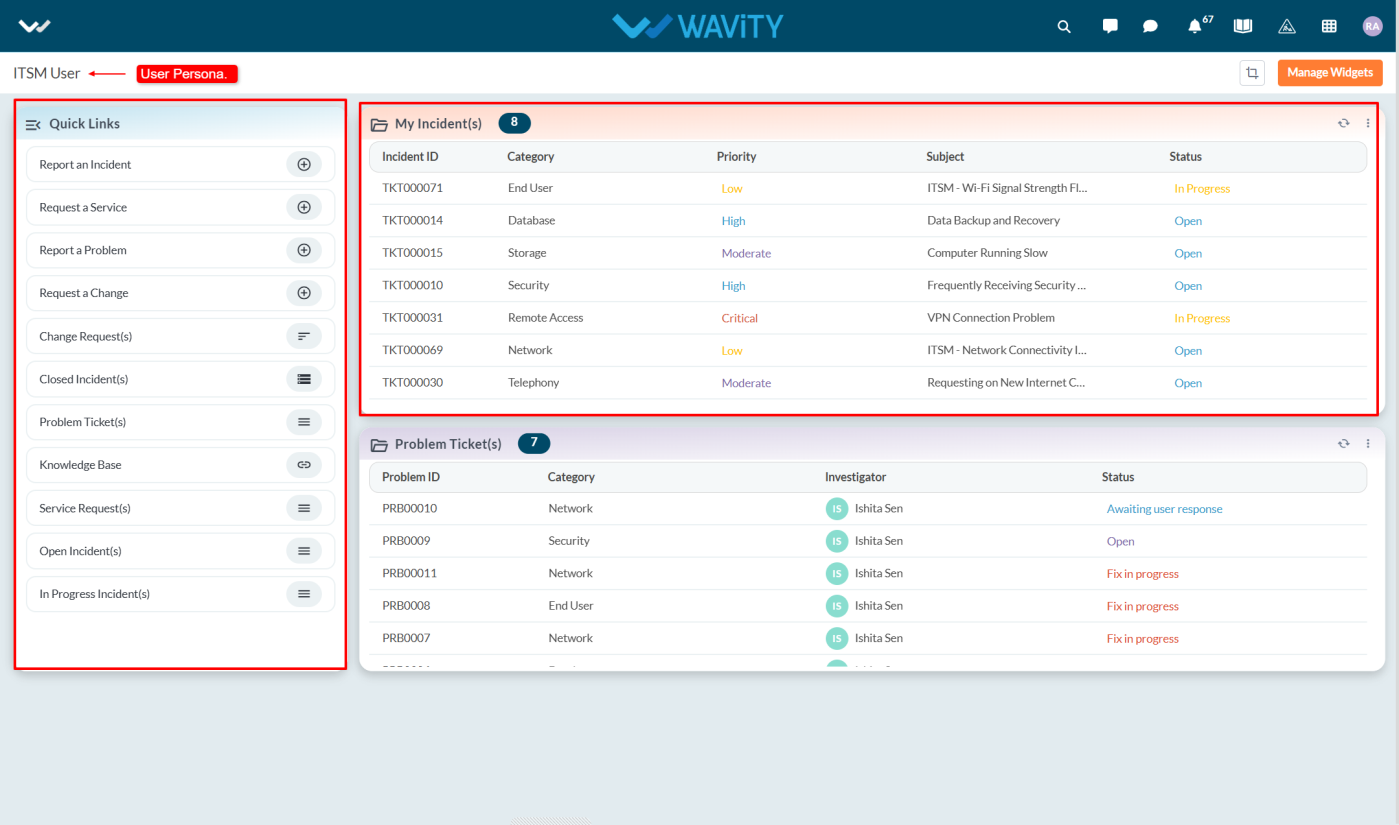
- To initiate an asset request, click on "Request a Service" under Quick Links.
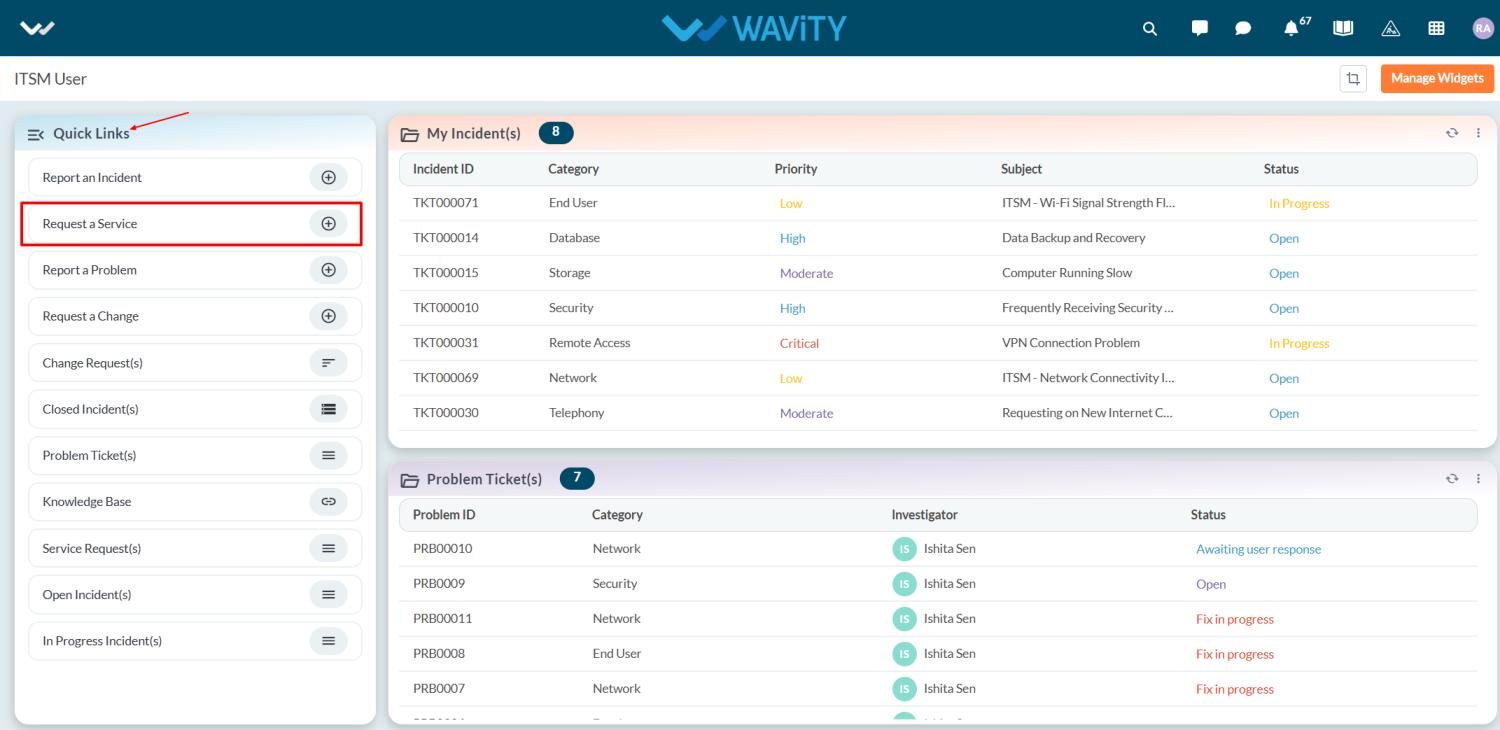
- This will navigate the user to the Service Request form.
- The Requester field will be auto-populated with the logged-in user’s name.
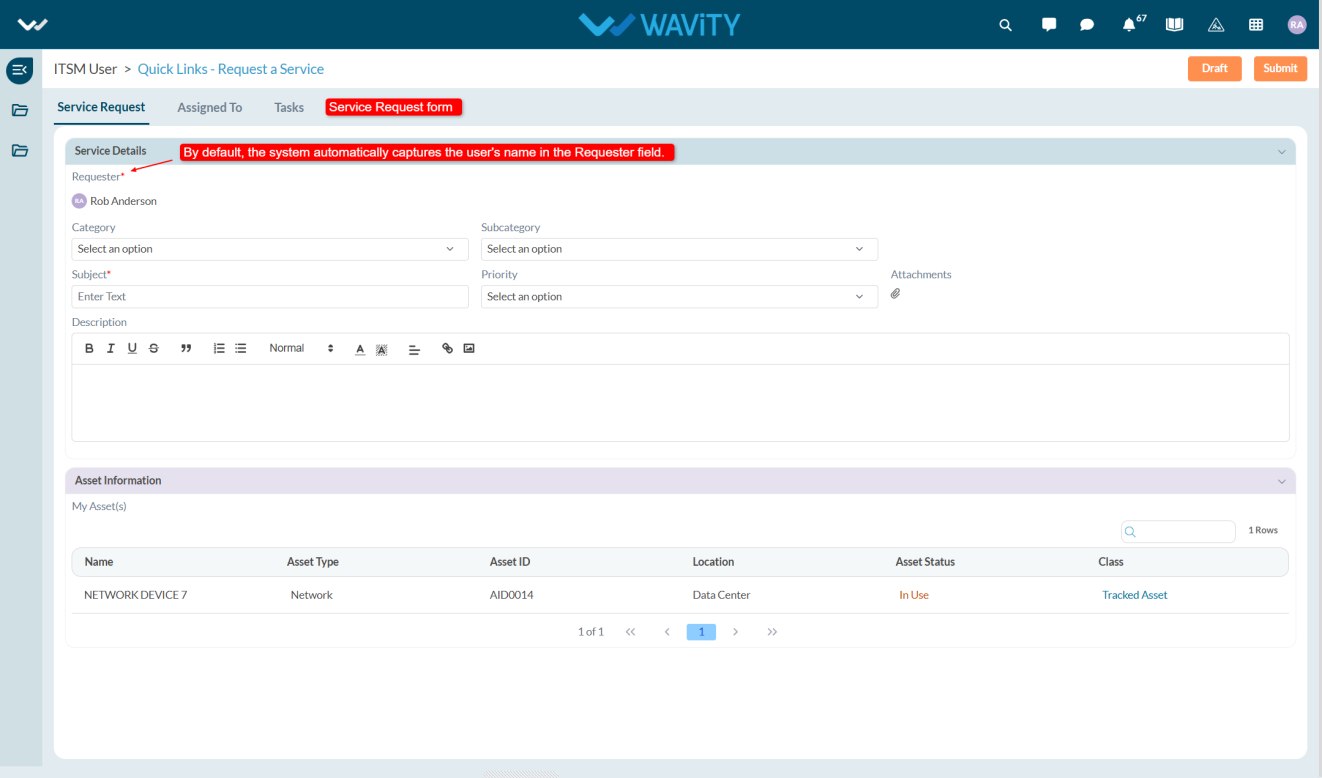
- In the Category field, users will find multiple options such as Hardware Request, Software Request, and Collaboration Tools. For asset requests, select Hardware Request.
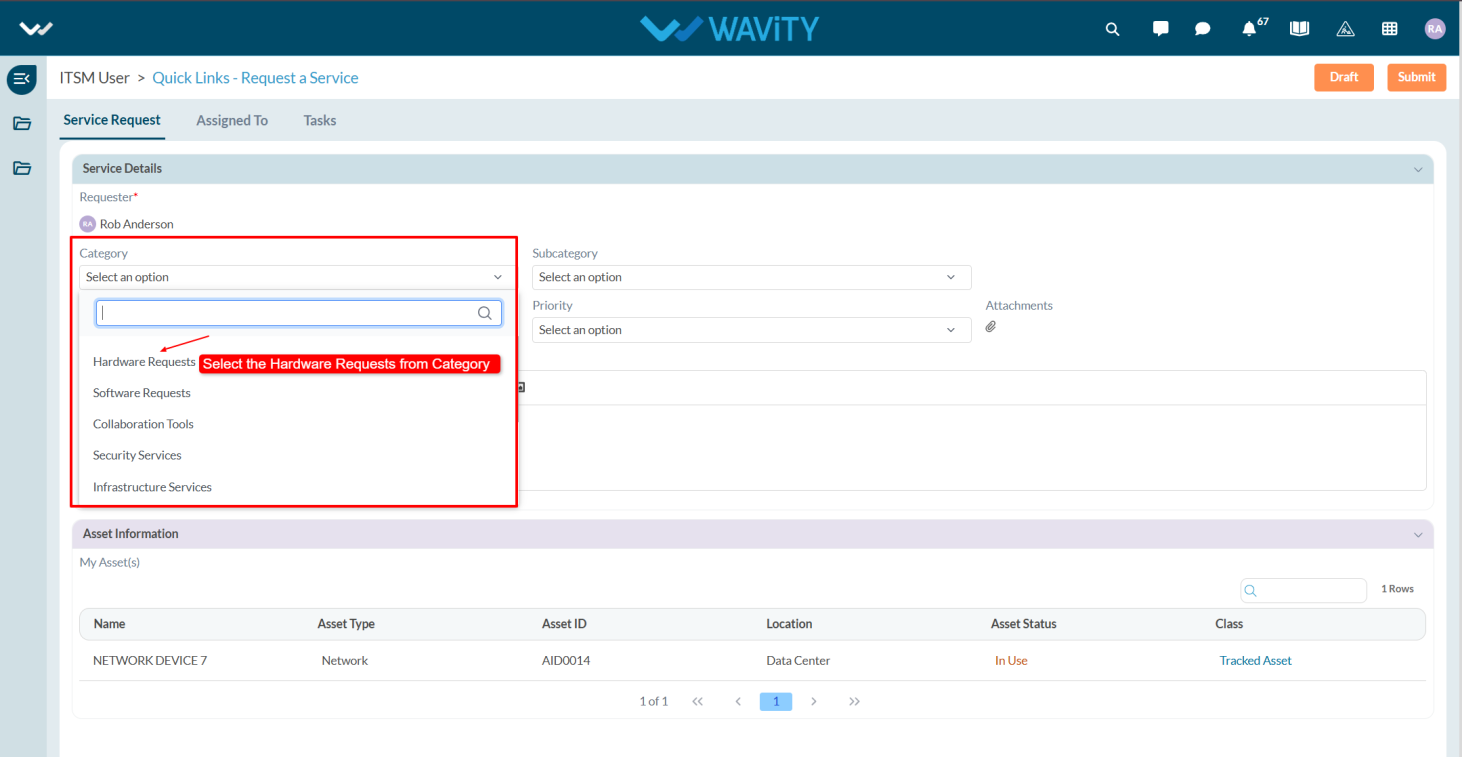
- In the Sub-Category field, options like New Asset, Repair/Maintenance, Exchange, and Return will be displayed. Select New Asset from the dropdown.
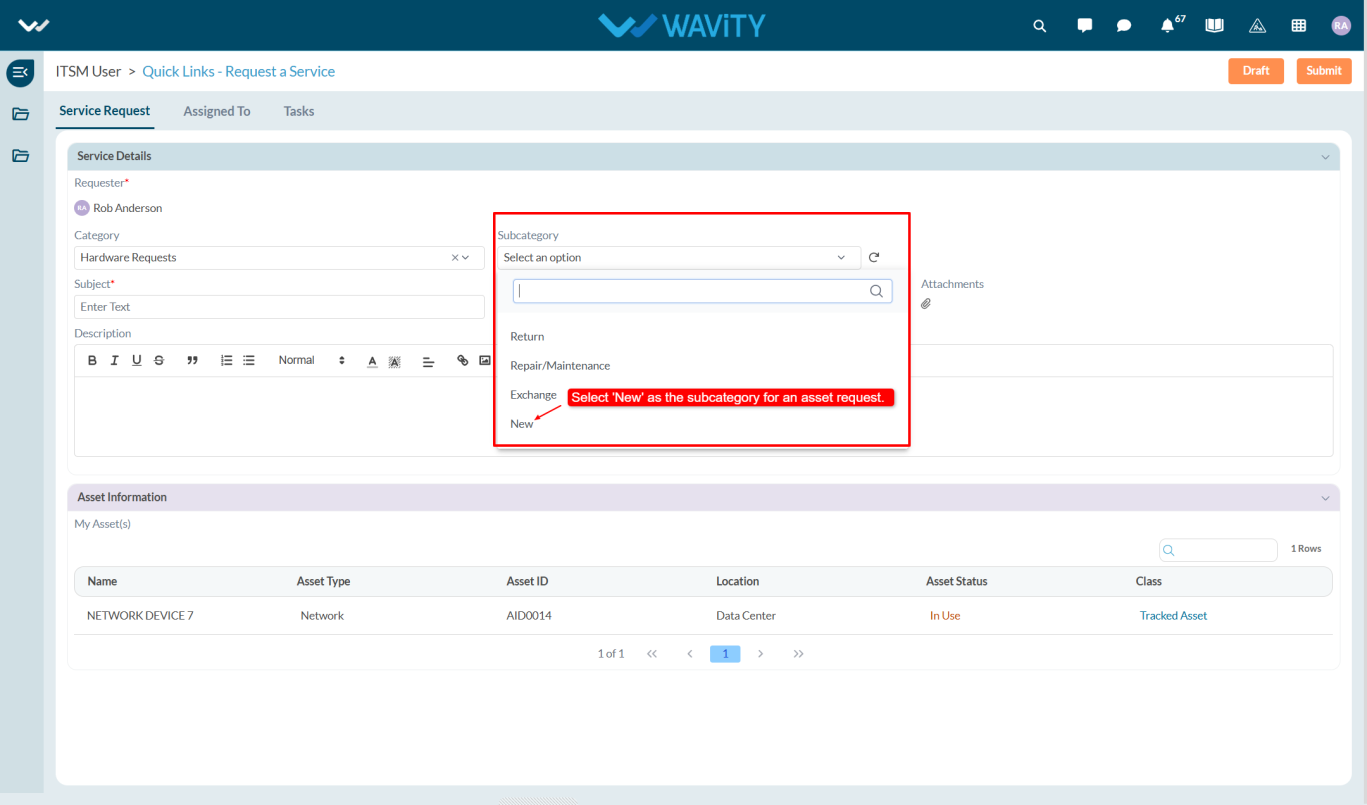
- Enter a clear and concise subject to help the agents identify the request easily, and if applicable, upload relevant images or screenshots under Attachments and provide additional details in the Description box.
- In the Asset Type field, select the appropriate option from the dropdown list based on your requirement.
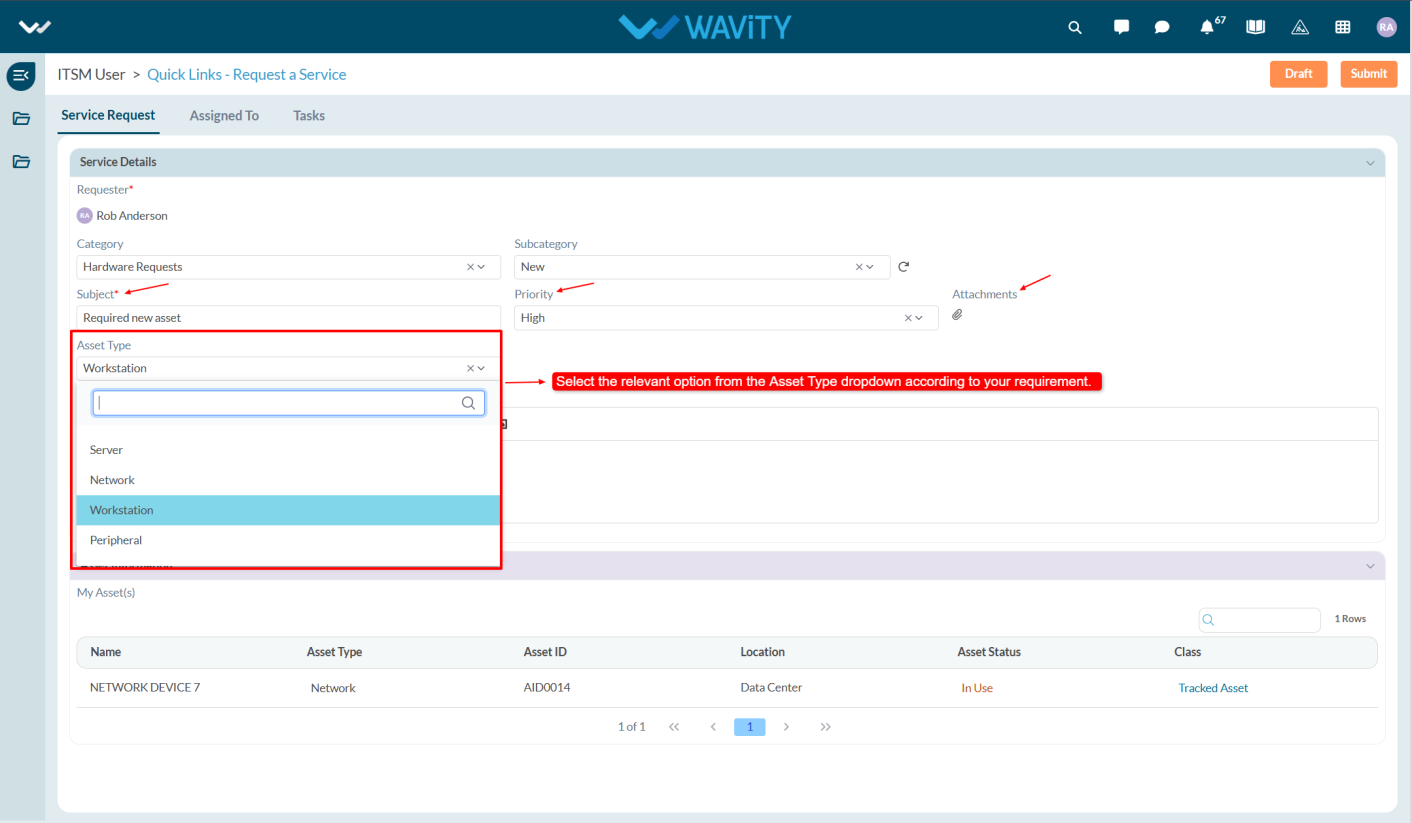
- Once all the required information is filled out, click the Save button to submit the request.
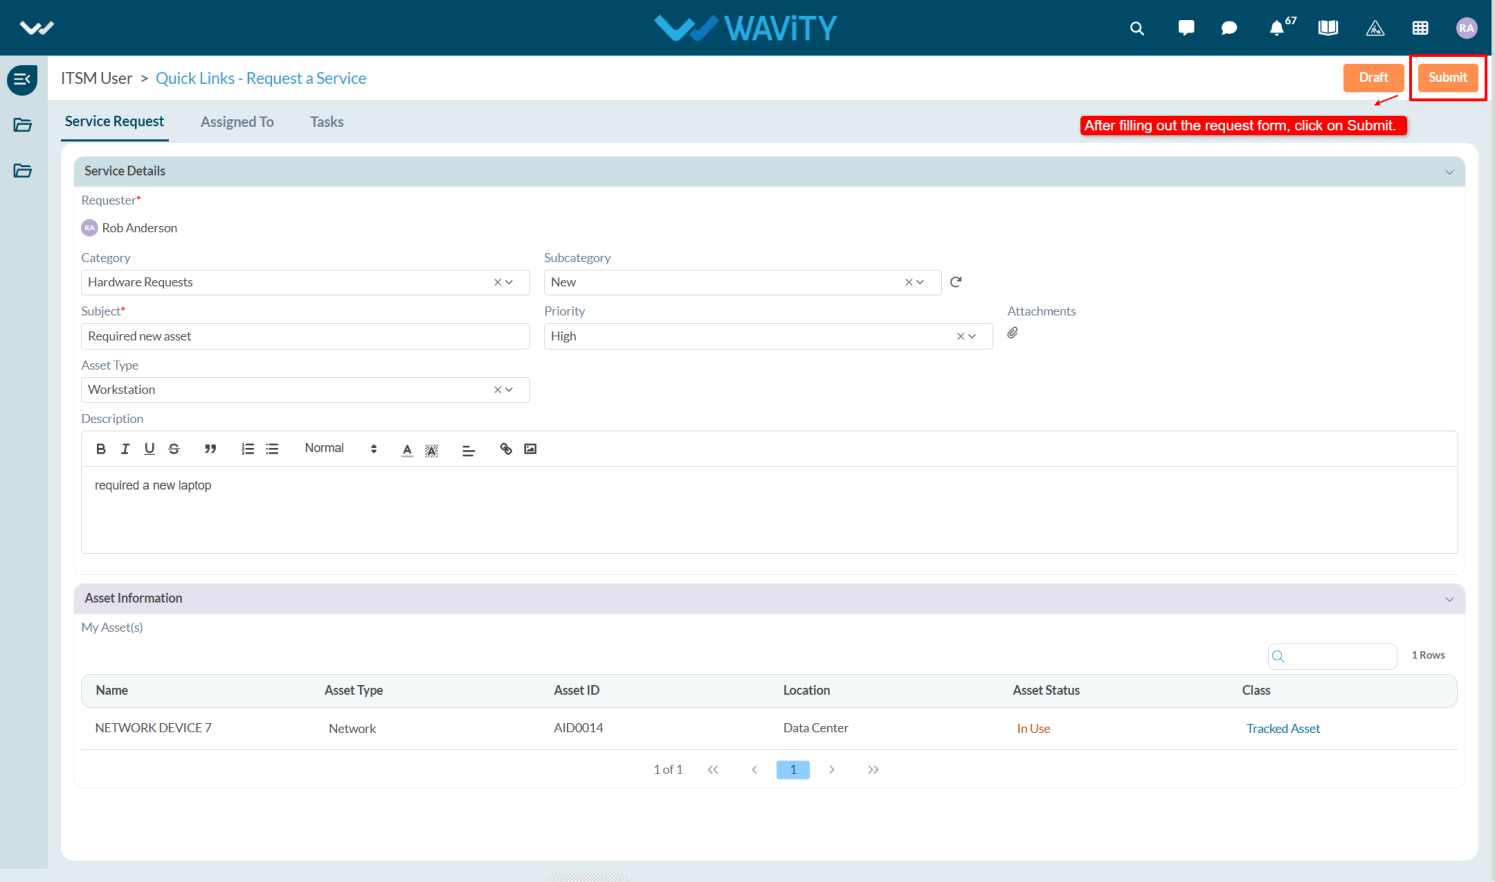
Procurement Agent Login – IT Asset Management
- Login to your Wavity account by entering your email id/username and password.
- After logging in, Procurement dashboard will be displayed as shown below. Dashboard can be edited by clicking on ‘Edit Dashboard’. Procurement dashboard contains the following major functions:
- Quick Links: Quick Links helps to navigate through the platform. Major quick links for user are Asset Categories, Inventory & Procure Asset.
- Analytics & Reports: Analytics and reports based on role and data in the platform.
- Activity Stream: It will display all the activities carried out in the platform.
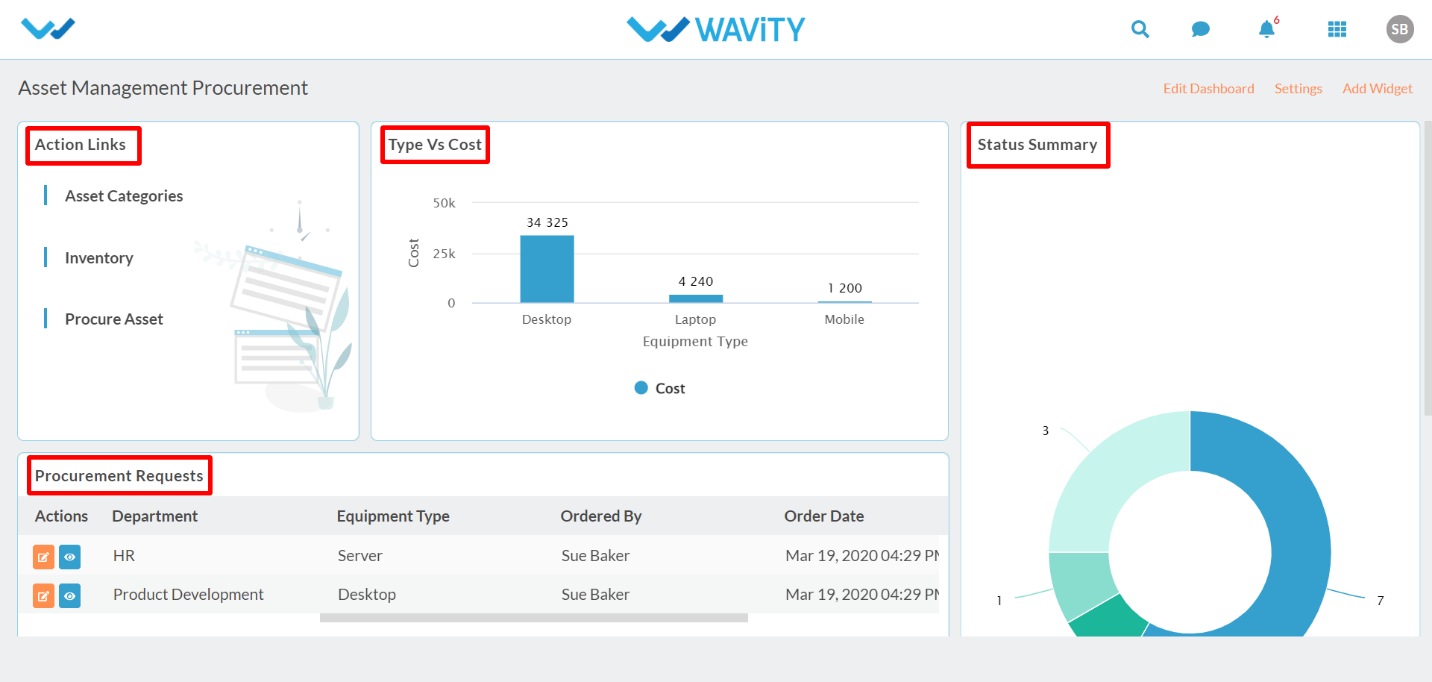
IT Agent Login – IT Asset Management
- Login to your Wavity account by entering your email id/username and password.
- After logging in, Agent dashboard will be displayed as shown below. Dashboard can be edited by clicking on ‘Edit Dashboard’. Agent dashboard contains the following major functions:
- Quick Links: Quick Links helps to navigate through the platform. Major quick links for user are Add Asset, Inventory Management, Asset Categories & Calculate Depreciation.
- Analytics & Reports: Analytics and reports based on role and data in the platform.
- Activity Stream: It will display all the activities carried out in the platform.
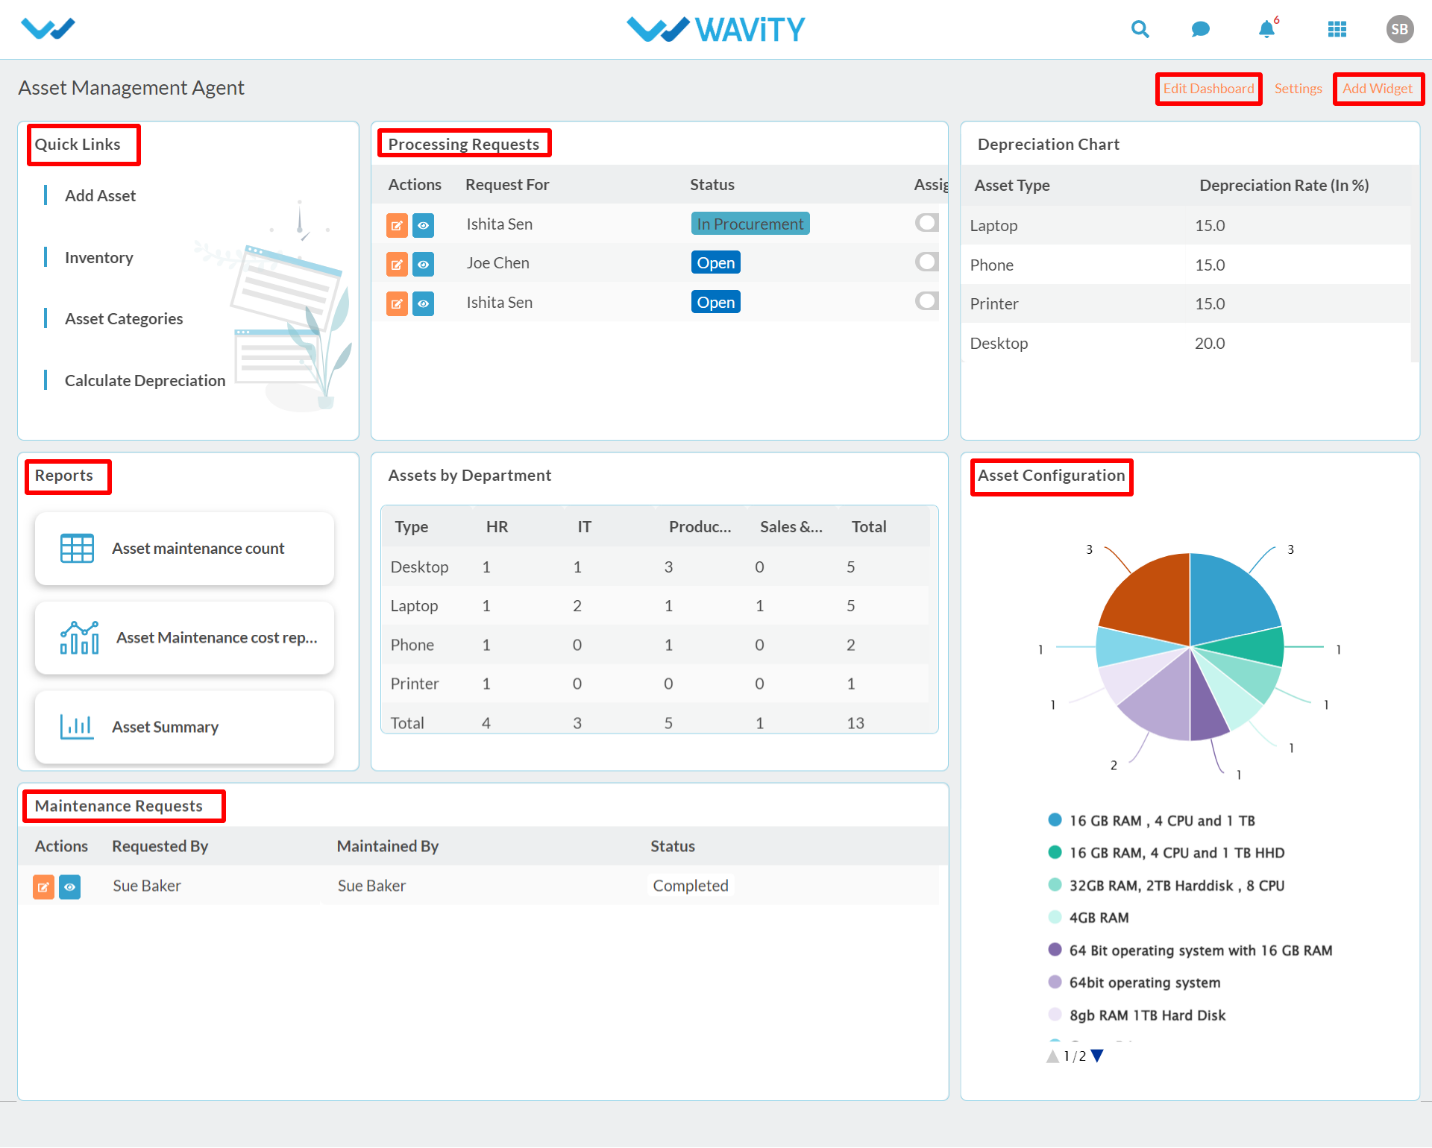
User Login – IT Asset Management
- Login to your Wavity account by entering your email id/username and password.
- After logging in, User dashboard will be displayed as shown below. Dashboard can be edited by clicking on ‘Edit Dashboard’. User dashboard contains the following major functions:
- Quick Links: Quick Links helps to navigate through the platform. Major quick links for user are Asset Request, My Assets & Approve Request.
- Analytics & Reports: Analytics and reports based on role and data in the platform.
- Activity Stream: It will display all the activities carried out in the platform.
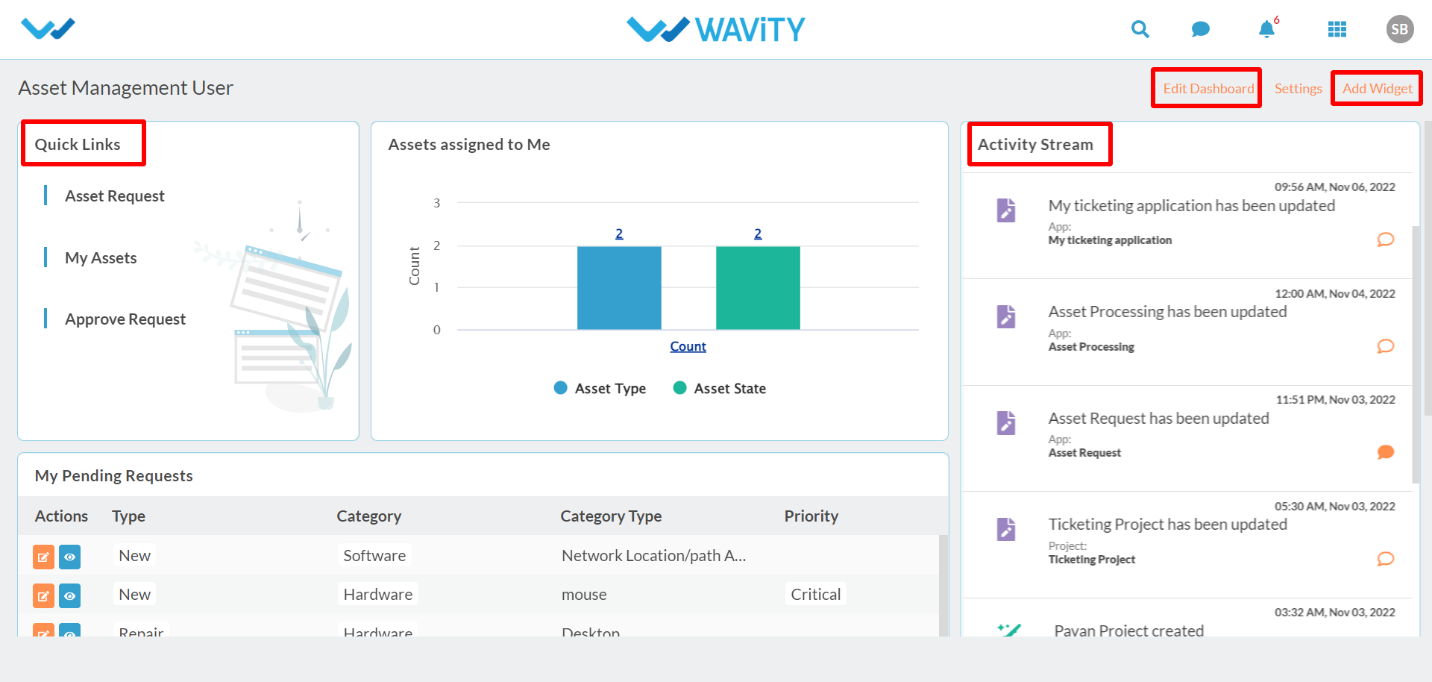
How to Reassign a Ticket?
- In Wavity, reassigning a ticket is straightforward and user-friendly. With minimal steps, agents can transfer tickets to the appropriate team or other agents, ensuring efficient resolution and smooth workflow management.
- Note: The steps provided serve as sample instructions and can be customized based on specific requirements; however, the core workflow will remain the same.
- In Agent dashboard, Click on the Ticket(s) assigned to me.

- After clicking on that, it will display the conversational UI at the right side click on the Record details popup.

- Select the IT Agent tab, and then click Yes under the Reassign option. The Re-Assignment section will then appear, allowing you to update the Re-assignment details.

- Now, select the agent in the Reassign To field to reassign the ticket and provide a reason for the reassignment.
- In the Agent Re-Assignment History, you can view the list of agents who have previously worked on the ticket.

- After entering the details, click on the Submit button. The ticket will then be reassigned to the agent you selected.

How to Search for Articles in Knowledge Base?
- The Wavity platform offers a Knowledge Base within the Help Portal, enabling users to independently access information and find answers to their queries. If the required information is not available, users can submit a support request to an agent for further assistance.
- For Knowledge Base Articles, Click on the Help Portal as shown in the below image.

- Users will land on the Customer Portal, where they can access Knowledge Base articles for self-help and informational support.

- Users can utilize the search bar to quickly find relevant Knowledge Base articles.

- If users want to view articles related to Wi-Fi connectivity issues, they can type relevant keywords in the search bar, and the system will display related articles. Select the article to view its complete information.

- You will be able to view articles related to Wi-Fi connectivity issues that may help address your query.

- To add Knowledge Base Articles in Help Portal refer this link: Creating a Knowledge Base Article | Wavity
How to Create a Ticket through Platform?
- In Wavity, creating a ticket is a simple and user-friendly process. Users can generate tickets through various channels including the platform, Customer Portal, Chatbot, Email, Slack, Microsoft Teams, WhatsApp, Instagram, and Facebook.
- Users can create a ticket via the platform by logging in with their credentials, which will take them to the user dashboard.
- Note: The steps provided serve as sample instructions and can be customized based on specific requirements; however, the core workflow will remain the same.

- Click on Create IT Ticket from Quick links.

- In Ticket tab, fill all the required details under Ticket Information section.

- By default the requester will considered as system user. Select the category from the below dropdowns as shown in the image.

- Select the Appropriate Sub-Category from the dropdowns.

- Select the Priority of the ticket such as Critical, High, Moderate and Low.

- Mentioning a clear subject while creating the ticket helps the agent quickly understand the nature of the problem and prioritize the issue effectively. Users can add attachments, such as images or screenshots that are relevant to the issue to help agents better understand and resolve the problem.

- Users can select agents from the Watch List and provide a detailed description of their issue in the Description box. After entering the details, click on the Submit.
