How Can We Help?
FAQ's
Getting Started
New to Wavity? Learn the best practices in getting your Workspace set up for success
Features
Solution is typically custom-built or configured to solve a specific customer problem.
Solutions
Solution is typically custom-built or configured to solve a specific customer problem.
Advanced Search
Search features by Text
Admin Guide: Bulk Import of Organization-Based Users
- In the Wavity platform, users can be imported in bulk based on their organization domain. This allows uploading multiple users at once with different domains.
- Only Admin have the access to perform user imports based on the domain.
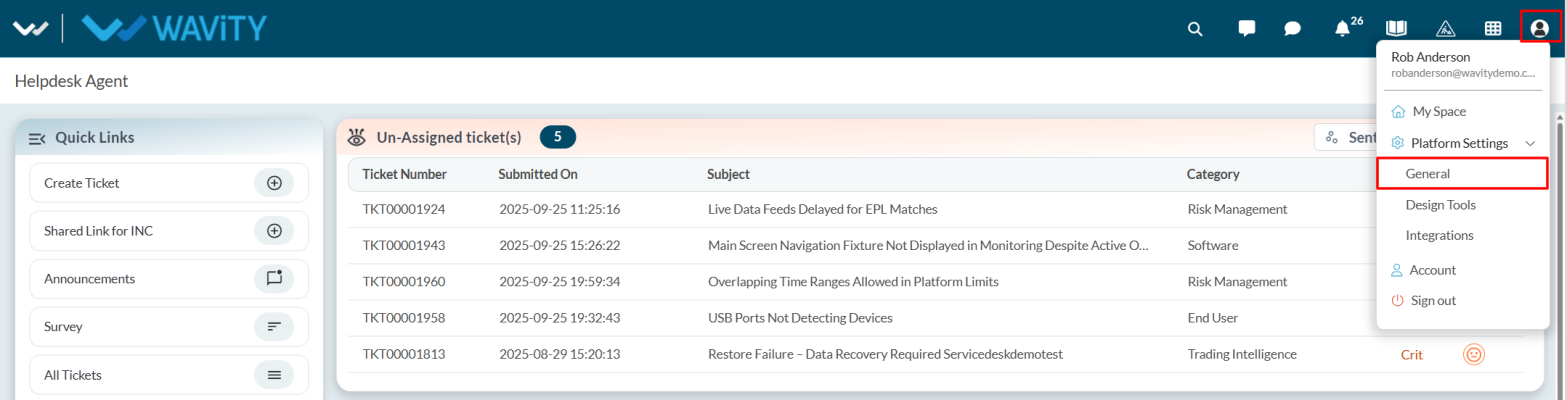
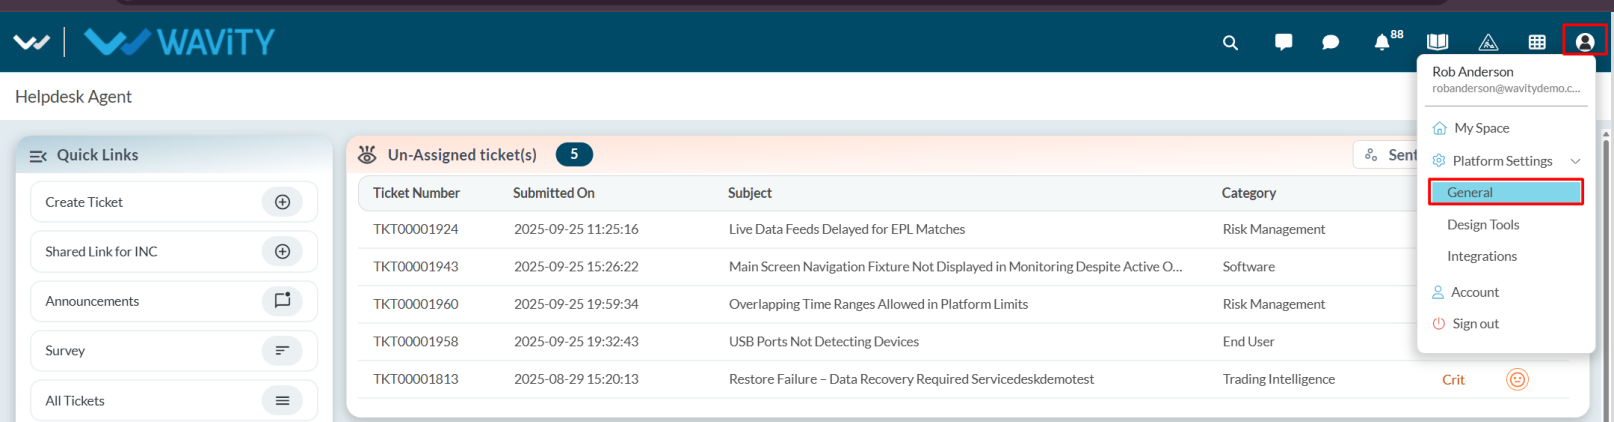
- The Admin user logs in with their credentials and navigates to the appropriate interface.
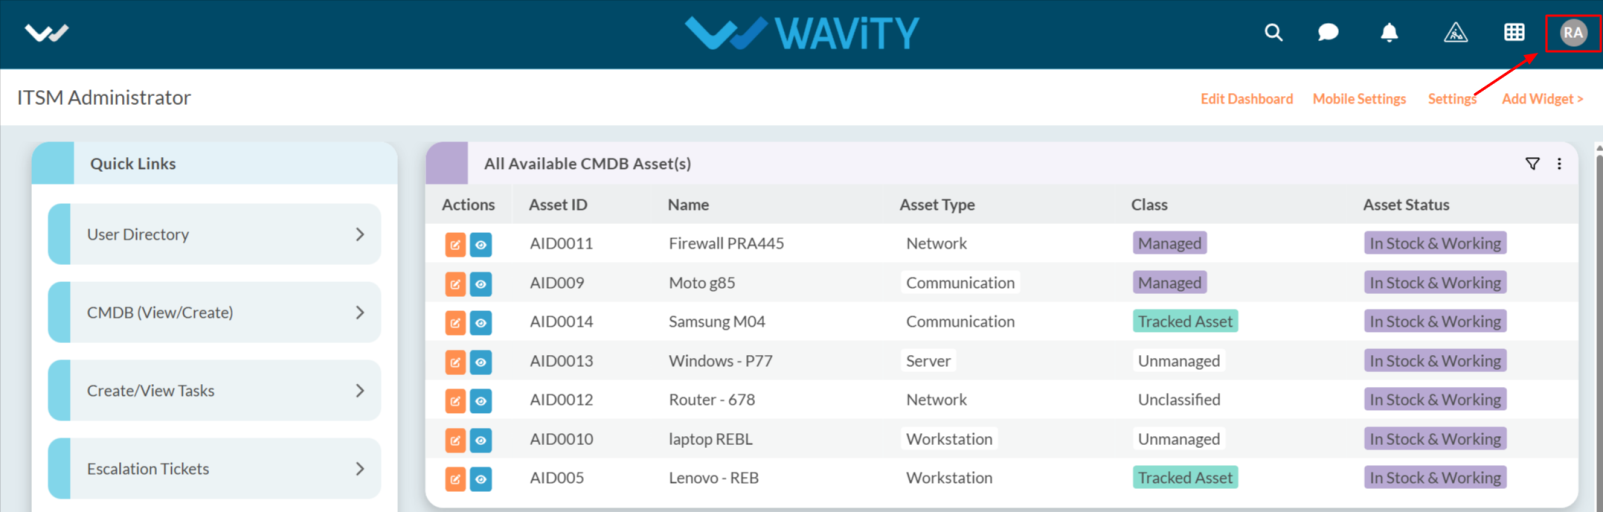
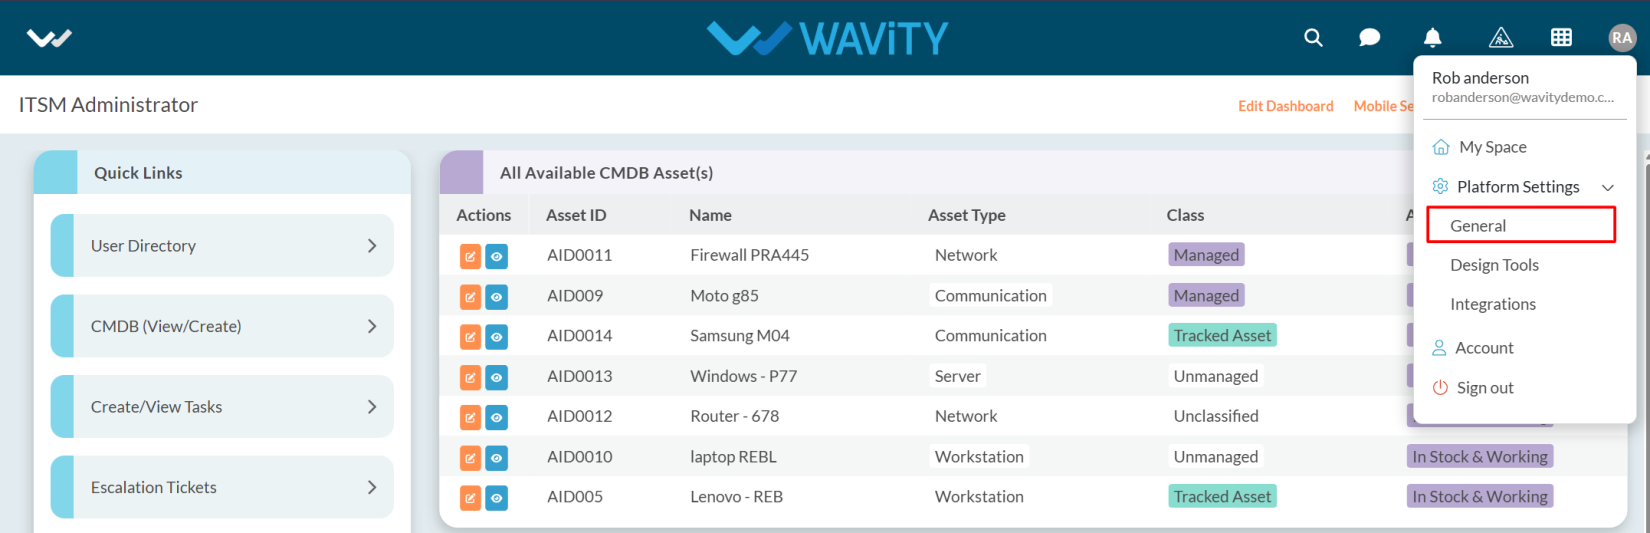
- Click on the Profile icon and select the General option from the dropdown.
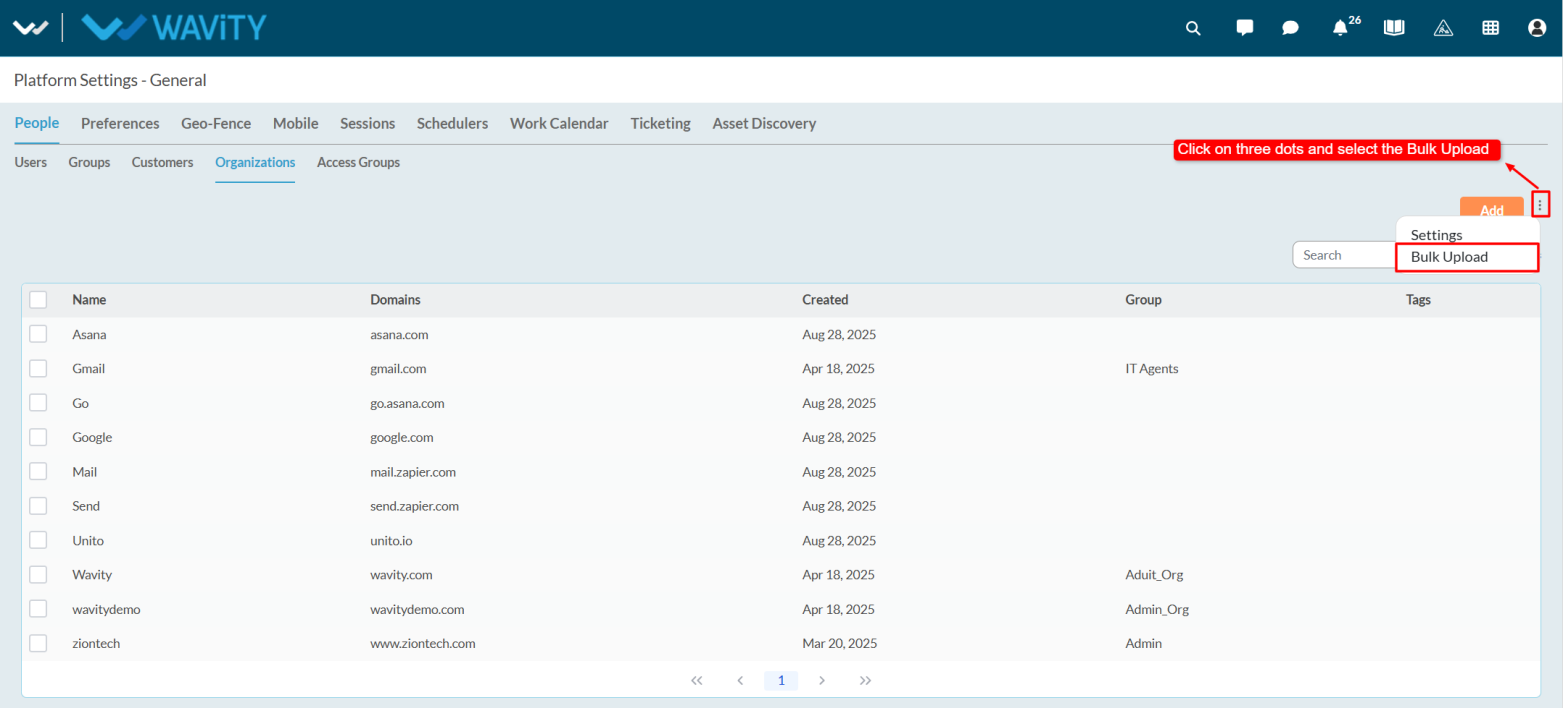
- Under the People tab, select Organization.

- Click on the three dots (⋮) and choose Bulk Upload from the dropdown options.
- The Bulk Upload Customers window will appear. Click the link labeled Download Bulk Upload Template to download the template.
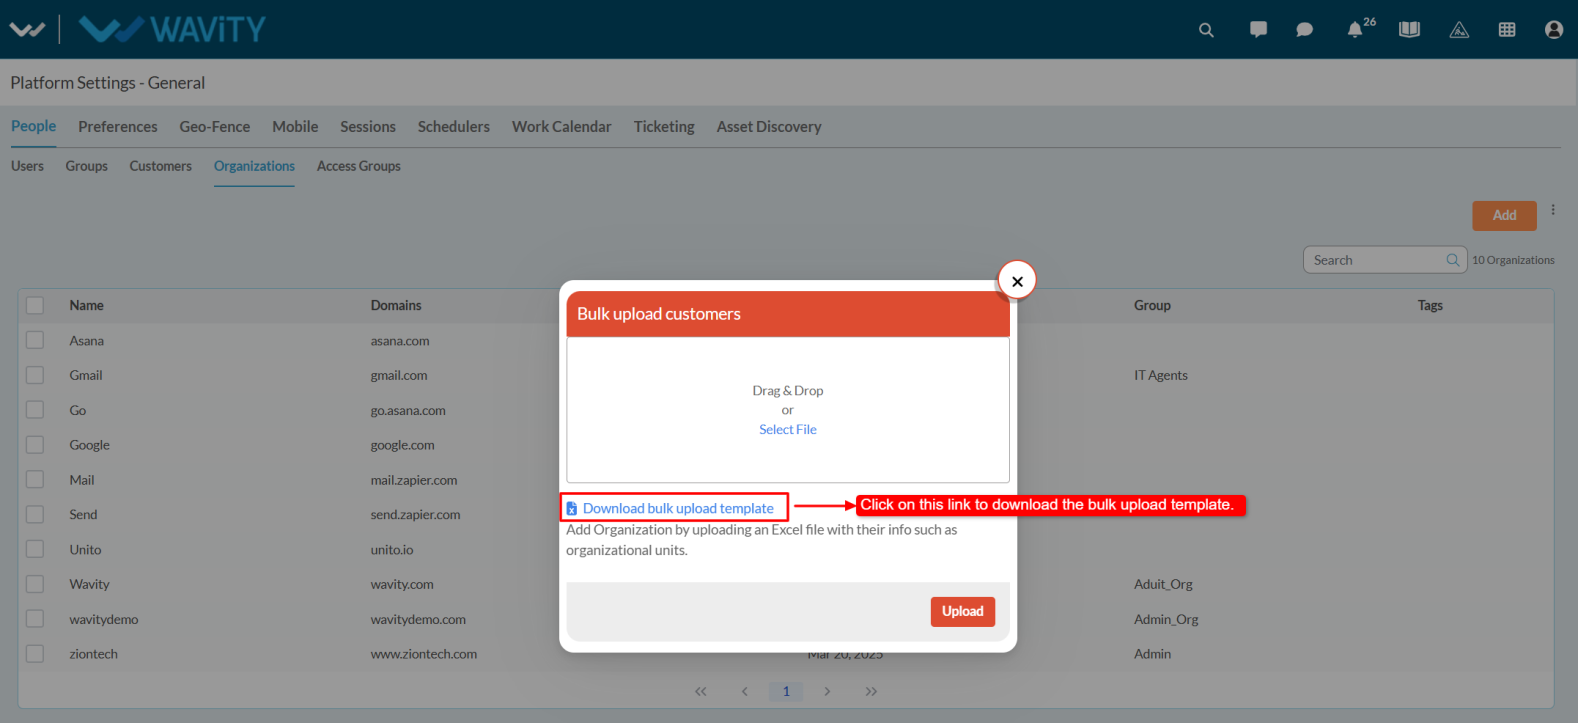
- An Excel sheet will be downloaded. Open it and fill in the required details such as Name and Domain. If there are any Custom Attributes, they will also appear in the sheet.
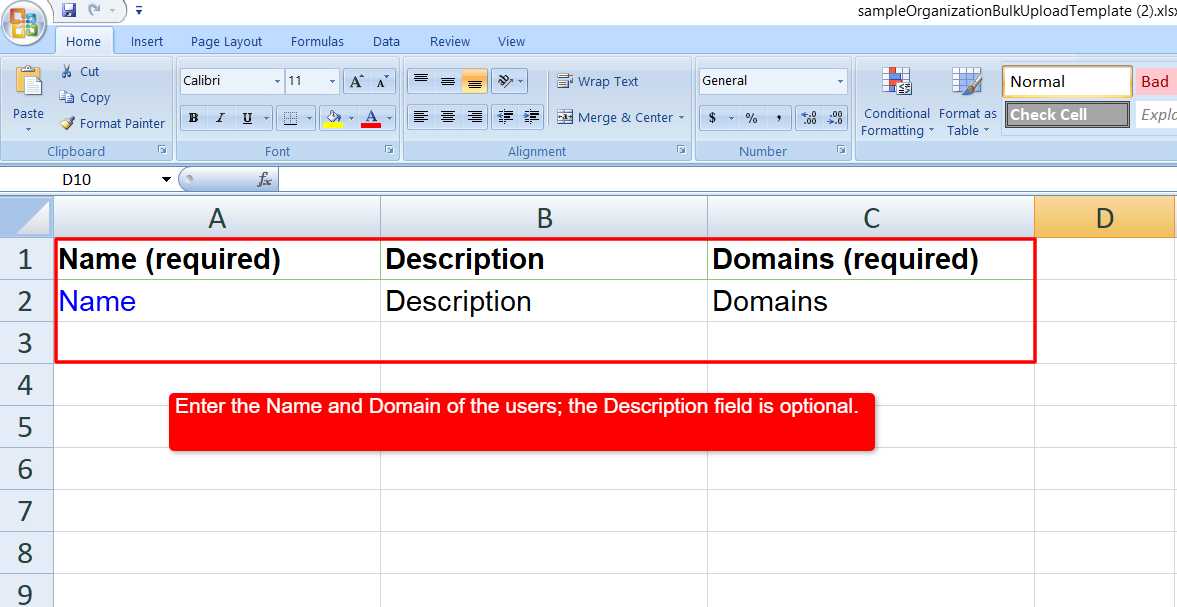
- After entering all the required details, save the Excel sheet.
- Upload the file by selecting Select File and click on Upload.
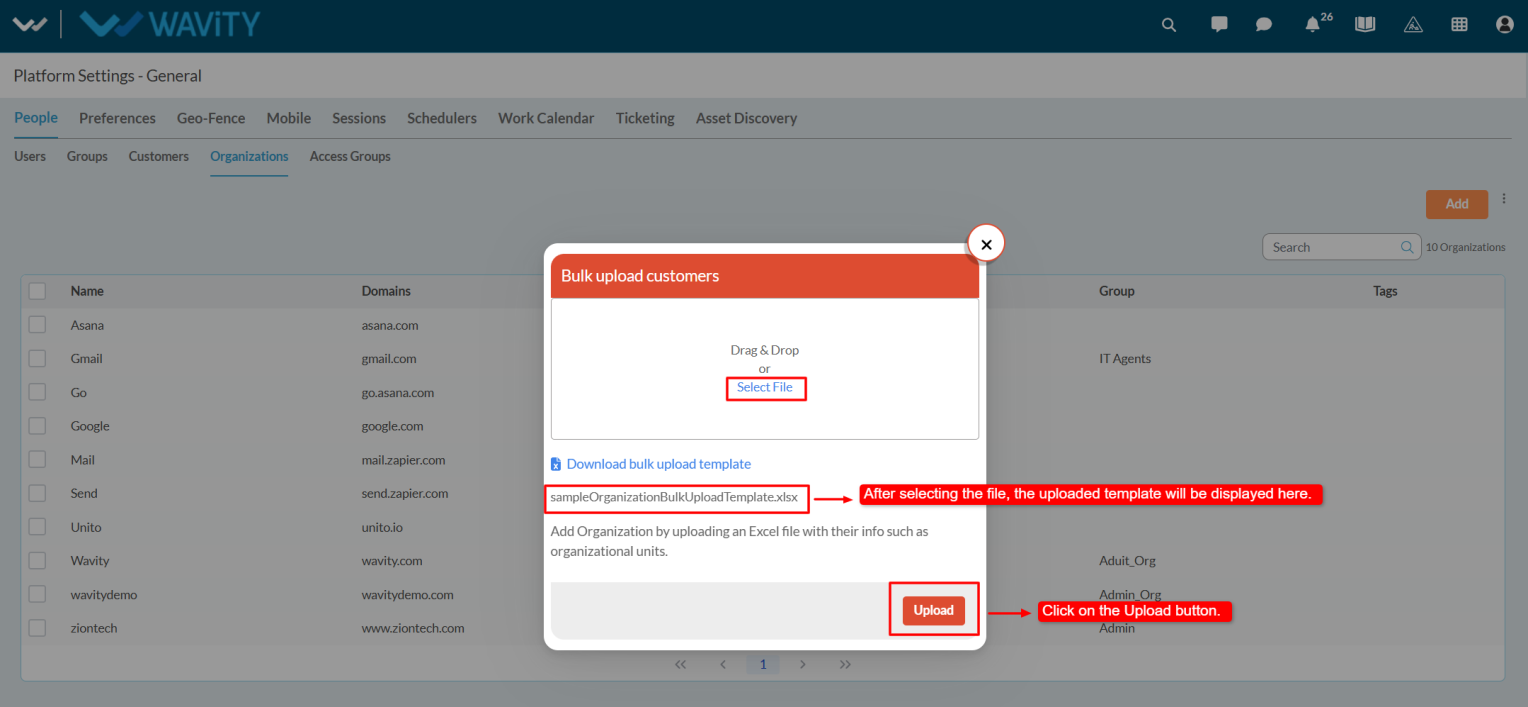
- All users listed in the sheet will be successfully imported into the system along with their associated domains.
Admin Guide: Customer to User Conversion Process
- In the Wavity platform, converting a customer into a user is a simple and straightforward process.
- Only Admin have the privilege to perform this action.
- Admin can log in with their credentials and navigate to the appropriate interface.
- Click on the profile icon and choose General from the dropdown menu.
- Go to the Customers tab under General.

- Select the customer you want to convert into a user.

- If required, the Admin can update customer details by clicking on the Edit option, which redirects to the customer profile page. Here, the Admin can modify fields such as first name, last name, or assign the organization based on the domain. Once the changes are made, click Save to apply the updates.

- After editing, select the customer and click on the Upgrade option.

- A confirmation popup will appear select Yes to proceed.
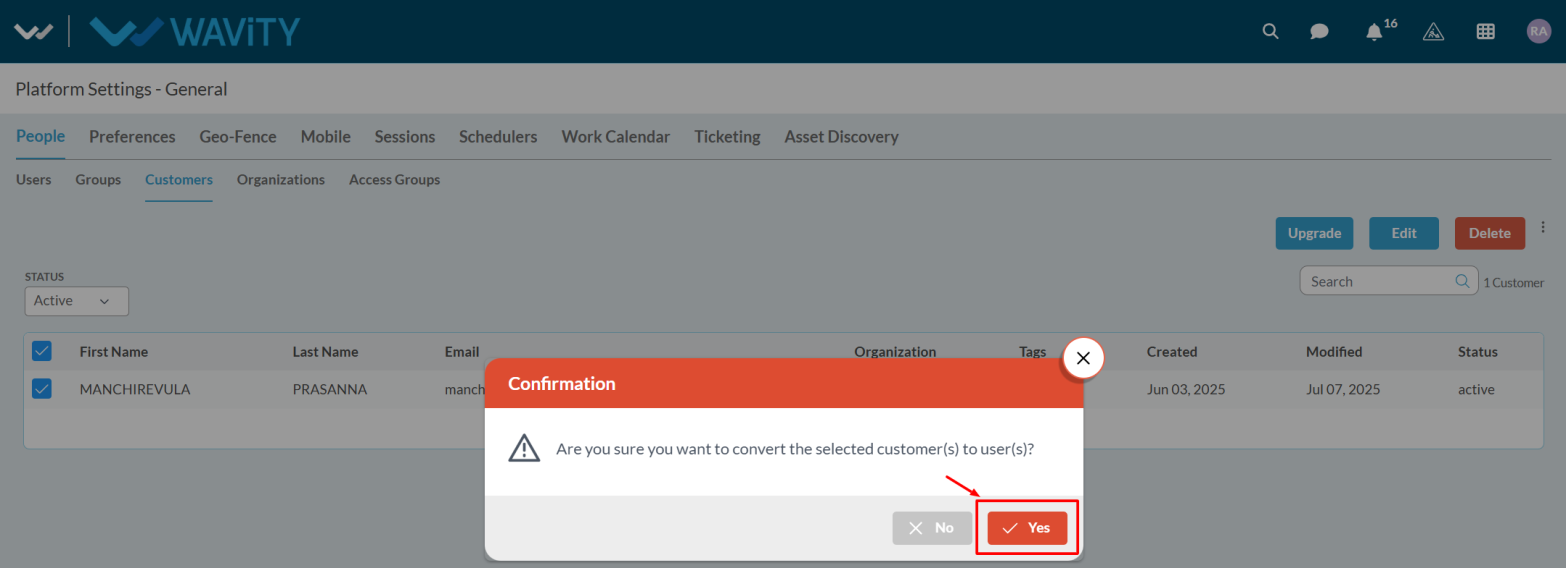
- The customer will then be successfully converted into a user, and a success notification will be displayed at the bottom of the screen.
Configuring Ticketing General Settings
- Ticketing General Settings section allows you to map Wavity application and configure advanced features such as Shifts, SLAs, Signatures, Live Chat, Macros, and the AI Chatbot.
- To begin, click on the profile icon, navigate to Platform Settings, and select General.

- In Ticketing Tab, Select the General.

- In the Ticketing Service, select the application which will mapped to configure macros, shifts, live chat, and other features.
- After selecting the application, you need to map it to the appropriate fields.

- After mapping the fields appropriately, click the Save button to apply the changes.

How to Integrate Google Drive with Wavity
- The Wavity platform offers seamless integration with cloud-based file storage services such as Google Drive, enabling direct file access and optimizing resource utilization.
- Only Admin will have authorization to enable Google drive integration with Wavity.
- To initiate Google Drive Integration within the platform, administrators must first enable it in the platform settings. Once this integration is activated, users within the same tenant can establish a connection by adding an instance to link their individual Google Drive accounts with Wavity.
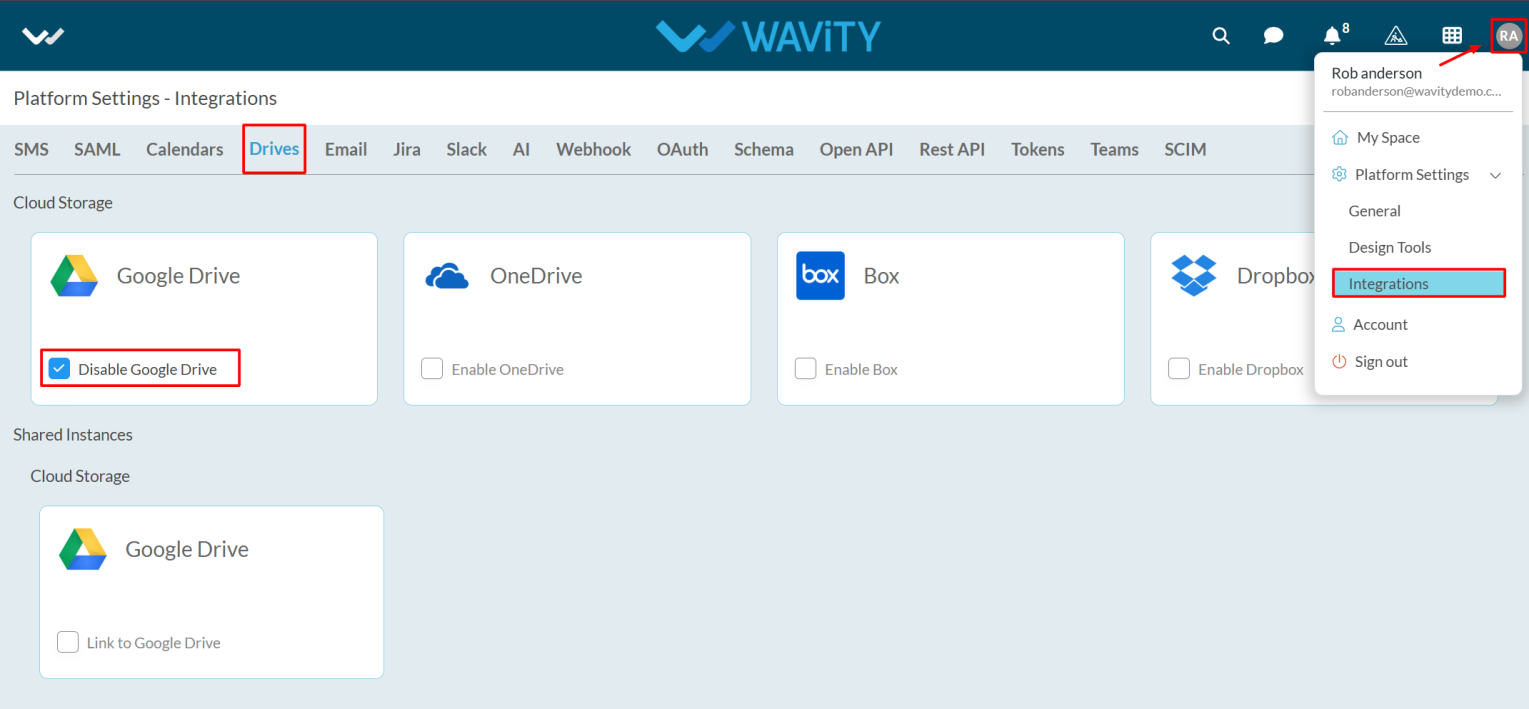
- Click on the Profile icon, Select Integration, then go to the Drives tab and click Enable Google Drive.
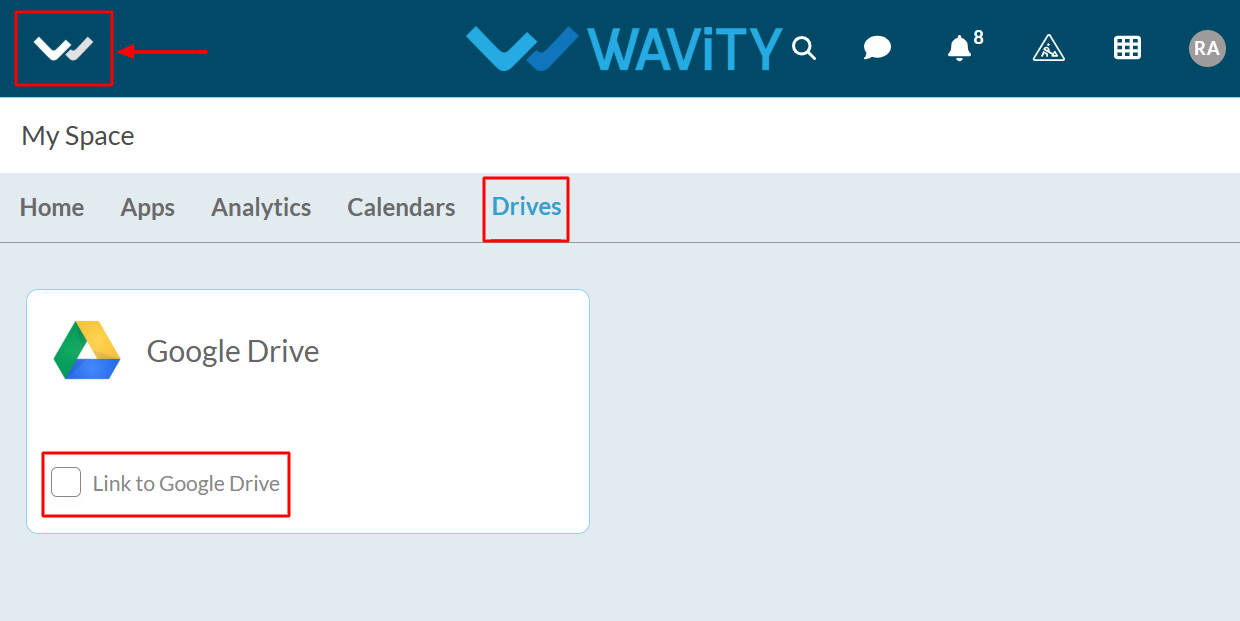
- For users to link your Google Drive with Wavity, click on the Wavity symbol to navigate to the My Space page. Under the Drives tab, click on Link to Google Drive, as shown below. Content from Google services is only visible to the user who has configured the instance.
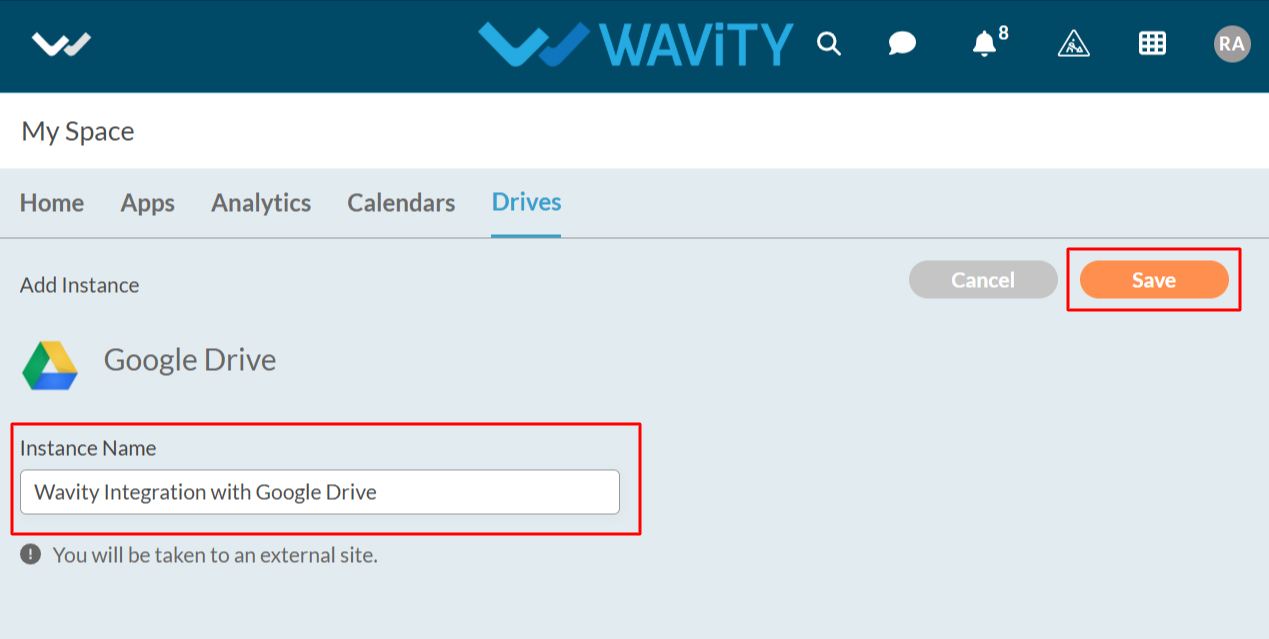
- Enter the Instance Name and click Save button to link Google drive with Wavity.
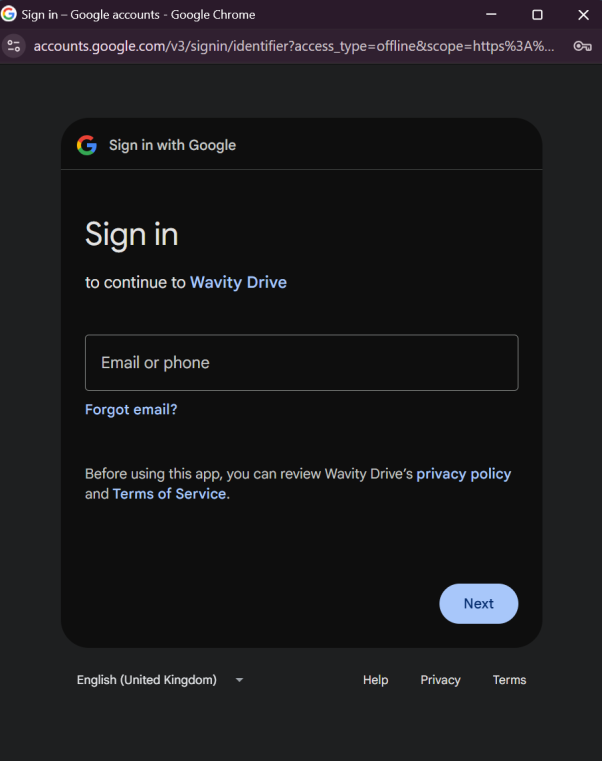
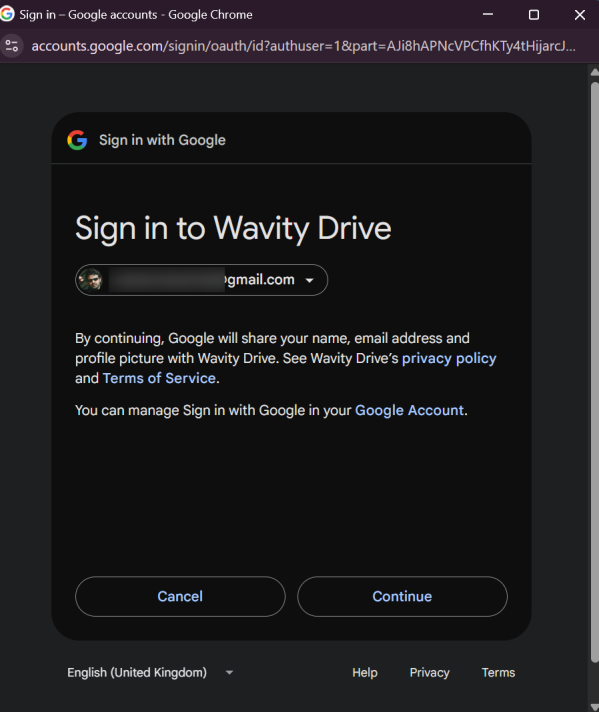
- In the pop up link, enter your login credentials such as your email or phone number and password as shown in below image.
- After entering and login to your Google account. Click on Continue to proceed further.
- Upon completion of linking process, a message pop up will be shown for 3 seconds with confirmation of linking Google drive with Wavity.

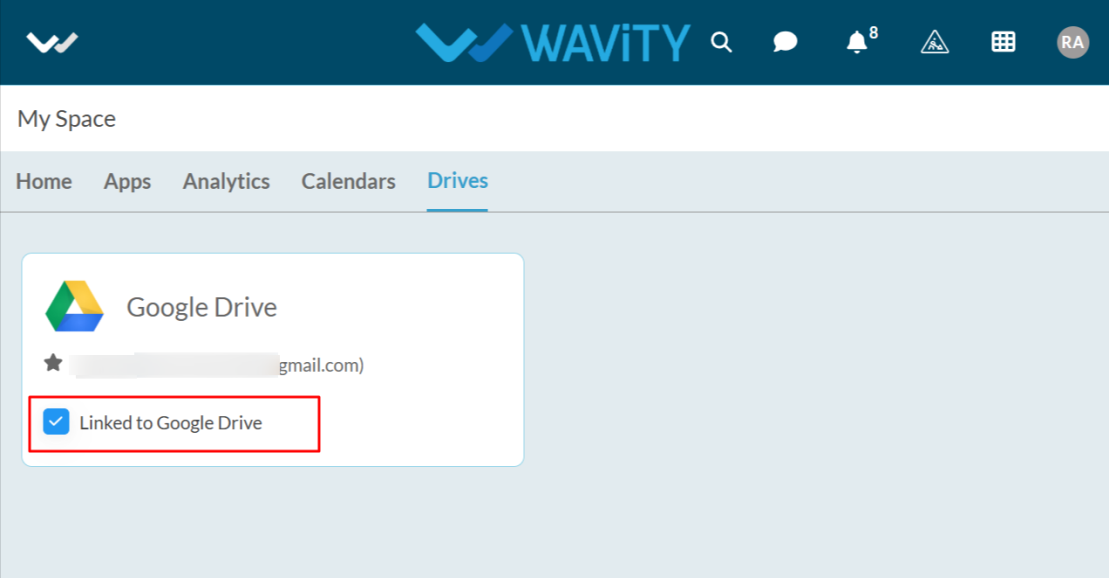
- Users also have the option to unlink an instance if they wish to do so..
- To unlink an instance, Click on the checked box containing Linked to Google Drive as shown in below image.
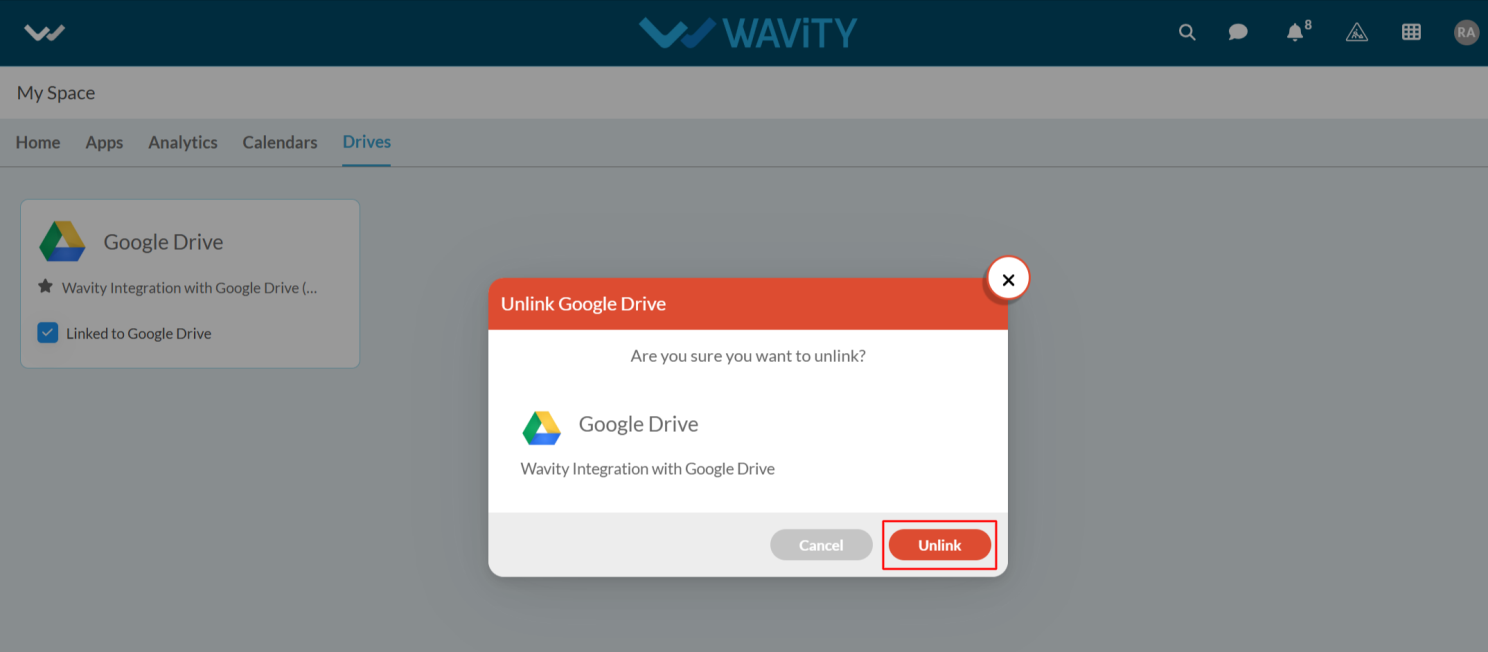
- In the message pop up, click on Unlink button to unlink your instance.
How to Integrate One Drive with Wavity
- The Wavity platform offers seamless integration with cloud-based file storage services such as One Drive, enabling direct file access and optimizing resource utilization.
- Only Admin will have authorization to enable OneDrive integration with Wavity.
- To initiate One Drive Integration within the platform, administrators must first enable it in the platform settings. Once this integration is activated, users within the same tenant can establish a connection by adding an instance to link their individual One Drive accounts with Wavity.
- Click on the Profile icon, Select Integration, then go to the Drives tab and click Enable OneDrive.

- For users to link your OneDrive with Wavity, click on the Wavity symbol to navigate to the My Space page. Under the Drives tab, click on Link to OneDrive, as shown below. . Content from Microsoft services is only visible to the user who has configured the instance.

- Enter the Instance Name and click Save button to link one drive with Wavity.

- In the pop up link, enter your login credentials such as your email or phone number and password as shown in below image.

- Upon completion of linking process, a message pop up will be shown for 3 seconds with confirmation of linking one drive with Wavity. Content from Microsoft services is only visible to the user who has configured the instance.
- Users also have the option to unlink an instance if they wish to do so.
- To unlink an instance, Click on the checked box containing Linked to One Drive as shown in below image.

- In the message pop up, click on Unlink button to unlink your instance.

How to Integrate Outlook Calendar with Wavity
- To initiate Outlook Calendar Integration within the platform, administrators must first enable it in the platform settings. Once this integration is activated, users within the same tenant can establish a connection by adding an instance to link their individual Outlook accounts with Wavity.
- Click on the Profile icon, Select Integration, then go to the Drives tab and click Enable Outlook Calendar.

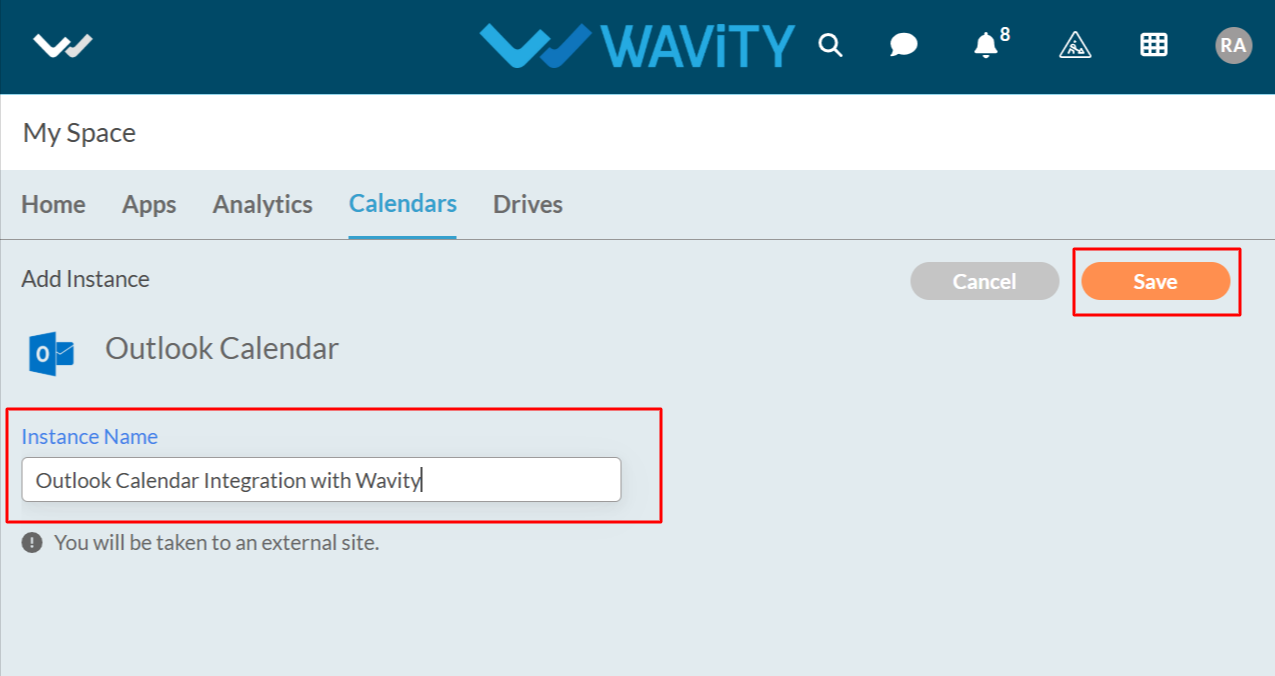
- For users to link your Outlook Calendar with Wavity, click on the Wavity symbol to navigate to the My Space page. Under the Calendars tab, click on Link to Outlook Calendar, as shown below. Content from Outlook services is only visible to the user who has configured the instance.

- Enter the Instance Name and click Save button to link Outlook Calendar with Wavity.
- In the pop up link, enter your login credentials such as your email or phone and password.

- Upon completion of linking process, a message pop up will be shown for 3 seconds with confirmation of linking outlook calendar with Wavity.

- Users also have the option to unlink an instance if they wish to do so.
- To unlink an instance, Click on the checked box containing Linked to Outlook Calendar as shown in below image.

- In the message pop up, click on Unlink button to unlink your instance.

How to Integrate Google Calendar with Wavity
- To initiate Google Calendar Integration within the platform, administrators must first enable it in the platform settings. Once this integration is activated, users within the same tenant can establish a connection by adding an instance to link their individual Google accounts with Wavity
- Click on the Profile icon, Select Integration, then go to the Drives tab and click Enable Google Calendar.

- For users to link your Google Calendar with Wavity, click on the Wavity symbol to navigate to the My Space page. Under the Calendars tab, click on Link to Google Calendar, as shown below. Content from Google services is only visible to the user who has configured the instance.

- Enter the Instance Name and click Save button to link Google Calendar with Wavity.

- In the pop up link, enter your login credentials such as your email or phone and password. Select your account if you have already logged into Google as shown below.

- After entering and login to your Google account. Click on Continue to proceed further.

- Upon completion of linking process, a message pop up will be shown for 3 seconds with confirmation of linking Google Calendar with Wavity.
- Users also have the option to unlink an instance if they wish to do so.
- To unlink an instance, Click on the checked box containing Linked to Google Calendar as shown in below image.

- In the message pop up, click on Unlink button to unlink your instance.

How to Integrate Drop Box with Wavity
- The Wavity platform offers seamless integration with cloud-based file storage services such as Drop Box, enabling direct file access and optimizing resource utilization.
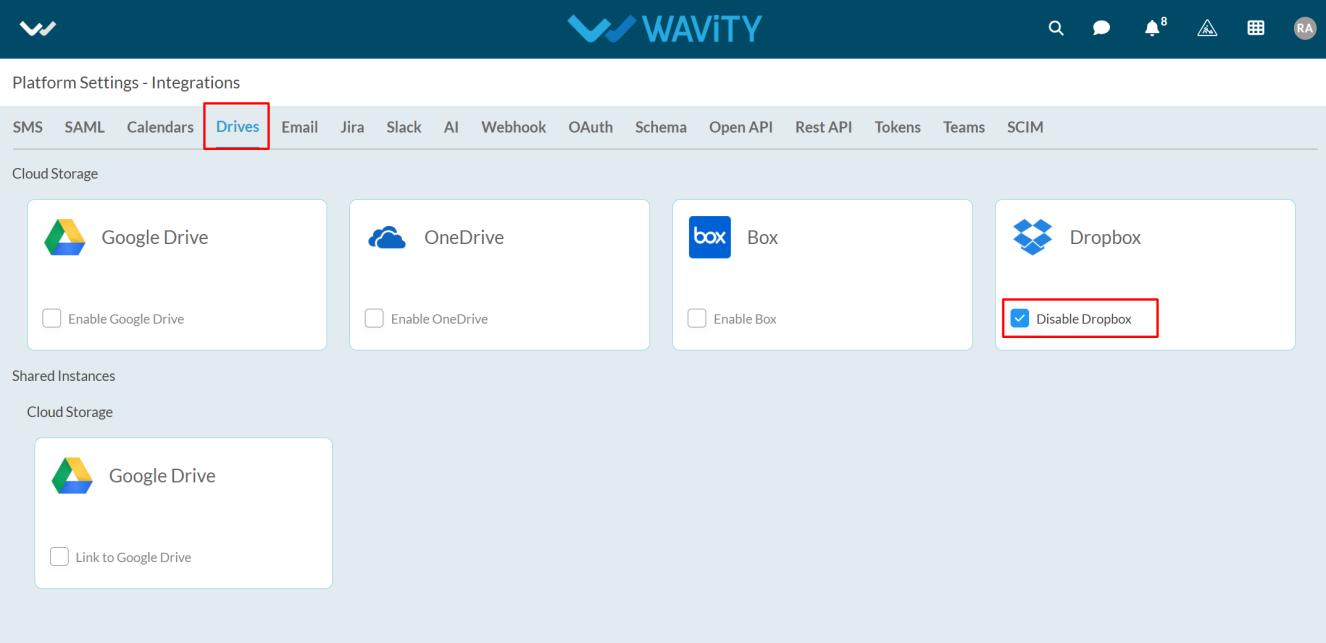
- Only Admin will have authorization to enable Drop Box integration with Wavity.
- To initiate Drop Box Integration within the platform, administrators must first enable it in the platform settings. Once this integration is activated, users within the same tenant can establish a connection by adding an instance to link their individual Drop Box accounts with Wavity.
- Click on the Profile icon and Select Integration.
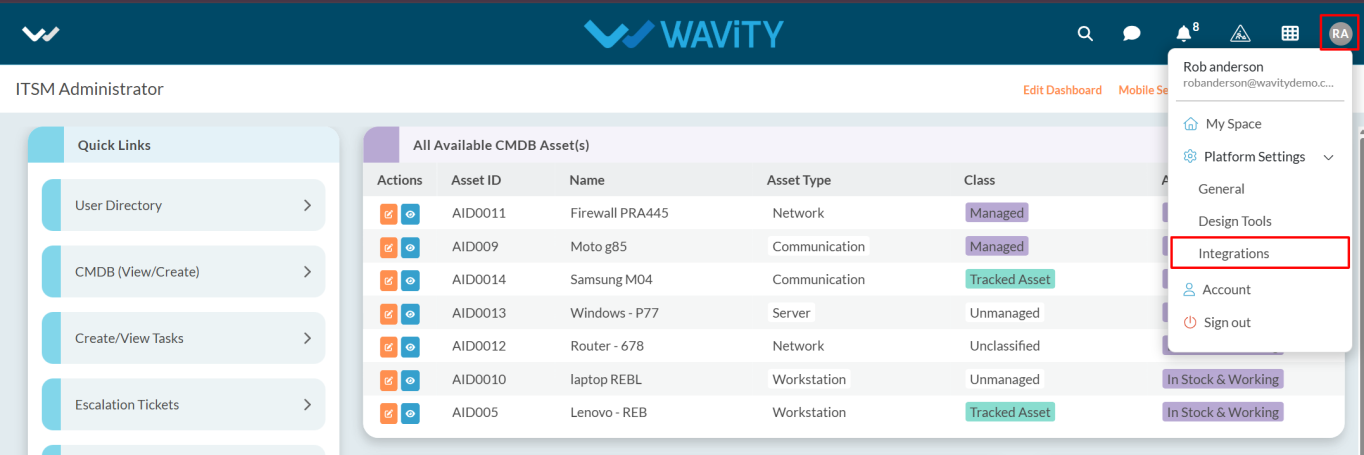
- Click on Drives tab and click Enable Dropbox.
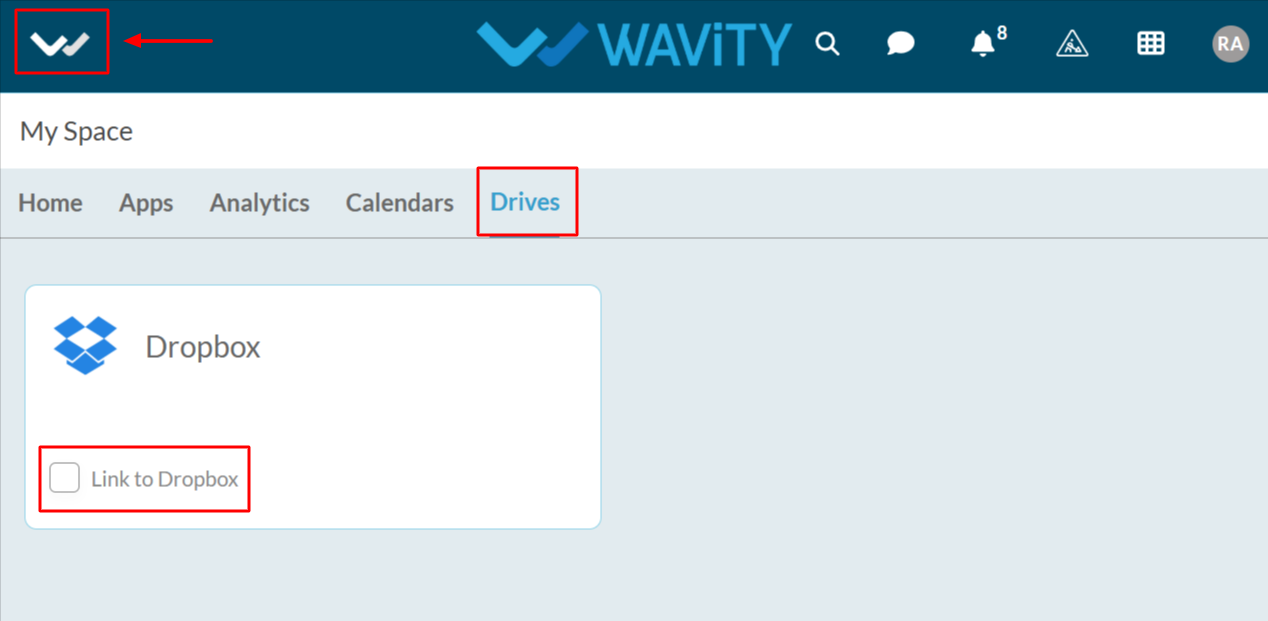
- For a user to link your Dropbox with Wavity, click on the Wavity symbol to navigate to the My Space page. Under the Drives tab, click on Link to Dropbox, as shown below. Content from Dropbox is only visible to the user who has configured the instance.
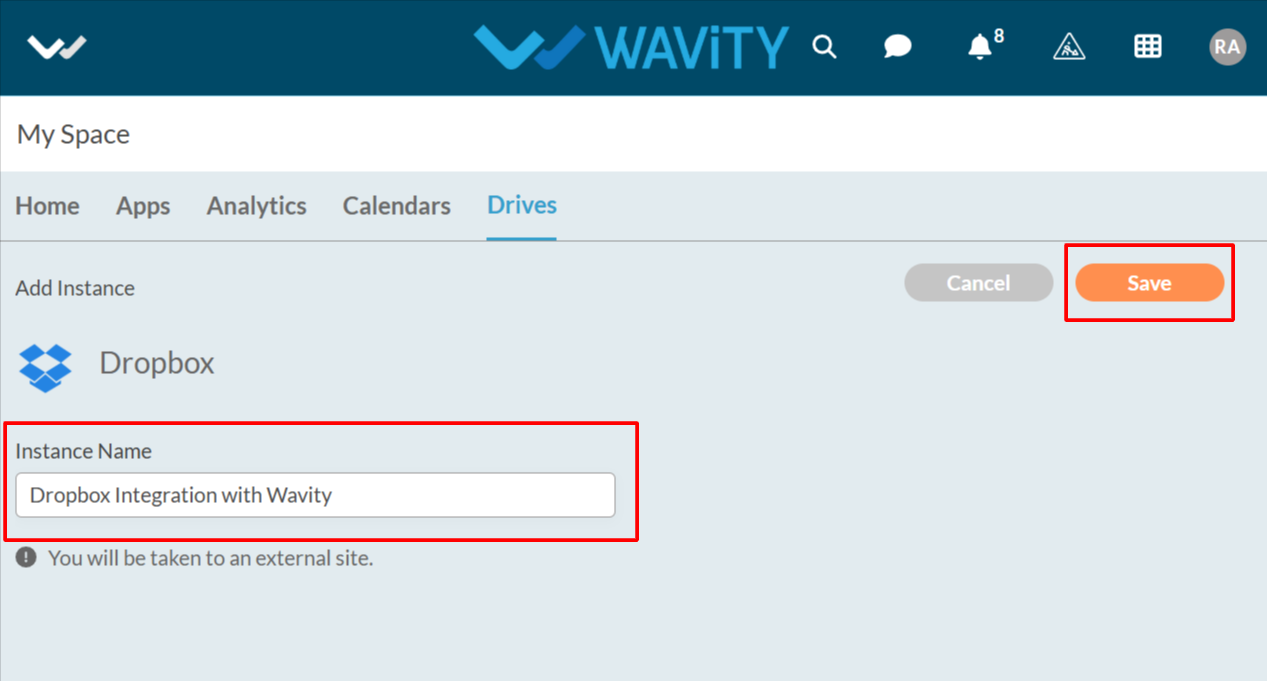
- Enter the Instance Name and click Save button to link Drop Box with Wavity.
- In the pop up link, enter your login credentials such as your email and you can also continue with Google and Apple as shown in below image.

- Upon completion of linking process, a message pop up will be shown for 3 seconds with confirmation of linking Drop Box with Wavity.
- Users can unlink an instance at any time by clicking the checked box labeled Linked to Drop box and then selecting the Unlink button in the confirmation popup.
How to Integrate Box with Wavity
- Wavity platform offers seamless integration with cloud-based file storage services such as Box, enabling direct file access and optimizing resource utilization.
- Only Admin will have authorization to enable Box integration with Wavity.
- To initiate Box Integration within the platform, administrators must first enable it in the platform settings. Once this integration is activated, users within the same tenant can establish a connection by adding an instance to link their individual Box accounts with Wavity.
- Click on the Profile icon, Select Integration, then go to the Drives tab and click Enable Box.

- For a User to link your Box with Wavity, click on the Wavity symbol to navigate to the My Space page. Under the Drives tab, click on Link to Box, as shown below. Content from Box is only visible to the user who has configured the instance.
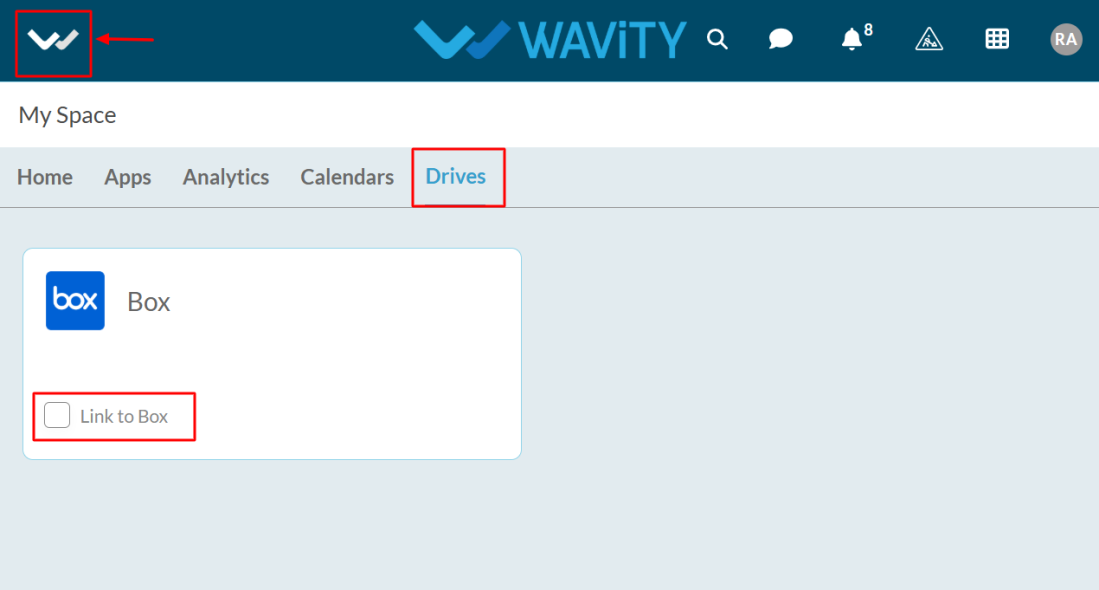
- Enter the Instance Name and click Save button to link box with Wavity.

- In the pop up link, enter your login credentials such as your email address and password as shown in below image.

- Upon completion of linking process, a message pop up will be shown for 3 seconds with confirmation of linking box with Wavity.
- Users can unlink an instance at any time by clicking the checked box labeled Linked to Box and then selecting the Unlink button in the confirmation popup.
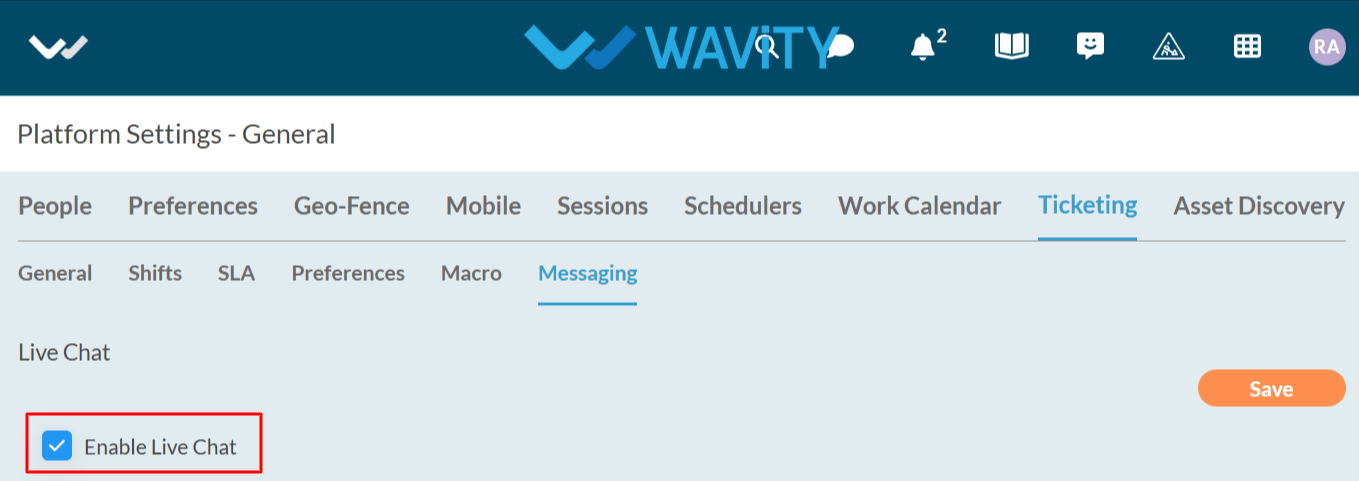
Live Chat Configuration Guide for Admins
- On the Wavity Platform, end users can directly communicate with agents to resolve their issues.
- The Messaging feature enables live chat between end users and agents for real-time support.
- Enabling Messaging feature is a simple process
- Only Admin will have access to enable the messaging feature.
- Click on the Profile Icon.
- Select General.

- After selecting General from the options, you will be directed to the Platform Settings – General page.
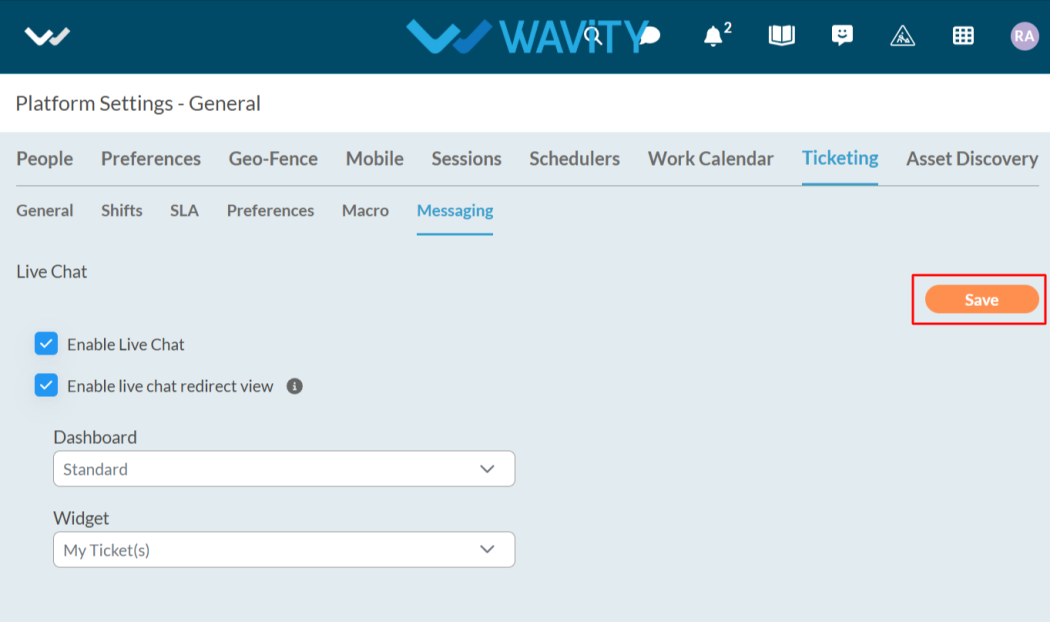
- Navigate to the Ticketing tab and select Messaging.

- After selecting the Messaging, you can view the Live Chat.
- Enable Live Chat.
- After enabling the live chat , you can Enable live chat redirect view
- Enable Live Chat Redirect View: If enabled, you can specify which widget the agent will be redirected to after accepting a live chat request.
- When you enable the Live Chat Redirect View, you must select both the dashboard and the widget to complete the configuration.
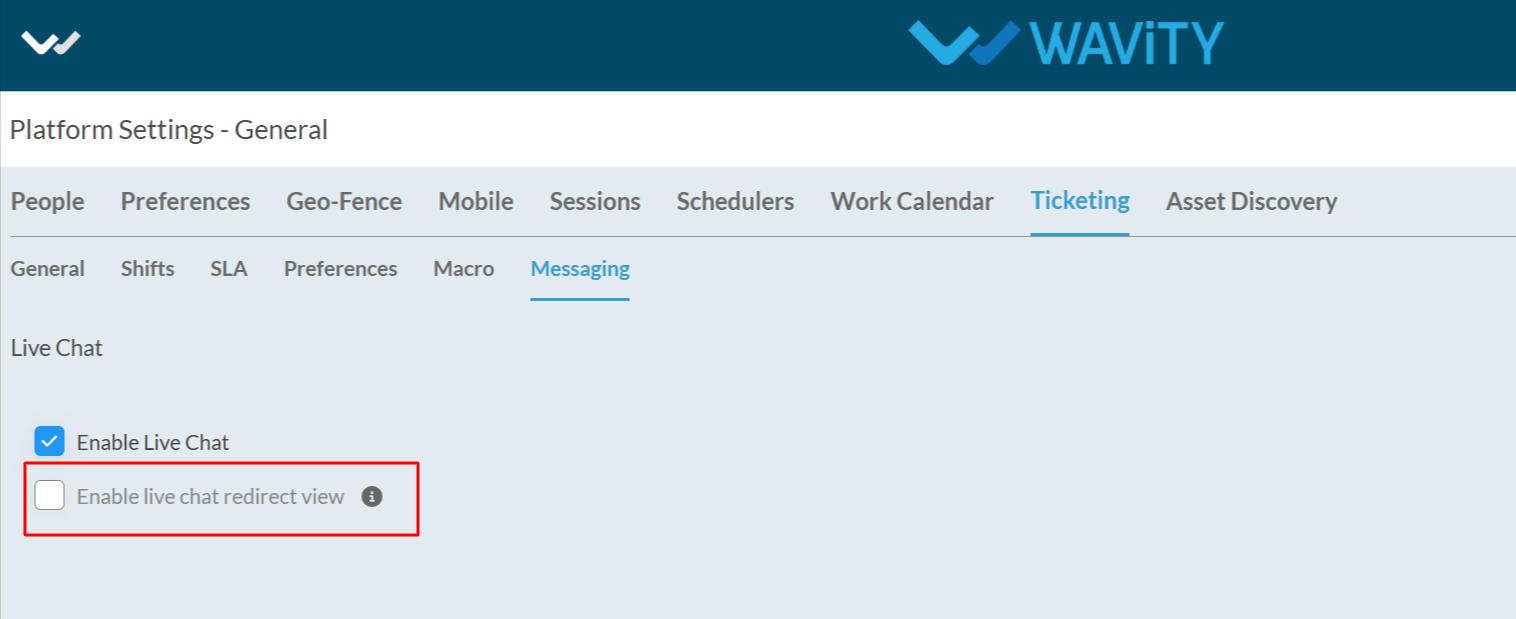
- Select the appropriate dashboard and widget from the options to complete the setup.

- After selecting the dashboard and widget, click the Save button to apply the changes.
- The Chatbot is now enabled. Now the end user can use the Live Chat feature where they can select 'Talk to an agent'; the Chatbot will then connect them with an agent, allowing the user to describe their issue.

Setting Up SLA in Wavity
- In Wavity platform, SLA (Service Level Agreement) specifies the maximum time within which a ticket must be responded to or resolved by an agent, based on its priority or severity level. With the help of SLA, you can send notifications, create records, or update existing records.
- To configure the SLA, follow the steps outlined below:
- Only Admin users will have access to create an SLA.
- Click on Profile Icon.
- Select the Design Tools from the options.
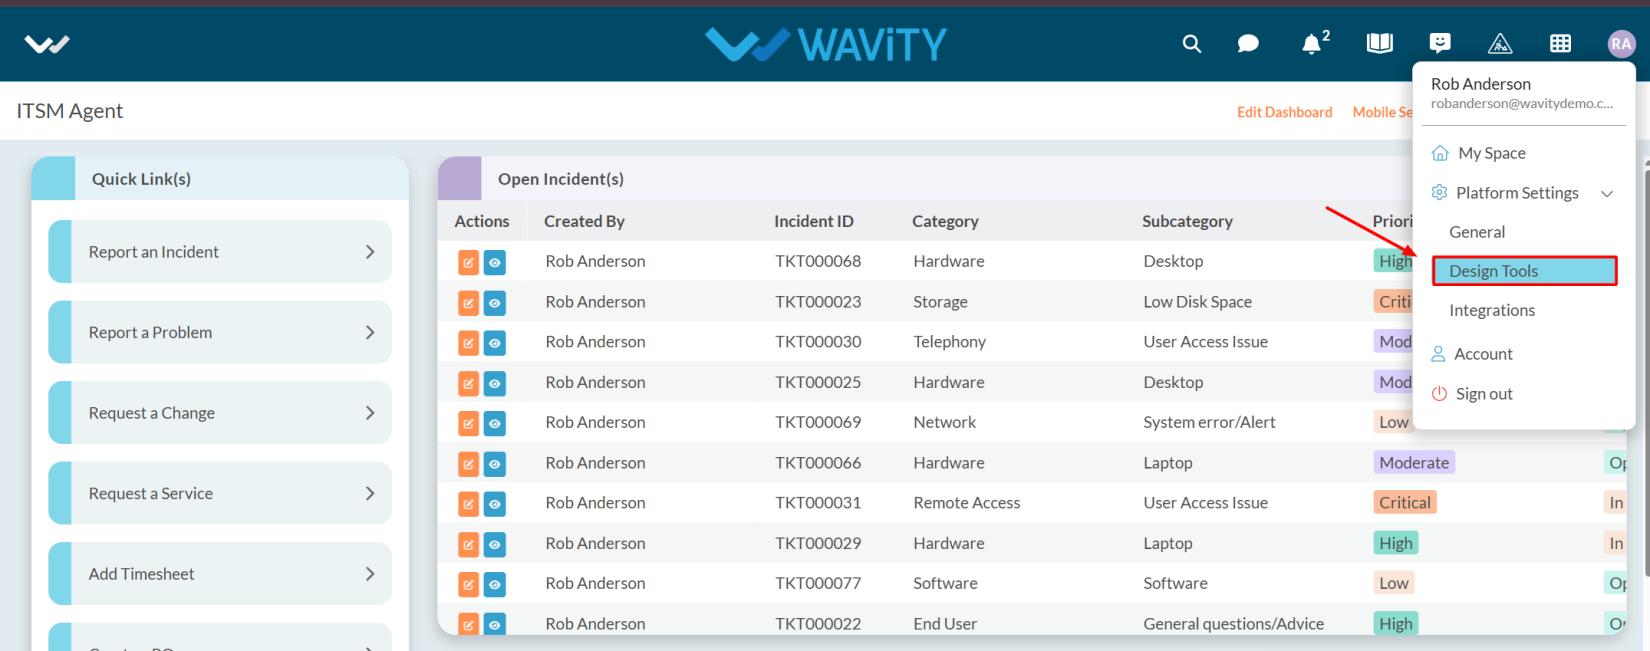
- After selecting Design Tools, you will be redirected to Platform Settings – Design Tools.
- In the Apps tab, select the appropriate app for which you want to enable the SLA feature.
- Click on the three dots.

- Select the Open app designer from the options.
- After making the selection, you will be navigated to the Open App Designer.
- Click on the Setting Icon.
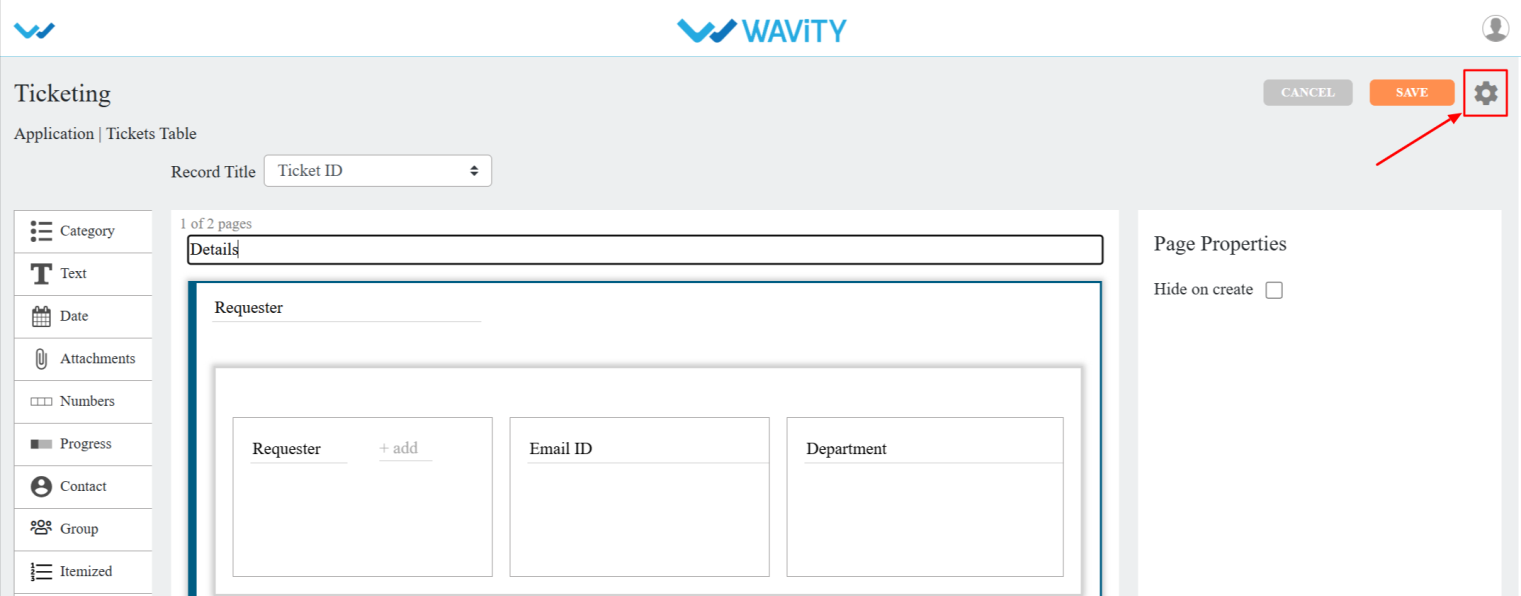
- Click on the Advanced settings.
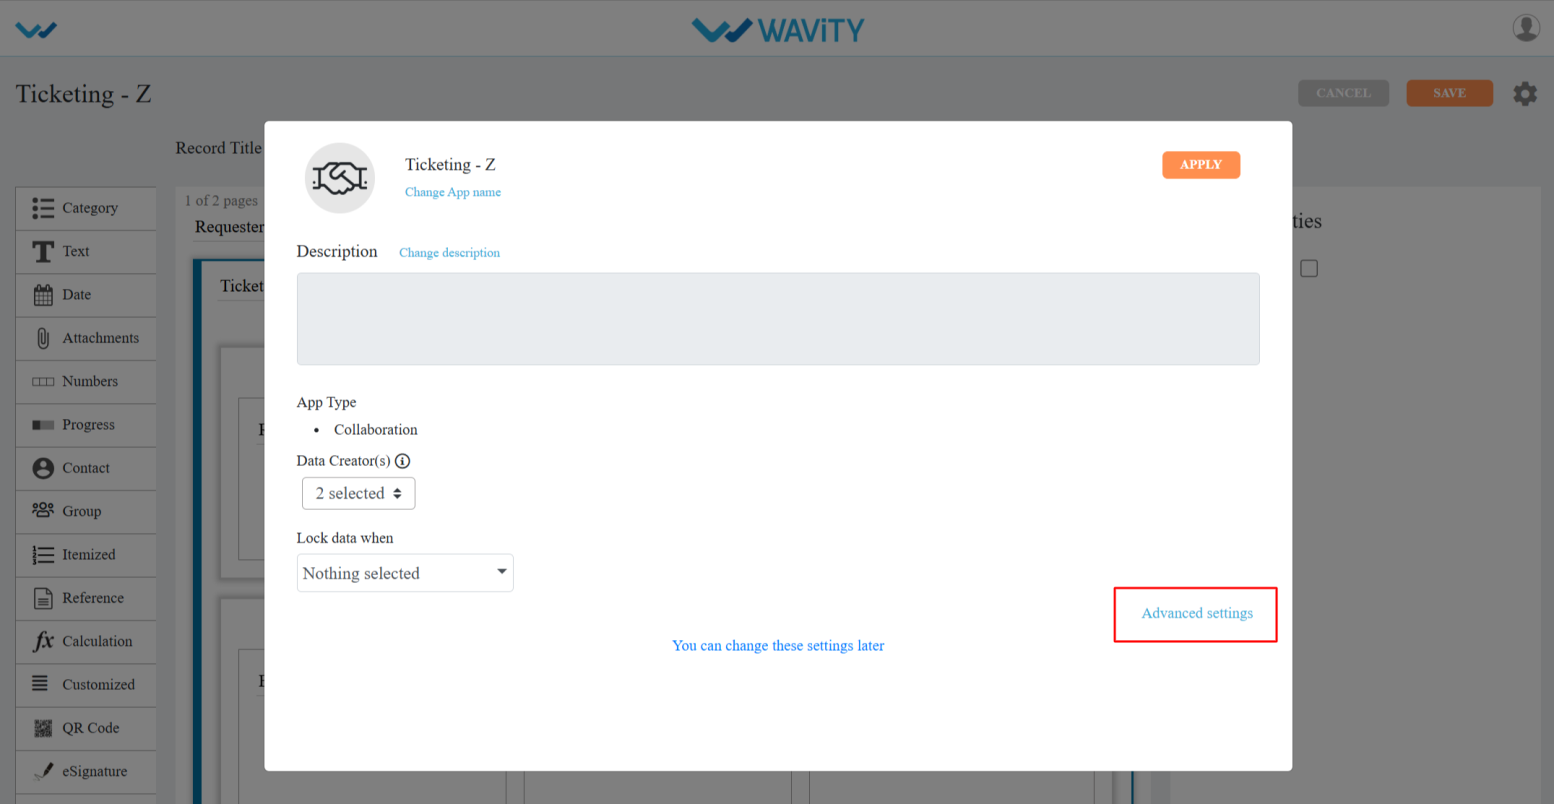
- Select the Data tab, scroll down, and click on the Enable SLA option for configuring SLA and click on Done.
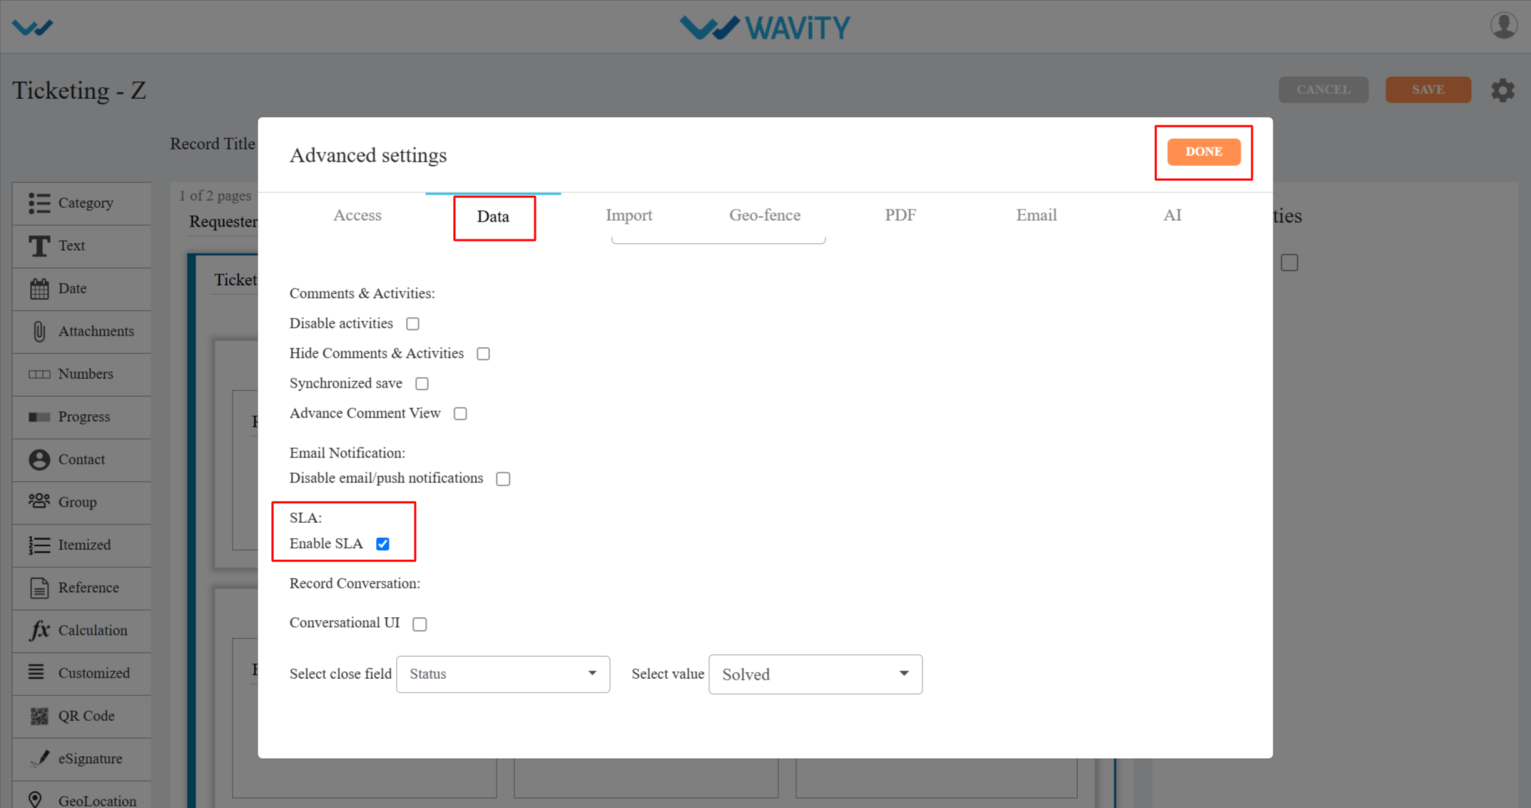
- Click on Save for applying changes.

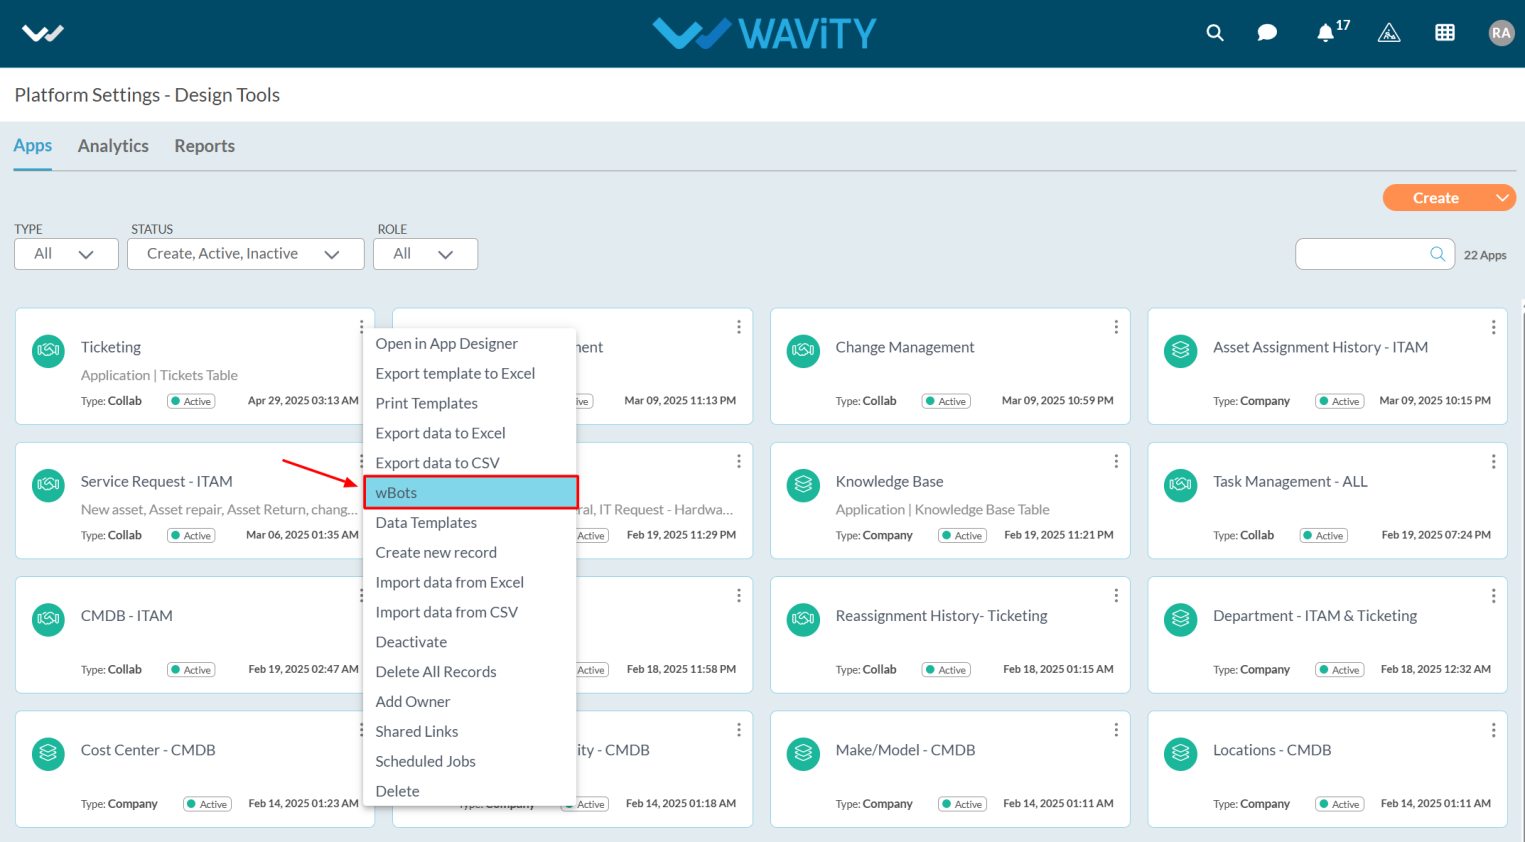
- Now, you need to create a wbot for the SLA.
- Go back to Platform Settings – Design Tools, select the app where you enabled the SLA feature, click on the three dots, and choose wbots from the options.
- Click on Create button.
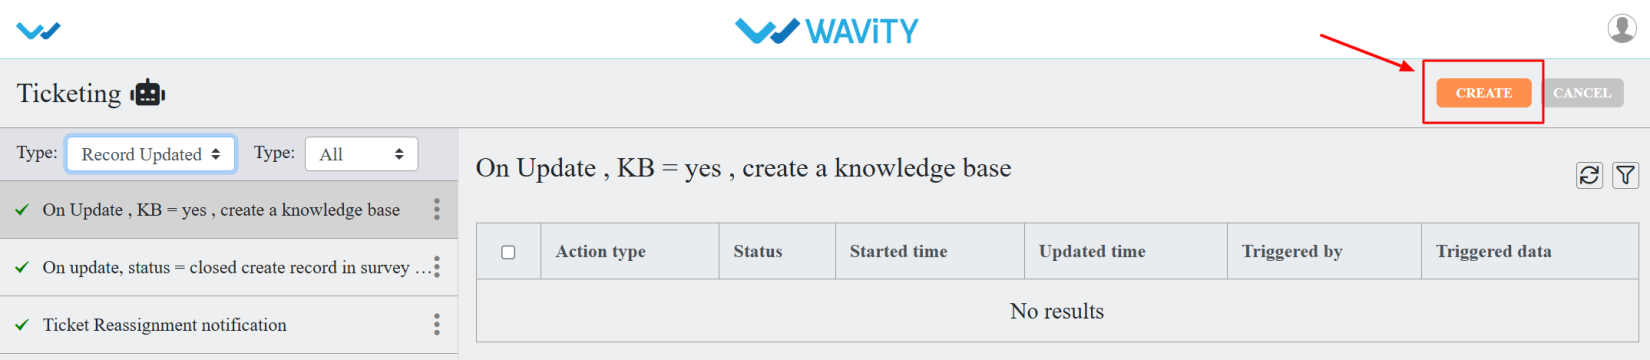
- Enter caption and description as you required.
- Now select the SLA from Start Wbots when.
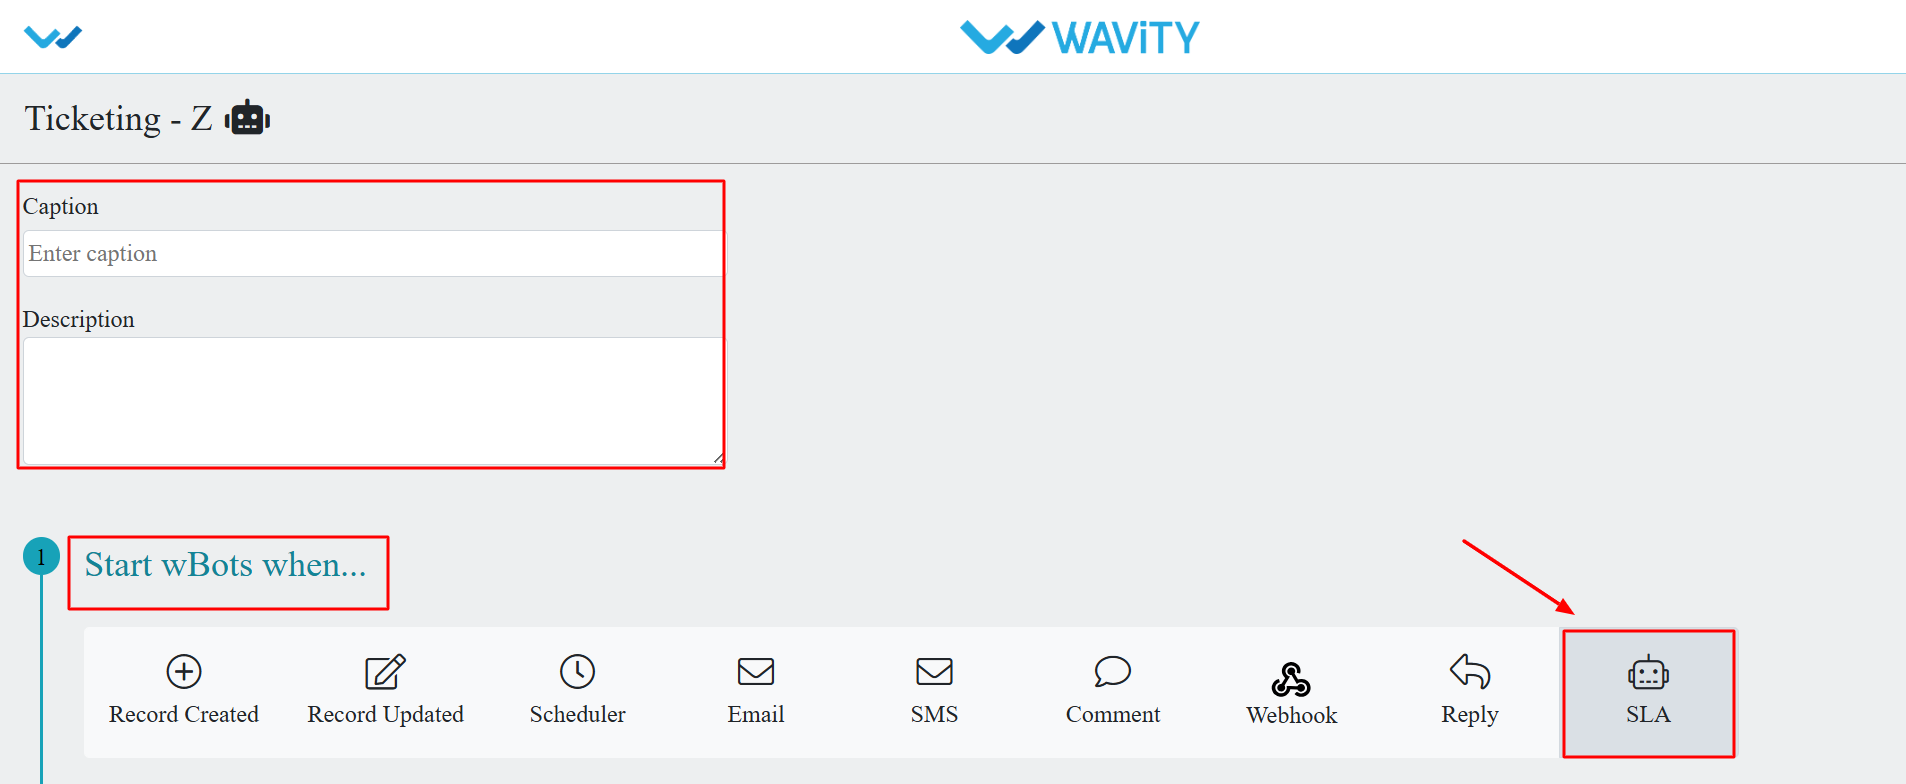
- After selecting the SLA, select the appropriate actions as you required it.
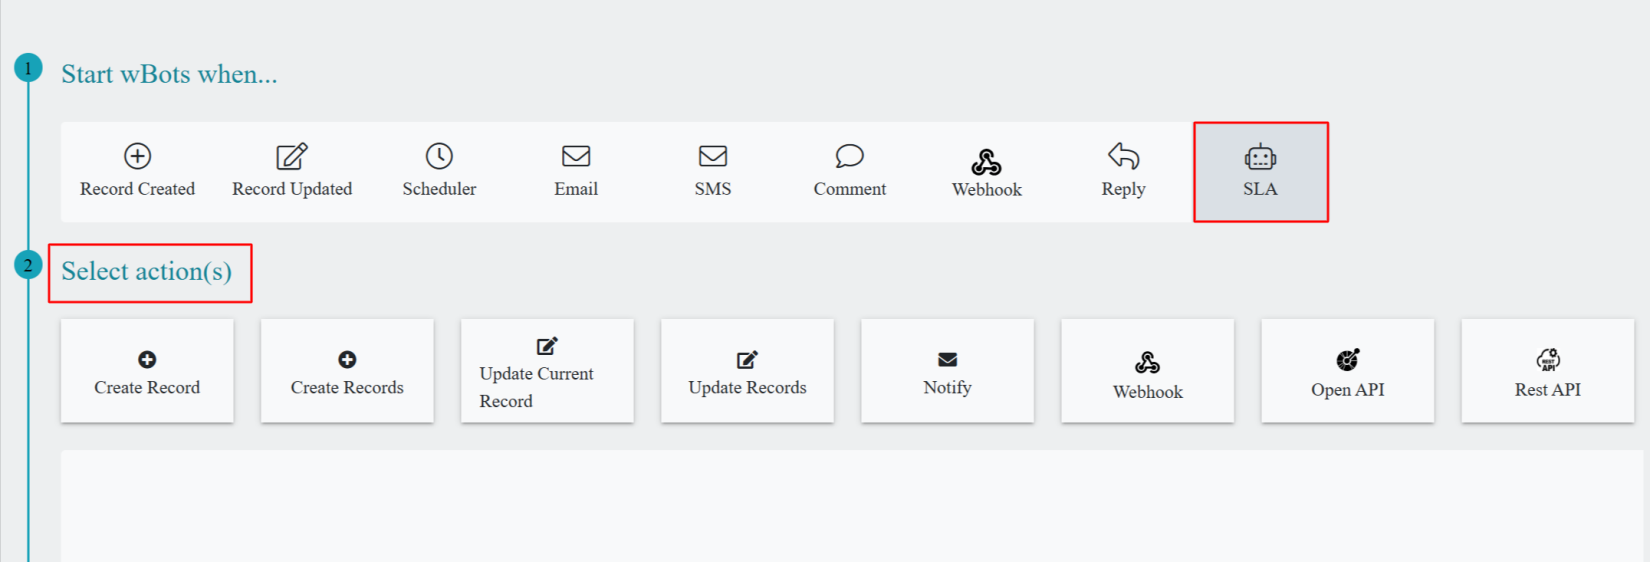
- After Selecting the action(s), click on save button.
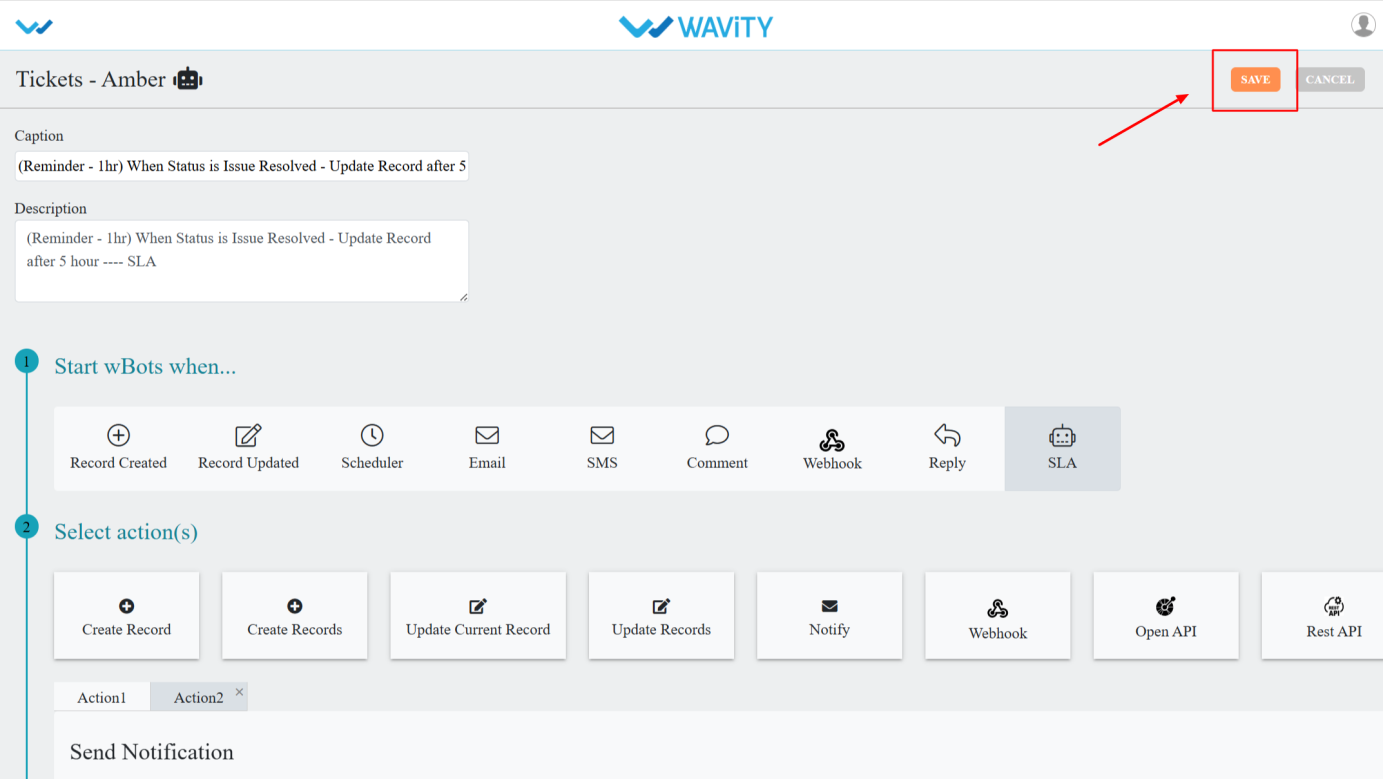
- The wbot will now be in an active state.
- Now go back, click on the Profile Icon.
- Select the General from options.
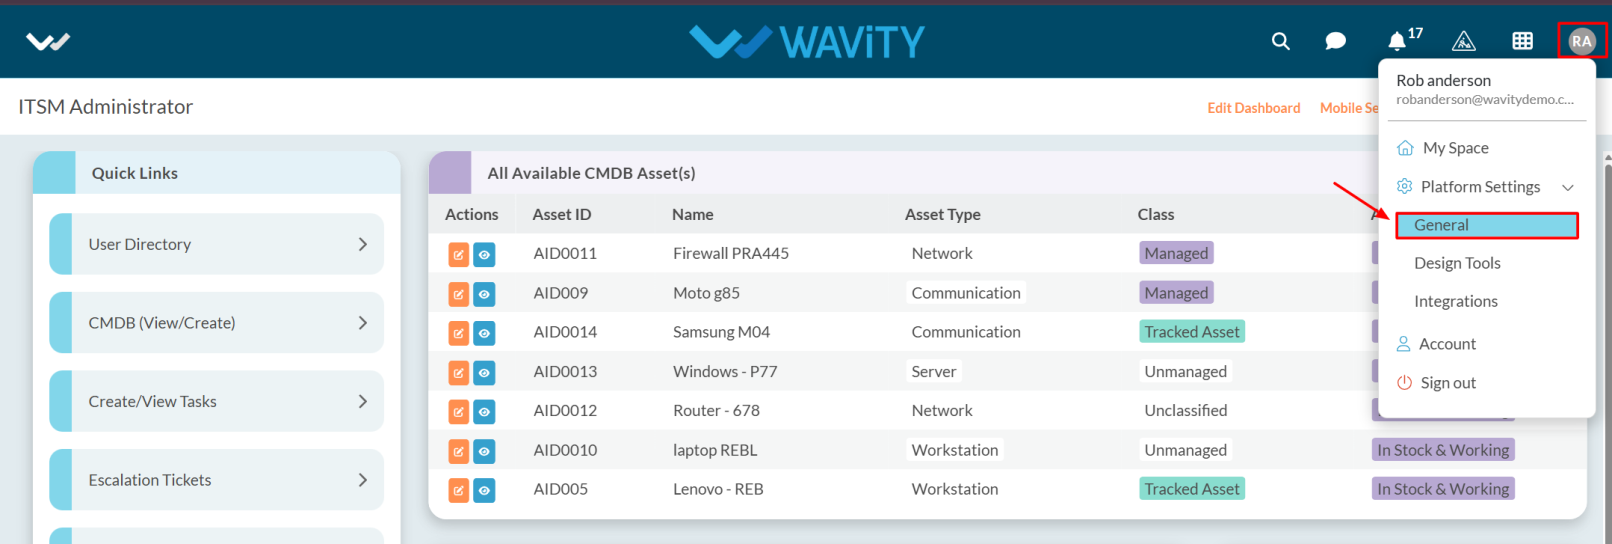
- After selecting General from the options, you will be directed to the Platform Settings – General page.
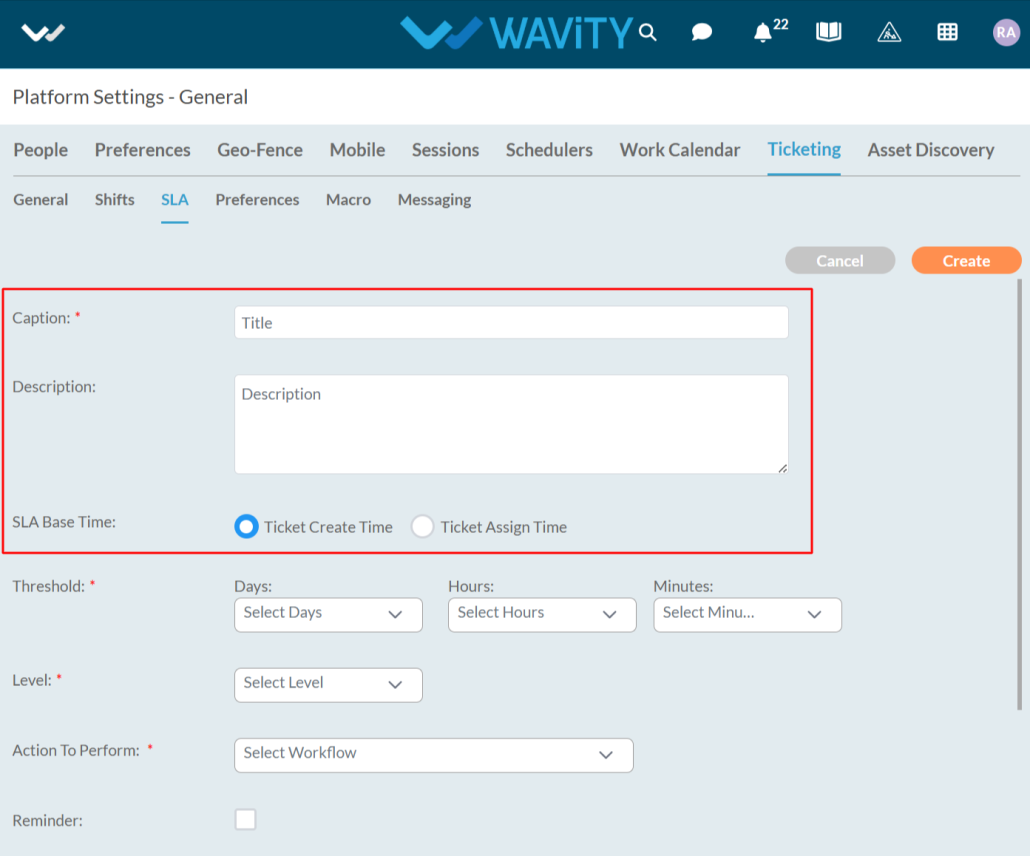
- Navigate to the Ticketing tab and select SLA.

- Click on Create button.

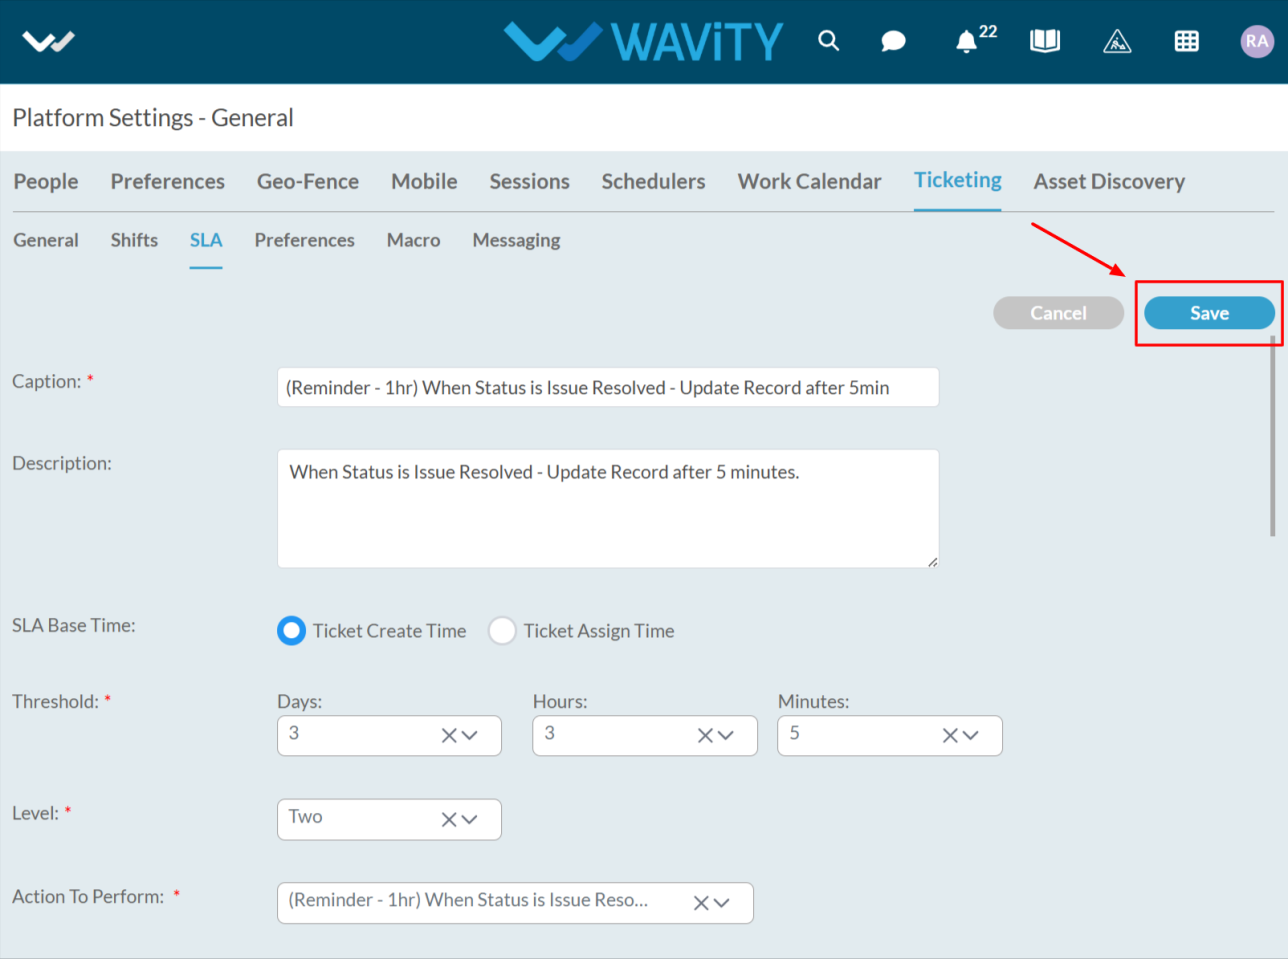
- Enter the caption and description as you required it.
- Select the SLA Base Time either Ticket Create Time or Ticket Assign Time based on when you want the bot to be triggered.
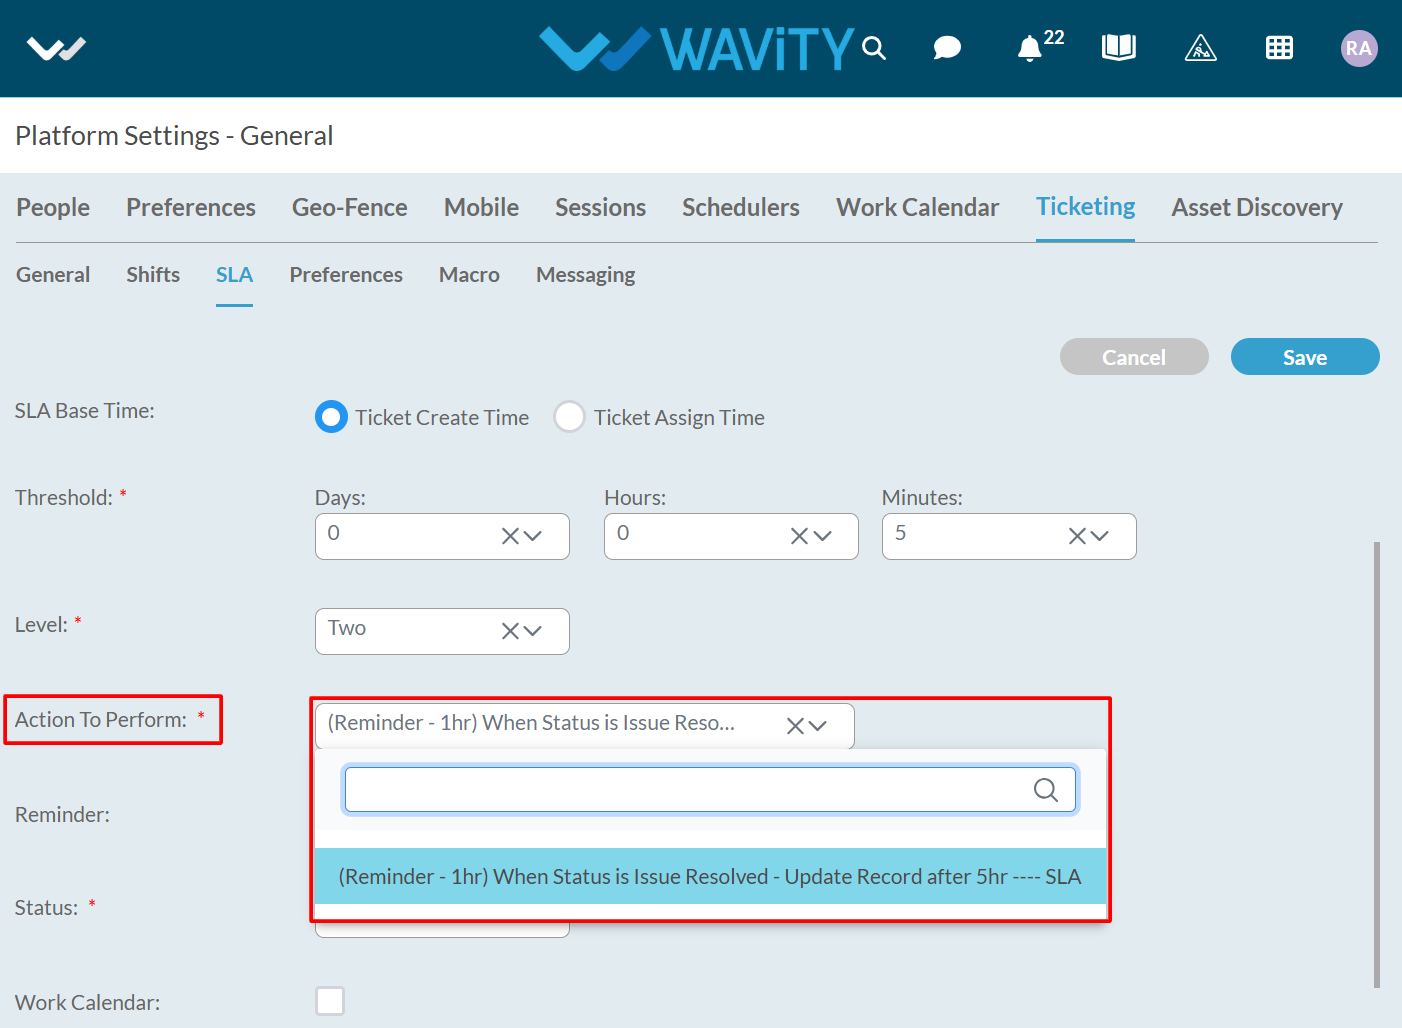
- Select the Threshold, Threshold refers to the specific time limit or condition that defines when an SLA is considered at risk or violated. It helps monitor performance and trigger alerts or actions before the SLA is breached.
- If a ticket must be resolved in 4 hours, a threshold might be set at 3.5 hours to send a warning before the SLA is breached.

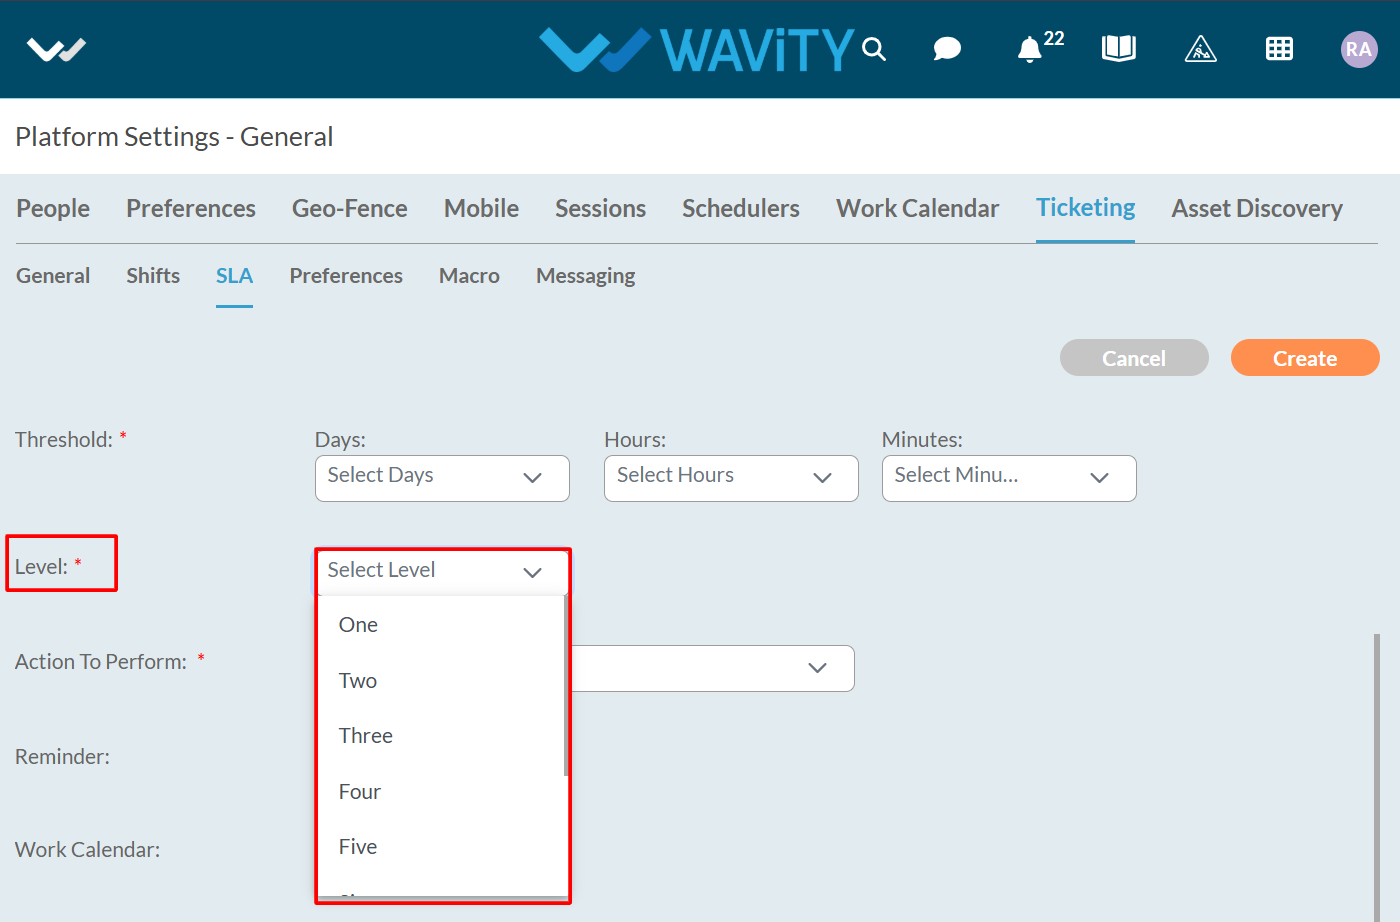
- Now select the Level, Level refers to the classification or tier that defines the urgency and priority of support based on the type of issue or customer.
- We can select the Levels up to nine.
- In Action To Perform, select the Workflow that you created for the SLA bots.
- You can select the Reminder option if you want to send a reminder before the bot is triggered.
- Select the Threshold in minutes for sending the reminder this must be less than the main SLA threshold and then choose the Action To Perform.
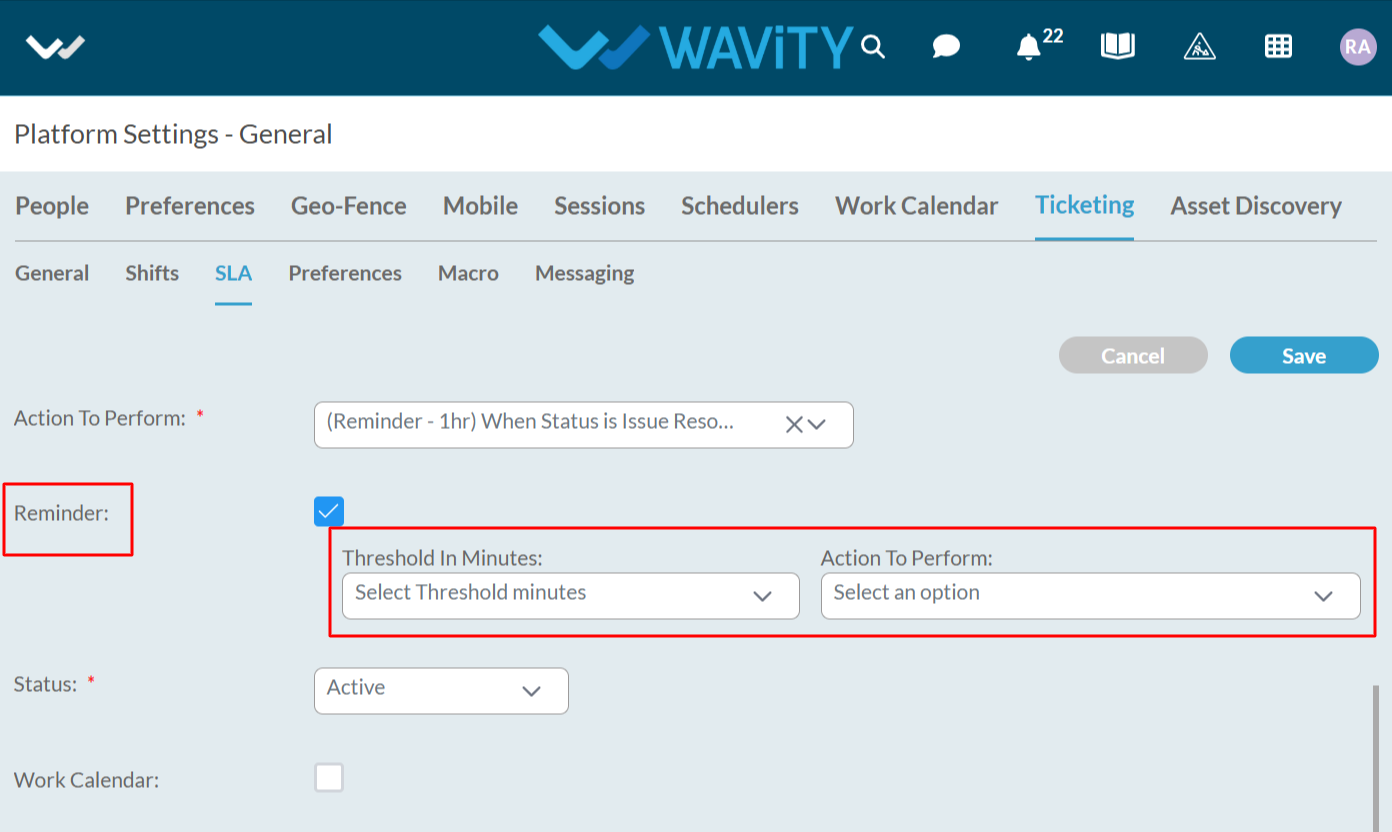
- You can select the status as inactive if you want to disable it.
- You can also enable the Work Calendar if needed. After enabling it, select the appropriate options as per your Calendar groups.

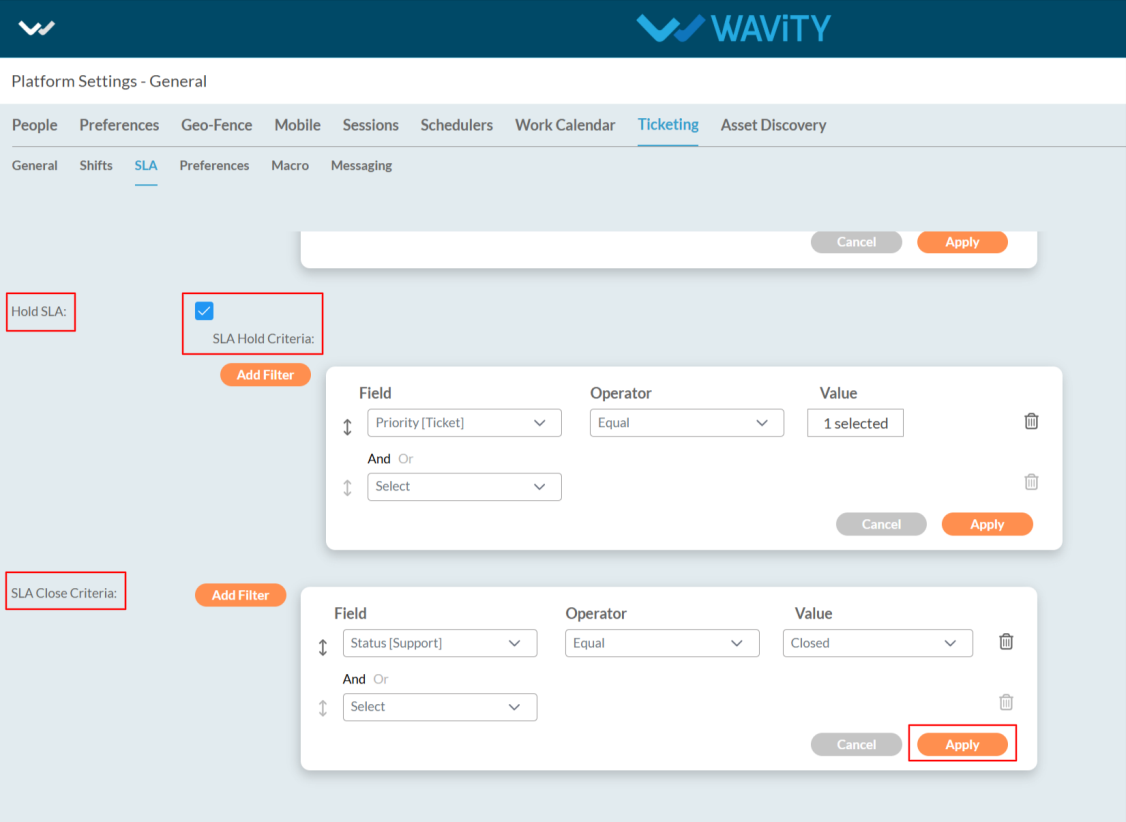
- The SLA can be initiated based on specific conditions if you apply a filter.

- You can also Hold or Close the SLA based on filters by clicking Add Filter, similar to how you set the SLA Start Criteria.
- After applying the filters, click on the Apply button.
- Now, click the Save button after entering all the required details.
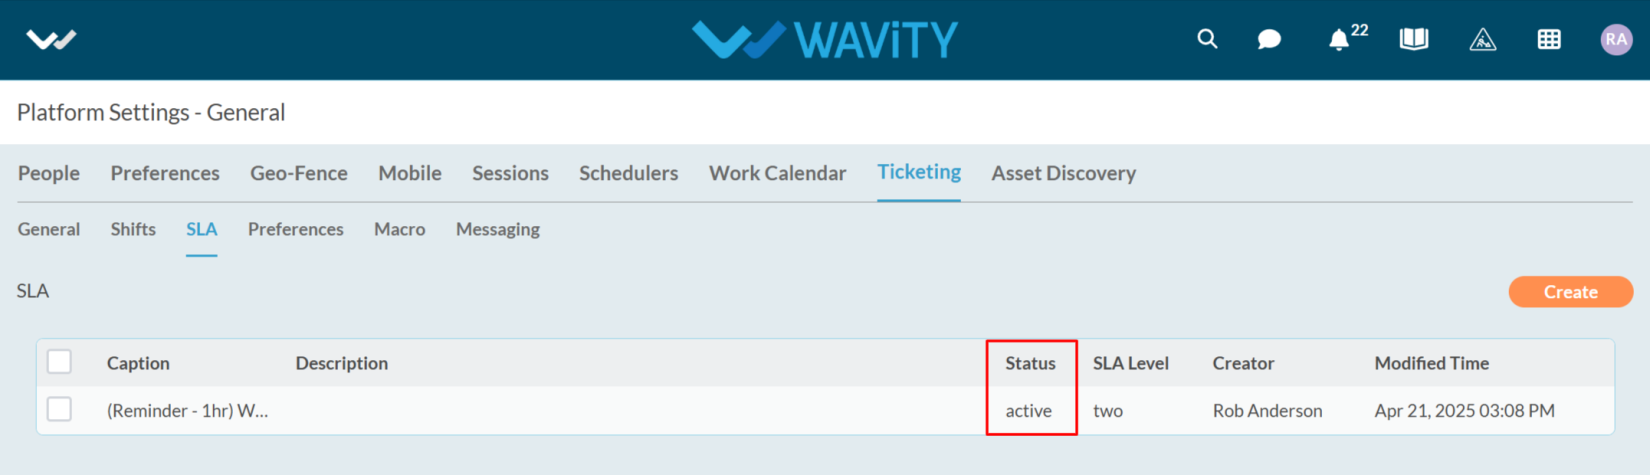
- Now your SLA has been in active state.
Setting Up Access Groups in Wavity Platform
- Access Groups enable the organization of signed-in users based on tags, user profiles, groups, or organizations, thereby simplifying the management of permissions and the control of access to specific resources or features.
- Access Groups are a way to organize users who are logged into your system.
- Creating Access Groups on the Wavity platform is a straightforward process.
- Only Admin will have access to set up the Access Groups.
- Click on the Profile Icon.

- From the options, select the General.
- After selecting General from the options, you will be directed to the Platform Settings – General page.
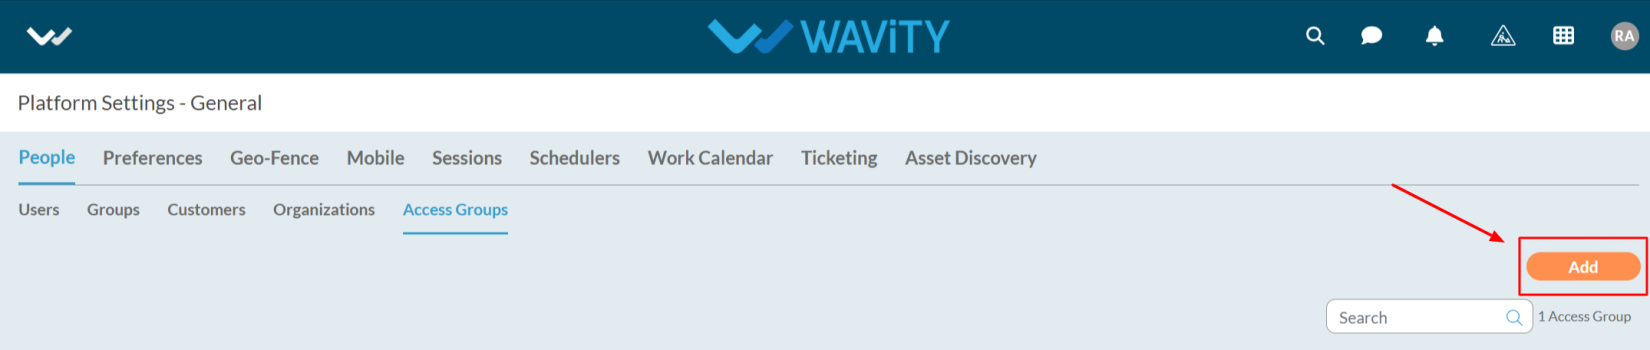
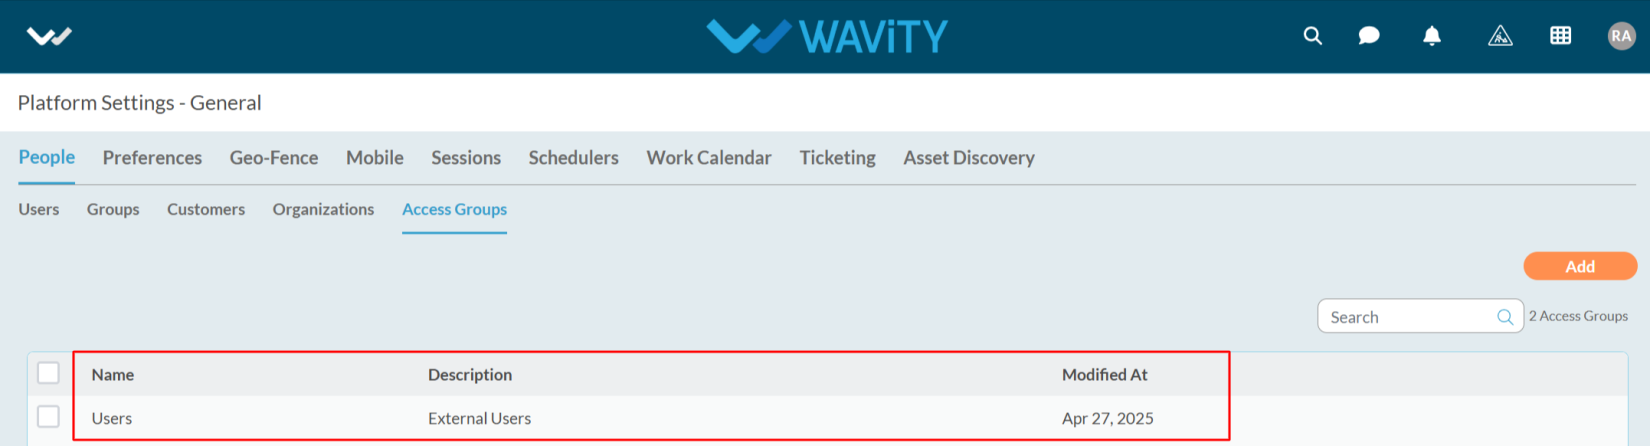
- Navigate to the People tab and select Access Groups.
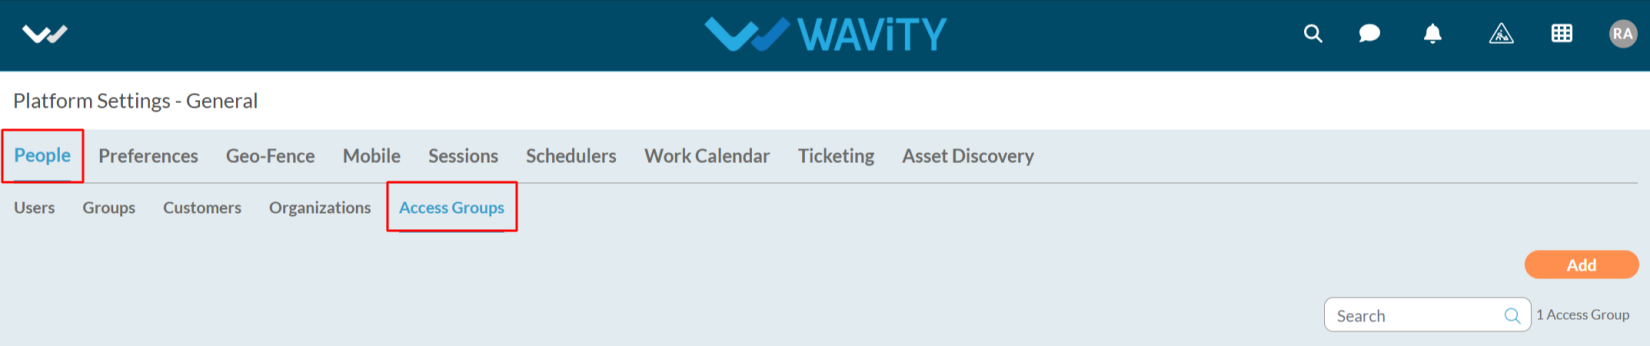
- Click on the Add button as shown in the image below.
- Enter the name and description as required.

- Enter the Tags as you required.
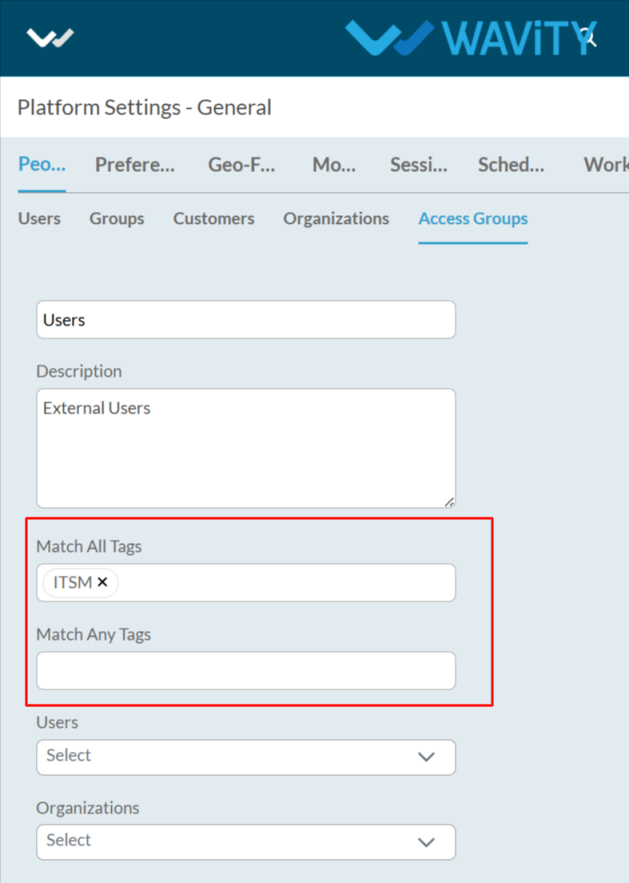
- Select the users, organizations, and groups from the dropdown options.
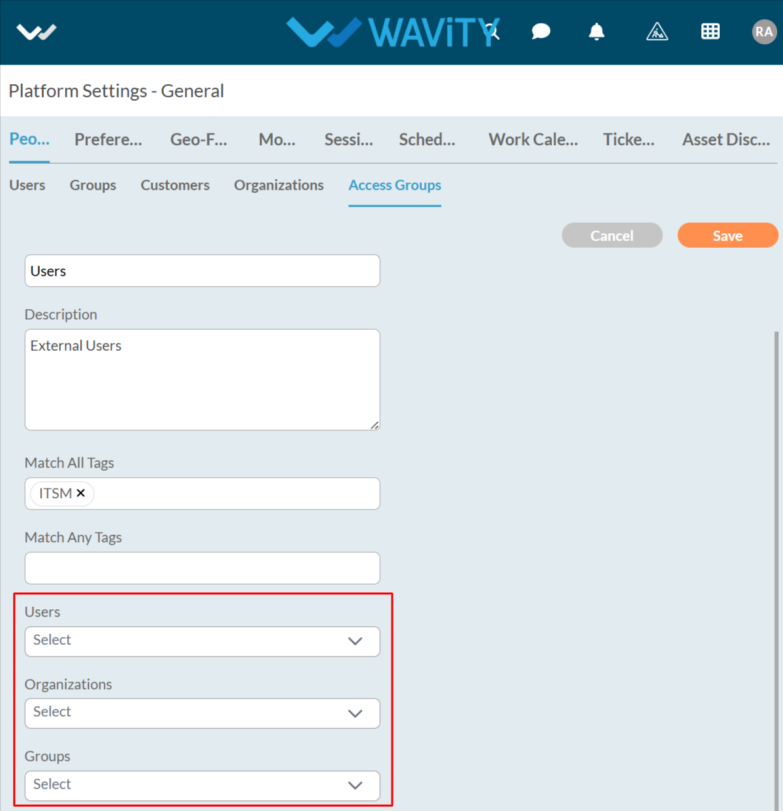
- After entering the details, click the Save button to proceed.
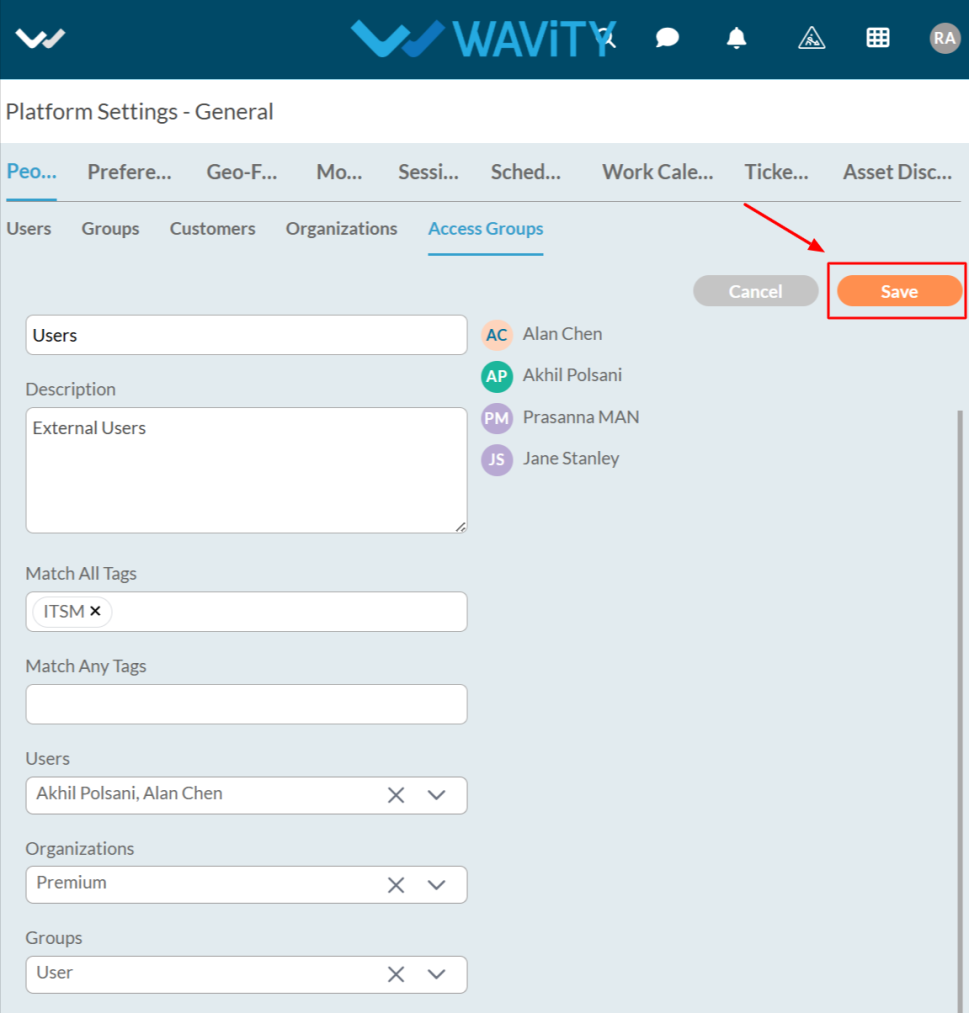
- The Access Group has been successfully created.
How to Add and Manage Organizations
- Organizations help determine which domain a user belongs to. When users create tickets from different domains, tracking their origin can become challenging. By associating users with an organization, it becomes easier to identify their domain and manage tickets more efficiently.
- The organization feature identifies users based on their email addresses. For example, if users belong to the IT domain and possess an email address such as abcit@.com, the organization can be defined as abcit.com.
- Adding Organization is easiest way in Wavity platform.
- Only Admin will have access to add Organization.
- Click on the Profile Icon.
- From the options, select the General.
- After selecting General from the options, you will be directed to the Platform Settings – General page.
- Navigate to the People tab and select Organizations.

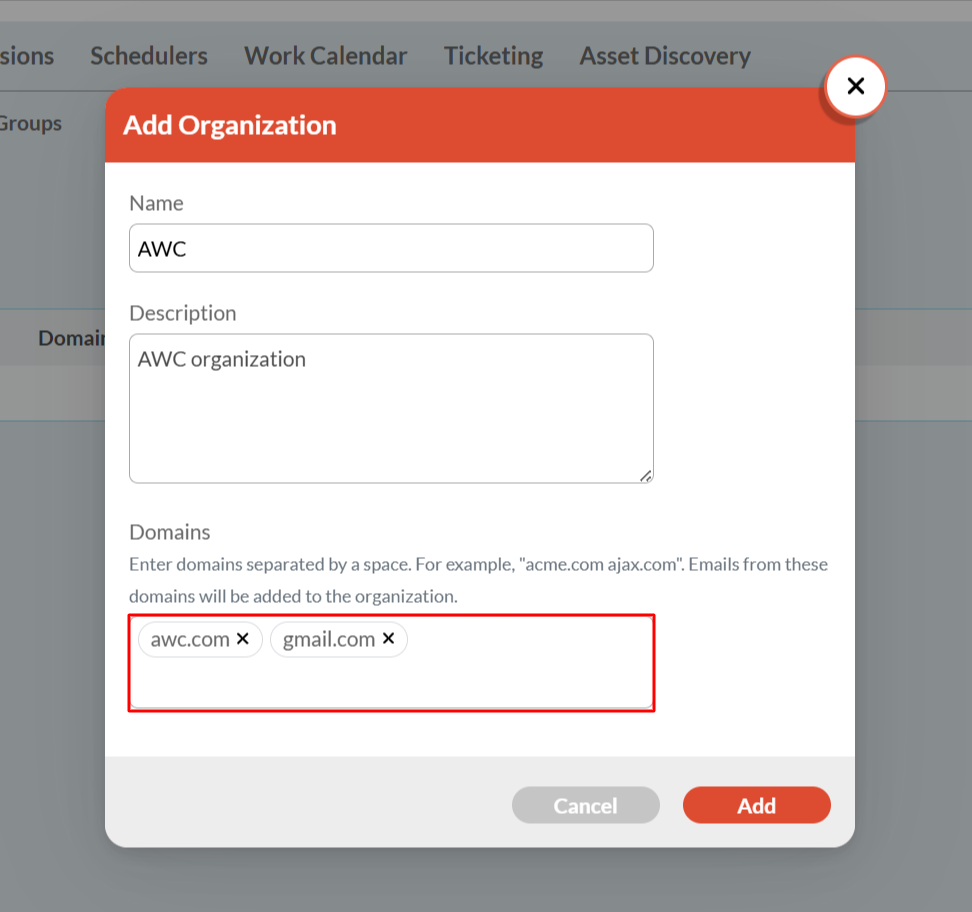
- Click on the Add button as shown in the image below.

- Enter the name and description as required.
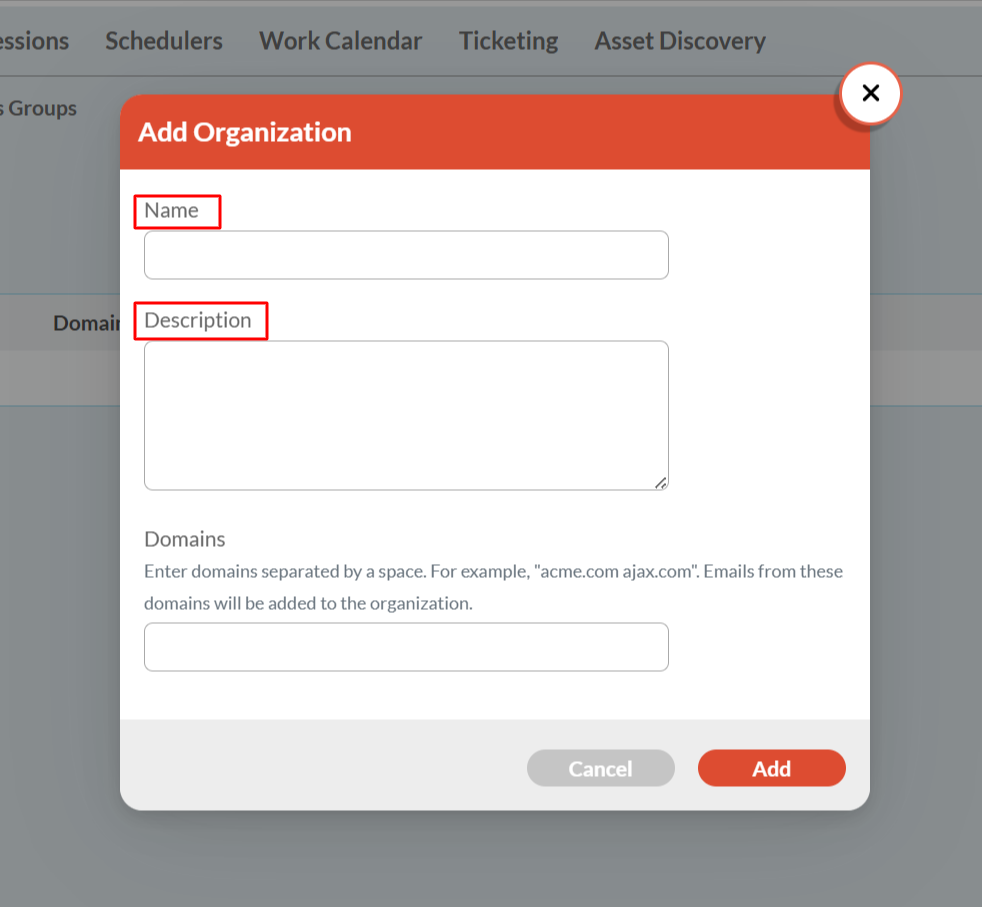
- In the Domains field, enter the domain (e.g., awc.com) based on the user's email address.
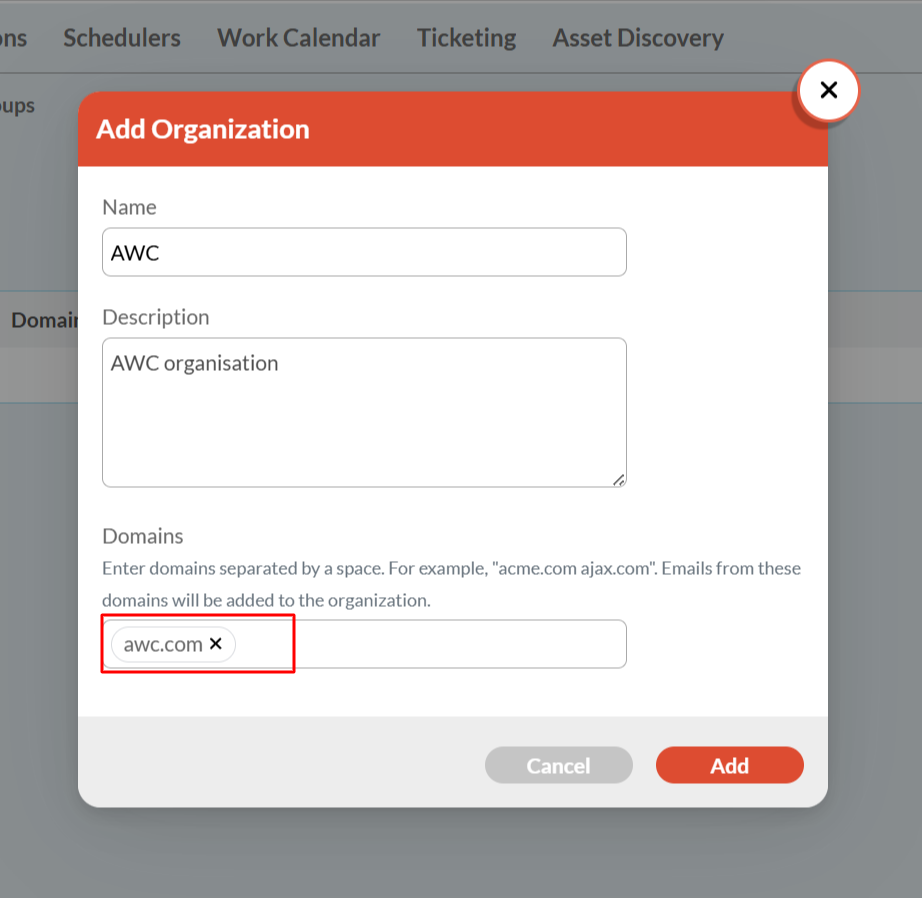
- After entering details click on Add button.

- Your organization has now been successfully created.

- Additionally, you can add multiple domains at once by entering them separated by spaces. Emails from these domains will automatically be associated with the organization.
Setting Up Signatures for Support Communications
- In Wavity platform, the Signature feature allows users (especially support agents or admin) to automatically add a preset signature to their ticket and email replies.
- Once you set up a signature, it automatically appears at the bottom of the ticket responses.
- Setting up Signature is a simple process.
- Only Admin have the access to set up the signature.
- In the Profile section of your account, enter the user's name to set up the signature.
- Click on Profile Icon.

- Select the Account from options.
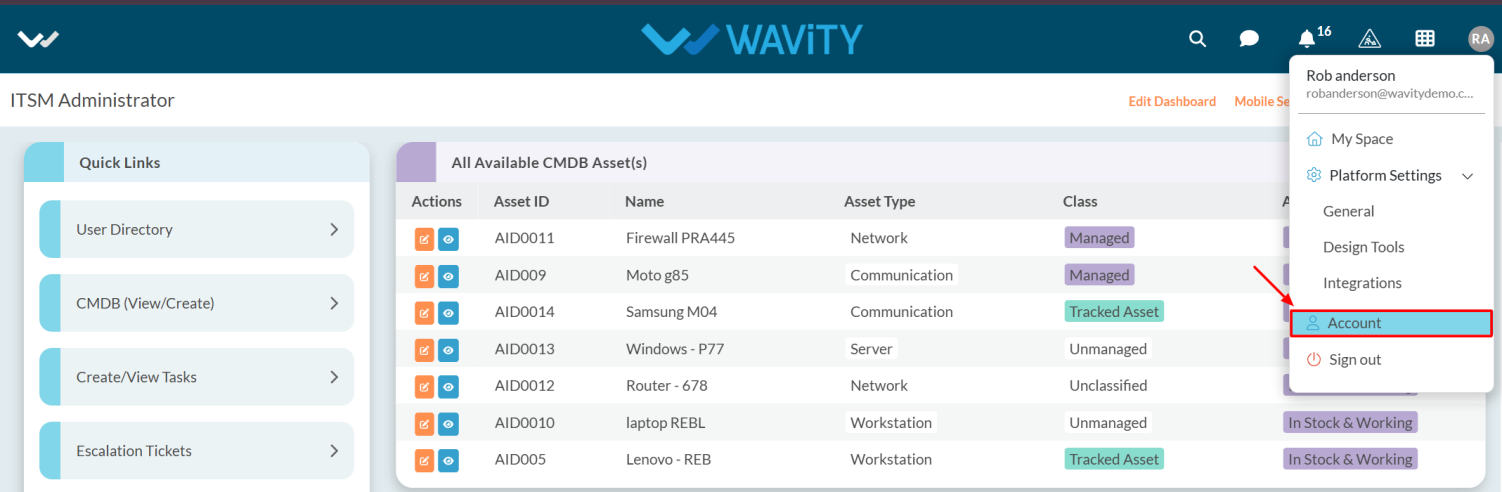
- After clicking, you will be directed to the Account page. From there, select the Profile section.
- Scroll down to find the Signature.
- Enter your name in the content box and click the Save button to apply the changes.

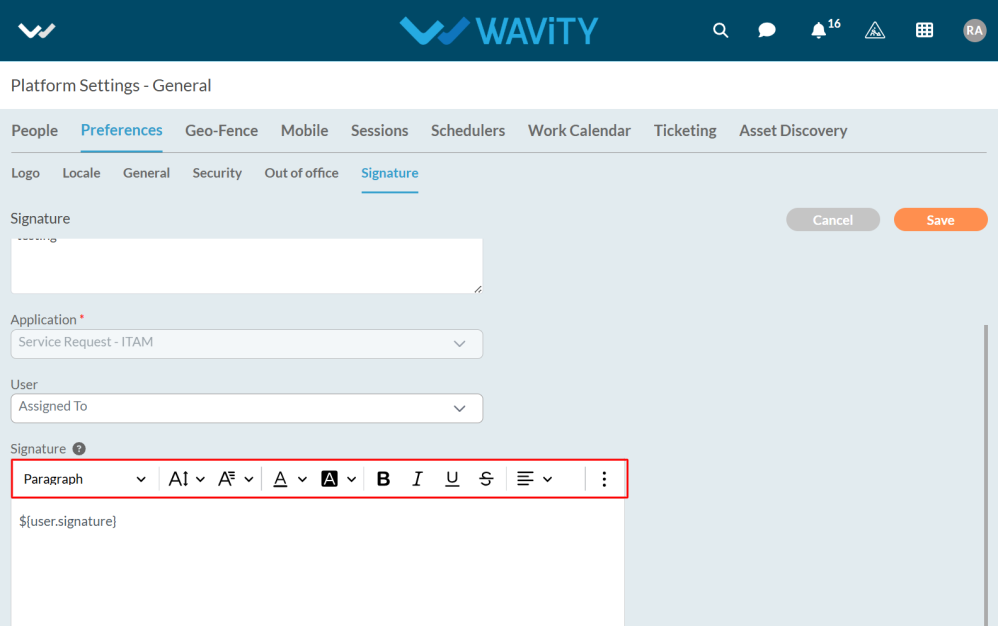
- Now as Admin to set signatures. Click on the Profile Icon.
- From the options, select the General.
- After selecting General from the options, you will be directed to the Platform Settings – General page.
- Navigate to the Preferences tab and select Signature.

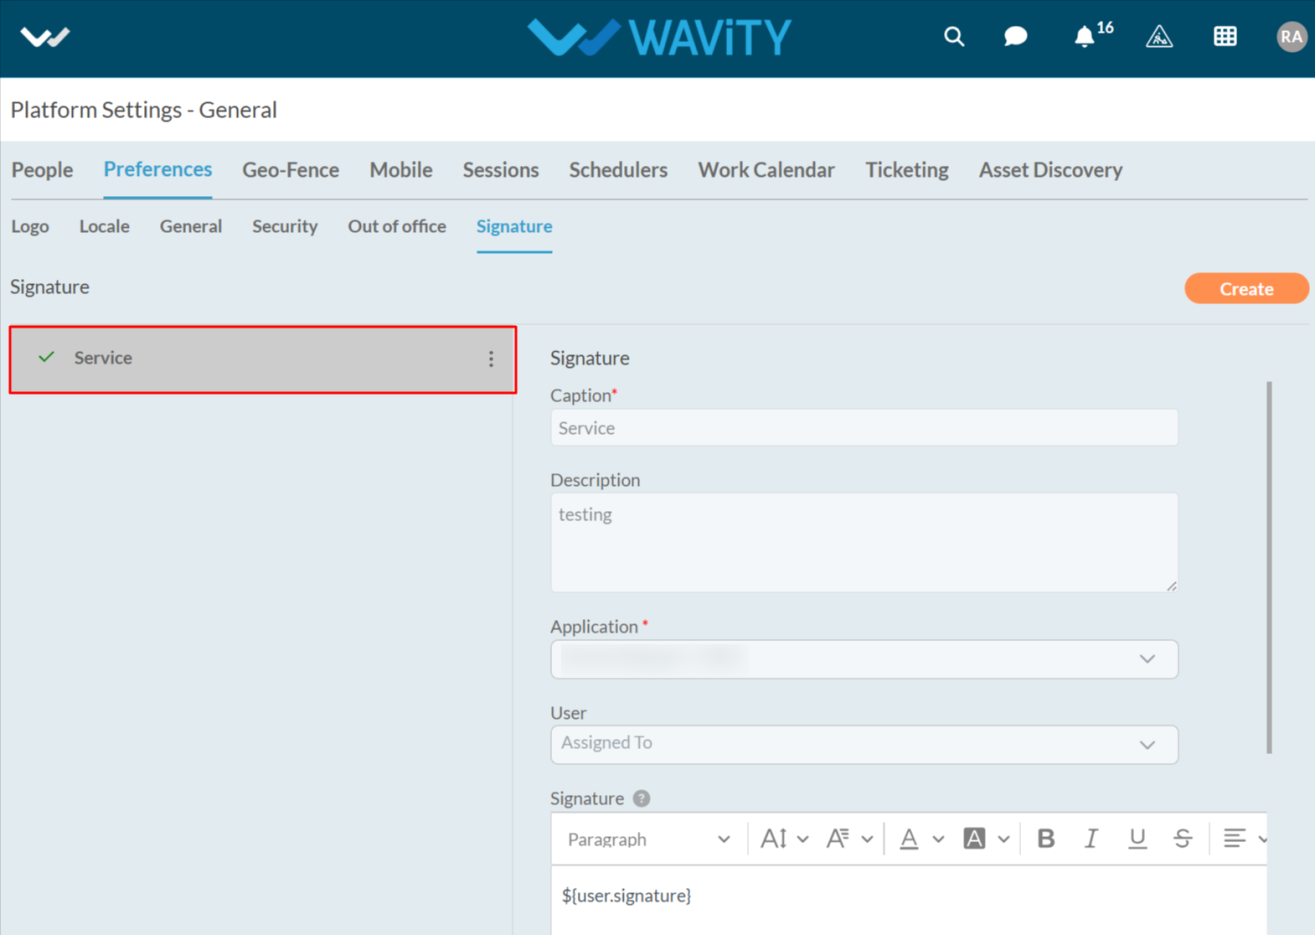
- To set up a signature click on Create.

- Enter the caption and description as you needed.

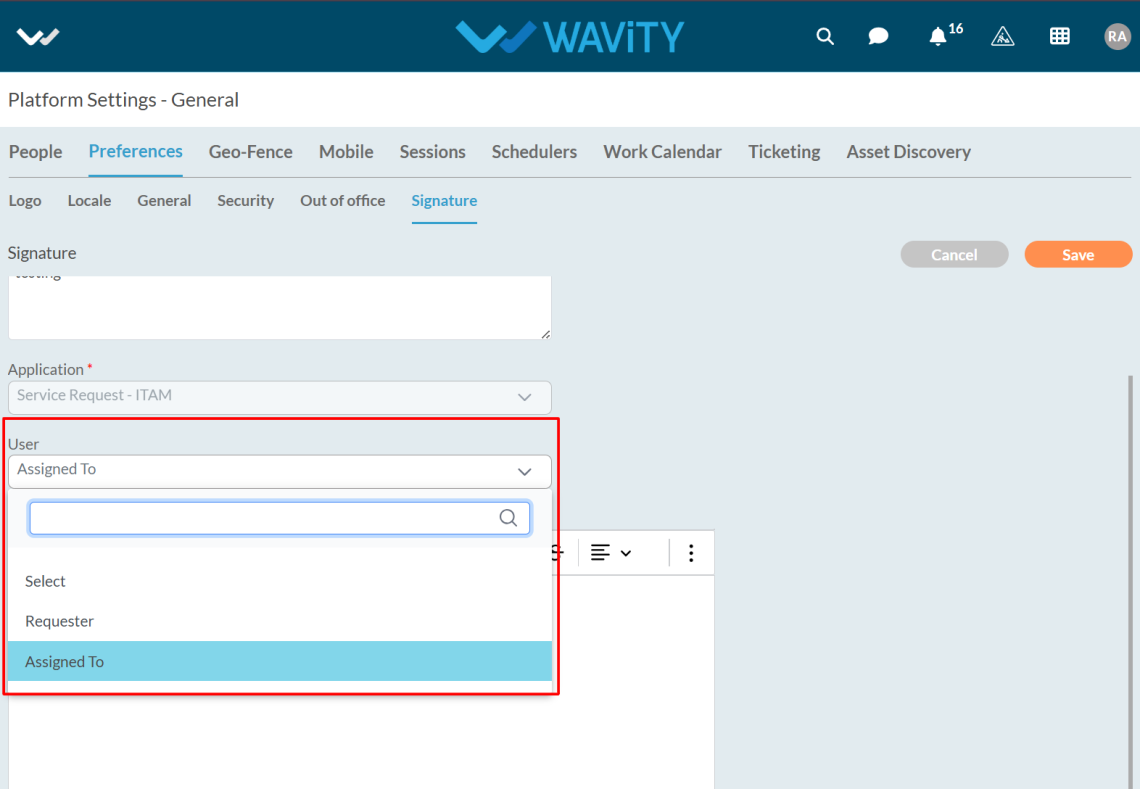
- After Entering the details select the Application and User.
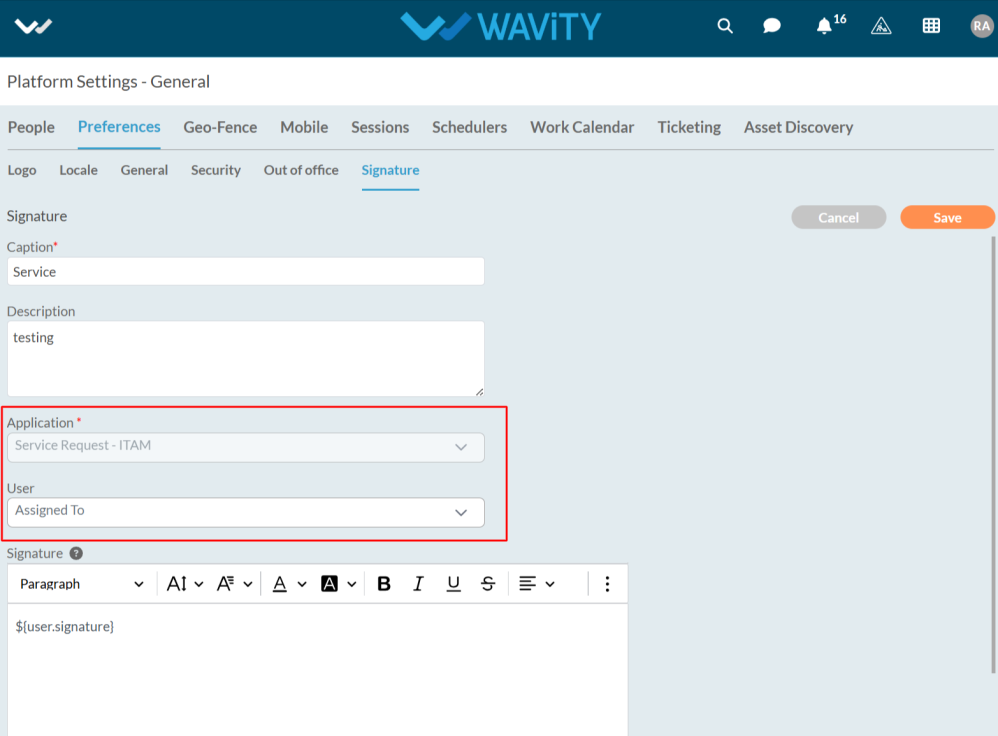
- In User, select the option to determine which username should appear in ticket responses.
- To add a user signature, click on the question mark symbol.
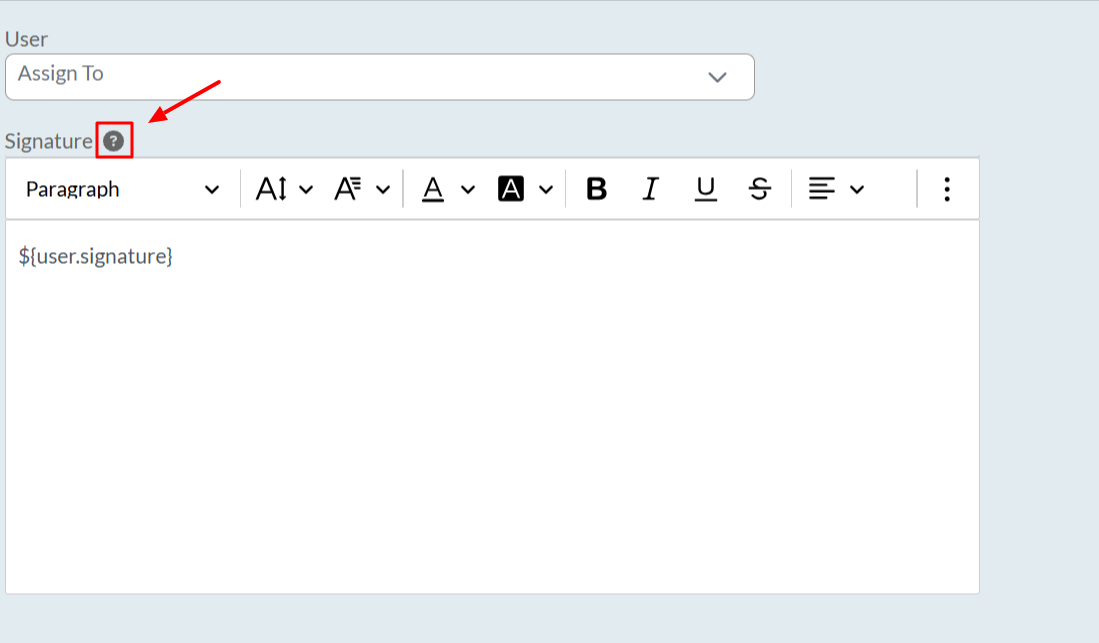
- After clicking on the symbol, a box appears where you can view all the links.
- You can add the user's first, middle, and last name, along with their email and phone number.
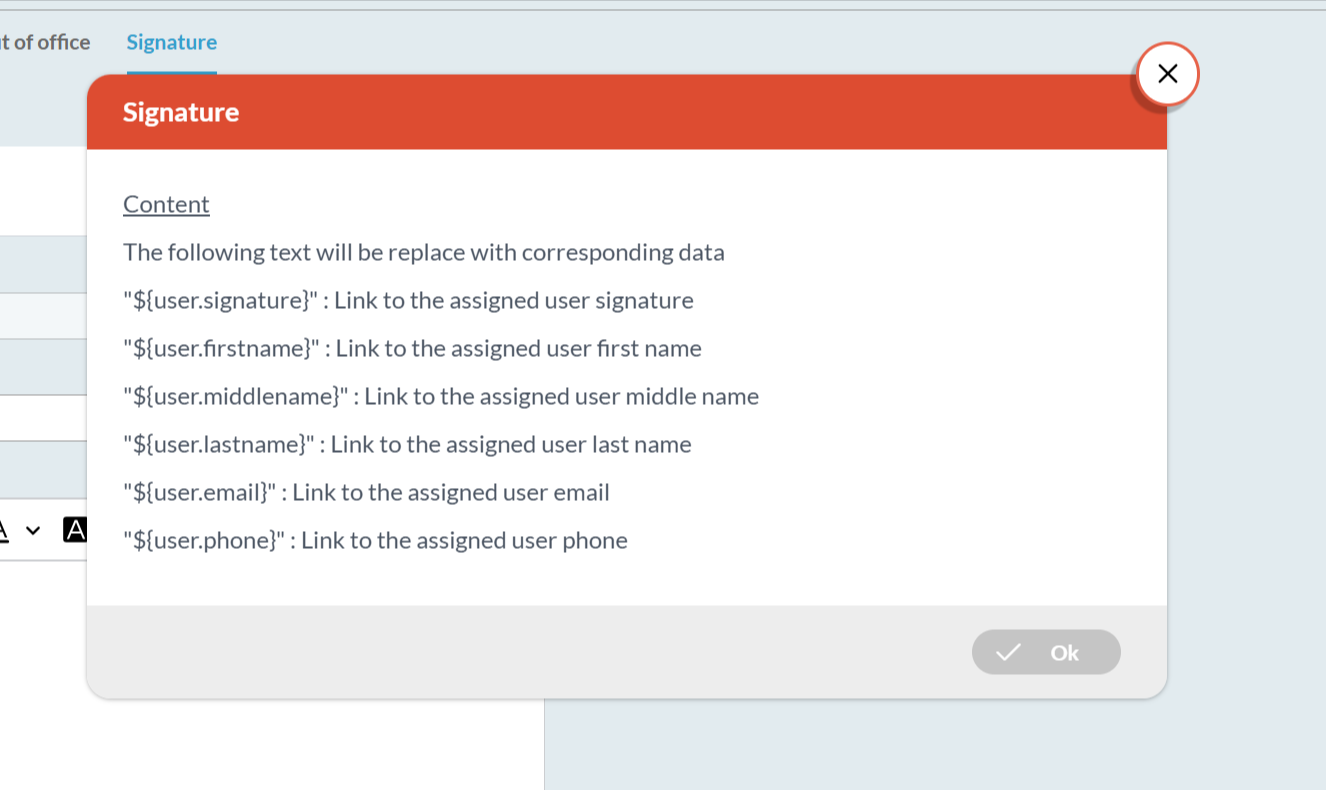
- Copy the link as you required.

- You can paste the link into the box, and there is also a text options available that you can select according to your requirements.
- After entering the details, click the Save button to apply the changes.

- The signature has been successfully created and is now ready for use in all ticket responses.
- After this, you need to enable the Add Signature option in Wbots for the application you set up the signature for. This ensures that when a ticket's status is updated or closed, the agent's name (as set in the signature) will appear at the bottom of the notification email.

How to Add External Users as Customers
- In Wavity, users can create tickets through the Customer Portal. If a user is not part of the platform (i.e., an external user), they can still be added as a customer, allowing them to create tickets in Customer portal.
- Only Admin will access to add customers.
- Click on Profile Icon.
- From the options select General.
- After selecting General from the options, you will be directed to the Platform Settings – General page.
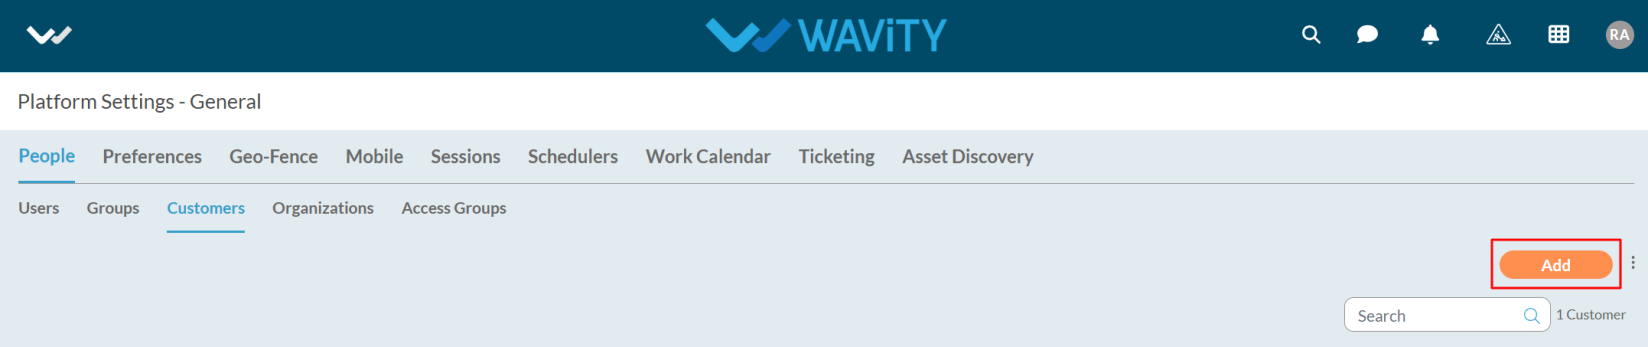
- Navigate to the People tab and select Customers.

- Click on the Add button as shown in the image below.
- Enter the email address, along with the first name and last name.
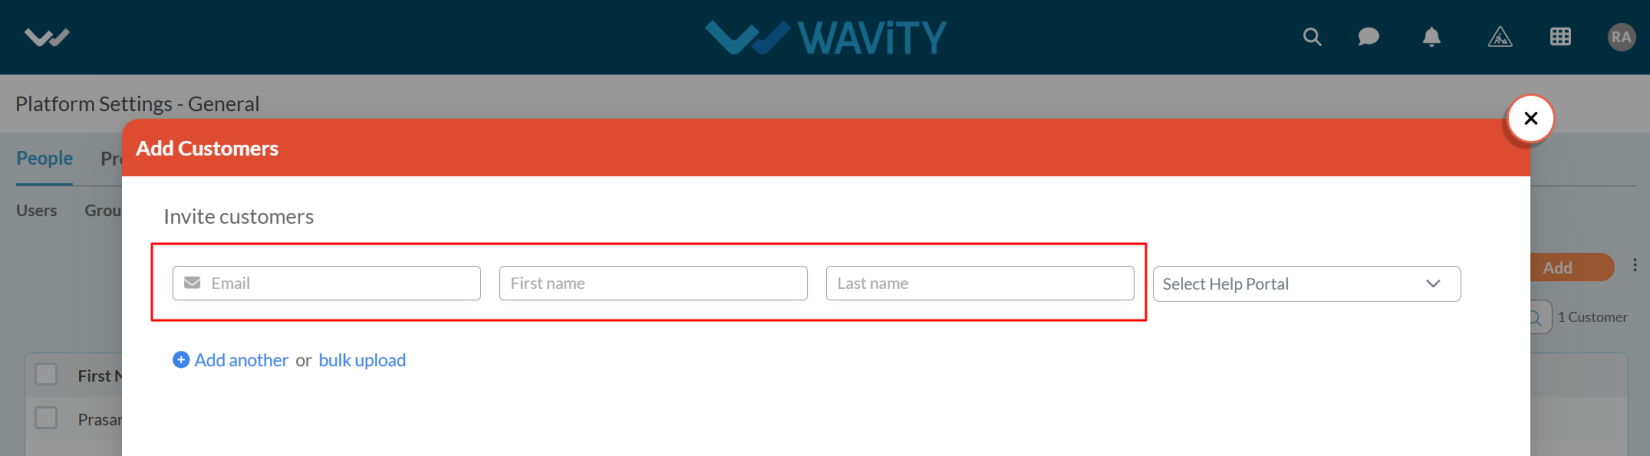
- You can also add users in bulk by clicking on the Bulk Upload option.
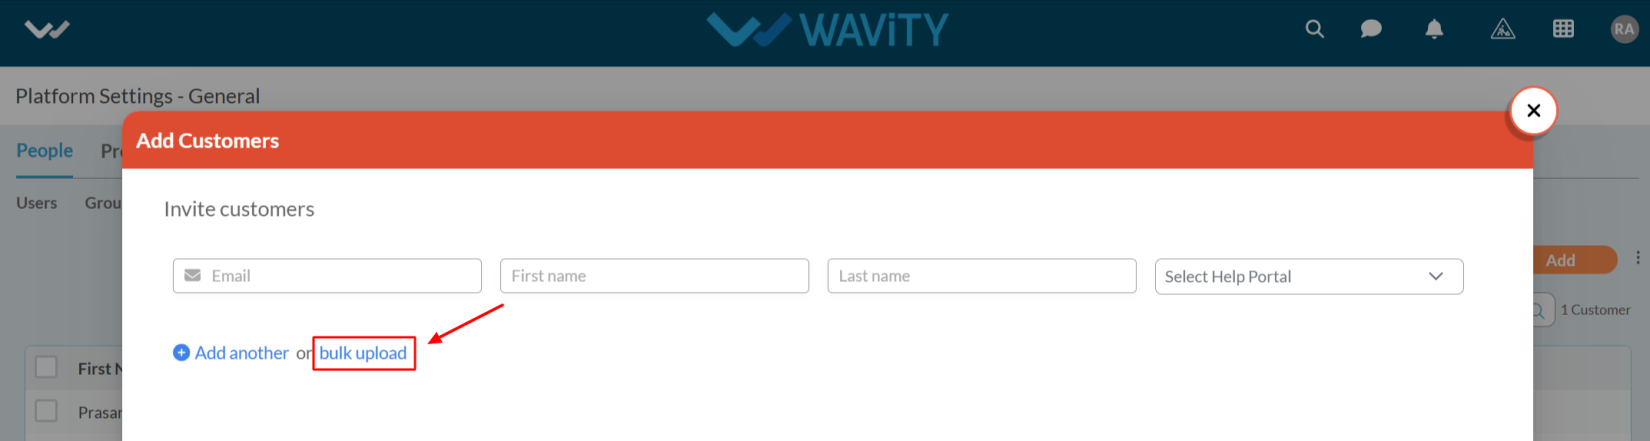
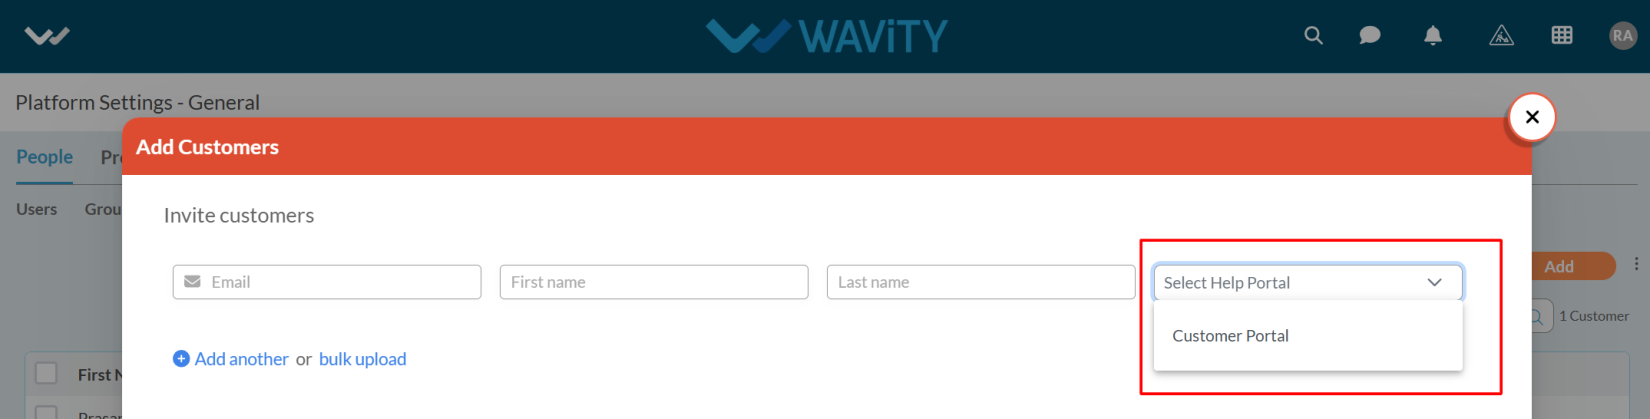
- To grant access for ticket creation, select Customer Portal from the Select Help Portal dropdown.
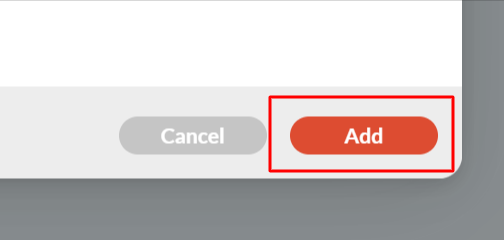
- After entering the customer details in the Add Customers form, click the Add button to proceed.
- The status will now appear as Created.
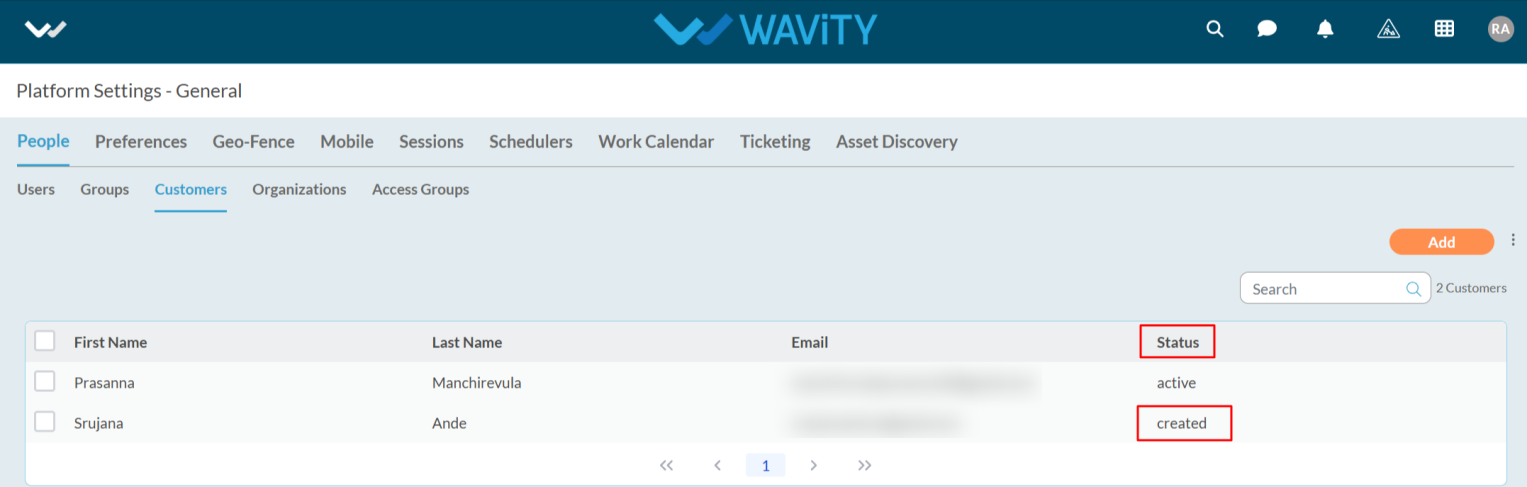
- The user will receive an email notification for Customer Portal activation.

- The user needs to click on Verify Email in the notification.
- After clicking, they will be redirected to the Customer Portal login page, where they will be prompted to set their password.
- After setting the password, the user needs to log in by entering their email address and password.
- Once logged in, they will be redirected to the Customer Portal.

Creating and Managing Shifts for Ticket Assignment
- Shifts feature in Wavity is typically used to manage agent work schedules. It allows for setting up shift timings for agents, ensuring that the platform can handle ticket assignments and communication based on when agents are available.
- This feature helps with managing coverage during different time slots and ensures there is always someone available to handle tickets.
- To set up shifts, follow these steps:
- Only Admin will have access to setup the Shifts.
- Click on the Profile Icon.
- From the options, select the General.
- After selecting General from the options, you will be directed to the Platform Settings – General page.
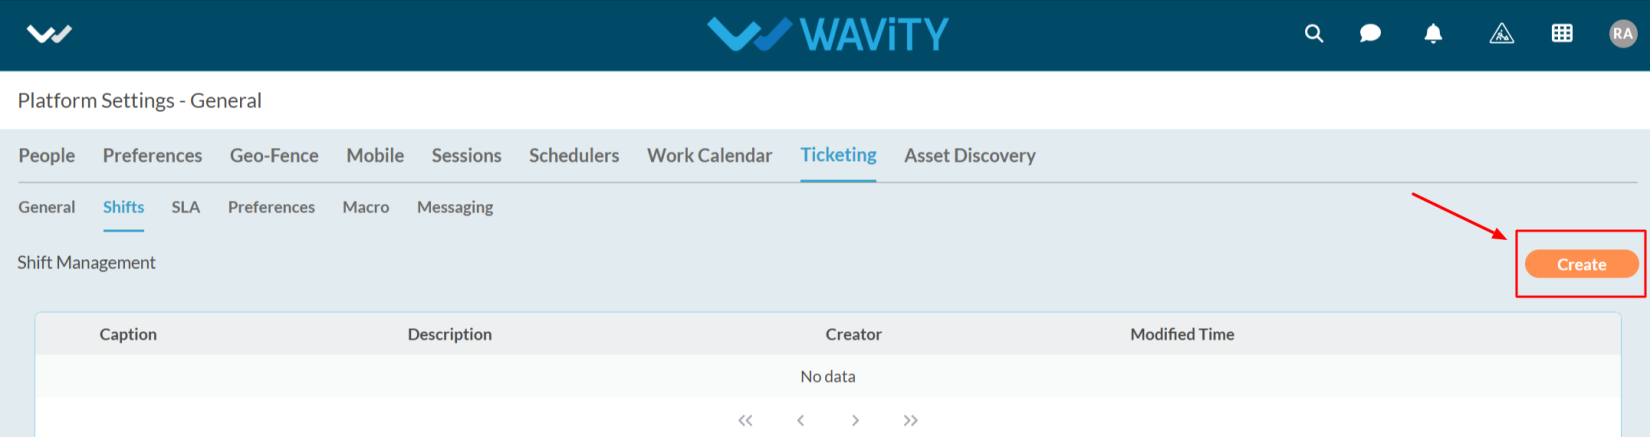
- Navigate to the Ticketing tab and select Shifts.

- Click on the Create button.
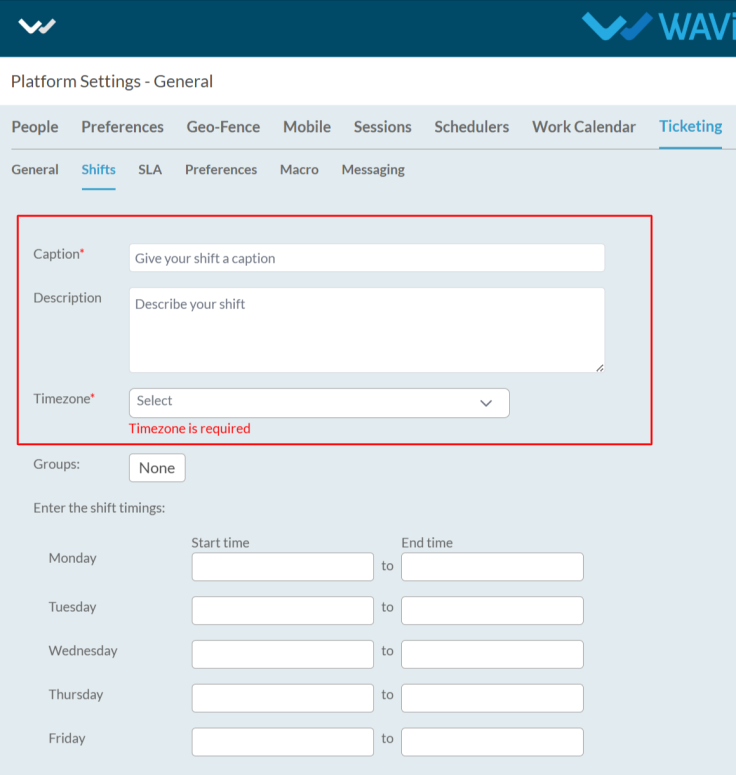
- Enter the caption and description for your shift, and select the time based on your time zone.
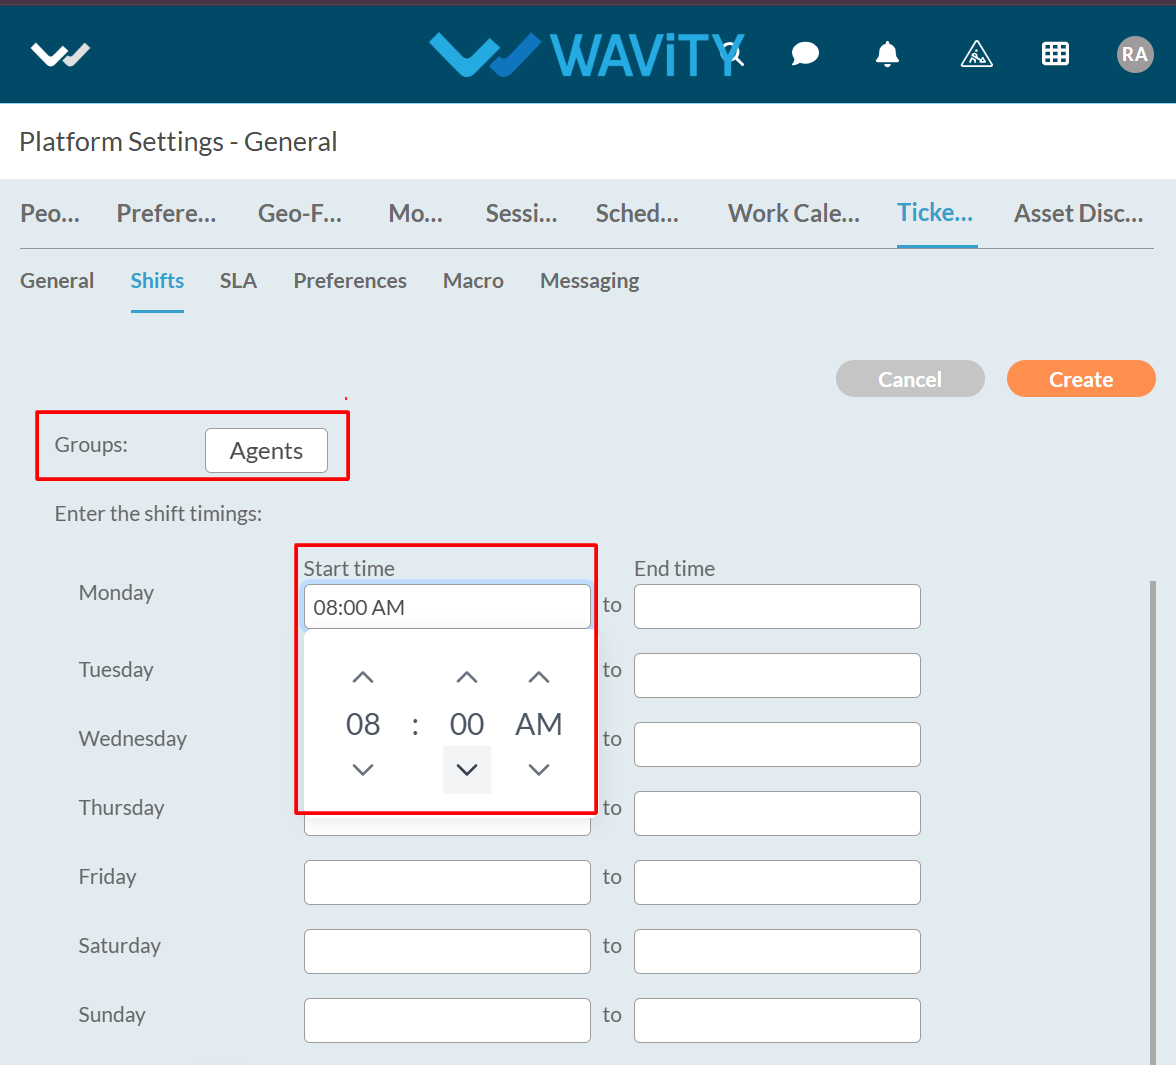
- Select the groups for which you want to set up the shifts and enter the start and end time for the weekdays.
- You can also enable the Rotation option as shown in the below image.
- Rotation within the Shifts feature refers to the method of automatically rotating the assignment of shifts among agents.
- Enter the required details, set the time, and select the group for rotation.

- After entering the details and time, click on the Save button, and your shifts will be created.

Configuring Ticketing Preferences for Inactive Agents
- In the Wavity platform, the Preferences feature is used to define actions when an agent becomes inactive or goes out of office.
- Actions to be performed when an agent goes inactive while setting up preferences.
- Reassign from Group: When the agent is inactive it will reassign the agent from the other group.
- Redirect Communication: Any new communication (such as ticket updates, emails, or chats) will be automatically redirected to other active agents or a designated backup.
- Setting up preference is easiest way in Wavity platform.
- Click on the Profile Icon.
- From the options, select the General.
- After selecting General from the options, you will be directed to the Platform Settings – General page.
- Navigate to the Ticketing tab and select Preference.

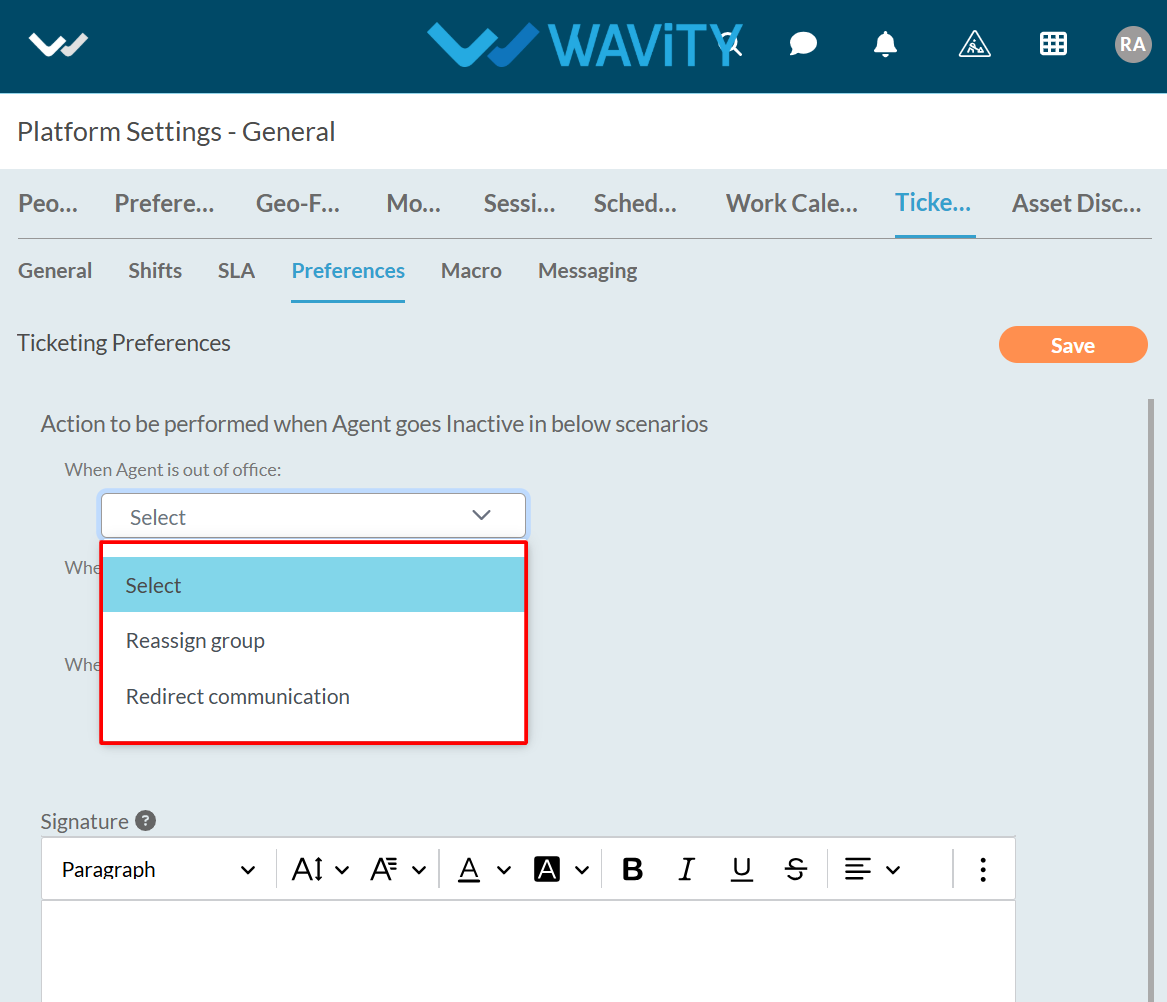
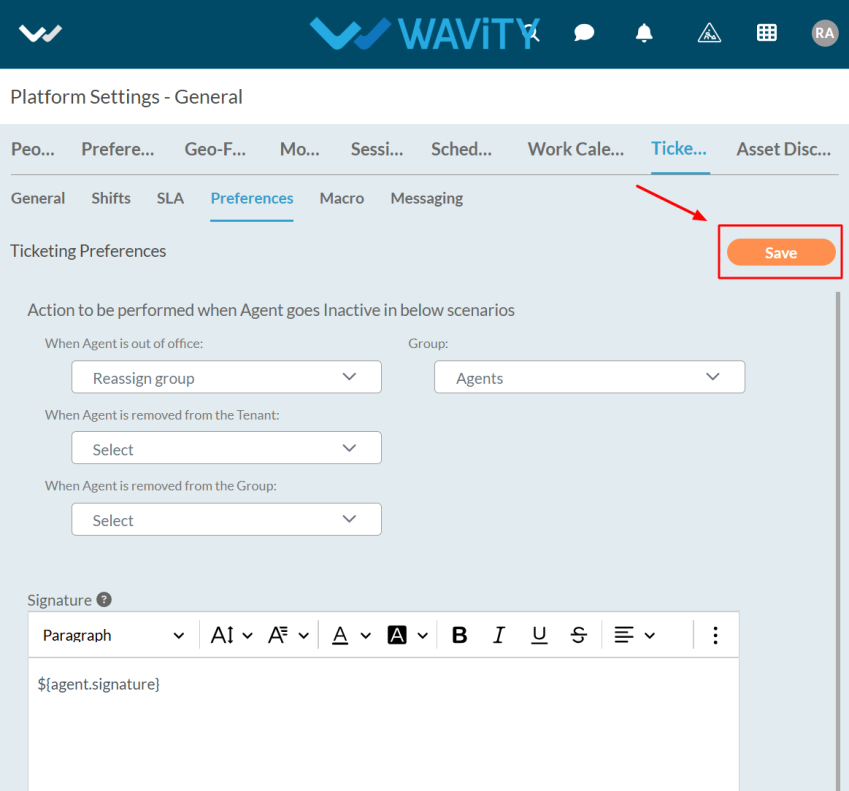
- Ticketing Preferences is performed in below scenarios:
- When Agent is out of office.
- When Agent is removed from the Tenant.
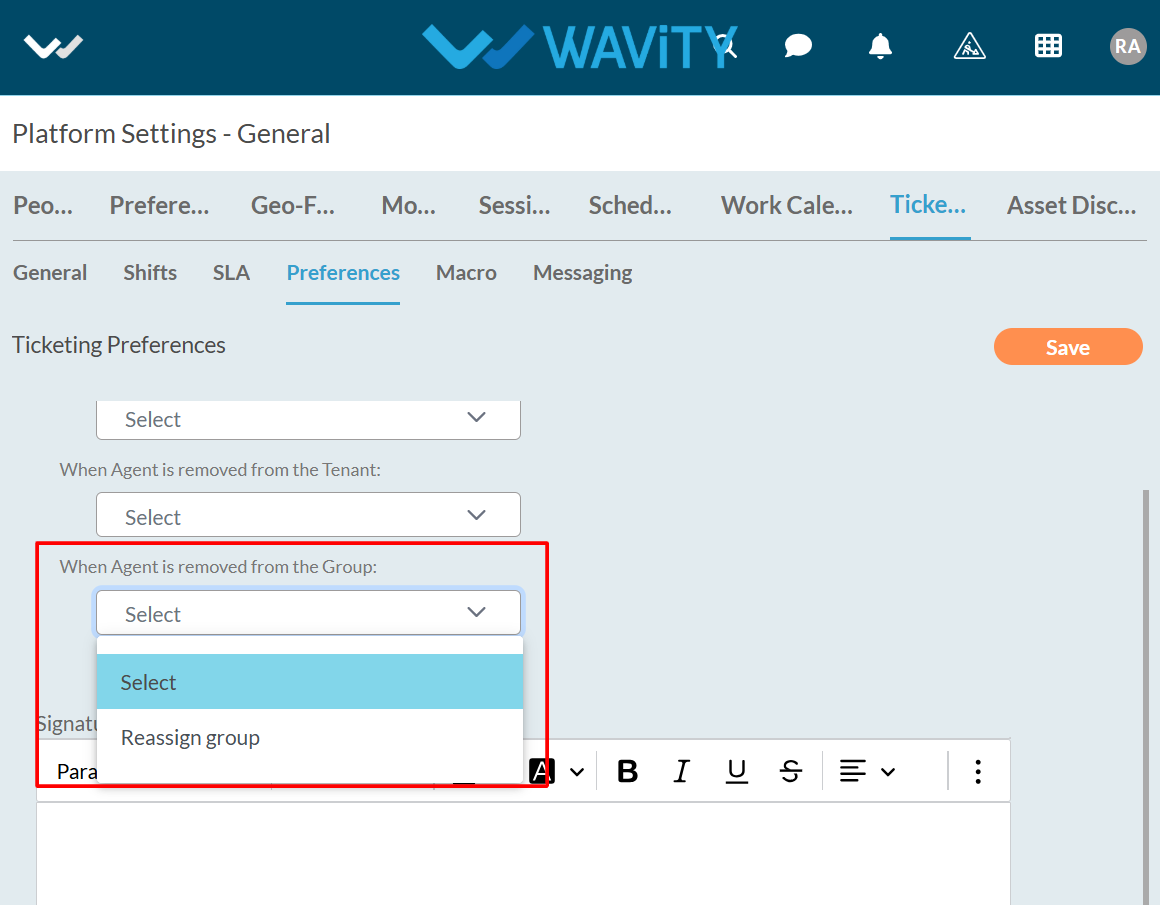
- When Agent is removed from the Group.

- You need to select the appropriate option from the dropdown — either Reassign Group or Redirect Communication — based on the action you want to perform when an agent goes inactive.
- When an agent is removed from the group, you can only select the Reassign Group option.
- You need add the signature in content box while clicking on the question mark as shown in the below image.

- Copy the link as needed.
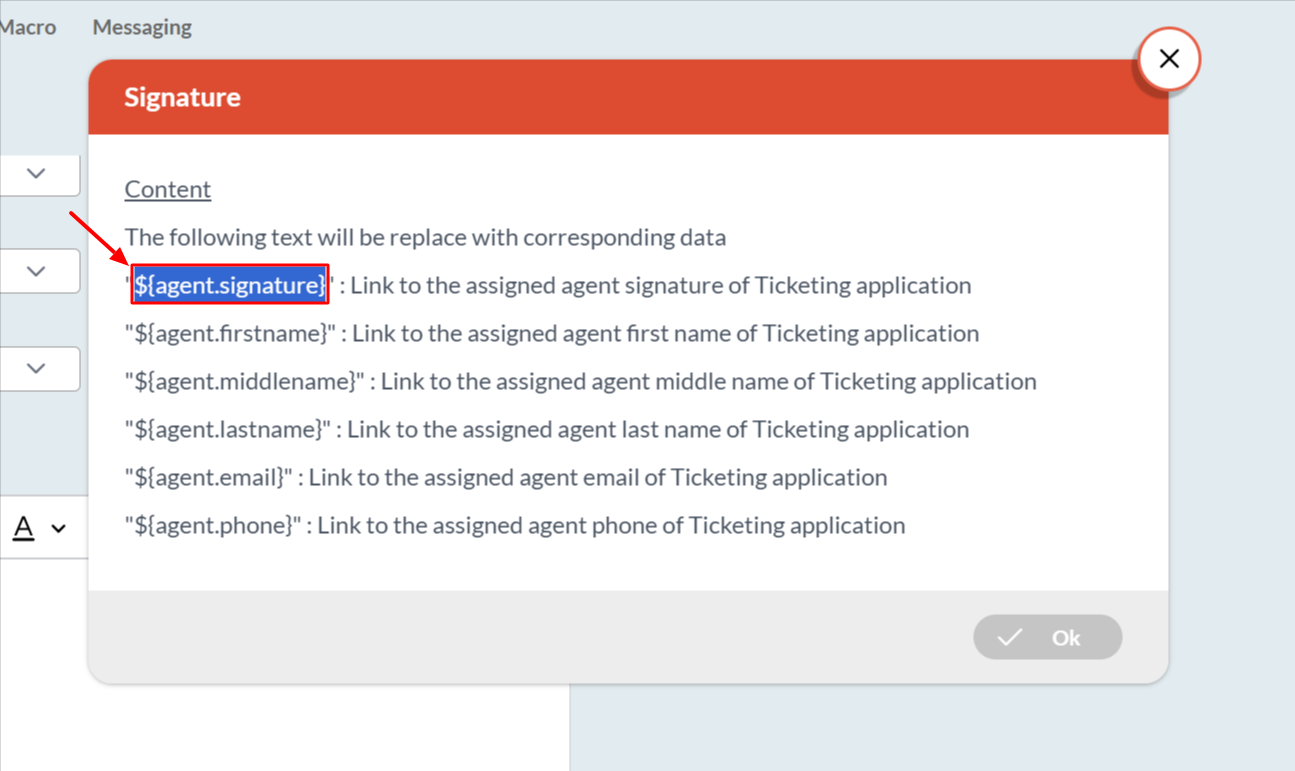
- Paste the link into the content box, click on the Save button, and your preference will be saved.
How to Sync Azure AD Users and Groups with Wavity via SCIM
- Wavity supports integration with Microsoft Azure Active Directory (Azure AD) to enable seamless synchronization of user and group attributes through SCIM (System for Cross-domain Identity Management). Follow the steps below to configure the synchronization process.
- Only an Admin user in your organization can set up and configure Azure AD SCIM integration in Wavity.
- You’ll need access to both the Wavity platform and the Azure portal using administrator credentials.
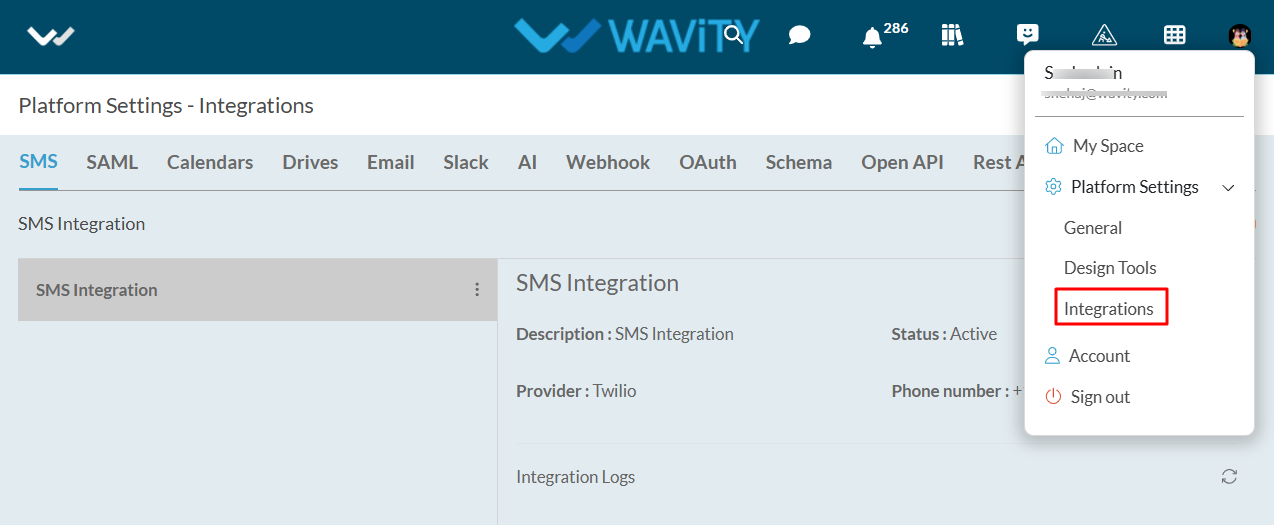
- Login with admin credentials and navigate to integrations page as shown in below image.
- Before setting up SCIM synchronization, Single Sign-On (SSO) must be enabled using Microsoft Azure. Click on the following link for detailed guide on enabling SSO with Azure in Wavity: Enable SSO Using Azure | Wavity

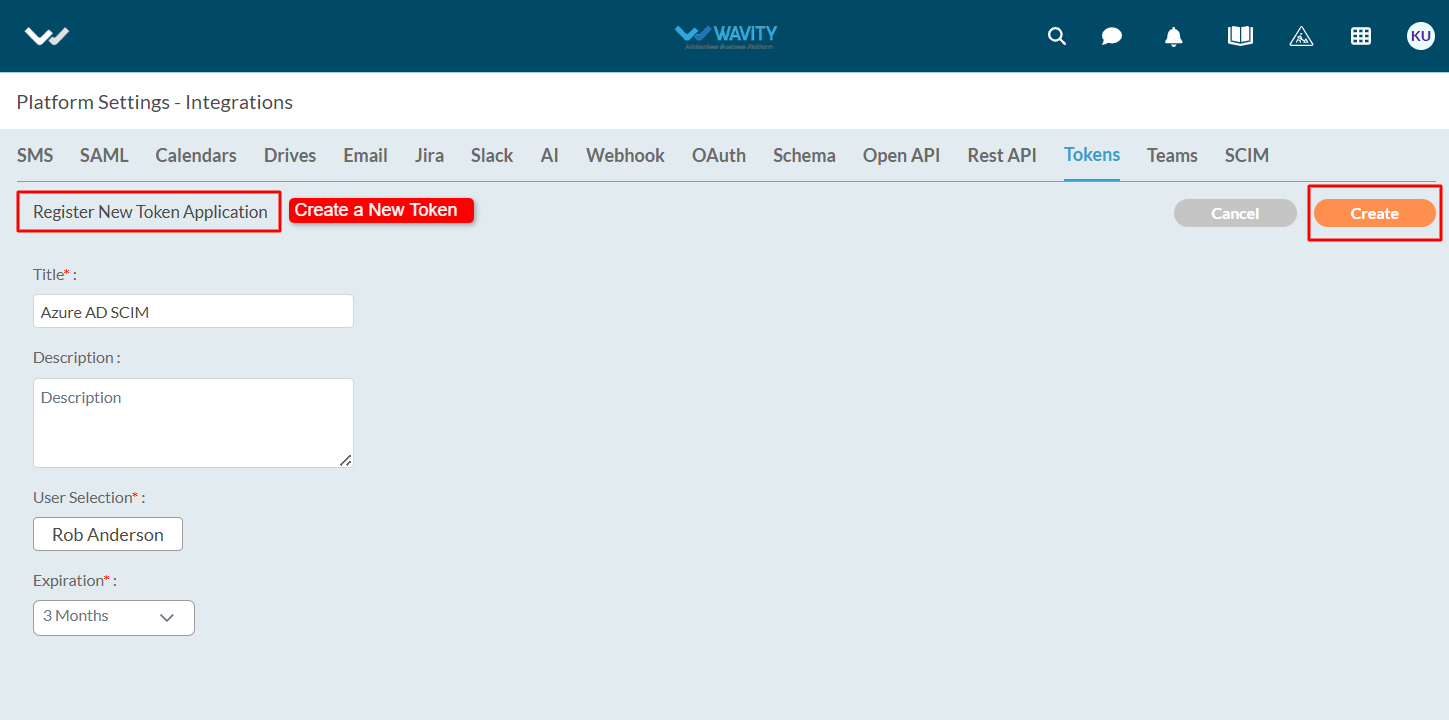
- Generate a Token in Wavity: Navigate to Tokens page, and click on ‘Create’ button.

- Fill in the token details:
- Title and Description
- User (preferably the Admin user)
- Expiration Period
- Click ‘Create’ as shown in below image.
- Copy the generated token – you’ll need it during the Azure configuration.

Configure SCIM Provisioning in Azure AD
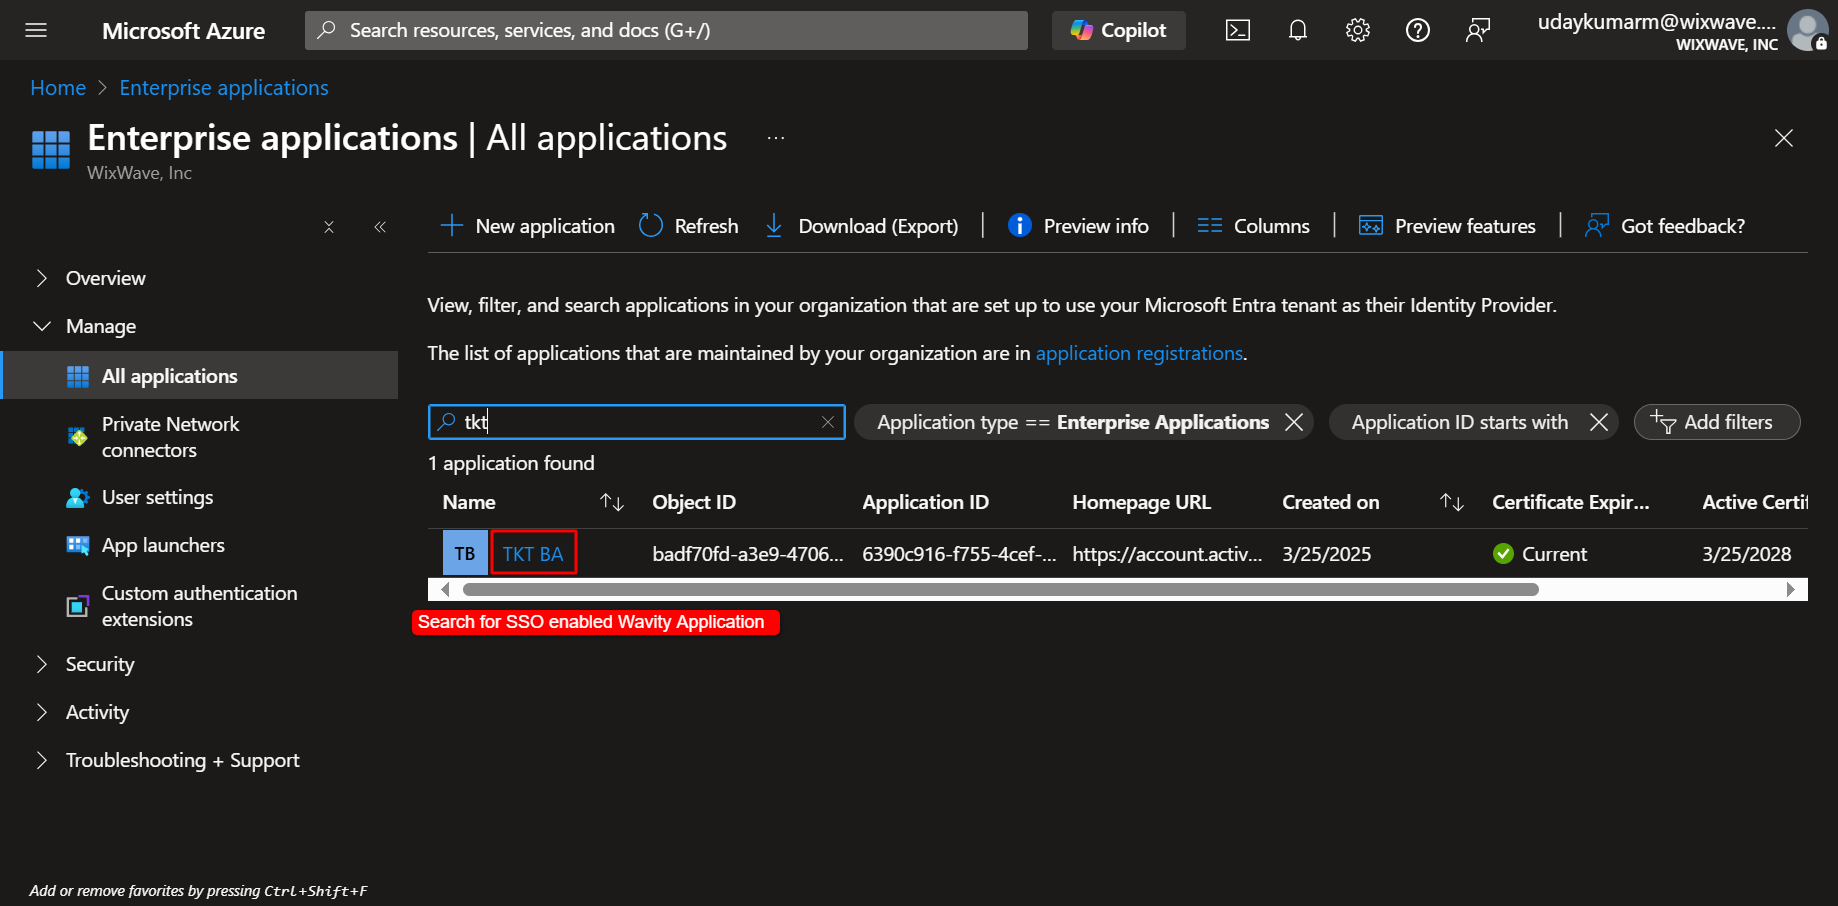
- Log in to the Azure Portal with admin credentials. Navigate to Azure Active Directory → Enterprise Applications.

- Search for and select your SSO-enabled Wavity application.
- Click on ‘Provision User Accounts’.

- On the Get Started page, click ‘Connect your application’.

- Provide SCIM Endpoint and Token: Enter your wavity tenant URL with the following format: https://<yourtenentURL>/scim/v2
- Paste the token which you had generated earlier in Wavity platform.
- Click on ‘Test Connection’

- A confirmation popup should appear indicating that the provisioning test connection was successful.
- Now, click on ‘Create’

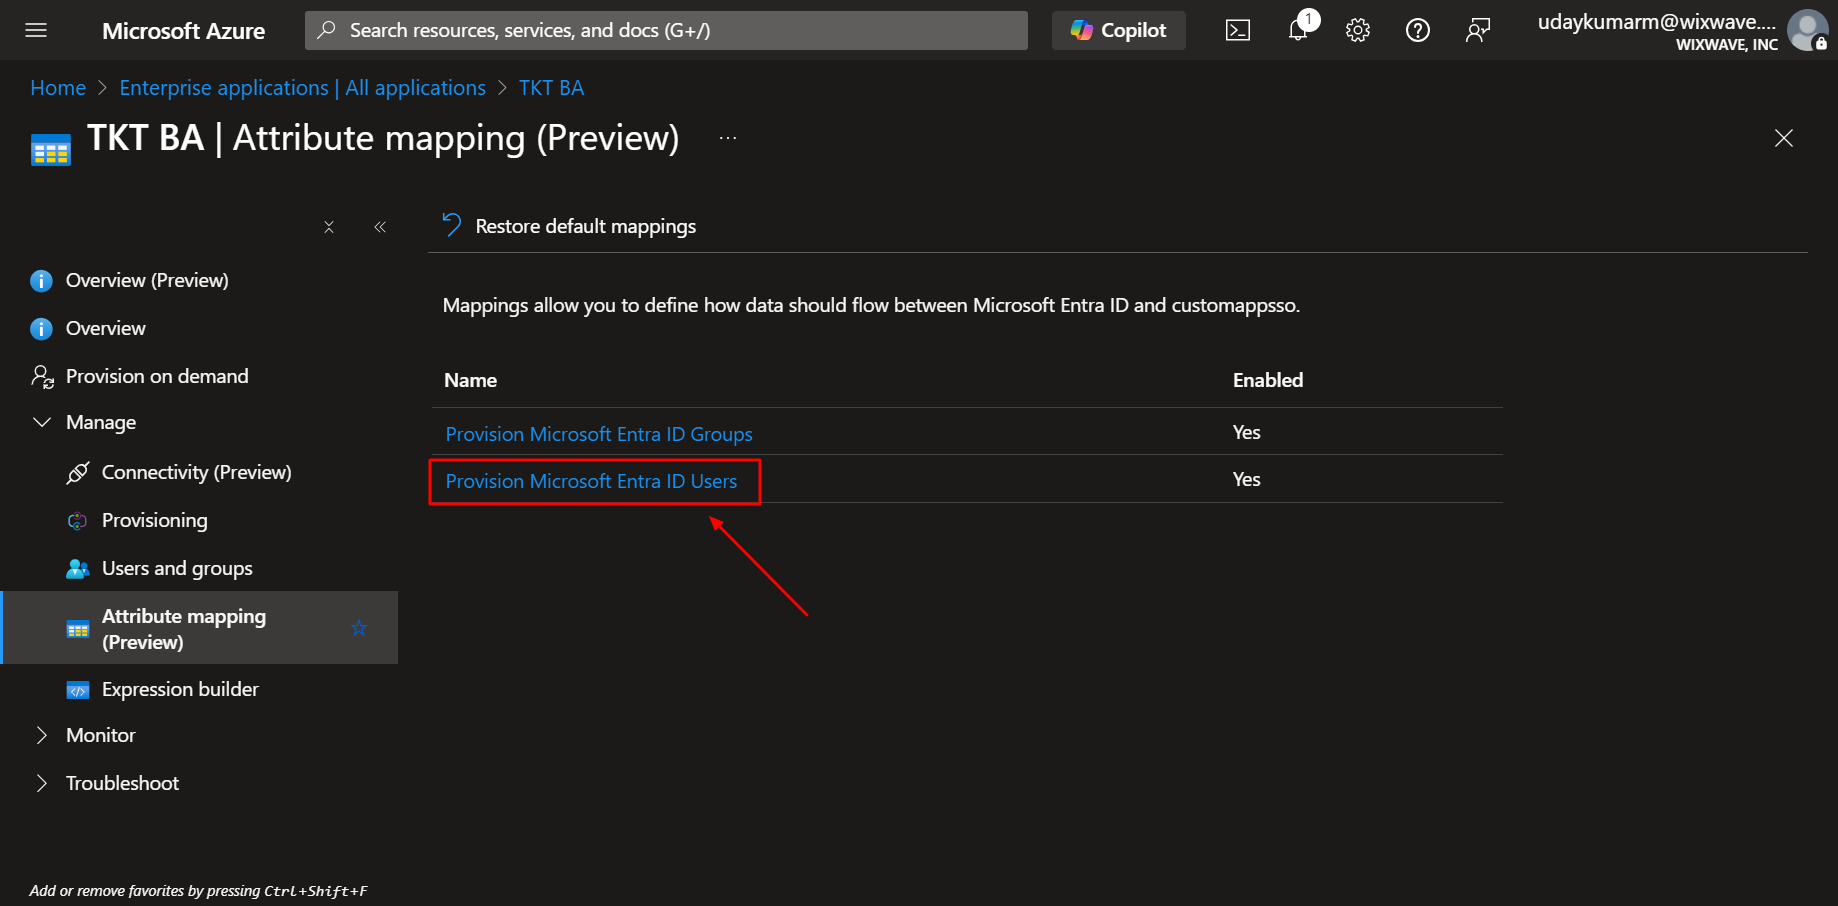
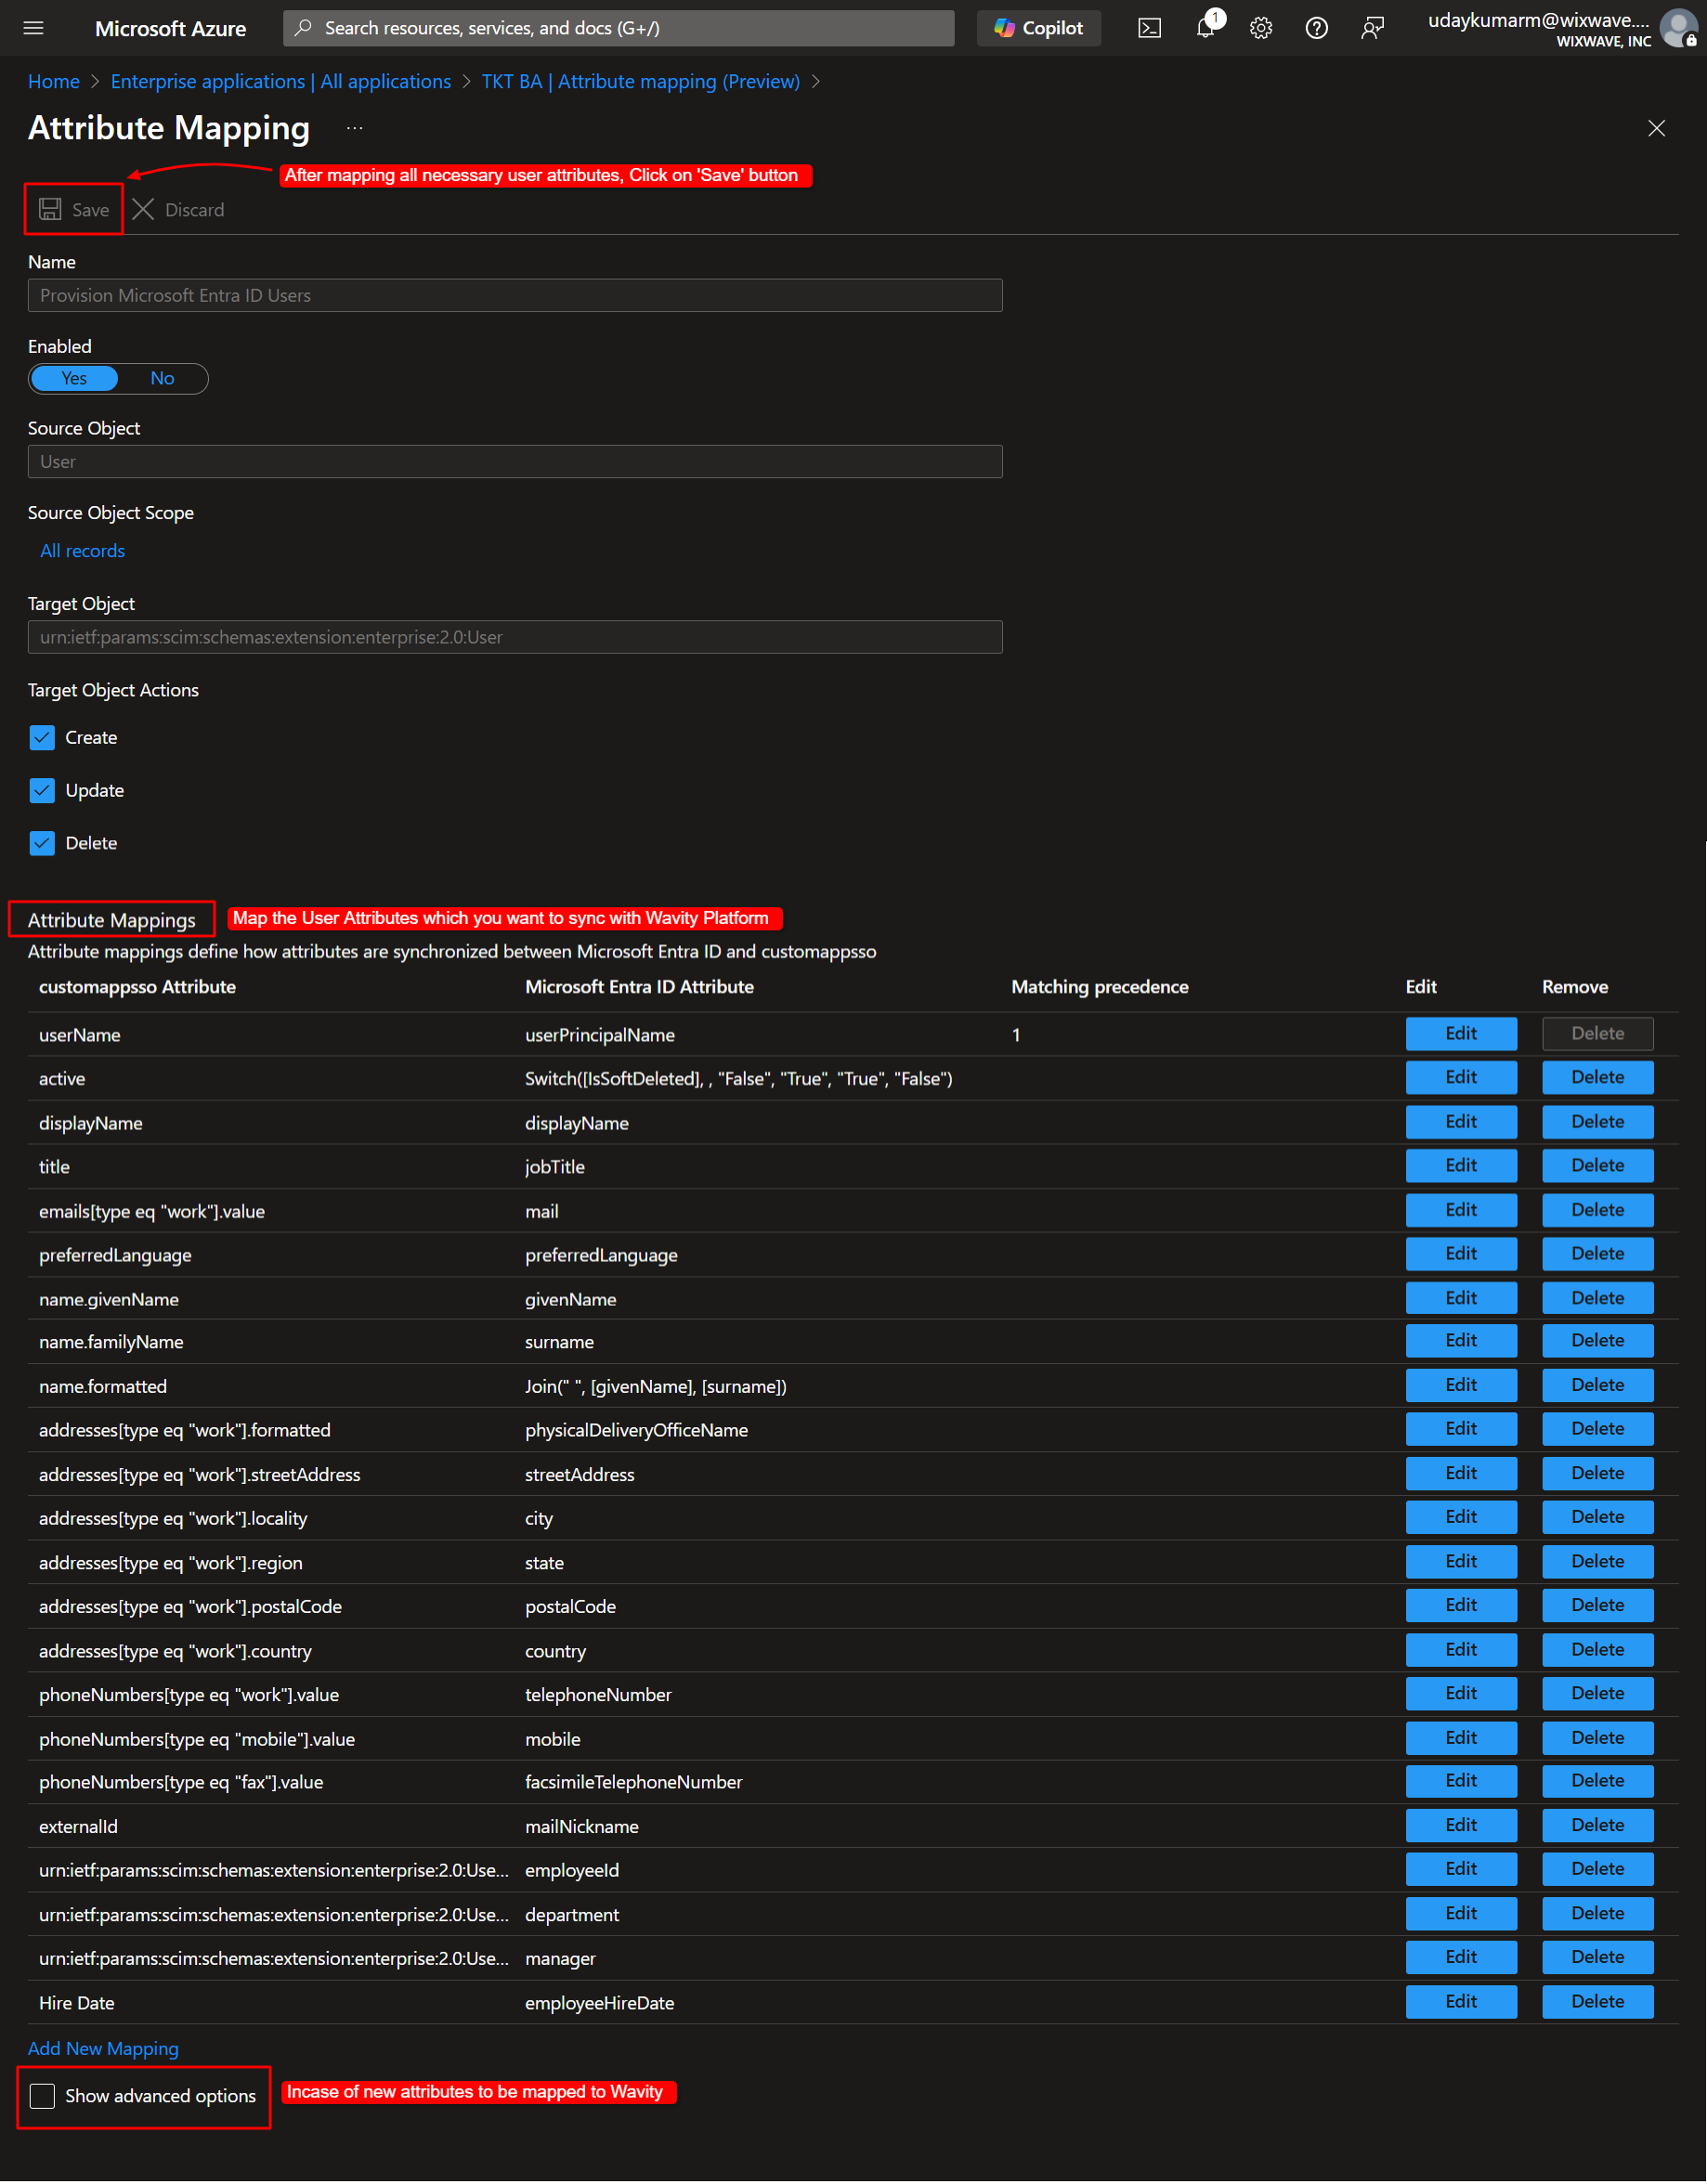
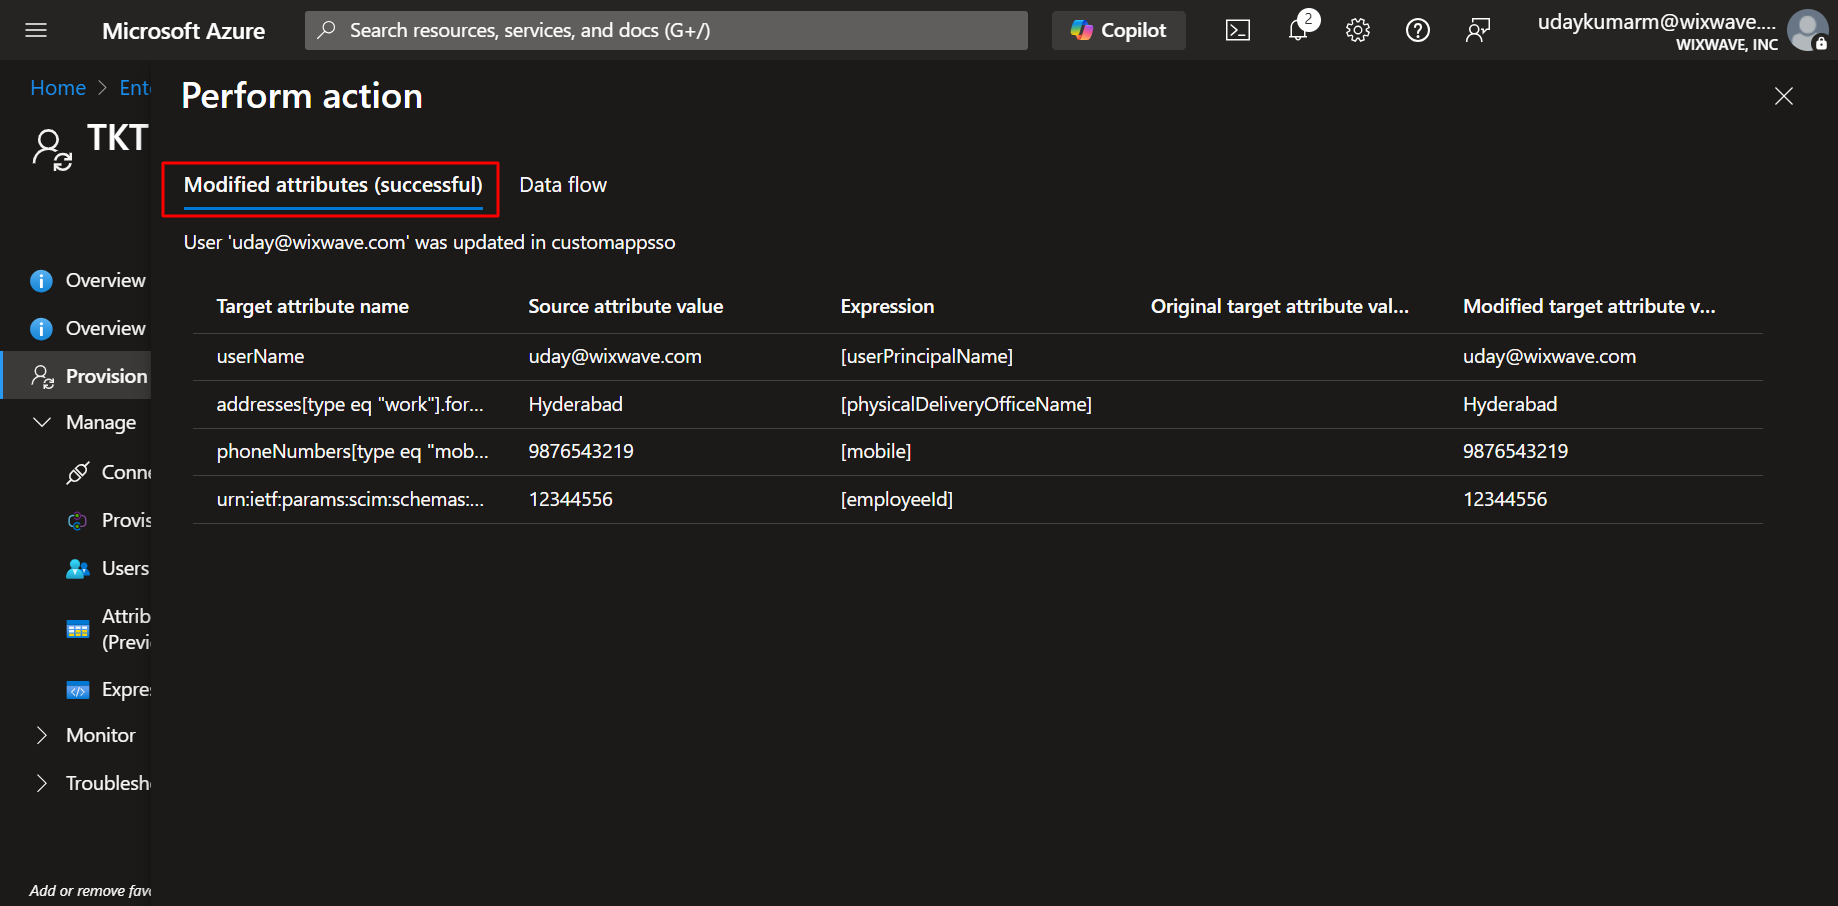
- To Map User Attributes: Go to the Attribute Mapping (Preview) section on the ‘Provision on demand’ page.
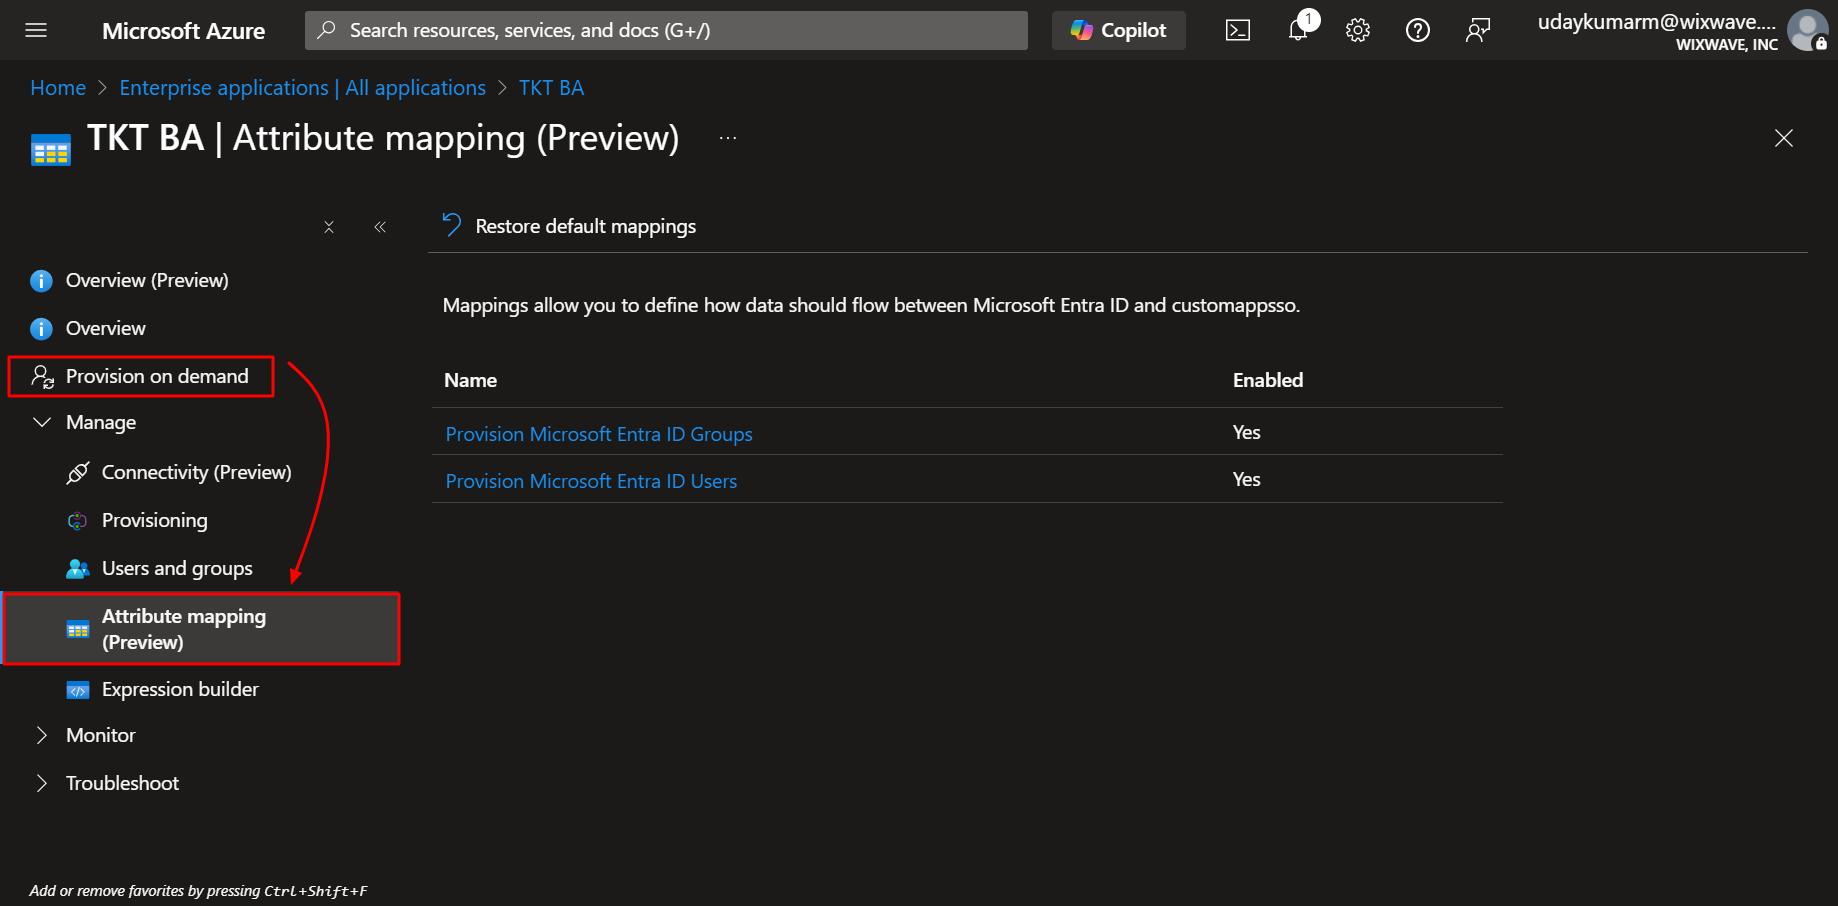
- Click ‘Provision Microsoft Entra ID Users’.
- Review and map the necessary user attributes to sync with Wavity.
- Click ‘Show advanced options’ to map any custom attributes.
- Click ‘Save’ when done.
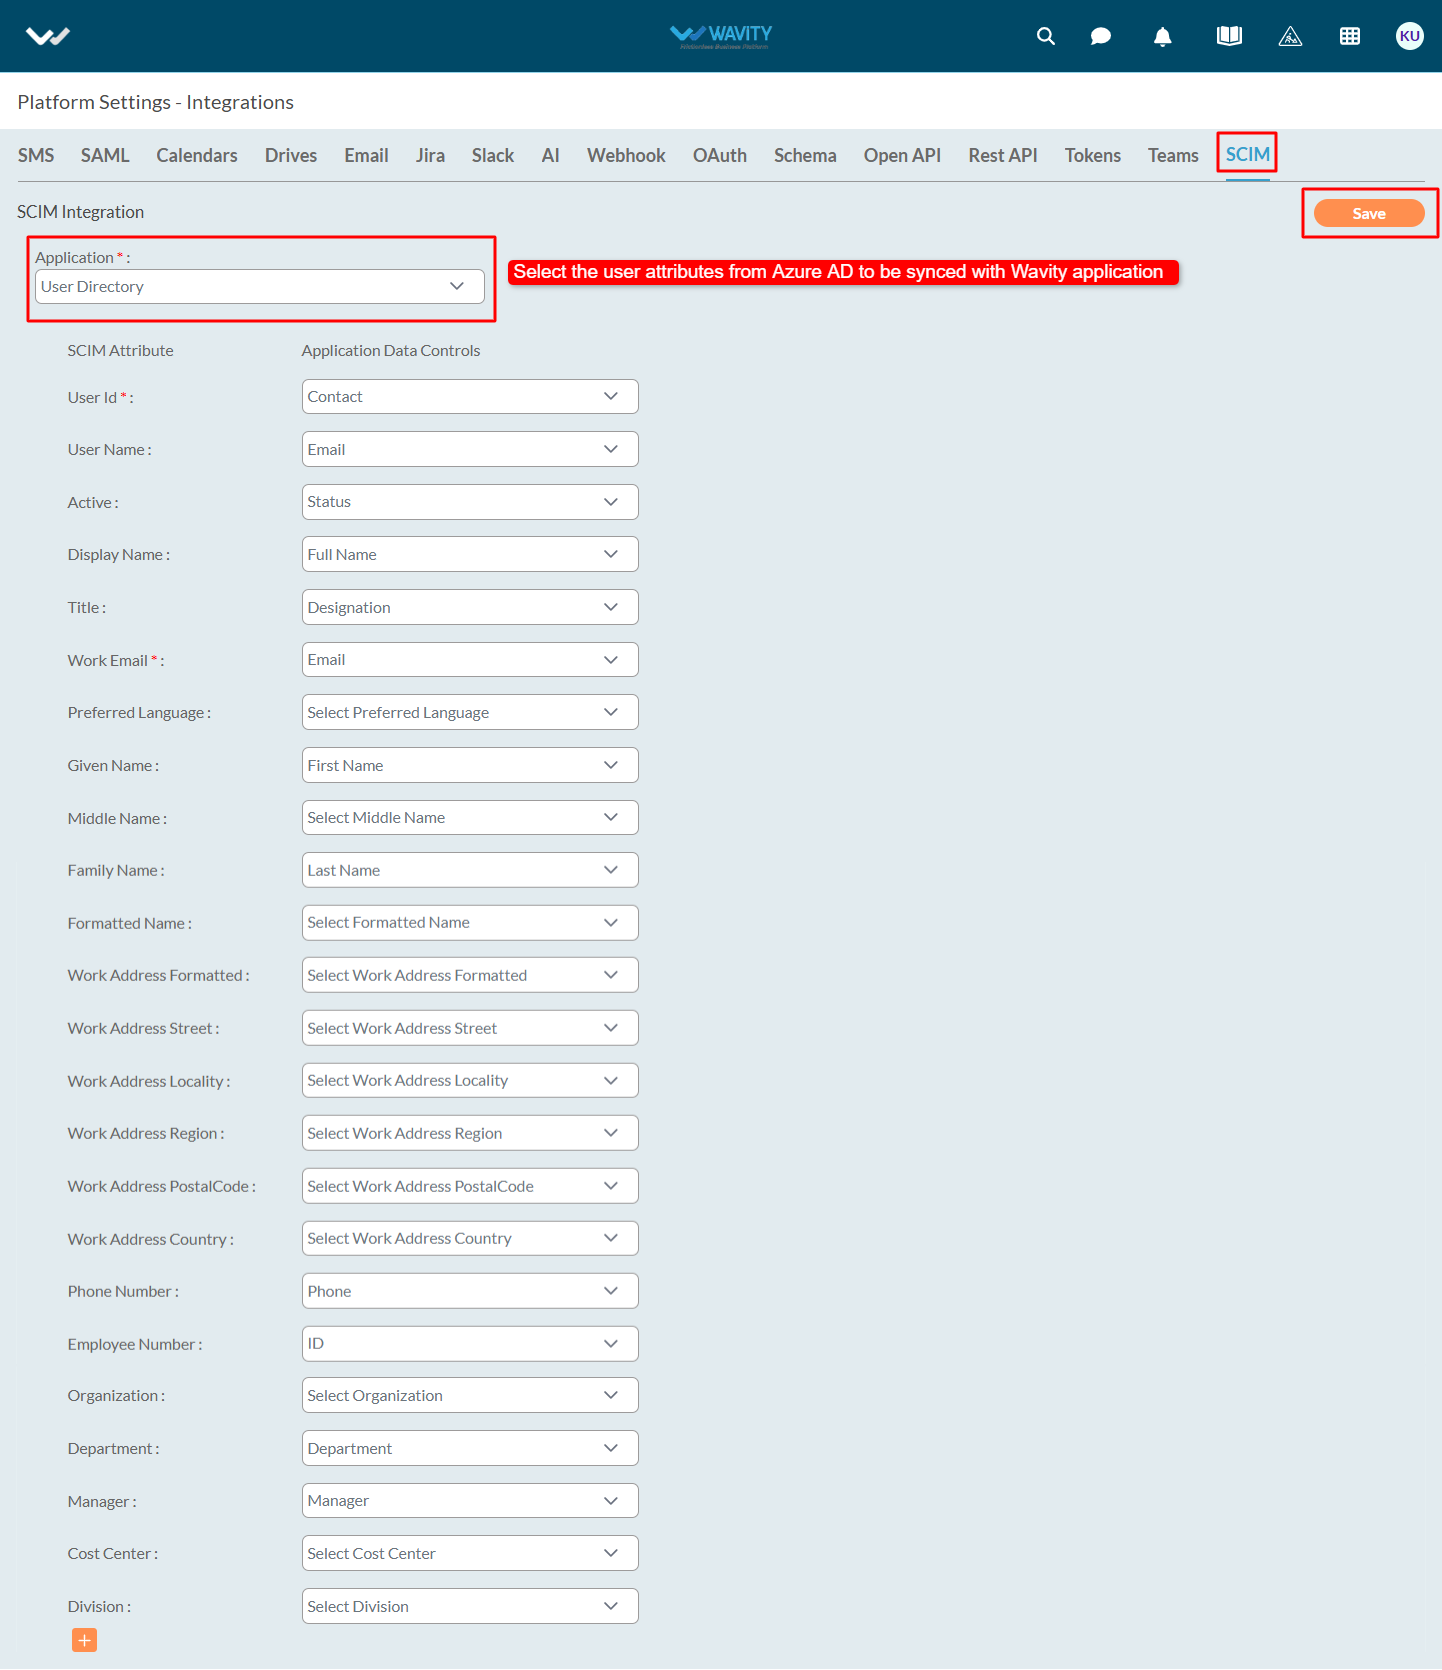
- To Finalize SCIM Setup in Wavity: In Wavity, go to the SCIM settings page. Select the corresponding Wavity application for syncing user attributes. Click on ‘Save’ button once done.
- To Assign Users & Groups in Azure: In Azure, navigate to the Users and Groups section of the Wavity application.

- Click ‘Add user/group’ → then ‘None selected’.
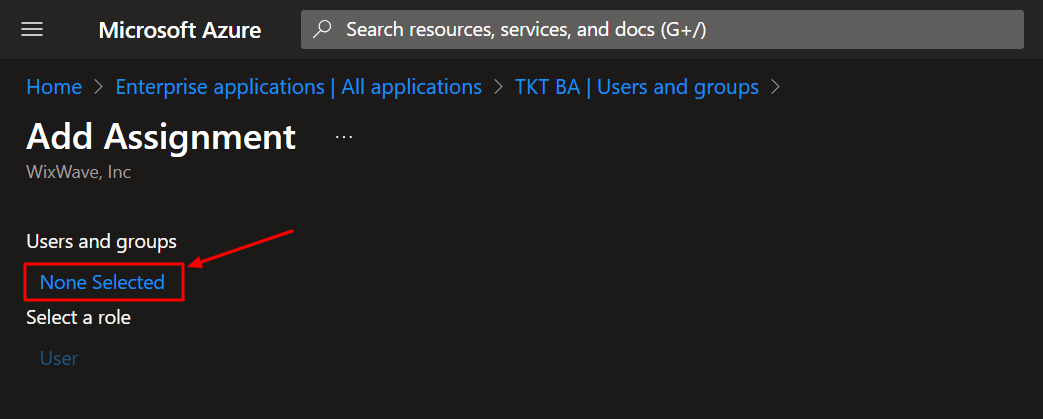
- Select all the users and groups for which data attributes will be synced with Wavity platform.
- Once done, click on ‘Select’ button and then on ‘Assign’ button.

- To Perform On-Demand Provisioning: Navigate to the ‘Provision on demand’ page in Azure. Add a user in the ‘Select user’ dropdown.
- Click on ‘Provision’ to add recently selected users and group members to do on-demand provision. This will instantly sync users/groups into the Wavity platform.

- Review the displayed user attributes as shown in below image.
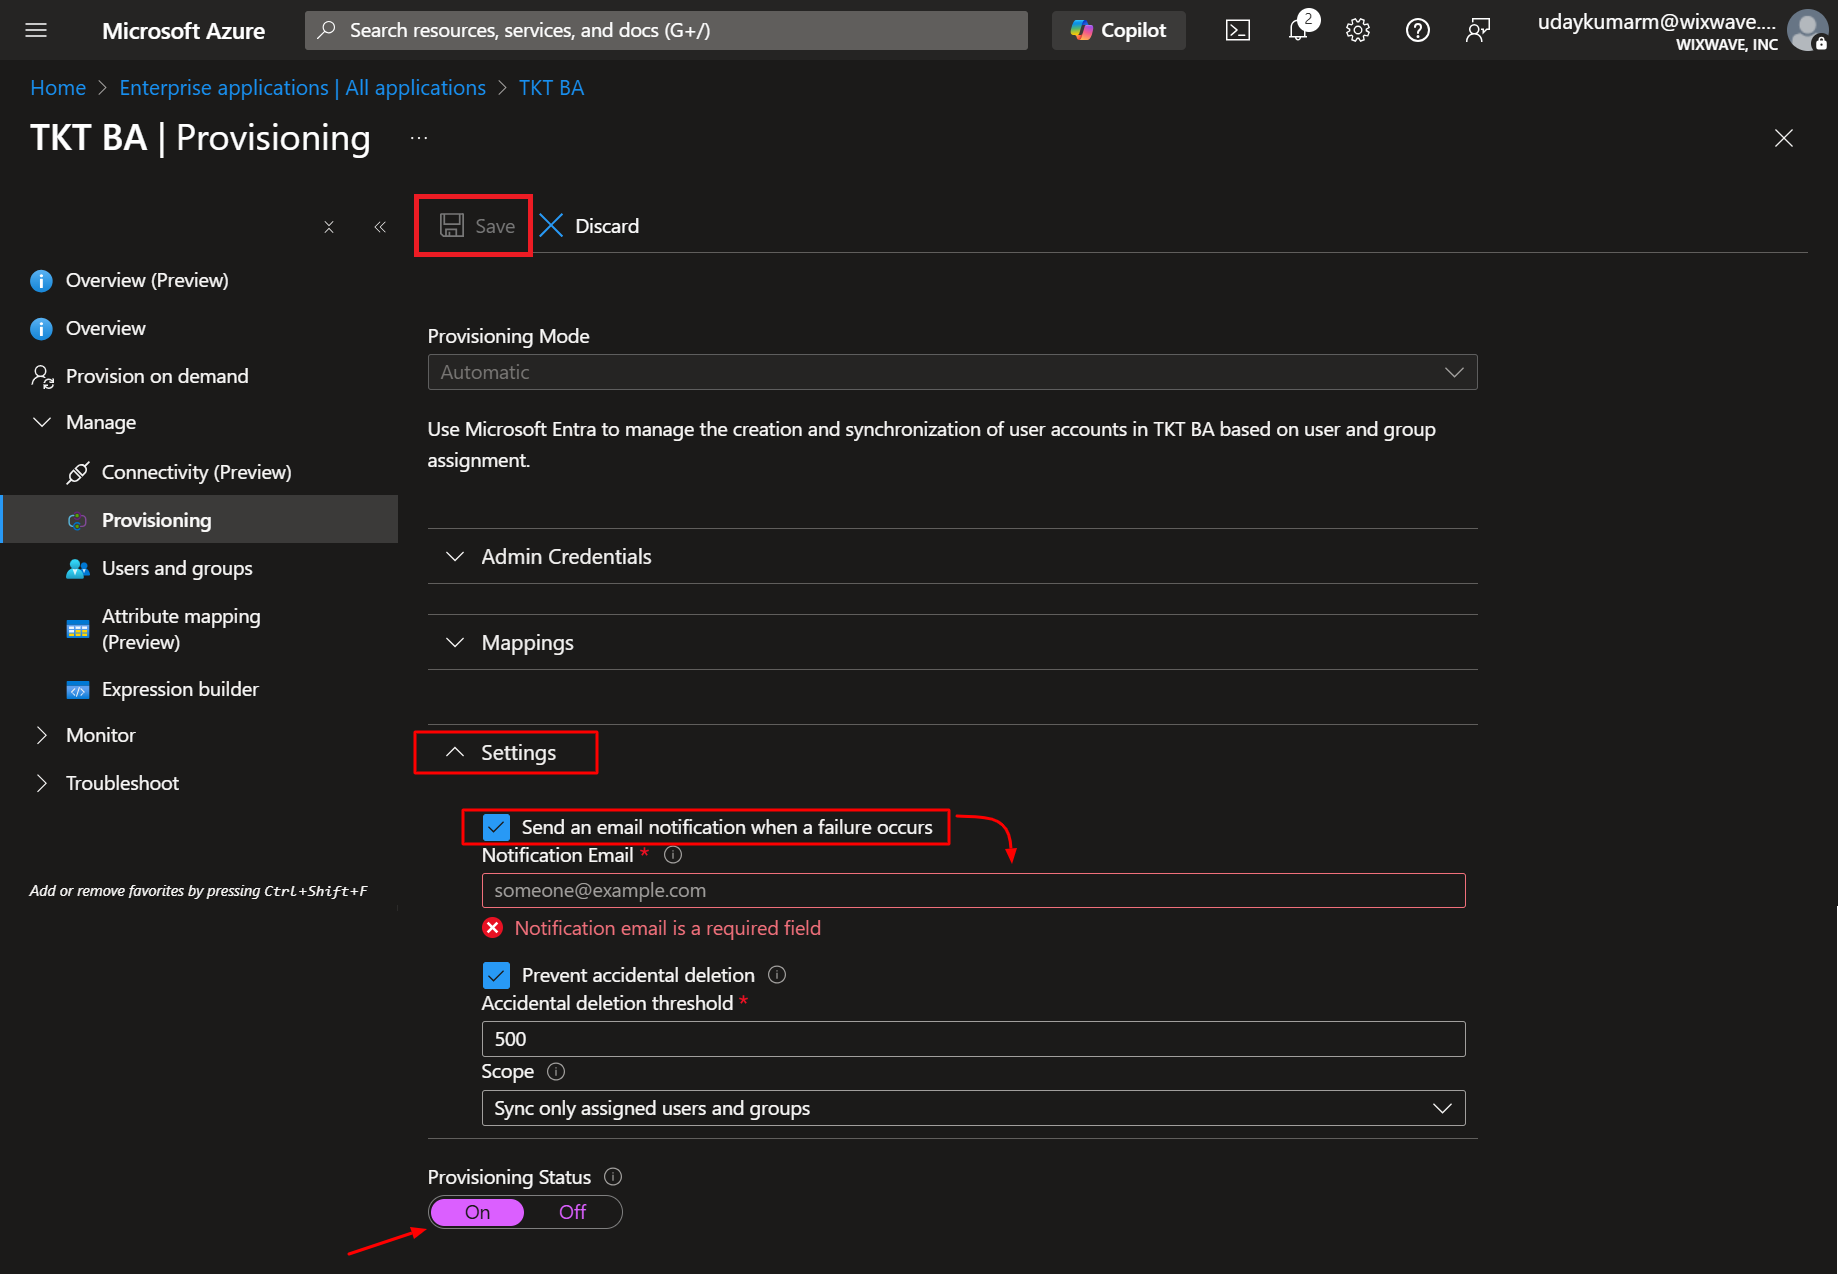
- To Activate Automatic Provisioning: Return to the Provisioning settings in Azure. Set Provisioning Status to On. Add an email address for failure notifications. Click ‘Save’.
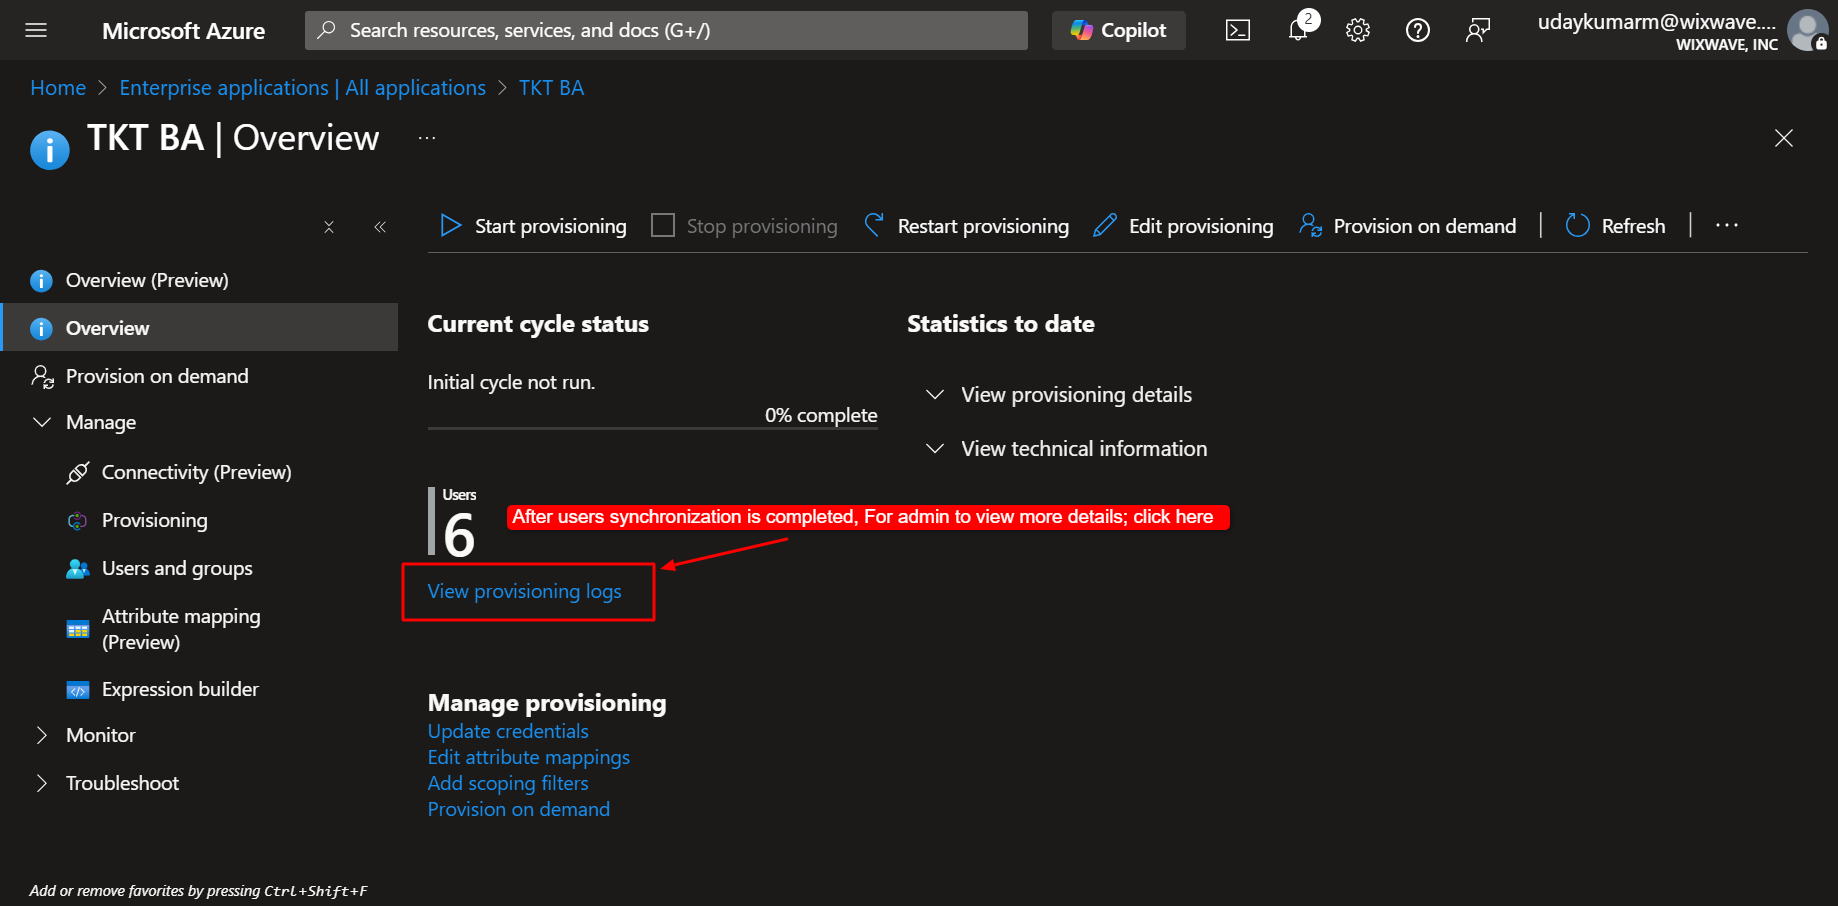
- To Monitor Provisioning Status: Go to the Overview page of the Azure Wavity application. Click ‘View provisioning logs’ to verify synchronization activities and confirm successful user provisioning.
How to Resend an Activation Link to a User
- Admins can resend an activation link to help users activate their accounts.
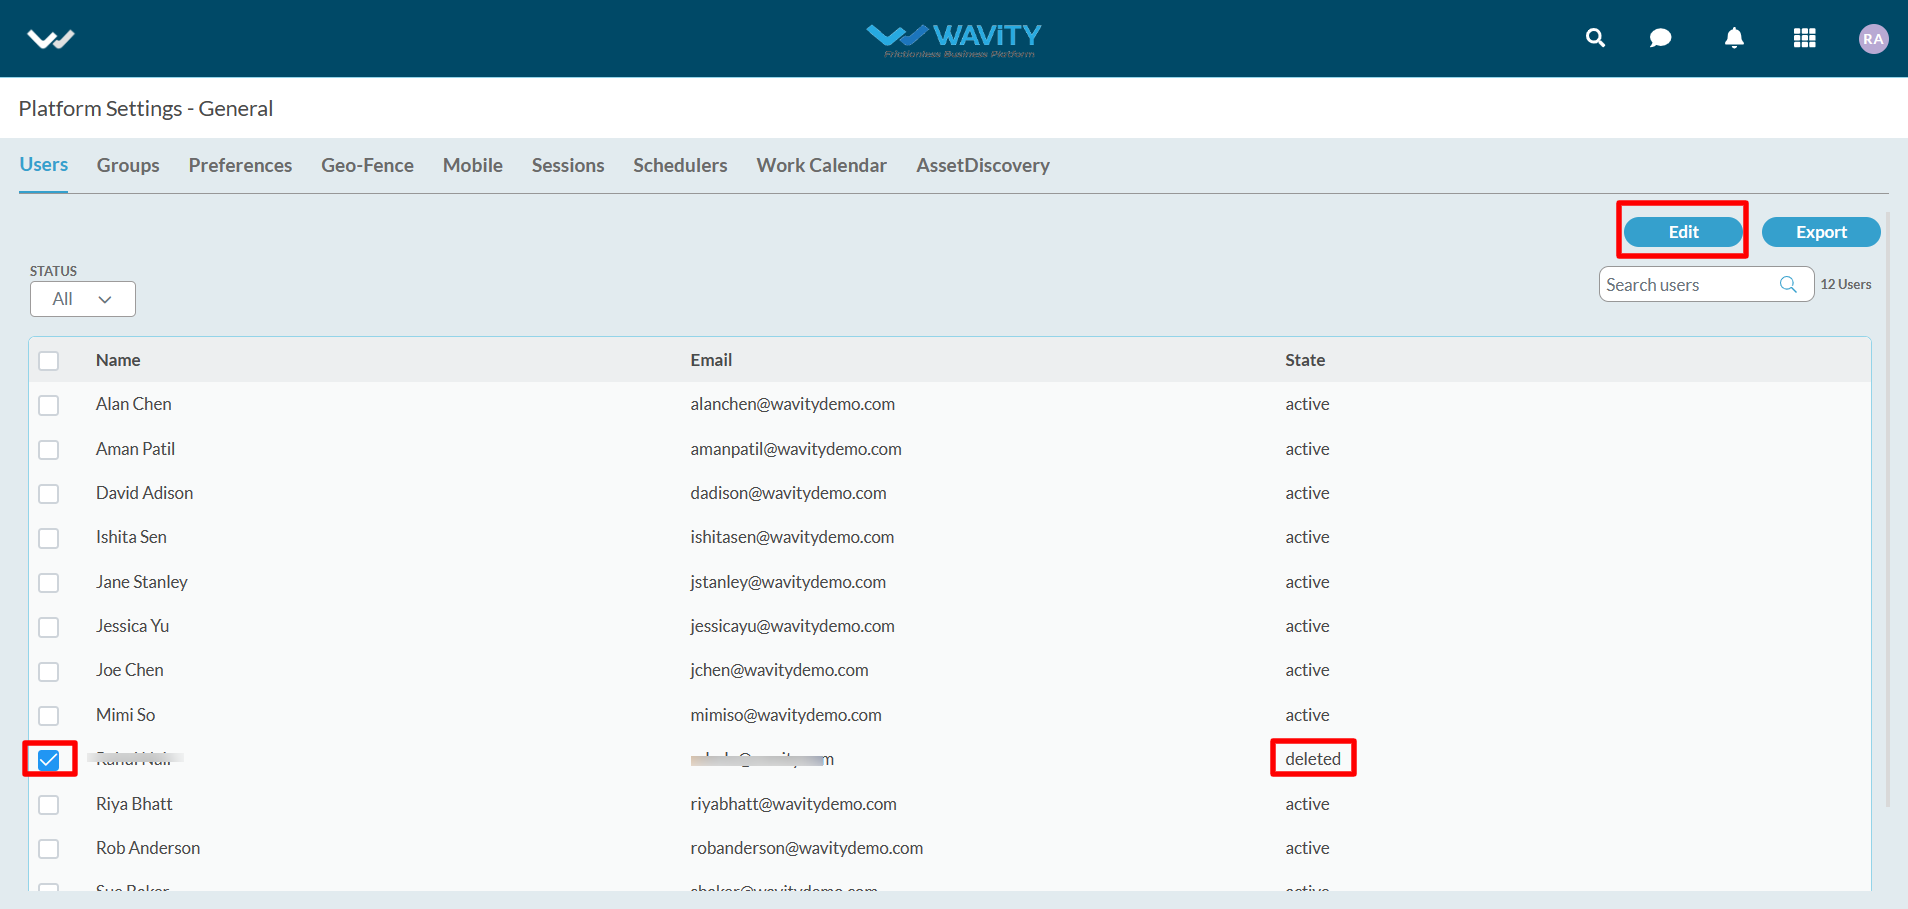
- Navigate to Profile Icon >Platform Settings - General > Users.
- Locate the user in the Users list using the search bar, and check their current status, such as "active," "deleted," "disabled," or "expired."
- Select the user for whom you want to resend an activation link. Click on “Edit” button as shown below.
- Click on “Reactivate” button as shown below.

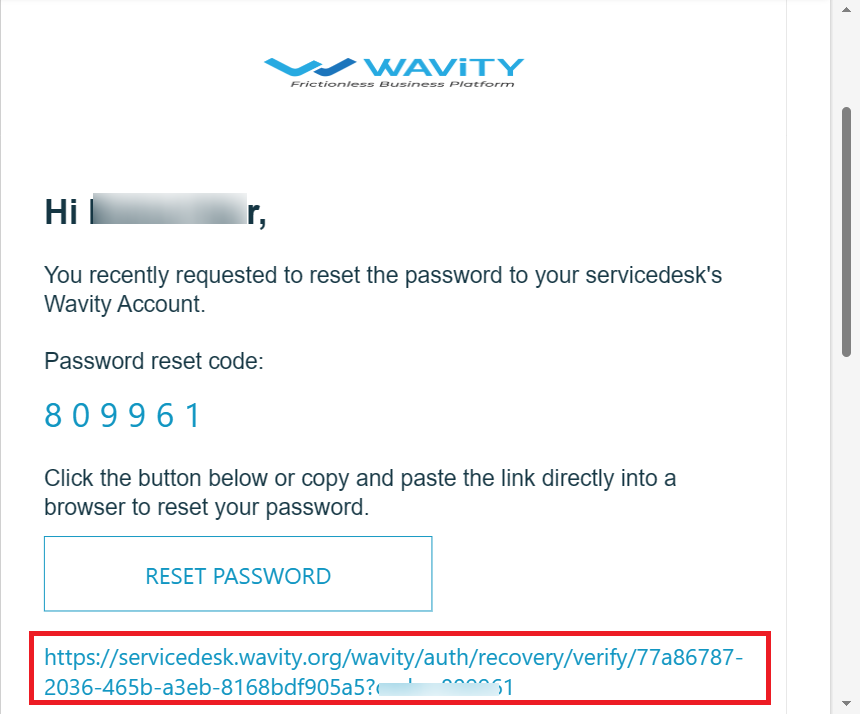
- Click "Reset" on the confirmation pop-up message to complete the password reset process.

- Confirmation message on password reset link will be displayed at the bottom of the page as shown in below image.

- Selected user will receive an automated email from Wavity containing an activation link as shown in below image. The user shall click on the activation link to reset their password. Please note that the activation link will expire in a few days.
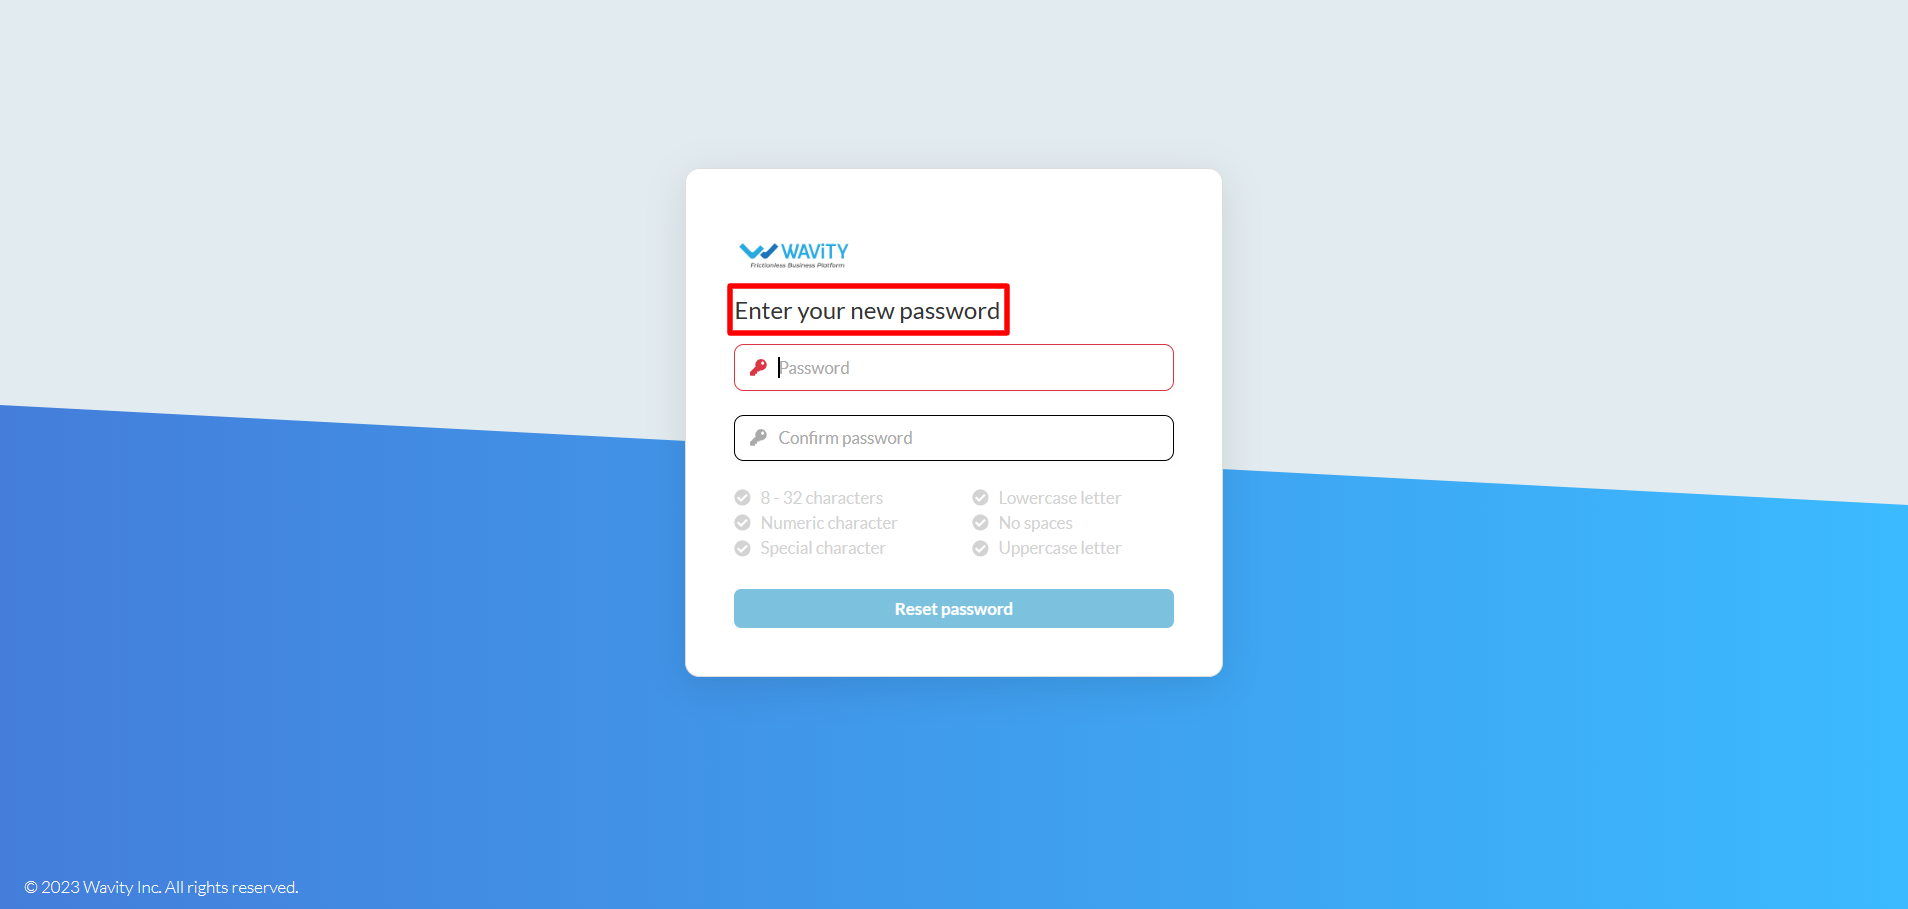
- The user shall enter a new password and reset it, ensuring all password conditions are met.
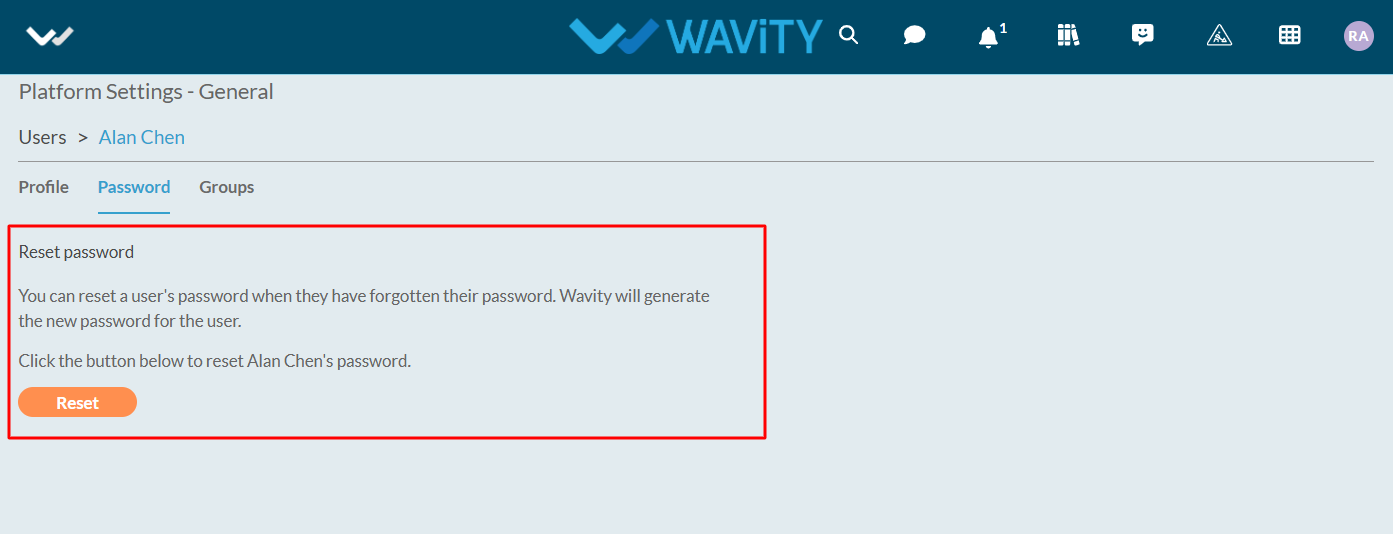
How to Reset a User’s Password?
- Only the admin of your organization has the authority to reset a user's password.
- To reset an individual user's password, click on the Profile icon and navigate to "General" under Platform Settings, as shown in the image below.

- Select the user whose password you want to reset, then click on the "Edit" button.
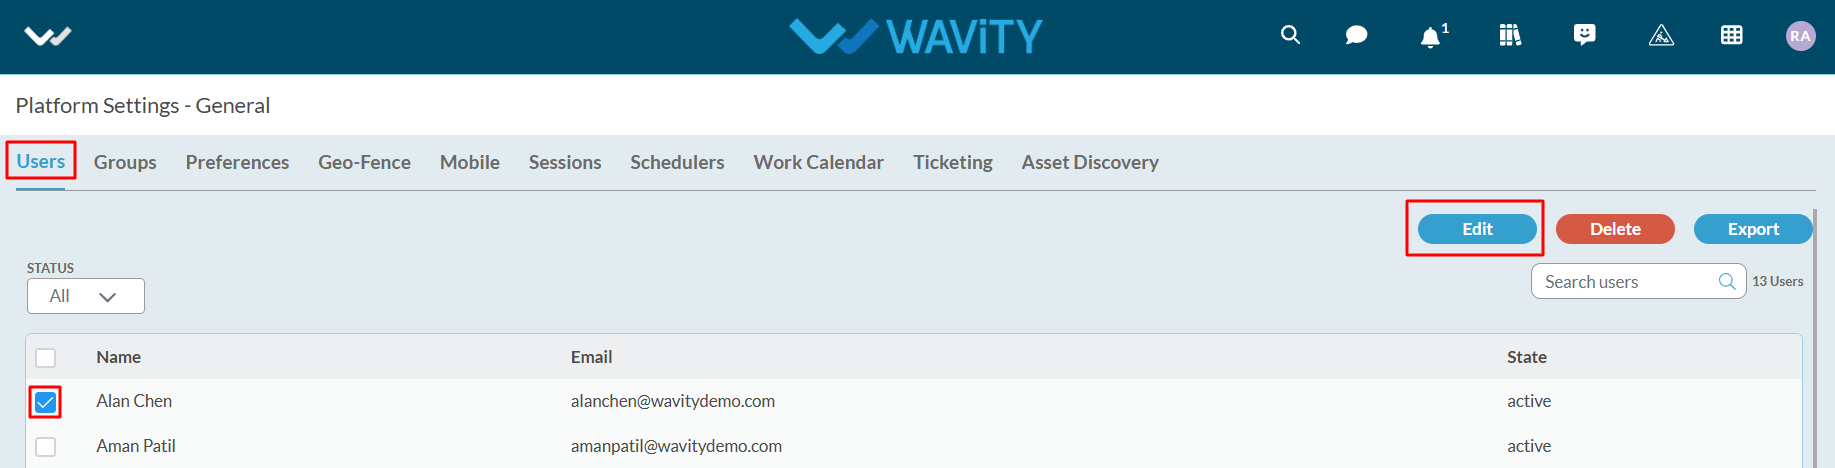
- Click on ‘Password’ section.

- You can reset a user’s password when they have forgotten their password. Wavity will generate a new password for the user. Click on “Reset” button to reset the selected user’s password.
- Click "Reset" on the confirmation pop-up message to complete the password reset process.

- Selected user will receive an automated email from Wavity containing an activation link as shown in below image. The user should click on the activation link to reset their password.

- The user should enter a new password and reset it, ensuring all password conditions are met.
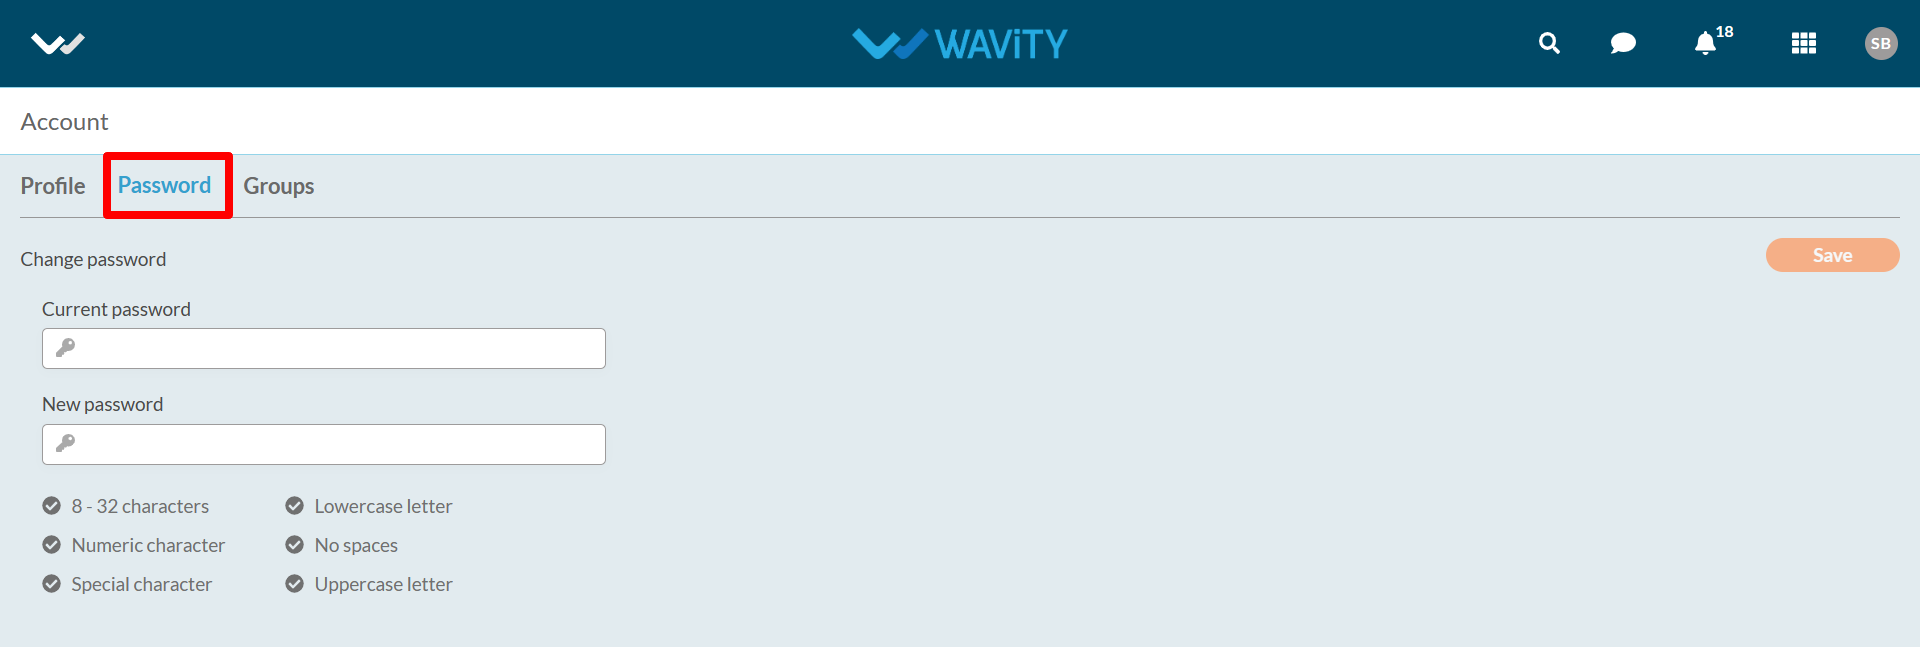
How to change or update your password?
- All users on the Wavity platform can change or update their password when needed.
- To update your password, click on the Profile icon and navigate to "Account" as shown in the image below.
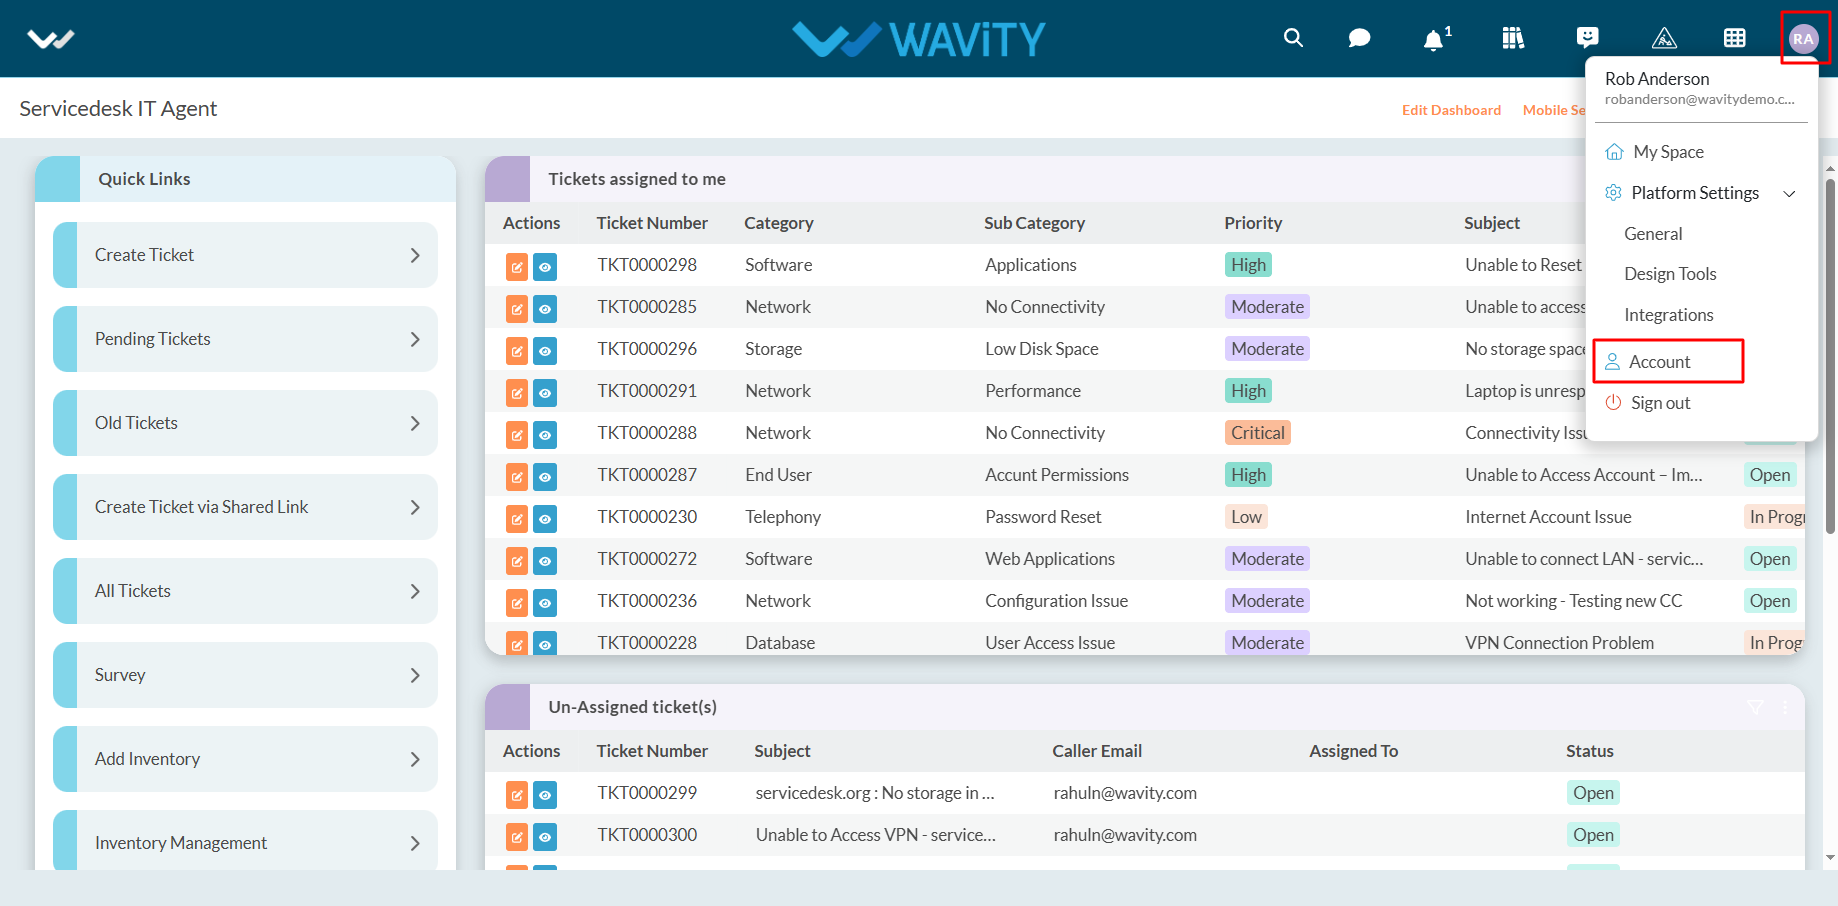
- Click on ‘Password’ section.

- Enter your current password as shown in below image.
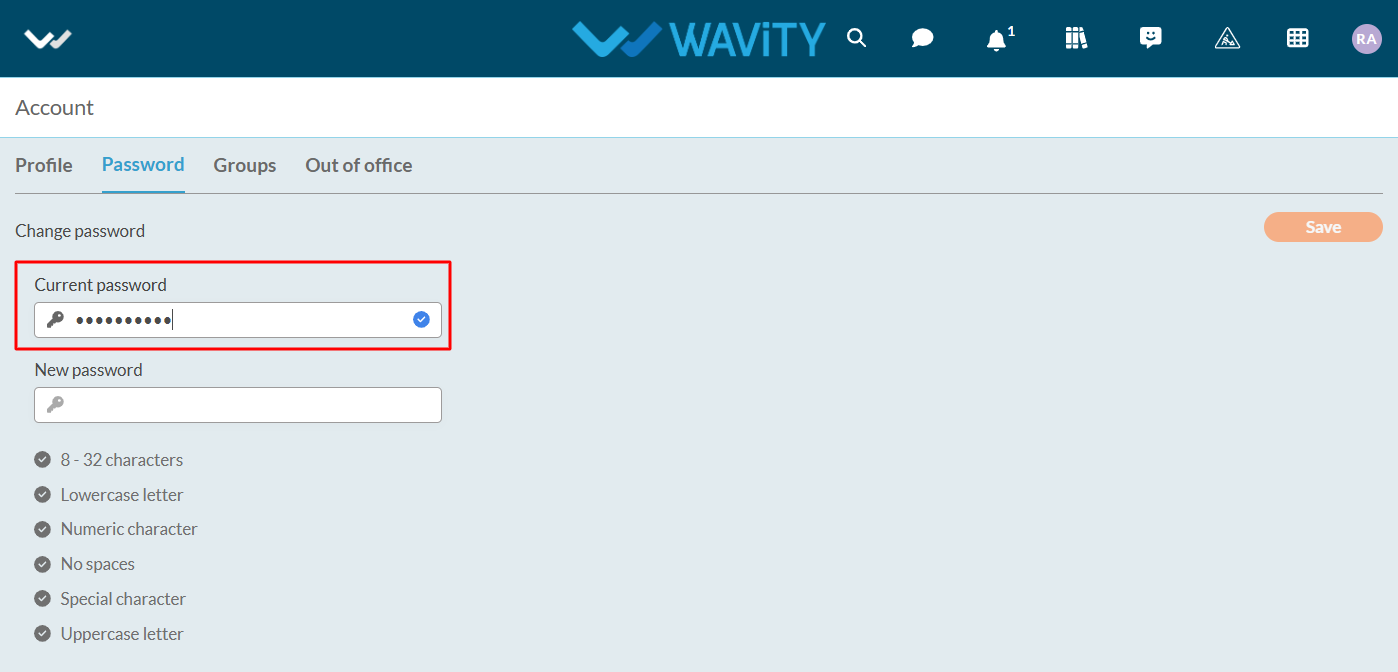
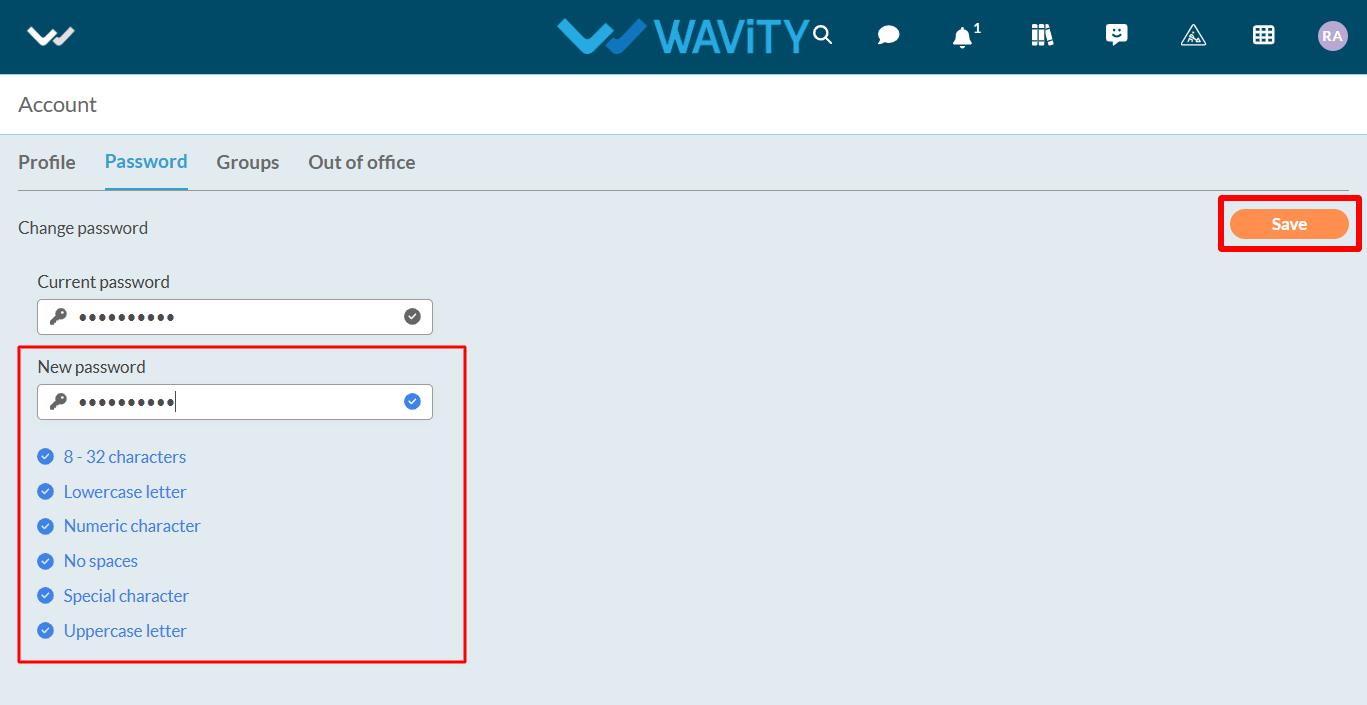
- Enter your new password, ensuring it meets all the password conditions mentioned below. Please make sure to remember your password.
- Once completed, click the "Save" button to update your password.
How to enable Email Integration with Microsoft Office 365
- The Wavity platform provides email integration functionality, allowing for the automatic generation of requests within the platform through email. This occurs subsequent to the sending of an integrated email, based on configured conditions.
Email Integration with Microsoft Office 365:
- Wavity supports direct email integration with Microsoft Office365.
- To enable email integration with Microsoft Office 365, You need to allow for consent and permissions to avoid hassle-free email integration with Wavity.
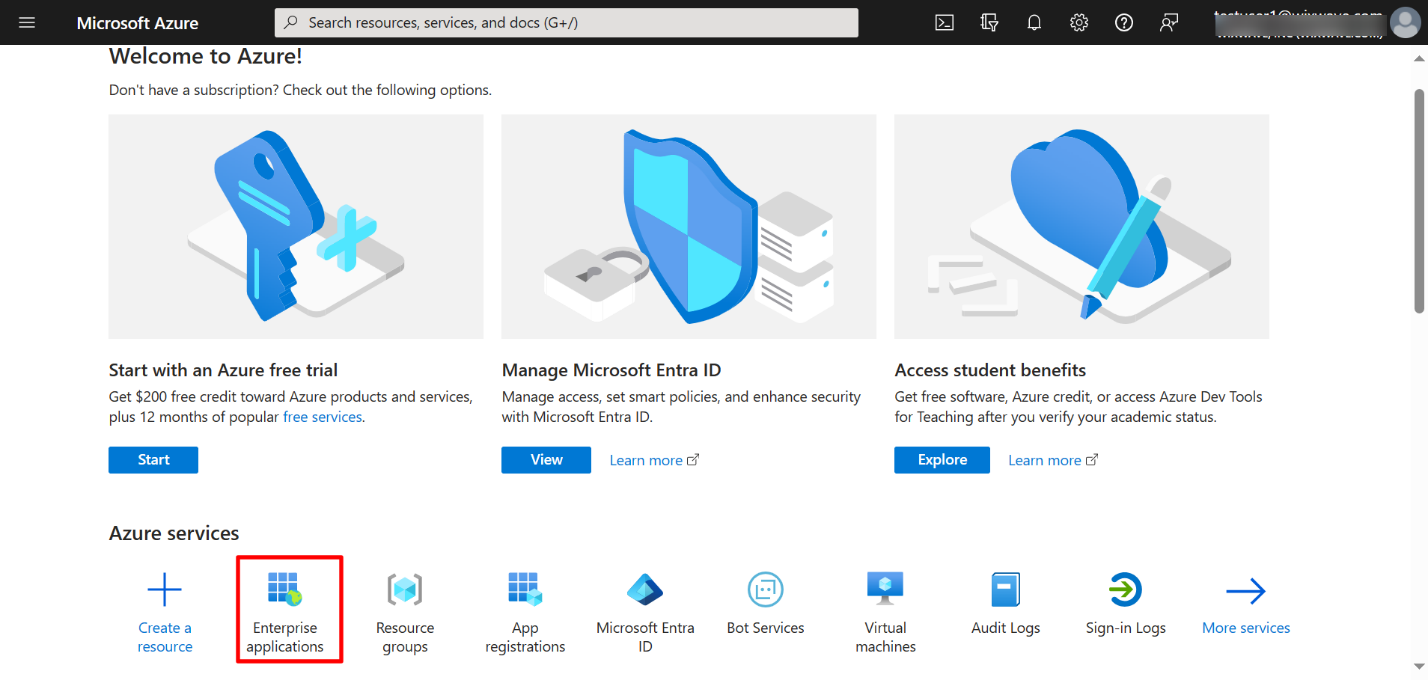
- Please log in to your Microsoft azure account using your admin credentials.
- Click on “Enterprise Applications” as shown in below image.
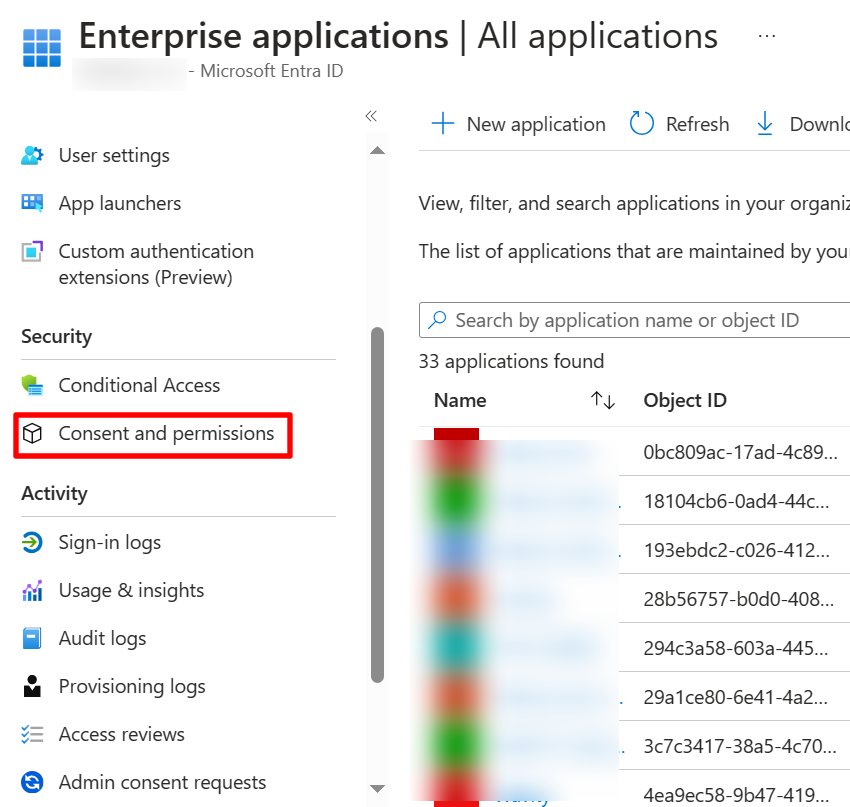
- Click on “Consent & Permissions” as shown in below image.
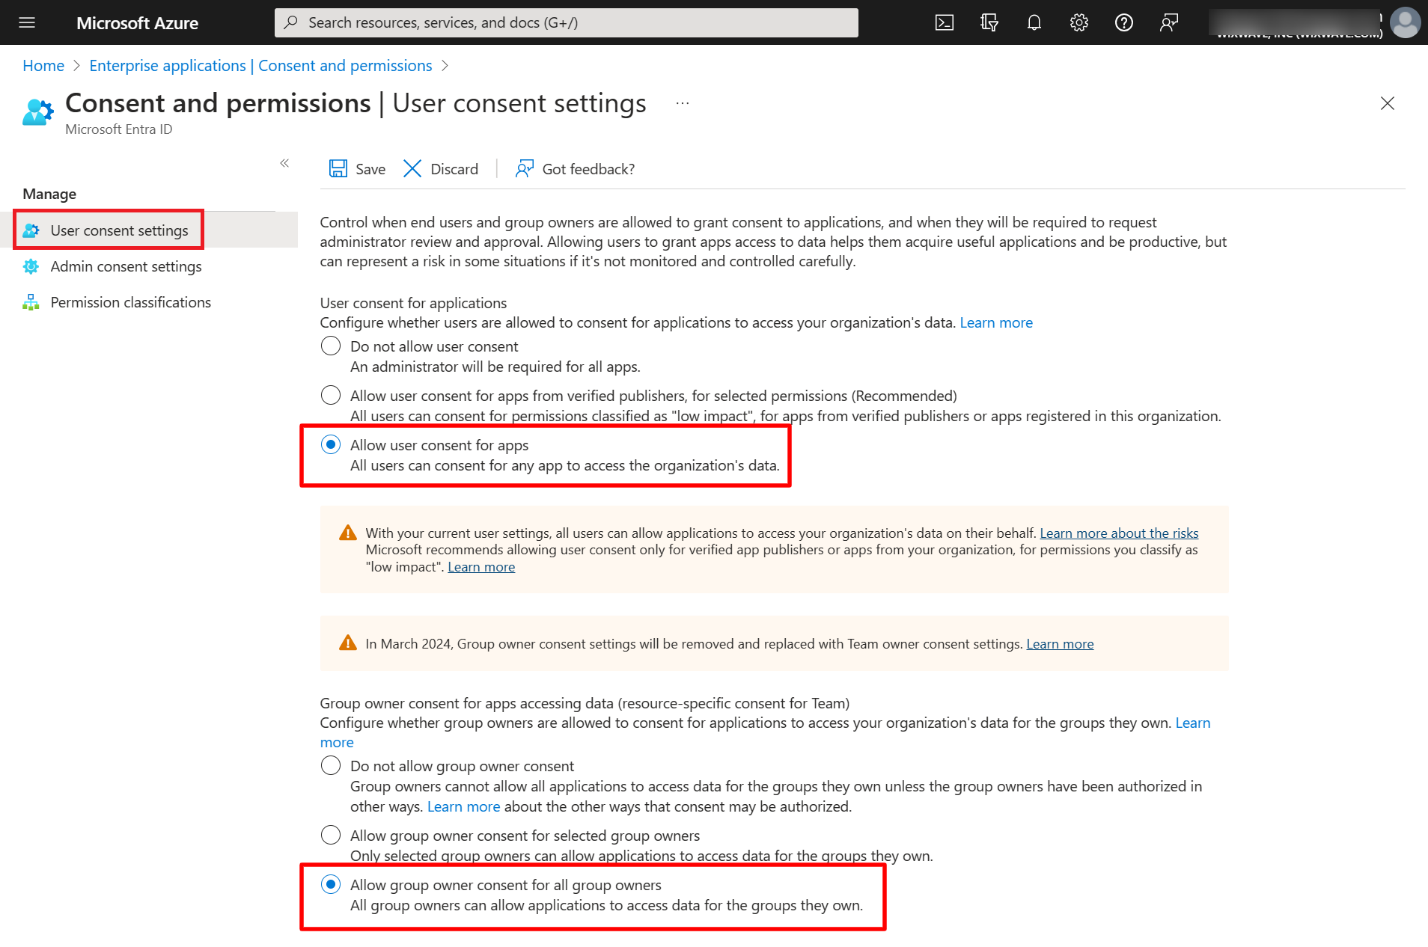
- Select “User Consent Settings” on the left as shown in below image.
- Select “Allow user consent for Apps” & “Allow group owner consent for all group owners” as shown in below image. Click on Save to update the settings.
- You can change the settings later back to your default settings after email integration with Wavity is complete.
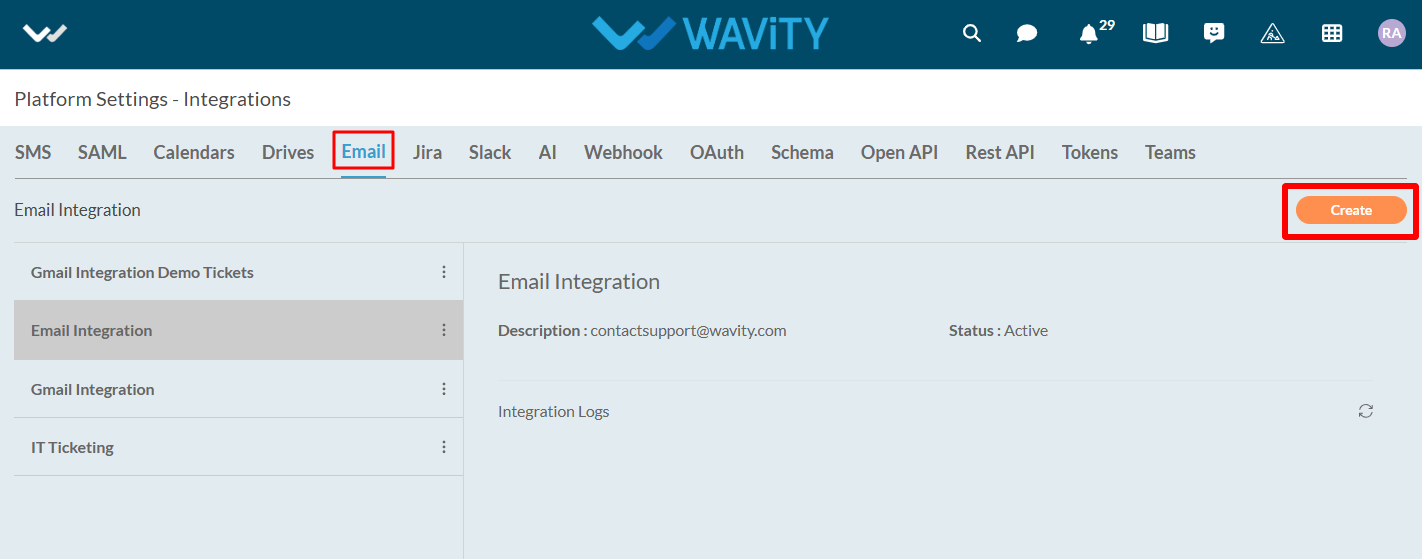
Enable Email Integration in Wavity
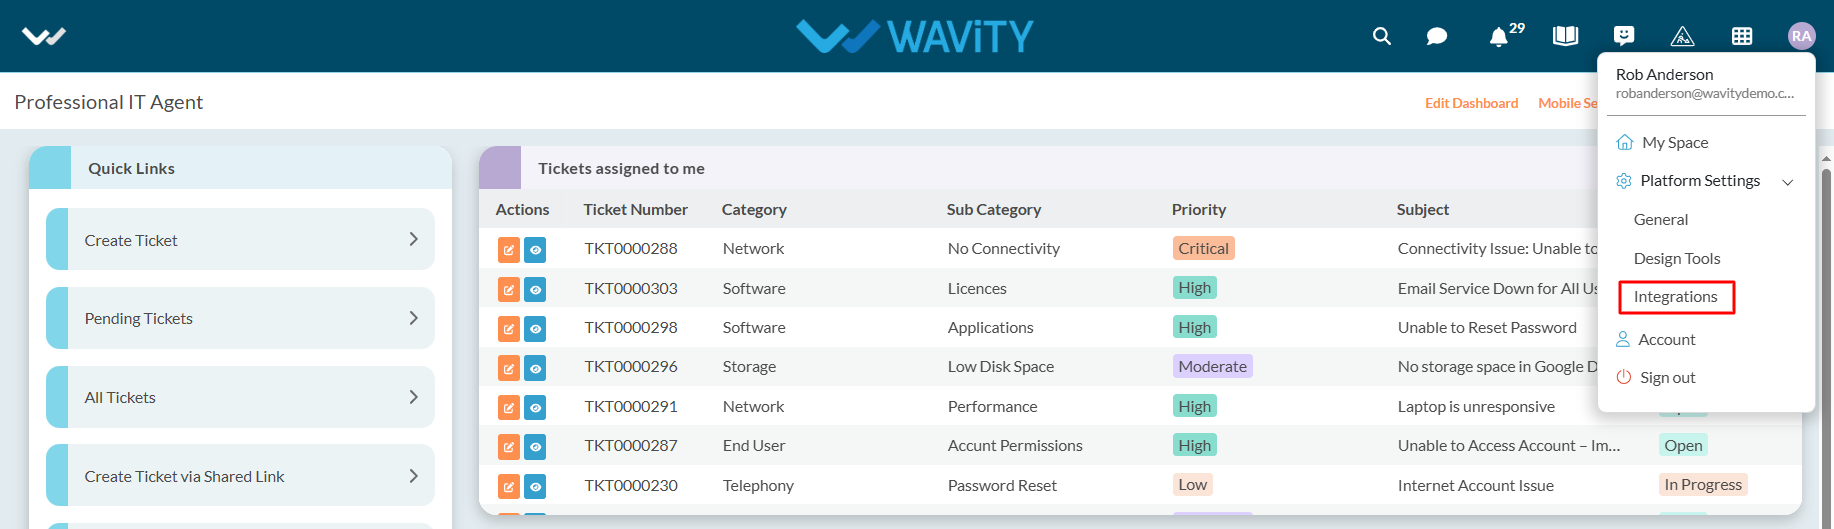
- To enable the email integration in Wavity, click on click on Profile >Integrations.
- Now, Click on “Create” button under Email section of the Integrations page as shown in below image.
- Under name & description, you can mention the email integration name and any further details under description for reference.
- Select “Microsoft Office365” as type of integration.
- You can also enable the type of integration required such as inbound or outbound or both.
- Click on “Click to link your account” button as shown in below image.
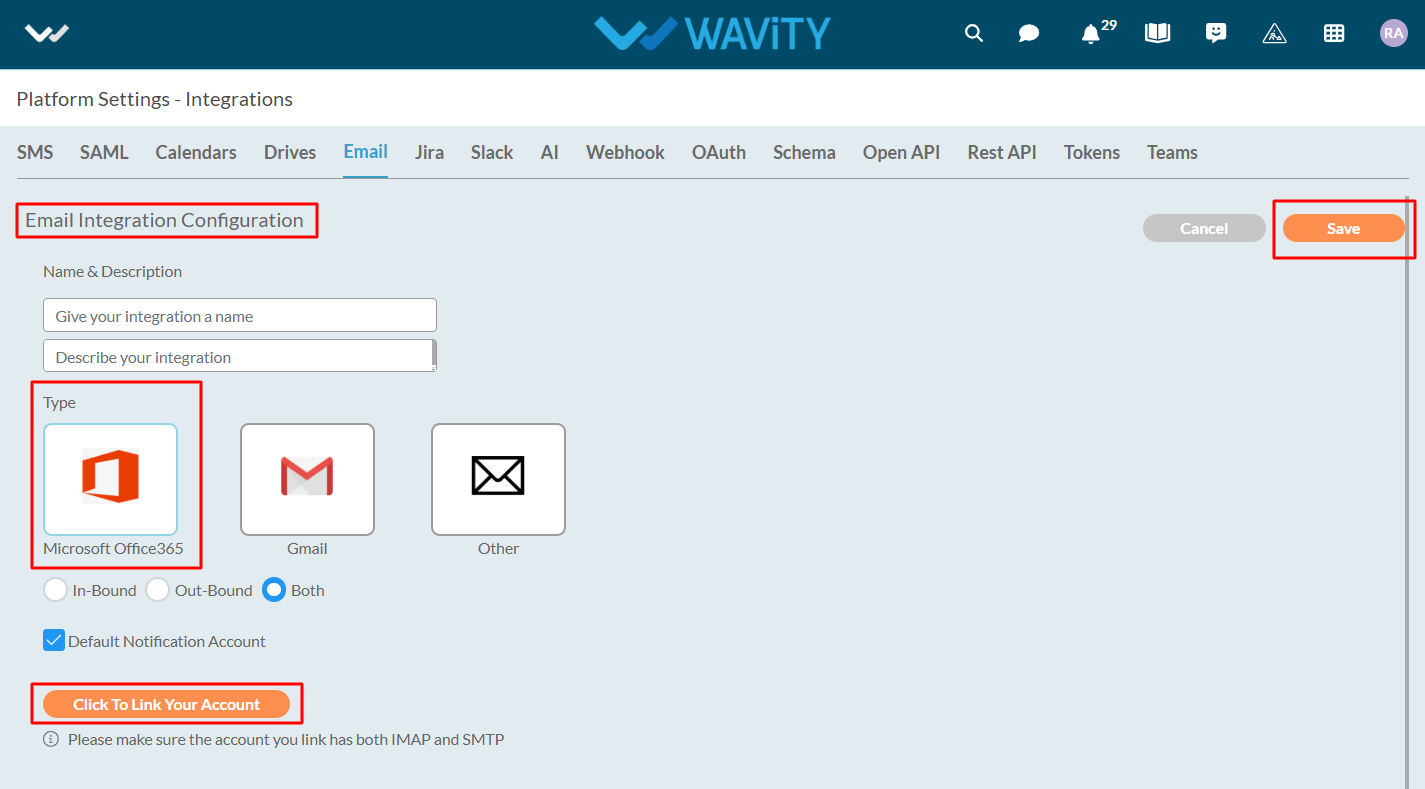
- You will receive a pop up message as shown below. Click on “Accept” to complete the process of linking your Microsoft account with Wavity.

Please follow the above steps to complete the process of linking your Microsoft Office email account with Wavity.
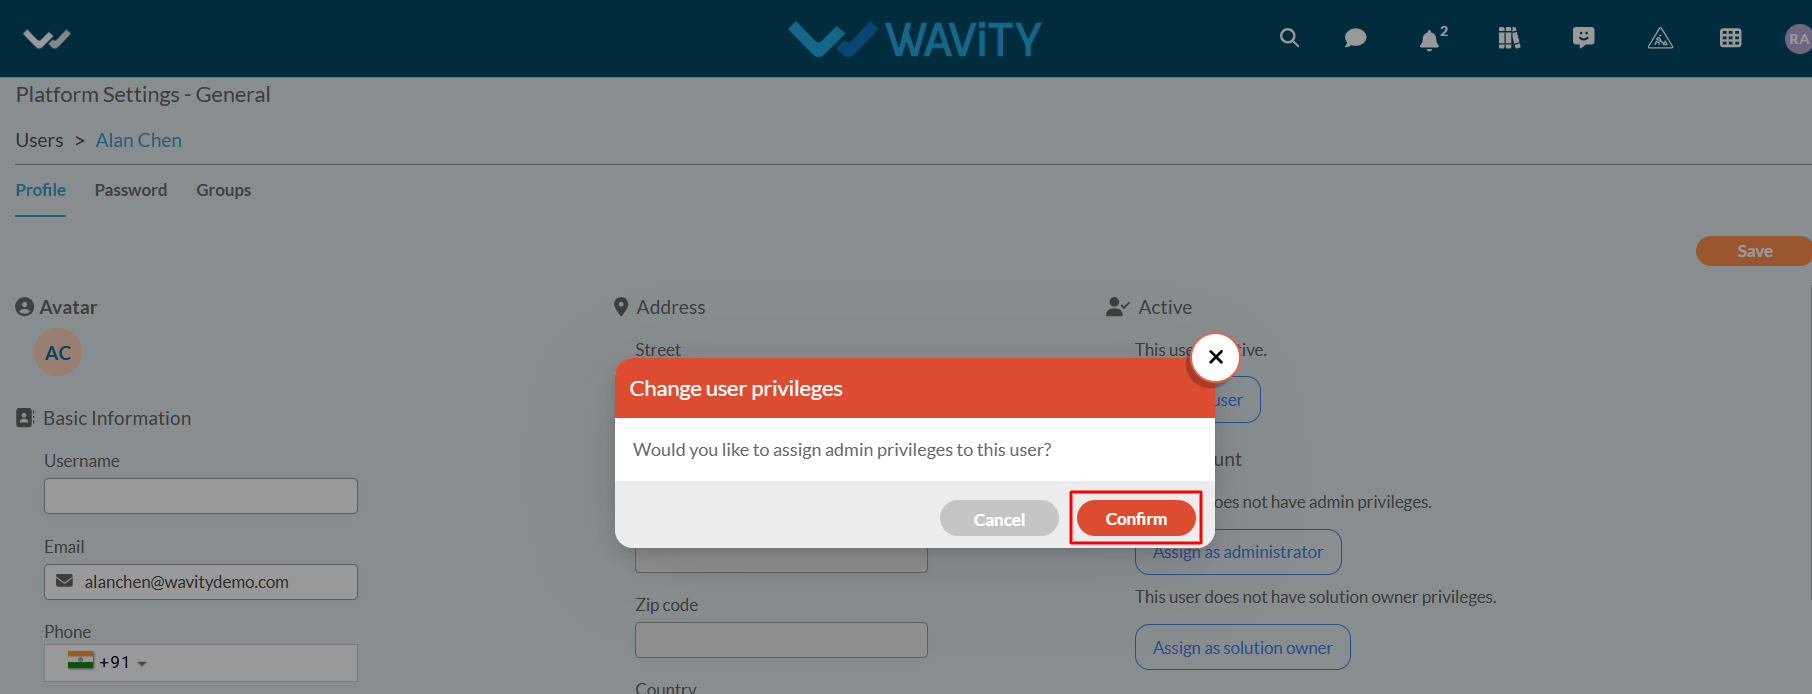
How to Grant Admin Rights to an Individual User?
- In the Wavity platform, the current active Admin of your organization can grant Admin rights to an individual user.
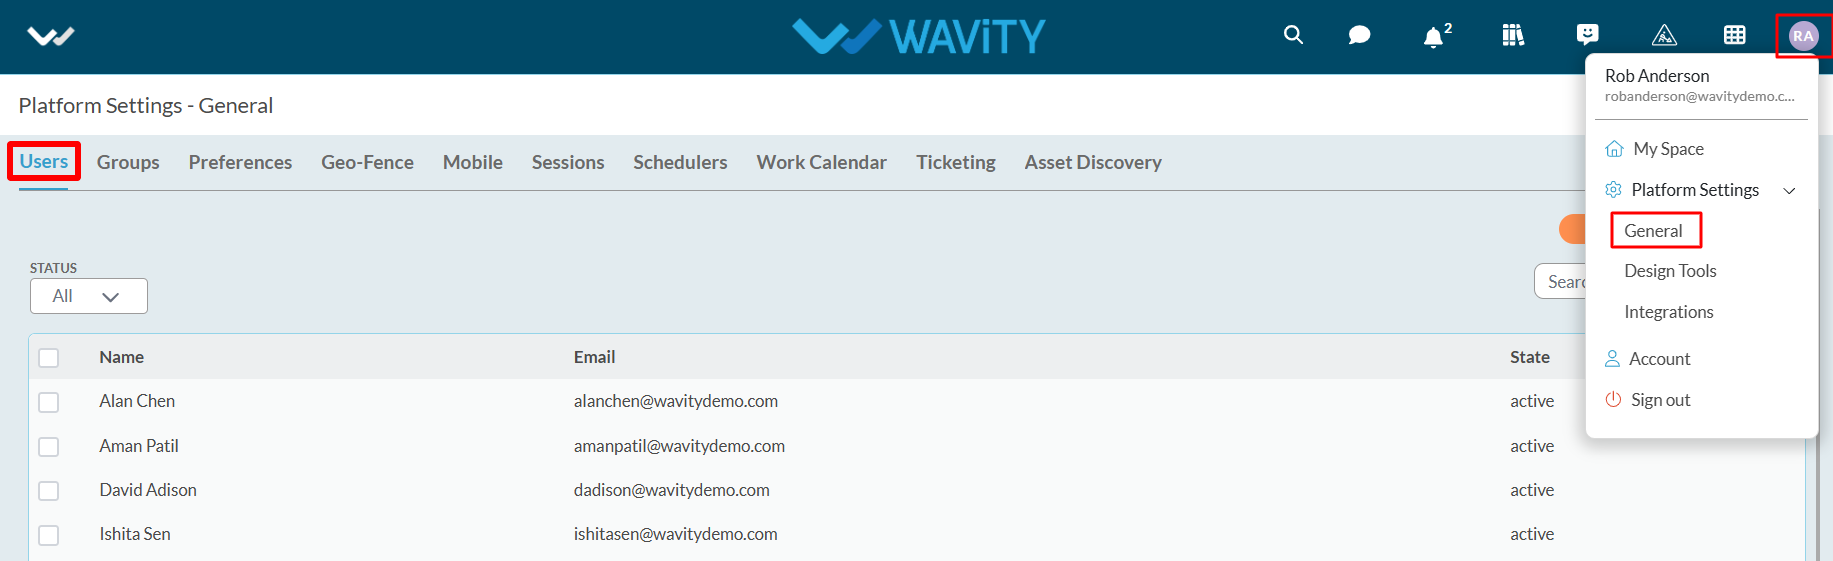
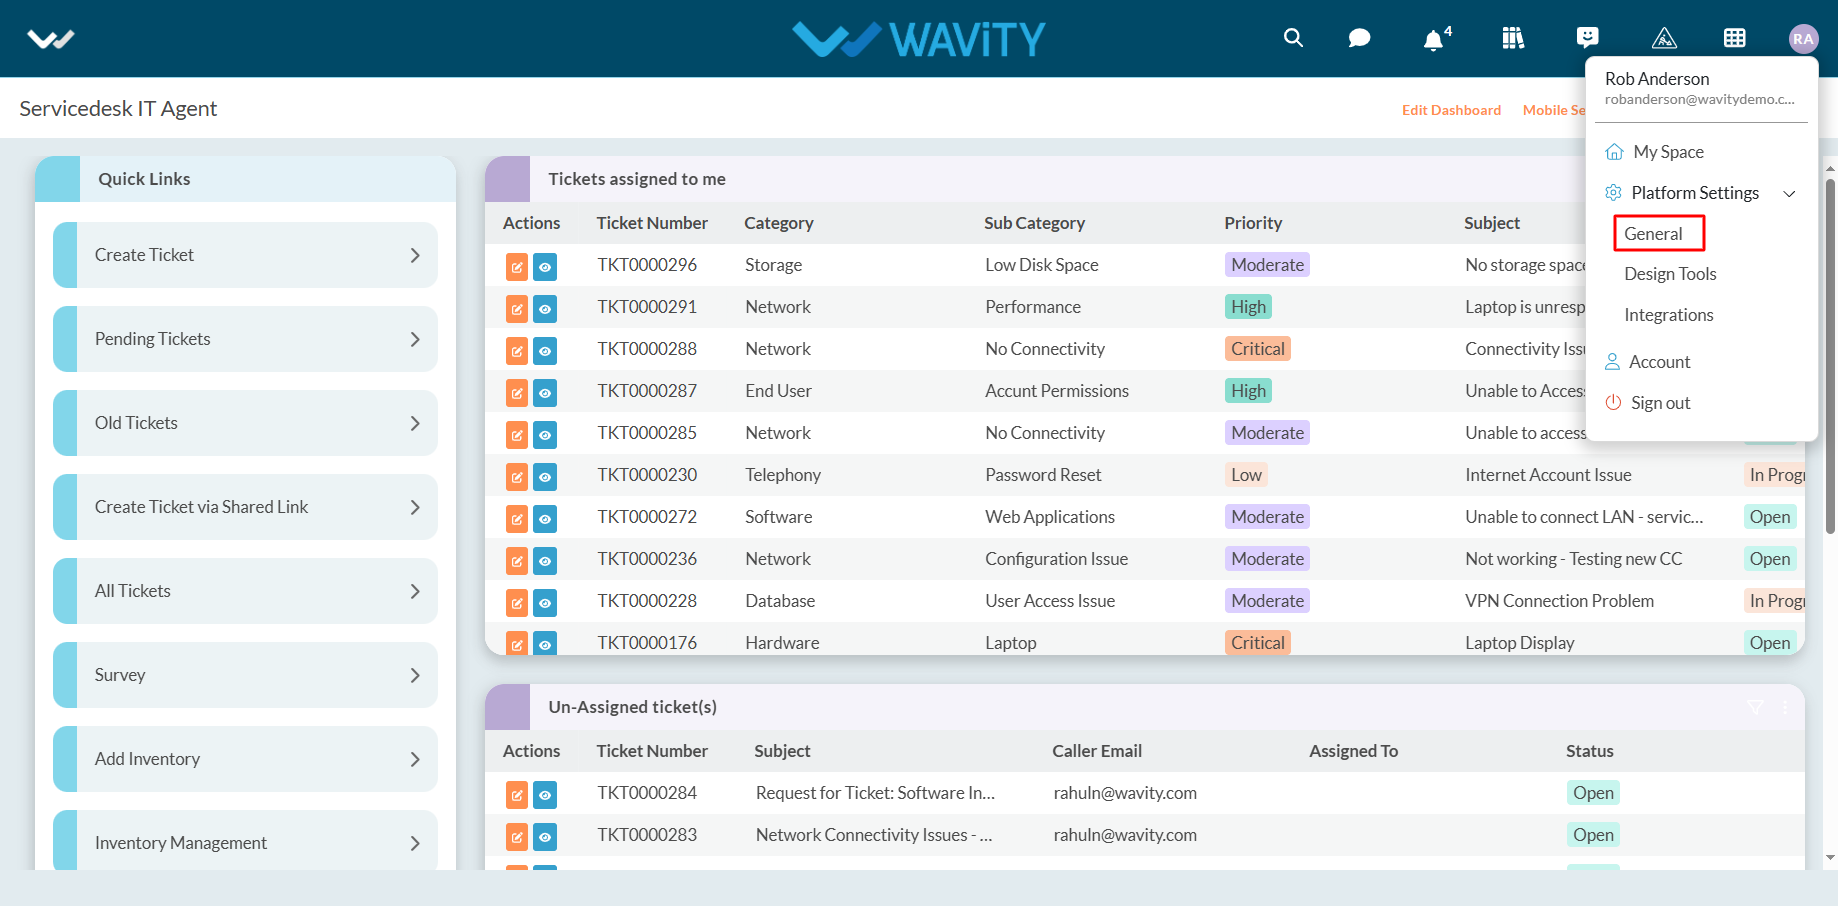
- To grant access, navigate to Profile Icon > Platform Settings –General > Users.
- Select the user to whom you want to grant Admin access. Then, click on the “Edit” button, as shown in the image below.

- The user's profile information will be displayed. Click on “Assign as Administrator” to grant Admin rights OR select “Assign as Solution Owner” to provide Solution Owner access.
- Administrator Access grants full control over the Wavity platform, including platform settings, integrations, design tools, App Designer, Workflow Automation tools (wBots) etc. In contrast, Solution Owner Access provides partial admin access, limited to the selected solution.
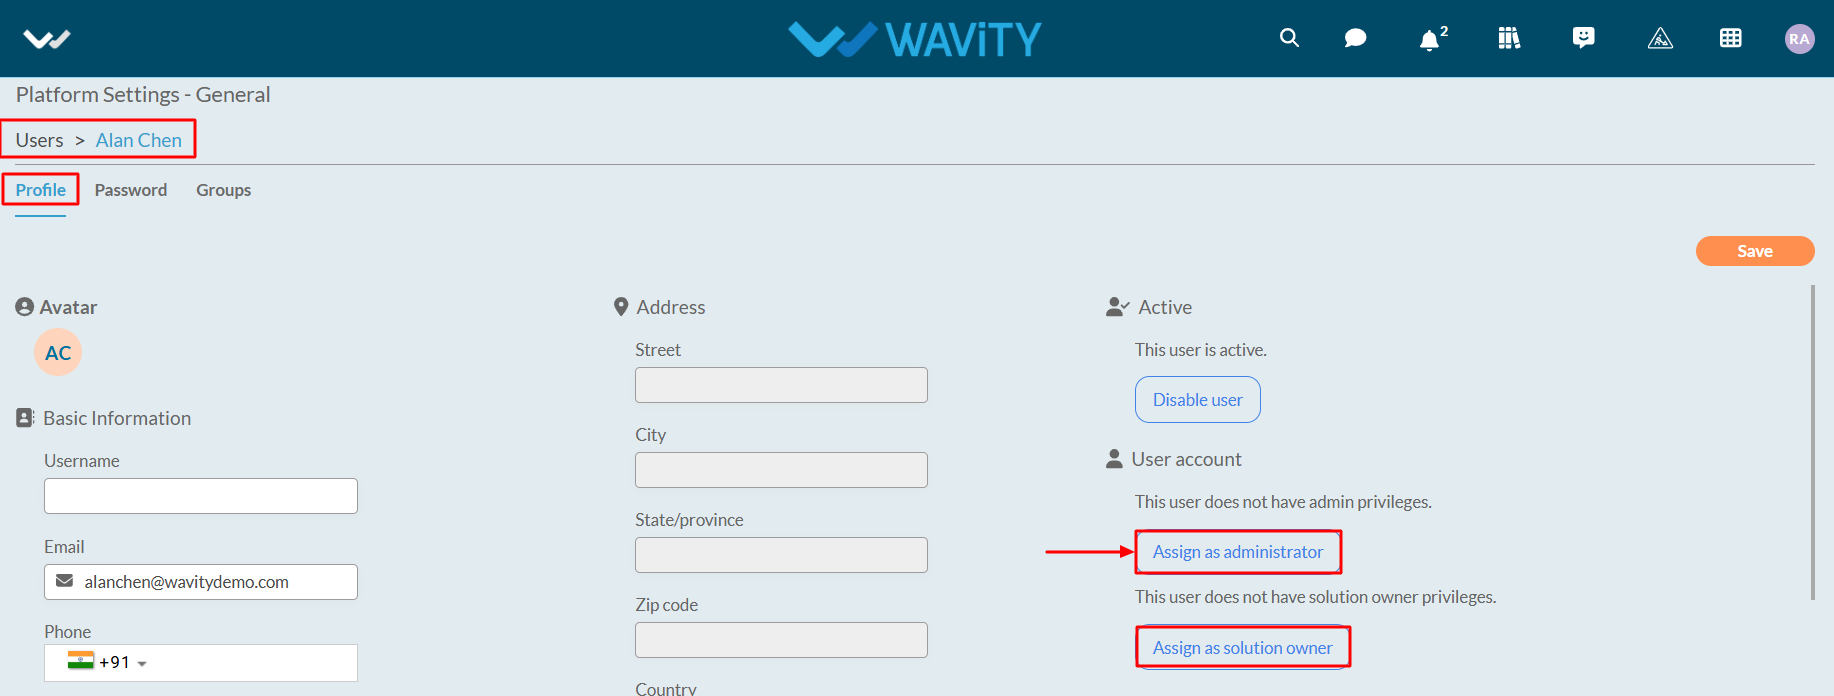
- Click on “Confirm” button to complete the process.
- Similarly, you can revoke Administrator access for a user by clicking on “Revoke Administrator Status” as shown in the image below.

How to enable Out of Office (OOO) Feature
- Admin/Solution Owner has the access to enable/disable Out of Office feature in the platform.
- First step is for Admin to enable “Out of Office” feature in the platform; click on Profile Icon > Platform Settings - General > Preferences. Click on ‘Checkbox’ to enable Out of office feature. Refer below image.
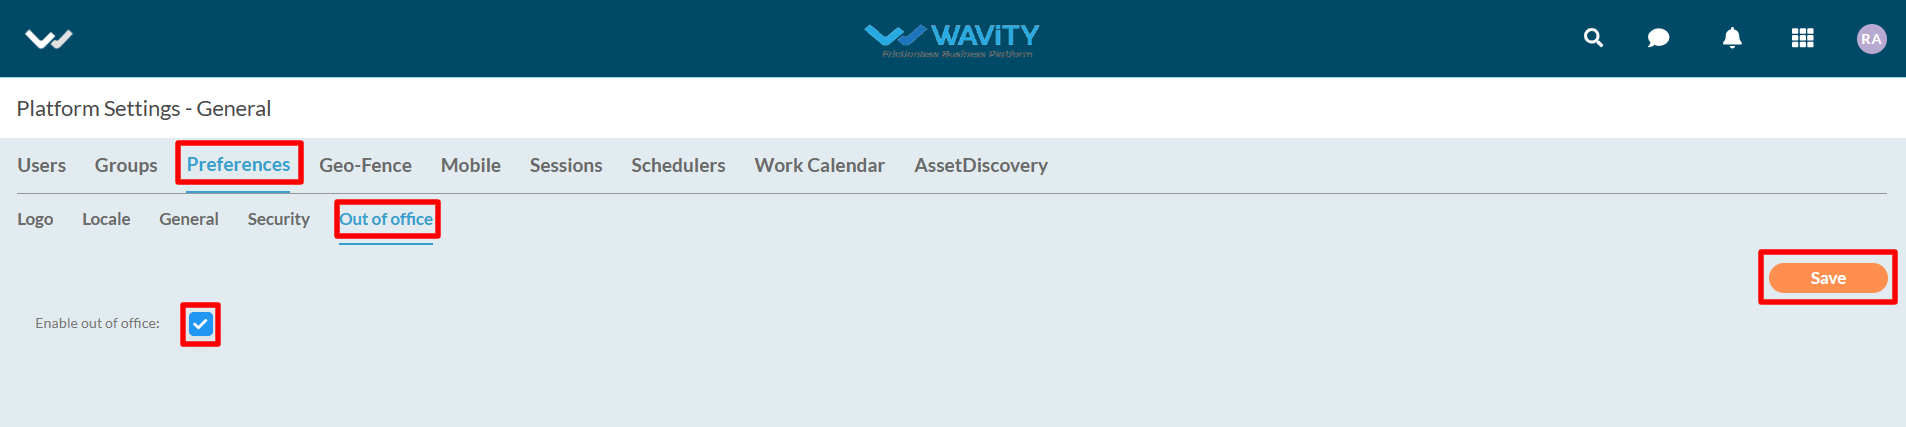
- Users within the platform can now activate the Out of Office option. When enabled for a specific user, assignments to that user will be suspended, and Service Level Agreements (SLAs) will not be taken into account during the designated period.
- For User to activate “Out of Office” for themselves, click on Profile Icon >Account. Refer below image.
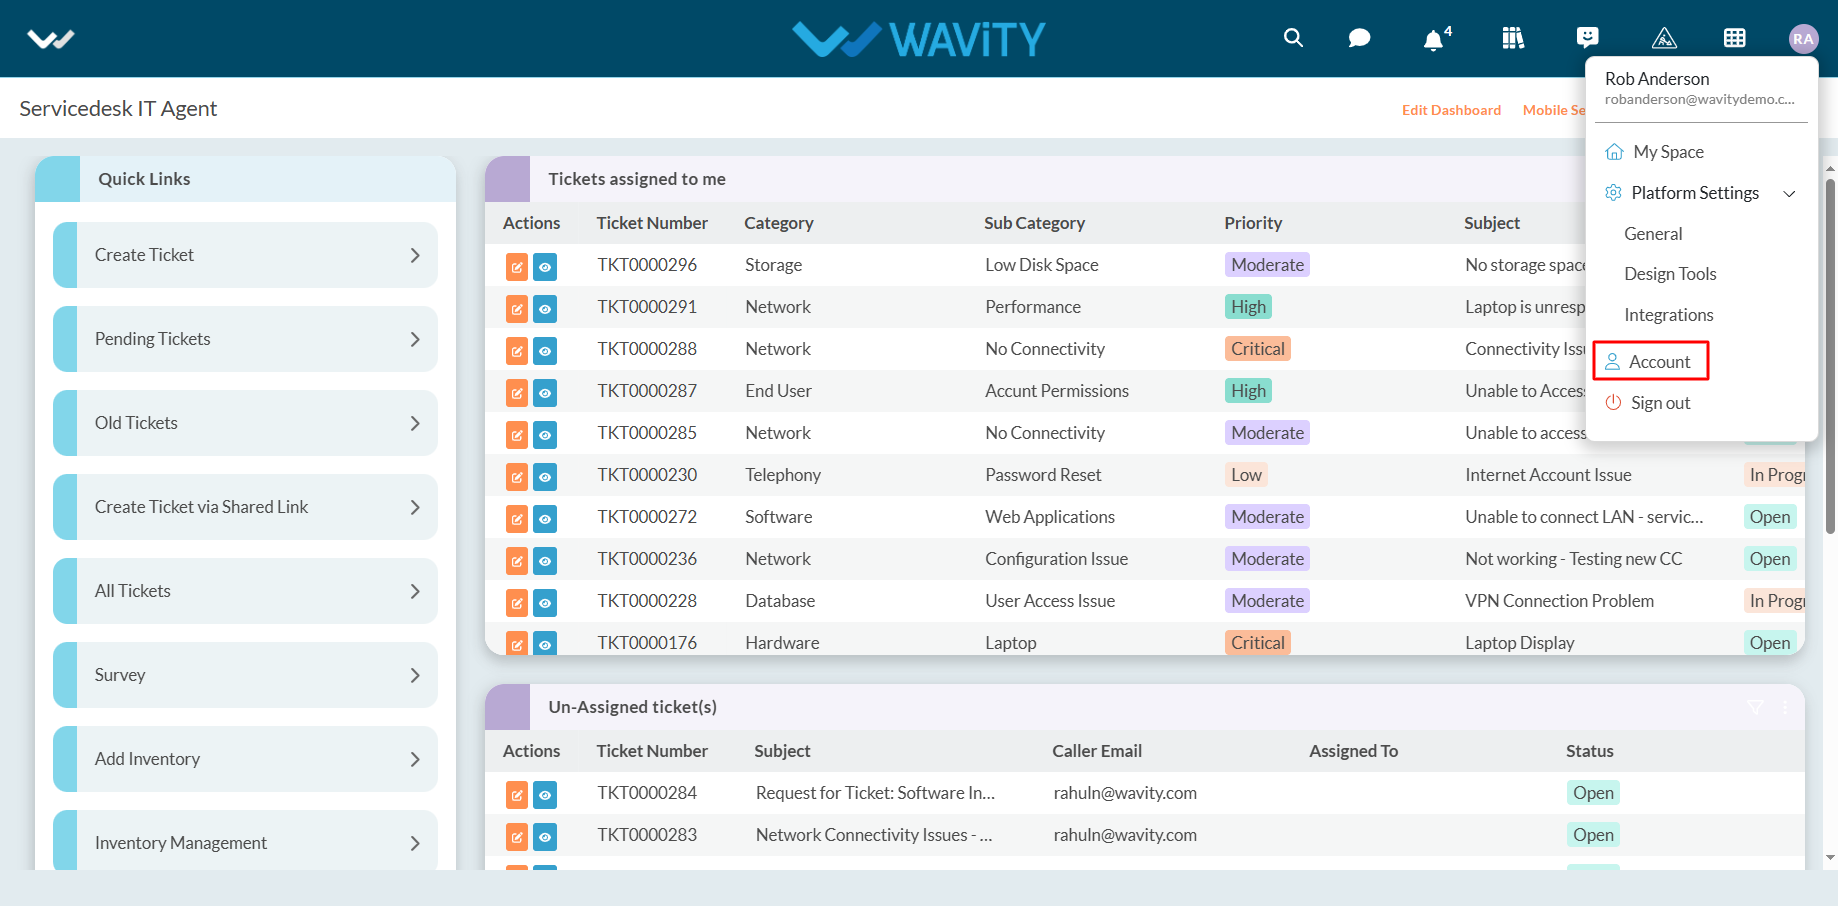
- Click on “Out of Office” section.

- Enable the ‘Checkbox’ beside “Enable Out of Office”. Now, User can enter the start time and end time. Click on “Save” button to complete the process.

How to use the activation link to activate your account
- Once an Administrator adds a user to the platform, the designated user will receive an email notification containing an activation link and activation code required to set up their account. Please be advised that the activation link will expire after a specified period of time.
- User shall click on the click from the mail as shown in below image.
- After clicking on the activation link, a new window will open, prompting the user to reset their password, as shown in the image below. Once the password is set, the user can log in to the platform by entering their valid credentials, including their email ID and password.
How to edit user details
- “Users” typically refer to individuals or groups of individuals who consume IT services provided by the IT department or service provider.
- In Wavity ITSM solution, users refer to individuals or groups who interact with the system to request, access, or use IT services. These users can be categorized into various roles, such as end-users, customers, service desk agents, technicians, managers, and administrators.
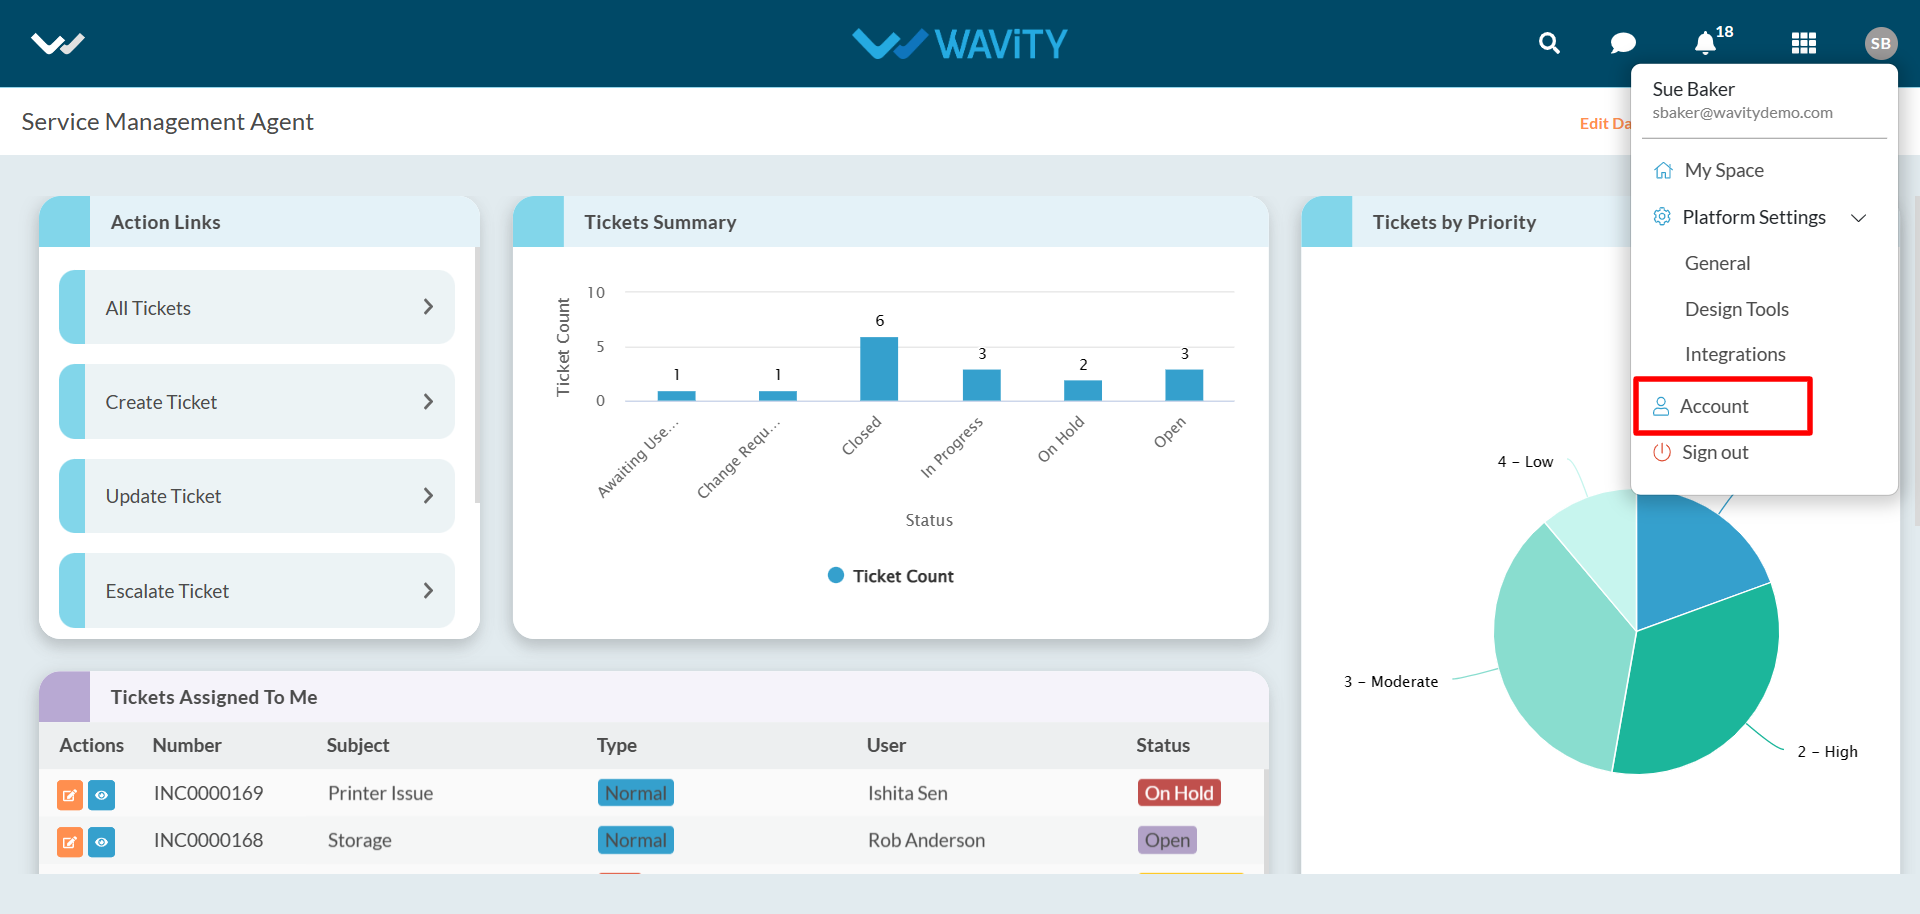
- Click on “Profile Icon” as shown in below image. This will display your User Name and Email id linked to your Wavity Account.
- Click on “Account” as shown below to view/edit your profile.
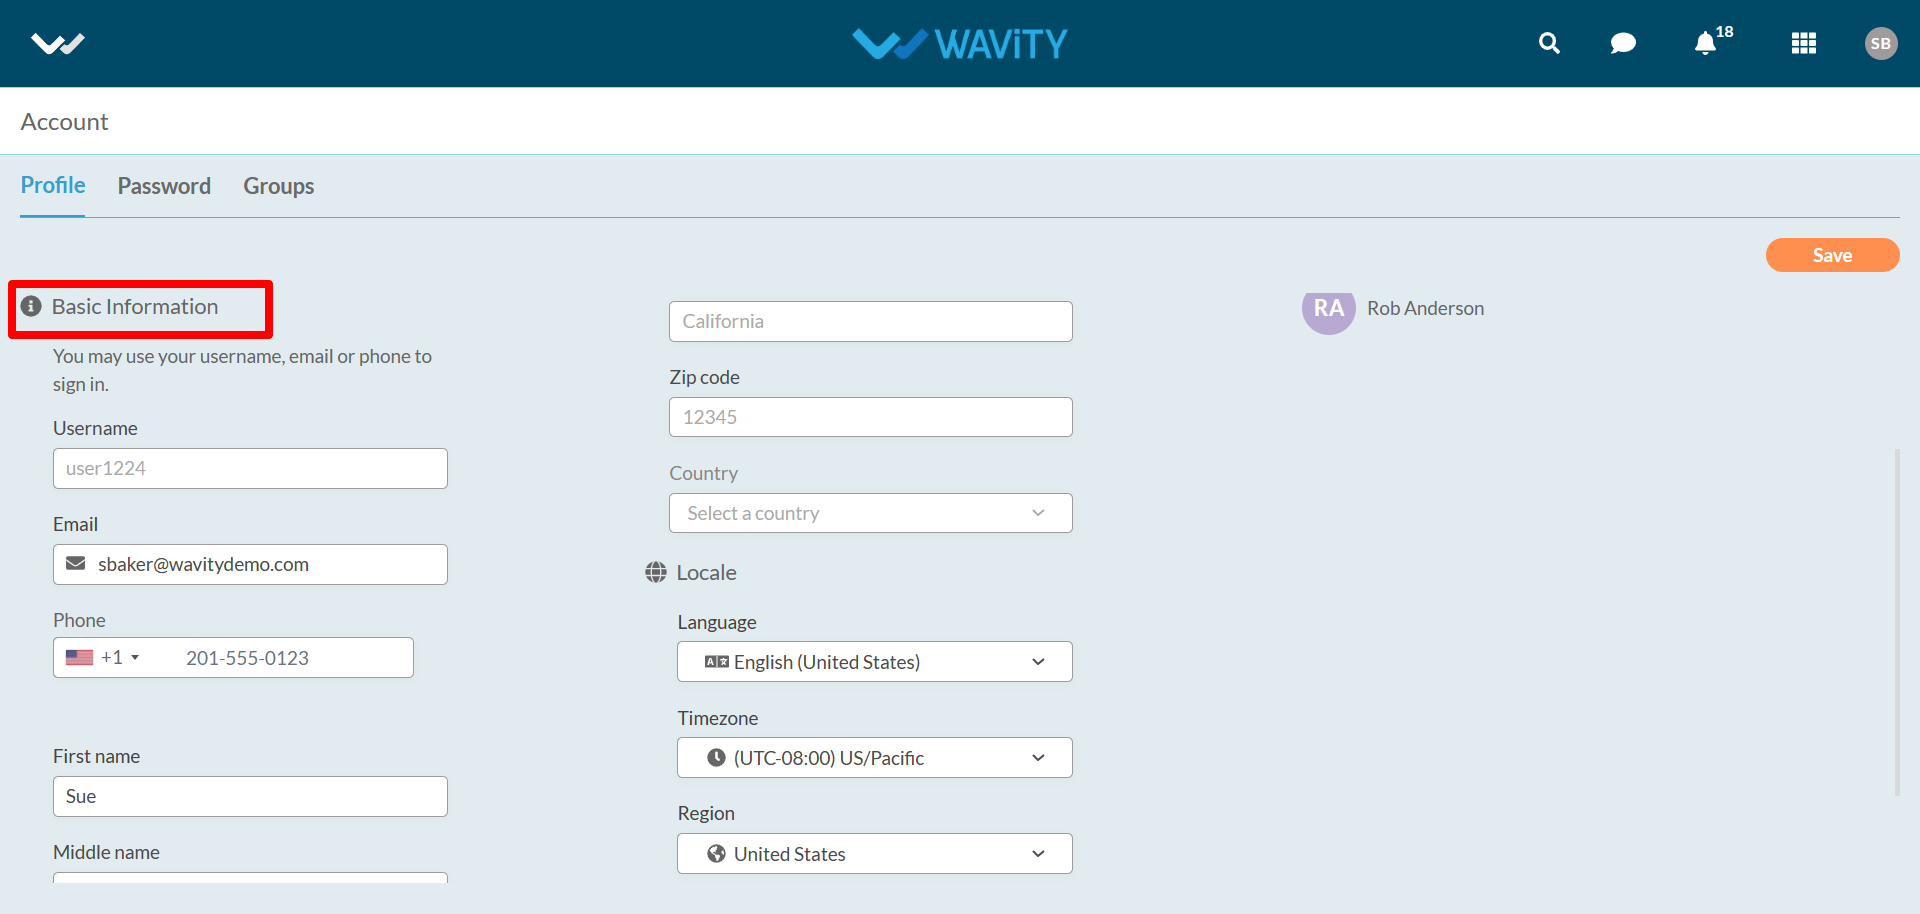
- You can edit/view your Username, Email ID (Linked with Wavity) and your initials such as First name and Last Name under Basic Information.
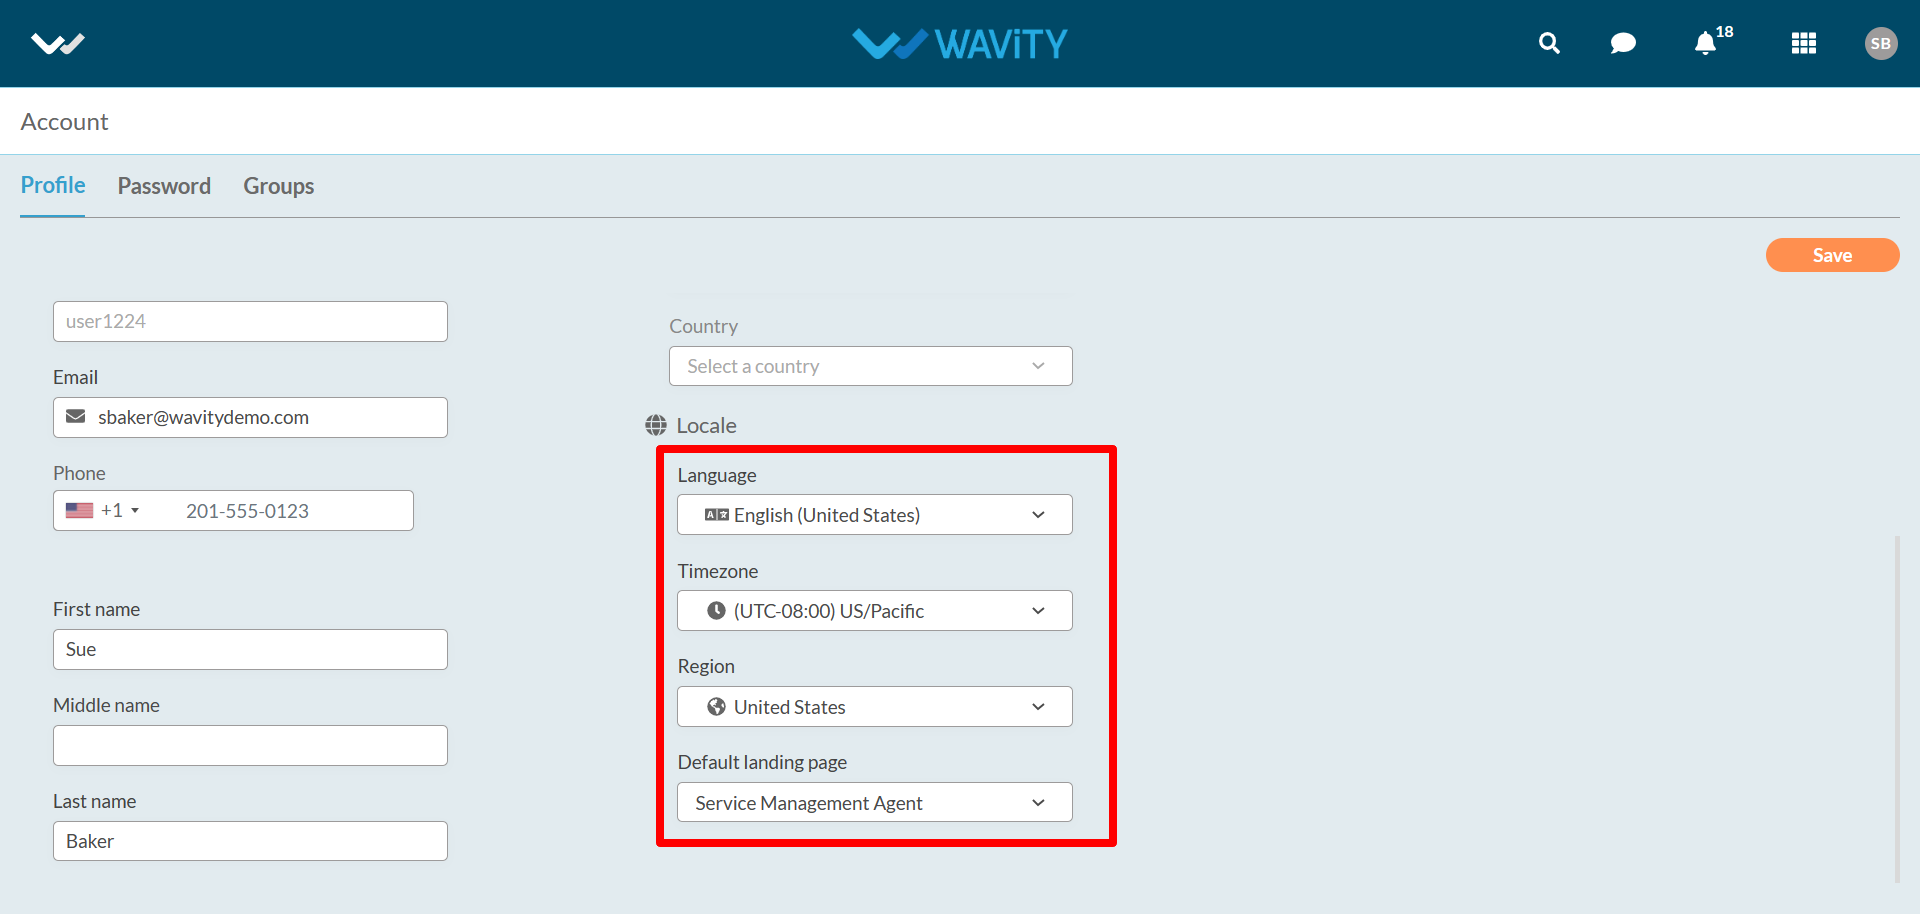
- Under ‘Locale’, Users can set the language of the system, select relevant timezone, select Region and Set your landing page.
- By default, Users will land directly to the landing page they have selected once logged in. For example: Agents in Wavity ITSM solution will land to Agent dashboard after logging in.
- Note: As an admin can able to edit user first name, last name and middle name. But as a user he/her can able to edit all the details along with default landing page.
- Users can view the “Status”, “Type of Account” and “Assigned Manager” as shown below.
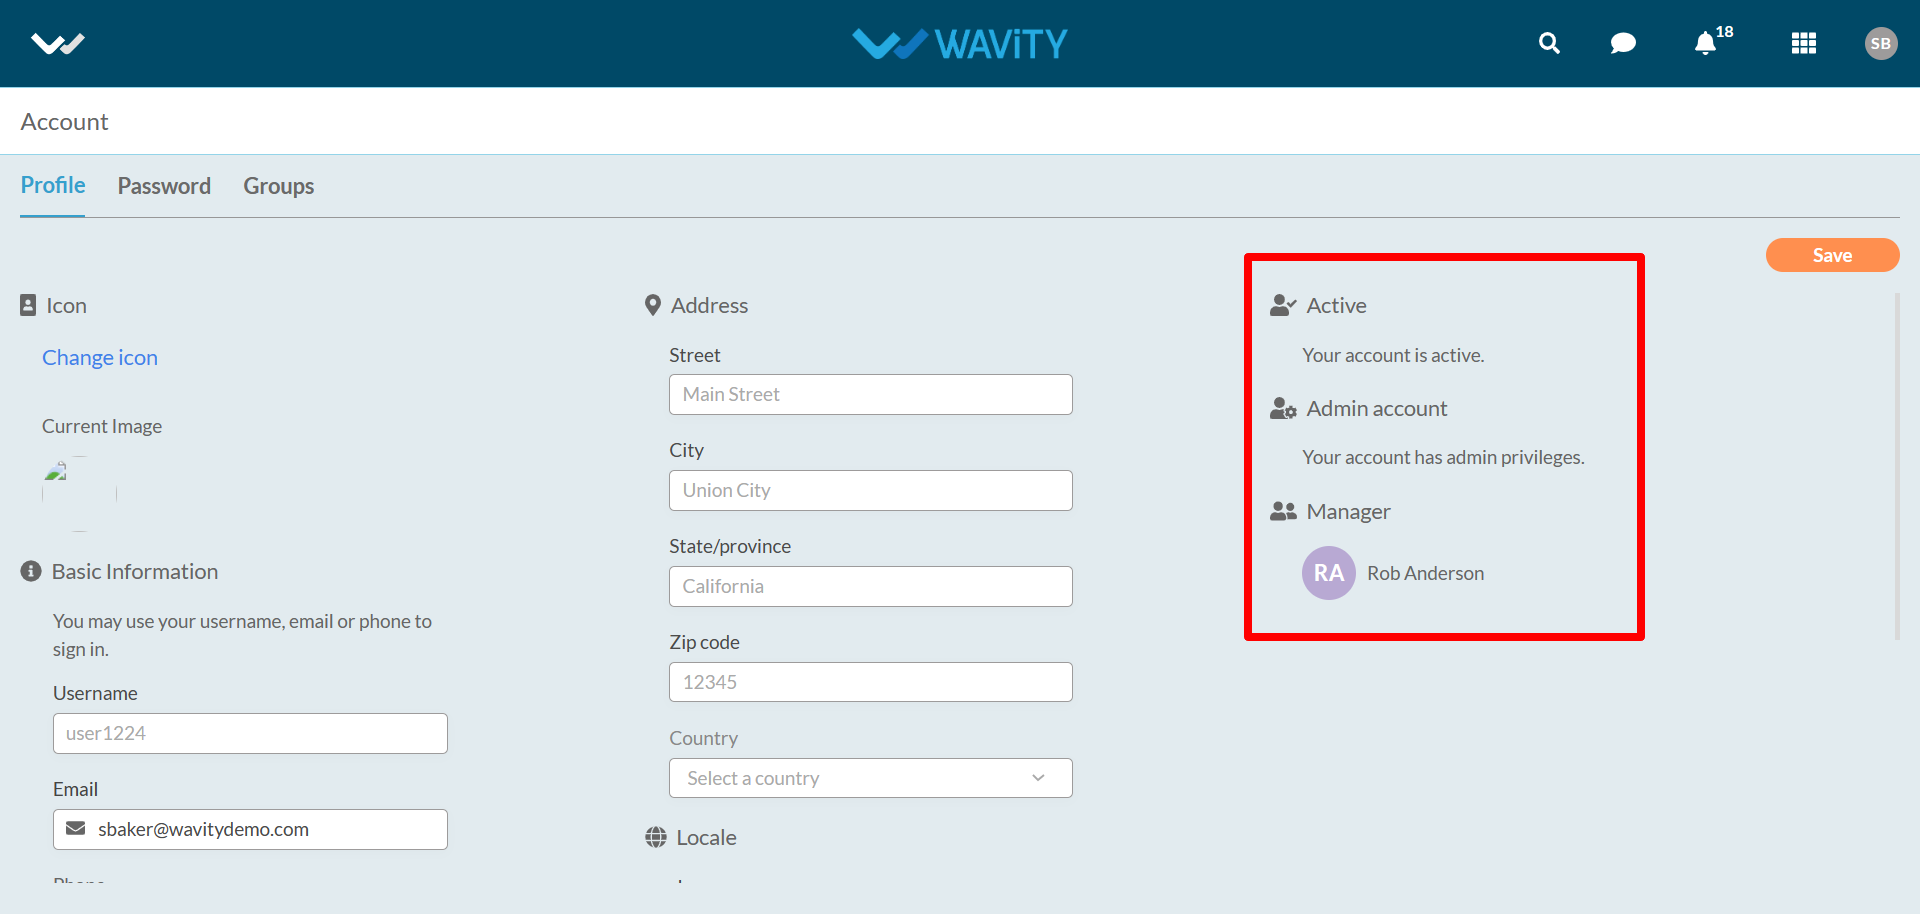
- Users can set passwords if required under “Password” section. They can view all the groups they are part of under “Groups” section.
How to delete a user in Wavity?
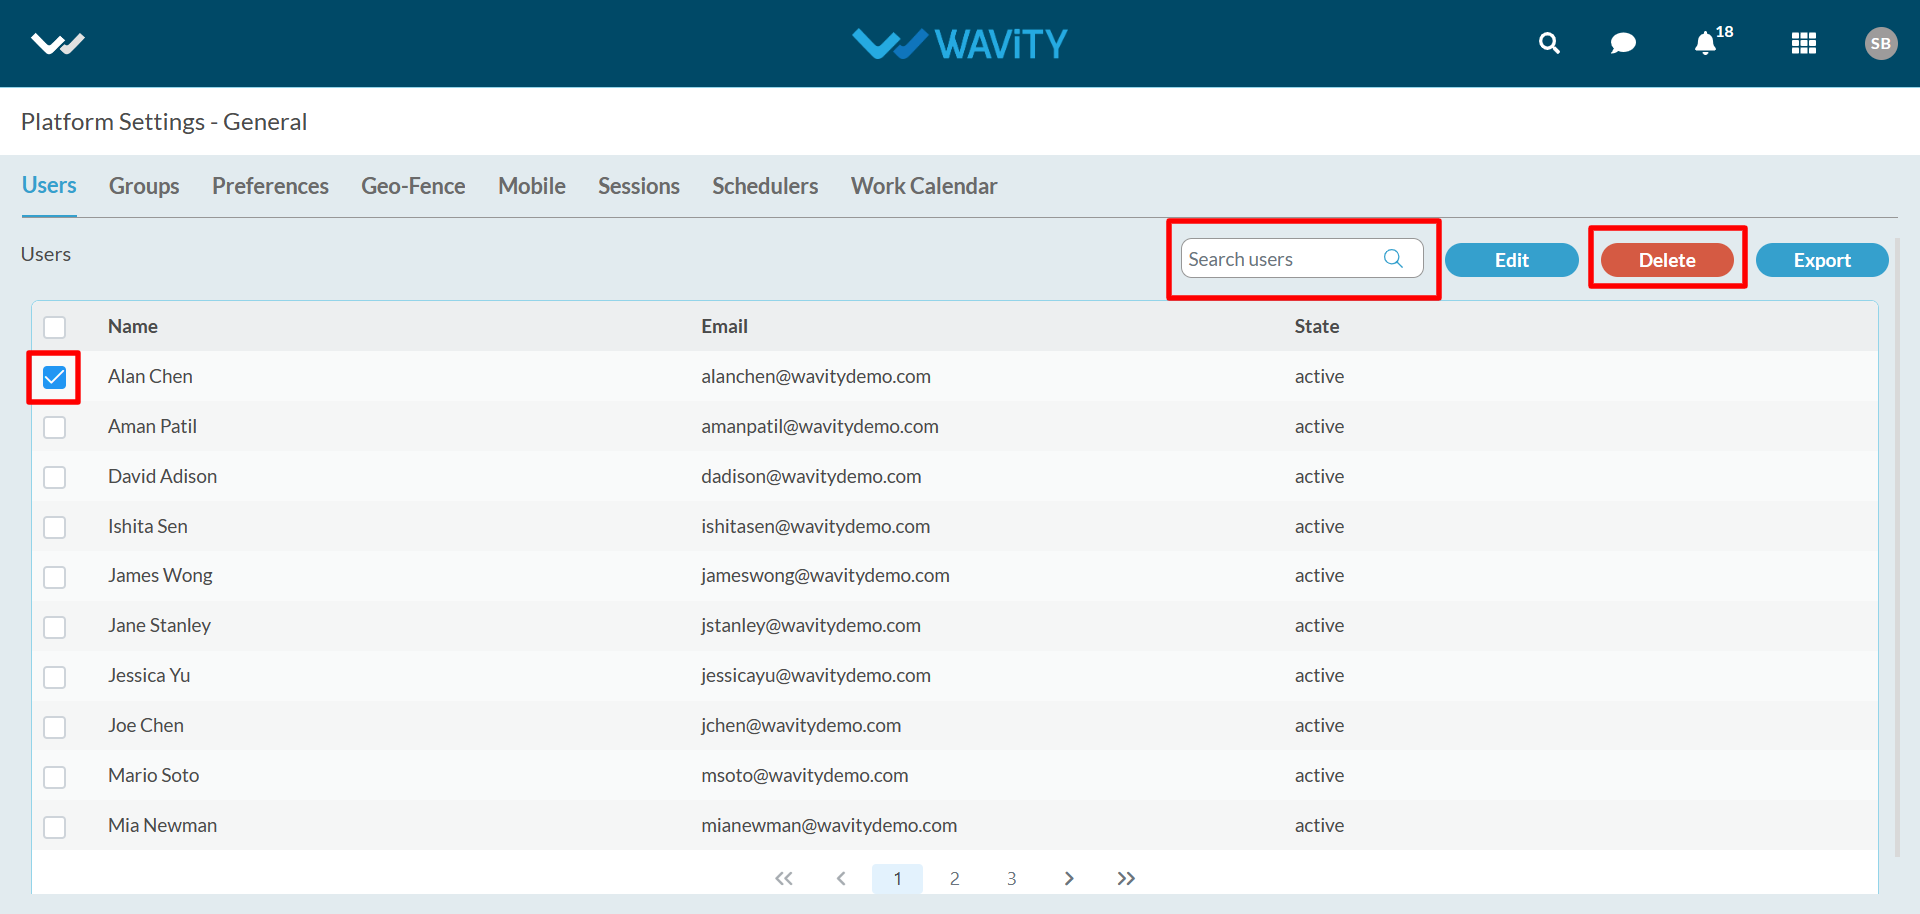
- In the Wavity platform, only an Admin has the authority to permanently delete or remove a user's access.
- Under profile icon, select ‘General’ to view the users list.
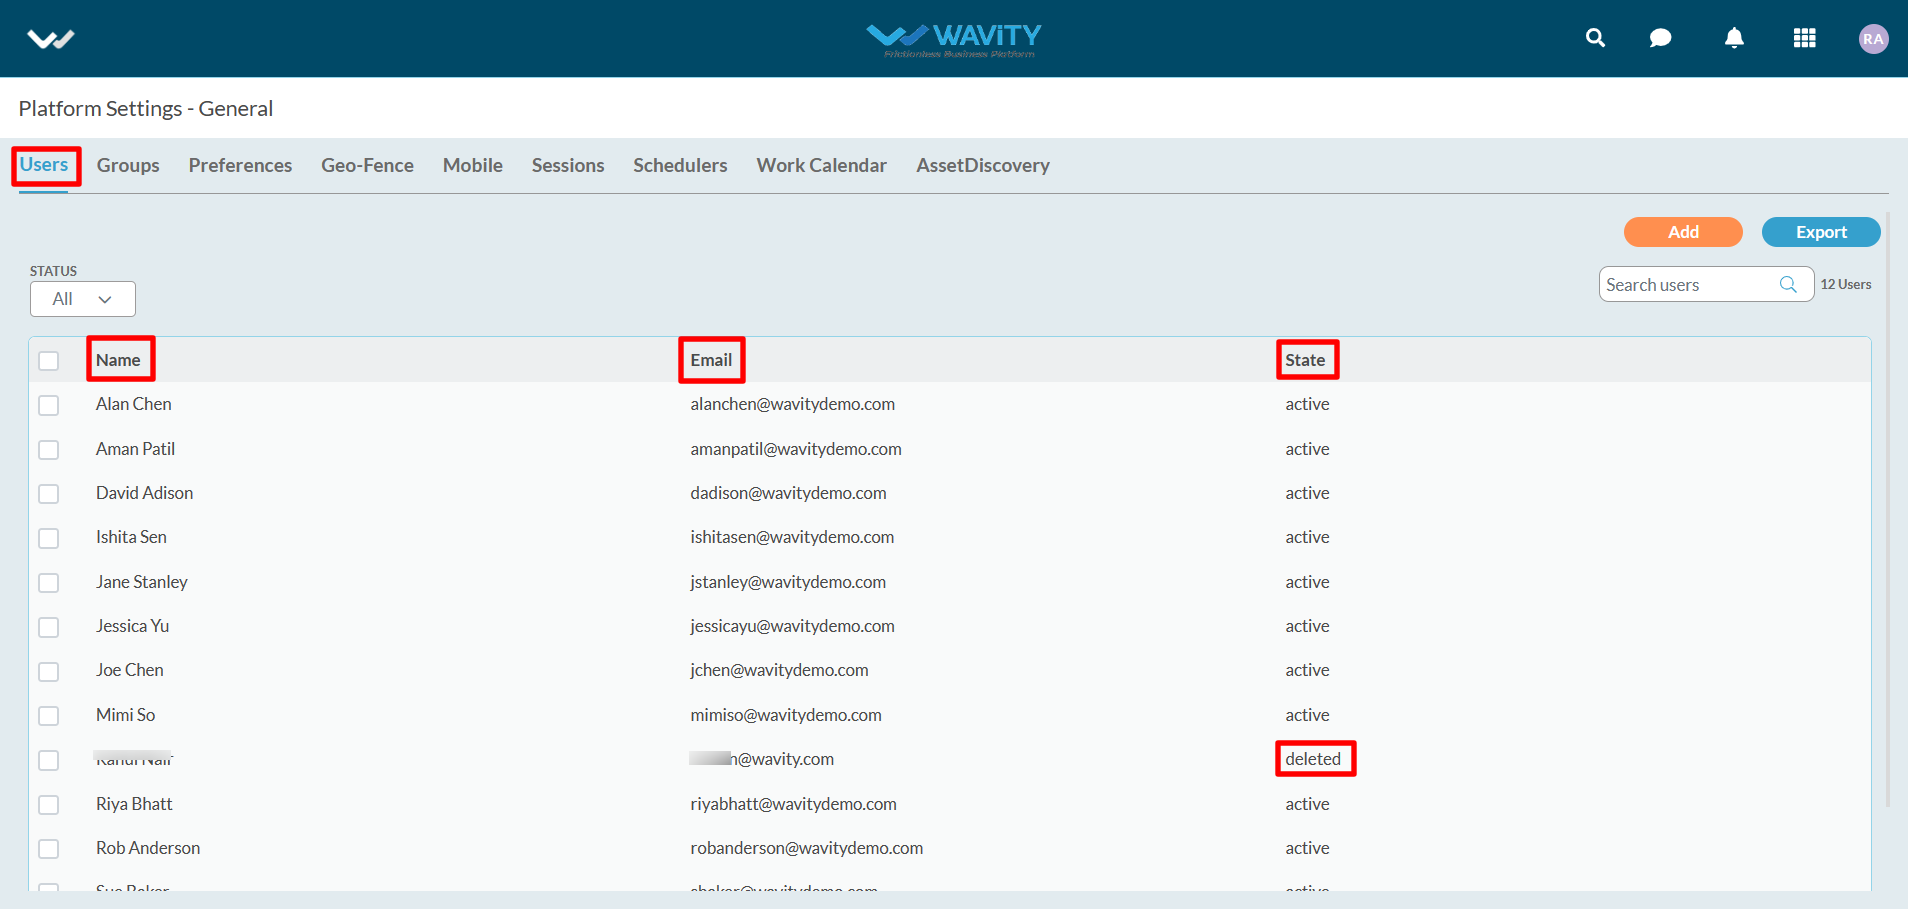
- All current users along with account status will be shown in the list as shown below. You can click check box next to the user. You can also search for an individual user using the “search box”.
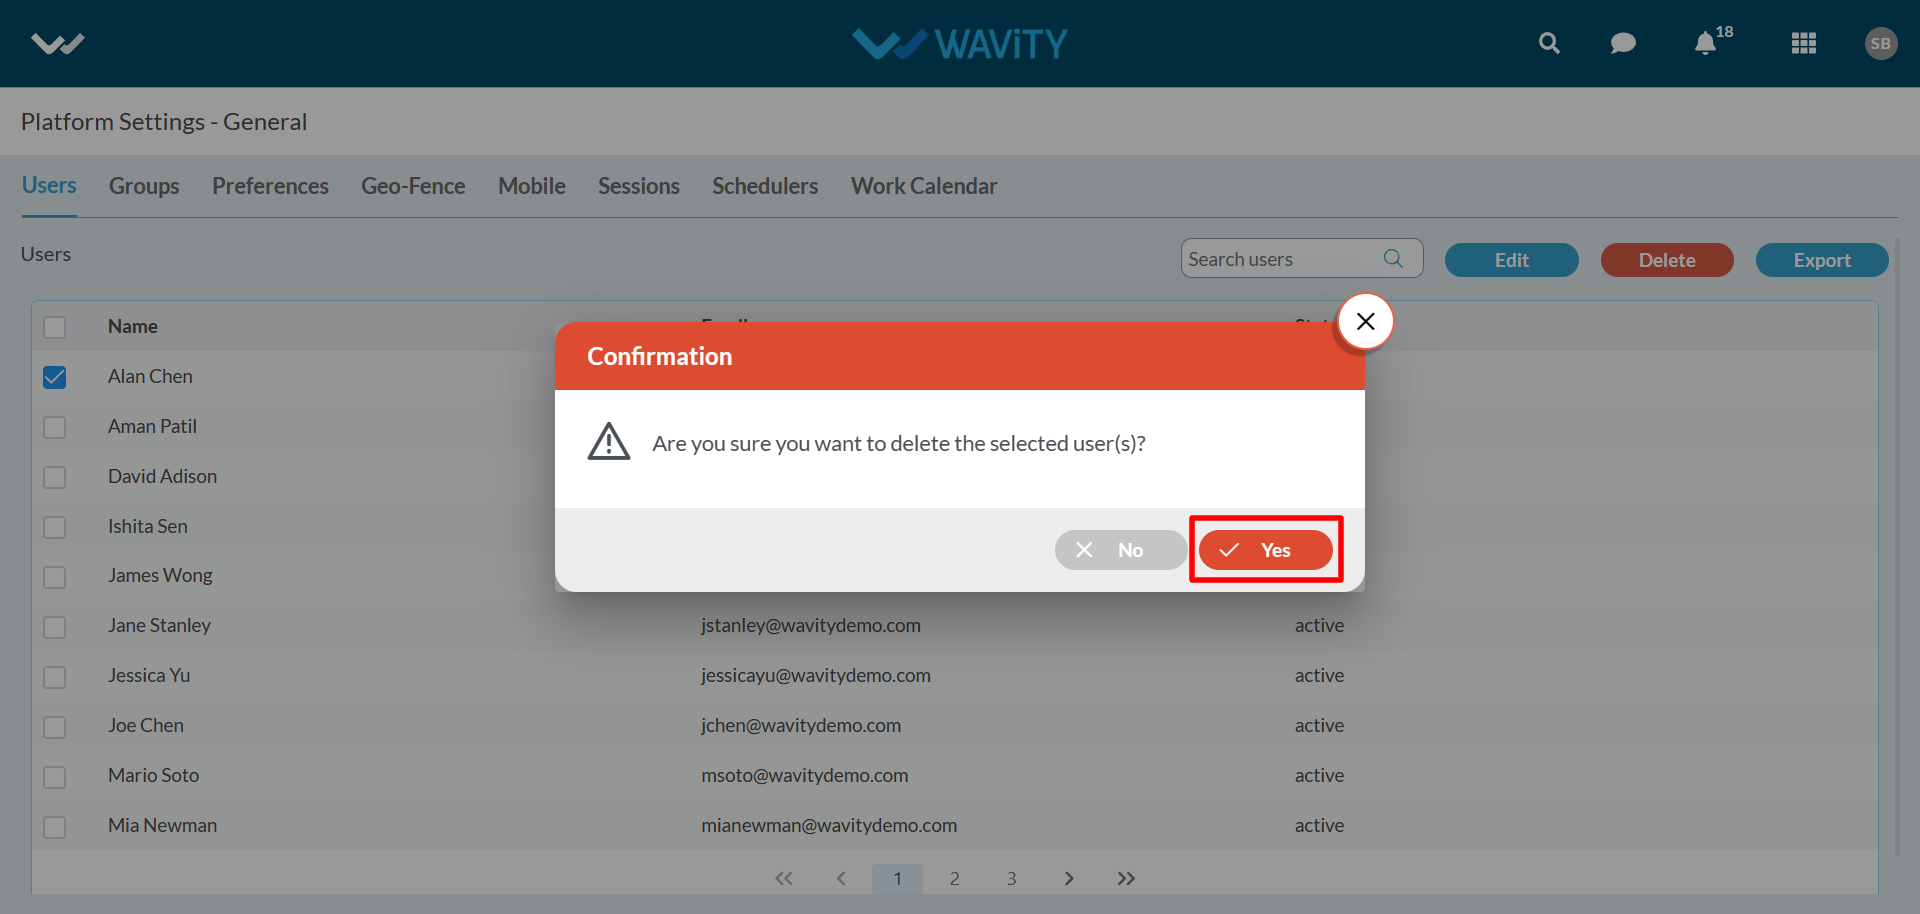
- Select “Delete” button.
- Click on “Yes” in the confirmation popup to delete the user from the platform permanently.
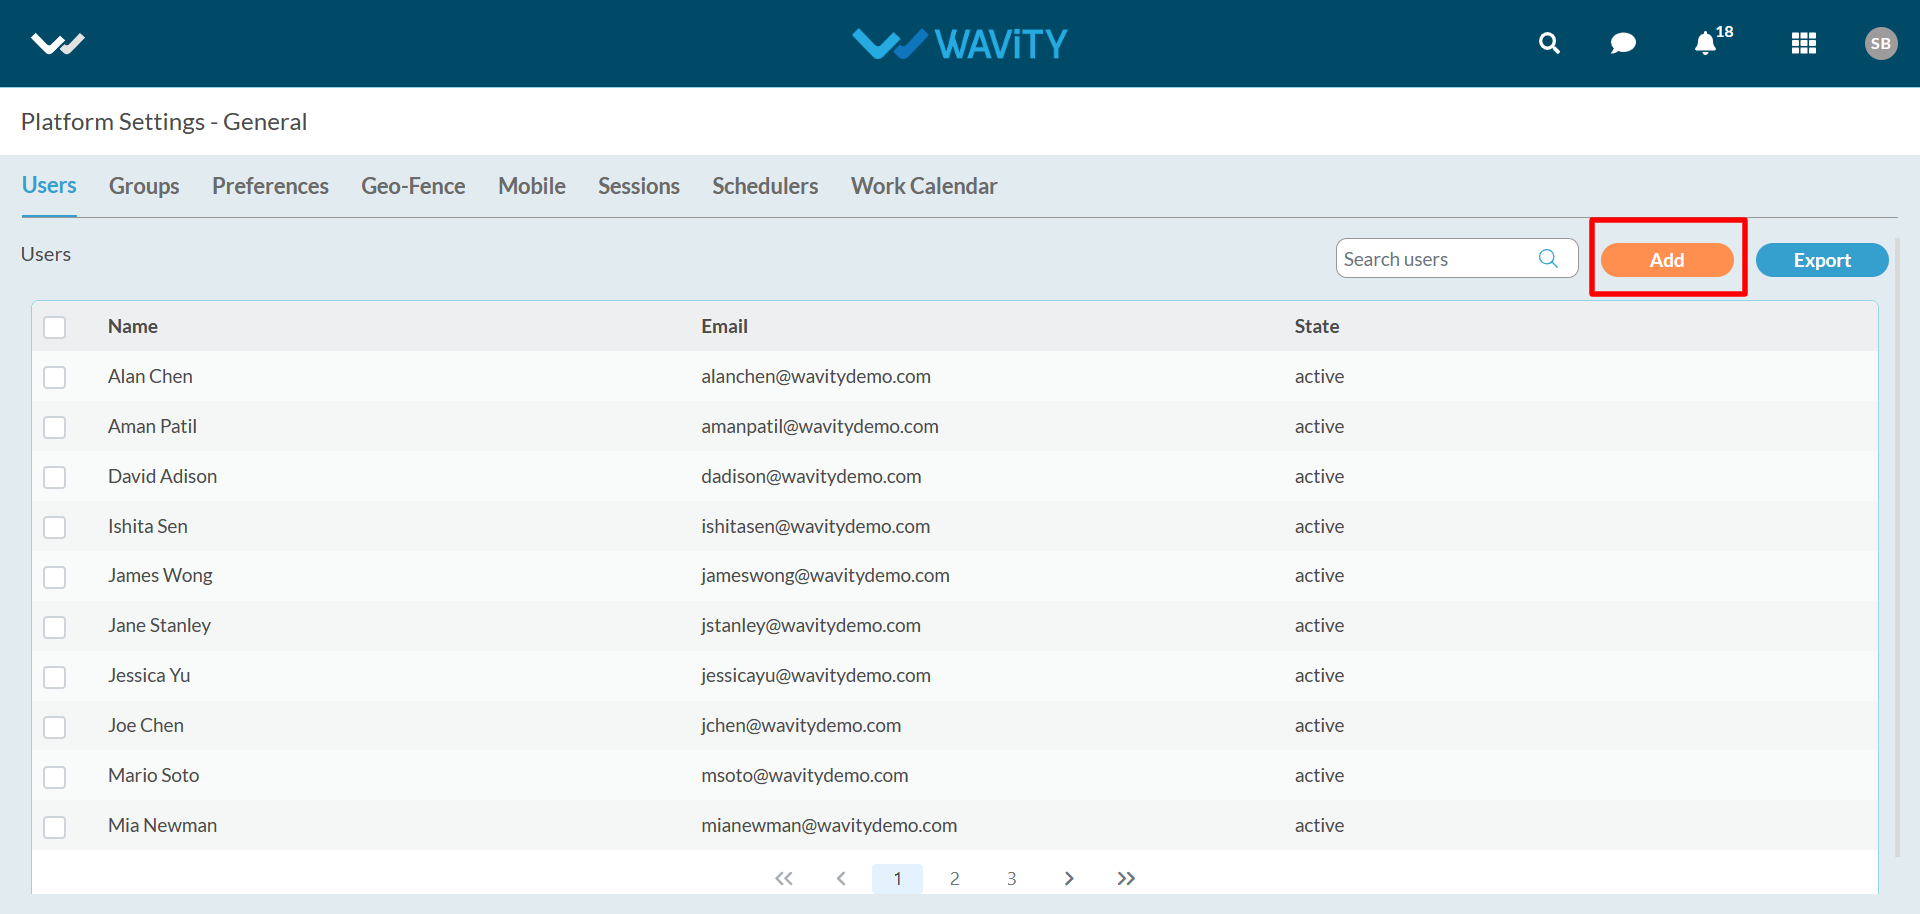
How to Add Users in Bulk
- In Wavity ITSM solution, users refer to individuals or groups who interact with the system to request, access, or use IT services. These users can be categorized into various roles, such as end-users, customers, service desk agents, technicians, managers, and administrators.
- Only an Admin has the authority to add users in Bulk.
- Click on “General” under profile icon as shown in below image.
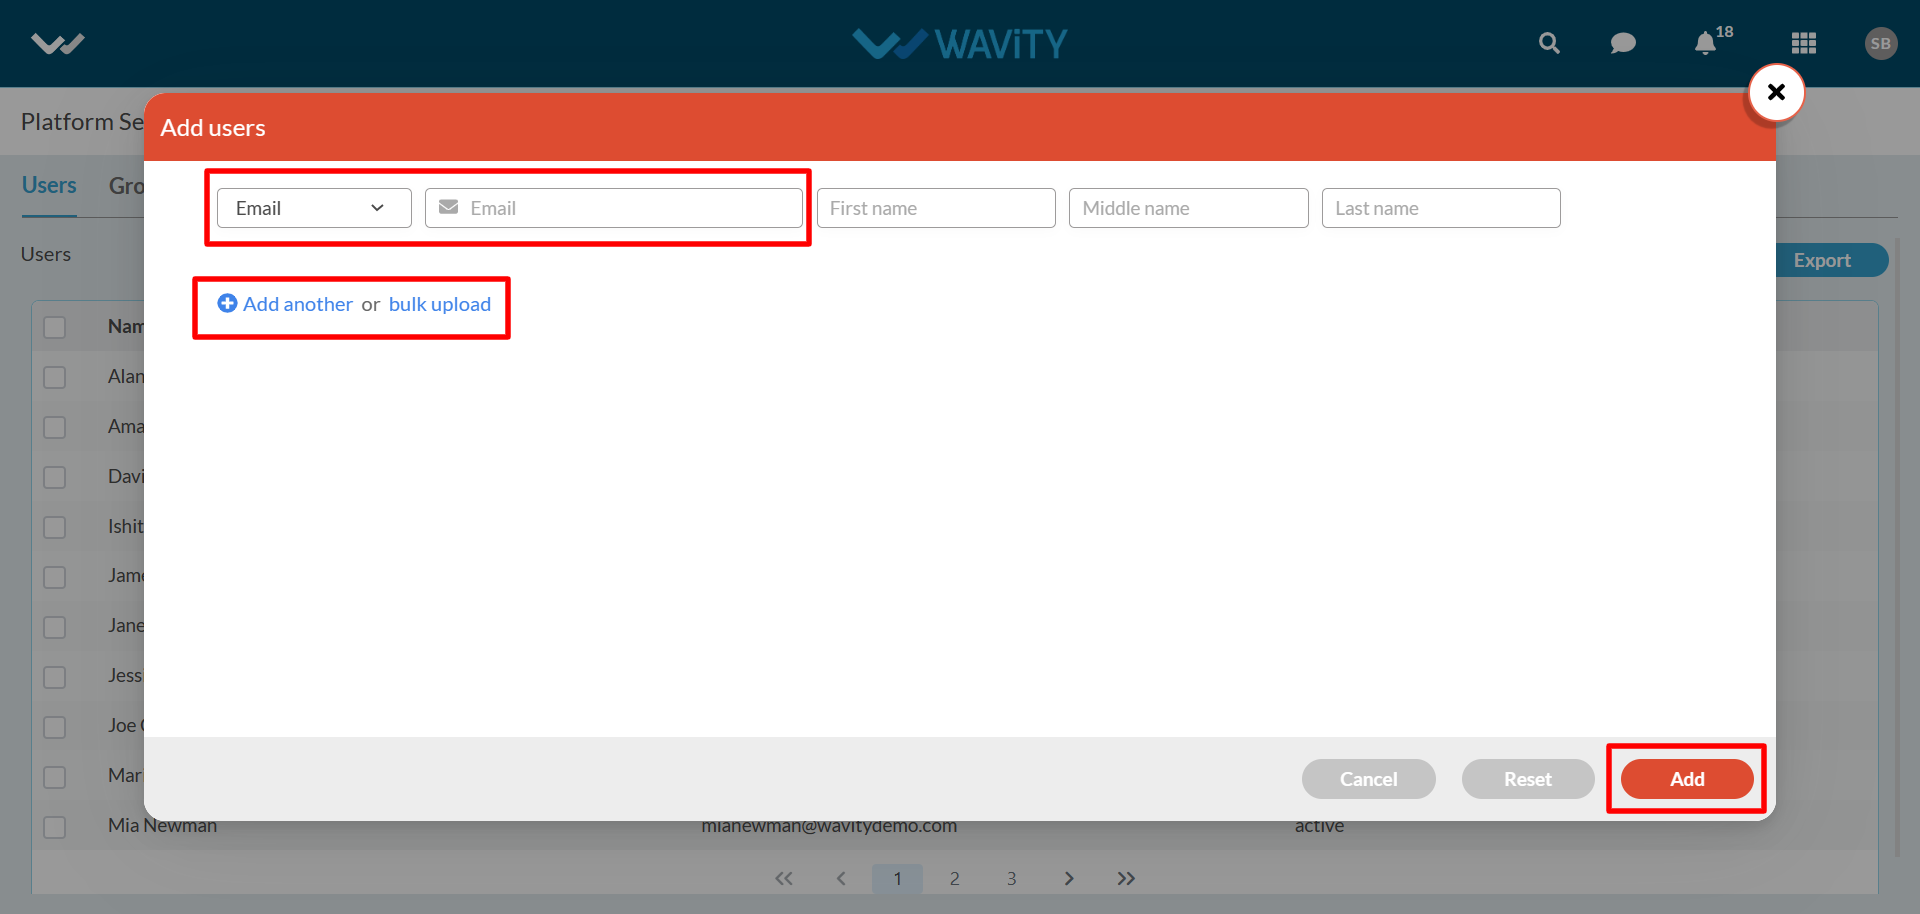
- Under ‘Users’ tab, Click on “Add” as shown below to add new users.
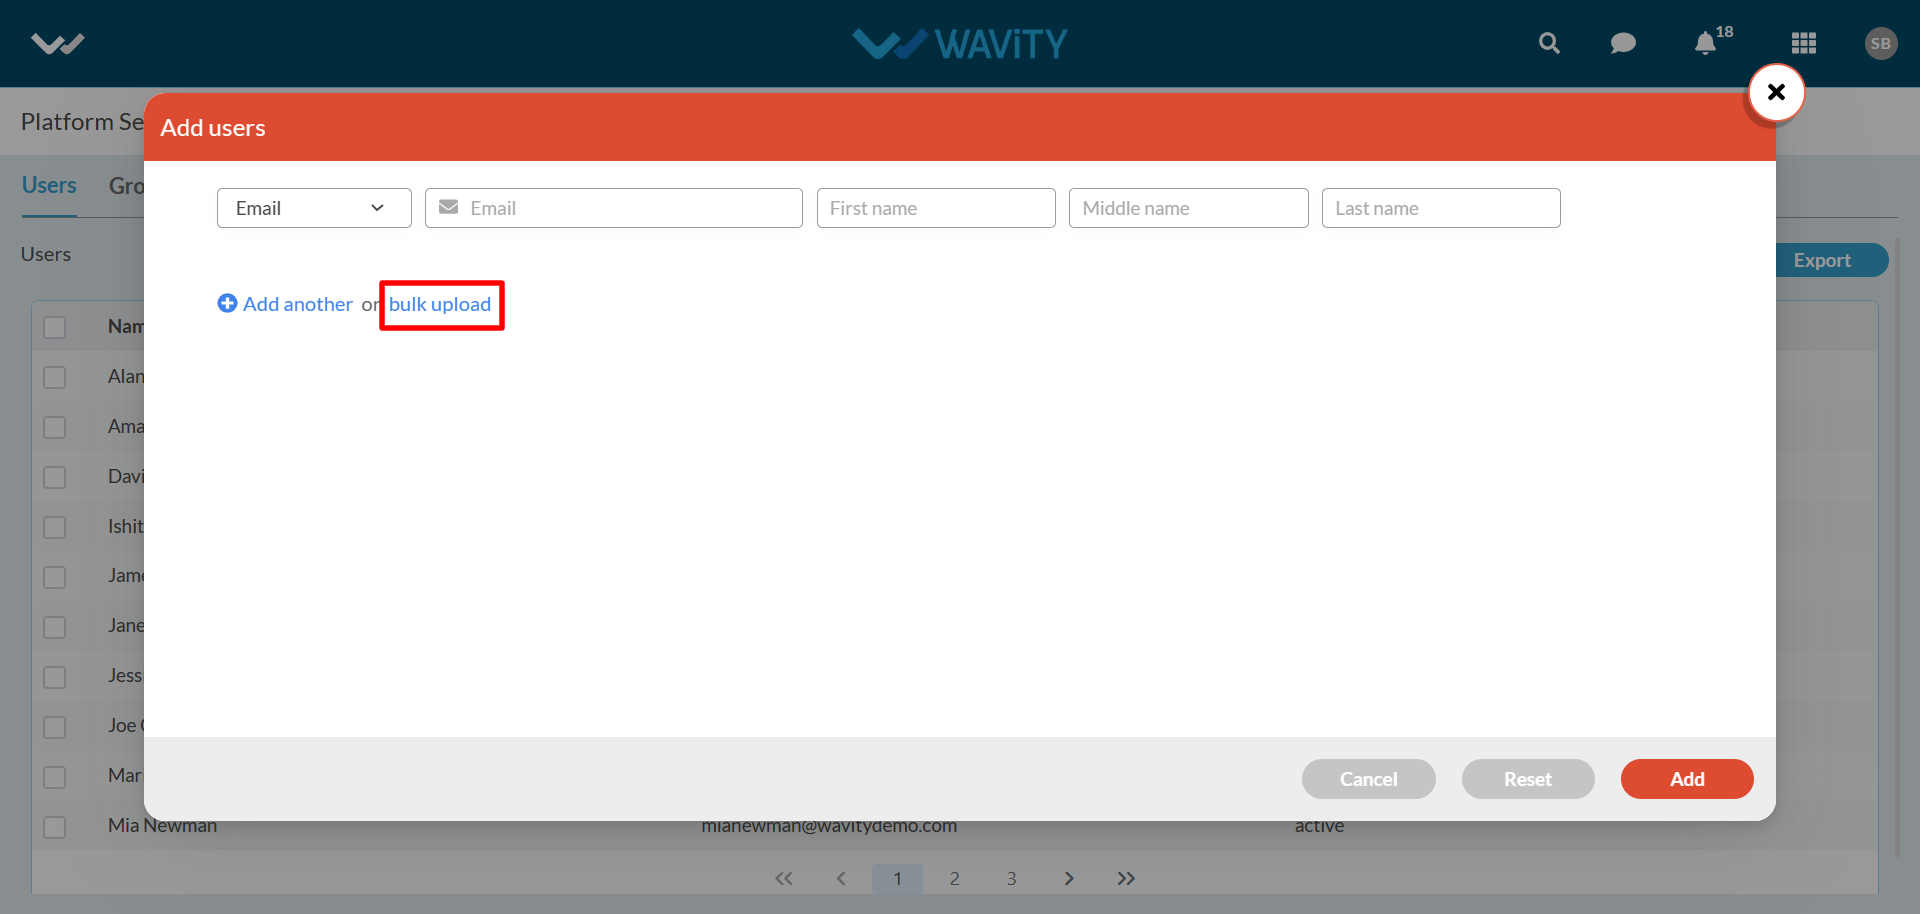
- Click on “Bulk upload” as shown below.
- If you have many users whose details are in an Excel sheet, you can upload it by selecting a file or using Drag & Drop. Then click on Confirm button.
- You can get ‘Sample-User-Bulk-Template’ by clicking on ‘Download bulk upload template’.
- Add all the users’ required fields in the sheet and upload.
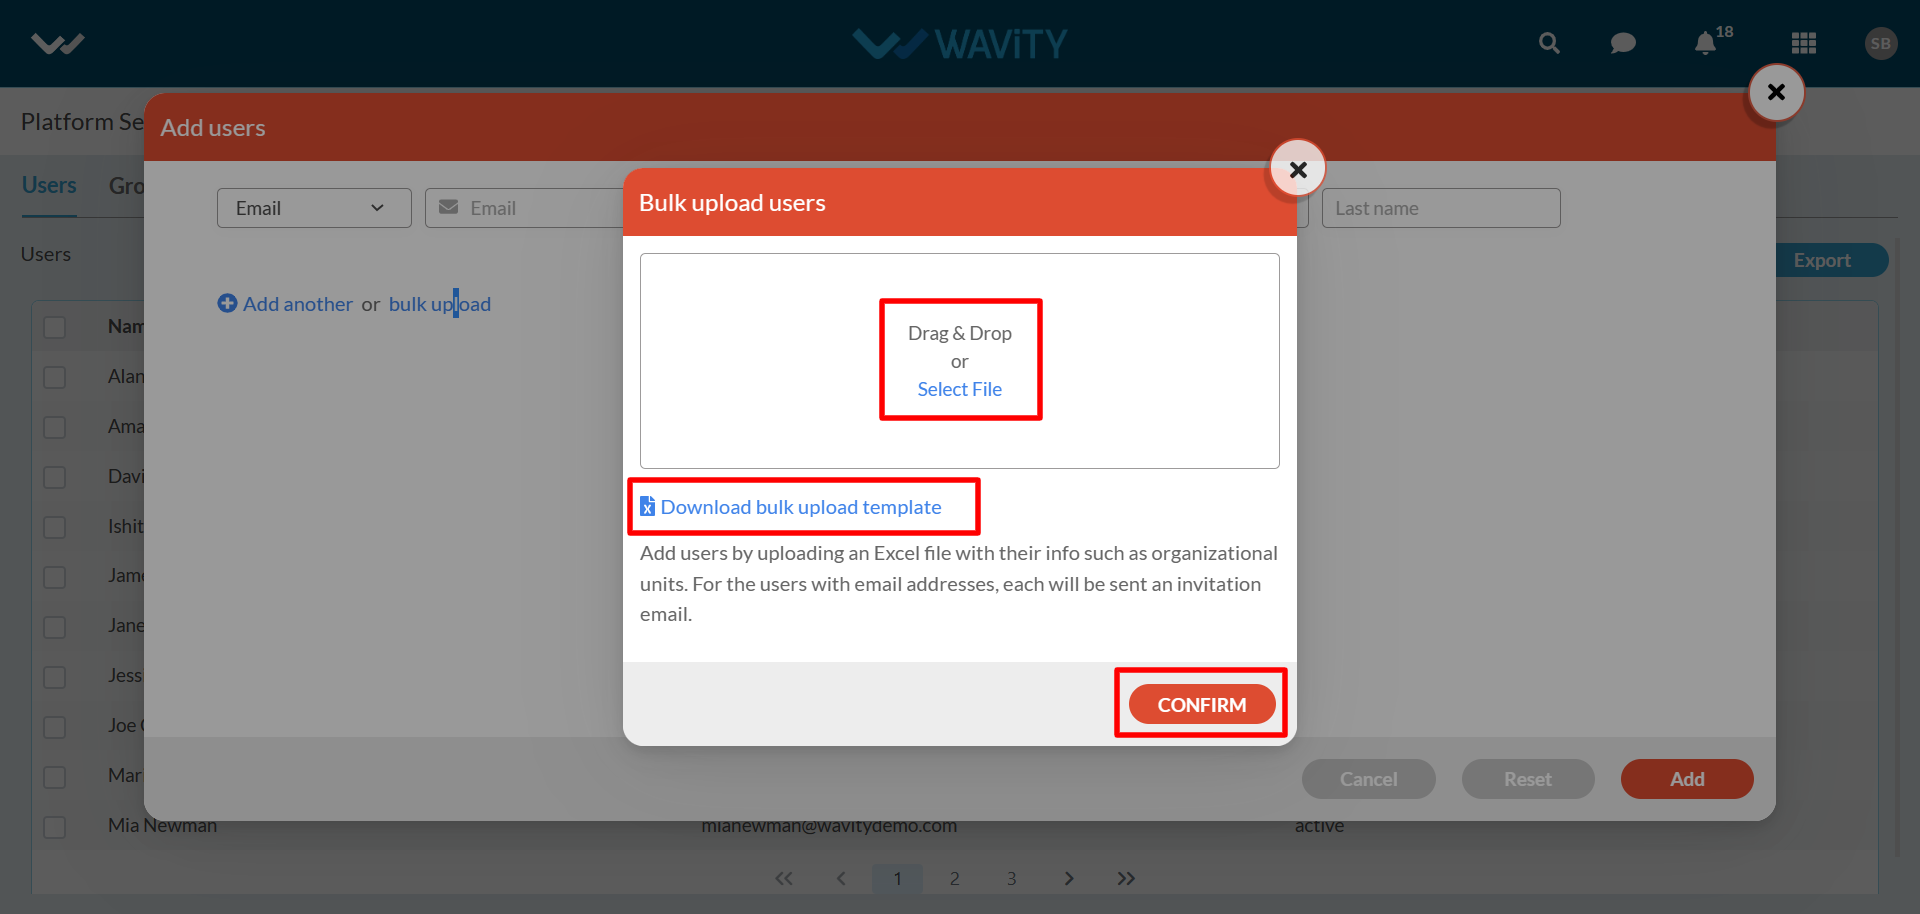
- Click on “Confirm” button. Now, each user will get an invitation email to setup their Wavity account by creating a new password.
How to add an individual user?
- In Wavity ITSM solution, users refer to individuals or groups who interact with the system to request, access, or use IT services. These users can be categorized into various roles, such as end-users, customers, service desk agents, technicians, managers, and administrators.
- Admin can add users individually in Wavity Platform
- Click on “General” under profile icon as shown in below image.
- Under ‘Users’ tab, Click on “Add” as shown below to add new users.
- You can add users manually by entering the email id along with First name and last name. Also, you can use “Bulk upload” option to add new users in bulk into the platform.
- Once "Add" is clicked, the user will receive an activation email. They can then set up their password and log in to Wavity.
User Profile Functions:
- “Users” typically refer to individuals or groups of individuals who consume IT services provided by the IT department or service provider.
- In Wavity ITSM solution, users refer to individuals or groups who interact with the system to request, access, or use IT services. These users can be categorized into various roles, such as end-users, customers, service desk agents, technicians, managers, and administrators.
- Users can perform the following functions in Wavity at profile level.
- Click on “Profile Icon” as shown in below image. This will display your User Name and Email id linked to your Wavity Account.
- Click on “Account” as shown below to view/edit your profile.
- You can edit/view your Username, Email ID (Linked with Wavity) and your initials such as First name and Last Name under Basic Information.
- Under ‘Locale’, Users can set the language of the system, select relevant timezone, select Region and Set your landing page.
- By default, Users will land directly to the landing page they have selected once logged in. For example: Agents in Wavity ITSM solution will land to Agent dashboard after logging in.
- Users can set passwords if required under “Password” section. They can view all the groups they are part of under “Groups” section.
- Users can message other users in the platform by clicking on “message” symbol.

- Users can directly search for applications and analytics using the “search bar” as shown below.

How To Export User Details?
- In the Wavity platform, only an Admin has the ability to export multiple user details directly into spreadsheet (Excel file).
- Under profile icon select ‘General’ to view the users list.
- All current users along with account status will be shown in the list as shown below. You can also search for an individual user using the “search box”.
- Single user details export:
- You can find export option as mentioned in the picture for each already created user if you click check box next to the user. Click on “Export” button. Spreadsheet with user details will be downloaded in your system.
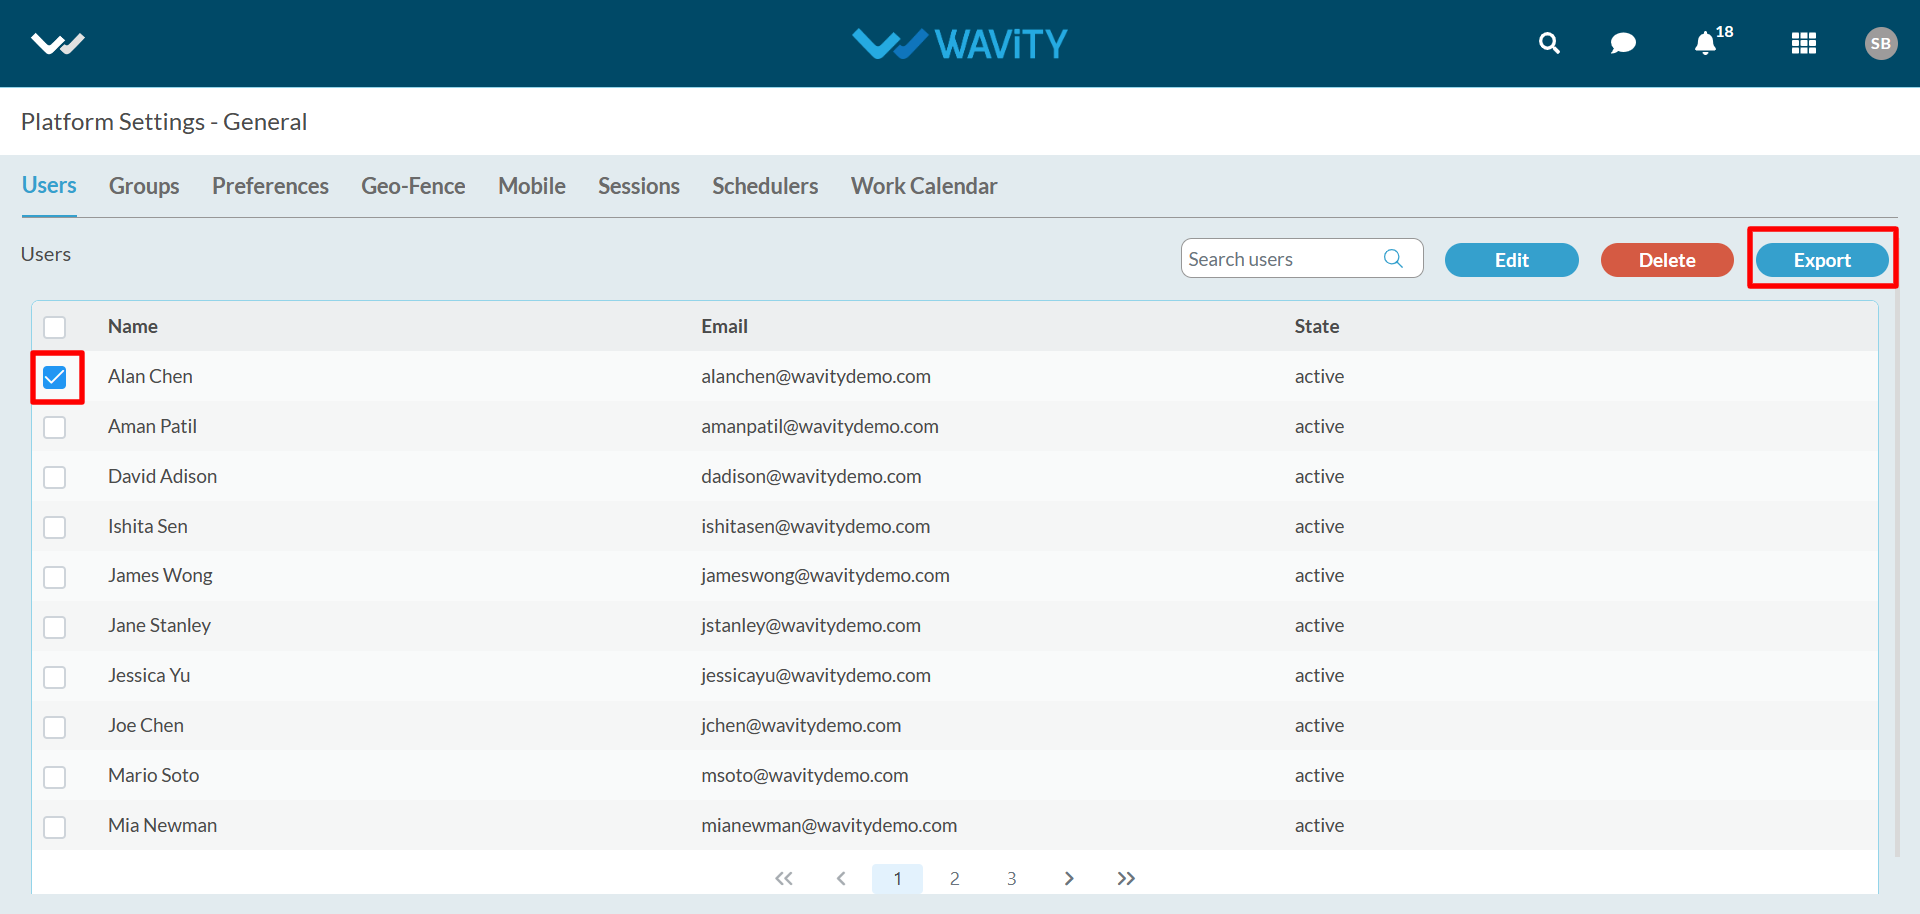
- Multi user details export:
- Select “Check box” as shown below to export multiple user details.
- Click on “Export” button. Spreadsheet file with user details will be downloaded in your system.

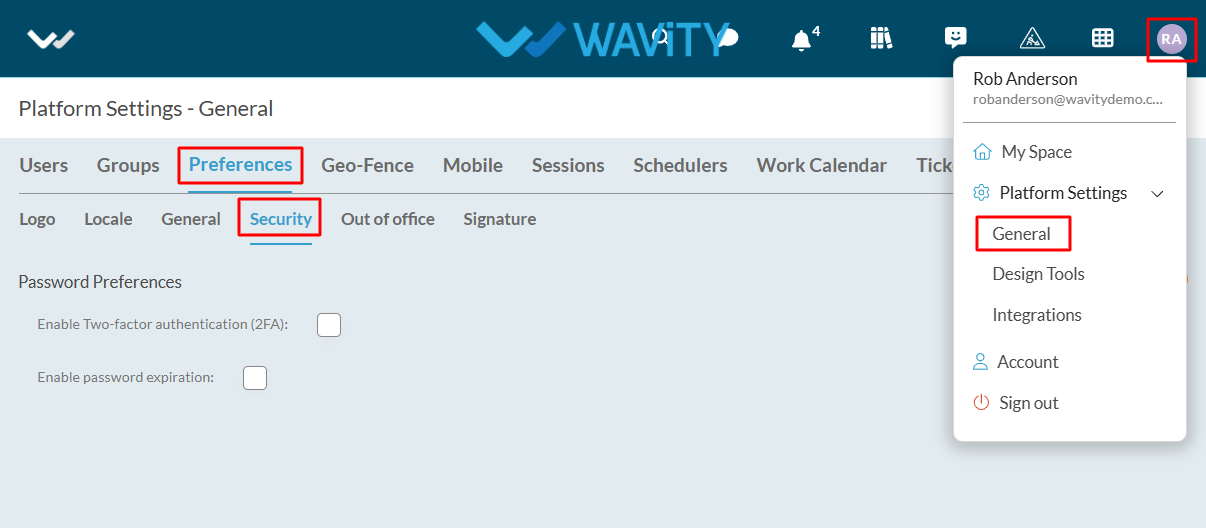
How To Enable Password Expiration?
- Note: Only Admin/Solution Owner can enable password expiration. Password policy rules can be configured at tenant preferences.
- To enable password expiration click on Profile Icon > Platform Settings – General > Preferences > Security.
- You can find the check box next to ‘Enable password expiration’ under ‘Password Preferences’.
- Enter the expiry details such as 'No. of days password to be expired', 'No. of days before first expiry notification' and 'No. of days before second expiry notification'.
- Click on "Save" button to complete the process.
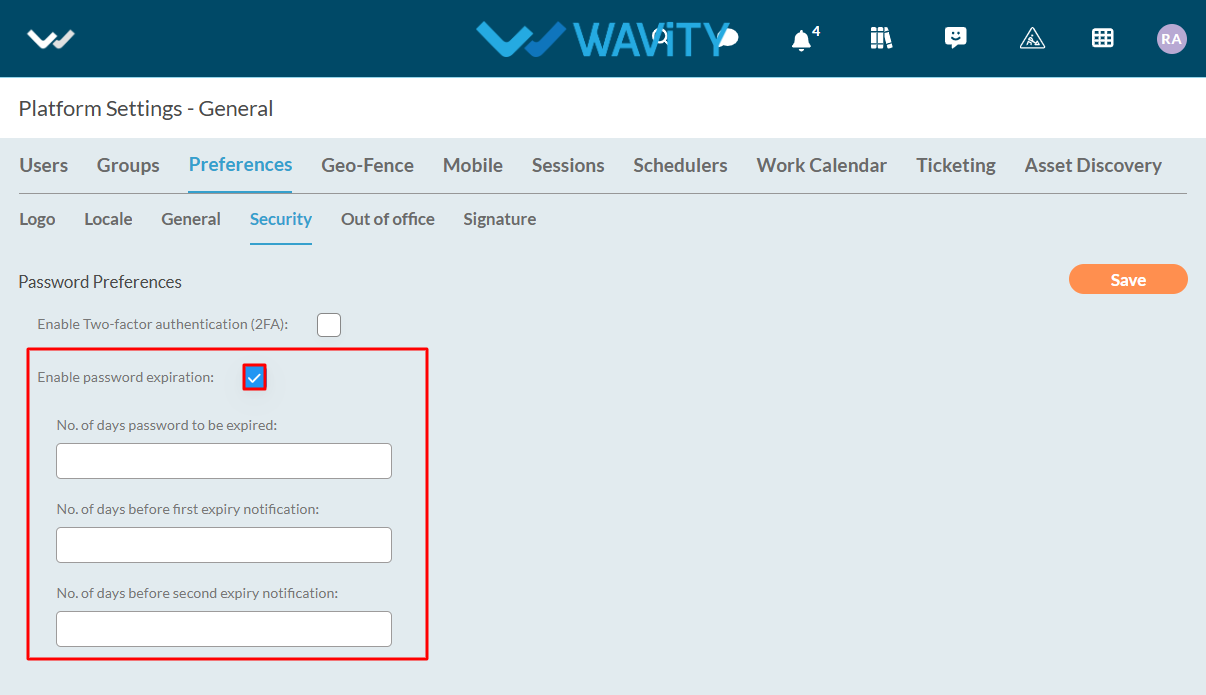
- Password rotation policy: A strong password rotation policy balances security with convenience by setting password expiration intervals between 90 to 180 days, based on security needs. Users should receive at least two reminders before expiration, such as one a week before and another closer to the date.
How To Enable Two-Factor Authentication?
- Two-factor authentication (2FA) is a security measure that requires users to provide two forms of identification to access a system or application. This approach adds an extra layer of security beyond just a traditional username and password login.
- Note: Only Admin/Solution Owner can enable Two-factor authentication.
- To enable two-factor authentication, click on Profile Icon > Platform Settings – General > Preferences > Security.
- Check the box and click on save.
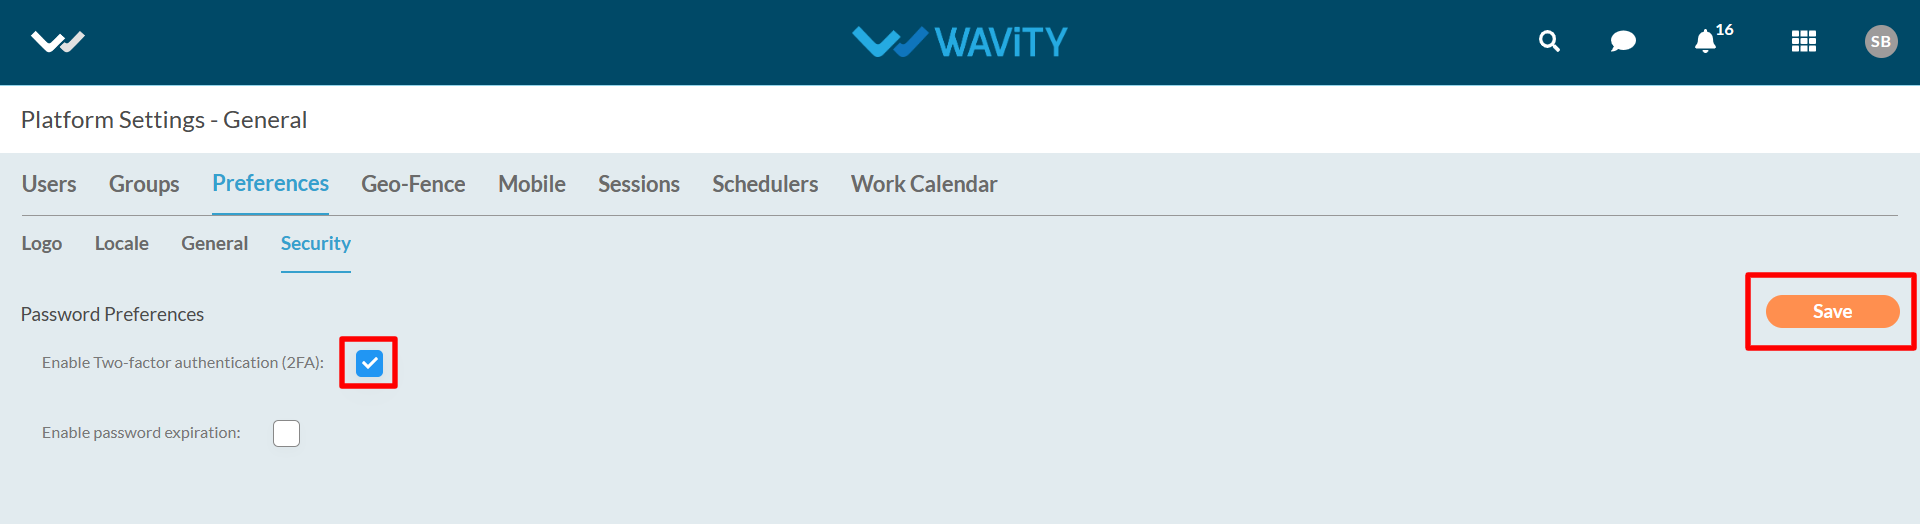
- Upon activation of two-factor authentication, System will send auto generated code to email or mobile during login and along with password. User should enter the received code.
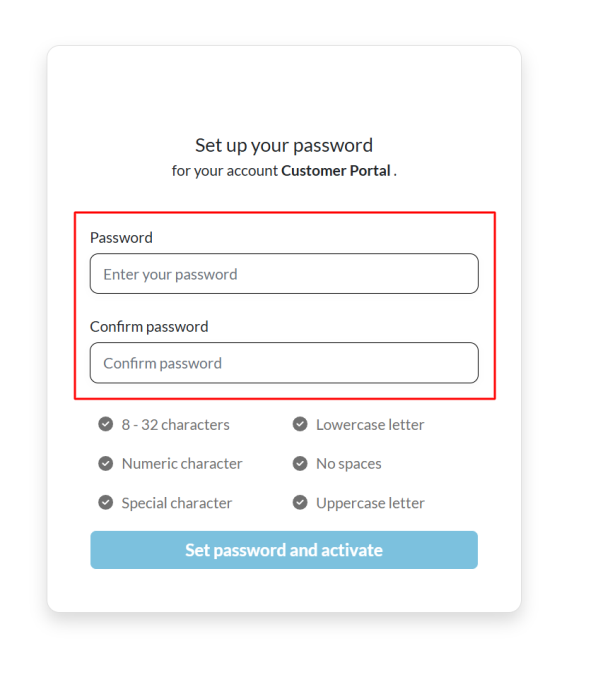
How Do I Activate My Account?(Tenant/Buyer Activation)
- When an account is created for you: You will receive an email from Wavity with the subject line “ Wavity (Company Name) Buyer Activation!“
- Please follow the link in the email to activate your account.
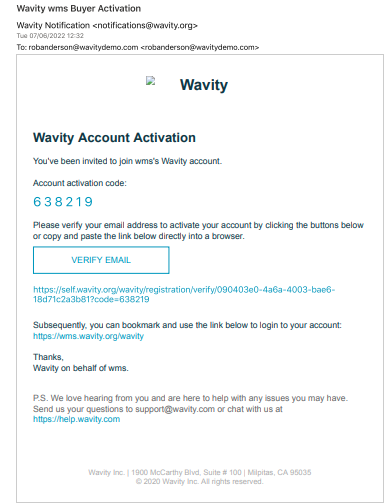
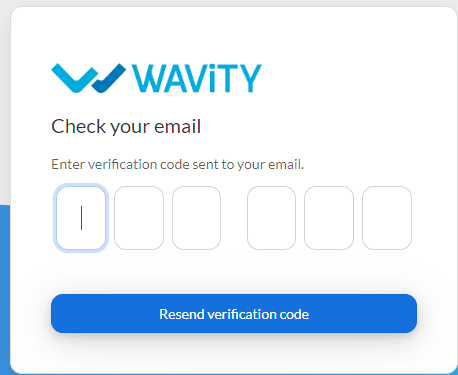
- Enter the Activation code as shown in below image.
- Set up your Password.
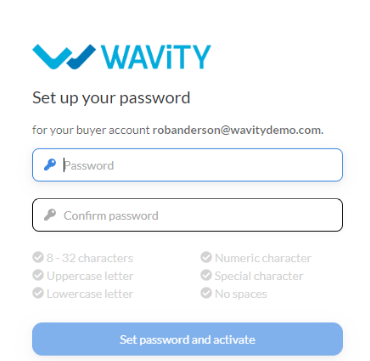
- Confirmation message will be displayed as shown below. You can now Sign In to Wavity platform with your email id and password using the tenant URL.

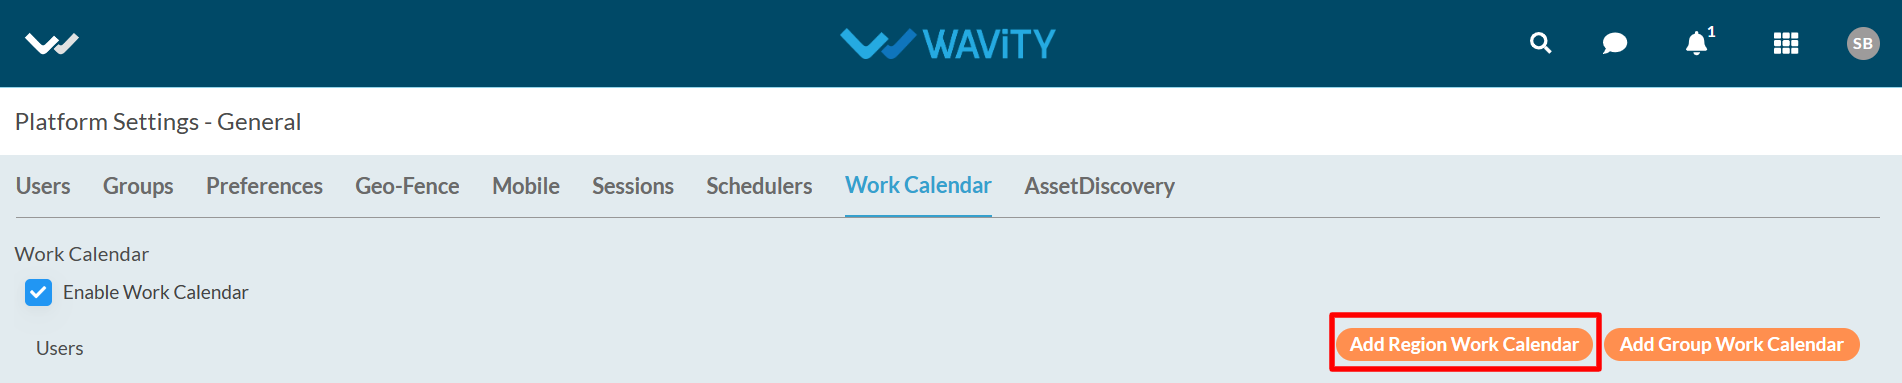
How To Enable Work Calendar?
- Work Calendar are used in calculating working hours. Automated Email notifications will trigger only during working hours.
- Only Admin has the access to enable work calendar function in the platform.
- To enable mobile restriction, click on Profile Icon > Platform Settings – General > Work calendar.

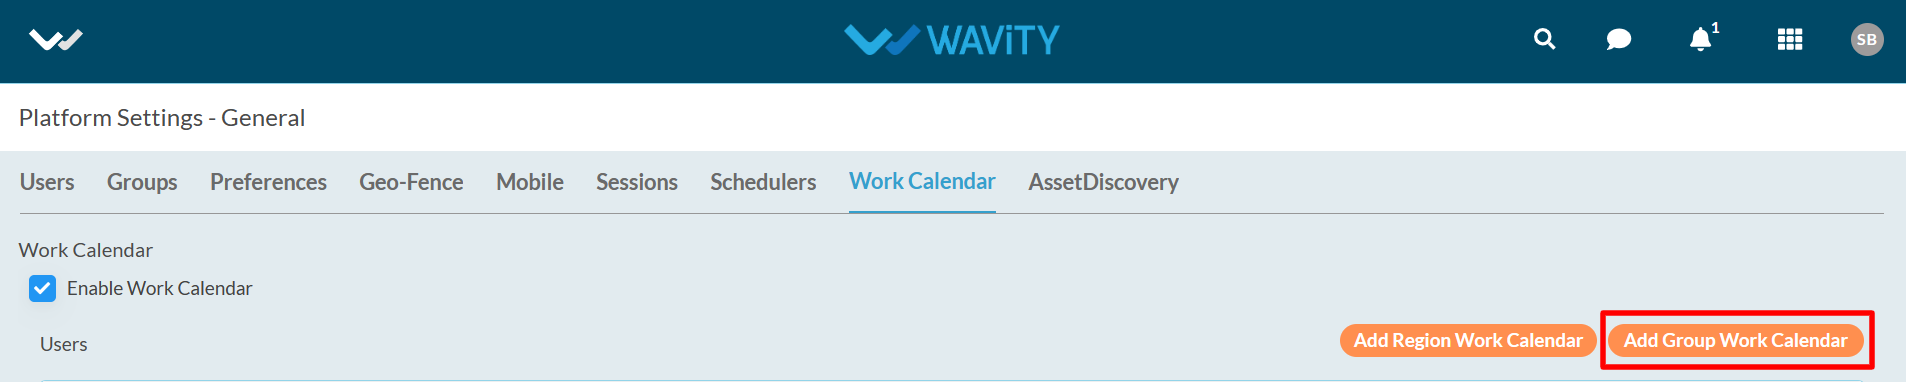
- Check the box to enable work calendar.
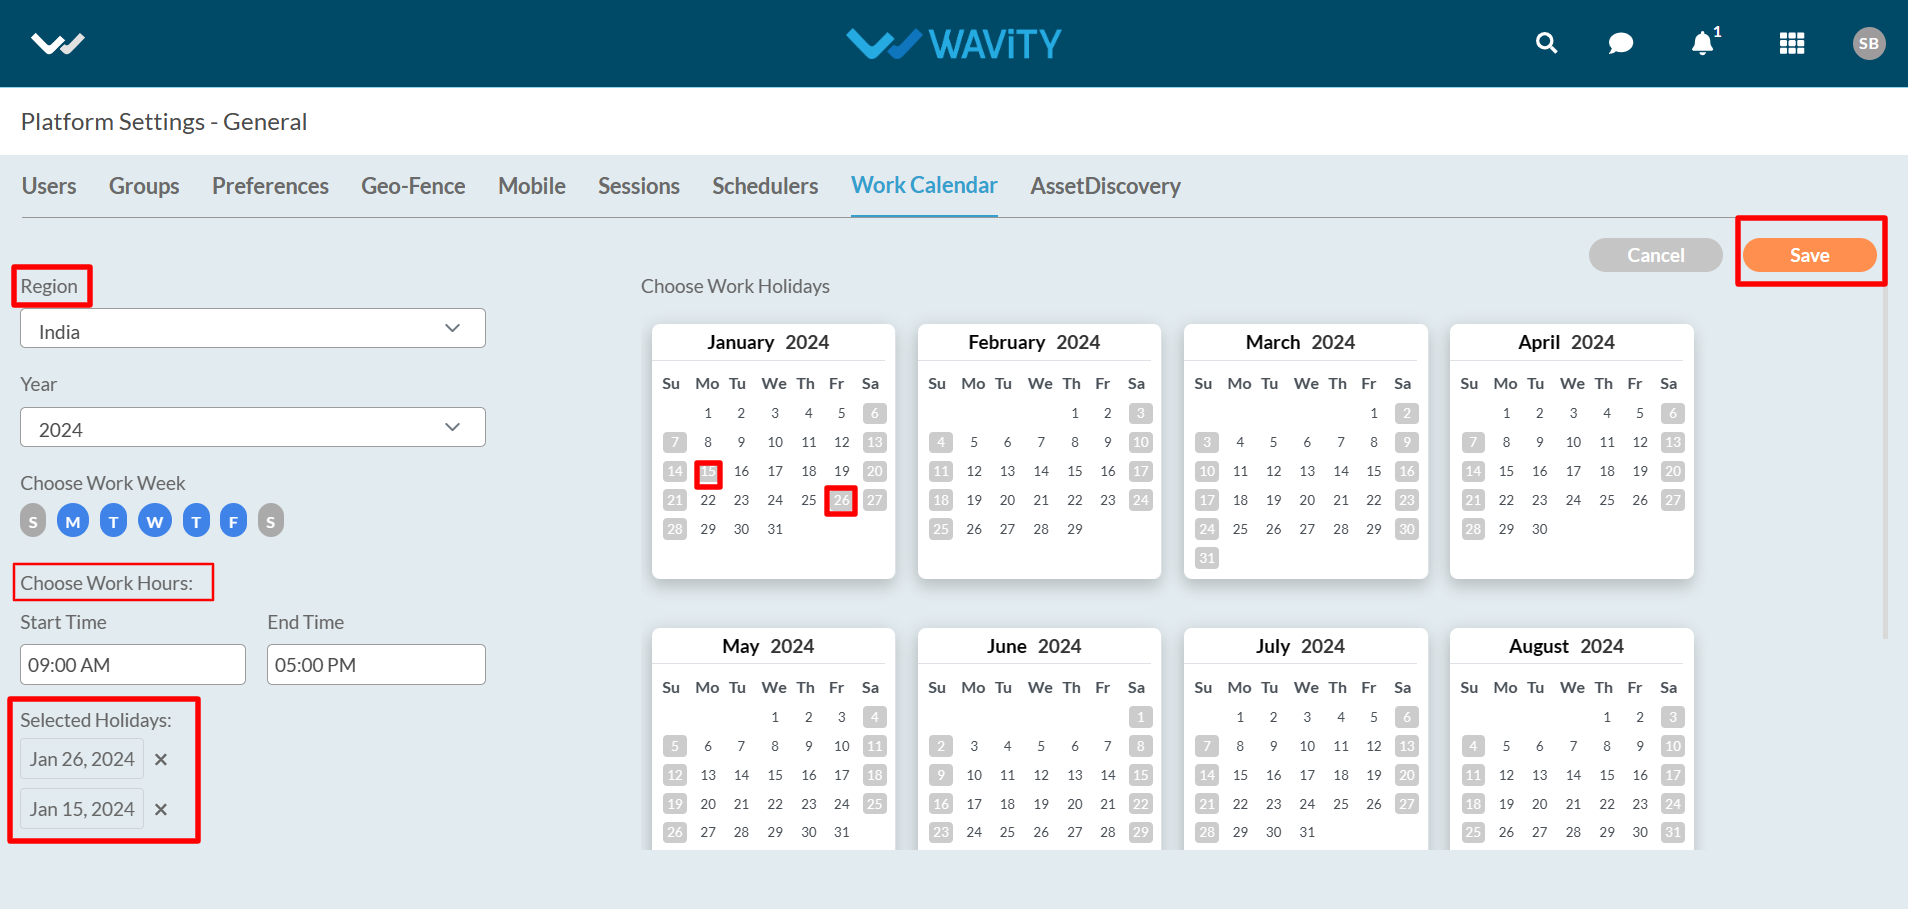
- There are two types of work calendar available in Wavity platform which is “Region Work calendar” (Applies to all groups in your organization) and “Group Work calendar” (Applies to specific groups in your organization).
- To add region work calendar; Click on“ Add Region Work Calendar” to add new calendar year as shown in below image.
- Select “2024” to add a work calendar for the new year as shown below in the image.
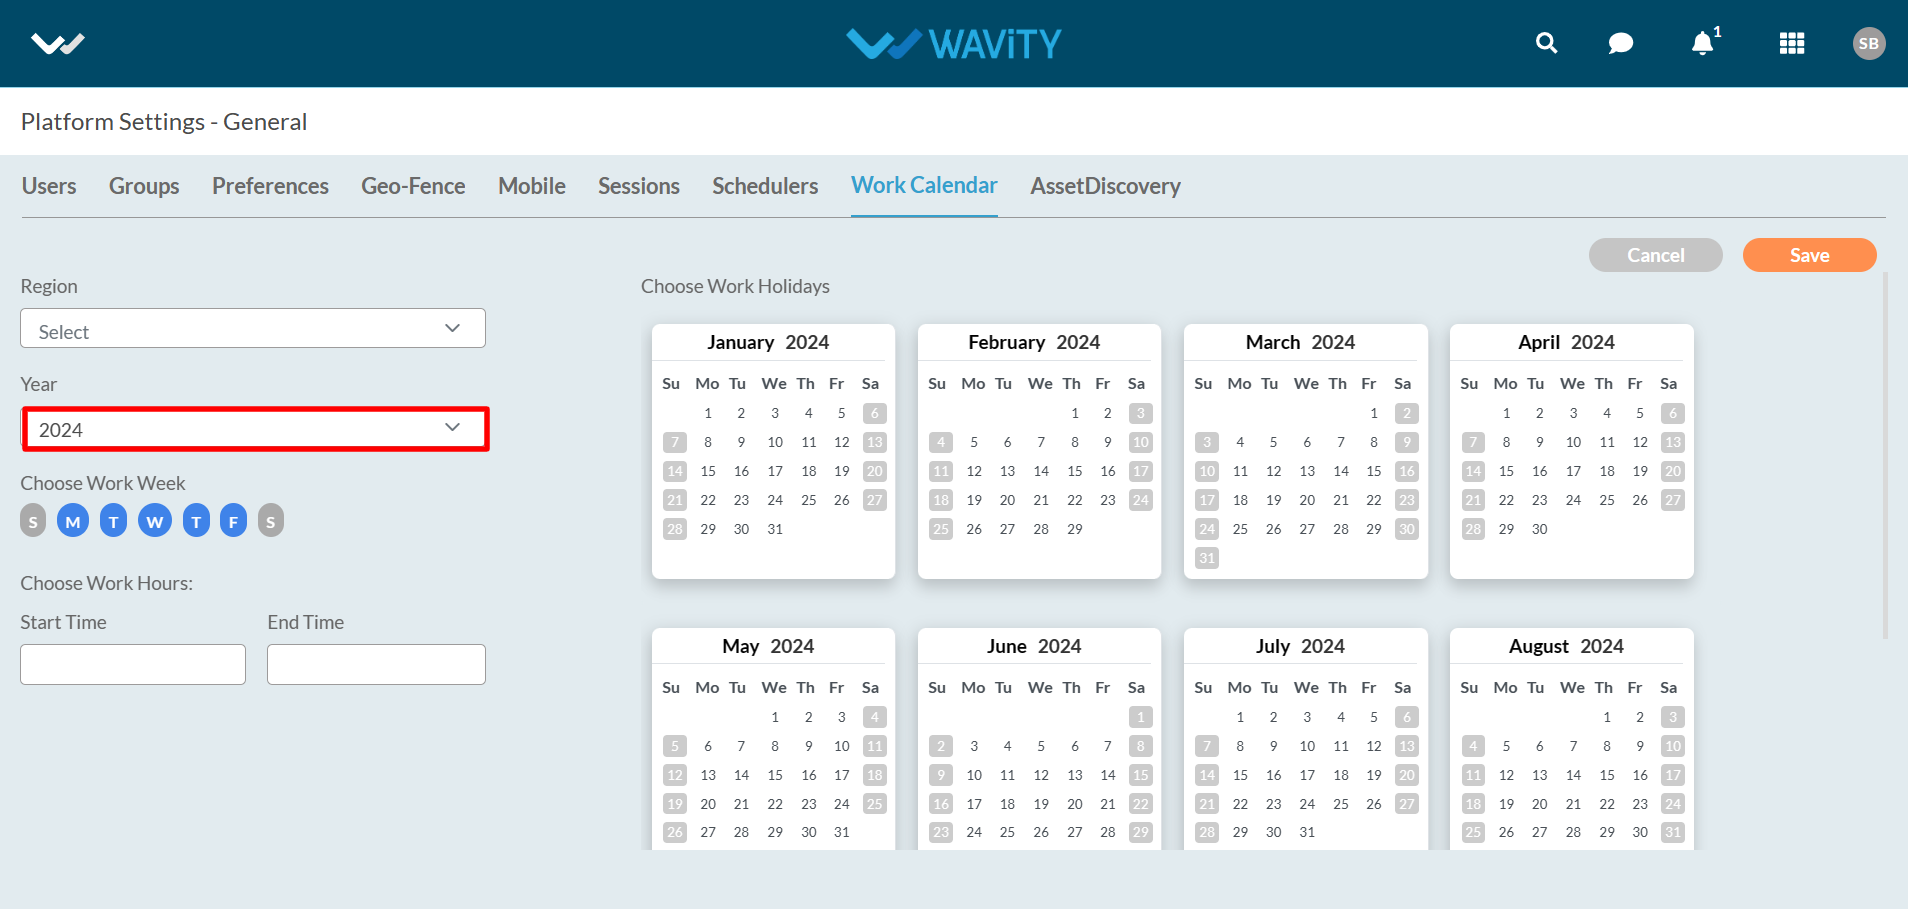
- Select region and chose the holidays from the calendar as shown in below. You can select the start time and end time as per your office working hours. Click on “Save” button to create a new region work calendar for the year 2024.
- To add group work calendar; Click on “Add Group Work Calendar” to add new calendar year as shown in below image.
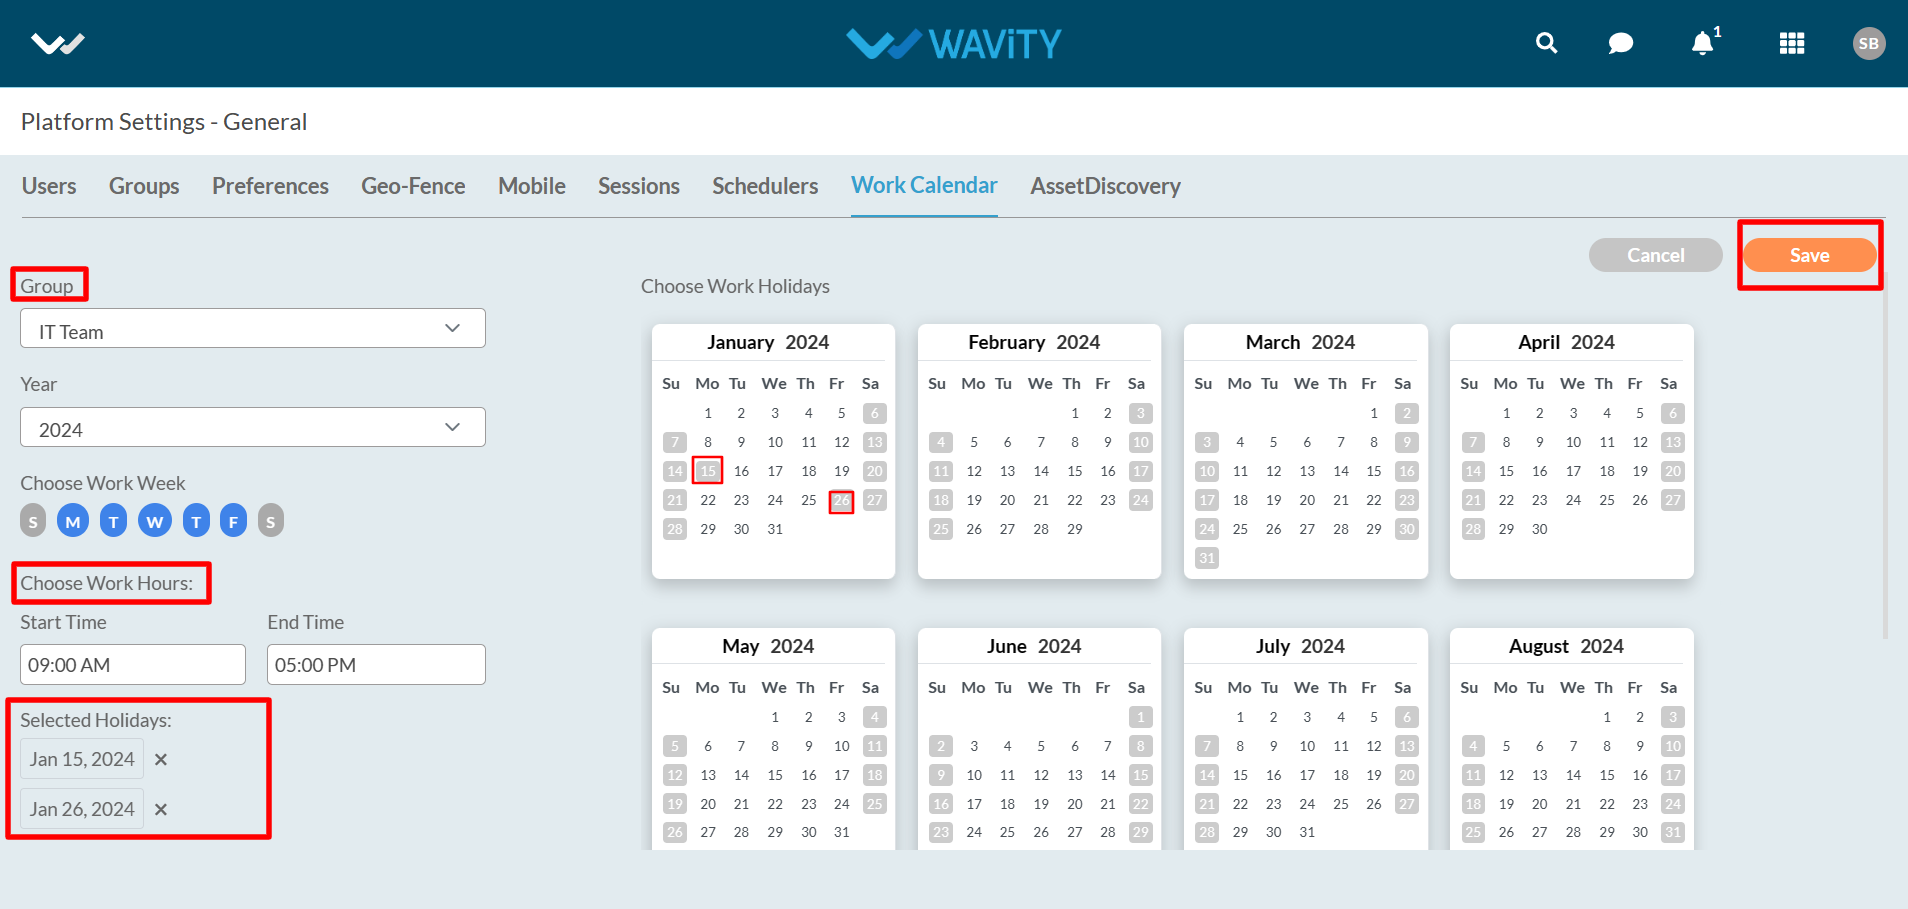
- Select “2024” to add a work calendar for the new year as shown below in the image.

- Select “Group” from the dropdown and chose the holidays from the calendar as shown in below. You can select the start time and end time as per your office working hours. Click on “Save" button to create a new group work calendar for the year 2024.
How Schedulers Works in Wavity?
- Only Admin has the access to use the schedulers function in the platform.
- To enable schedulers, click on Profile Icon > Platform Settings – General > Schedulers.
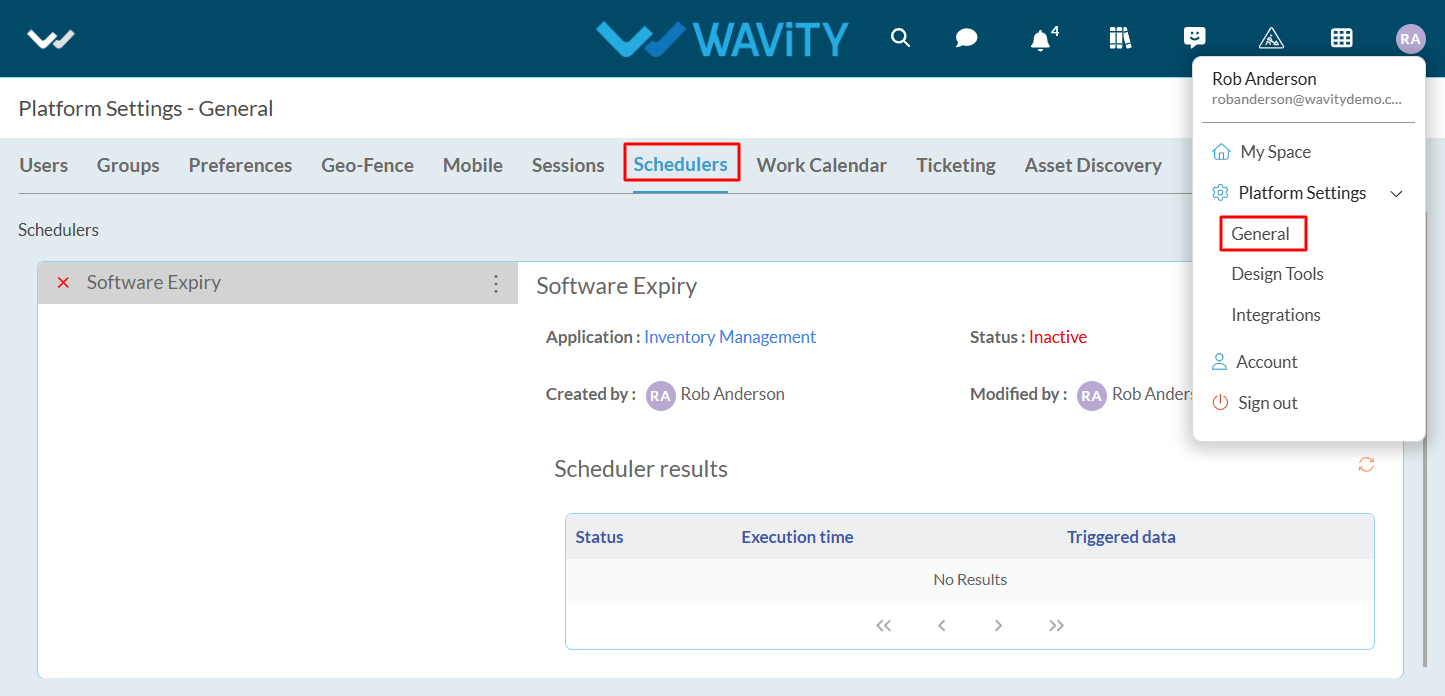
- Schedulers helps to have the regular automated follow up emails that will trigger automatically by providing required details as shown below.
- You can select the start and end dates with fixed time and set the period by selecting days and its occurrence duration. Also, Select the relevant application and provide the conditions to trigger the scheduler.
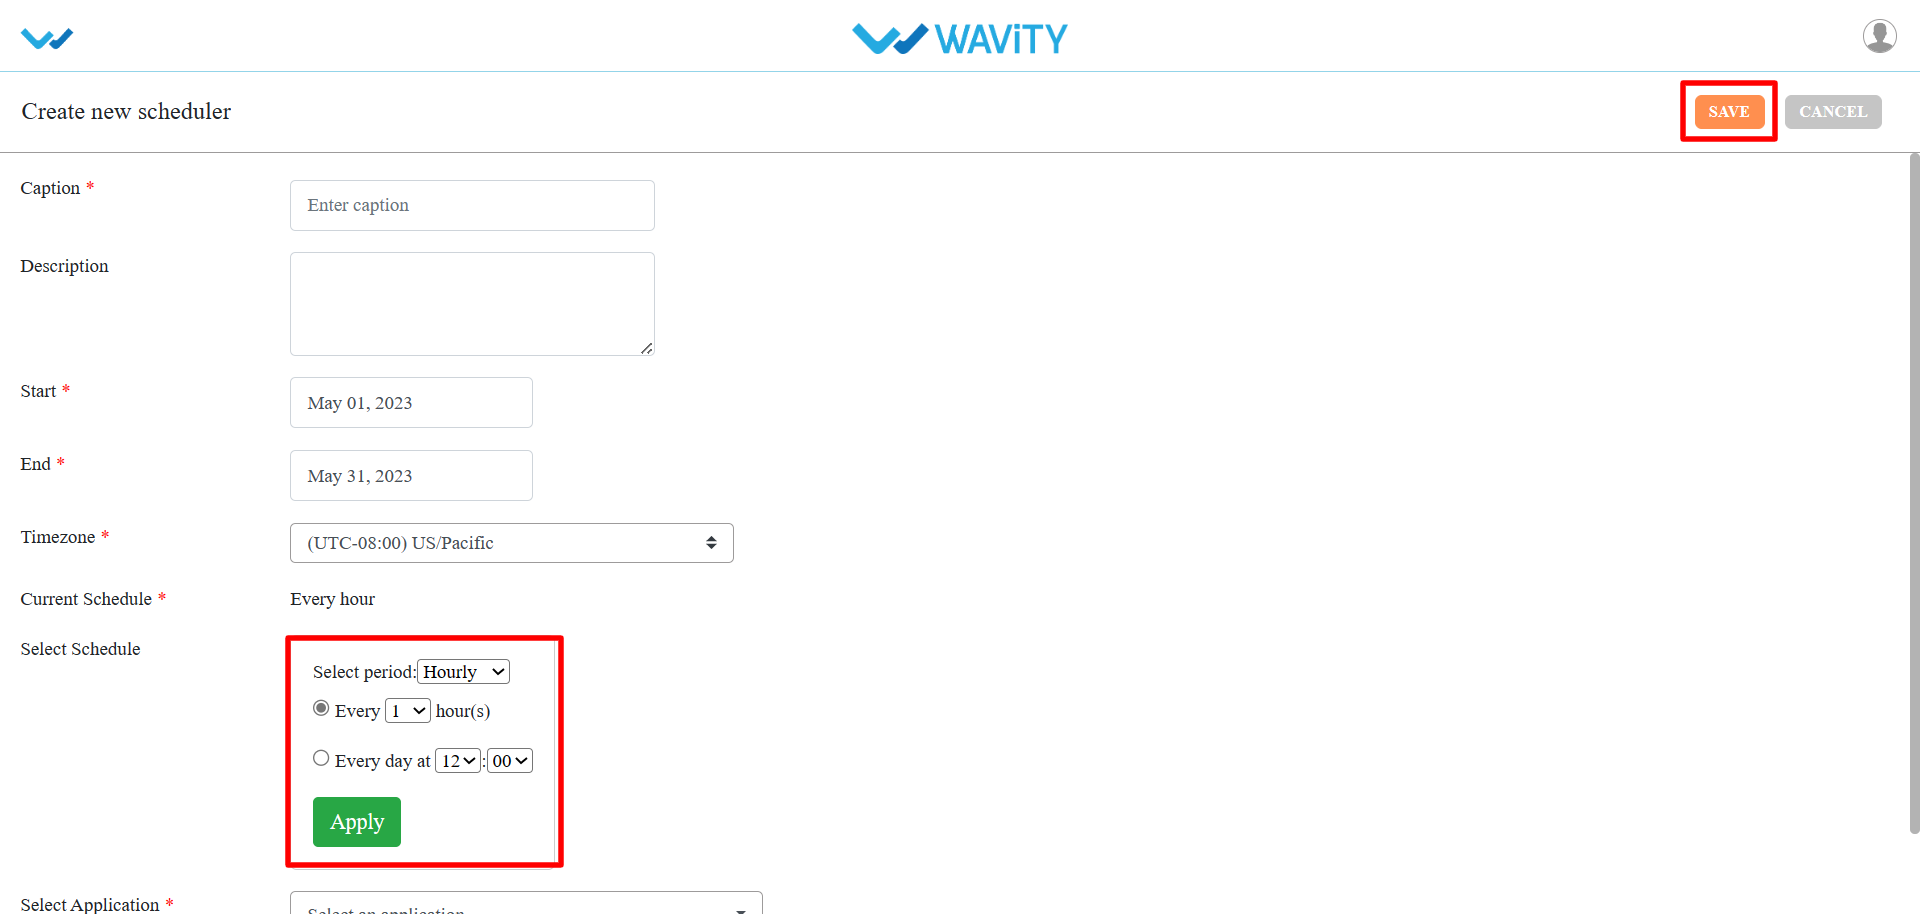
- Thus, schedulers helps to schedule emails notification which can trigger automatically based on specific conditions. It is a onetime setup process.
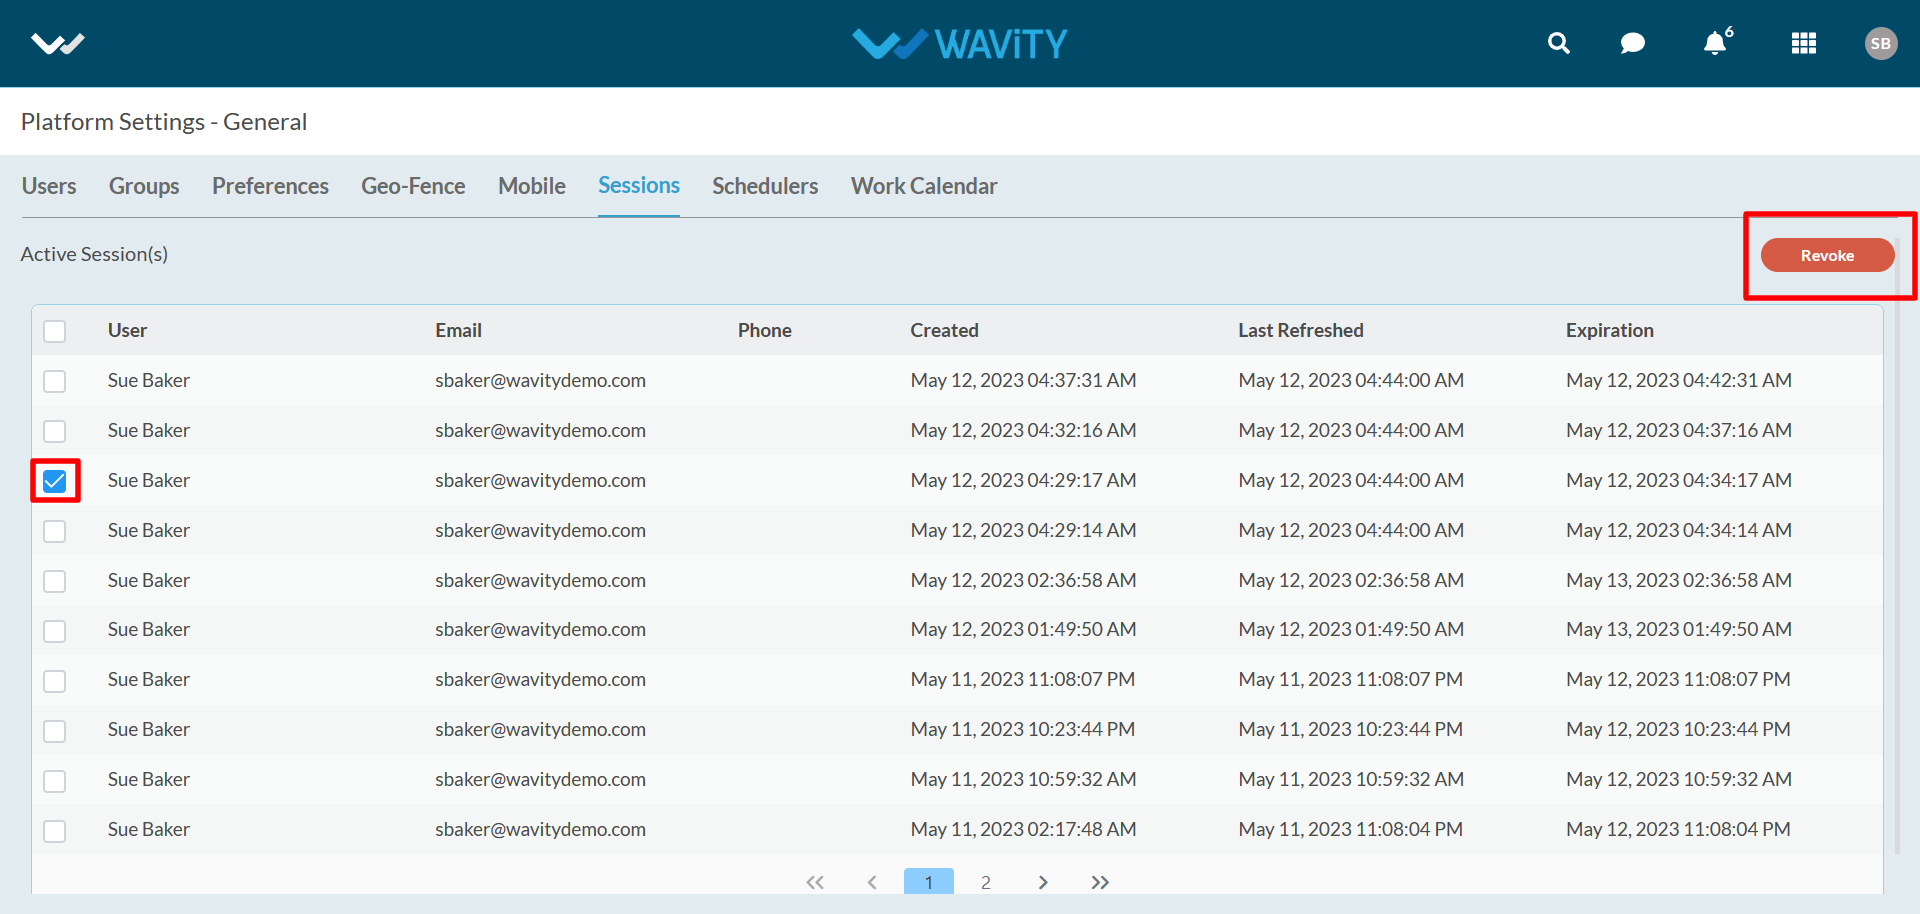
What Session Does?
- Sessions helps admin to check the currently logged in Users.
- Navigate to Profile Icon > Platform Settings – General > Sessions.
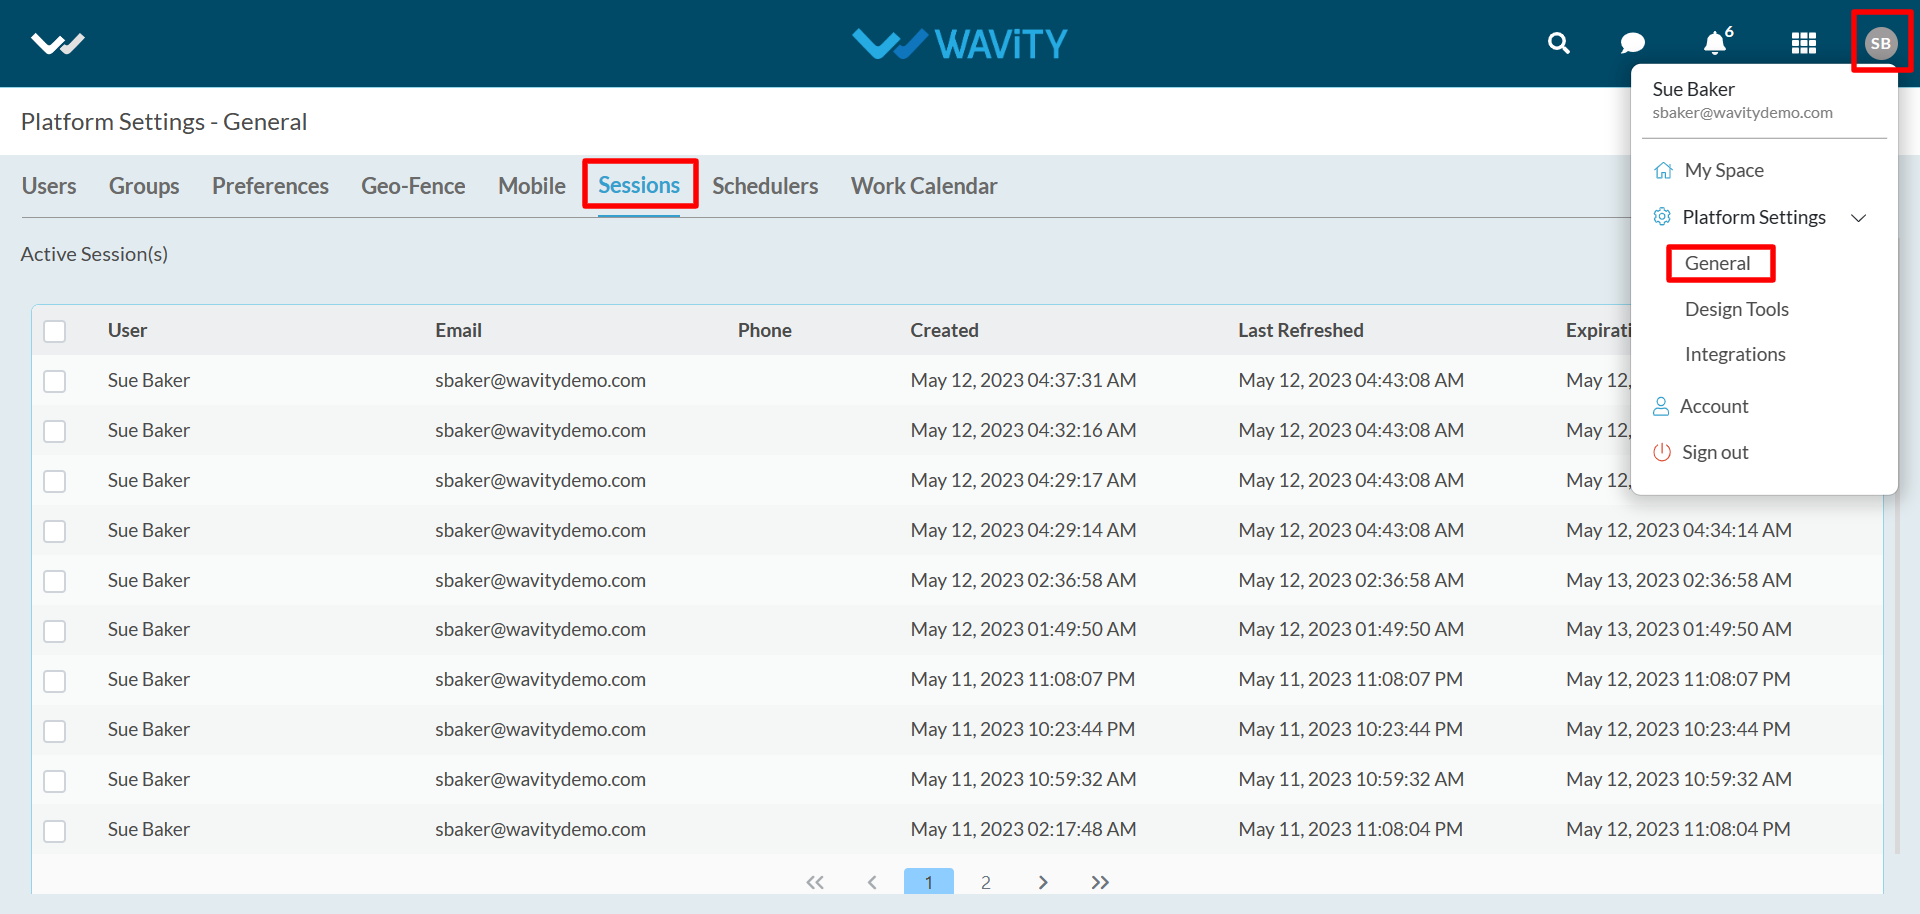
- Admin can revoke the access from end user at any time by clicking on Revoke button as shown.
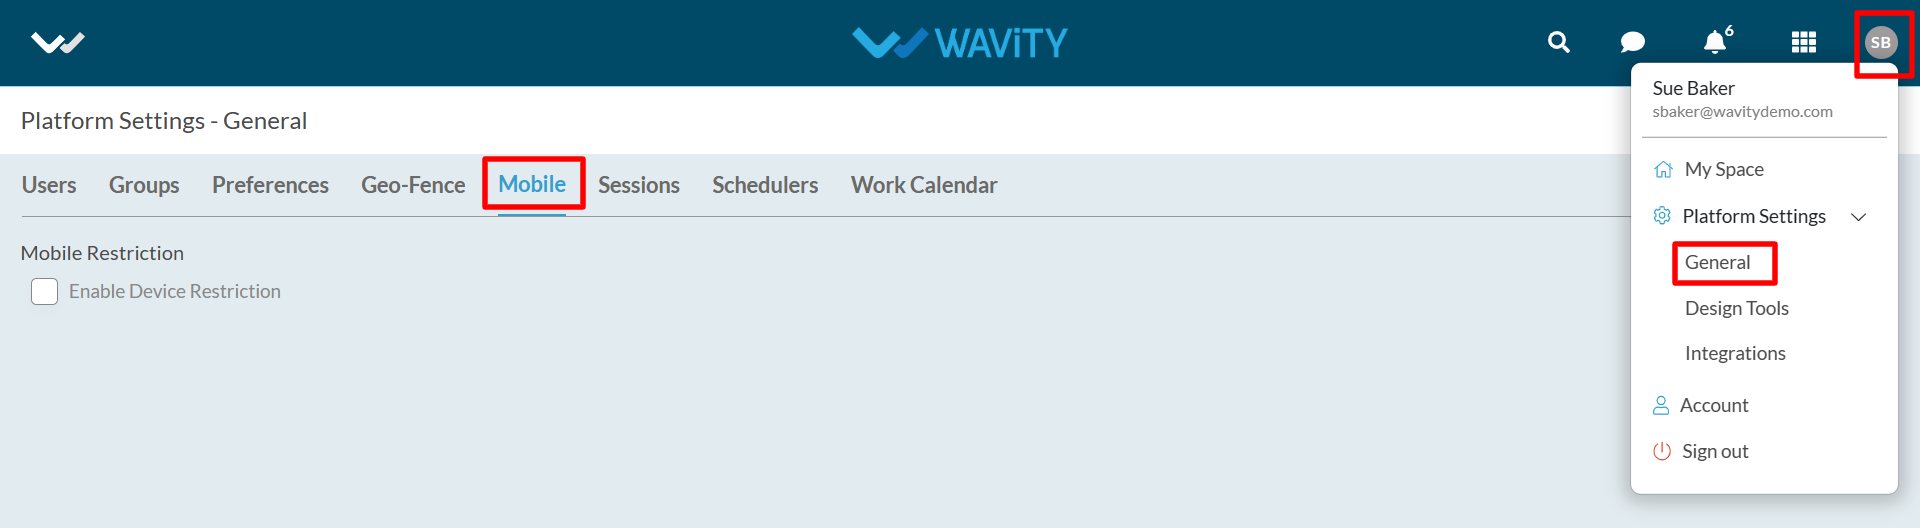
How To Enable Mobile Restriction?
- Only Admin has the access to enable mobile restriction in the platform.
- To enable mobile restriction, click on Profile Icon > Platform Settings – General > Mobile.
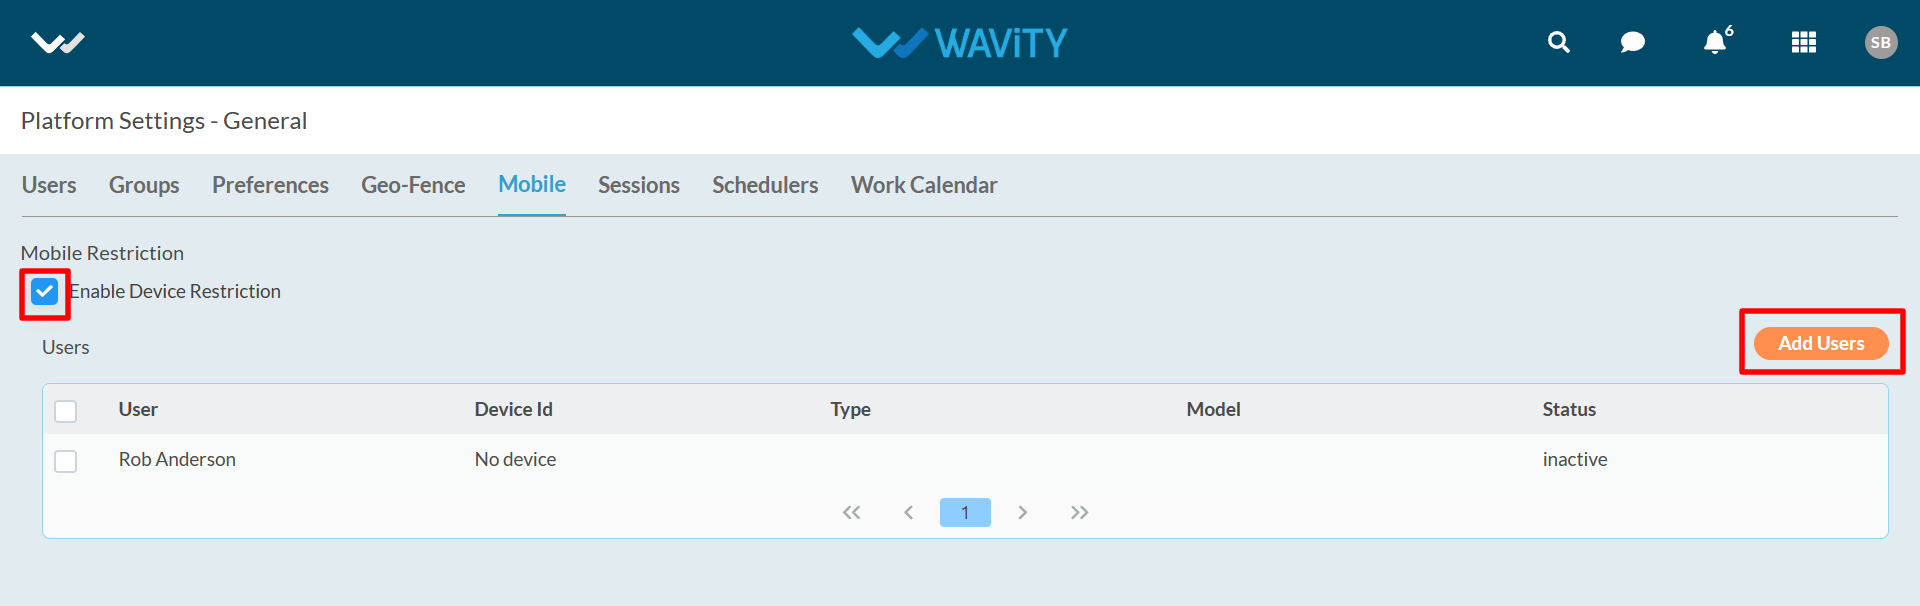
- Enable the option ‘Enable Device Restriction’ as shown below. You can add users also.
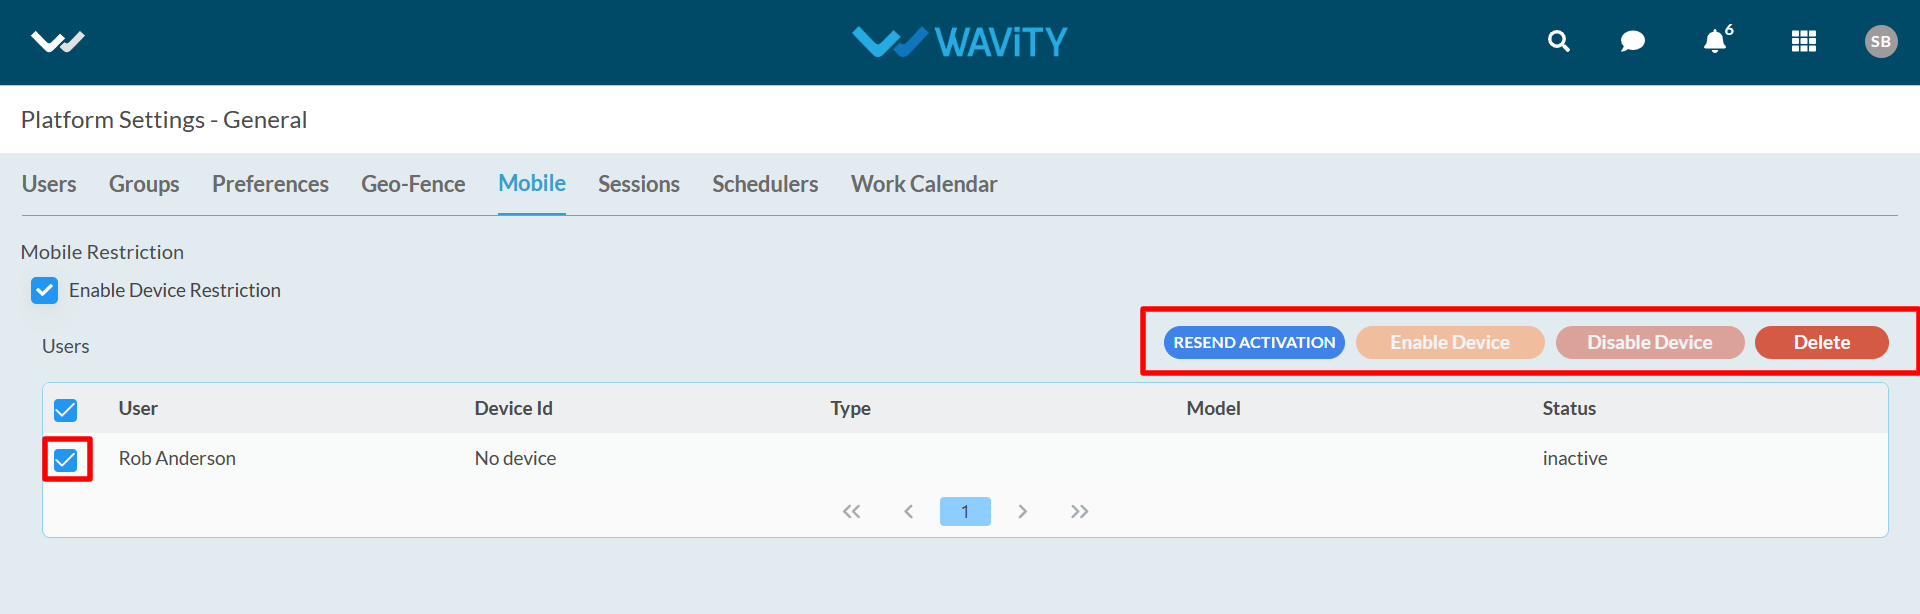
- After selecting the User, Admin have the following options such as Resend Activation, Enable Device, Disable Device & Delete. Depending on your requirements, Admin can select the relevant option accordingly.
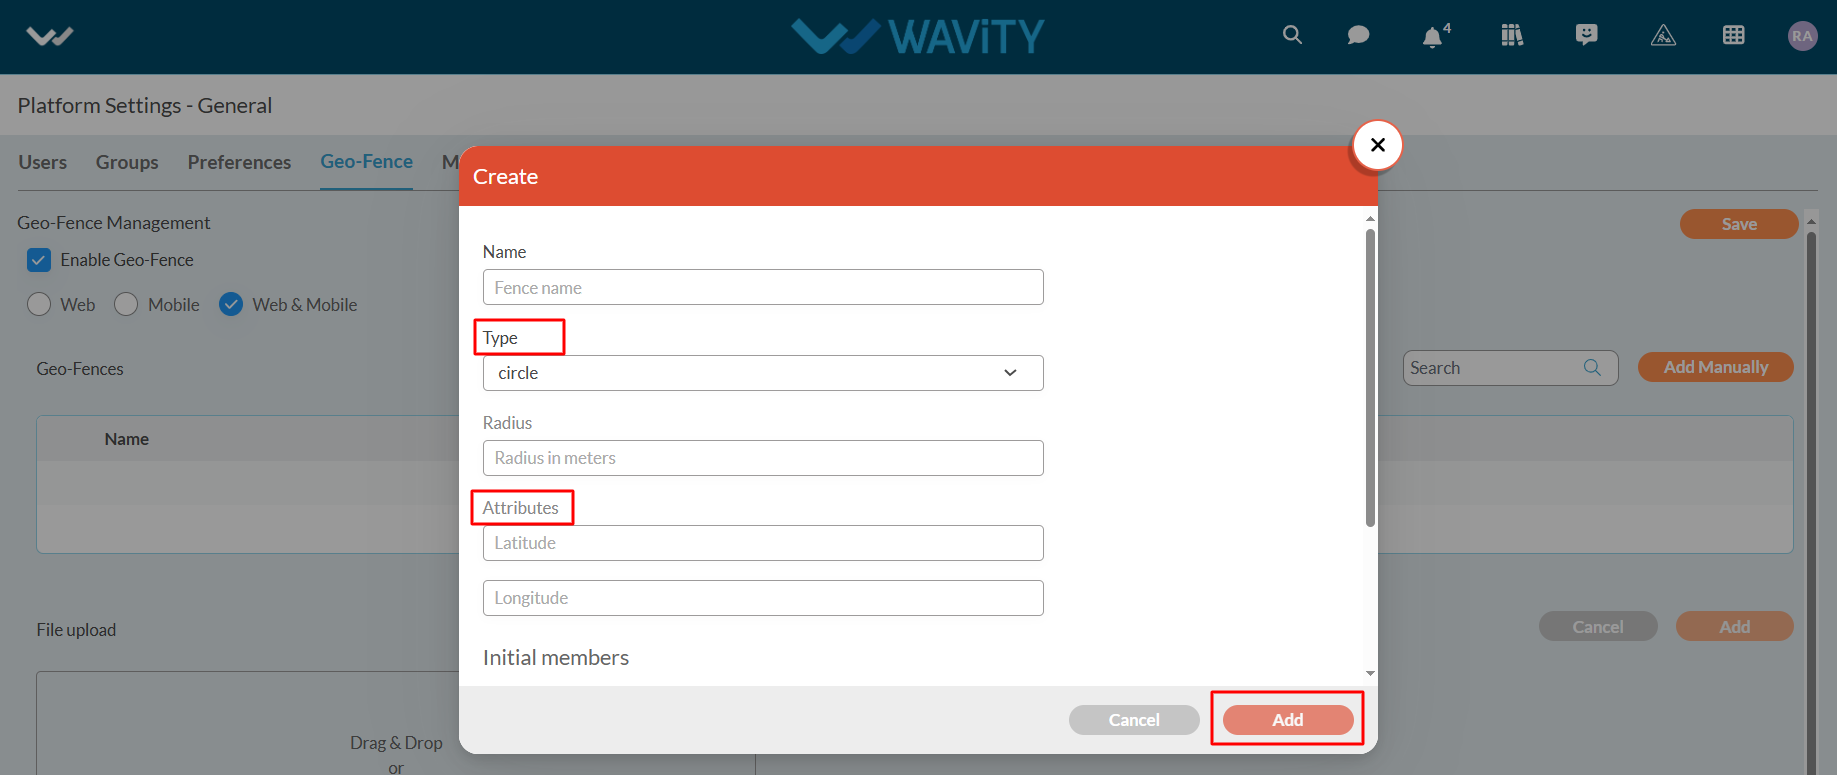
How To Add Geo-Fences?
- Only admin of your organization can enable Geo-Fence Management. Generally, this feature allows an administrator to set geographical areas to limit where an employee or user is permitted to check-in and check-out.
- To set default landing page, click on Profile Icon > Platform Settings – General > Geo-Fence.
- Select the options for which device you want to add Geo-Fence and click on save.
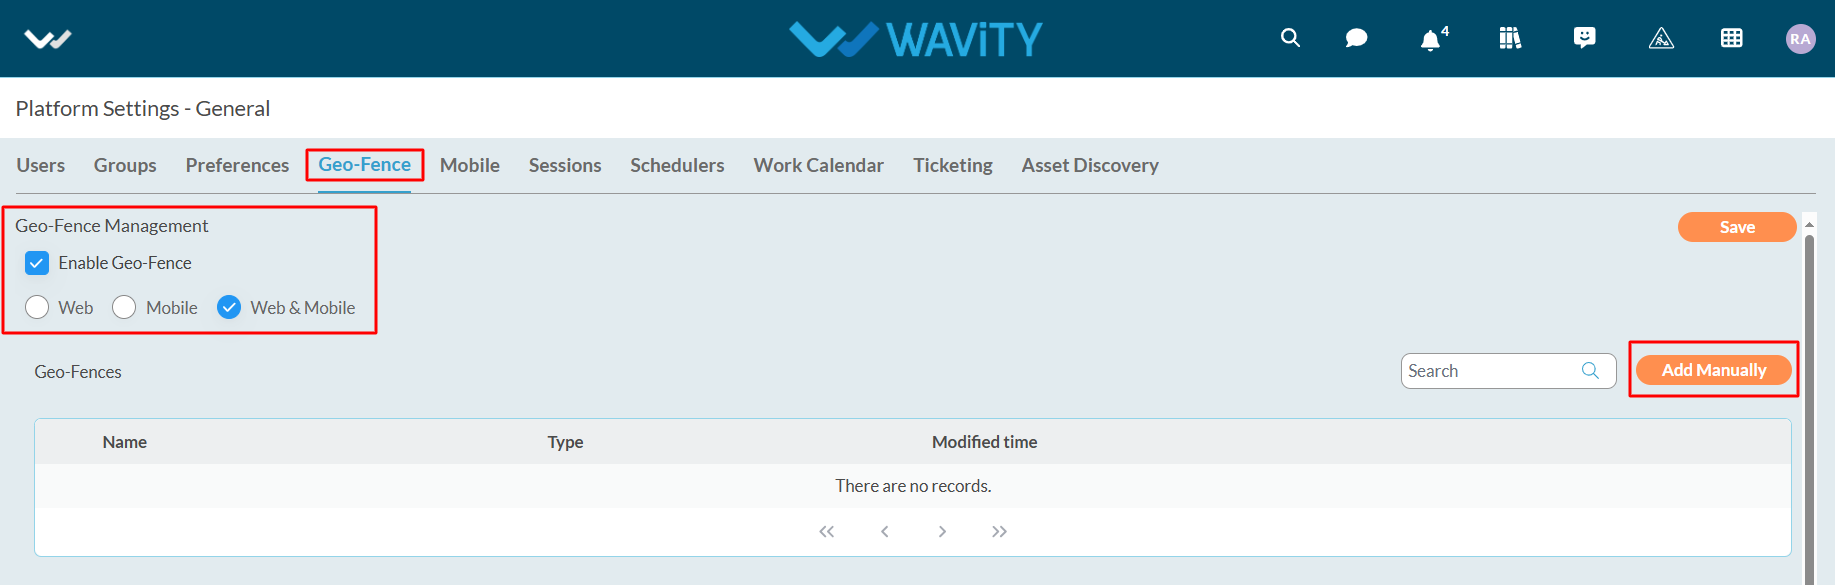
- You can add manually Geo-fence parameters such as latitude, longitude as per your requirements.
- When user trying to create/update the record; the system will validate whether the user is inside the set geo fence or not. On the basis of the validation, system will show pop up error if the user is outside the geo-fence.
- Similarly, system will allow the user to create/update a record if the user is inside the geo-fence.
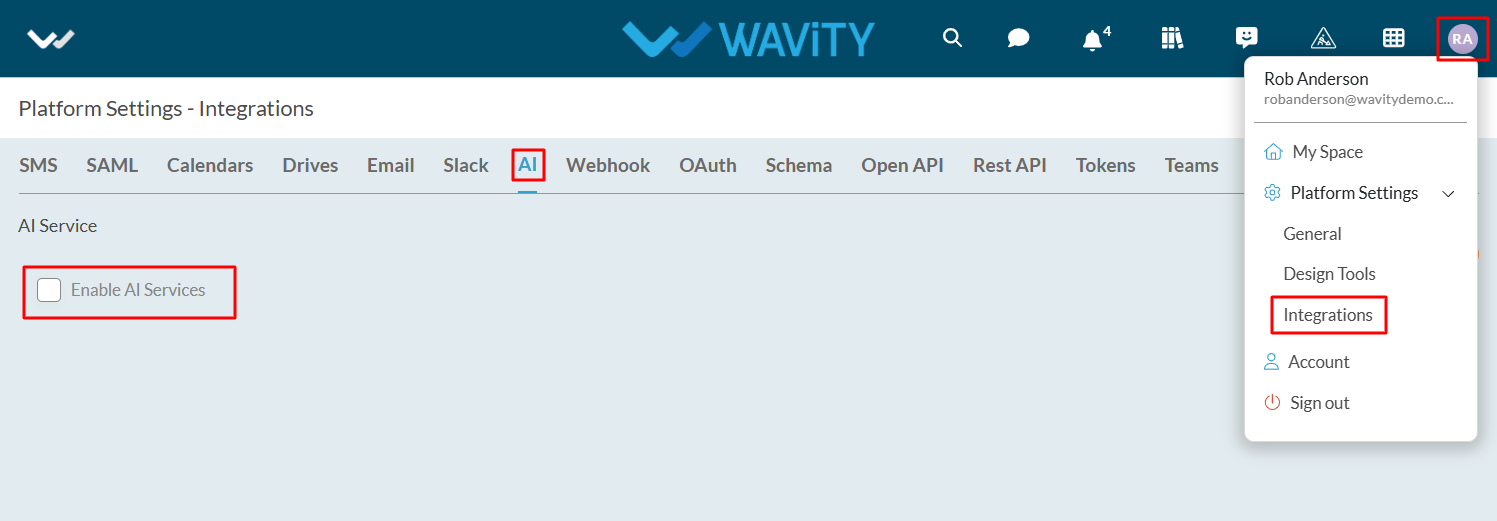
How to Enable AI Services in Wavity Platform?
- In Wavity Platform, You can enable AI Service. Enabling this function will allow the use of Artificial Intelligence tool to automate ticket resolution with AI automation and real time sentiment analysis.
- Only Admin has the access to enable AI Services in the platform.
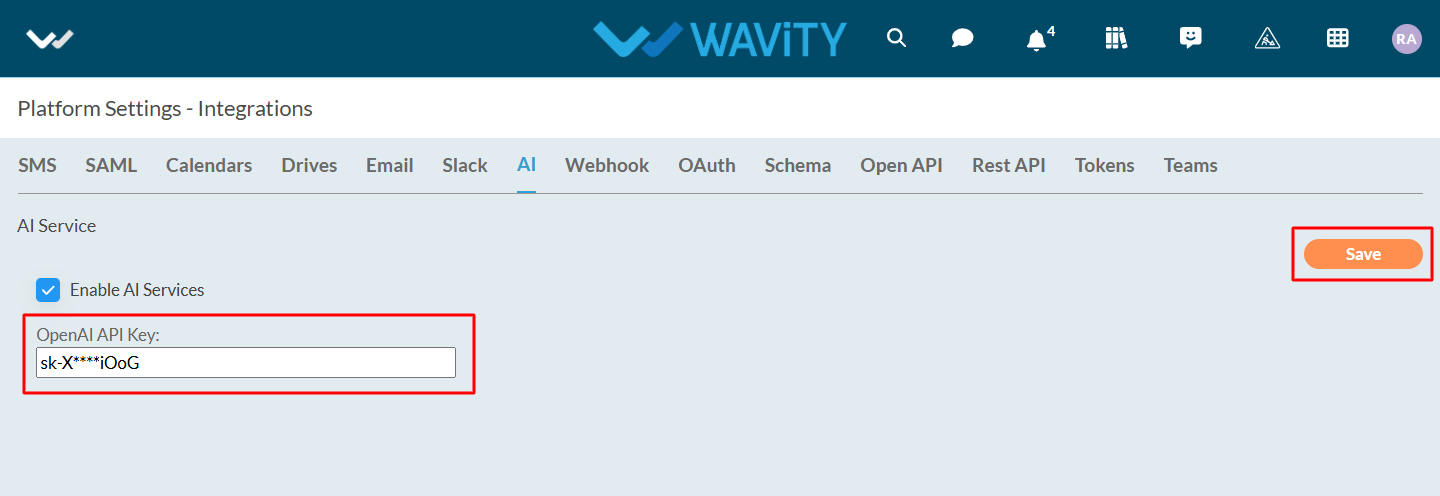
- To enable AI Services, click on Profile Icon > Platform Settings - Integrations > AI
- Check the box next to the label ‘Enable AI Services’. Enter the OpenAI API Key and click on “Save” button update this function in the platform.
AI Services in Wavity:
- Automated Ticket Categorization & Routing
- AI Sentiment Analysis
- AI Chat Bot
Automated Ticket Categorization & Sentiment Analysis:
- Wavity's AI Assignment feature automatically categorizes tickets by analyzing the content of the email body or description of ticket, thereby streamlining the ticket management process and improving efficiency.
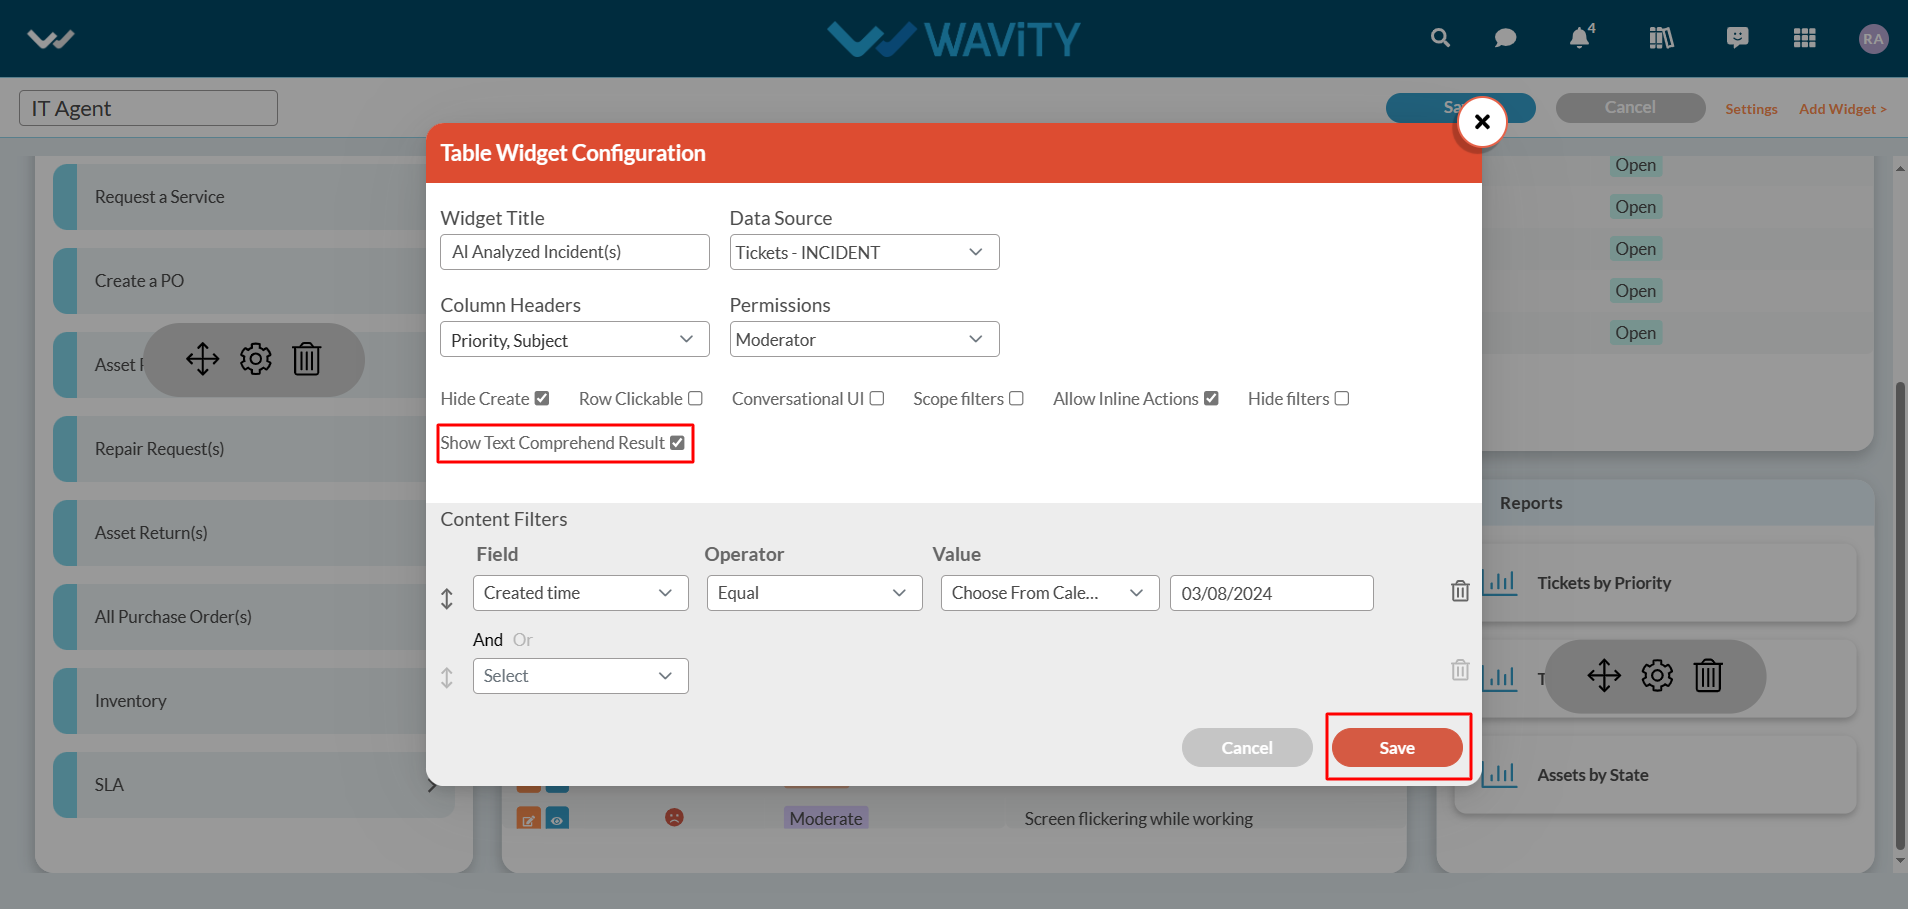
- As the first step, You can enable AI into the Interface by clicking on Edit dashboard option as shown below.
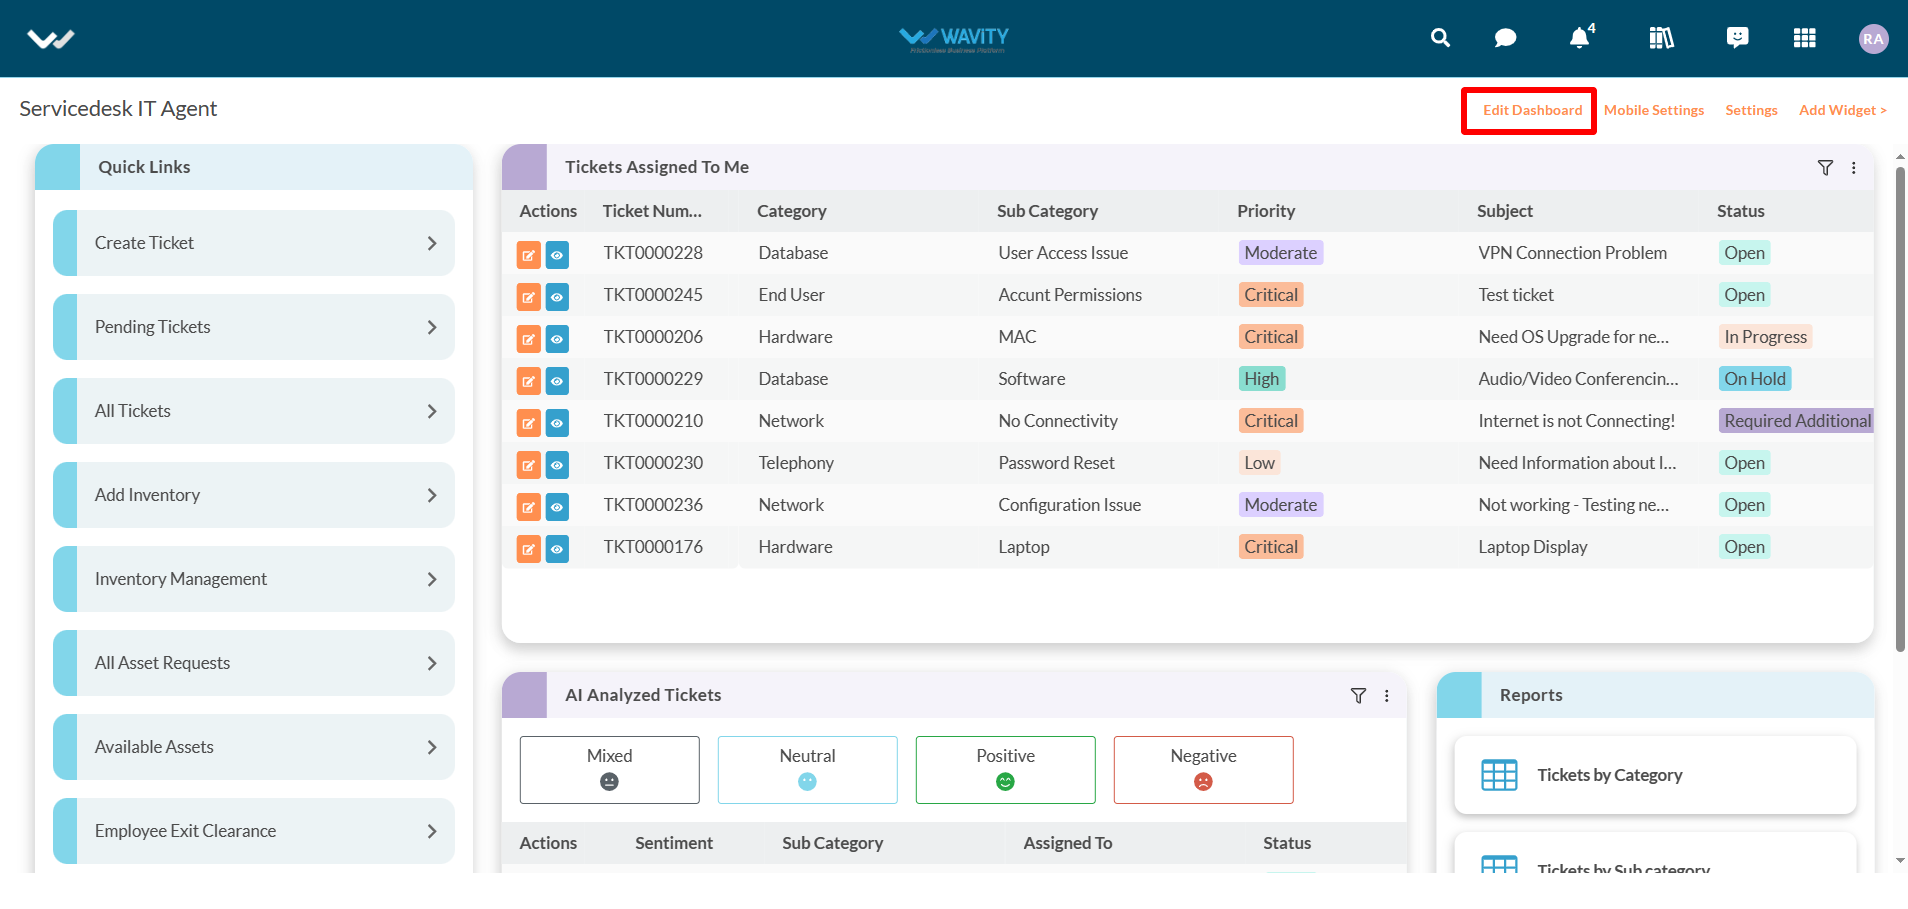
- Click on “Setting” Icon on the Widget as shown below.

- Select “Show Text Comprehend Result” and click “Save” button to enable AI Sentiment analysis with "emoji" icons in the interface.
- Additionally, you can view the details of AI Ticket Categorization for each ticket by clicking on the "blue" icon, as shown in the image below.
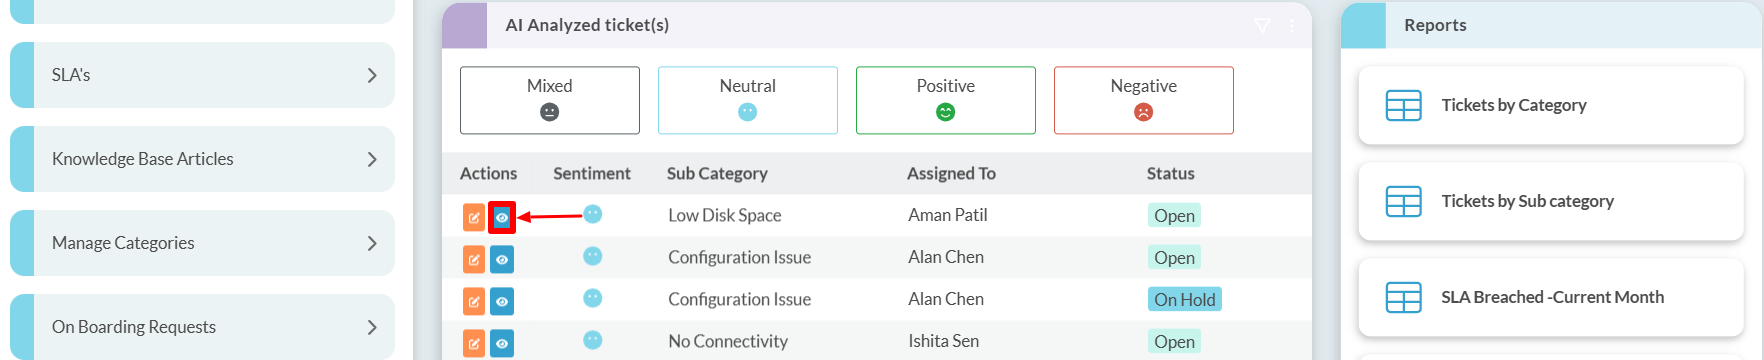
- Next, click on the "three dots" menu and select "Details," as shown in the image below.

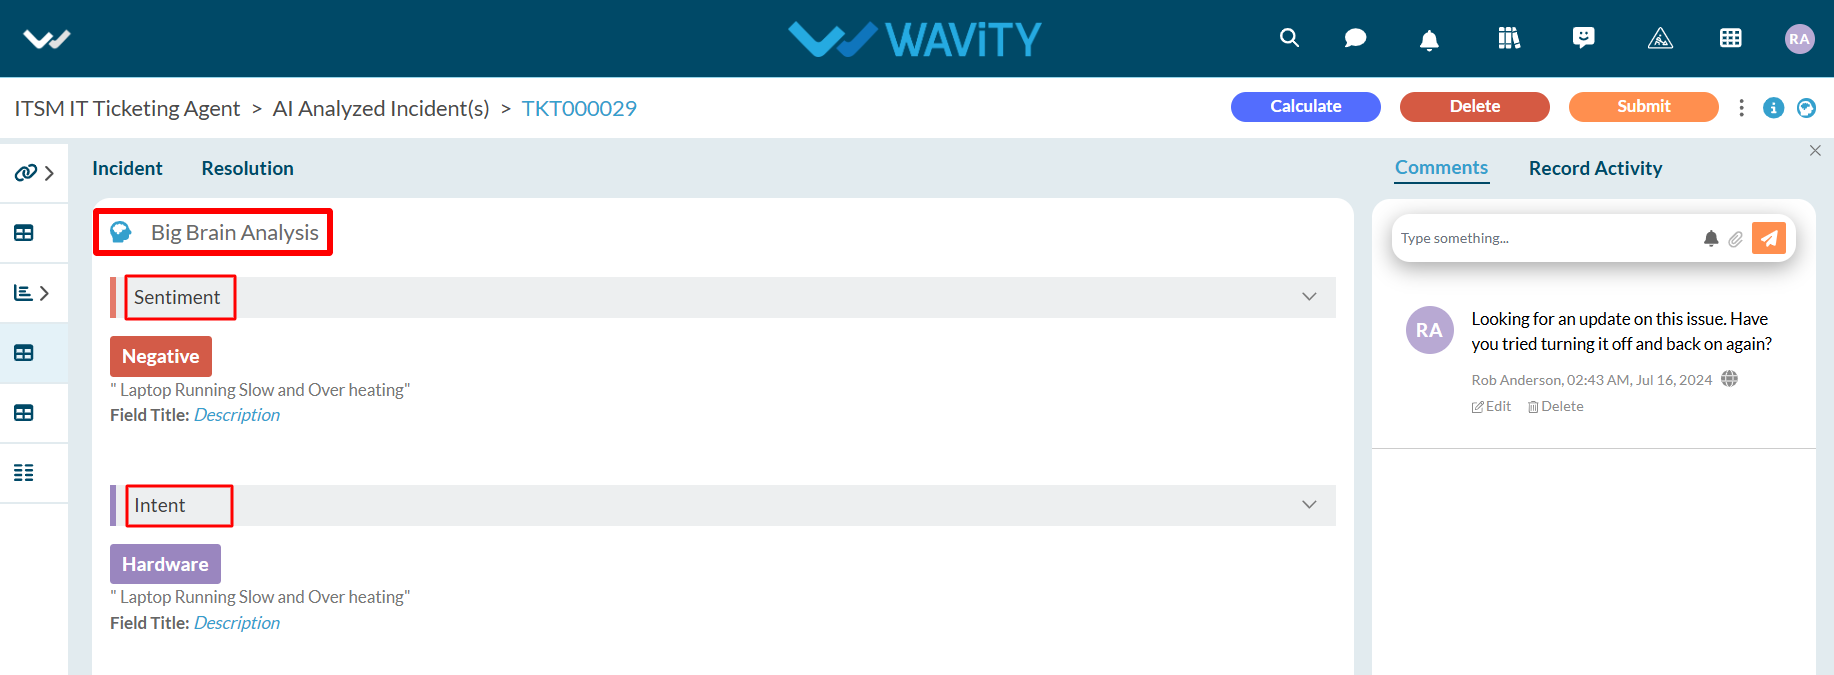
- Click on "Big Brain Analysis" icon.

- This section displays the sentiment of the user who created the ticket, along with the AI-generated ticket categorization under the Intent category. Based on the category identified in the Intent, AI can automatically assign the ticket to the appropriate agent.
- AI Chat bot: For more details, please click on the following link: How to use AI ChatBot in Wavity | Wavity
How to set default landing page?
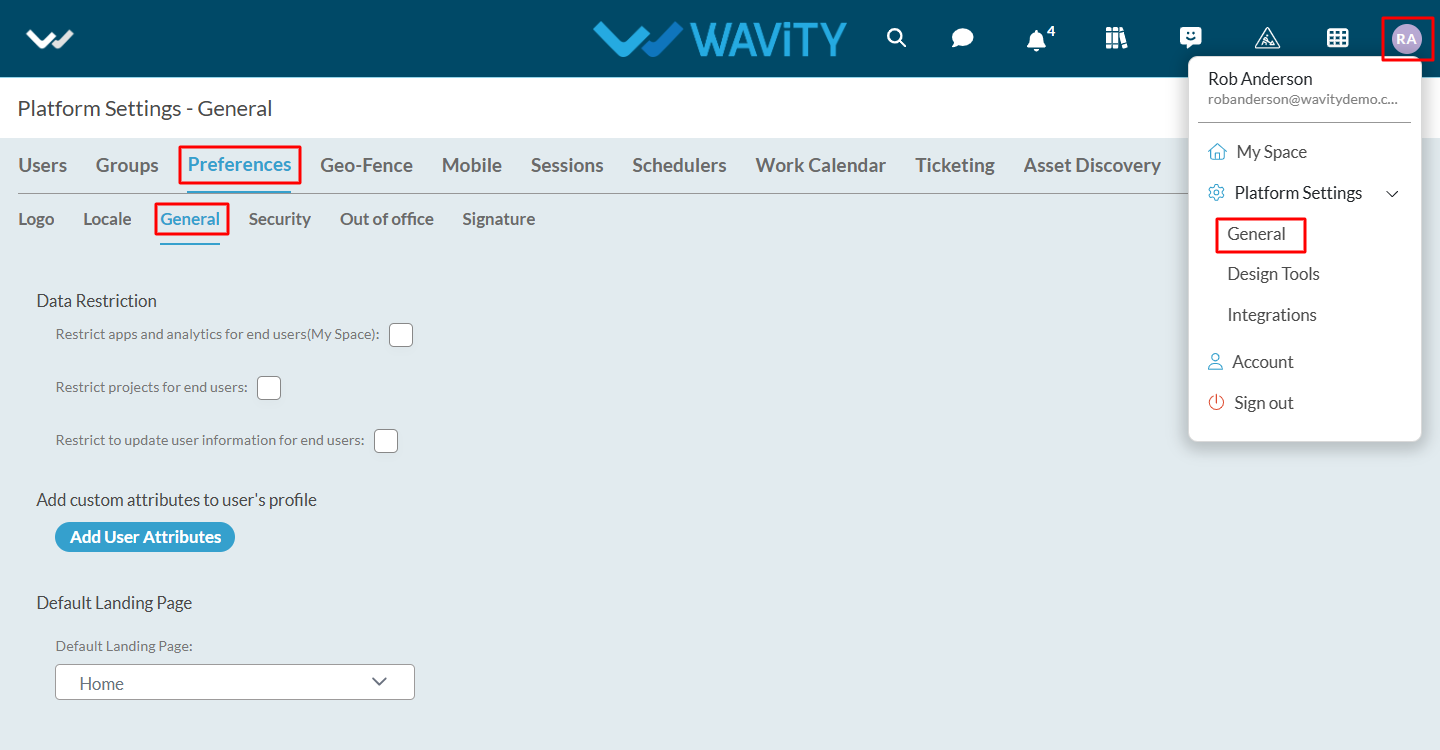
- In the Wavity platform, you can configure a default landing page for all users.
- Admins or Solution Owners have the authority to set this default at the platform level. However, end users can customize their own landing page through the Profile Settings.
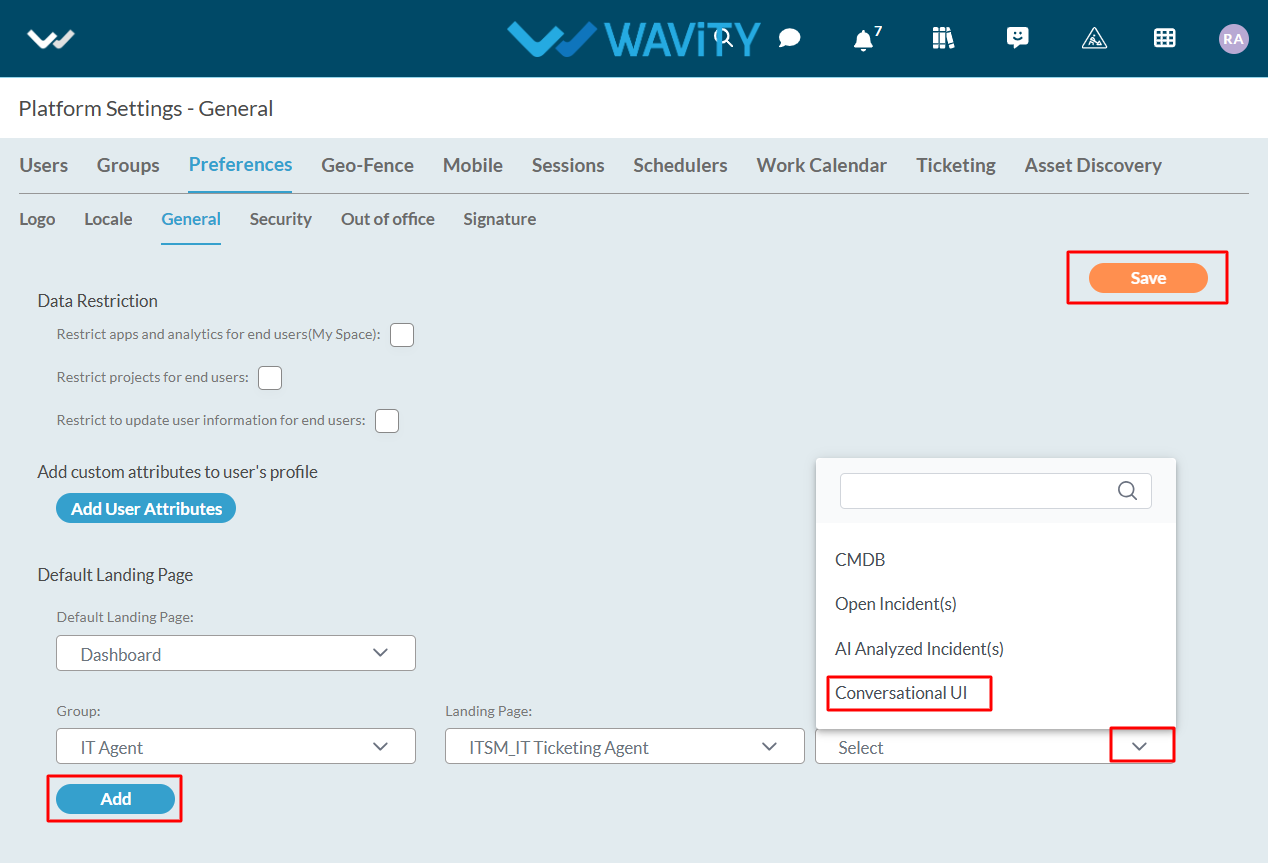
- To set default landing page, click on Profile Icon > Platform Settings - General > Preferences > General.
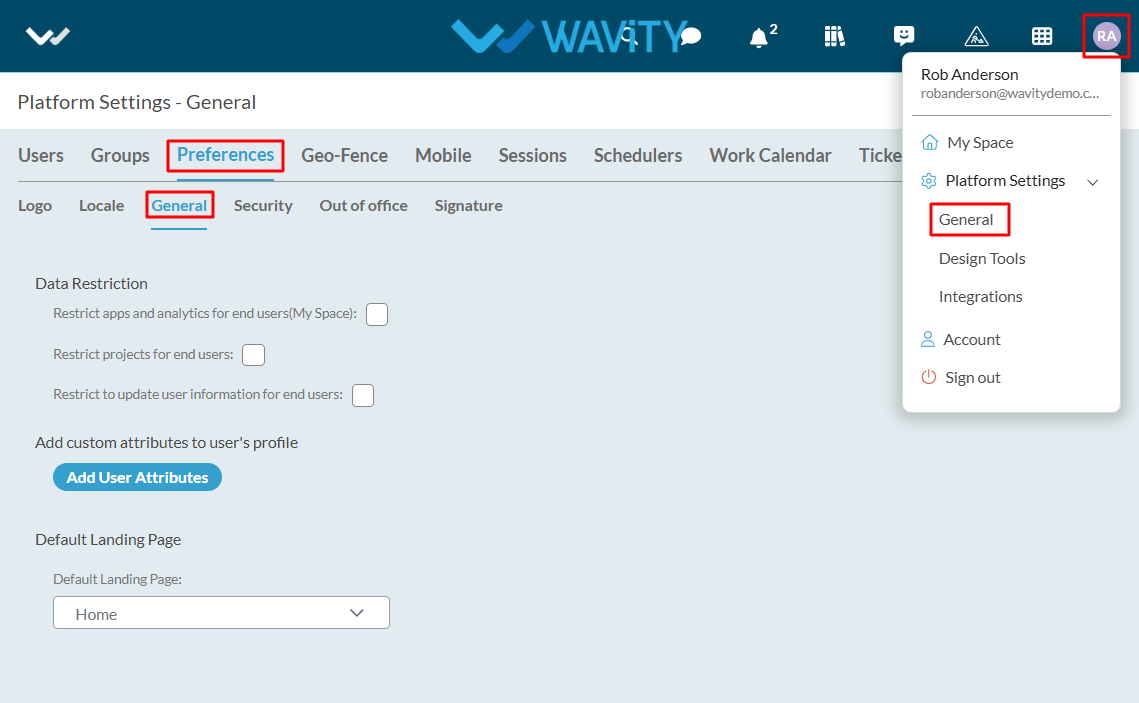
- In the Default Landing Page tab, select the desired landing page as needed.
- Click the “Save” button to apply the default landing page for all users.
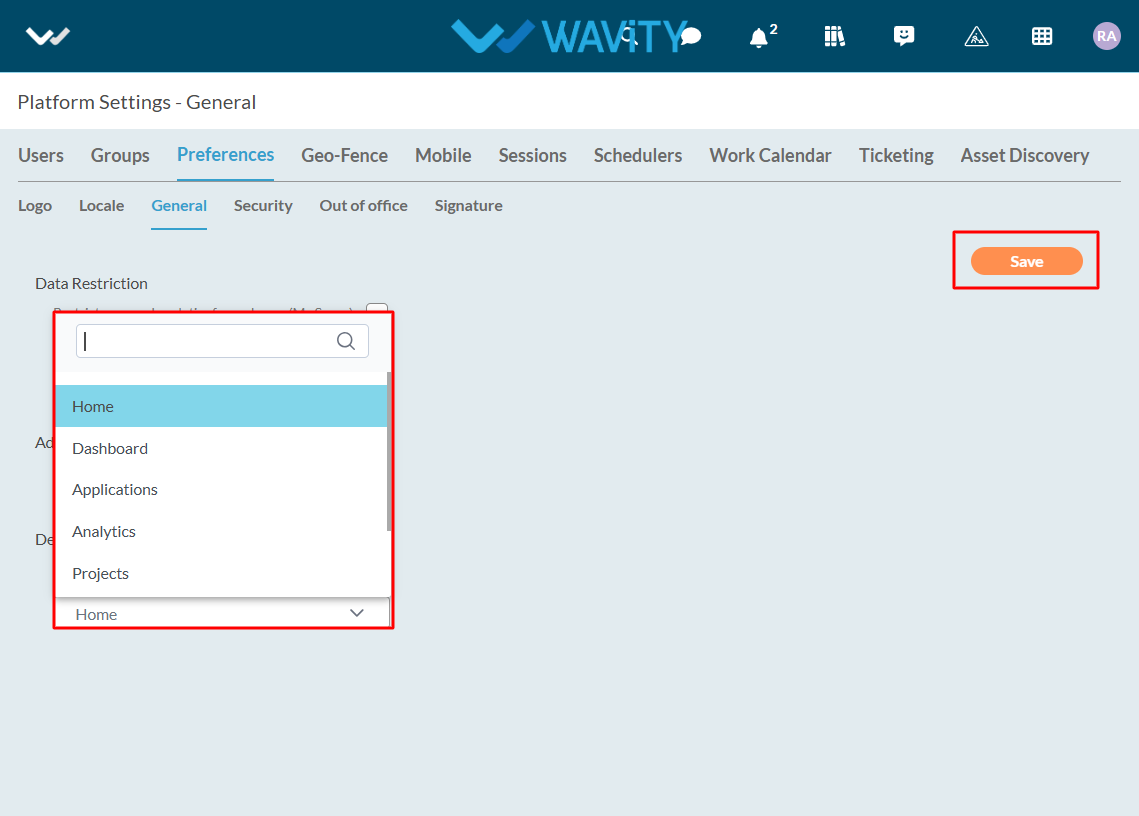
- If you choose Dashboards as the landing page, you can select the group and specific landing page using the dropdown menus, as shown below.
- All users in the selected group will, by default, be directed to the chosen landing page upon login.
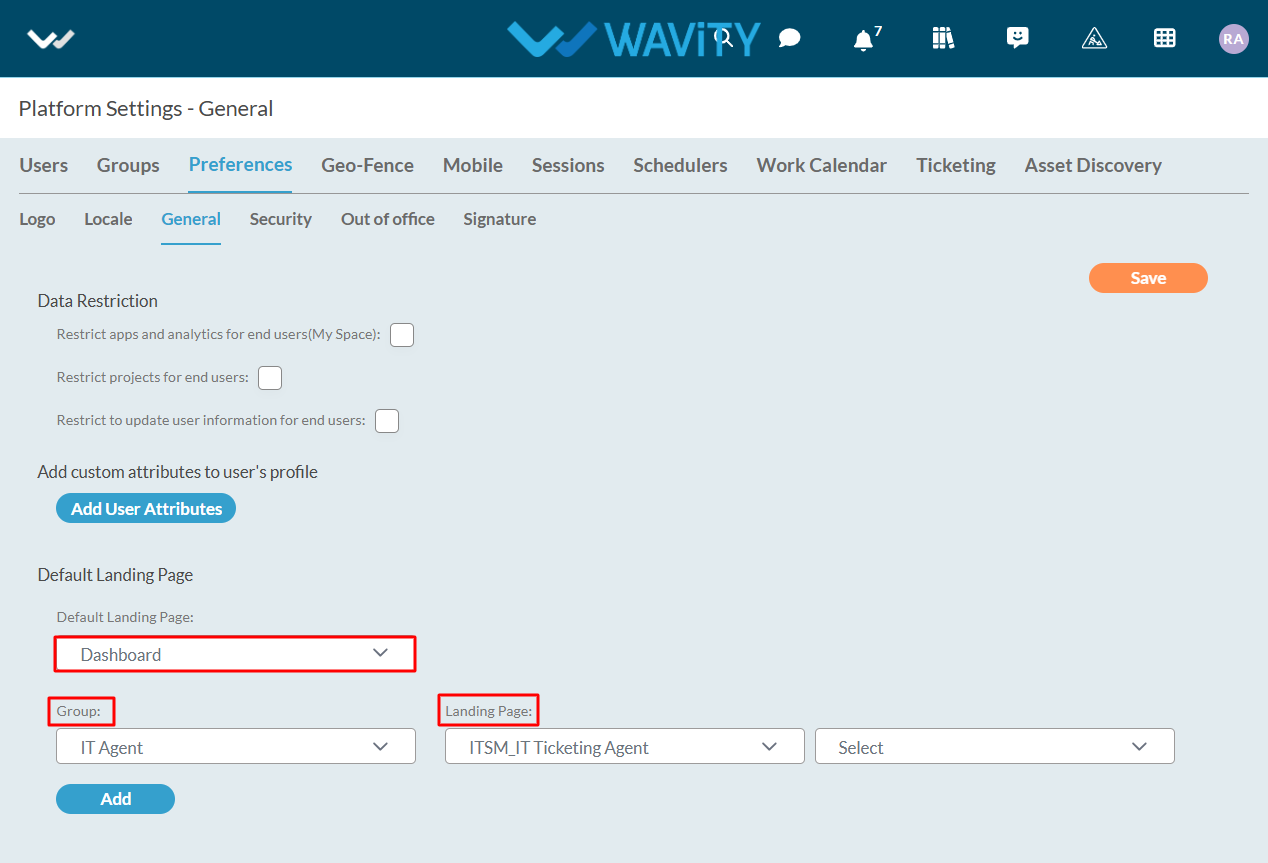
- You can also choose specific widgets as the landing page by selecting them from the dropdown menus.
- Click the “Save” button to finalize and set the default landing page.
How to set Data Restriction?
- In the Wavity platform, you can enable data restrictions to control user access. When enabled, non-admin users will be restricted from creating, editing, or viewing apps and analytics data across the entire platform.
- Only the Admin of your organization has the authority to configure and manage data restrictions.
- To set data restriction, click on Profile Icon > Platform Settings – General > Preferences > General.
- If needed, select the checkbox next to the label ‘Restrict apps and analytics for end users’.
- Similarly, check the boxes for ‘Restrict projects for end users’ and ‘Restrict updating user information for end users’ as required. Finally, click the “Save” button to apply the data restrictions.

How To Set Default Locale?
- In the Wavity platform, you can set a default locale that defines the platform's time zone, region, and language. Admins have the authority to configure the default locale for the platform. However, individual users can customize their own locale settings through the Profile Settings section.
- To set default locale click on Profile Icon > Platform Settings – General > Preferences > Locale.
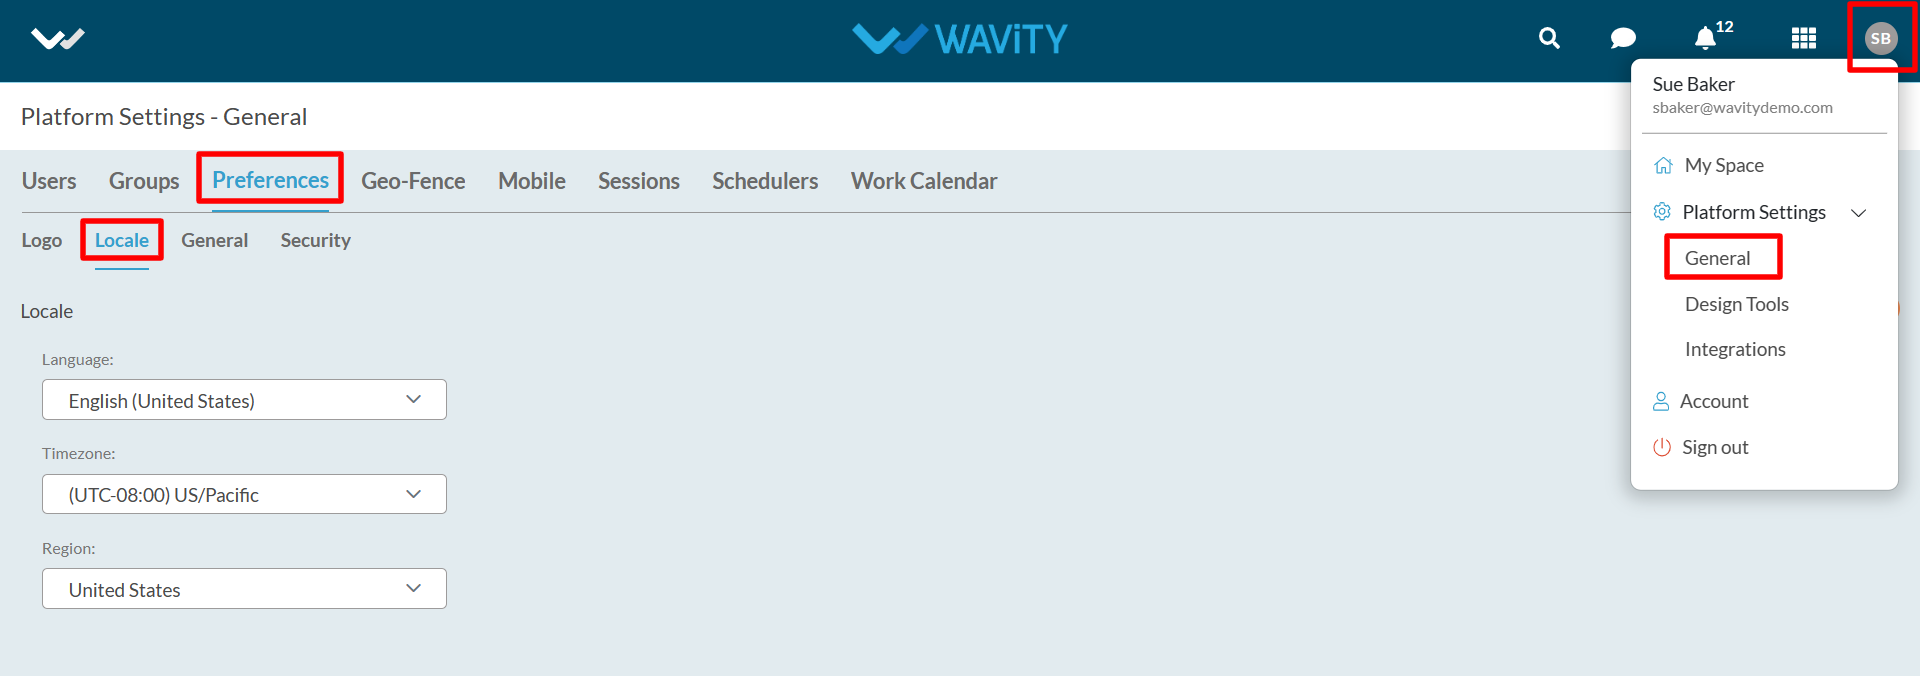
- Here, You can set the Language used in platform, Timezone and Region using the dropdown. Once selected, Click on “Save” button to update default locale of the platform.
How to Upload or Change the Organization Logo?
- In the Wavity platform, you can replace the default Wavity logo with your company or organization’s logo.
- Only Admins have the authority to upload or change the logo on the platform.
- To upload logo click on Profile Icon > Platform Settings – General > Preferences > Logo.
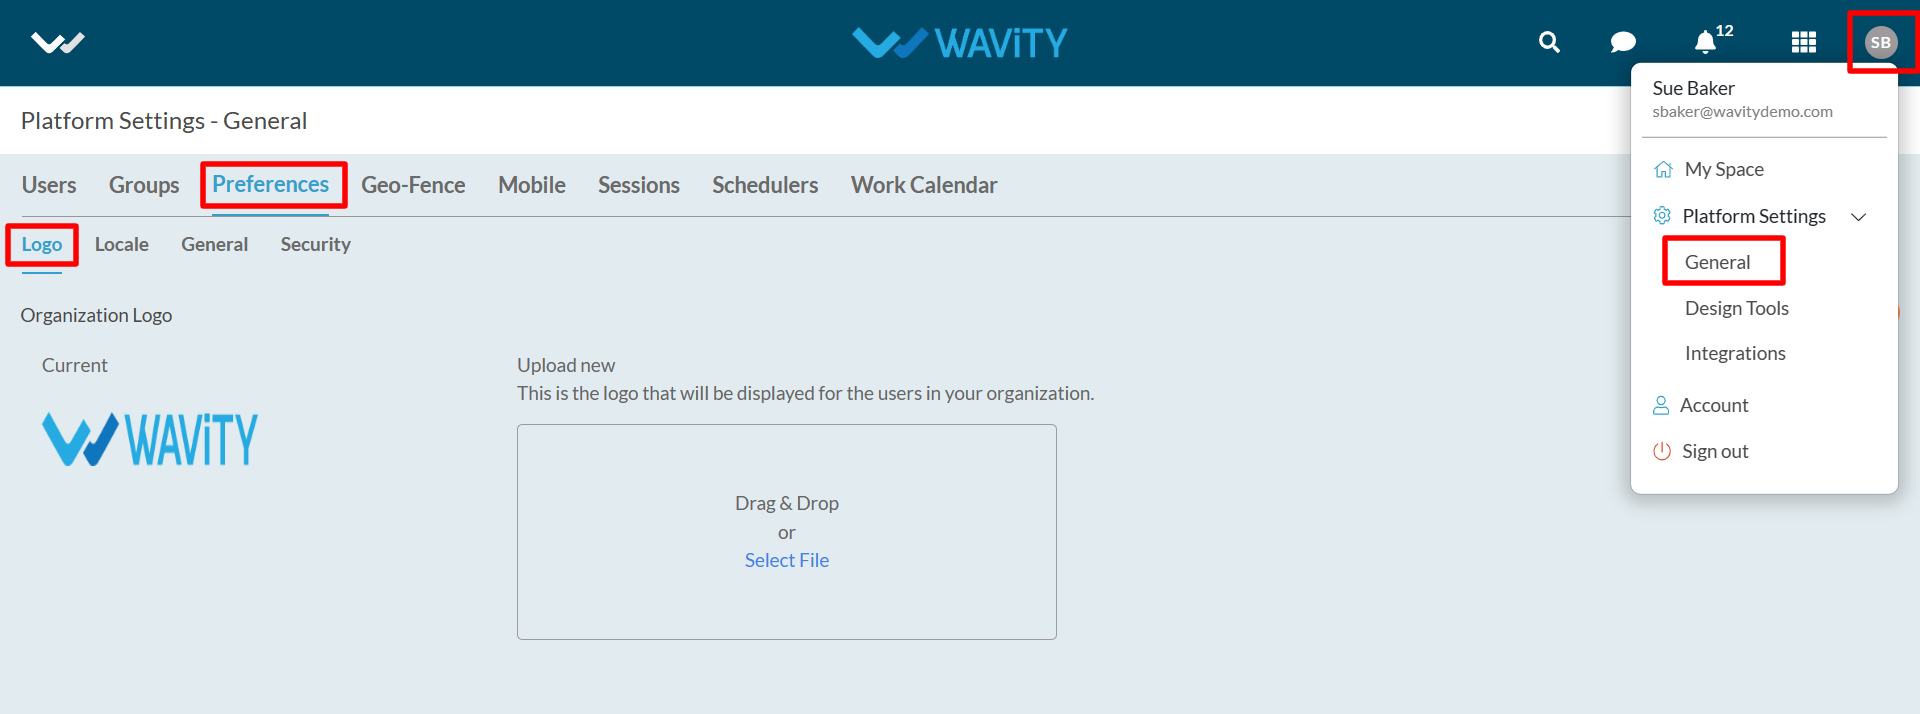
- Use Drag & Drop option or Select file option to upload the logo. Once your logo is uploaded in the platform. Click on “Save” button to upload/replace the logo in the platform. Preferred parameters for the logo: Transparent background with a maximum size of 160px width by 40px height.
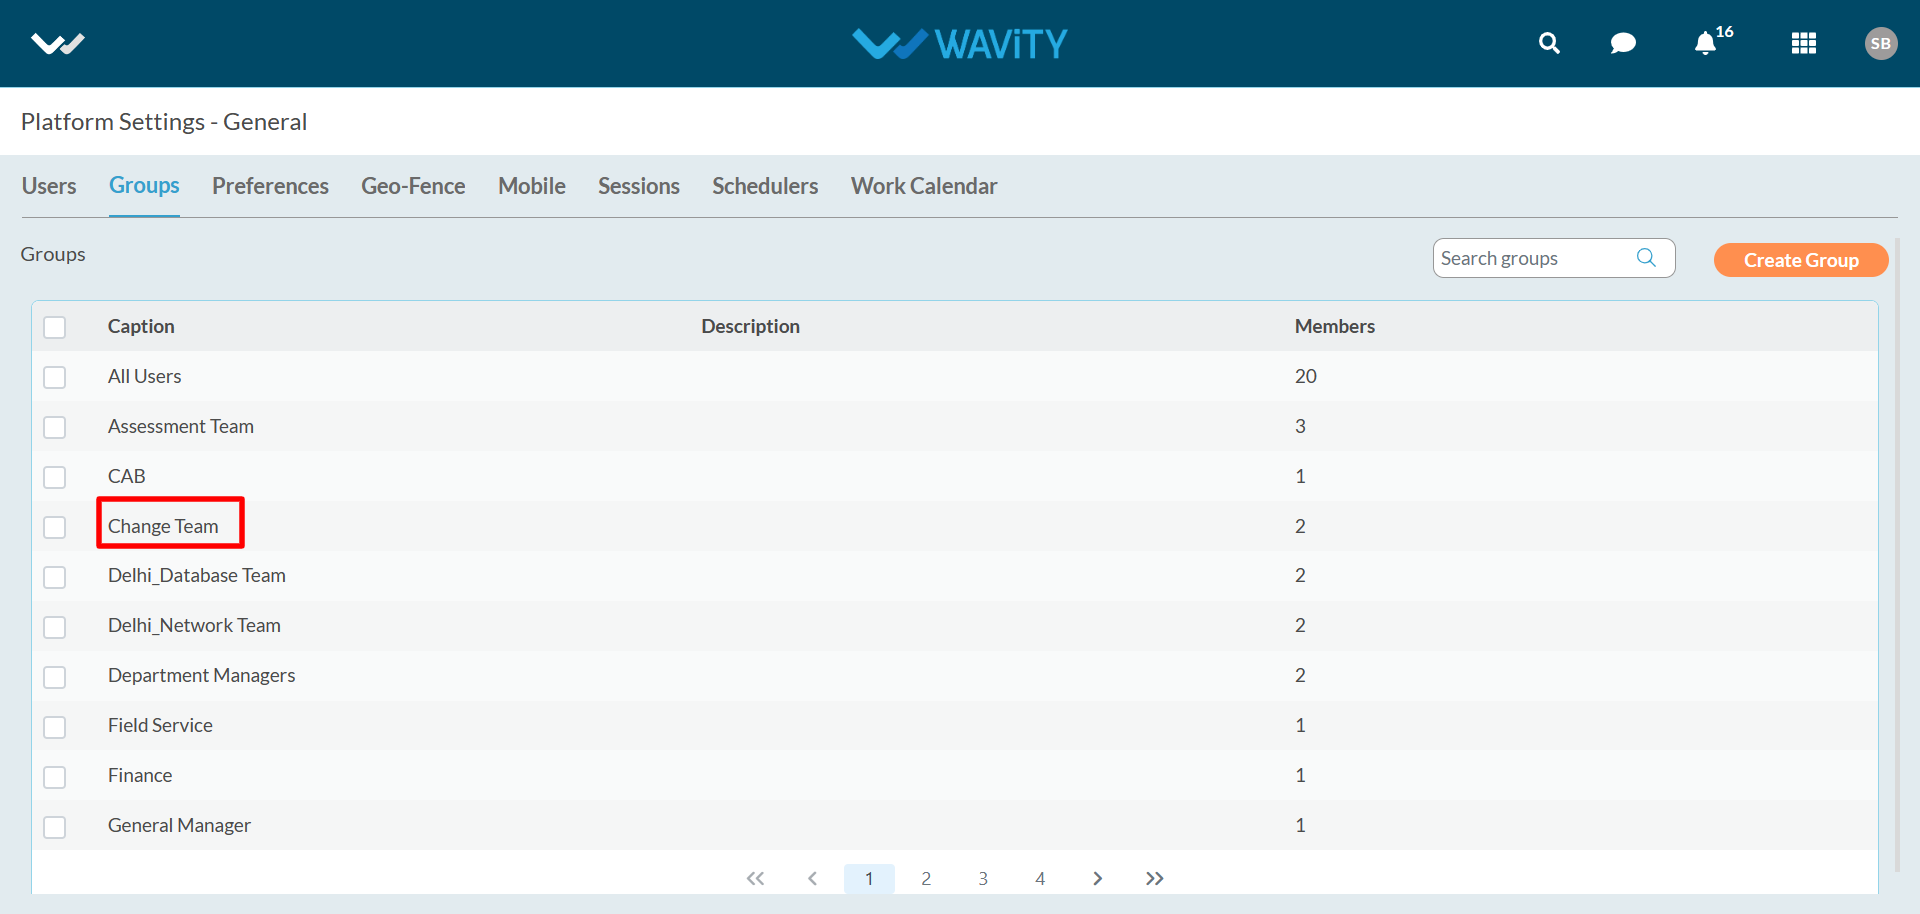
- In Wavity, Groups help organize your organization's members into departments, teams, and more. Only your company’s Admins have the ability to create or edit Groups. This guide provides an overview of Groups in Wavity.
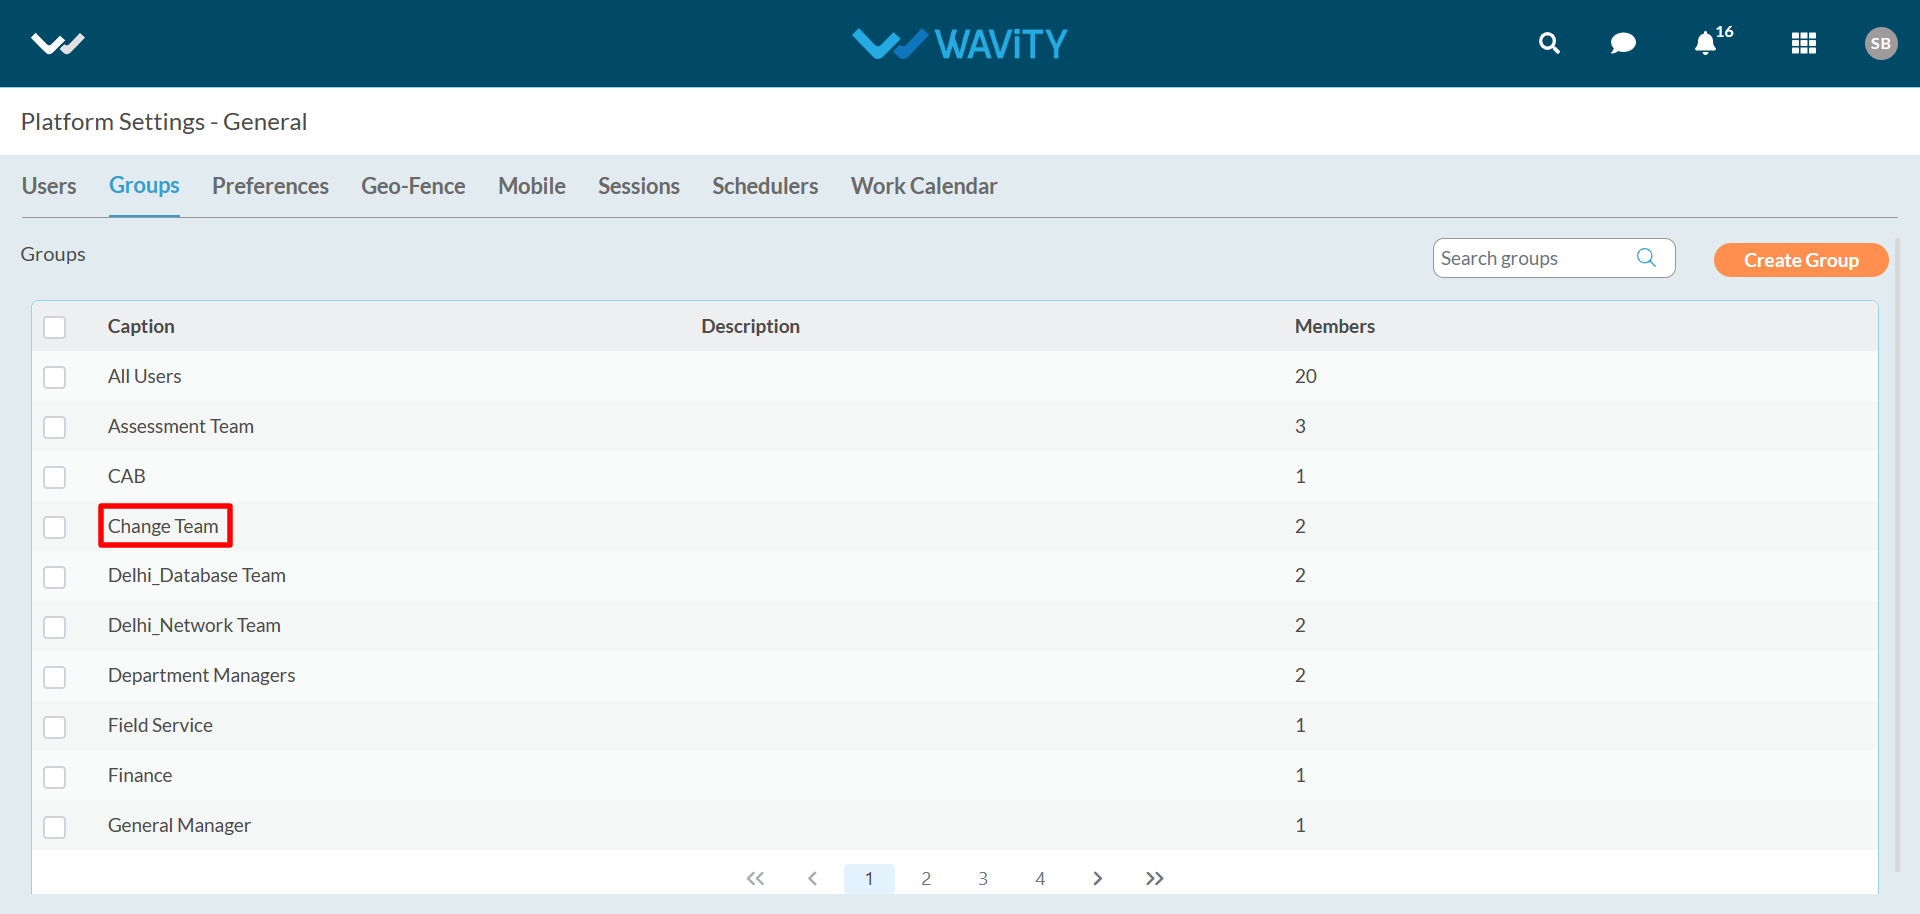
- Groups are found under ‘Platform Settings > General > Groups’
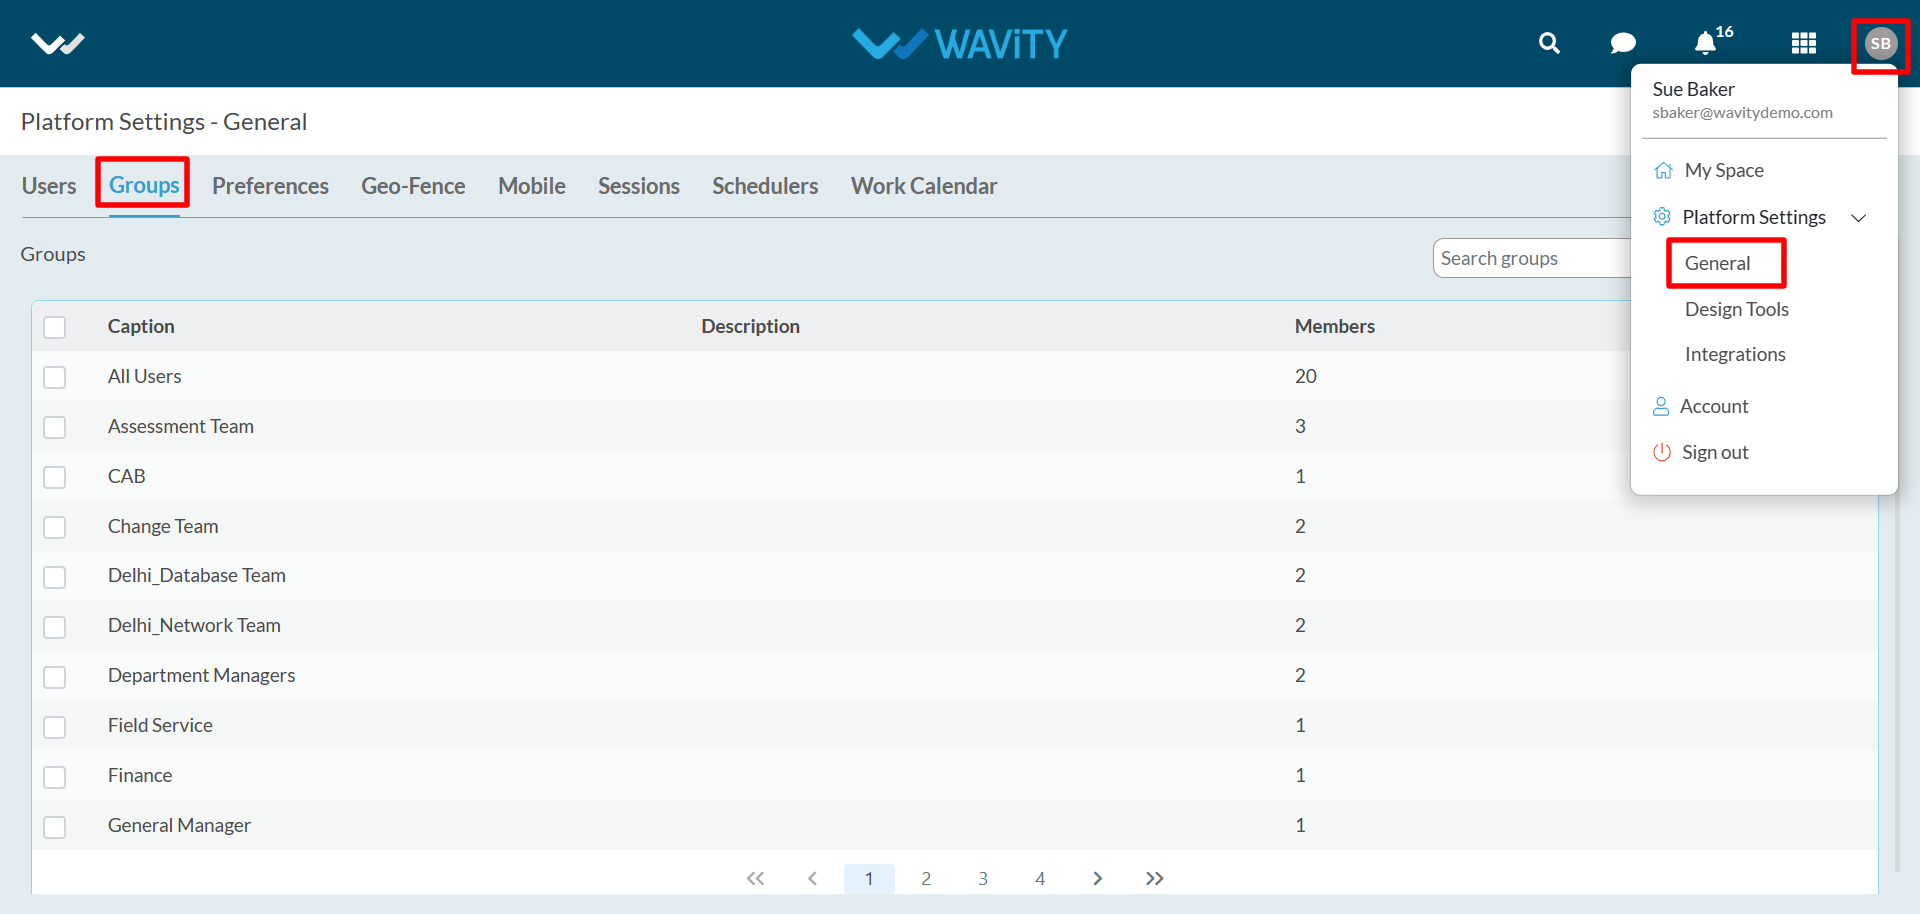
- You can create as many groups as you want.
- You can see the list view of groups along with caption, description and members count.
- You can find a group with using search.
- Navigate to ‘Platform Settings > General > Groups’ page.
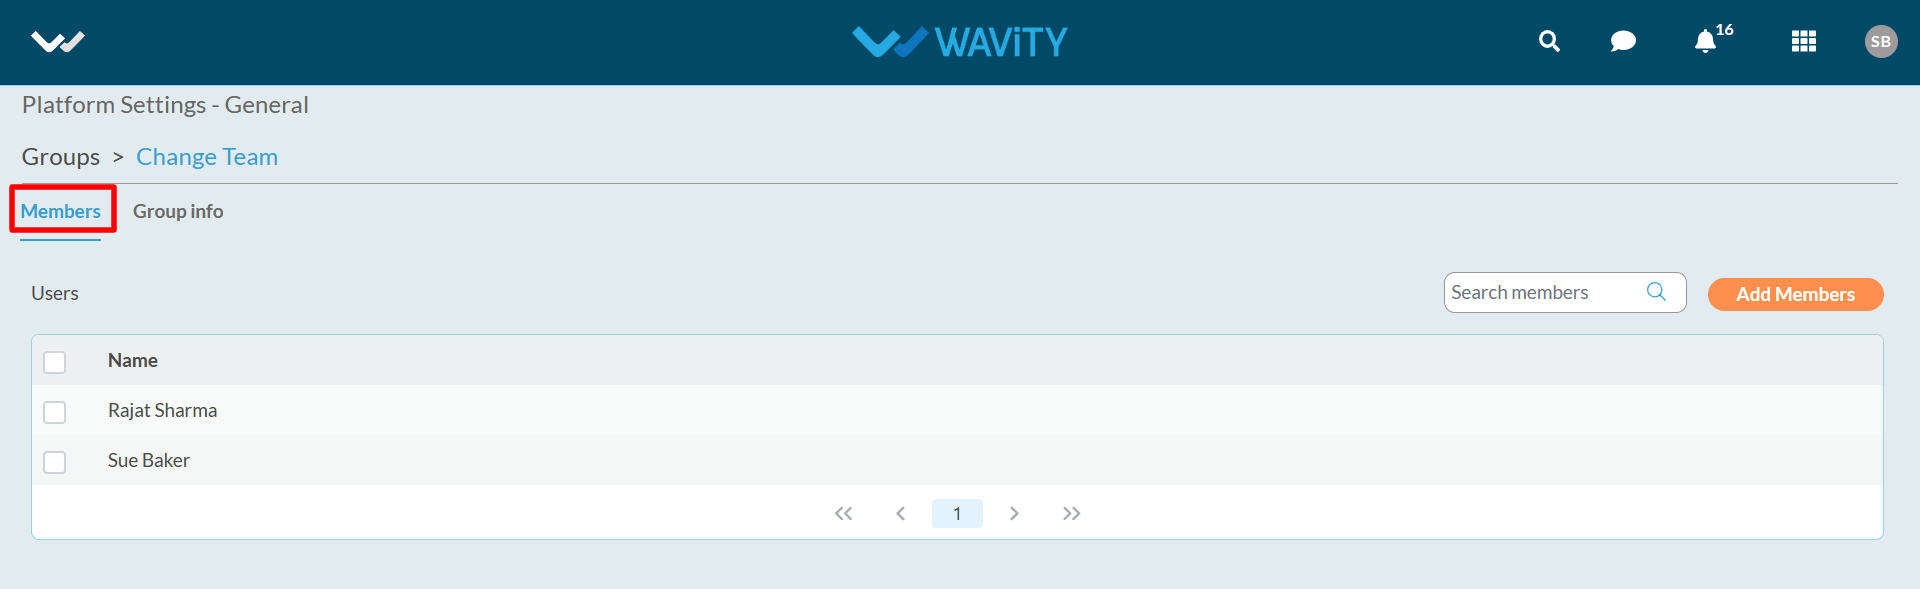
- Click on a group name to view all the information.
- You can view the group members. You can add or remove members as per your requirements.
- You can view group name and description under group info. You have the option to edit group name and description.
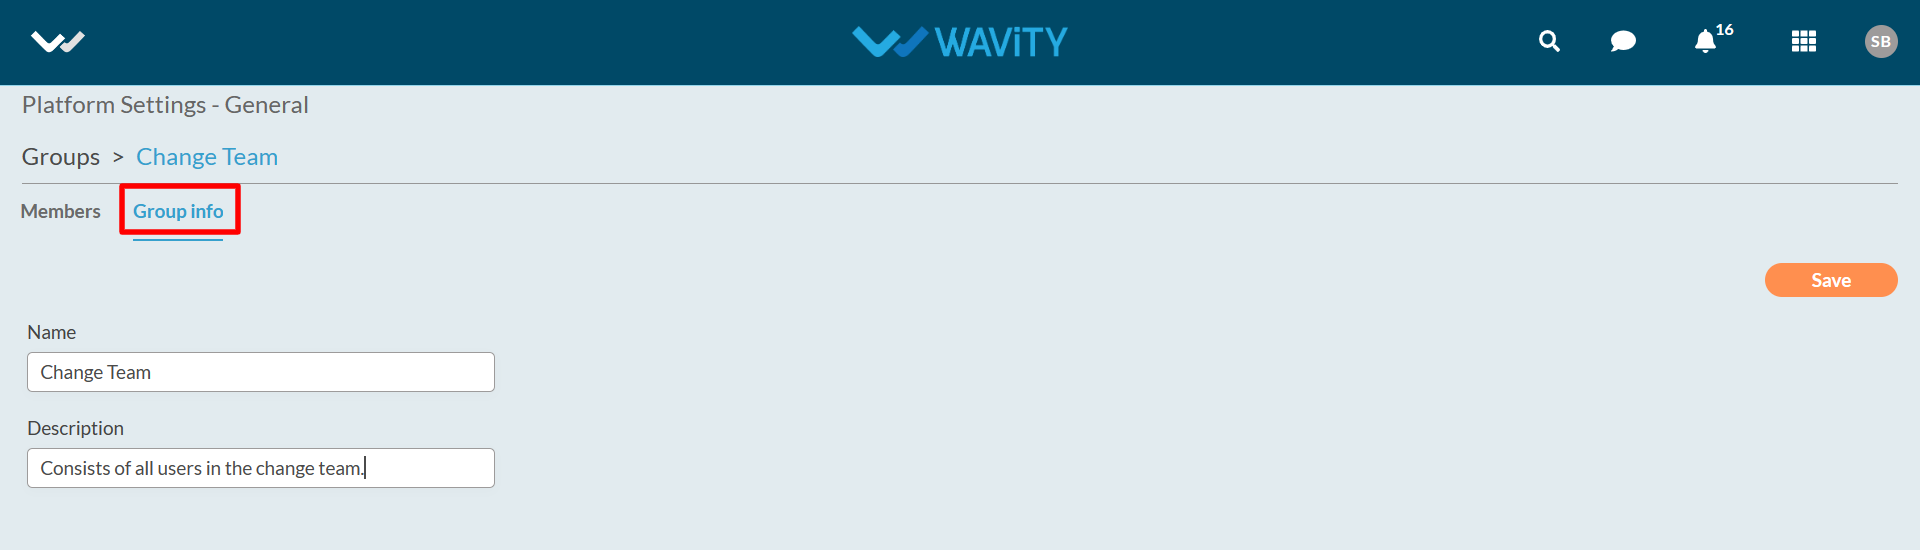
- Note: You must be an admin in order to access the settings and make changes.
Only Solution Owner/Admin can add member into groups in Wavity Platform.
Navigate to the groups listing page -‘Platform Settings > General > Groups.
Select the group to add members as shown in below image
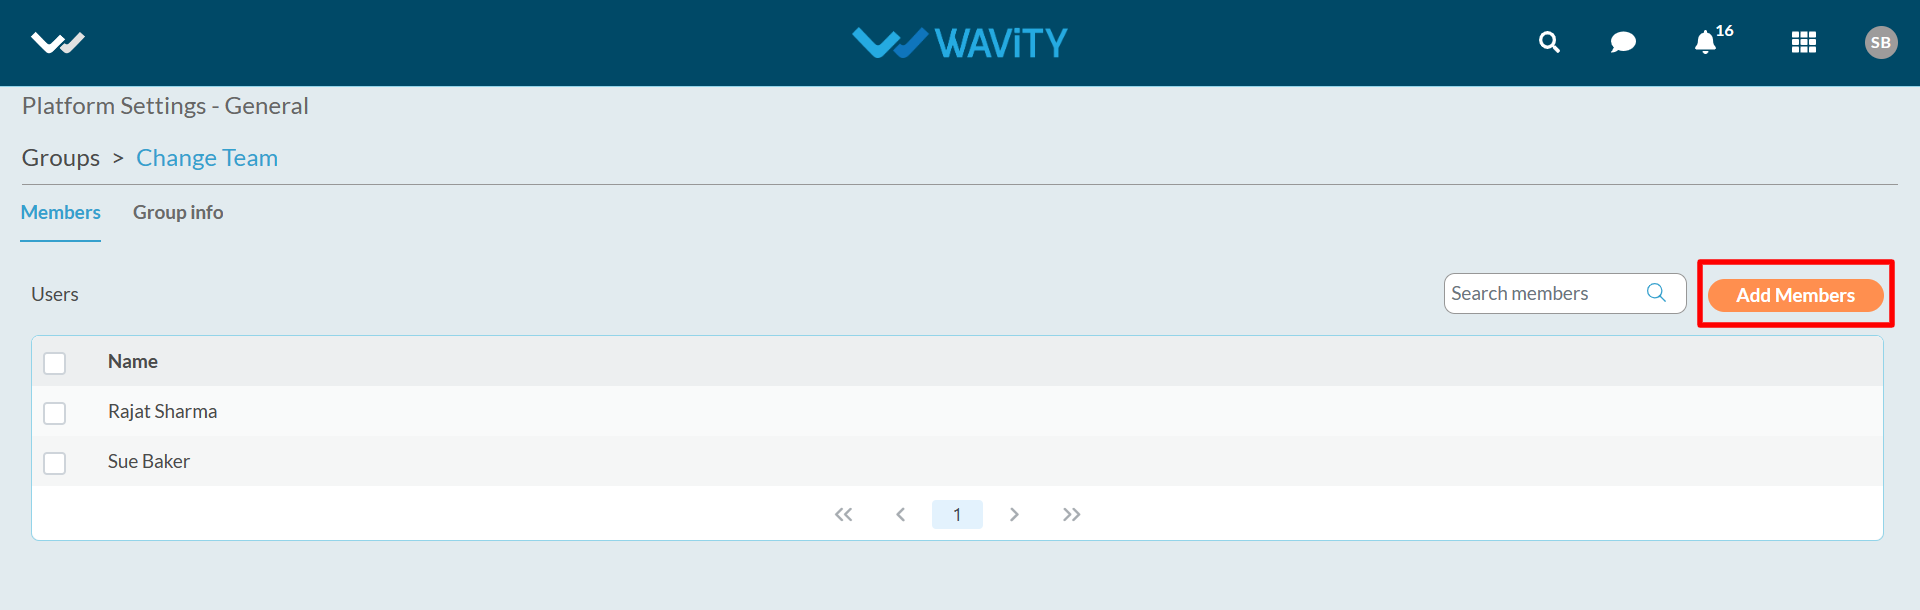
Add Members/Users into the group by clicking on the button as shown below.
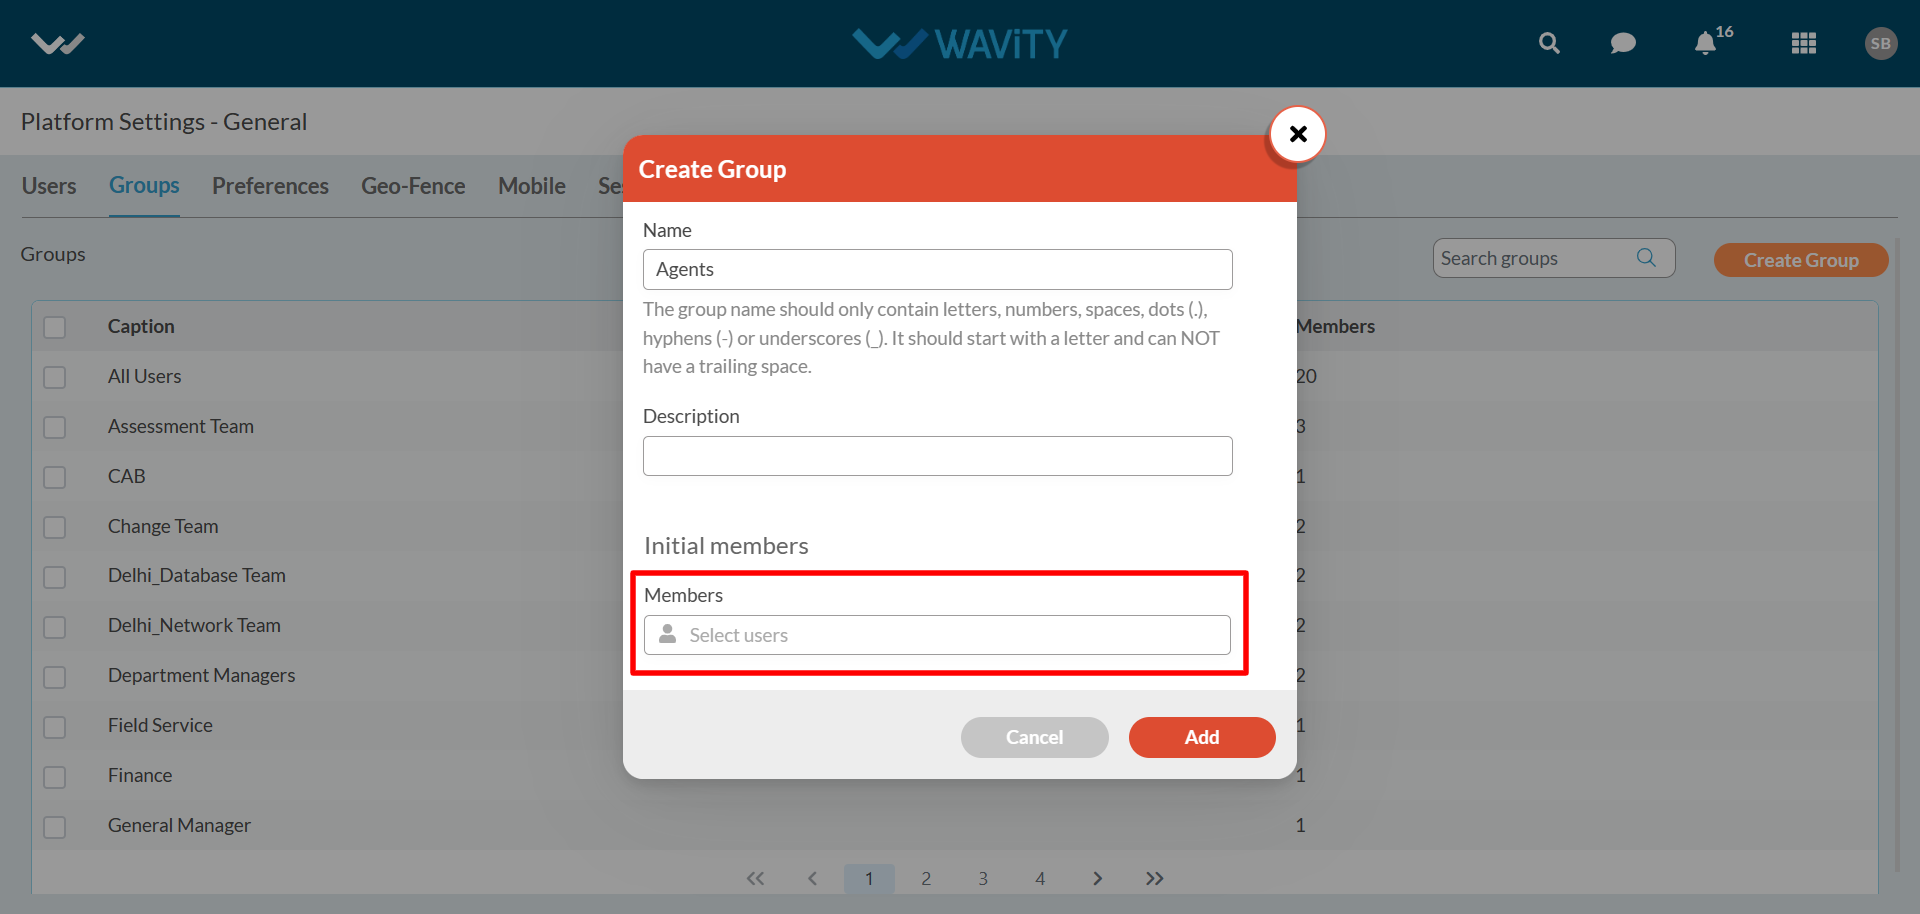
You can search for the user by entering few letters of user name. Select the ‘User Name’ you want to add in the new group.
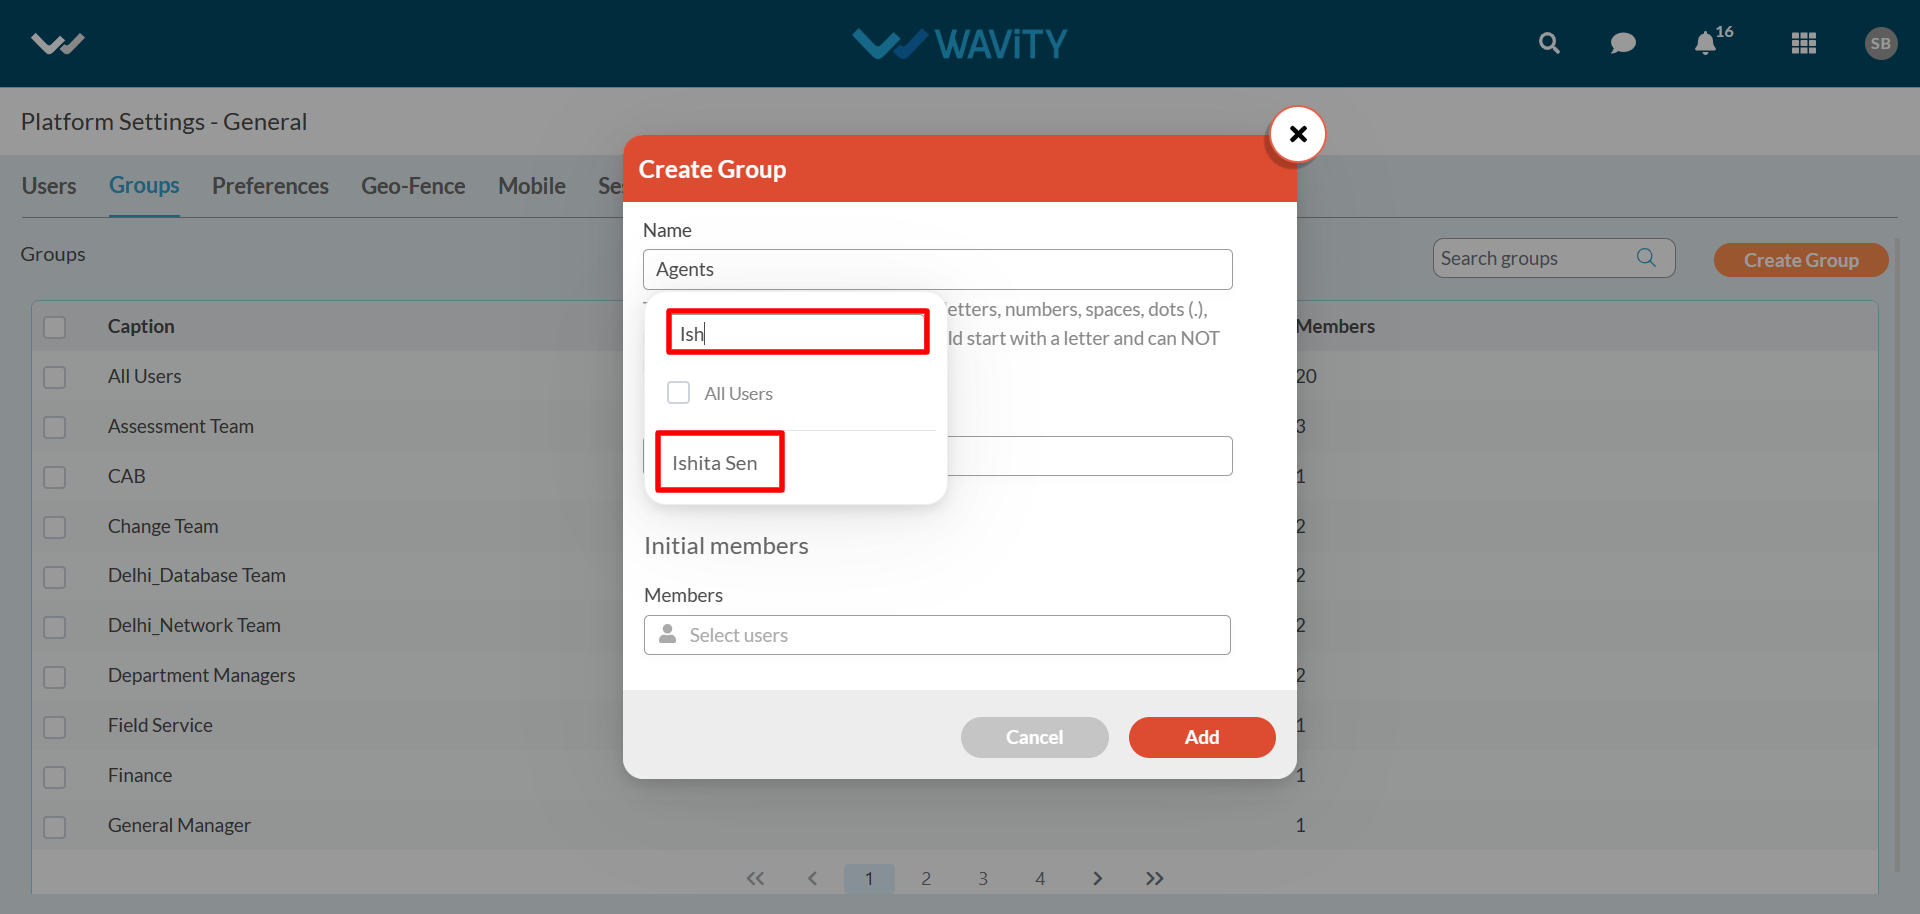
Click on “Add” button to create the new group. You can select multiple members into the group in one time.

How to remove members from the group?
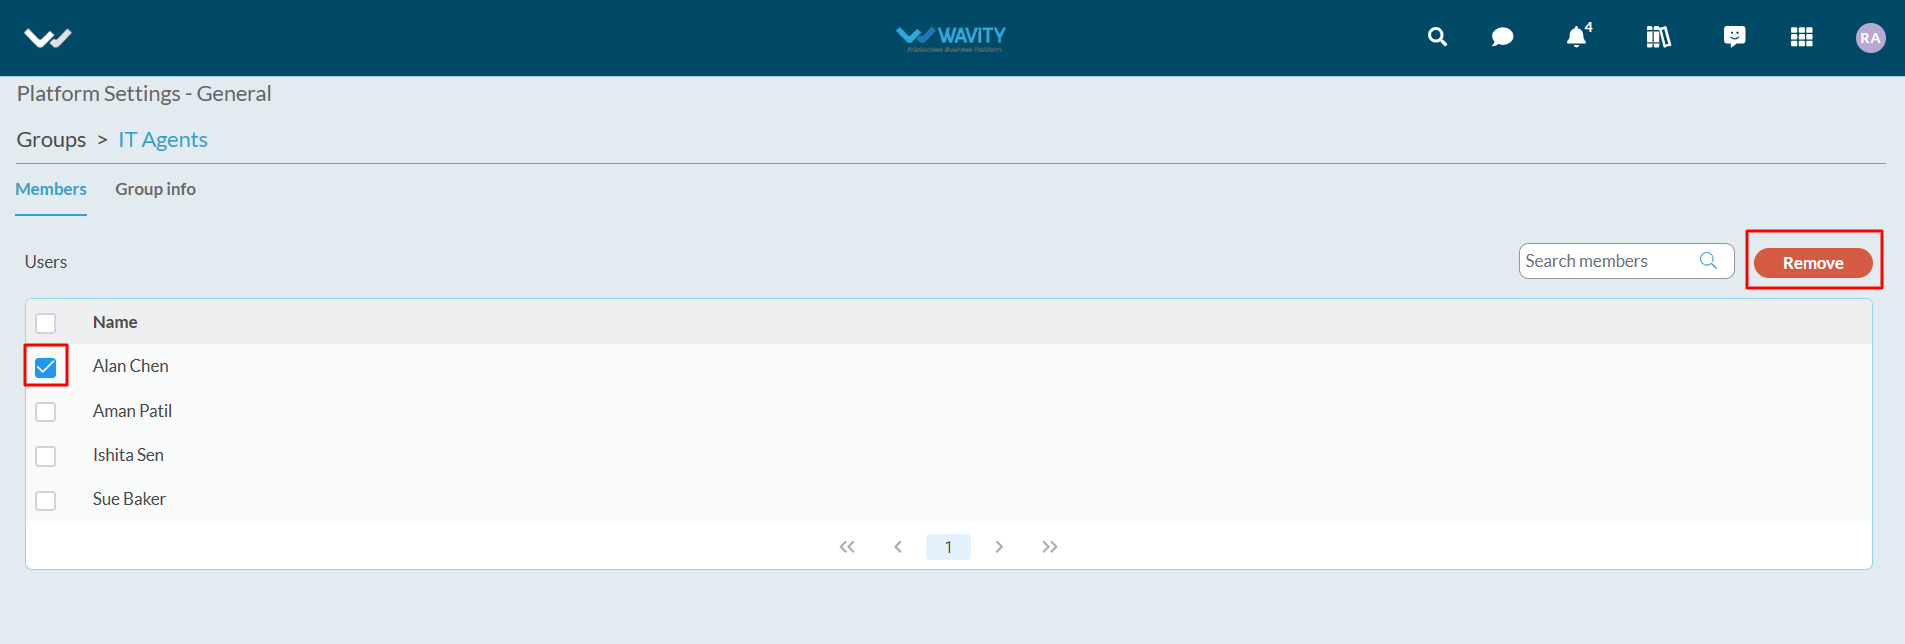
- Only Admin has the authority to remove member into groups in Wavity Platform.
- Navigate to the groups listing page -‘Platform Settings > General > Groups’
- Select the group to remove members as shown in below image.
- Select the members you want to remove from the group as shown below. Click on the “Remove” button to complete the process. You can select multiple members to remove from the group in one time.
How to Delete a Group?
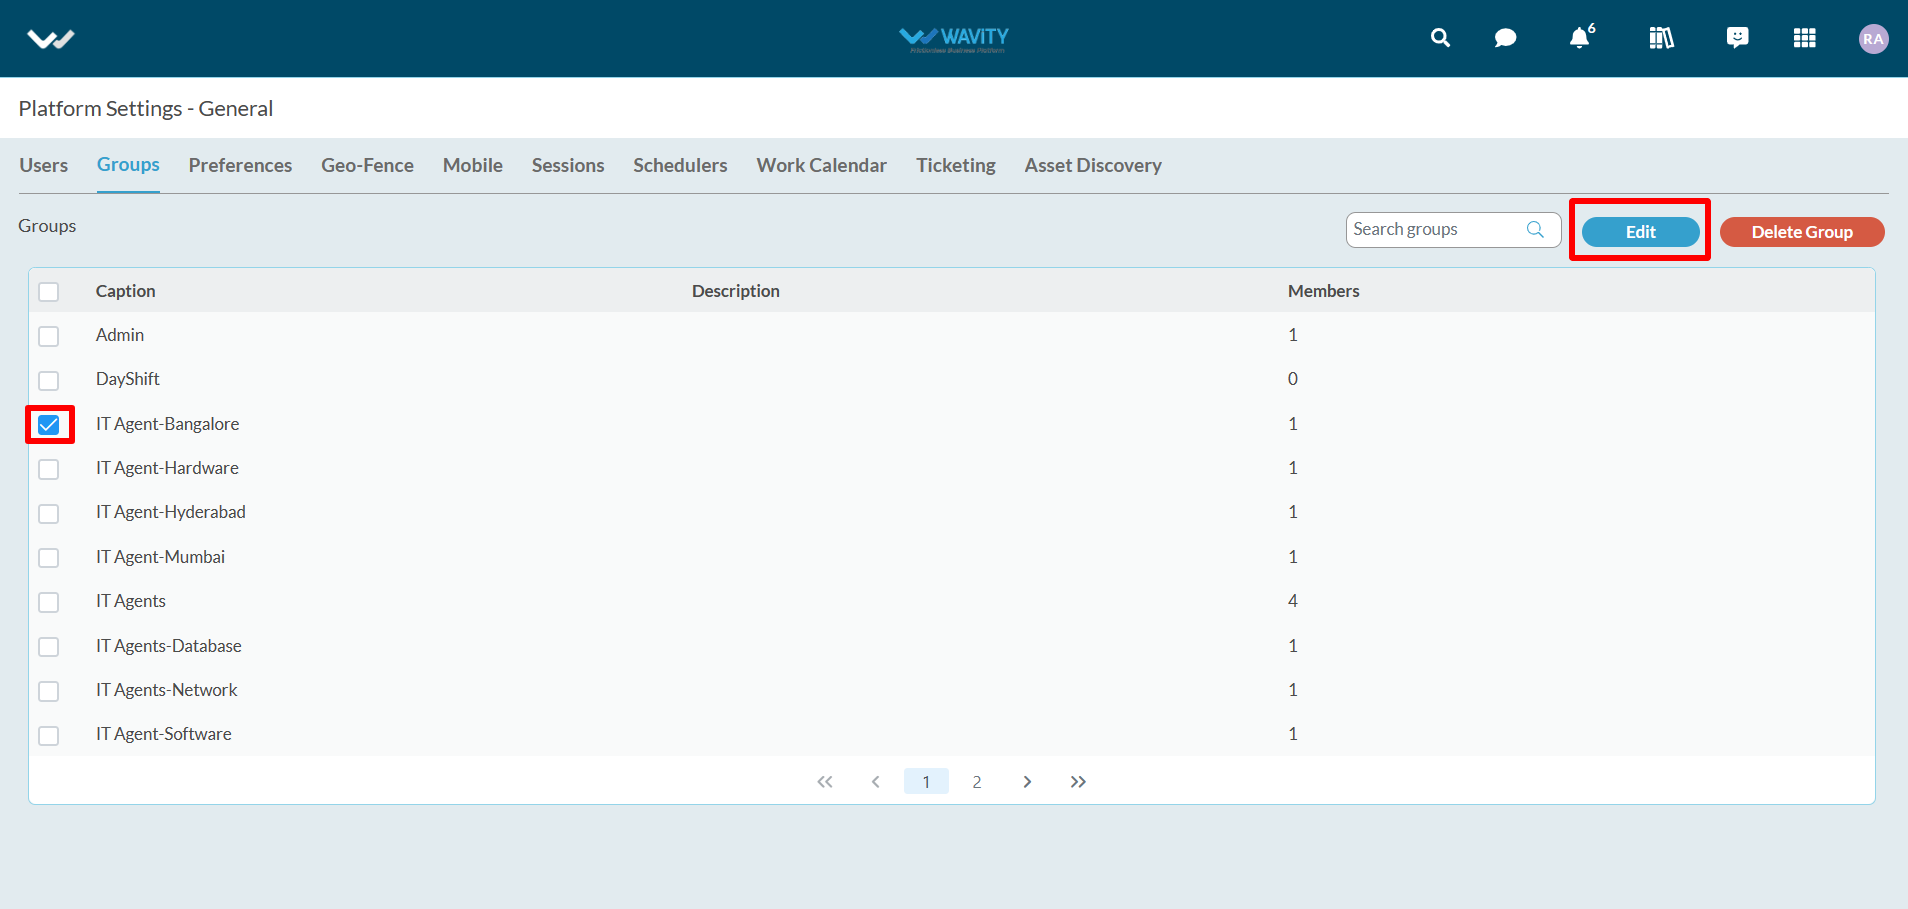
- Only Admin of your organization has the authority to delete group in Wavity Platform.
- Navigate to the groups listing page – ‘Platform Settings > General > Groups’
- Click on checkbox next to the group you want to delete in the platform.
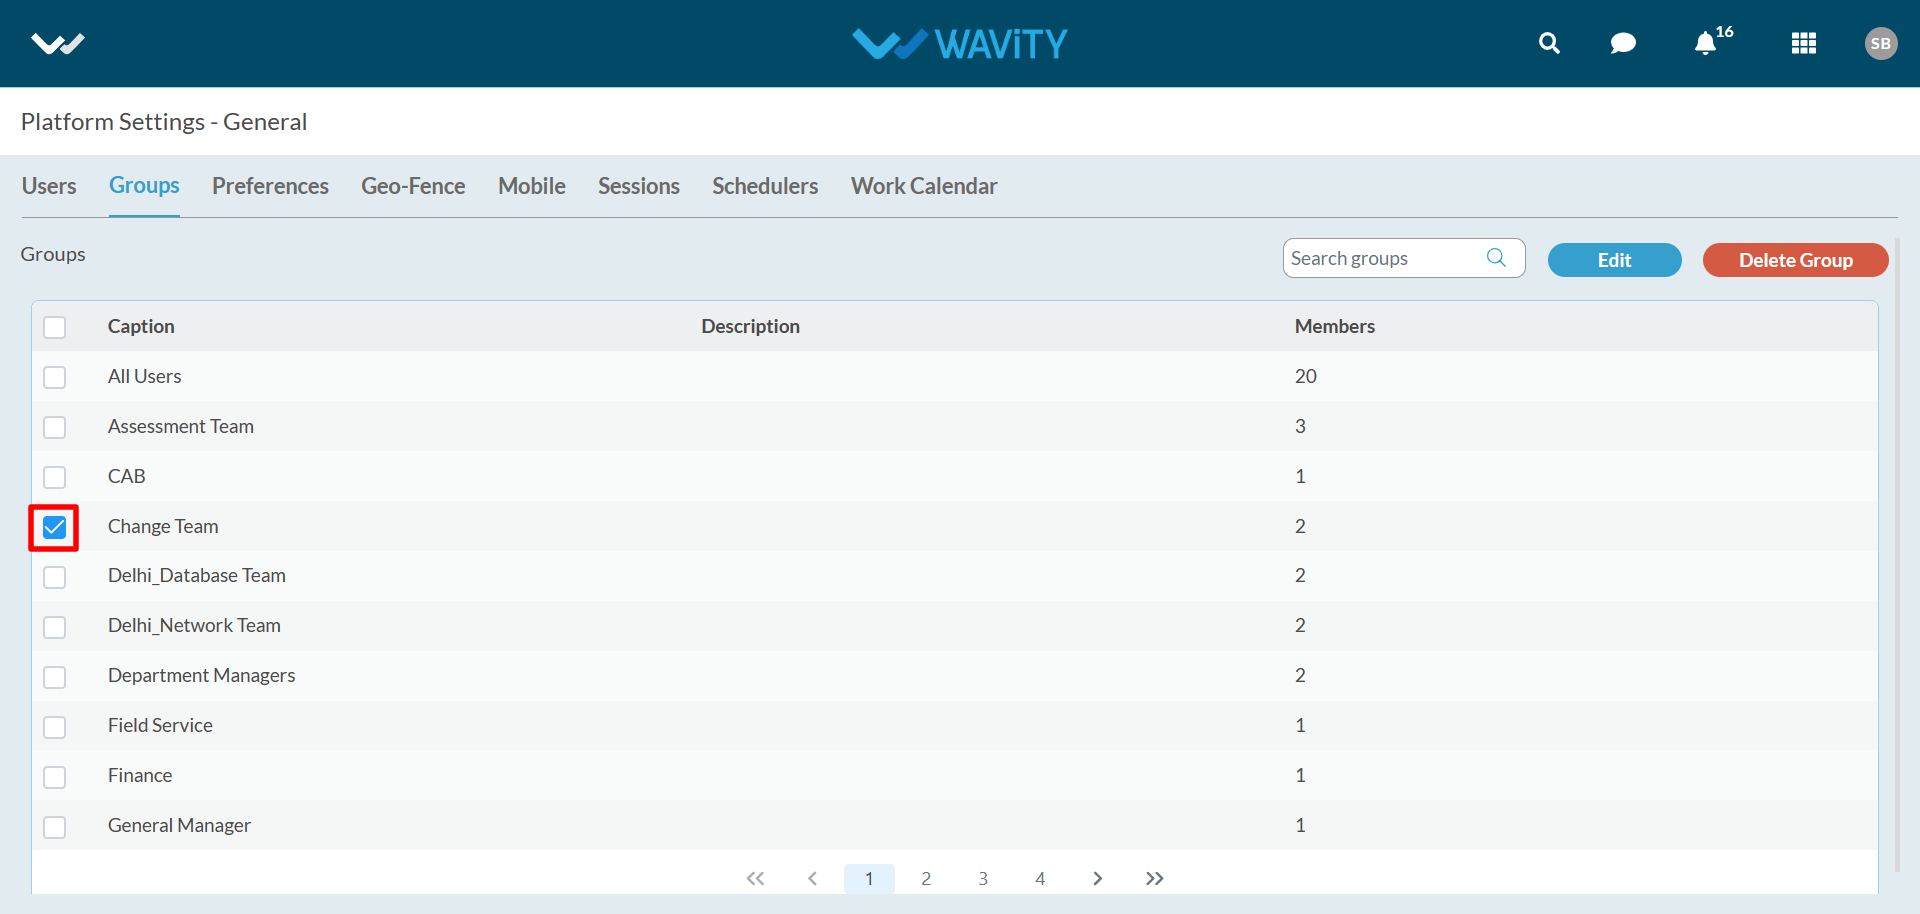
- Click on “Delete Group” button.
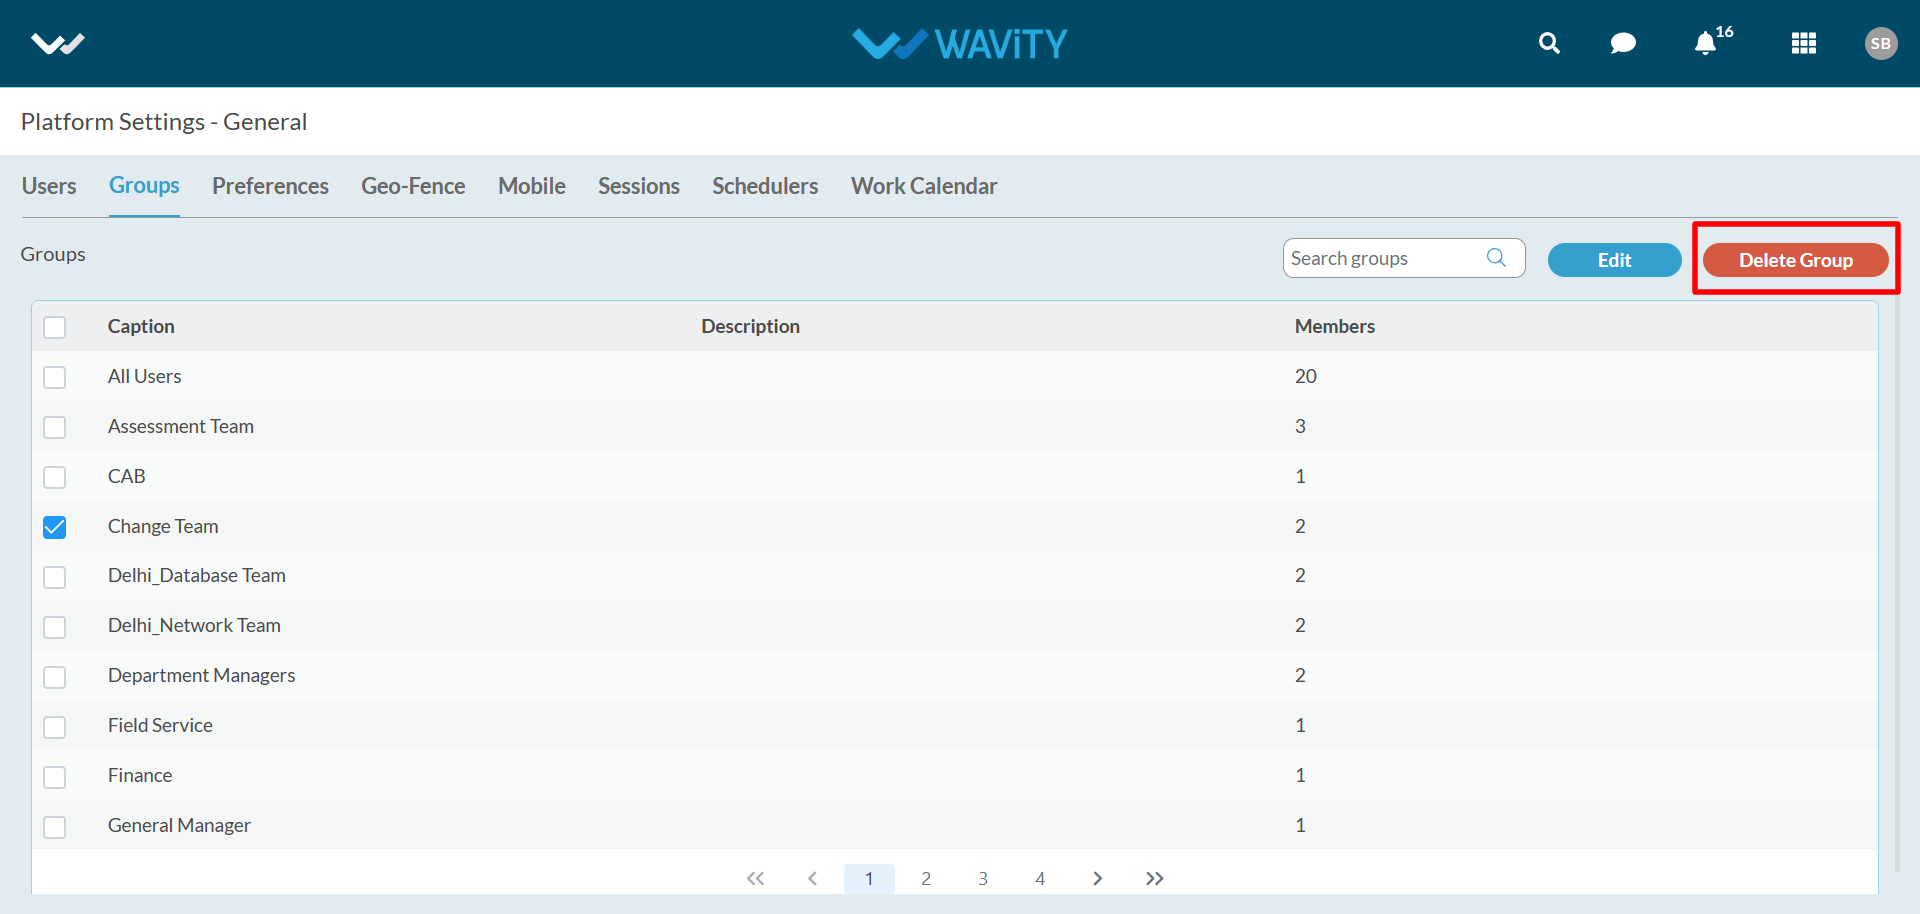
- Click on “Yes” in the confirmation pop up to delete the group in the platform.

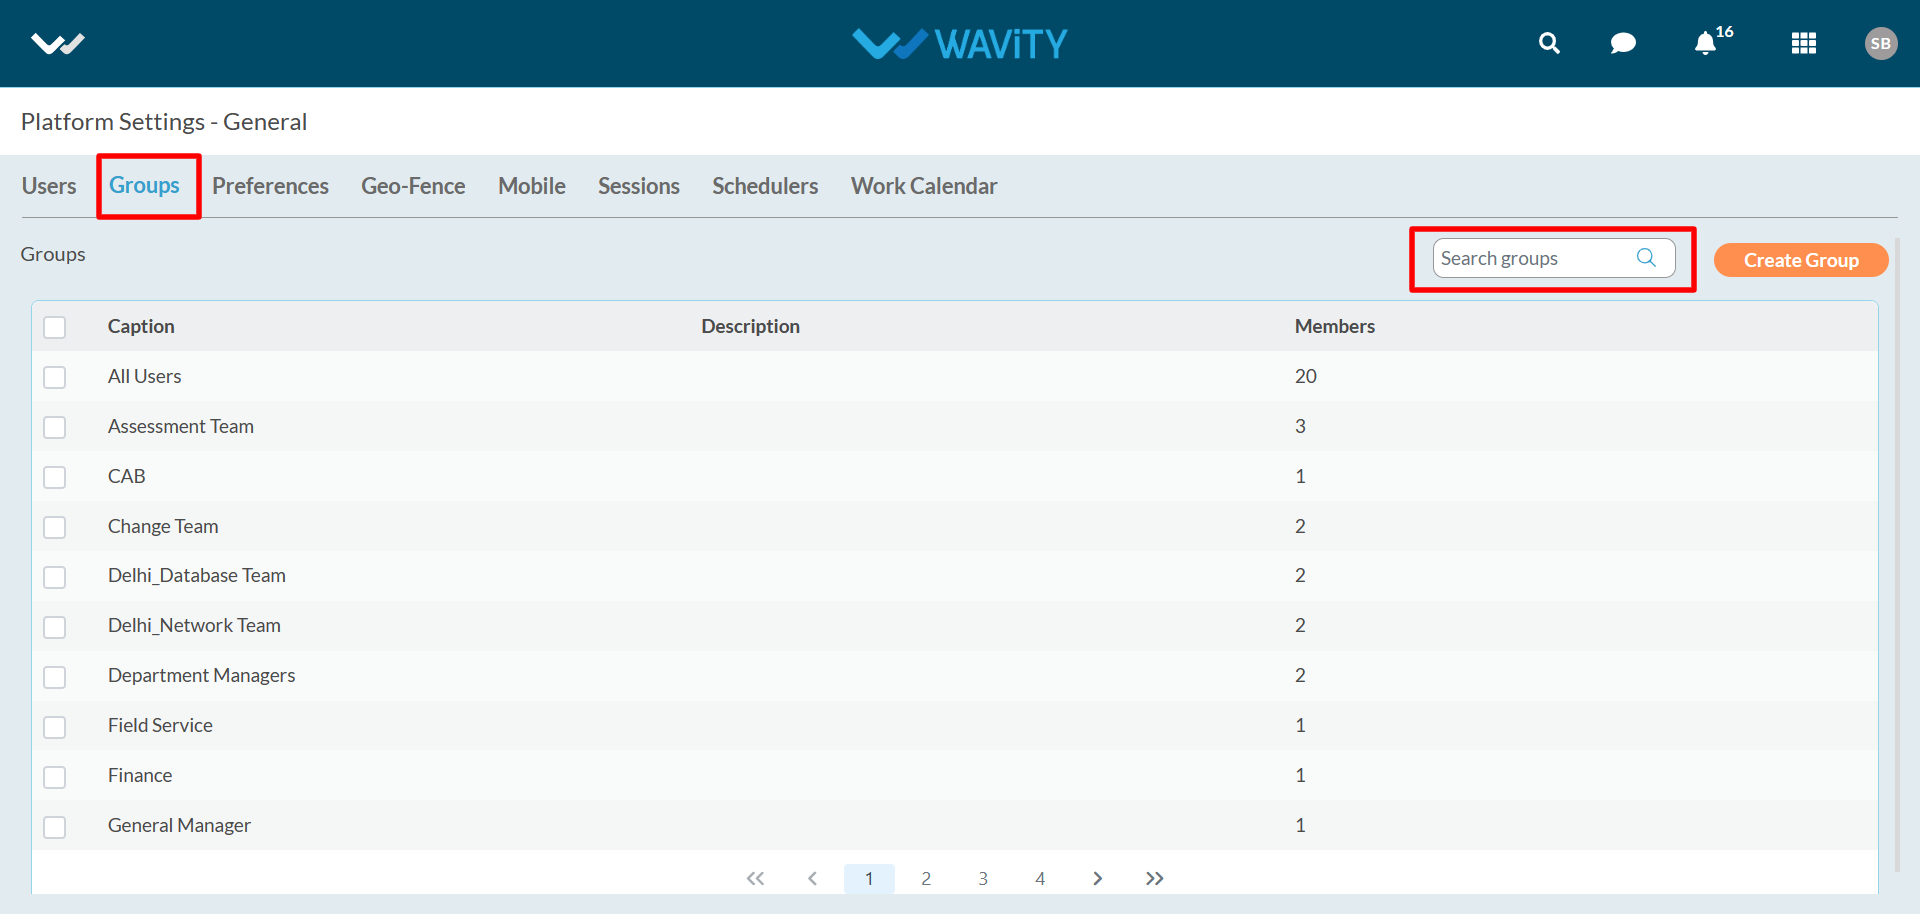
How to Create & Edit groups in Wavity platform?
- Only Admin of your organization has the authority to create and edit groups in Wavity Platform.
- Navigate to the groups listing page – ‘Platform Settings > General > Groups’
- Click on “Create Group” button.

- Fill in all the details of the group in ‘Create Group’ pop up such as Name & Description.
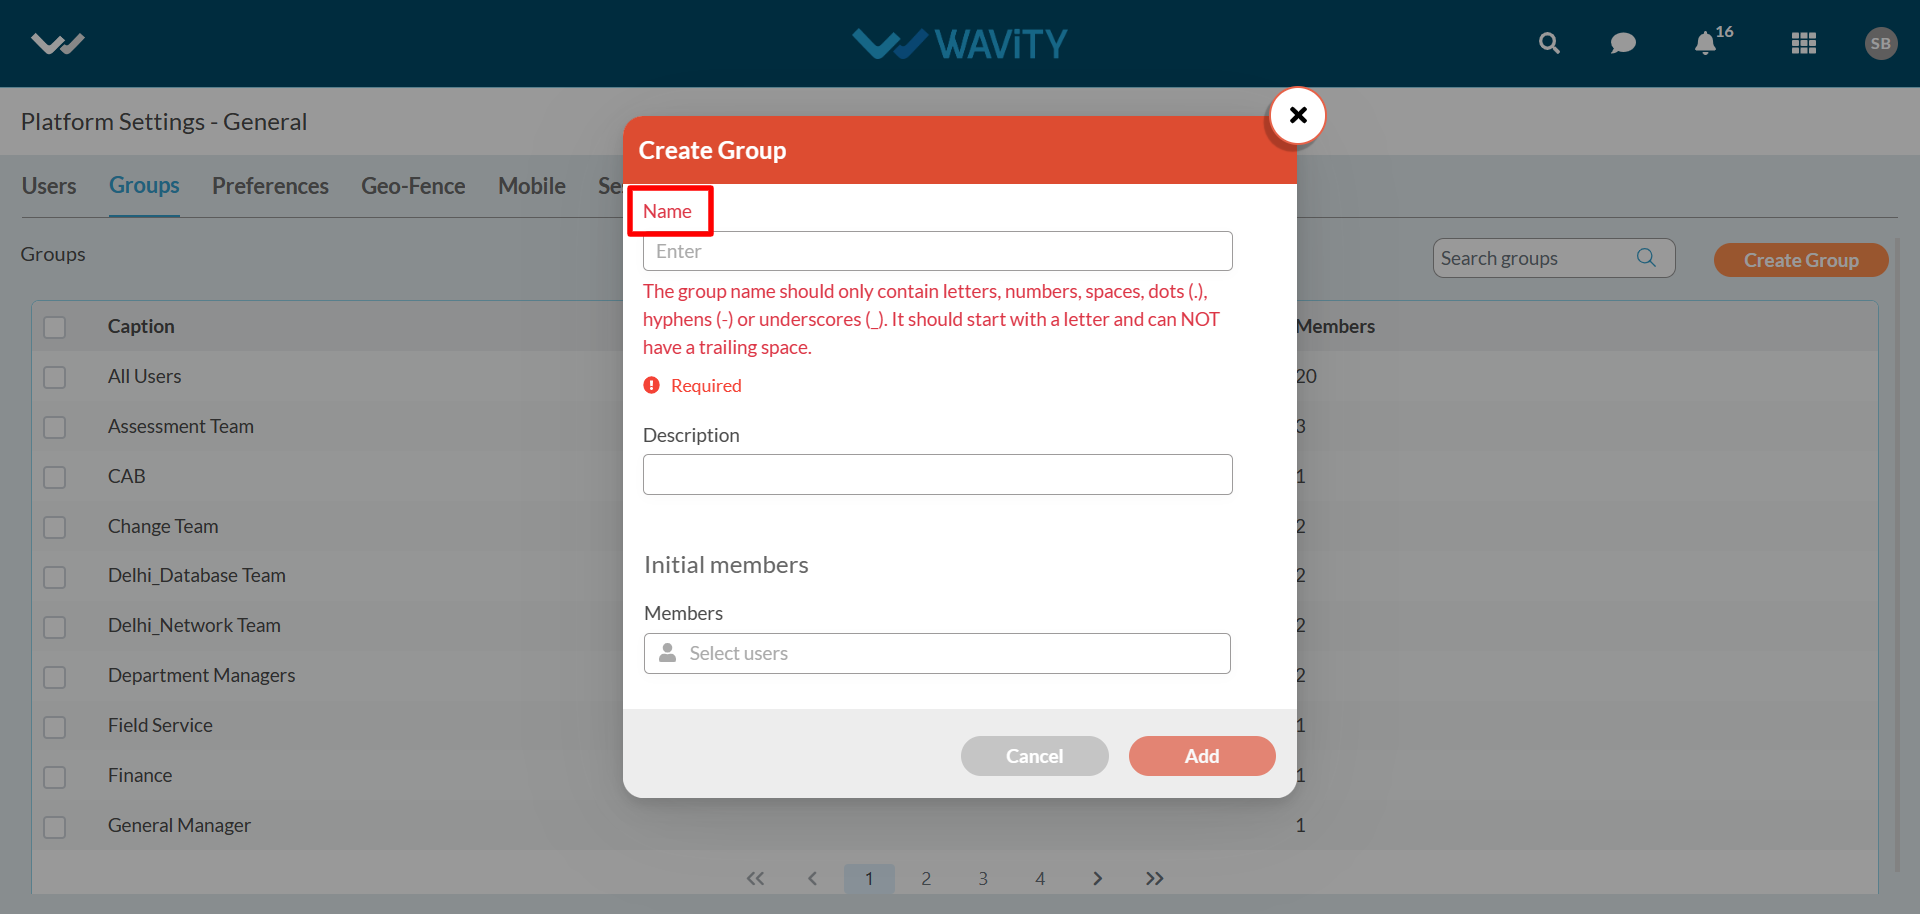
- Add Members/Users into the group by clicking on the button as shown below.
- You can search for the user by entering few letters of user name. Select the ‘User Name’ you want to add in the new group.
- Click on “Add” button to create the new group.
- You can also edit existing groups in the platform. In the group listing page, select the group you would like to edit.
- To remove a user from the existing group, Select the user and click on “Remove” button.

- To add User, Click on “Add Members” button to add new users in the existing group.